7 Simple Home Garden Ideas for Small Yards (Budget Friendly) Glow-Up Magic
Your small yard deserves to feel like a little movie set—golden light skimming over glossy leaves, herbs brushing your ankles, and a corner that just begs for a glass of something cold. But here’s the pain point: cramped layouts, patchy grass, and a budget that laughs at the phrase “custom landscaping.” These seven small garden ideas fix that exact frustration—by leaning into vertical lines, layered texture, intentional lighting, and shapes that trick the eye. We’re talking tile you can actually afford, thrifted planters that look designer, and layout choices that make your tiny yard feel three times bigger in photos and real life.
Expect tones of olive and charcoal, raw wood with woven textures, candles tucked beside container shrubs, and furniture scaled to flatter—not swallow—your space. Every idea brings polish without the pretension, and yes, they photograph like a dream. If you crave a cozy, high-style outdoor nook that plays well with renters, pets, and weekend projects, this is for you.
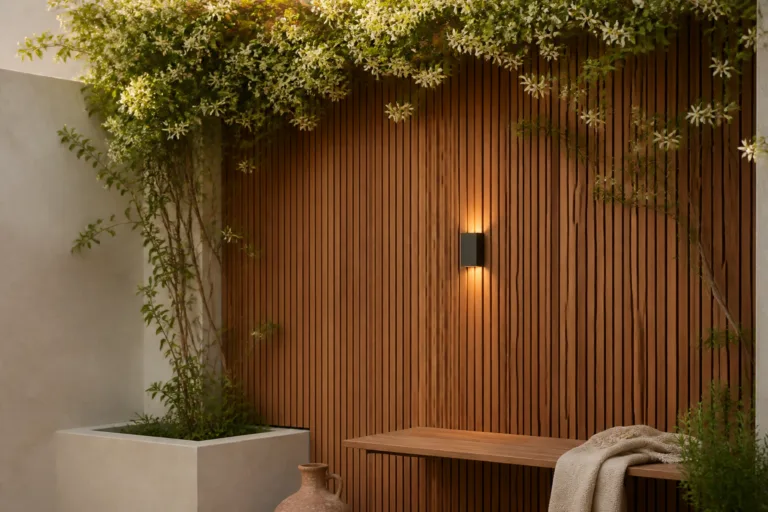
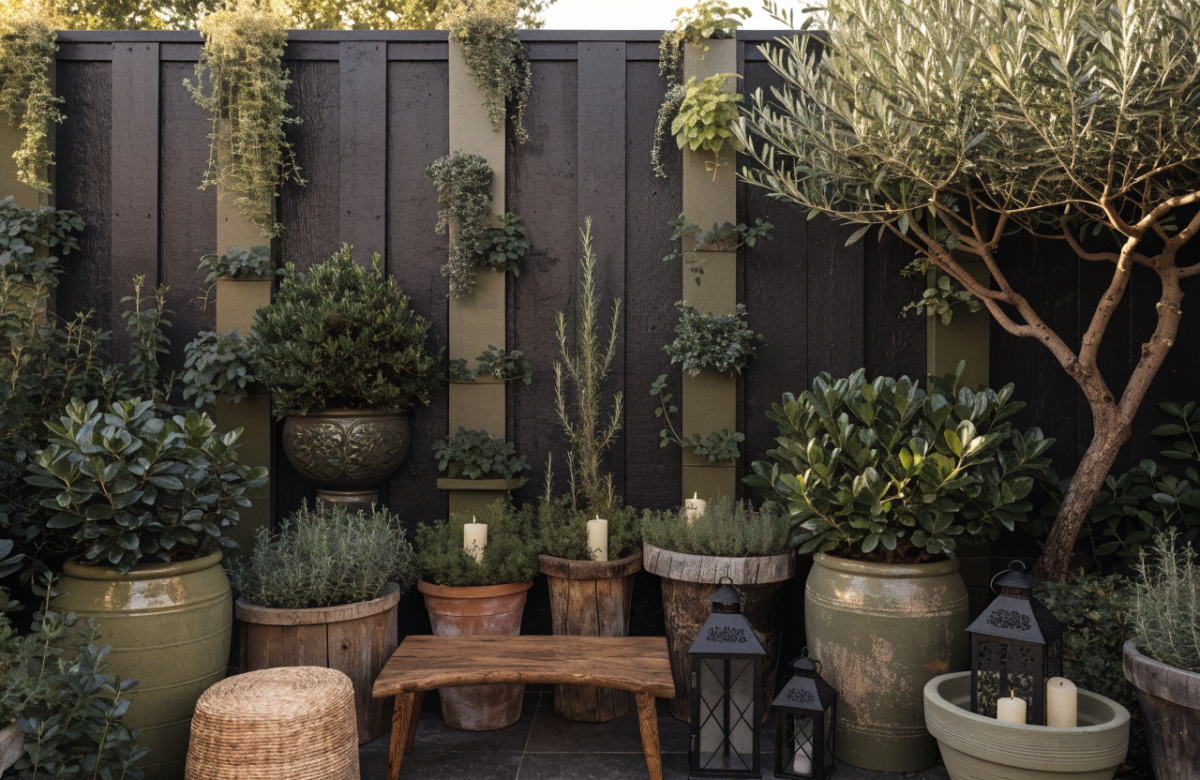
1. Vertical Courtyard Oasis With Slim Planters And Lantern Glow
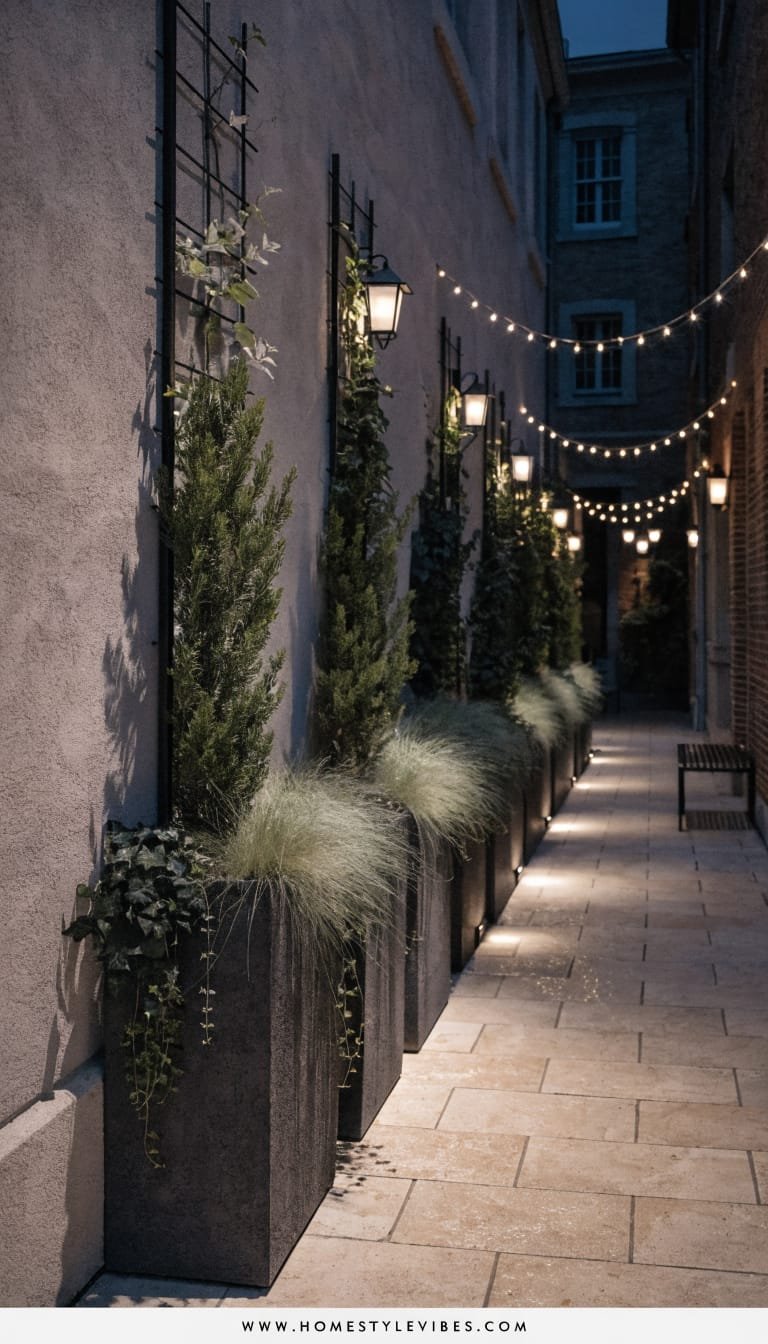
We’ve all been there: you bought adorable planters, lined them along the fence, and… nothing. It still feels flat, cramped, and a little like a storage corridor. This vertical courtyard approach flips the script. The vibe? European city courtyard meets boutique hotel—calm, leafy, and moody after dark. It works especially well in side yards, tiny patios, or any narrow strip you’ve written off. The strategy stacks height with wall trellises, slim planters, and layered lighting to draw eyes up and around, not just across.
Lighting softens the whole space. Wall-mounted solar lanterns or string lights draped along a taut wire create a warm, flattering wash that bounces off green foliage. Greens look deeper, textures feel intentional, and the space stops reading as small. For real homes, this translates to low-maintenance plant choices (think evergreen vines and drought-tolerant herbs), privacy from neighbors, and a layout that shakes off clutter.
Why it looks expensive: repeating slim planters in the same profile reads custom. Limiting the palette—matte black metal, olive green leaves, organic clay—adds cohesion. A single oversized lantern anchoring the “entry” and a tall mirror or reflective wall piece fake more depth, the way stylists do for magazine shoots.
Materials lean classic and textural: powder-coated steel planters, terracotta accents, cedar trellis, limewash or microcement on a small section of wall, and woven lanterns. Photos pop because you’ve got contrast (matte black against green), depth (layers of plant heights), and sculptural shadows at night.
Variations you’ll love:
– Budget-friendly: DIY a cedar trellis with furring strips; use thrifted terracotta + black spray paint for cohesion.
– Renter-friendly: Use freestanding ladder trellises and command-hook lanterns with battery candles.
– Darker version: Charcoal stain on the fence plus glossy foliage like star jasmine for a dramatic, nighttime-jewel-box effect.
Key Design Elements:
- Main materials: powder-coated metal planters, cedar or bamboo trellis, terracotta, limewash
- Color palette: matte black, olive, soft cream, warm wood, aged clay
- Lighting strategy: wall lanterns + string lights + one oversized floor lantern
- Furniture silhouettes: slim bistro set or a narrow bench with simple lines
- Texture layers: rough clay, smooth metal, woven rattan or seagrass
- Accent details (hardware, decor pieces, plants): brass house numbers, mirror, jasmine, ivy, rosemary
How To Recreate This Look:
- Start with a vertical backbone: install trellises along one wall or fence.
- Add slim planters in a repeating shape; plant evergreen climbers and herbs.
- Layer a narrow bench or bistro set; consider a small outdoor rug in a neutral stripe.
- Install string lights on a tight catenary line; add wall or hanging lanterns for warm spots of light.
- Style with a large outdoor mirror, a couple of terracotta pots, and a single sculptural planter at the entrance.
Why This Looks Expensive: Repetition and restraint. Matching planters and cohesive finishes mimic a custom install while the vertical lines frame the scene like a designer courtyard.
Common Mistakes To Avoid: Overmixing planters and colors—you’ll lose the elevated vibe. Don’t let string lights sag too low; a taut line keeps it chic, not dorm room.
Pro Styling Tip: Shoot at dusk with lanterns lit; step back to include foreground foliage for depth and instant “editorial” drama.
Keep scrolling—next up is a tiny-yard layout trick that turns “awkward patio” into “instant destination.”
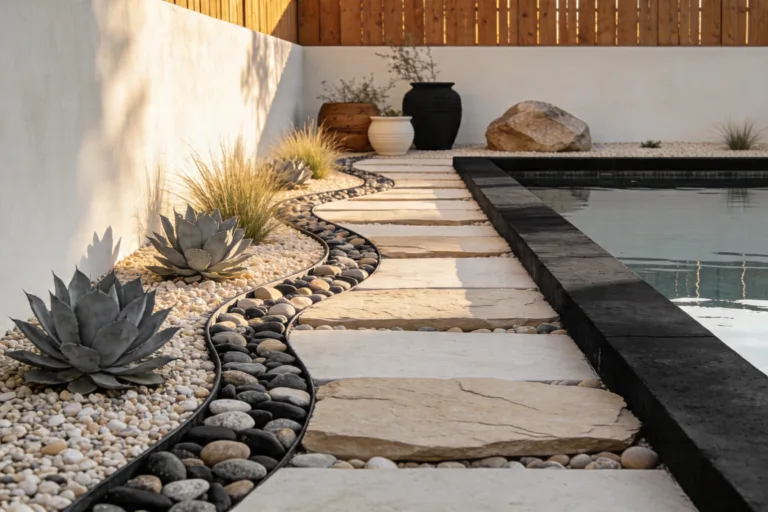
2. Modular Paver Grid With Gravel And Herb Edges
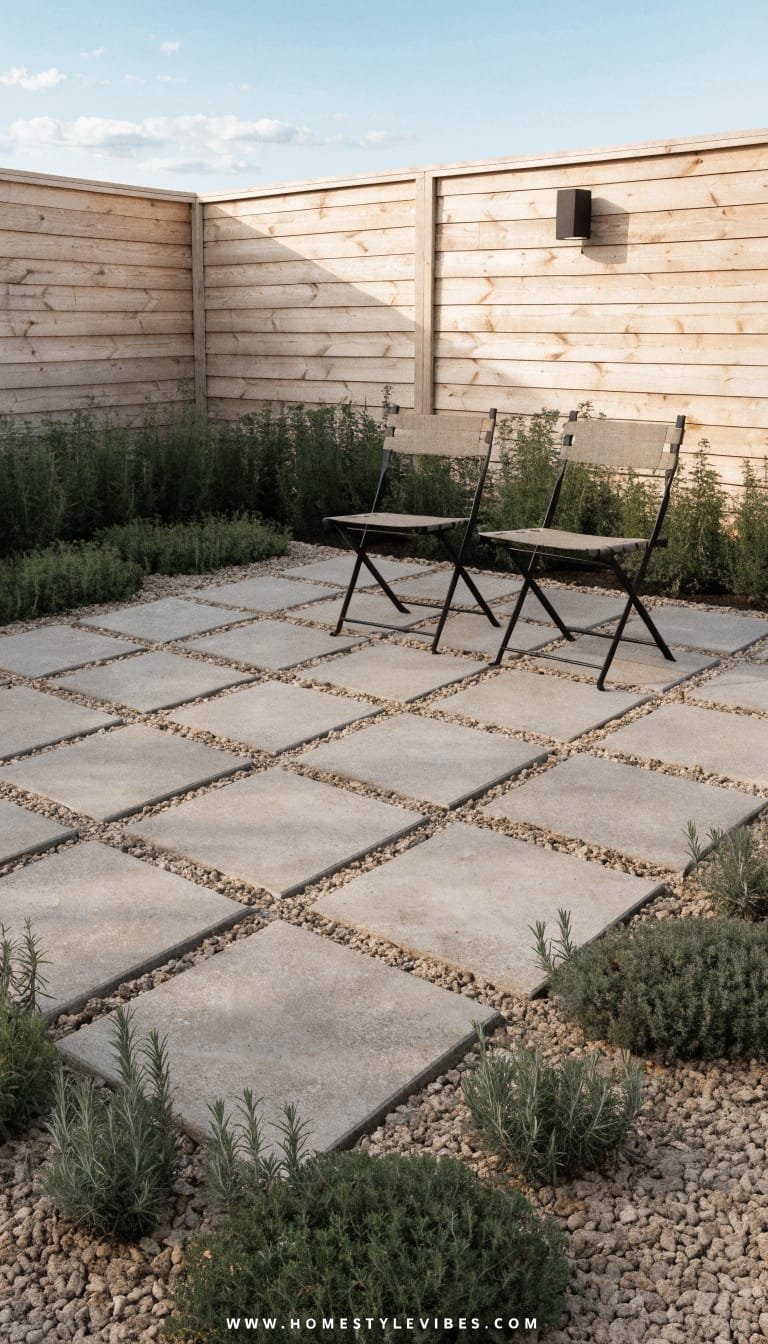
It’s that one corner that always feels off: the patchy lawn that never fills in, the mud after rain, and the folding chairs that sink like quicksand. You’ve tried seed, but it still looks sad by week three. Enter the modular paver grid—clean, graphic, and ridiculously practical. The vibe leans Scandinavian courtyard meets modern Mediterranean: low, green, and textural, with stone you can actually install yourself over a weekend.
Why it works in real homes: grids organize chaos. Square or rectangle pavers spaced with gravel give you drainage, stability, and a tidy surface for a table or lounge chair. Herbs tucked along the margins soften the lines and make the air smell subtly beautiful. Lighting can stay simple: one low-voltage uplight near a feature pot and a couple of stake lights to guide the eye, nothing fussy.
Why it looks expensive: the grid. Designers love an intentional pattern. Pair larger pavers (16–24 inches) with fine gravel in a complementary tone and keep gaps consistent using spacers. The finish feels custom even when the materials are basic. Bonus points for one oversized container tree—olive, bay laurel, or dwarf citrus—to function like a living sculpture.
Materials do the heavy lifting: concrete or porcelain pavers, crushed gravel or decomposed granite, steel edging, and unglazed clay. Photographically, this sings because of the crisp negative space between pavers and the subtle sparkle of gravel in sunlight. You get high contrast with low maintenance.
Variations:
– Budget-friendly: Use concrete stepping stones set into compacted crushed rock; edge with recycled bricks.
– Small-space: Choose larger pavers with wider gaps so the grid reads clearly; it’ll trick the eye into seeing “planned minimalism.”
– Renter-friendly: Lay pavers over landscape fabric without mortar; everything can lift when you move.
Key Design Elements:
- Main materials: concrete or porcelain pavers, compacted gravel, steel or plastic edging
- Color palette: warm gray, soft white, sage green, charcoal accents
- Lighting strategy: subtle path stakes + one feature uplight
- Furniture silhouettes: low, linear lounges; café table with slim legs
- Texture layers: smooth paver, gritty gravel, soft herb foliage
- Accent details: oversized pot with a sculptural tree, herb borders (thyme, oregano), black watering can
How To Recreate This Look:
- Start with layout: mark a simple grid; keep lines straight using string lines.
- Add base layers: dig 3–4 inches, lay landscape fabric, and add compacted gravel base.
- Layer pavers with spacers; brush fine gravel into gaps for a tight, finished look.
- Install edging to keep gravel tidy; add low path stakes and one uplight near a feature pot.
- Style with a single tall container tree, a neutral outdoor rug, and herb-filled edges for scent and softness.
Why This Looks Expensive: The grid reads architectural and deliberate. The restrained color palette mimics boutique hotel courtyards.
Common Mistakes To Avoid: Skipping compaction leads to wobble. Avoid mixed gravel colors—they can look messy and cheap.
Pro Styling Tip: Photograph from a low angle so the paver lines converge; sprinkle a little water pre-shoot to make gravel tones richer.
Ready for a cozy nook that feels like you booked a staycation? Keep going.
3. Micro Deck Lounge With Built-In Planter Bench
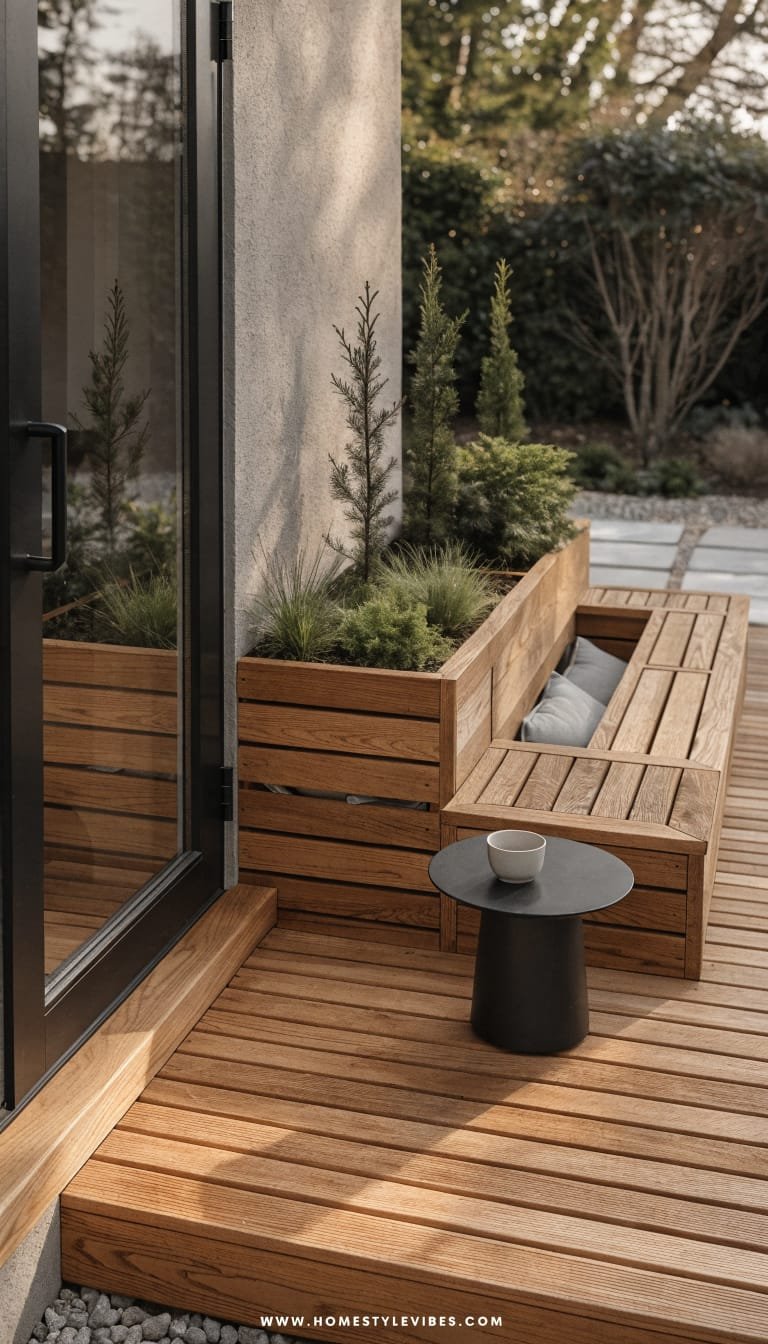
You’ve got a tiny patch by the back door that feels… transitional. Not a real lounge, not a garden. You’ve tried a couple chairs, but it still looks temporary. A micro deck with a built-in planter bench turns that “meh zone” into your most-used hangout. The mood is Japandi-leaning: warm wood, clean lines, breezy greenery. It makes hosting feel easy because seating tucks right into your footprint.
Real-home magic: the bench doubles as storage and greenspace. Build a low L-shaped bench against a fence or wall with a planter integrated on one side. It frames the area, creates a destination, and controls clutter. Lighting matters here—tuck LED strip lights under the bench lip and add a single floor lantern near the planter for glow that feels custom.
Why it looks expensive: built-ins always do. Even a simple box bench in stained pine reads tailored when you miter edges and repeat the slat rhythm across the deck boards. Keep cushion colors neutral (linen-beige, stone-gray) and add one patterned lumbar. Use 2–3 oversized pots instead of many small ones. Less equals luxe.
Material palette: pressure-treated or cedar decking, black brackets or hidden fasteners, smooth pebble mulch within the planter, and a restrained plant palette—bamboo clumps, grasses, or a dwarf olive. It photographs beautifully because the horizontal lines lead the eye, while the bench shadow line adds depth and sophistication.
Variations:
– Budget-friendly: Use deck tiles over a level surface and a simple plywood bench with exterior paint.
– Darker version: Stain the deck espresso and pick deep-green foliage; add brass outdoor sconces for contrast.
– Renter-friendly: Freestanding bench with caster wheels; planters on wheels for repositioning.
Key Design Elements:
- Main materials: cedar or pine decking, exterior-grade plywood, black screws or hidden fasteners
- Color palette: warm wood, stone-gray, soft white, sage
- Lighting strategy: under-bench LED strips + one floor lantern or cordless table lamp
- Furniture silhouettes: low-profile bench with boxy lines, round side table
- Texture layers: linen cushions, ribbed throw, smooth pebbles, fine grasses
- Accent details: matte black hooks, outdoor art, a single sculptural pot
How To Recreate This Look:
- Start by defining the footprint: measure a compact rectangle and plan the bench length to match.
- Add a simple deck base or deck tiles; ensure drainage and level support.
- Layer the bench: build a box frame, integrate a planter section lined with pond liner, and cap with matching deck boards.
- Install lighting under the bench lip; conceal wires neatly along the back.
- Style with neutral cushions, one patterned lumbar, and 2–3 large planters to anchor corners.
Why This Looks Expensive: The integrated forms—bench plus planter—suggest a custom carpenter even when it’s DIY. The single-tone wood finish unifies everything.
Common Mistakes To Avoid: Oversized cushions that smother the bench. Skip too many small plants; it starts to look cluttered fast.
Pro Styling Tip: Angle your camera so deck boards run diagonally in frame; it stretches the scene and makes the bench feel longer.
If you dream of morning coffee surrounded by herbs, the next one’s your love letter.
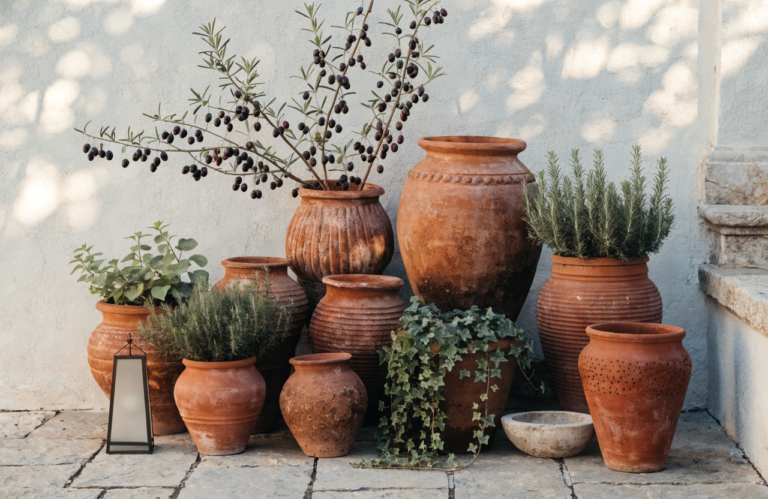
4. Tiered Container Garden Bar With Mix-and-Match Terracotta
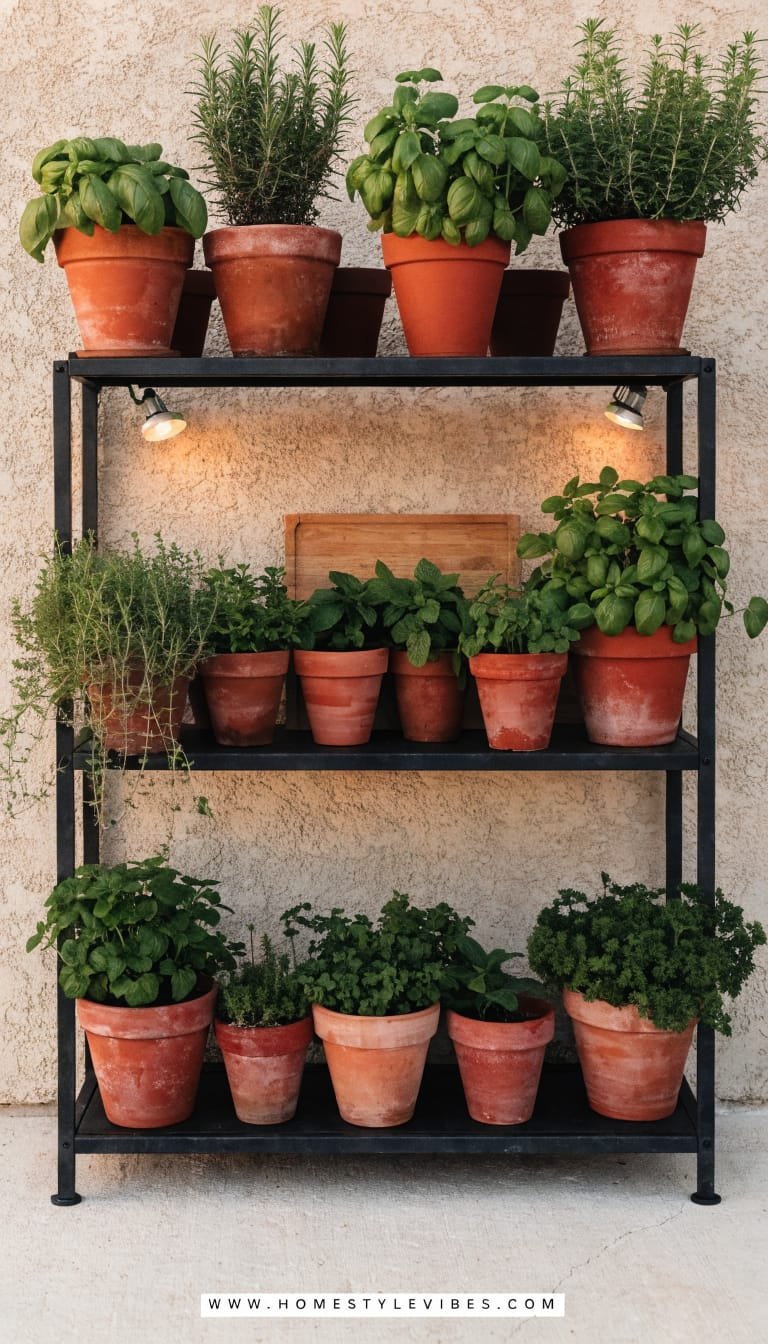
You keep buying adorable herbs, then they disappear into chaos on the ground. We’ve all been there. This design corrals flavor and foliage on a vertical “garden bar”—a tiered shelving unit that doubles as a styling moment. The mood is casual Mediterranean: sun-warmed clay, trailing thyme, a cutting board leaning just-so. It works for tiny patios and narrow balconies because it climbs instead of sprawls.
Lighting makes it sparkle at night: tuck clamp-on solar spots under the top shelf and let them graze the terracotta. The clay warms up, leaves glow, and your evening spritz looks like it belongs in a magazine. In real life, it means no bending to harvest mint and a neat, photogenic focal point that stays organized.
Why it looks expensive: cohesion. Mix different terracotta shapes, but unify them with one finish—either leave raw and sealed or dust with a light limewash for chalky softness. Add black metal brackets and a single brass mister for a chic utility detail. The “bar” vibe reads like a styled vignette, not a plant dump.
Materials: pine or metal shelving, terracotta in varied heights, a couple of glazed accents for shine, and woven baskets for tools. Photos love this because of the color temperature—warm clay against cool greenery—and the gentle, stacked shadows that build depth across tiers.
Variations:
– Budget-friendly: Use cinder blocks and 2x8s; paint the boards in warm taupe for a subtle designer wash.
– Small-space: Go narrow and tall; add a shallow rail to keep pots secure.
– Renter-friendly: Rolling utility cart becomes a movable herb bar that follows the sun.
Key Design Elements:
- Main materials: terracotta, pine shelves or metal cart, matte sealant, woven baskets
- Color palette: terracotta orange, sage, basil green, charcoal accents
- Lighting strategy: clip-on solar spots or rechargeable puck lights under shelves
- Furniture silhouettes: slim shelves, petite folding stool
- Texture layers: chalky clay, glossy glazed pot, linen tea towel, rattan tray
- Accent details: brass spray mister, herb markers, small cutting board, citrus bowl
How To Recreate This Look:
- Start by measuring height and selecting a tiered shelf that fits your wall or railing space.
- Add a consistent pot finish: seal or lightly limewash terracotta for tonal harmony.
- Layer herbs by height: tallest on top, cascading in the middle, compact at the bottom.
- Install discreet clip lights or puck lights; hide cords with adhesive clips.
- Style with a rattan tray, small cutting board, and one citrus bowl for color pop.
Why This Looks Expensive: Monochrome terracotta plus simple black brackets emulate boutique garden shops. The restrained styling signals intention, not chaos.
Common Mistakes To Avoid: Too many mismatchy pots without a unifying finish. Avoid heavy watering right before guests—muddy shelves kill the vibe.
Pro Styling Tip: Stagger pot sizes in a 2-1-2 rhythm per shelf; leave negative space for airiness and better photos.
Craving more drama? The next idea borrows a designer trick from interiors and sneaks it outdoors.
5. Charcoal Backdrop With Sculptural Foliage And One Bold Color Pop

Maybe your fence looks tired, or your tiny yard just blends into the neighbor’s beige everything. You’ve tried colorful flowers, but it still reads busy, not intentional. A charcoal or deep olive backdrop with sculptural, mostly green planting creates instant editorial drama. Think gallery wall meets botanical studio—minimal, moody, and striking in both daylight and dusk.
Real-home perks: deep tones hide fence imperfections and visually push the boundary outward, which makes small yards feel more expansive. Lighting becomes strategic—one or two pinpoint uplights under sculptural plants (agave, bird of paradise, fatsia) do the heavy lifting. The rest can be candle glow. You don’t need 900 solar stakes, trust me.
Why it looks expensive: designers love restraint. Keep blooms minimal and choose one bold accent color—a cobalt ceramic pot, a paprika-red stool, or citrus in a glossy planter. The contrast against charcoal creates that “expensive shadow” effect. It reads like a set, not a hodgepodge.
Materials: exterior paint or stain in charcoal/olive, matte black planters, one high-sheen accent pot, and a pebbled or gravel base. In photos, the matte wall swallows glare, plants pop, and your single accent color becomes a focal jewel.
Variations:
– Budget-friendly: Paint only a feature panel or a large plywood screen; leave the rest of the fence as-is for a zoned moment.
– Small-space: Go with vertical sculptural plants like columnar yew or bamboo; they rise, not sprawl.
– Renter-friendly: Use a freestanding painted lattice or outdoor fabric panel to mimic the dark backdrop.
Key Design Elements:
- Main materials: exterior paint, matte black planters, gravel mulch, glossy accent pot
- Color palette: charcoal or deep olive, layered greens, single bold accent color
- Lighting strategy: targeted uplights + candle clusters
- Furniture silhouettes: powder-coated metal, clean lines, low profile
- Texture layers: matte wall, glossy accent, strappy or architectural leaves
- Accent details: large sculptural rock, cobalt pot or paprika stool, metal side table
How To Recreate This Look:
- Start by painting a backdrop wall or panel in charcoal or deep olive.
- Add 2–3 sculptural plants in matte black planters; vary heights.
- Layer a gravel base to keep the ground clean, modern, and low-maintenance.
- Install one or two uplights; position them to graze leaves and cast dramatic shadows.
- Style with a single accent-color pot or stool and a candle cluster in hurricane lanterns.
Why This Looks Expensive: High contrast and a single statement hue evoke gallery-level curation. The matte backdrop acts like a custom set piece.
Common Mistakes To Avoid: Multiple bright colors competing. Skip glossy black on the wall—matte absorbs light better and looks more refined.
Pro Styling Tip: Shoot at blue hour so the charcoal reads velvety and plant shadows look crisp and architectural.
Want cozy without the charcoal? The next idea layers soft tones and movement for a completely different vibe.
6. Gravel Meadow Path With Soft Perennials And Bistro Stop
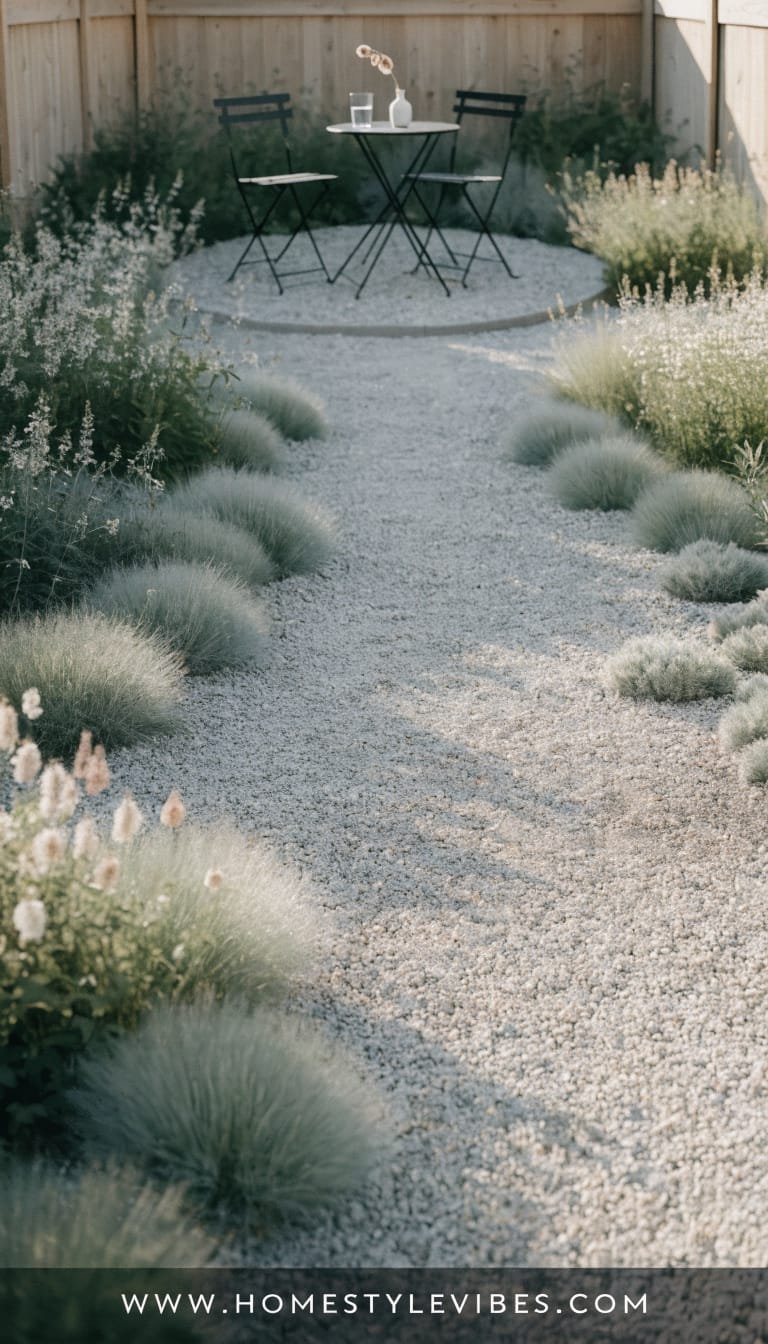
Your small yard might just be a rectangle with a fence. You’ve tried a straight path along the edge, but it feels like a hallway. This approach breaks the box with a meandering gravel path that creates a mini “meadow” moment, ending at a tiny bistro stop. The mood is cottage-meets-Parisian café: airy, textural, and romance-y without veering into clutter.
In real homes, curved lines soften hard boundaries and make a small footprint feel generous. The path invites you to wander (even if it’s three steps). Lighting can stay low-tech—solar stakes tucked into grasses and one table lantern. The real star becomes movement: ornamental grasses, salvia, catmint, and low yarrow that sway and catch light like a slow-motion filter.
Why it looks expensive: naturalistic planting used sparingly feels curated. Choose a restrained palette—2 grasses, 2 perennials, 1 groundcover—and repeat them. Use steel edging to define the path crisply. Gravel color matters; pick a warm buff or soft gray that harmonizes with your home exterior for that “designed” cohesion.
Materials: compacted gravel, steel or flexible edging, a pair of café chairs, and a small round table. This photographs beautifully because the curved path gives depth and the meadow layers soften everything into a painterly gradient.
Variations:
– Budget-friendly: Use repurposed bricks to edge curves; plant divisions from friends for perennials.
– Small-space: Shortcut the curve—create a gentle S-shape within a 6–8 foot run.
– Renter-friendly: Lay a fabric underlayment and keep planting in containers, grouping them to mimic “beds.”
Key Design Elements:
- Main materials: gravel, steel edging, café set, clay or galvanized containers
- Color palette: warm buff, lavender, soft pinks or whites, dusty green
- Lighting strategy: low solar stakes tucked into grasses + tabletop lantern
- Furniture silhouettes: delicate iron or aluminum bistro set, round table
- Texture layers: feathery grasses, fine gravel, smooth metal chairs
- Accent details: vintage watering can, striped café umbrella (optional), linen napkins
How To Recreate This Look:
- Start by sketching a soft curve; mark it with a hose to test flow.
- Add edging to lock in the shape; dig a shallow trench for stability.
- Layer compacted gravel; rake smooth for a gentle crown that sheds water.
- Install plants in sweeping drifts; repeat species for rhythm.
- Style with a café set at the path’s pause point and a small lantern for evening glow.
Why This Looks Expensive: Curves signal custom design. Repeating plant drifts feel intentional, not random.
Common Mistakes To Avoid: Mixing too many plant varieties. Avoid pea gravel on steep slopes—it scatters; choose a slightly larger grade.
Pro Styling Tip: Photograph from above and slightly off-center so the curve leads the eye to the café set; let tall grass plume into the foreground frame.
Now for a micro-architecture moment that changes everything without a single plant in the ground.
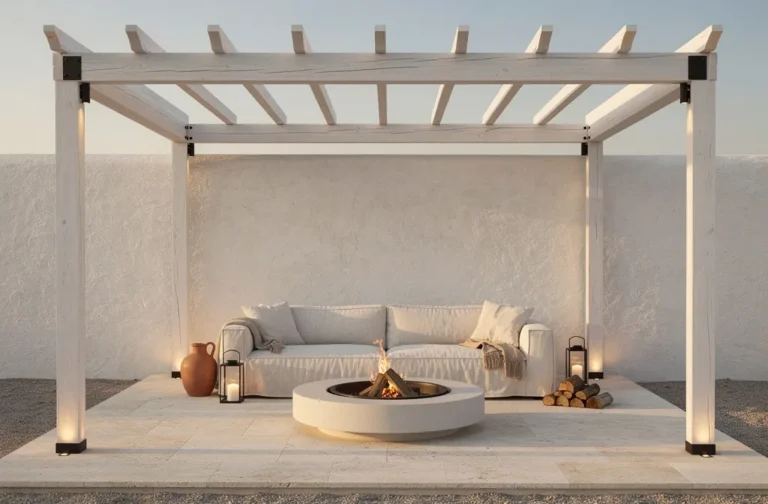
7. Slim Pergola Frame With Shade Sail And Café-String Canopy
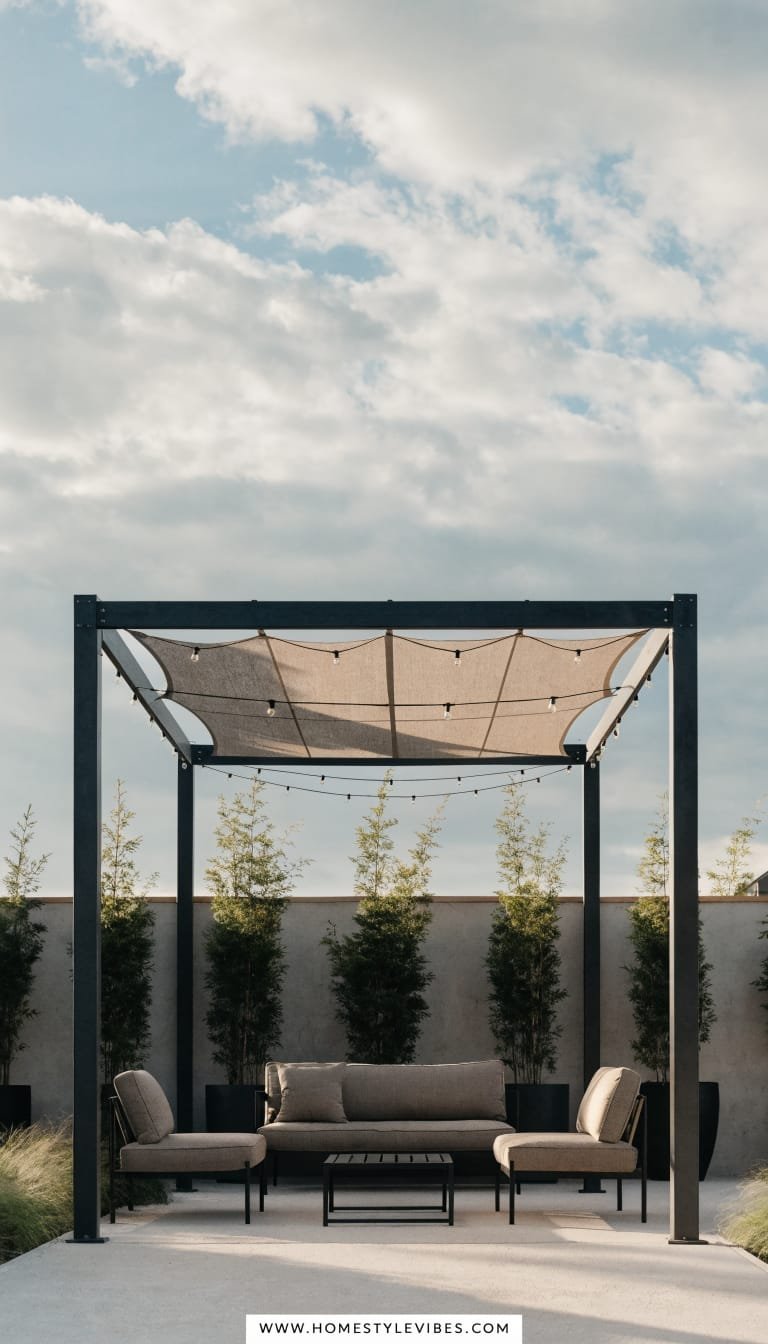
Shade is the silent deal-breaker. You set up seating, and the midday sun punishes you. Or the yard feels too exposed to neighbors, so you never actually sit there. You’ve tried a big umbrella, but it dominates the space and tips over in wind. A slim pergola frame with a fitted shade sail creates intimacy, softens light, and doubles as a lighting rig for string lights that look dreamy at night.
The mood sits between coastal and urban loft: airy structure, crisp lines, fabric that diffuses light like a softbox. In real homes, it’s affordable micro-architecture that instantly “zones” the yard, raising resale appeal because people can see how to live in the space. The lighting payoff is huge—string lights attached to the frame stay tight and elevated, which feels boutique, not backyard barbecue.
Why it looks expensive: proportion and negative space. Keep posts slim (4x4s or metal), paint or stain them to match your trim or fence, and choose a sail in bone, sand, or soft gray. Finish hardware in black for contrast. Add a single outdoor curtain panel on one side for privacy and movement—instant resort.
Materials: pressure-treated posts or metal tube, bolt-down post bases (for patios), sail shade fabric with D-rings, turnbuckles, and outdoor-rated string lights. Photos love the canopy layers—fabric diffuses light so everything under it looks glowy, skin looks great, and the geometry reads modern.
Variations:
– Budget-friendly: Use two posts plus a wall mount for a lean-to effect; choose a smaller sail.
– Small-space: Build a 6×8 frame just big enough for a loveseat and side table.
– Renter-friendly: Freestanding metal pergola kit with sandbagged feet; clip-on sail for shade.
Key Design Elements:
- Main materials: metal or wood posts, sail shade, black hardware, outdoor string lights
- Color palette: sand, bone, charcoal, warm wood
- Lighting strategy: taut café-string canopy + one lantern on a dimmer
- Furniture silhouettes: slim loveseat, nesting tables, low ottoman
- Texture layers: woven rug, slub cushions, linen curtain panel, matte metal
- Accent details: wall-mounted shelf for candles, trailing ivy in a hanging pot, striped throw
How To Recreate This Look:
- Start by mapping sun angles; position the frame where you most need shade.
- Add posts using bolt-down bases or set in concrete; confirm height for string light clearance.
- Layer the sail shade with turnbuckles; tension until smooth with a crisp plane.
- Install café lights in straight or gentle zig-zag runs; keep lines tight and symmetrical.
- Style with a woven outdoor rug, a compact loveseat, and one breezy curtain panel for softness.
Why This Looks Expensive: Structured shade with taut lines feels architectural and intentional, not ad hoc. Matching hardware and fabric tones polish the whole composition.
Common Mistakes To Avoid: Sagging sails and droopy string lights. Measure and tension properly—loose lines kill the designer vibe.
Pro Styling Tip: For photos, shoot up through the sail edge and string lights against the sky—geometry plus glow equals instant save-to-Pinterest energy.
Let’s wrap this garden tour the way good evenings end—soft, satisfied, and a little inspired.
Here’s the truth: you don’t need acreage or a landscape crew to create a small-yard garden that feels luxurious. You need discipline with materials, a point of view, and a plan that respects how you live. Texture, lighting, and restraint do the heavy lifting. Matte finishes and repeated shapes read bespoke. Clever lighting adds that evening magic that turns plants into sculpture and turns simple seating into a destination.
Pick one idea. Start small. Maybe it’s the vertical courtyard with its lantern glow. Maybe it’s the paver grid that finally fixes the muddy patch. Or the tiny pergola that solves shade and privacy in a single weekend. Whichever you choose, build it with intention and a tight palette. Keep plants in families. Repeat silhouettes. Let empty space breathe. Luxurious gardens never shout; they whisper in leaves, in shadows, in the quiet confidence of good bones.
And when you’re done? Light a candle, pour something chilled, and take a photo right at golden hour. Frame a leaf in the foreground, steady your hand, and watch your small garden glow-up look like a magazine spread. Because it can be. Because you made it. And because, IMO, simple done beautifully always wins—seriously.