5 Diy Raised Garden Bed Ideas That Cost Almost Nothing to Build
You want a lush little kitchen garden that looks curated, calm, and wildly productive. You hate the price tags on store-bought raised beds and the way flimsy planters warp after one summer. Imagine soft morning light hitting tidy rows of herbs framed by weathered wood, gravel crunching underfoot, and tomatoes climbing neatly as if your yard has always been this organized. These five DIY raised garden bed ideas tackle that exact frustration—each one photogenic, built mostly from free or low-cost materials, and doable in a weekend for under $60.
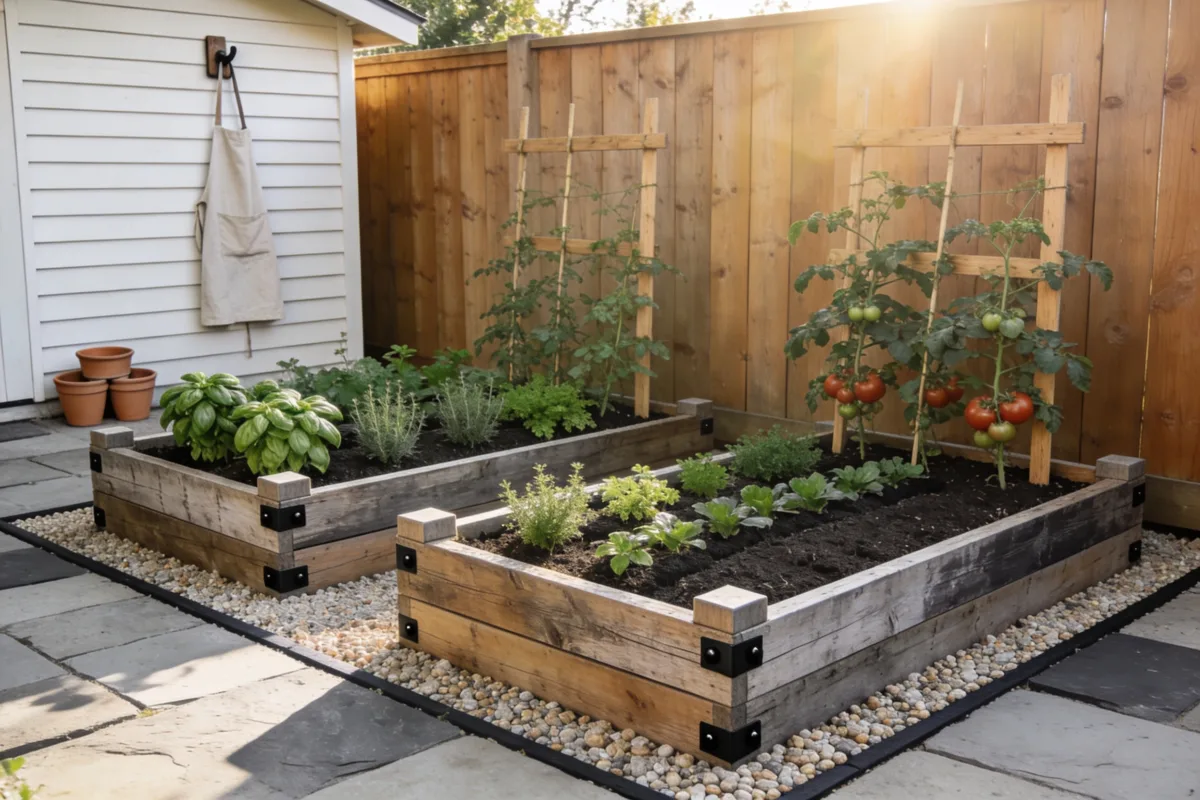
Think layered textures: rough-sawn boards next to trailing thyme, matte black screws against honeyed cedar, or a stripe of pea gravel that makes the whole space read intentional. Expect Pinterest-level visuals with real-life practicality: good drainage, clean edges, and crops that won’t sprawl into chaos. The result? A kitchen garden that costs less than one grocery trip for fancy microgreens but pays you back all season. If you love a simple, grounded, unfussy vibe that still feels pulled-together, this is for you.
1. Salvaged Pallet Box With Corner Posts and Gravel Edge
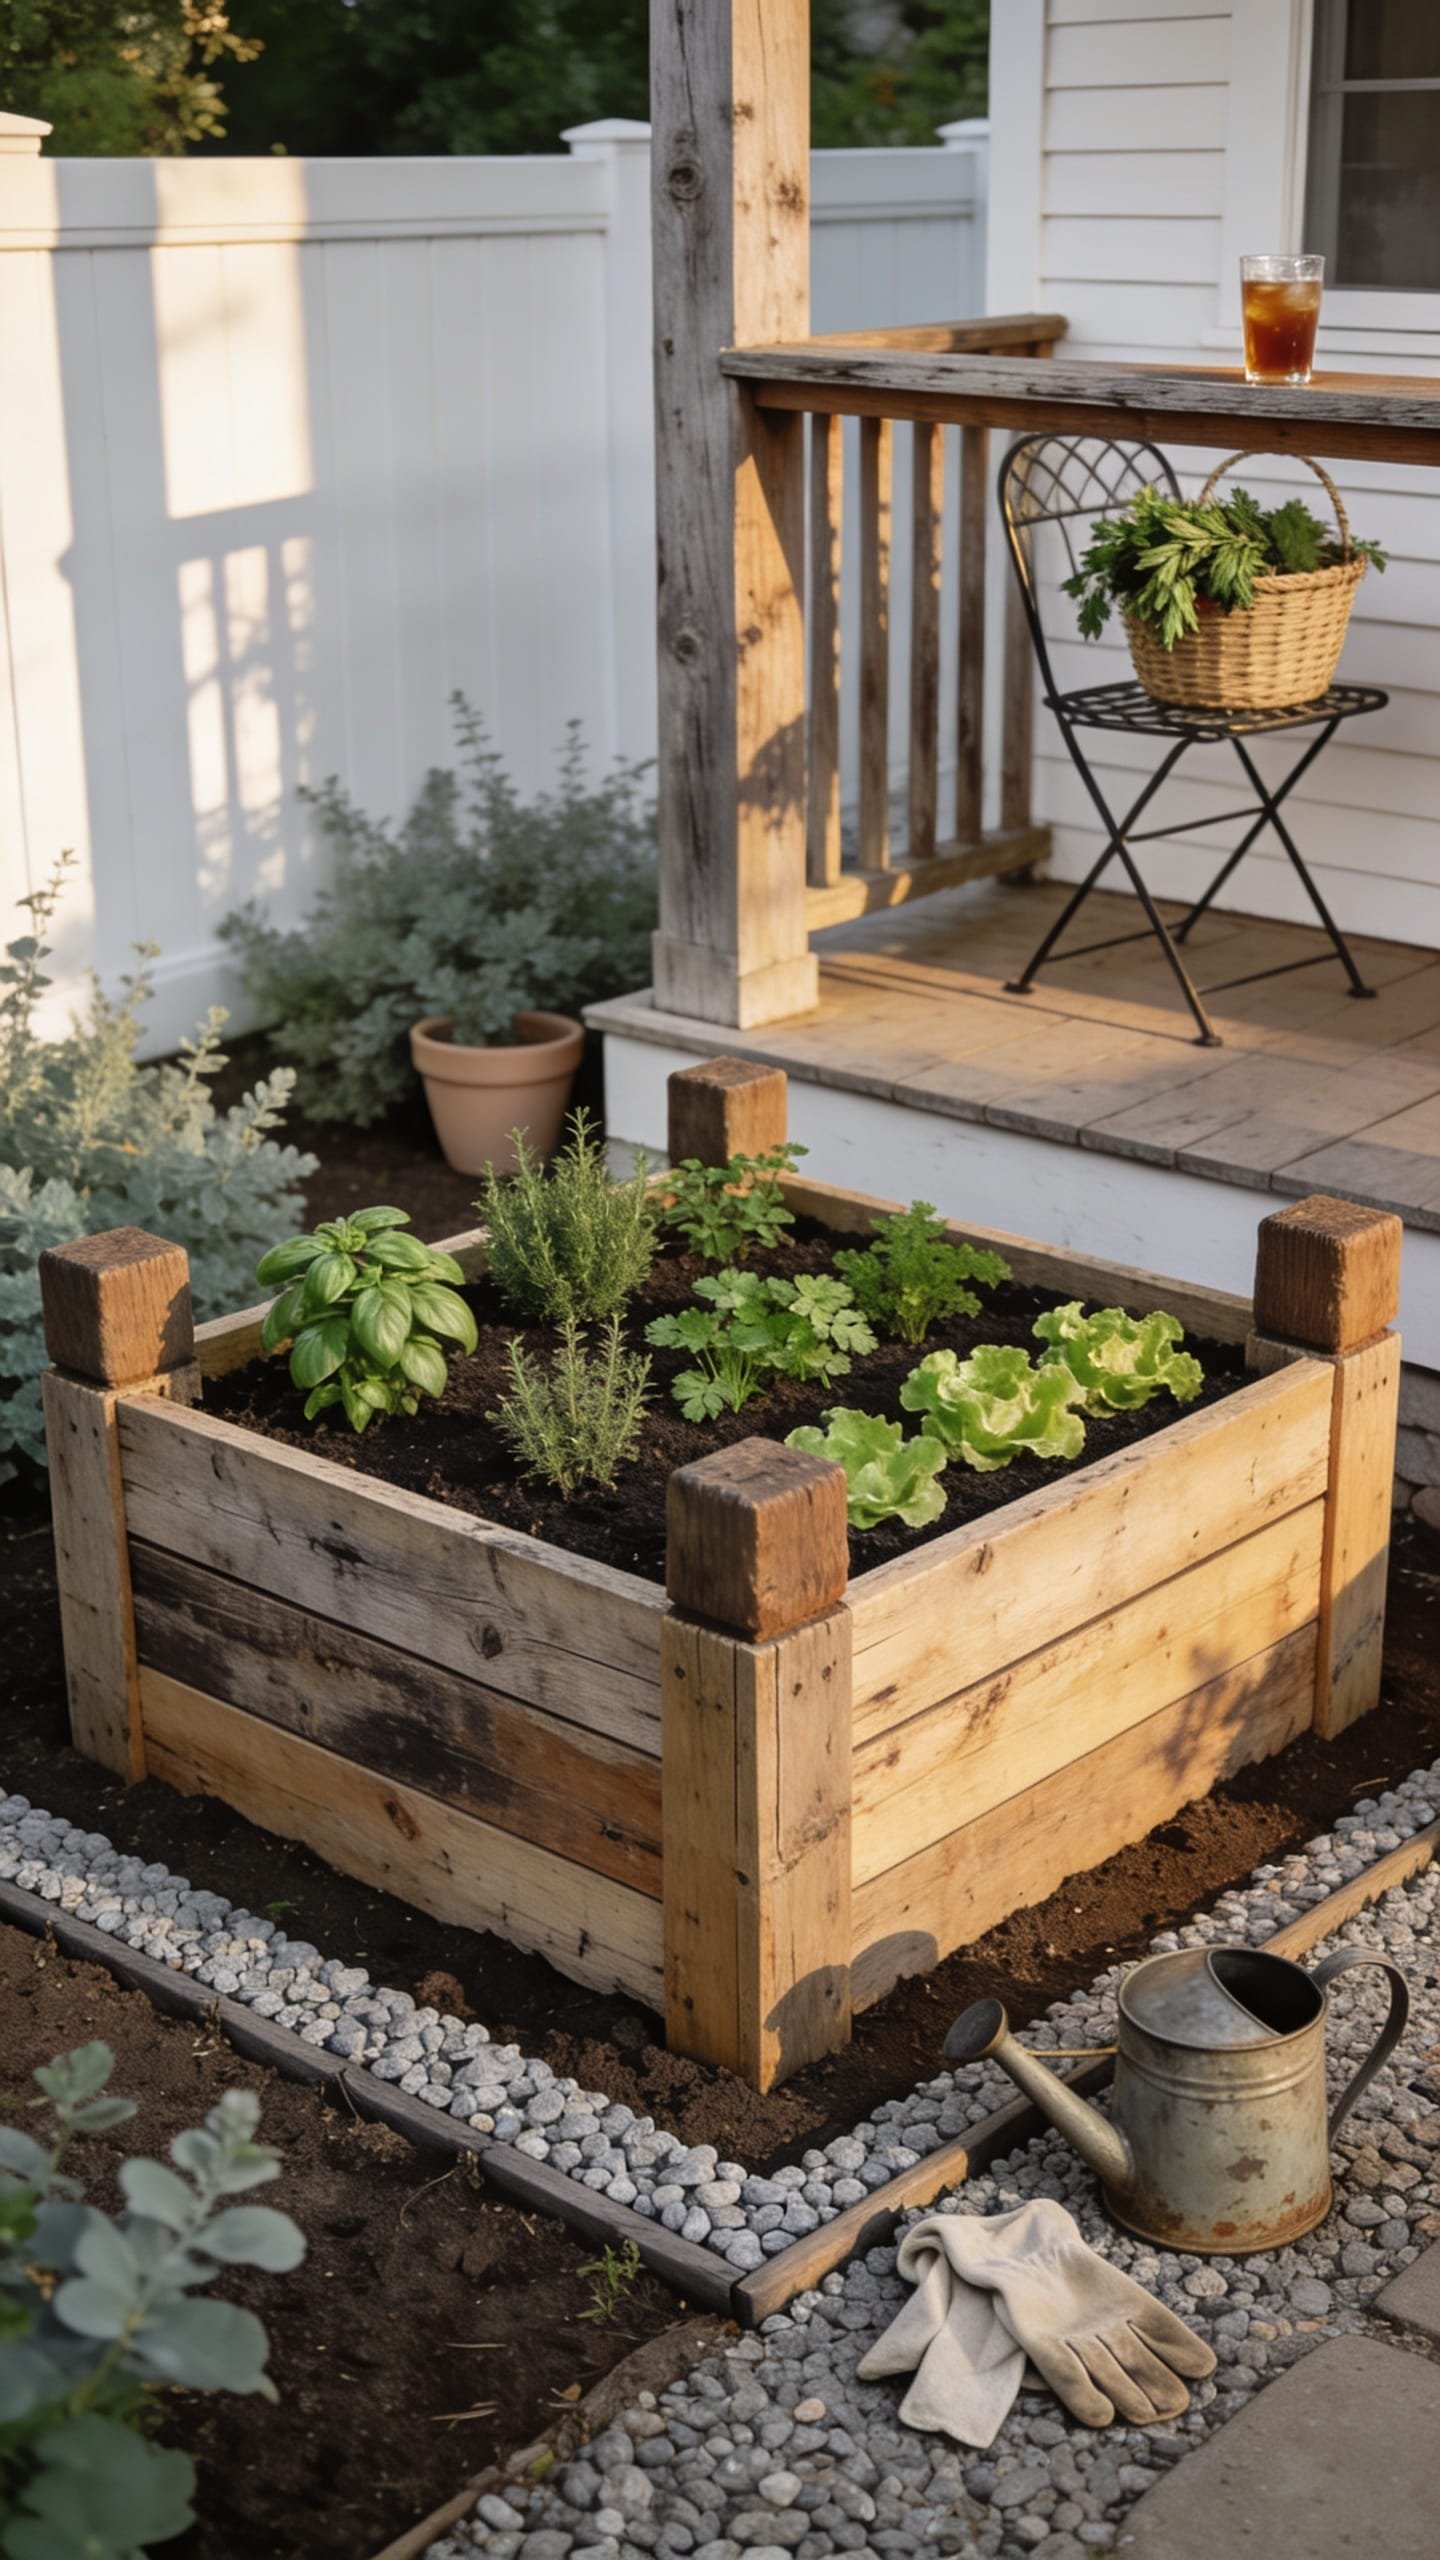
We’ve all been there: you want order in the garden, but your beds keep slumping into unflattering mounds by mid-July. Pallet wood solves two problems at once—cost and structure—if you handle it right. This raised bed reads rustic-modern with a touch of farmhouse, especially when you add a thin gravel border that frames the whole piece like a gallery print. The mood is warm and practical: think bistro basket of herbs, iced tea sweating on the porch rail, everything tidy enough to bring your neighbor over without panic-cleaning.
It works because pallets are usually free, corner posts add real strength, and gravel blocks weeds while making your bed look “finished.” In small yards, the straight lines and low height keep things feeling open. Lighting loves this one—morning sun turns the pallet boards to a soft honey tone, while evening shadows add depth between planks. Dominant materials: salvaged wood, exterior screws, pea gravel, a breathable weed barrier. It photographs beautifully thanks to the contrast between rough wood grain and the smooth, uniform gravel field. Variations to consider: go lower for a petite herb box, use black-painted corner posts for a modern note, or line the interior with scraps of landscape fabric for longevity.
Budget Breakdown:
- Pallets (2–3, confirm heat-treated/HT): free–$10 each
- Corner posts (2×2 or 2×3 studs): $6–$12
- Exterior screws: $5–$10
- Weed barrier or cardboard: free–$8
- Pea gravel trim (2–3 bags): $10–$18
- Compost/soil mix (as needed): $15–$30
Total Estimated Cost: $25 – $70
Best For: Small to mid-size backyards or alleys where structure beats sprawl. Great for herb gardens and compact veggies that like good drainage.
Key Design Elements:
- Main materials: Pallet planks, 2×2 corner posts, gravel, landscape fabric
- Color palette: Weathered wood browns, gray gravel, soft green foliage
- Lighting strategy: Place where it gets at least 6 hours of sun; capture golden hour photos for warmth
- Furniture silhouettes: Simple wood bench or a black metal folding chair nearby
- Texture layers: Rough grain boards, smooth pea gravel, fluffy herb leaves
- Accent details (hardware, decor pieces, plants): Matte black screws, terracotta pots perched on the gravel line, trailing thyme over the edges
How To Recreate This Look:
- Source heat-treated pallets (stamped “HT”), pry apart with a cat’s paw and rubber mallet to save boards.
- Cut boards to uniform lengths and sand edges quickly to avoid splinters.
- Screw boards into 2×2 corner posts, creating panels; then join panels into a box.
- Lay cardboard or fabric in the footprint, pour a 4–6-inch gravel collar around all sides.
- Fill with a 60/40 topsoil-compost mix and plant herbs in a repeating pattern for rhythm.
Why This Looks Expensive: The gravel border acts like a frame, turning a simple box into a landscaped feature. Repeated plant varieties and consistent board heights create visual rhythm that reads custom, not cobbled.
Watch Out: Don’t use chemically treated pallets. If you see “MB” stamped, skip it. Also avoid mixing board heights chaotically—keep lines as even as possible for a composed look.
Pro Styling Tip: For photos, water the gravel lightly before shooting—darker stones make the wood look richer and the greens more saturated.
Curious how to add curves without buying fancy kits? The next one bends—literally.
2. Corrugated Metal and Branch Frame With Curved Lines
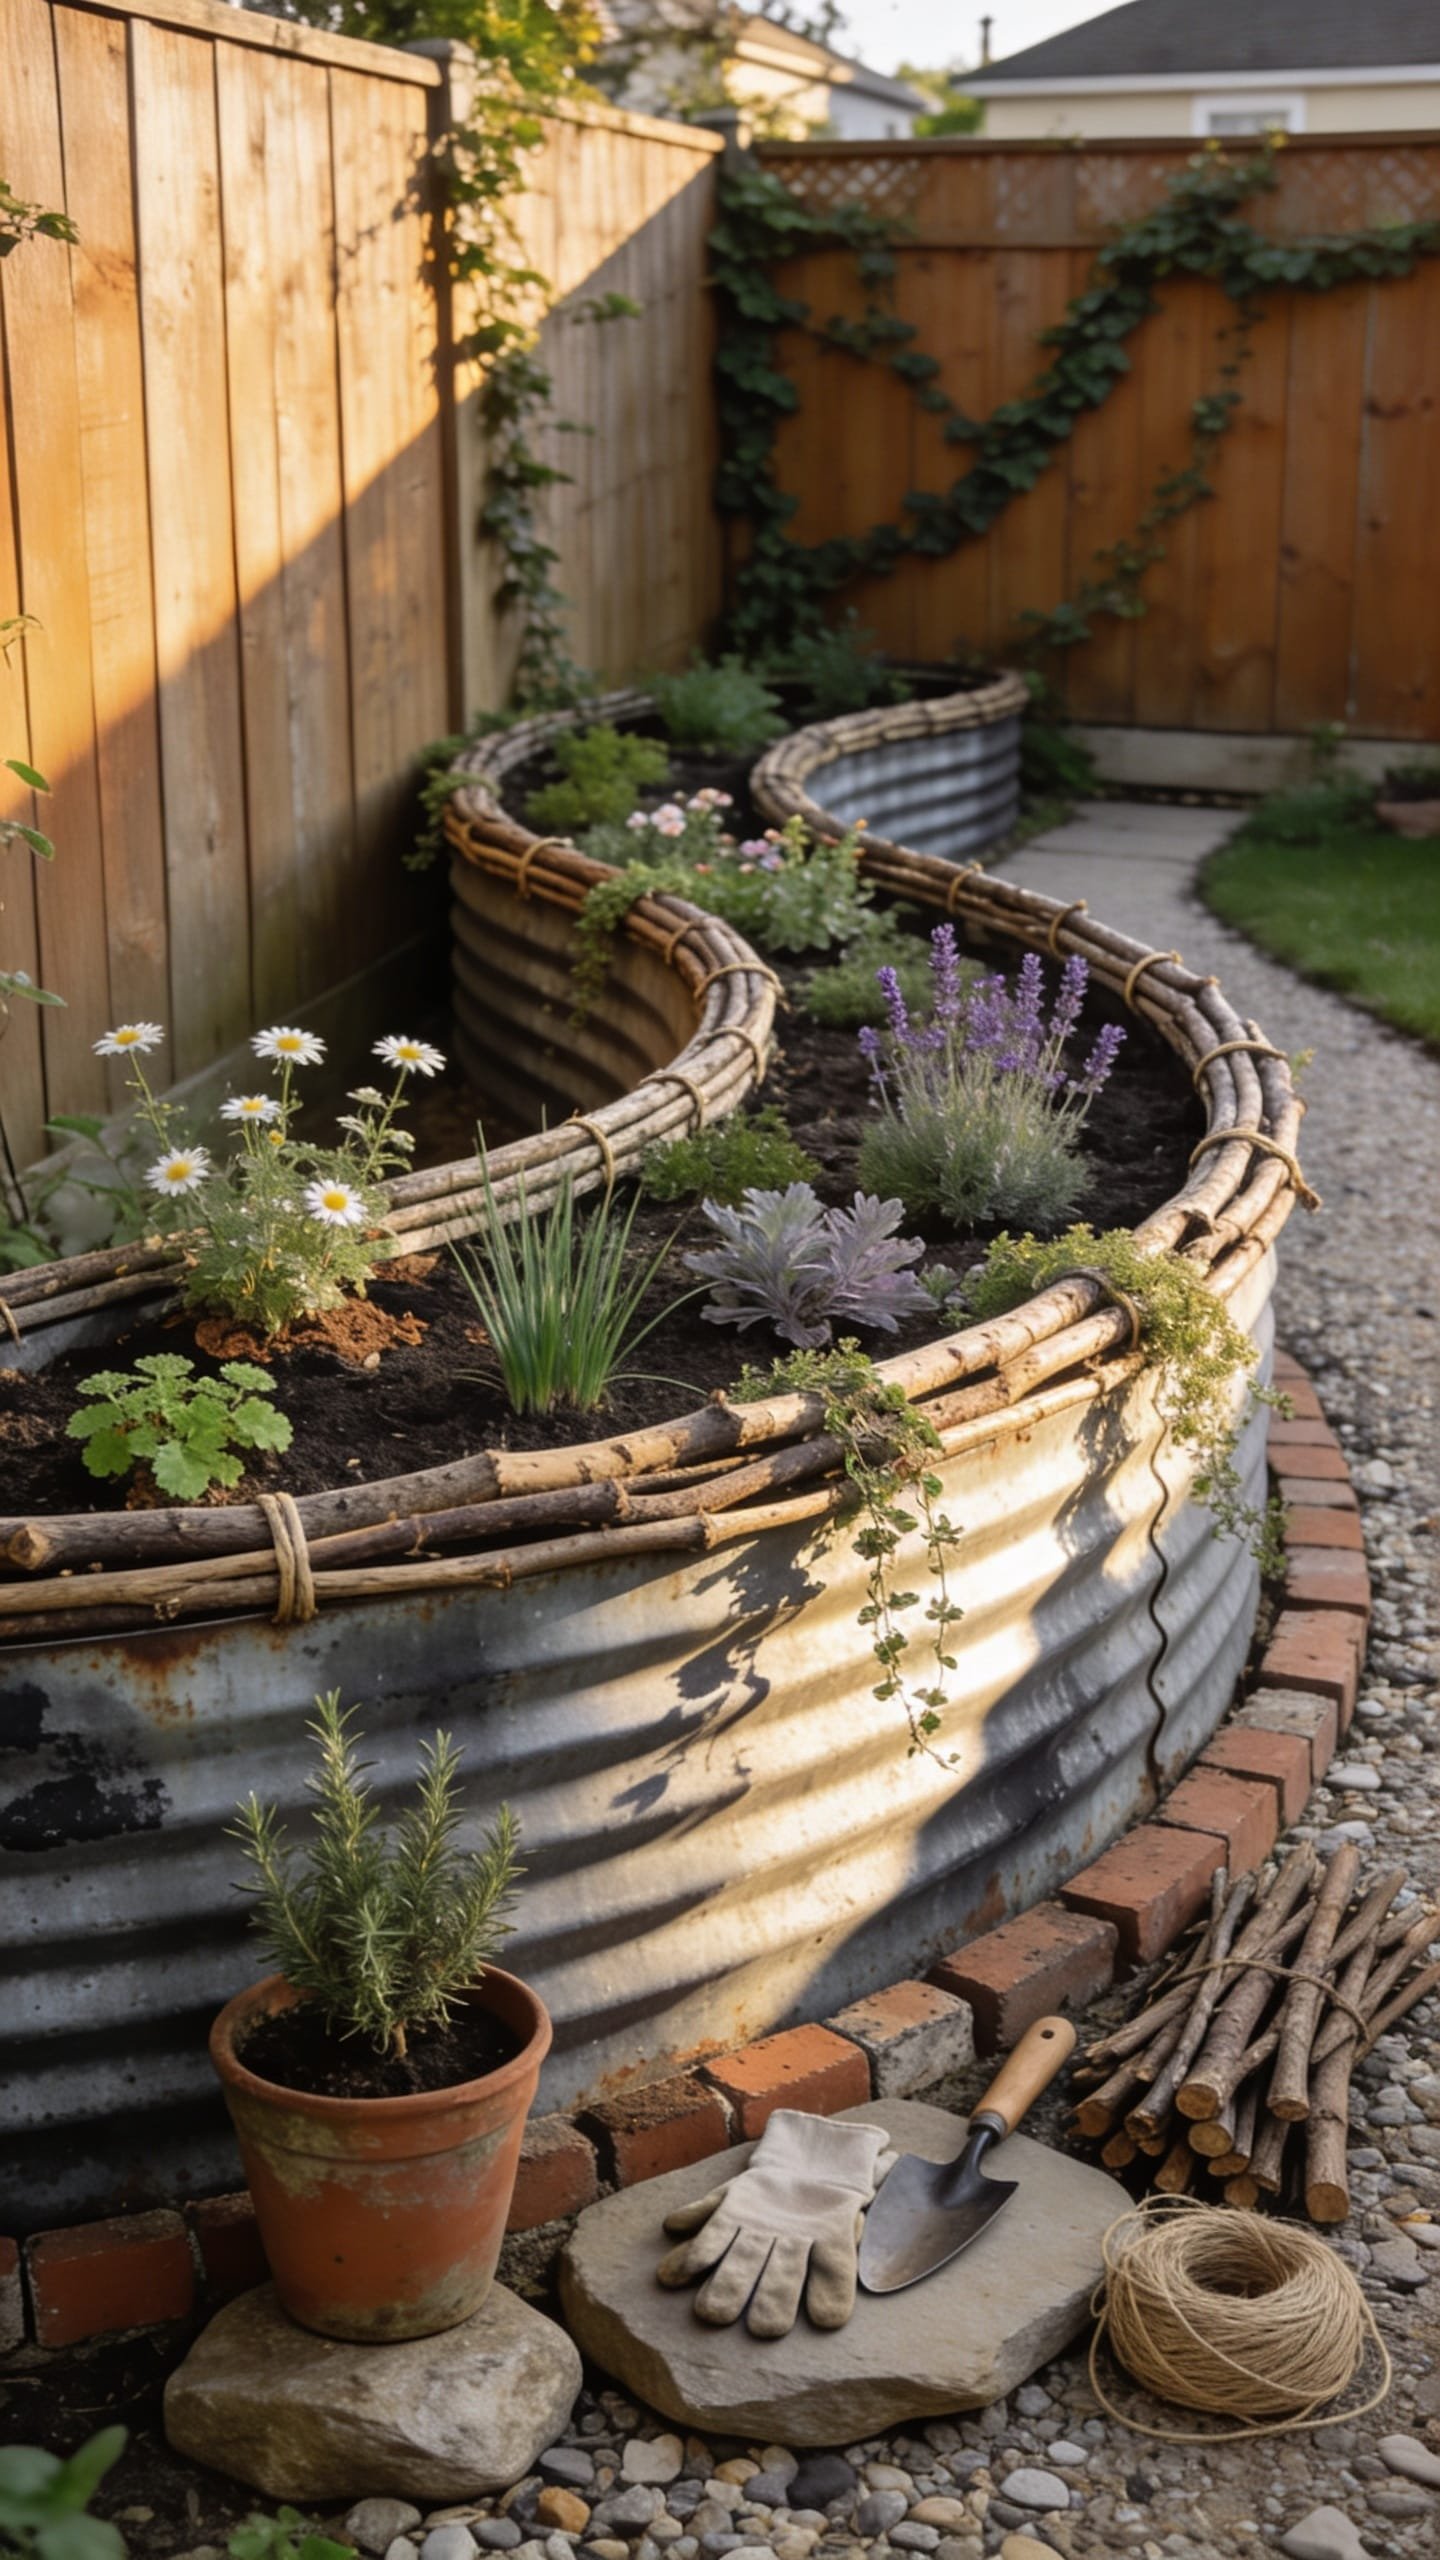
It’s that one corner that always feels off—too boxy, too stiff, too “builder-basic.” You’ve tried rectangular beds, but the layout still looks flat. Enter a curved raised bed using salvaged corrugated metal and straight-foraged branches for a sculptural top edge. The vibe leans modern rustic with a dash of European allotment garden: soft arcs, glinting metal catching the sun, and herbs cascading along a wavy silhouette.
Why this works in real backyards: curves soften fences and hard angles, the metal resists rot, and branches bring organic texture for free. In smaller spaces, a single crescent-shaped bed lets you tuck a bistro chair into the inner curve—instant micro-hangout. Lighting matters here: metal panels reflect light back into the foliage, brightening shaded corners and giving your photos that subtle glow. Materials are friendly to a tiny budget—offcut corrugated panels, branches from pruning, salvaged stakes or rebar, and zip ties. Photographs love the contrast—the matte bark against the metallic ripple, shadows tracing the arc like a contour drawing.
Variations you’ll use: small-space version with a 4-foot diameter semicircle; renter-friendly by securing panels to freestanding stakes without digging; darker version with painted black panels if your yard skews bright and you want drama.
Budget Breakdown:
- Corrugated metal offcuts or used roofing panels: free–$20
- Stakes or rebar (4–6 pieces): $8–$18
- Branches (foraged): free
- Zip ties or wire: $3–$6
- Cardboard base or landscape fabric: free–$8
- Compost/soil: $15–$30
Total Estimated Cost: $26 – $82
Best For: Awkward corners, along fences, or front yards where a design-forward element helps the garden read intentional. Great for pollinator mixes, spinach, and edible flowers.
Key Design Elements:
- Main materials: Corrugated metal, rebar stakes, foraged branches
- Color palette: Silvery metal, bark browns, deep green foliage, optional black accents
- Lighting strategy: Place to catch early or late sun so the ribs of the metal cast soft shadows
- Furniture silhouettes: A curvy wire bistro chair or a low stool that echoes the bed’s arc
- Texture layers: Ribbed metal, knobby bark, soft leaf canopies
- Accent details: Twine-wrapped ties, a small sign on a branch post, trailing nasturtiums
Why This Feels Designer: That branch “cap rail” telegraphs thoughtfulness. Instead of hiding the structure, you celebrate it with a tactile, continuous line that feels sculptural and custom.
How To Recreate This Look:
- Mark your curve with a garden hose; adjust until it feels balanced with nearby paths or fences.
- Drive rebar or stakes every 2–3 feet along the curve, leaning slightly outward for stability.
- Bend the corrugated panel into place against stakes; secure with wire or zip ties at multiple heights.
- Lay cardboard or fabric inside; backfill with soil; gently mound for better drainage.
- Wire straight branches along the top as a continuous rim; plant low trailing herbs along the front to soften the edge.
One Thing To Avoid: Don’t cut the metal without gloves and eye protection, and avoid ragged panel ends facing walkways. If you need to trim, fold the cut edge slightly with pliers to blunt it.
Pro Styling Tip: Photograph from the inside curve outwards so the bed arcs through the frame—your eye follows the line and the garden reads larger.
Quick Tip: Draw your bed footprint with flour or crushed chalk before committing. You’ll see proportion issues instantly, and it wipes away with the first watering.
Remember: this isn’t about copying a showroom. It’s about creating a tidy, productive garden that feels like yours and works with whatever scraps and seconds you can source. If one concept clicks, that’s your green light—start there and build out later.
3. Brick-on-Edge Kitchen Garden With Reclaimed Pavers
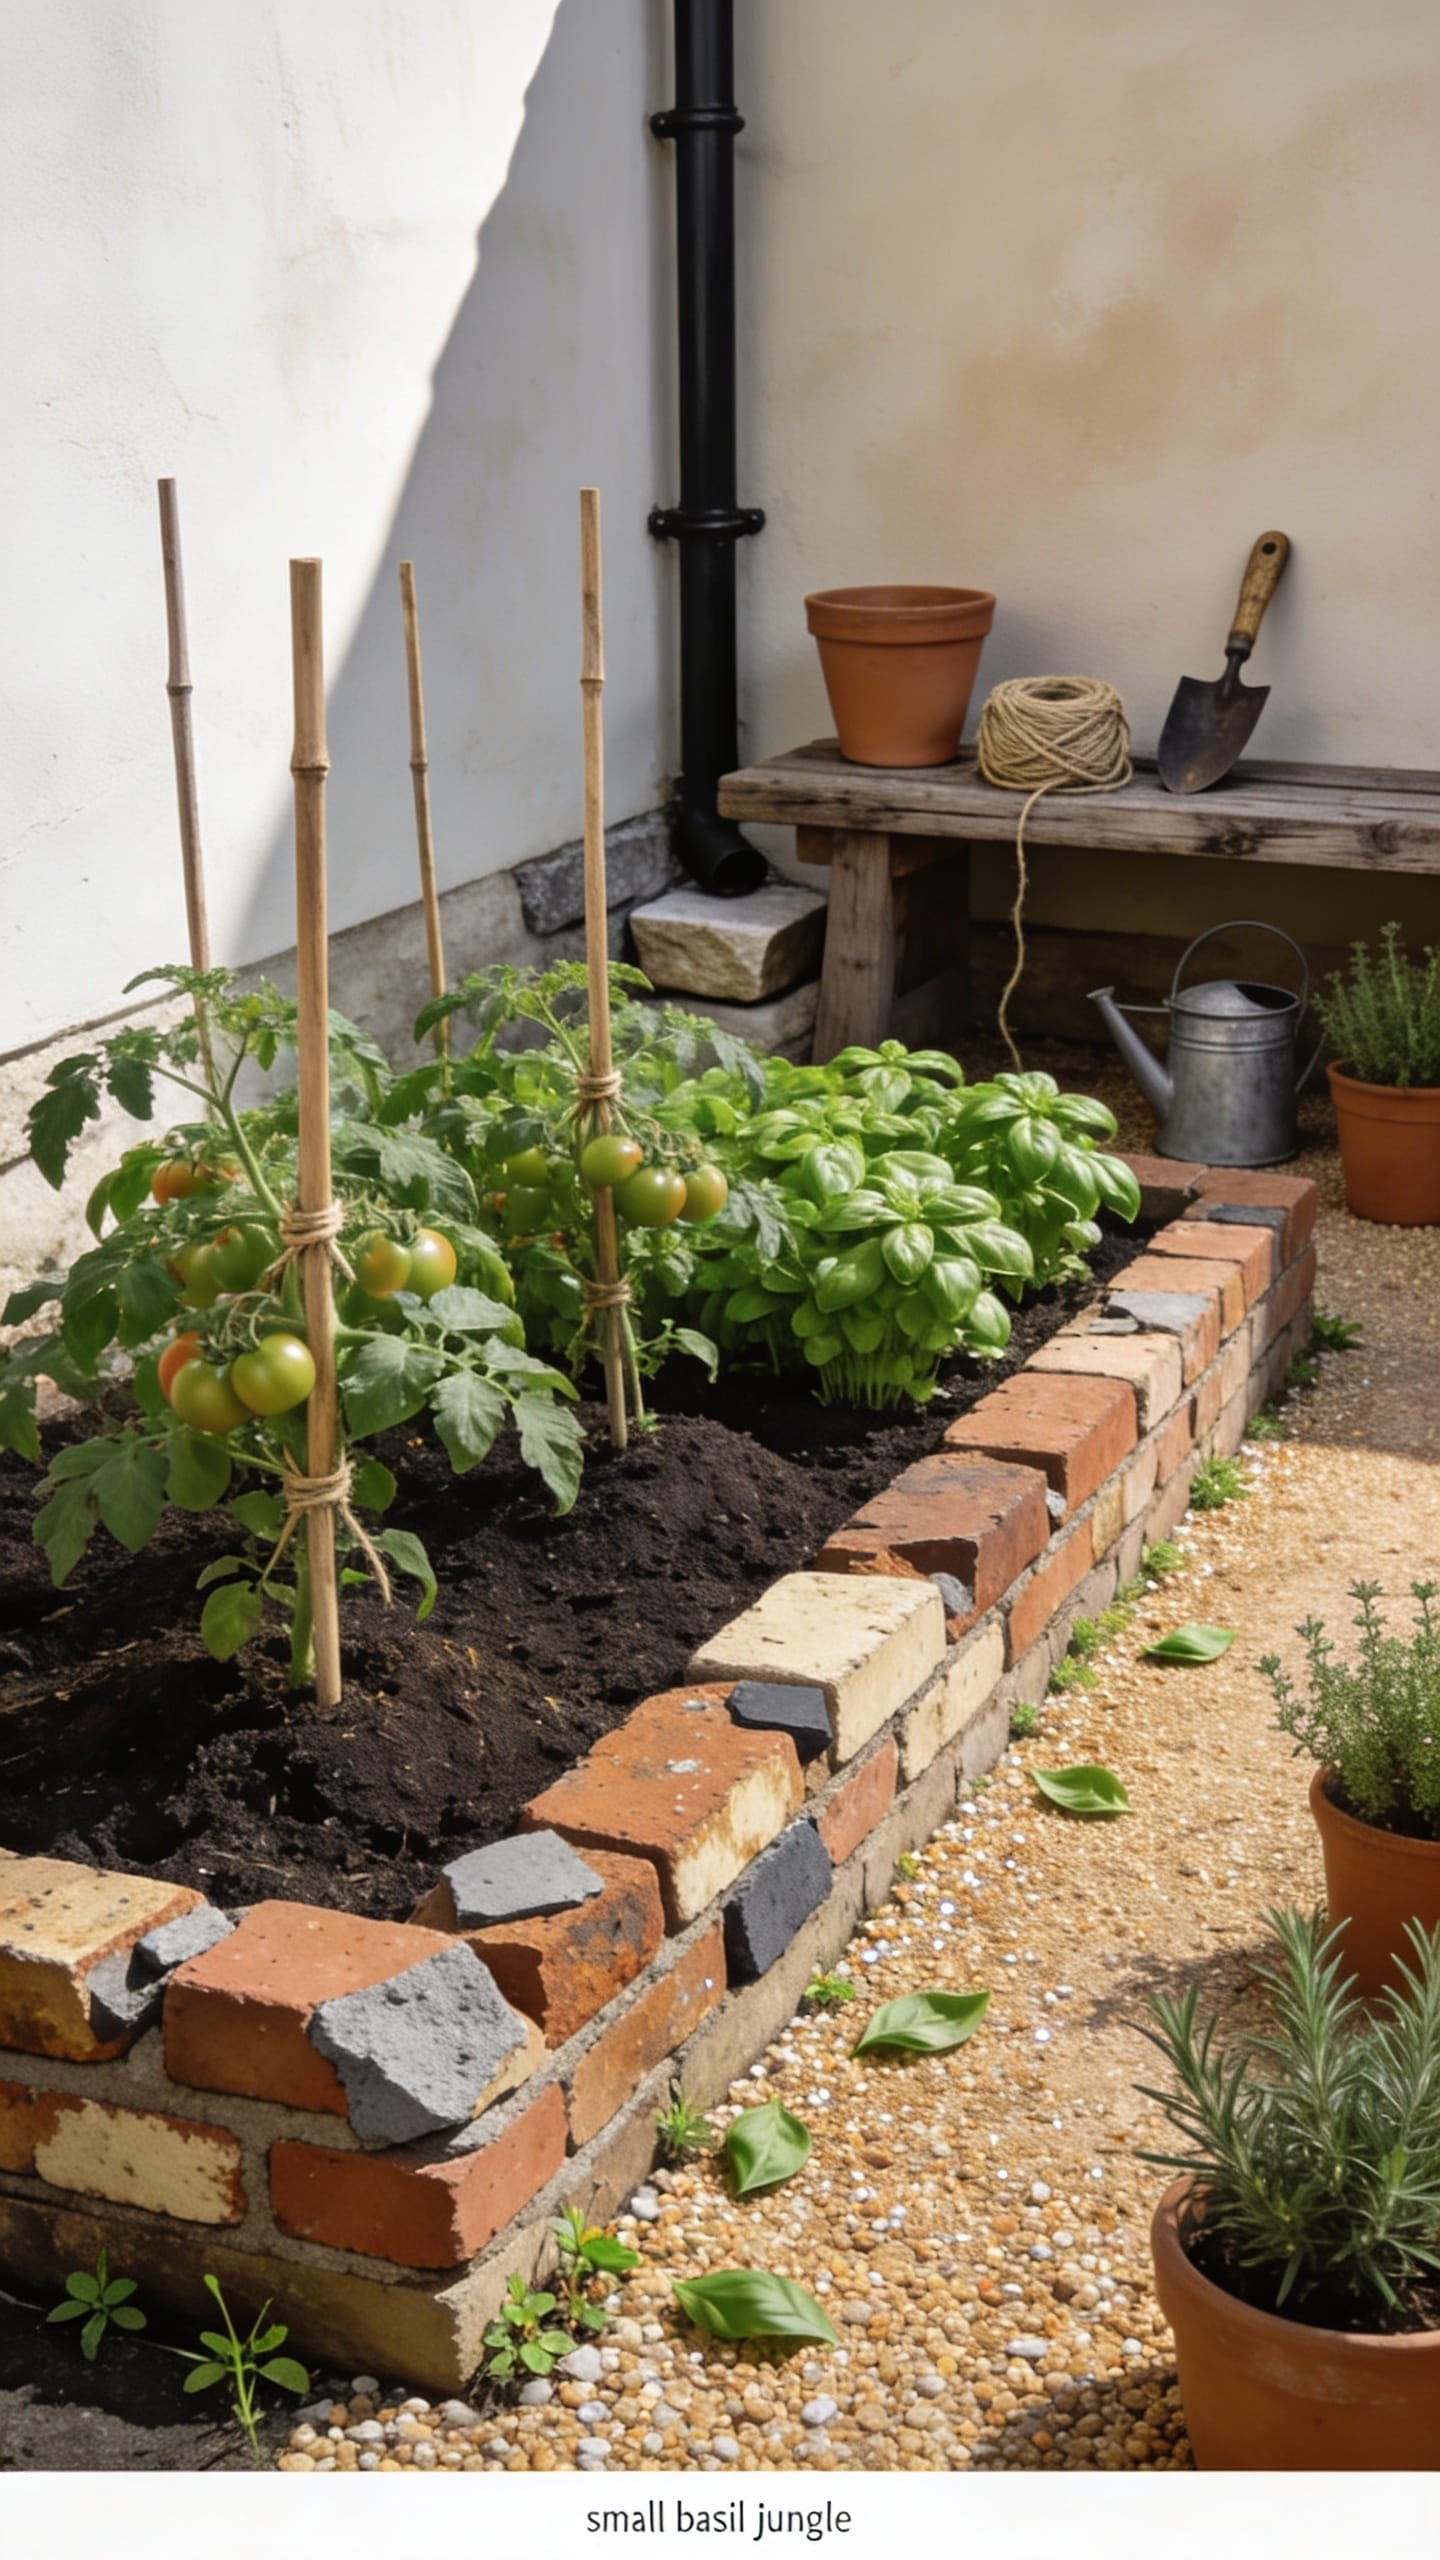
You want that old-world kitchen garden look—tomatoes tied with twine, a basil jungle, neat edges that make even weeds look charming. But then you price new brick, and suddenly it’s “maybe next year.” Here’s the fix: reclaimed bricks or broken pavers set on edge to form a slim raised border. It’s technically a low raised bed (8–10 inches), but it reads structured and generous, especially when you infill with rich compost and a narrow gravel path. Think timeless courtyard vibe: warm clay tones, crunchy underfoot texture, and crisp lines.
This design thrives in real life because it’s indestructible, easy to reshape, and perfect for renters—you can lift it and take it with you. Bricks on edge make your soil sit a bit higher without major digging, and the perimeter prevents that end-of-season “soil collapse.” Lighting loves brick. Golden hour turns those edges into softly glowing borders, and shadows pool between the bricks for depth. Materials: old brick/paver stacks from Craigslist curbsides, sand or screening, cardboard, and compost. Photographing it is a dream—strong contrast between brick, gravel, and green plus a repeat motif that feels editorial.
Variations: small-space version isolates one 3×6-foot bed with a single brick ring; budget tweak uses broken pavers mixed with intact brick for a wabi-sabi edge; darker mood by using charcoal pavers with deep-green kale and burgundy basil.
Budget Breakdown:
- Reclaimed brick/pavers: free–$1 per piece
- Leveling sand or screenings: $6–$12
- Weed barrier or cardboard: free–$8
- Pea gravel for paths (optional): $10–$20
- Compost/soil mix: $15–$40
Total Estimated Cost: $31 – $80
Best For: Sunny front-yard gardens or side yards you pass daily. Great if you crave tidy edges with cottage flavor.
How To Recreate This Look:
- Sketch a simple rectangle or L-shape; mark it with string.
- Lay down cardboard; top with a thin layer of sand to level.
- Set bricks on edge side-by-side; tap with a mallet to even heights.
- Backfill inside with soil; outside with a strip of pea gravel.
- Plant in clean rows or tight grids: basil, lettuce, marigold, repeat.
Key Design Elements:
- Main materials: Reclaimed brick/paver, sand, gravel
- Color palette: Clay reds, sandy taupe, sage and emerald greens
- Lighting strategy: Place to capture sunset light for saturated brick tones
- Furniture silhouettes: A raw wood potting bench or iron plant stand nearby
- Texture layers: Brick ridges, fine gravel, leafy greens, twine ties
- Accent details: Terracotta markers, copper plant labels, a tall rosemary as a “mini tree”
Why This Reads High-End: Repetition and restraint. Matching materials, tight joints, and a consistent brick height say “deliberate.” The small gravel reveal around the outside feels like architecture, not backyard improvisation.
The Most Common Mistake: Skipping the leveling layer. If you set bricks straight on lumpy soil, your edge will wave like a bad haircut. Ten extra minutes with a mallet and level pays off every time.
Pro Styling Tip: For photos, snip any leggy herbs and tie them to simple bamboo canes—vertical lines add polish and make the bed read taller.
Did You Know? Adding one handful of crushed eggshells along your tomato row discourages slugs and gives calcium. It’s not glamorous, but your tomatoes care more about minerals than Instagram.
4. Straw Bale Frame That Composts Into Next Year’s Soil
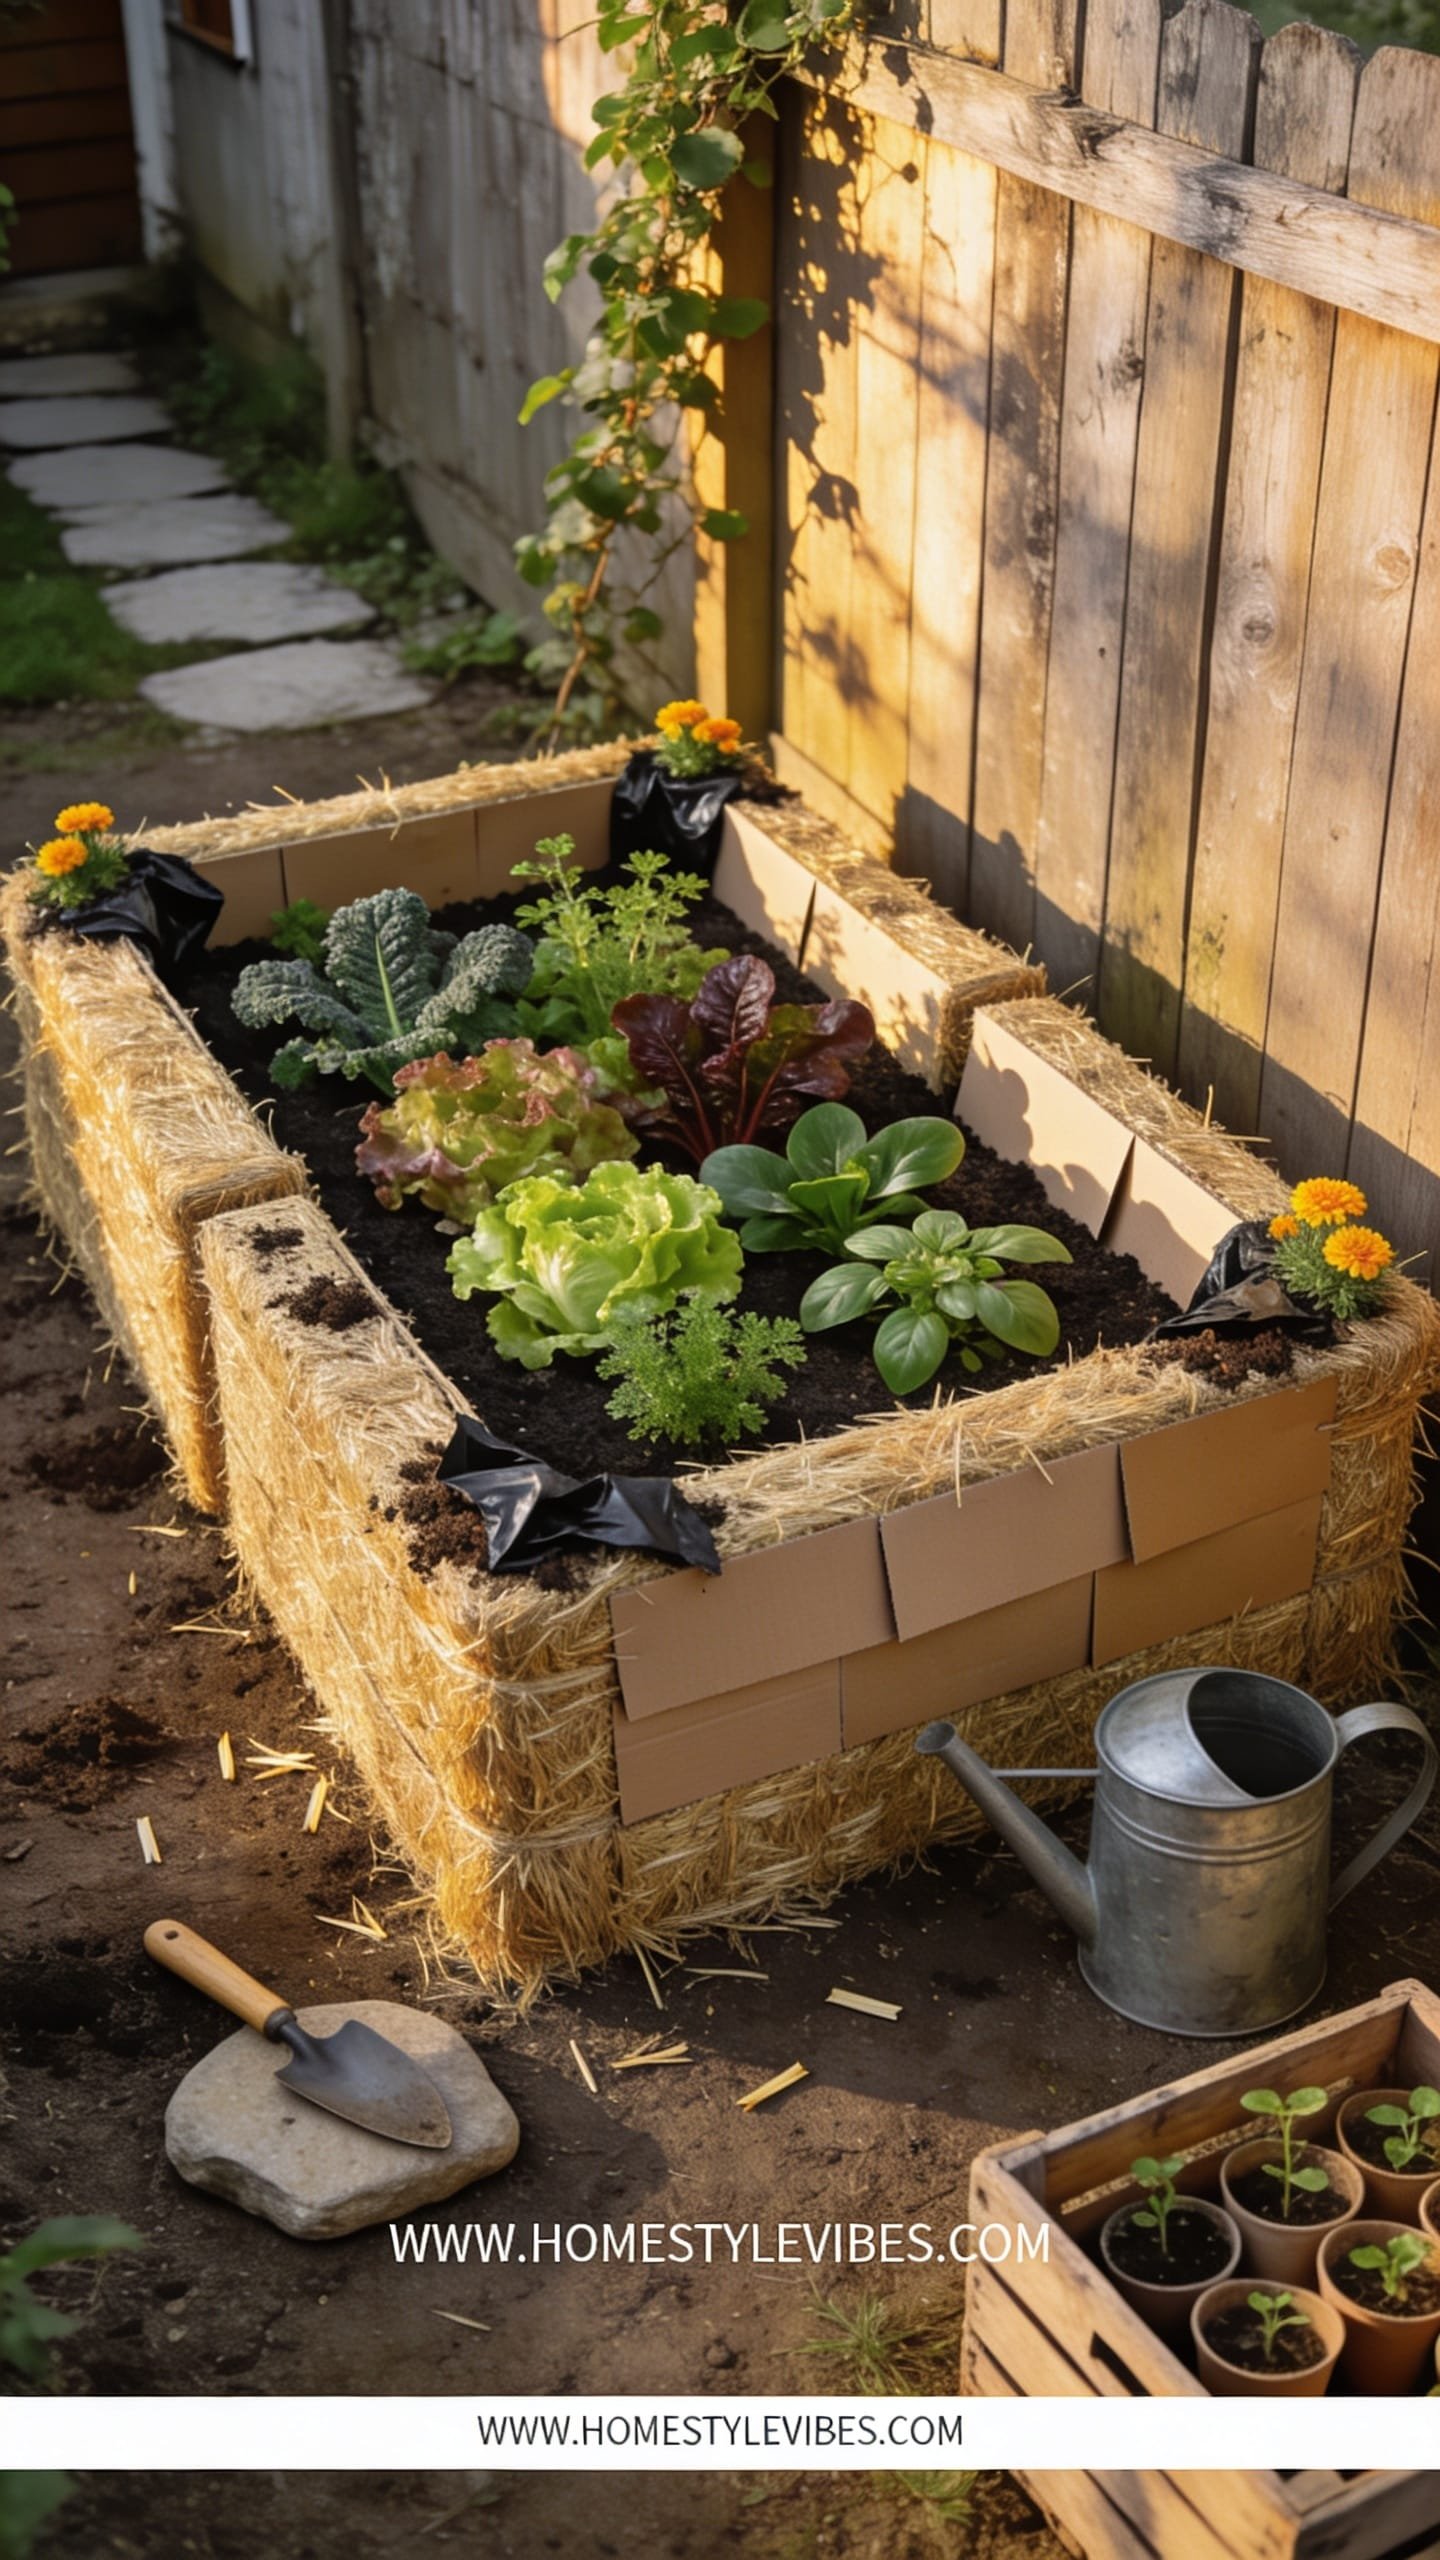
You’ve got enthusiasm but no lumber, no saw, and definitely no weekend to measure corners. Straw bales are the shortcut you weren’t taught in school. Arrange four bales into a rectangle, line the interior with cardboard or compost bag scraps, fill with soil, and you’ve built a raised bed in 20 minutes. The mood is cottage-meets-farm, with soft golden texture framing a riot of greens. It smells faintly of summer fields and photographs with a buttery warmth that makes everything look abundant.
Why it works: straw bales insulate roots, reduce weeds, and gradually break down into next year’s compost. Family-friendly? Totally—kids can sit on the edge to help plant. Easy upkeep and zero tools. Lighting loves the straw’s warm tone; the golden edges reflect light back up into foliage, brightening leaves from below. Materials: straw (not hay—hay brings seeds), cardboard, soil, twine. For renters or event gardens, it’s the perfect seasonal install. Want variations? Use a skinny version with two bales lengthwise for tight spaces, or stack bales two-high for wheelchair accessibility.
I tried a straw bale frame one July when my plans and my budget were not on speaking terms. It went from “weeds and regret” to “gorgeous and productive” in under an hour. Was it perfect? No. I had one bale that slumped because I stored it in the rain—lesson learned. But the kale grew like it had a secret trust fund.
Key Design Elements:
- Main materials: Straw bales, cardboard, compost-rich soil
- Color palette: Golden straw, deep greens, pops of marigold and nasturtium orange
- Lighting strategy: Site where straw catches morning light; it reads luminous on camera
- Furniture silhouettes: A rough wood crate as a side table; enamel bowl for harvests
- Texture layers: Crisp straw, loamy soil, bouncy lettuce, matte terracotta
- Accent details: Jute twine, cedar plant markers, a staked sunflower as a cheerful anchor
Budget Breakdown:
- Straw bales (4–6): $20–$45 total depending on season
- Cardboard or paper feed sacks: free
- Soil/compost: $20–$40
- Twine: $2–$4
Total Estimated Cost: $42 – $89
Best For: Fast builds, pop-up gardens, renters, and kid-friendly kitchen gardens. Ideal for cooler shoulder seasons when you want instant structure.
How To Recreate This Look:
- Place bales cut-side up in a rectangle; the cut side wicks water better.
- Line the interior with cardboard to block weeds.
- Fill the center with a compost-heavy mix; water to settle.
- Tie a jute belt around wobbly bales if needed.
- Plant easy wins: lettuce, kale, beans on a teepee, plus flowers for pollinators.
Why This Looks Intentional: The consistent straw texture creates a unified frame around the chaos of growth. Add a single material accent—jute twine or copper tags—and the whole bed reads styled, not improvised.
Don’t Do This: Don’t use hay. It’s full of seeds and you’ll grow a field of mystery grasses. Also avoid placing bales directly on soggy ground; they wick water and can slump.
Pro Styling Tip: Snip clean edges on any overhanging plants and tuck a few marigolds at the corners—they photograph like gilded corners on a book.
Quick Tip: If your soil budget is tight, fill the core of a large bed with sticks, leaves, and grass clippings first. Top with 6–8 inches of good soil. That hidden bulk saves money and feeds microbes as it breaks down.
If one of these ideas feels doable right now, run with it. You can always add another bed later or mix styles—your garden, your rules.
5. Free-Form Log and Branch Bed With Woven Wattle Sides
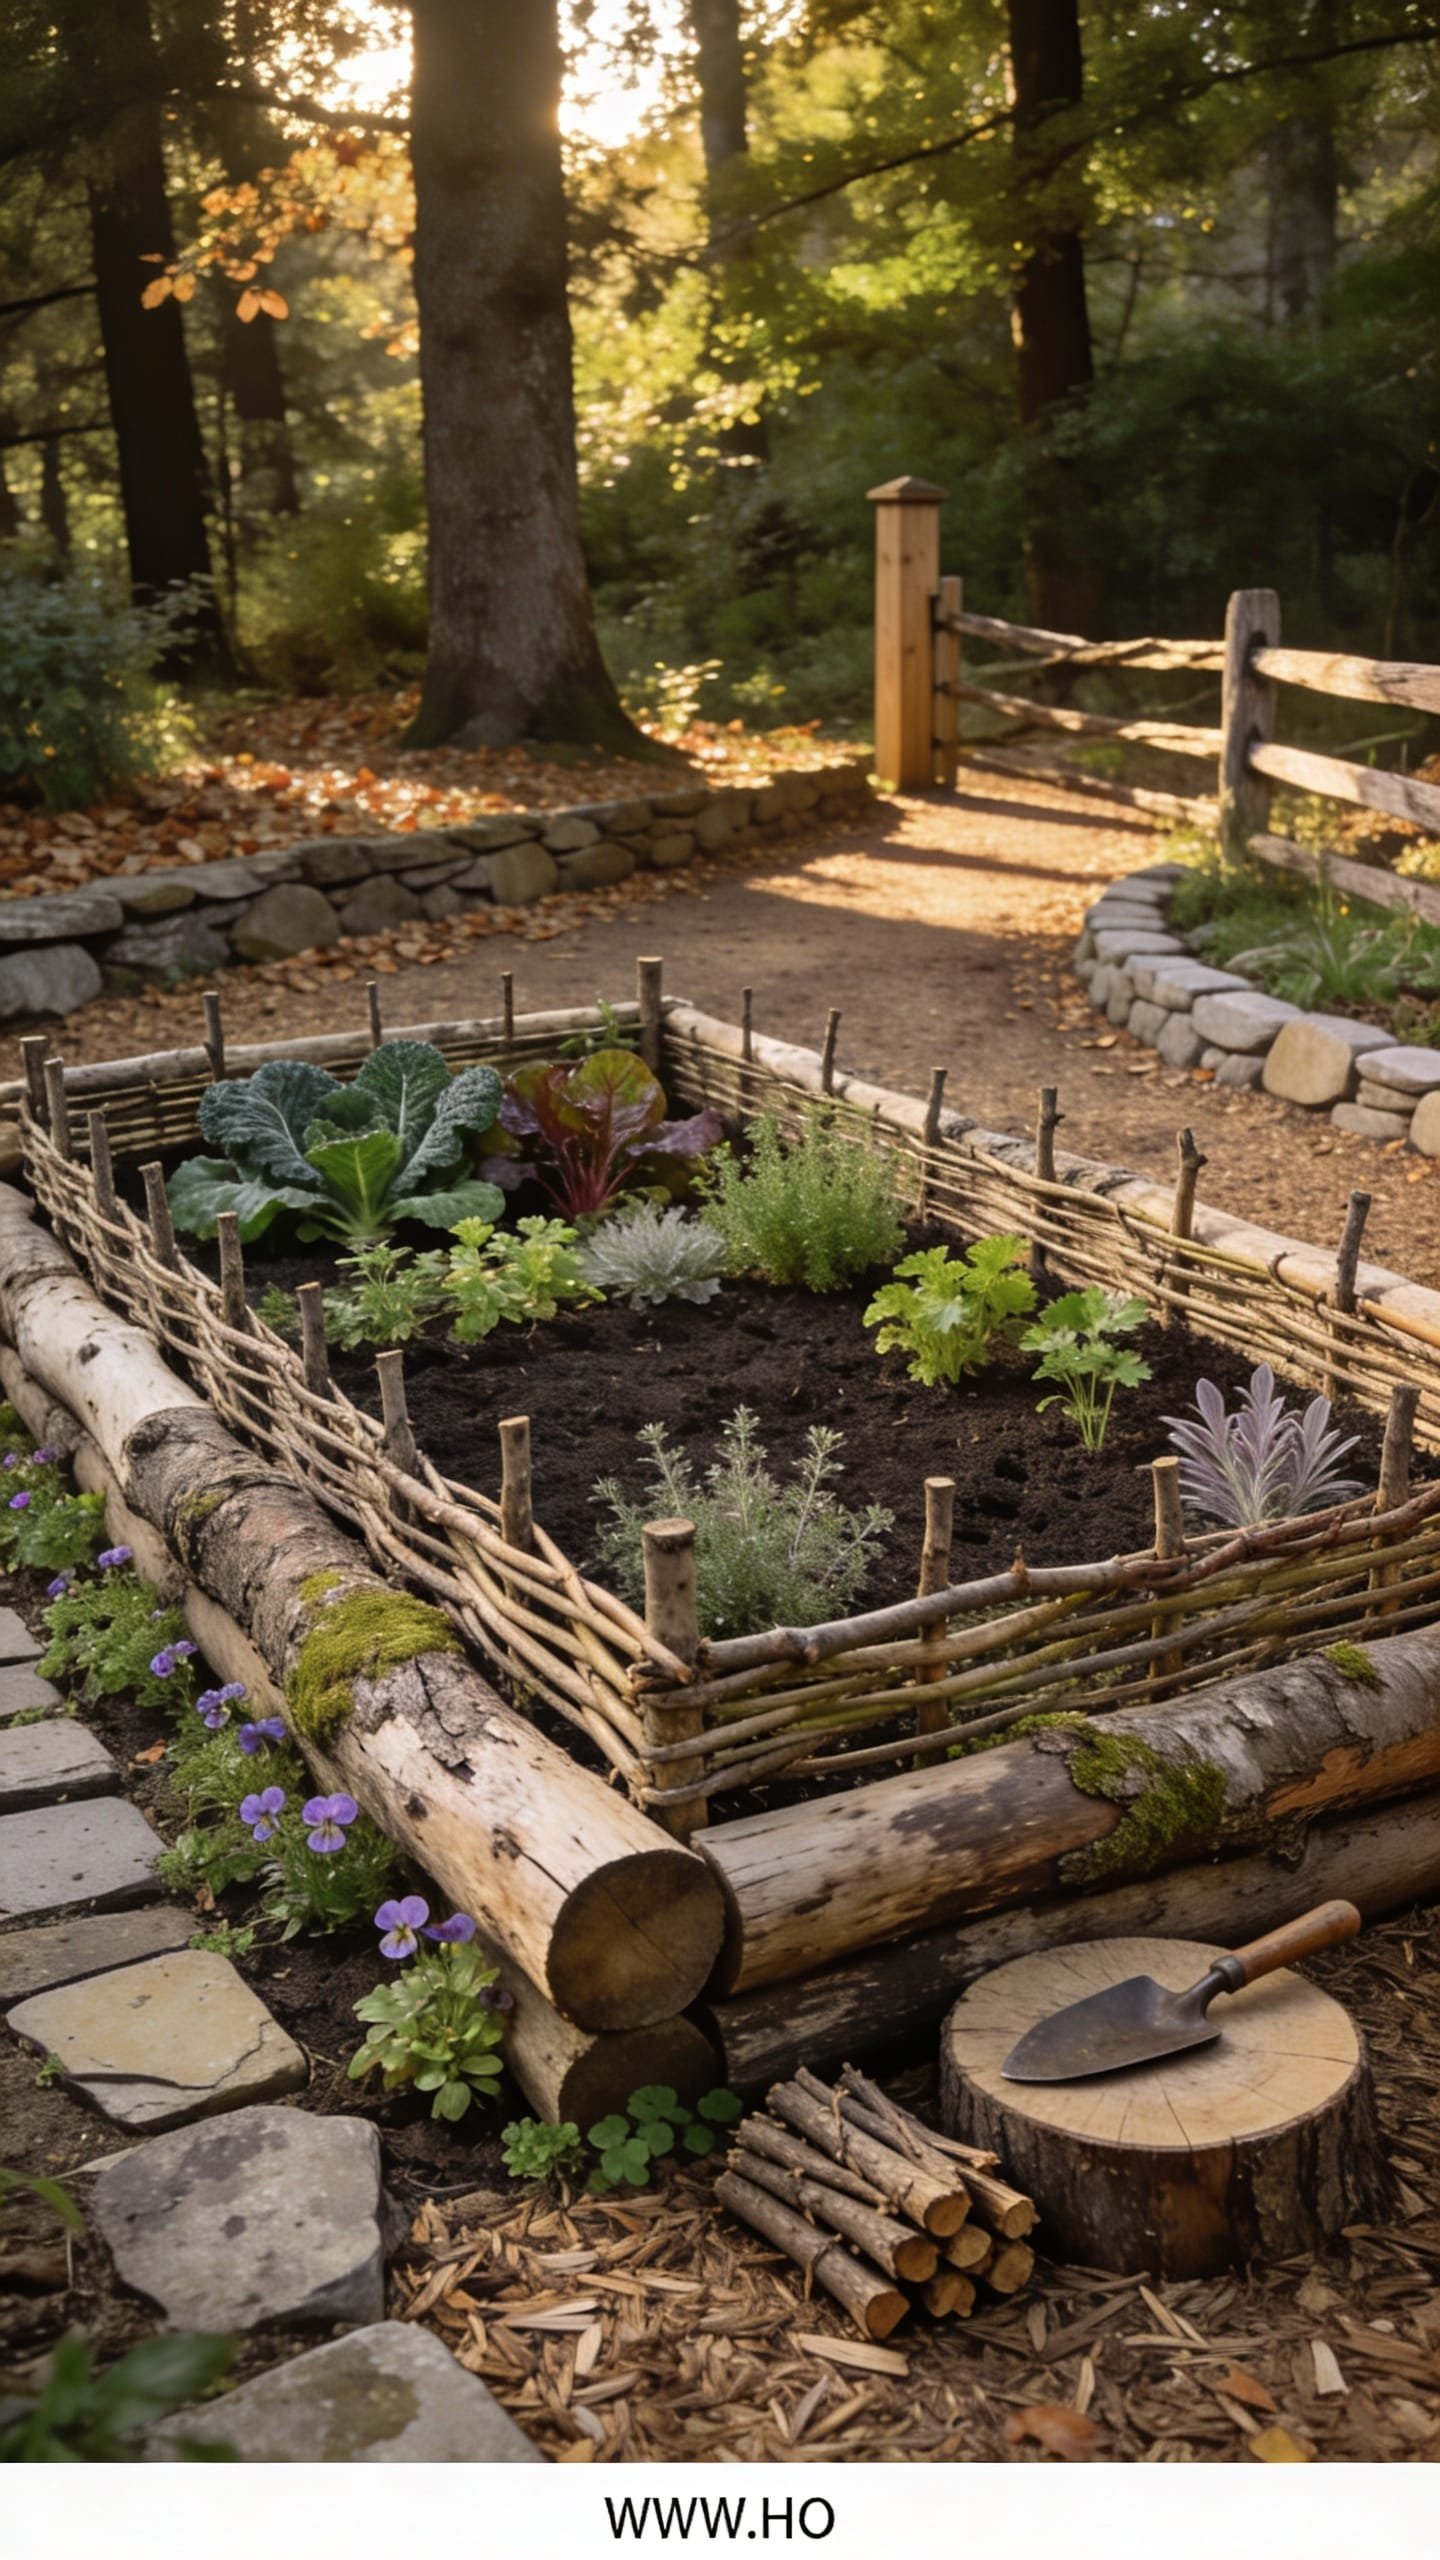
Sometimes the problem isn’t money—it’s mess. Too many random sticks, prunings, and storm-fall logs piling up in the corner. Here’s the beautifully low-cost solution: use those logs as the structural edges of a raised bed and weave the thinner branches between short stakes to form wattle sides. The mood leans woodland cottage with a whisper of Scandinavian simplicity. It feels grounded, tactile, and wildly photogenic—the kind of bed that looks like it has always been part of the landscape.
It works in real gardens because it’s incredibly forgiving. Uneven logs? Embrace the irregular profile and keep the top line gently rolling. In small yards, position a single log-and-wattle bed on a diagonal to create depth; diagonal placement tricks the eye into seeing more space. Lighting plays up the woven shadows on sunny afternoons, and rain darkens the bark to a beautiful espresso. Materials are, frankly, almost free: logs or large branches, stakes made from cut saplings or salvaged 1x1s, and pliable trimmings (willow is dreamy, but grapevine, dogwood, or even ivy clippings work). It photographs like a magazine spread because texture does the heavy lifting—no paint, no stain, just nature doing its thing.
Two variations to love: a micro-bed at 2×4 feet for city balconies with dirt patches, or a moody “forest greens” palette with Tuscan kale, chard with ruby stems, and purple basil for color drama. For a renter-friendly swap, build as a freestanding frame on a tarp-lined gravel base; when you move, lift the logs and go.
Budget Breakdown:
- Logs/branches (storm-fall or prunings): free
- Stakes (cut saplings or scrap 1x1s): free–$8
- Twine/wire for tie points: $3–$6
- Cardboard or fabric liner: free–$8
- Soil/compost: $15–$40
Total Estimated Cost: $18 – $54
Best For: Shady to part-sun gardens where woodland edges feel natural. Ideal for herbs, greens, and woodland strawberries.
Key Design Elements:
- Main materials: Logs, stakes, woven branches
- Color palette: Bark browns, moss greens, deep leafy tones, splashes of edible flowers
- Lighting strategy: Let dappled light do the styling—afternoon sun will pattern the wattle with shadows
- Furniture silhouettes: A simple stump stool or a slender black lantern for evening glow
- Texture layers: Smooth log ends, ribbed bark, flexible vine weave, velvety kale
- Accent details: Twine knots, a small mushroom statue, thyme trailing over the edge
How To Recreate This Look:
- Lay logs to outline your bed; choose the flattest sides for contact with the ground.
- Drive stakes every 8–10 inches along the sides; alternate inside and outside the logs for grip.
- Weave flexible branches in and out of the stakes; tap down each course to tighten.
- Line with cardboard, fill with soil, and mound slightly for drainage.
- Plant a layered mix: tall greens in the back, mid-height herbs center, trailing thyme or strawberries at the front to spill over the weave.
Why This Looks Expensive: Layered texture and intentional asymmetry. The weave adds craftsmanship, the log edges add mass, and the whole piece reads bespoke—like you hired an eco-landscape designer.
Watch Out: Don’t use freshly cut black walnut—its juglone can inhibit some plants. Also avoid logs that are punky-soft; they’ll collapse fast. Go for moderately seasoned wood.
Pro Styling Tip: Shoot at an angle that catches the woven side in raking light; the shadow play does half the beautifying for you.
Did You Know? Hugelkultur-style cores—logs and sticks buried under soil—hold moisture and release nutrients as they break down. If your climate runs dry, this method reduces watering without any fancy irrigation.
A quick real-life confession: a friend of mine spent weeks agonizing over which raised bed to build, convinced the style choice would “define her as a gardener.” We set up a simple log-and-wattle demo in one afternoon. She texted me a photo at dusk with fireflies in the background and wrote, “Oh. I just wanted dinner with a view.” Sometimes the right bed is the one you can finish before sunset.
Quick Checklist
- Confirm pallets are heat-treated and free of chemicals
- Frame beds with a visible “reveal” like gravel or brick for a finished look
- Repeat plant varieties for rhythm and calmer visuals
- Level edges thoroughly before filling
- Use cardboard as a free, effective weed barrier
- Mix compost into topsoil at roughly 40–50 percent for productivity
- Choose straw, not hay, for bale frames
- Weave flexible branches tightly and tap down each course
- Lean into curves where straight lines feel harsh
- Photograph at golden hour; water surfaces lightly for richer color
Frequently Asked Questions
How do I build a raised garden bed on a very tight budget without it looking junky?
Pick one material and commit. Pallet boards with a gravel edge or reclaimed brick on edge both look intentional when repeated. Keep heights consistent, add a narrow border, and limit plant varieties to a few repeated favorites.
I only have a small patio—can I still use these ideas?
Yes. Try a micro brick ring or a 2×4-foot log-and-wattle bed. Keep paths to a minimum and choose compact crops: bush beans, dwarf tomatoes, lettuce, and herbs. Place beds diagonally to create the illusion of depth.
What about maintenance—will these cheap materials fall apart by season’s end?
Choose the right salvage: heat-treated pallets, reasonably solid logs, and corrugated metal with clean edges. Straw bales are seasonal by design but become compost for next year. A quick mid-season check of screws and ties keeps everything tight.
I rent and can’t dig—what’s my best raised bed option?
Go for straw bales or a freestanding corrugated curve secured to stakes sitting on pavers. Add a tarp or landscape fabric base with gravel on top to protect the ground. When you move, disassemble and take your materials along.
What’s the most common design mistake with DIY raised beds?
Floating beds with no defined perimeter. Always include a frame or a narrow border—gravel, brick, or a shadow line—to make the bed read like a deliberate feature instead of a pile of soil.
Closing Thoughts
Pick one idea that feels doable this weekend and start there. The truth is, the best raised garden beds don’t come from fancy kits; they come from materials that tell a story and a layout you’ll actually maintain. Focus on texture, clean edges, and a repeat rhythm of plants. That’s what makes the garden look finished and keeps your stress low.
Luxury in the yard isn’t about price tags. It’s texture plus lighting plus restraint: weathered wood against dark soil, a shadow line on gravel, the same three herbs tucked into multiple pockets. Start small, edit bravely, and let the plants do the bragging. You’ve got this—and your future pesto is already smiling.

About the Author

Krisztina P.Rendes, Founder of Home Style Vibes
Founder of Home Style Vibes
Krisztina Puskásné Rendes created Home Style Vibes as a cozy-modern lifestyle space where homemaking meets inspiration. Her goal is to help women create beautiful, organized, and peaceful homes they truly love — without overwhelm. You’ll find here heart-driven content on home decor, cleaning tips, easy family recipes, organization and decluttering, DIY home projects, plants, and seasonal ideas — all designed to bring more calm, comfort, and style into everyday life.