7 Home Garden Design Ideas For A Front Yard That Looks Professionally Landscaped
You want a front yard that makes neighbors slow the car and whisper, “Did they hire a landscape architect?” You hate the reality: patchy grass, a rogue hose that never coils right, and plants that look like witness protection versions of their nursery tags. You dream of a cinematic entry—a soft crunch of gravel, layered greens, brushed light on stone, a door framed with something lush and alive. These 7 home garden design ideas for a front yard that looks professionally landscaped will fix the chaos with a clear plan, realistic steps, and results that photograph like a glossy magazine. Give me one weekend and a $1,500–$5,000 range (depending on the design), and you’ll love walking up to your door again. If you want something modern, cozy, coastal, cottage, or drought-smart, there’s a version here for you—sharp lines, calming textures, and mood-lifting light included. The vibe: calm, polished, Pinterest-worthy. Perfect if you love a tailored look that still feels personal, lived-in, and unbelievably welcoming.
1. Curated Gravel Entry With Layered Green Borders
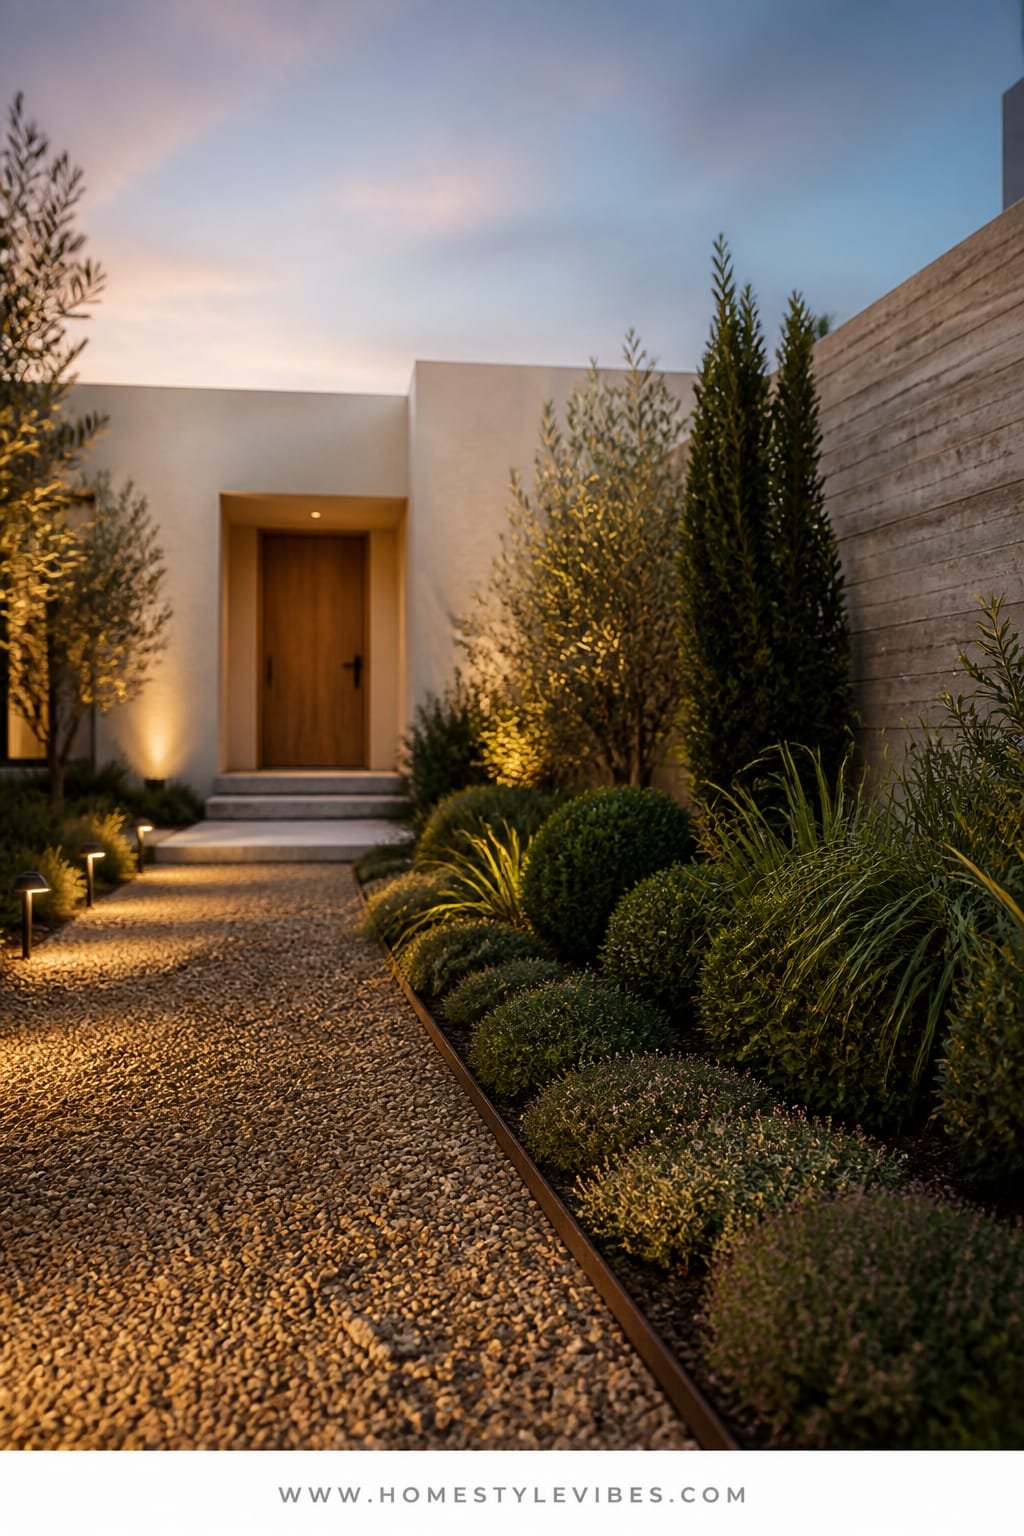
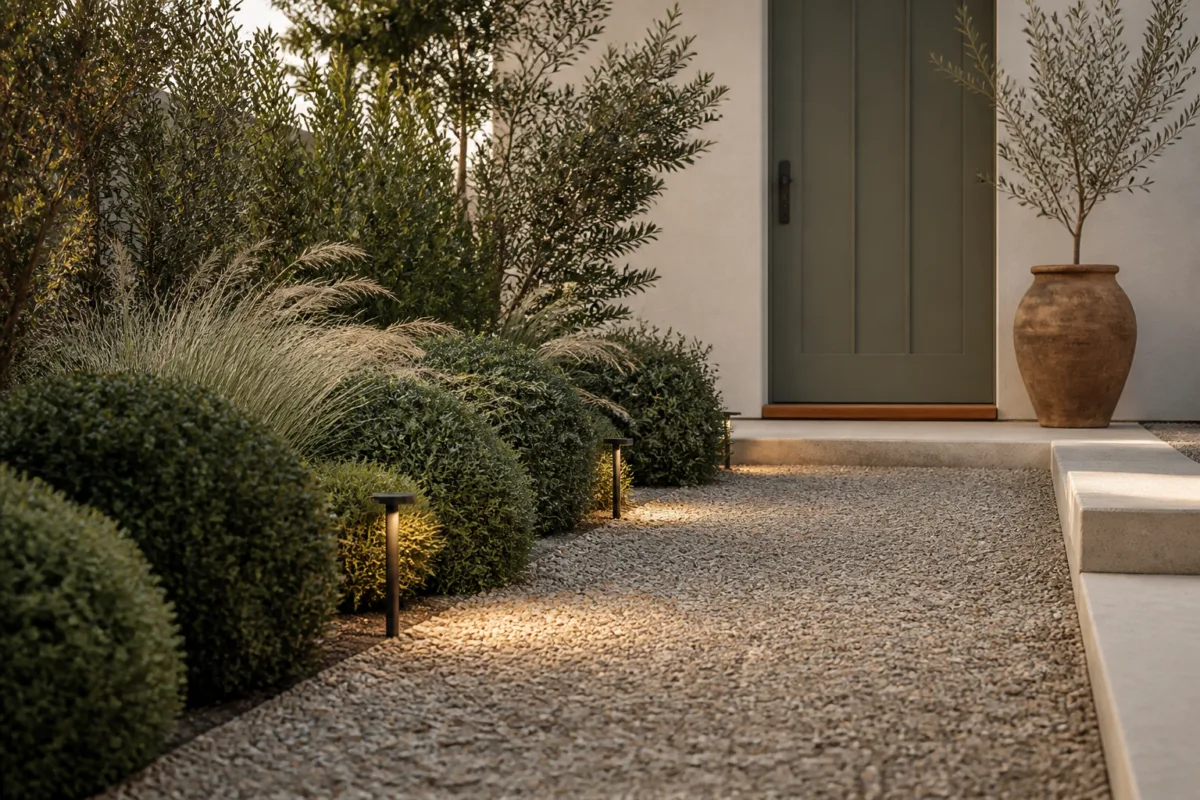
We’ve all been there: you crave that satisfying crunch underfoot and the clean lines of a designer path, but your entry feels like a muddy mystery every time it rains. This look creates a hotel-boutique mood—orderly, serene, with a hush of texture. It works beautifully in real homes because gravel is forgiving, affordable, and easy to shape. Lighting plays a starring role here: low, warm stake lights skim across the stones at dusk, creating long, cinematic shadows. Materials lean minimal and tactile—pea gravel, steel or aluminum edging, evergreen shrubs, and matte-black path lighting. It photographs beautifully thanks to contrast (light gravel vs. deep green plants), repeating shapes, and that subtle sparkle gravel gets in evening light.
Variations make this doable anywhere. Budget-friendly: use decomposed granite instead of gravel and plant dwarf mondo grass for edging. Small-space version: a single, narrow gravel ribbon with one hero planter at the door. Darker mood: charcoal gravel with glossy holly and dark-stained wood edging. Renter-friendly swap: lay heavy-duty landscape fabric, top with gravel, and use portable planters to “fake” borders without digging.
Budget Breakdown:
- Pea gravel or decomposed granite: $150–$600 (quantity depends on path length)
- Metal or composite edging: $100–$300
- Landscape fabric + pins: $60–$120
- Path lights (4–8 fixtures): $120–$450
- Evergreen shrubs (boxwood, pittosporum, dwarf yaupon): $12–$40 each
- Mulch for borders: $50–$150
Total Estimated Cost: $600 – $2,000
Best For: Narrow walkways or undefined entries that need structure; ranch, modern farmhouse, or mid-century homes that benefit from crisp lines and low maintenance.
Key Design Elements:
- Main materials: pea gravel, decomposed granite, steel edging, evergreen shrubs
- Color palette: soft gray, deep green, black accents, natural wood or stone
- Lighting strategy: low, warm, downward lighting to graze textures
- Furniture silhouettes: none required; consider a minimal bench near the door
- Texture layers: fine gravel, clipped foliage, matte metal, bark mulch
- Accent details: oversized terracotta pot, black house numbers, simple doormat
How To Recreate This Look:
- Start with the path shape: keep it straight for modern homes, gently curved for traditional facades.
- Add edging and stake it in firmly; this keeps gravel crisp and contained.
- Layer landscape fabric, then 2–3 inches of gravel or decomposed granite; compact lightly.
- Install low path lights along the inner edge so the beam skims the stones, not your eyes.
- Style with evergreen borders and one oversized planter at the entry for scale and focus.
Why This Looks Expensive: The uniform gravel and tidy edging mimic custom stonework lines, while repetitive evergreens signal a designer’s restraint. The warm light wash reads “boutique hotel,” not “backyard project.”
Watch Out: Don’t skip the edging or you’ll end up with gravel bleeding into your lawn. Also, keep the gravel 1–2 inches below any threshold so rainwater drains away from the house.
Pro Styling Tip: For photos, water the gravel lightly before sunset; it deepens color, reduces dust, and boosts contrast with foliage.
Keep scrolling—next up is the front-yard equivalent of a crisp, linen button-down: easy, timeless, and insanely photogenic.
2. Symmetry-Forward Classic Entry With Tall Planters and Soft Hedges
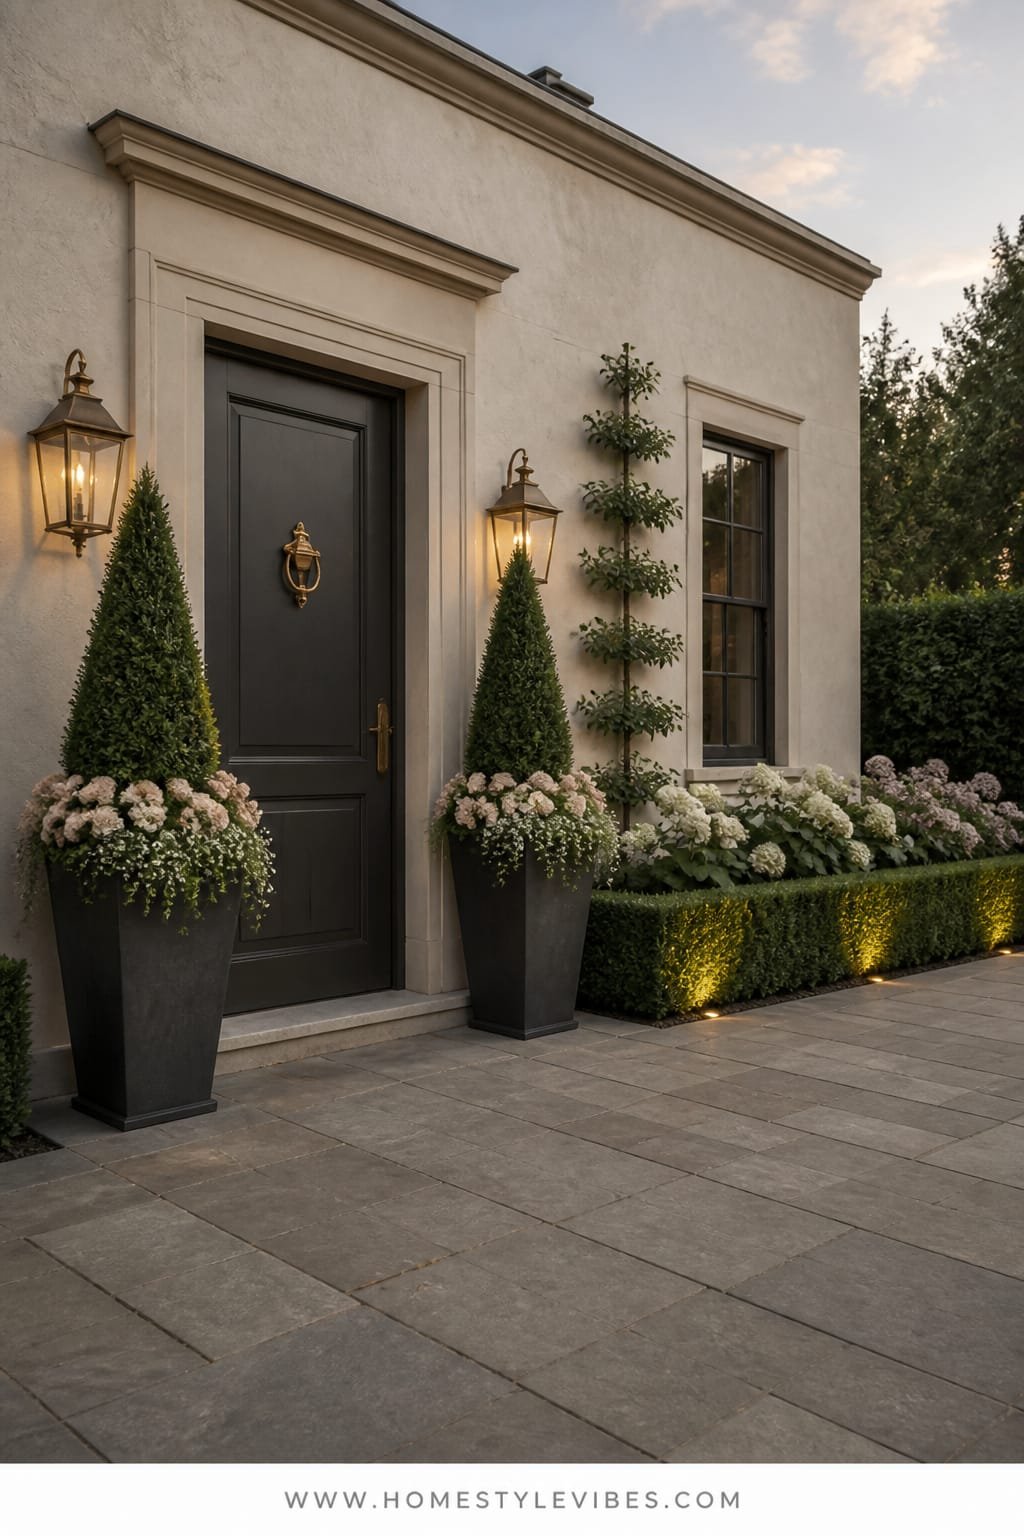
It’s that one corner that always feels off—the front door looks tiny, the porch feels bare, and your attempts with mismatched pots read more “yard sale” than “grand arrival.” This design creates a tailored, East Coast mood: think clipped hedges, tall planters that frame the door, and a soft monochrome palette punctuated by flowers. It works for real homes because symmetry instantly organizes visual clutter, and the planting palette is forgiving. Lighting feels formal but warm: uplights on hedges, a polished lantern by the door, and a hint of glow under steps if you have them. Materials include painted wood, boxwood (or low-care alternatives), smooth concrete, and brushed brass or black hardware. Photos love this look because of its strict geometry softened by rounded foliage—your eye knows where to land.
Customize it easily. Budget-friendly: use resin planters painted matte black instead of stone. Small porch version: one tall planter dead center with a pair of dwarf hydrangeas flanking the steps. Darker twist: use deep charcoal paint on the door and add burgundy heuchera underplanting. Renter-friendly: all in containers—line up three low planters per side and treat them like a hedge.
Key Design Elements:
- Main materials: resin or stone planters, clipped hedges, concrete or brick, polished door hardware
- Color palette: black, white, green, brass accents; blooms in white or soft pinks
- Lighting strategy: wall lantern at the door, low-voltage hedge uplights
- Furniture silhouettes: minimal bench or stool, clean lines
- Texture layers: glossy leaves, matte planters, fine gravel or mulch
- Accent details: classic doormat, symmetrical house numbers, seasonal wreath
Budget Breakdown:
- Tall planters (pair): $120–$600
- Hedge plants (6–12): $80–$480
- Lantern sconce: $120–$350
- Uplights (4–6): $150–$450
- Mulch or gravel: $60–$150
- Door hardware upgrade: $80–$250
Total Estimated Cost: $610 – $2,280
Best For: Traditional or colonial facades, homes with a visible front door and small porch, people who want tidy, low-drama upkeep.
How To Recreate This Look:
- Start by painting or polishing the front door and hardware; crisp hardware sells the look.
- Add matching tall planters on each side of the door; choose evergreen topiaries or bamboo for height.
- Plant a low hedge line along the walkway or base of the porch; keep spacing precise for a carpeted effect.
- Install a statement lantern and place two to four uplights to “wash” the hedge.
- Style with a classic coir mat and a restrained wreath in one material (olive branches, eucalyptus).
Why This Feels Designer: Designers lean on symmetry when budgets are tight because it hides imperfections and emphasizes architecture. Two strong verticals at the door create scale instantly.
One Thing To Avoid: Don’t mix too many flower colors; it breaks the elegance. Keep blooms to one or two soft tones for continuity across seasons.
Pro Styling Tip: For photos, angle the camera slightly to capture both planters and the hedge line; the repeated verticals and horizontals tell a clean, satisfying story.
Breathe. You don’t need a landscape crew—you need a clear plan and the right materials. Next, let’s pull in warmth and sculptural interest with stone and native grasses.
3. Modern Meadow: Gravel Pads, Native Grasses, and Sculptural Stone
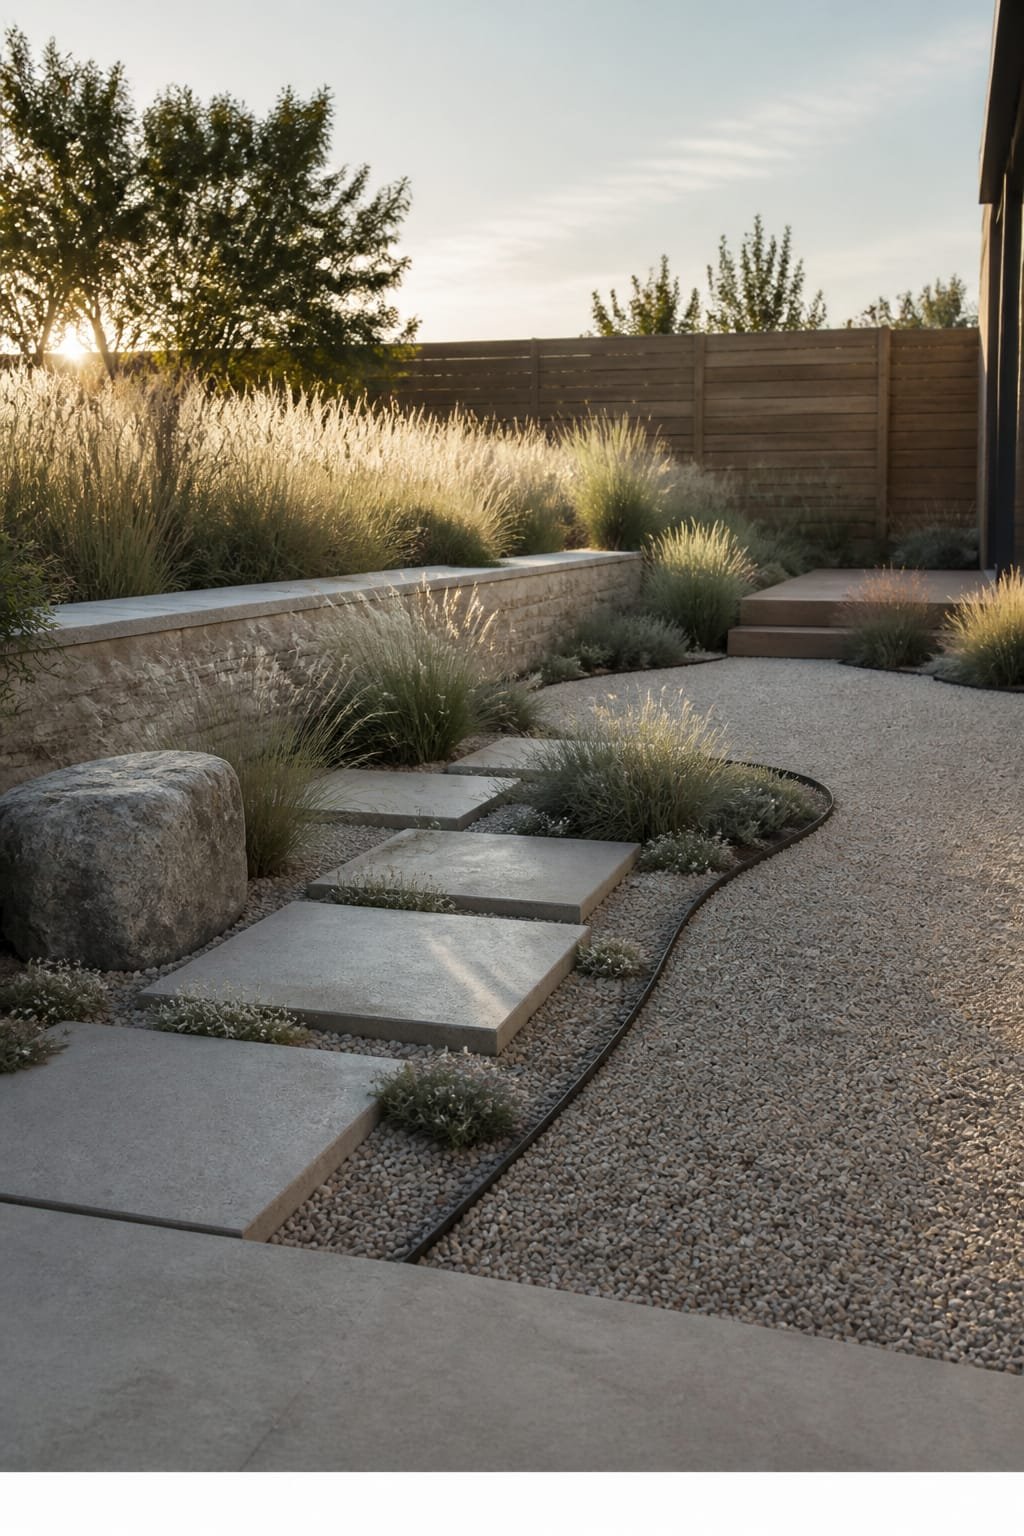
You’ve tried planting “whatever looks pretty,” but everything dries out by August and you’re left with crunchy stems and disappointment. This modern meadow concept feels coastal-desert chic: floating stone pads, swaying grasses, and matte black accents. It works in real life because it’s drought-smart, low maintenance, and friendly to pollinators. Lighting is subtle and architectural—tiny spike lights tucked among grasses so they glow like champagne bubbles at night. Materials sing: limestone or large pavers, crushed gravel, corten or black steel accents, and native grasses like feather reed, blue fescue, or little bluestem. It photographs beautifully because of movement—grasses catch light and create depth and softness against hardscape.
Variations keep it flexible. Budget-friendly: use concrete step stones spaced in gravel. Small-space: one floating path with a single boulder and three grass species repeated. Darker mood: charcoal gravel, basalt boulders, and deep green grasses. Renter-friendly: large trough planters filled with grasses and a shallow gravel “mat” on landscape fabric to suggest permanence without digging.
Budget Breakdown:
- Large pavers or step stones (6–12): $200–$900
- Crushed gravel: $150–$400
- Native grasses (12–30): $120–$600
- Accent boulders (1–2): $180–$500
- Path/plant uplights (4–6): $150–$450
Total Estimated Cost: $800 – $2,850
Best For: Sunny, water-limited areas; modern or mid-century facades; homeowners who want maximum vibe with minimal watering.
Key Design Elements:
- Main materials: limestone or concrete pavers, crushed gravel, corten edging, native grasses
- Color palette: sand, charcoal, olive, soft blue-grays
- Lighting strategy: micro-uplights among grasses, soft backlighting on boulders
- Furniture silhouettes: optional low bench in black or teak
- Texture layers: rough stone, fine gravel, feathery plumes, rusted metal
- Accent details: house numbers in sans serif, matte mailbox, wide-format doormat
How To Recreate This Look:
- Start with a simple path layout: 18–24 inch spacing between large pavers gives that “floating” feel.
- Add gravel around and between pavers; use a tamper for a firm surface.
- Layer grass species in odd numbers; group 3–5 of each for a natural drift effect.
- Install a single boulder near a turn in the path to act as a visual anchor.
- Style with tiny spike lights hidden in the grass clumps for an evening glow.
Why This Reads High-End: The restrained palette and repetition of simple forms feel curated. Designers love species repetition—it calms the eye and telegraphs intention, not impulse buys.
The Most Common Mistake: Mixing too many plant types. Stick to 3–5 species and repeat them; it’s the difference between poetry and noise.
Pro Styling Tip: Photograph at golden hour when seed heads catch backlight; you’ll get depth, shimmer, and that salty, coastal mood even if you’re nowhere near the ocean.
If one idea resonates more than the others, that’s your starting point. You don’t need all seven—one strong move done well will change your entire front entry story.
4. Courtyard Feel: Low Wall, Bench Nook, and Scented Planting
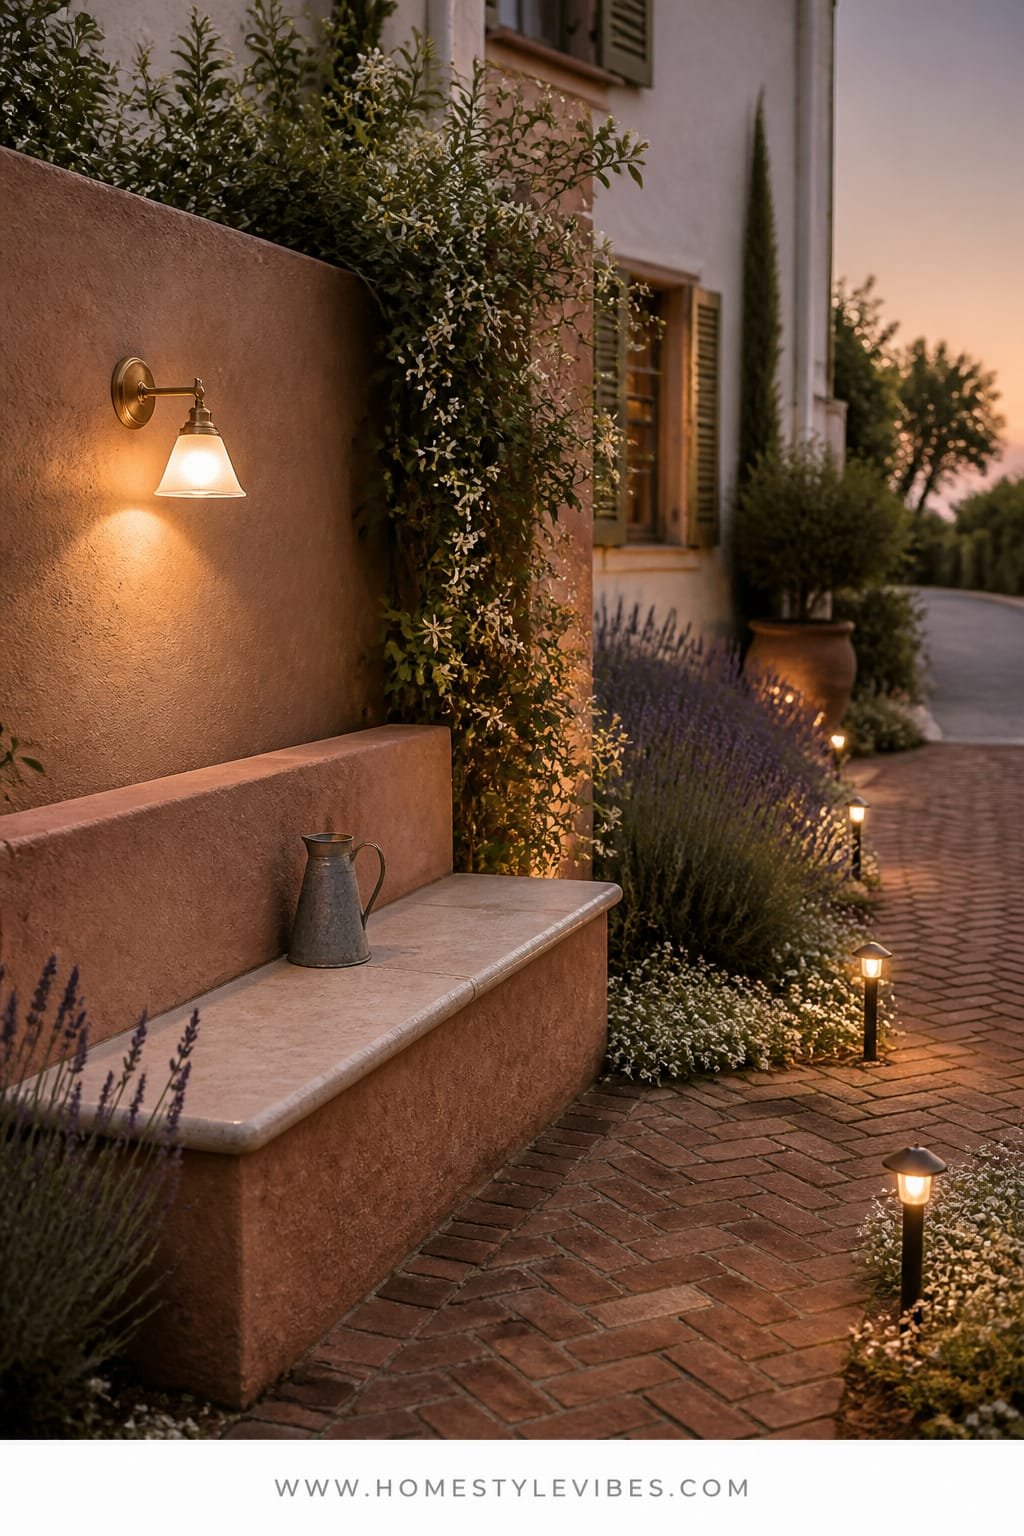
You want a place to actually sit out front, but your yard currently says “transit lane” instead of “linger here.” This concept creates a mini-courtyard: a low stucco or masonry wall, a built-in or freestanding bench, and fragrance-forward plants like lavender, star jasmine, or sweet alyssum. It cultivates a European-street-cafe mood—soft, intimate, and social. It works beautifully because it proves that front yards can be usable rooms. Lighting matters: a warm sconce at the wall, a soft solar lantern on the bench, and maybe string lights for gatherings. Materials include limewashed plaster, tumbled pavers, warm wood, and terracotta. Photos love this because layered heights and a defined edge create depth; the wall frames the scene like a pro photographer.
Go custom or keep it simple. Budget-friendly: use prefab concrete blocks skim-coated with masonry paint to fake a stucco wall. Small-space: half-wall only (8–10 feet) with a narrow bench and one tree-form shrub like a crape myrtle. Darker mood: charcoal-painted wall with white jasmine spilling. Renter-friendly: skip the wall—line up three large planters as a “living wall” and add a portable bench.
Budget Breakdown:
- Low wall materials: $300–$1,200 (masonry or block + finish)
- Bench (built-in or teak): $180–$700
- Plants (fragrant mix + one small tree): $150–$500
- Hardscape pavers or pea gravel: $200–$600
- Lighting (sconce + string or solar): $100–$300
Total Estimated Cost: $930 – $3,300
Best For: Homes with a bit of setback from the street, social blocks, anyone who waves to neighbors and wants a “front porch” feel without having a porch.
Key Design Elements:
- Main materials: stucco or masonry, warm wood, terracotta, tumbled stone
- Color palette: warm white, olive, lavender, terracotta orange
- Lighting strategy: wall sconce, ambient lanterns, optional strings
- Furniture silhouettes: bench with gentle curves or simple slats
- Texture layers: limewash, rough pavers, soft leaves, airy blooms
- Accent details: outdoor pillows in washed linen, a vintage-style doorbell or knocker
Why This Looks Intentional: Defining an outdoor room at the front suggests confidence. The low wall sets boundaries and frames the planting, which instantly reads like custom landscape architecture.
How To Recreate This Look:
- Start by choosing the wall line—parallel to the sidewalk or angled to create a pocket.
- Add a simple bench; flank it with two large planters for a “room end.”
- Layer scented plants nearest the bench so the aroma greets you as you sit.
- Install a sconce or add lanterns for gentle evening light.
- Style with a cushion or two and a small side table for coffee or wine.
Don’t Do This: Avoid overstuffing the space with tiny pots. Keep planters large and few; clutter undermines the courtyard serenity.
Pro Styling Tip: For photos, place a linen throw on the bench and a single citrus in a bowl; the quiet props hint at life without stealing focus from the architecture.
Ready for something sculptural and bold? The next idea is a masterclass in geometry and shadow play.
5. Sculpted Steps and Tiered Beds With Shadow-Lined Lighting
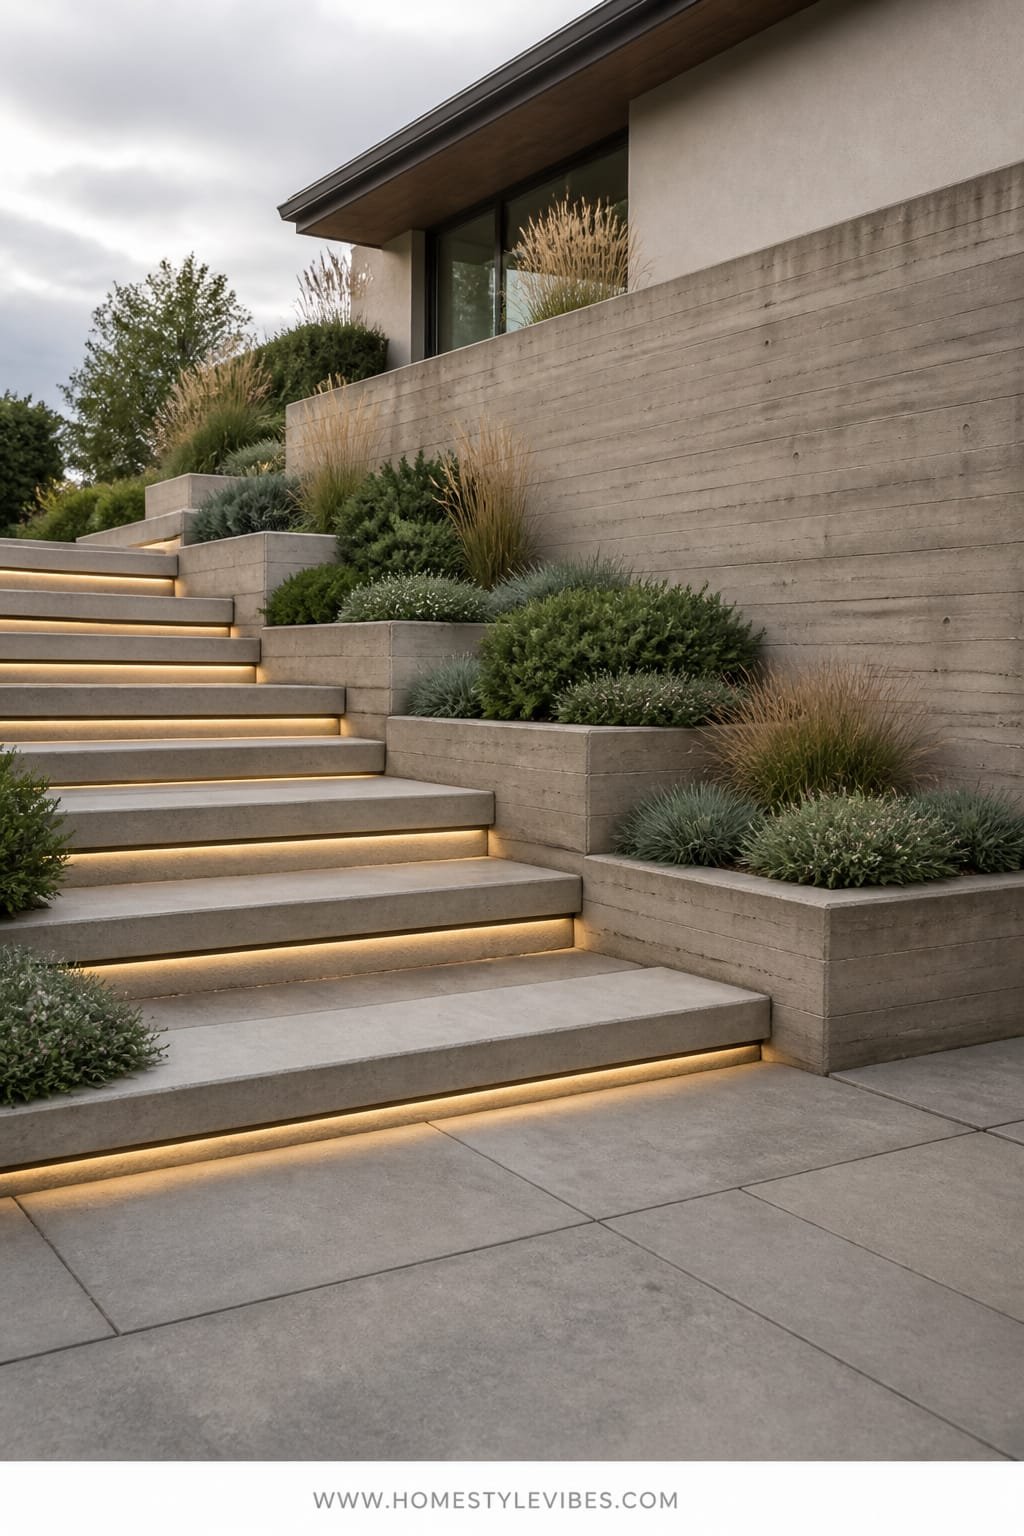
You’ve got a sloped front yard that eats budgets for breakfast, and nothing you plant survives the runoff. Tiering is your friend. This design creates a modern, sculpted mood using terracing: broad steps, retaining planters, and integrated step lighting that casts precise shadow lines. It works because water management meets visual order. Lighting becomes architectural—step-edge LEDs or discreet wall lights that make every riser glow. Materials go sleek: poured concrete or large-format pavers, corten steel or stone for risers, and textural planting like rosemary, lomandra, and dwarf olive. Photos adore this look; the rhythmic rise of steps and narrow light lines create a dramatic “processional” effect.
Customization is easy. Budget-friendly: use timber sleepers and gravel steps. Small-space: two tiers only, with one wide step and a single planter-tier. Darker mood: basalt steps, blackened steel planters, and moody greens. Renter workaround: create visual tiers with stacked planters on a gentle slope—no digging, just grouping.
Budget Breakdown:
- Steps and risers (materials + labor if needed): $800–$4,000
- Step or wall lights (4–8): $200–$600
- Plants for tiered beds: $150–$500
- Gravel or mulch: $100–$250
- Edging or border steel: $120–$350
Total Estimated Cost: $1,370 – $5,700
Best For: Sloped sites, contemporary facades, homeowners who want that gallery-walk entrance that looks incredible at night.
Key Design Elements:
- Main materials: concrete or stone treads, corten or timber risers, structured shrubs
- Color palette: concrete gray, rust, deep olive, charcoal
- Lighting strategy: integrated step or wall lights for clean shadow lines
- Furniture silhouettes: none needed; optional slim console near door
- Texture layers: smooth treads, rough risers, fine-leaf shrubs
- Accent details: linear house numbers, sleek mailbox, minimal door mat
Why This Looks Expensive: Precision. Even spacing, consistent riser heights, and integrated lighting tell you a pro planned it. The geometry steals the show before the plants even grow in.
How To Recreate This Look:
- Start by mapping riser heights; keep them consistent and comfortable for walking (usually 6–7 inches).
- Add wide treads (12–16 inches) for a generous feel.
- Layer tiered beds on either side; plant in rows or blocks for structure.
- Install lighting on every second riser to avoid airport-runway vibes.
- Style with a single large planter at the top landing to signal arrival.
One Thing To Avoid: Don’t mix too many edging materials. Pick one for risers and stick with it; variety here reads chaotic.
Pro Styling Tip: Shoot from the base of the steps at twilight; you’ll get that cinematic gradient up the risers and deep, satisfying shadow play.
Pause for a second: this isn’t about recreating a showroom. It’s about building a front yard that actually works for how you come and go, with plants and materials that suit your climate and your patience level.
6. Cottage Layering With a Clean Twist: Soft Blooms, Arched Arbor, and Tidy Edges
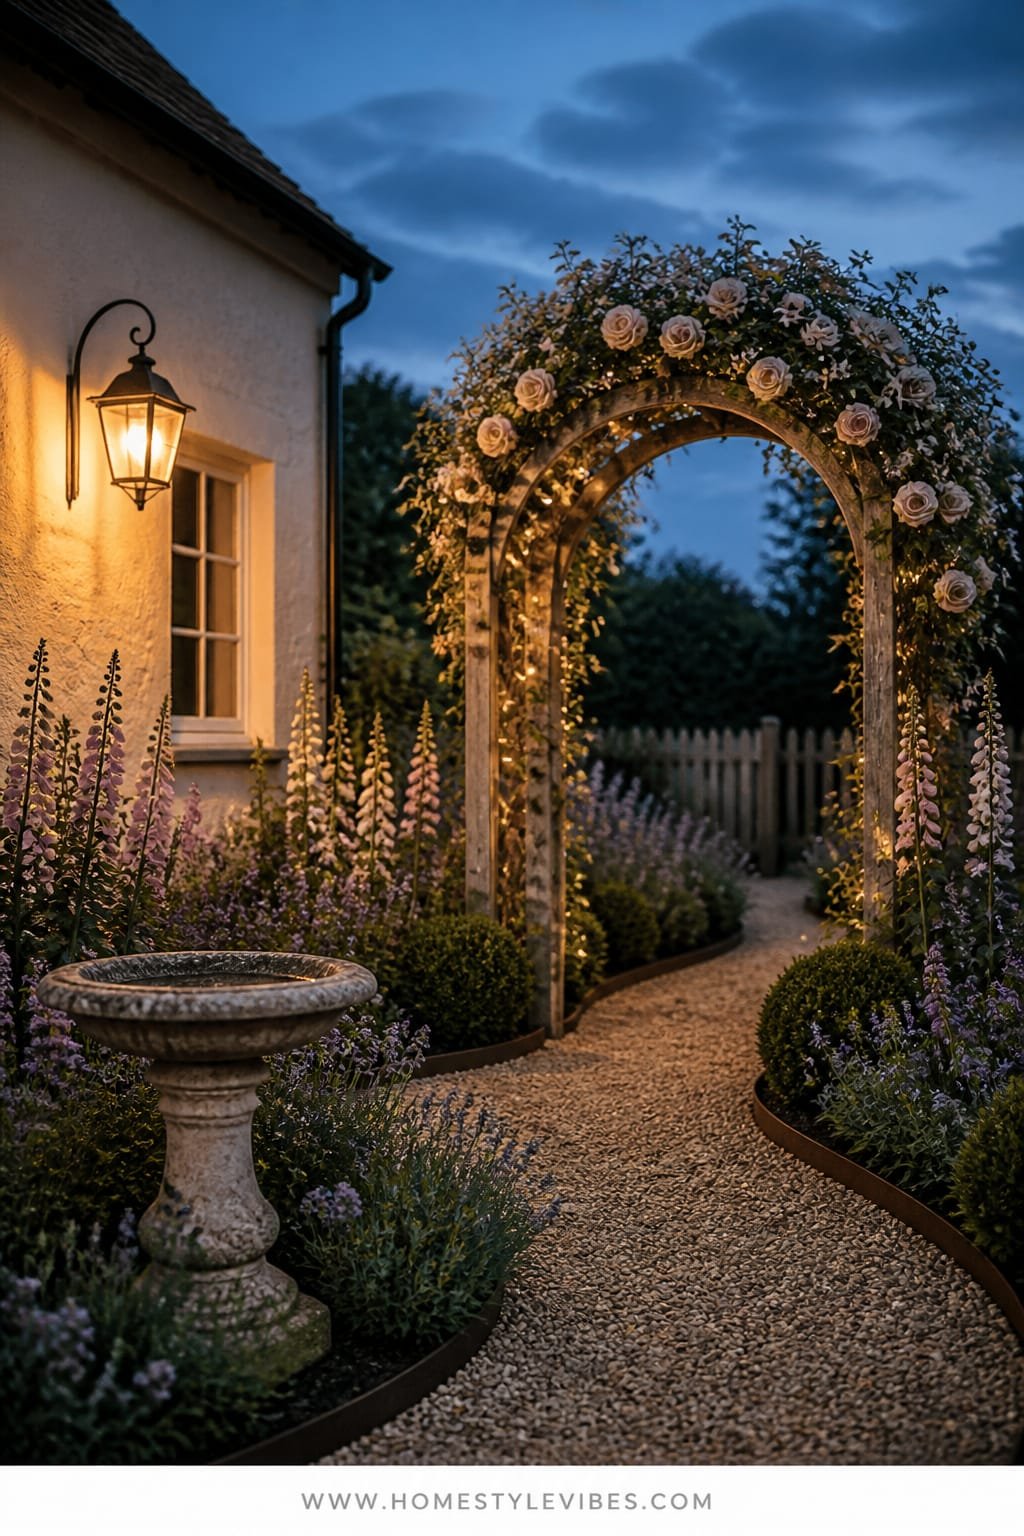
You love cottage gardens but hate when they look messy by July—flops, mildew, and a tangle of hose spaghetti. This version keeps the romance and removes the chaos by pairing soft blooms with ruthless edge control. The mood is “storybook with discipline”: an arched arbor, climbing roses or jasmine, repeating perennials, and neat steel edging to keep beds crisp. It works because structure holds the softness in check. Lighting is delicate: tiny fairy lights in the arbor for evenings, plus a warm, vintage-style sconce. Materials include painted wood or powder-coated metal, crushed oyster shell or fine gravel paths, and terracotta tucked in clusters. It photographs beautifully thanks to the contrast between airy flowers and clean bed lines; the arbor frames your entry like a portal.
Tailor it to your space. Budget-friendly: metal arbor kits painted matte and a smaller variety of perennials. Small-space: half-arbor against the wall and a single narrow border with repeating lavender. Darker mood: deep plum and white blooms with a black-painted arbor. Renter-friendly: pots-only cottage—mix terracotta planters in different sizes with an arbor that anchors in planters.
Budget Breakdown:
- Arbor: $120–$500
- Climbers (2): $40–$120
- Perennials (12–24): $120–$480
- Edging (steel or composite): $100–$250
- Path material (oyster shell or gravel): $120–$400
- Lighting (sconce + micro string): $80–$220
Total Estimated Cost: $580 – $1,970
Best For: Traditional bungalows, cottages, or any home where you want softer curb appeal without lawn maintenance nightmares.
Key Design Elements:
- Main materials: painted arbor, steel edging, terracotta, gravel path
- Color palette: soft whites, blush, sage, muted blues
- Lighting strategy: gentle string or fairy lights on the arbor, warm porch sconce
- Furniture silhouettes: vintage-style bench or bistro chair at the porch
- Texture layers: frothy blooms, matte metal, warm clay, crushed shell
- Accent details: copper watering can, aged terracotta saucers, classic coir mat
How To Recreate This Look:
- Start by placing the arbor slightly forward of the door line to create a threshold moment.
- Add steel edging to outline curving beds; this is what keeps the design feeling polished.
- Layer perennial drifts: 3–5 of each variety, repeat twice for rhythm.
- Install a fine gravel or shell path that gently crunches underfoot.
- Style with terracotta clusters—groups of three in varying heights near the entry.
Why This Feels Designer: Cottage romance with strict edges is the trick. The clean lines read editorial while the blooms keep it approachable and human.
Watch Out: Don’t choose only spring bloomers. Mix in summer and fall performers like salvia, catmint, and anemones for a longer “camera-ready” season.
Pro Styling Tip: Clip spent blooms the day before you photograph; fresh deadheading sharpens the look by 20%—seriously.
Almost there. Ready for a bold, low-water idea that still feels lush? The last one brings spa energy to your stoop.
7. Zen Front Yard: Raked Gravel, Evergreen Sculptures, and a Minimal Water Bowl
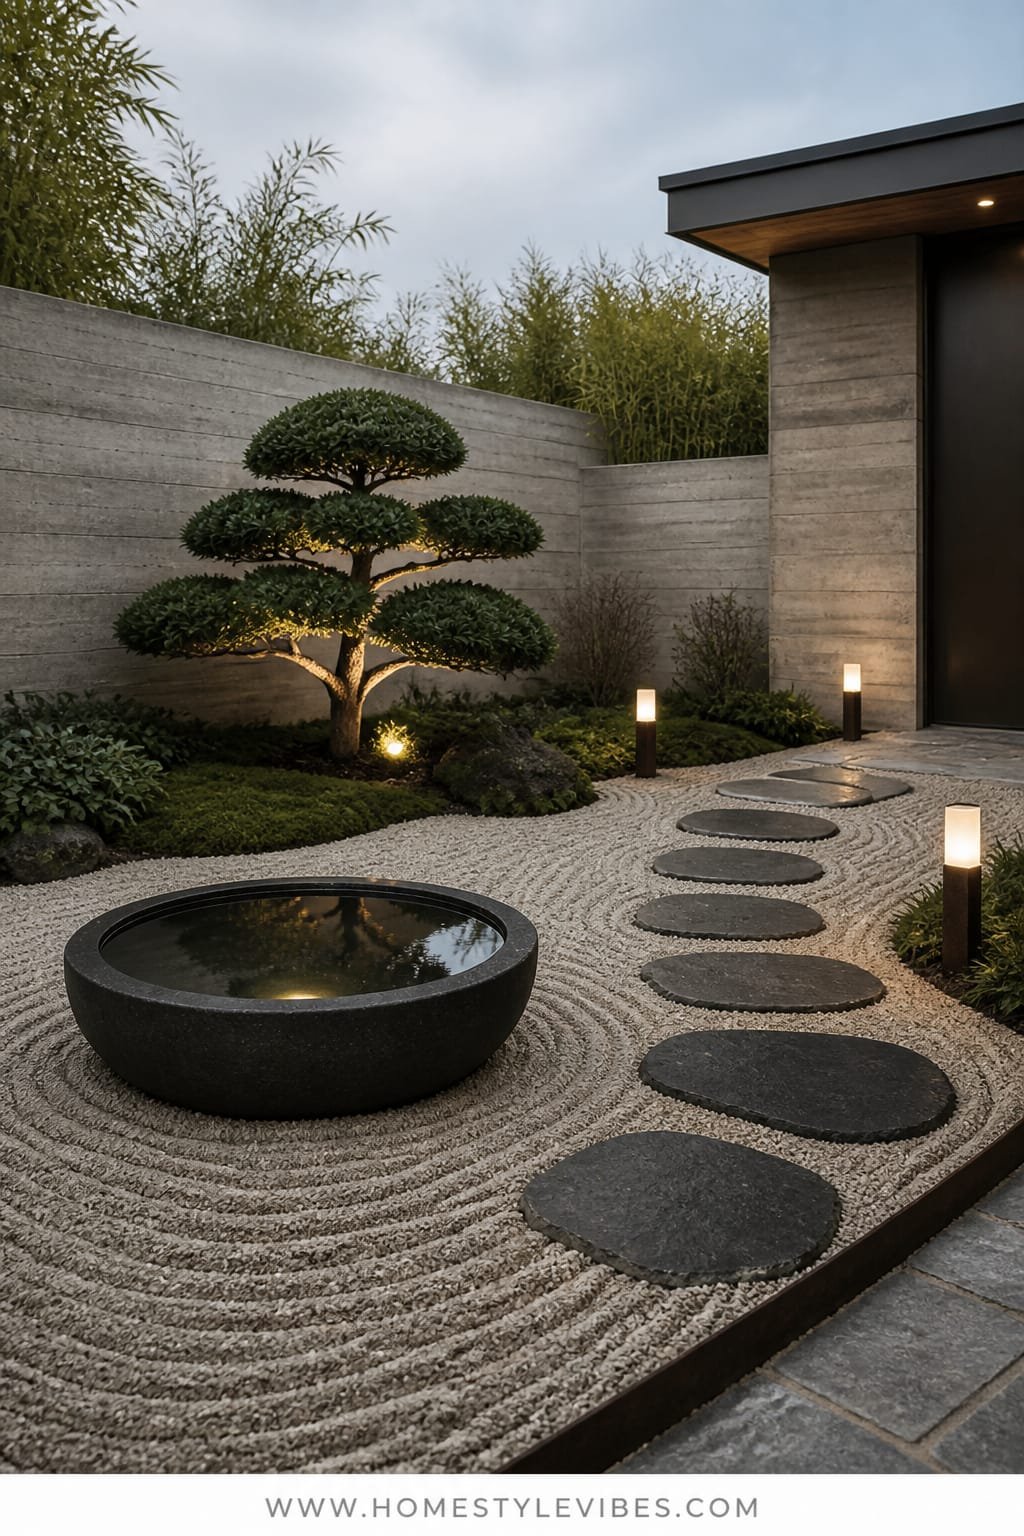
You want calm. Your weekdays feel fast, and you crave a front entry that slows your breathing before you even step inside. This Zen-inspired design creates a hotel-spa mood with a pared-back palette: raked gravel, evergreen structural plants, and a single water feature or reflective bowl. It works because it’s minimal on maintenance and huge on presence. Lighting is meditative: soft path lights with frosted lenses and a single spotlight on your statement plant. Materials are tactile and honest—river rock, fine gravel, natural stone, charred wood or cedar, and simple planters. It photographs like a dream thanks to negative space, crisp lines, and controlled repetition.
It’s endlessly adaptable. Budget-friendly: skip the water feature and use a reflective metal bowl or large glazed pot instead. Small-space: a 6×6-foot Zen vignette to one side of the entry. Darker mood: black gravel, basalt stones, and deep-green pines. Renter-friendly: use portable gravel mats or trays and a freestanding fountain you can take with you.
Budget Breakdown:
- Fine gravel + river rock: $150–$500
- Statement evergreen (Japanese maple, pine, or olive): $120–$450
- Water bowl or fountain: $180–$700
- Lighting (frosted path + one spotlight): $150–$400
- Simple bench or stone seat: $120–$400
Total Estimated Cost: $720 – $2,450
Best For: Minimalist or Japandi-leaning homes, busy families who want low-upkeep serenity, and anyone drawn to quiet texture over color.
Key Design Elements:
- Main materials: raked gravel, smooth river stones, cedar or charred wood, sculptural evergreens
- Color palette: charcoal, soft gray, deep green, warm wood
- Lighting strategy: diffused path lights, a focused beam on the hero plant
- Furniture silhouettes: simple backless bench or stone plinth
- Texture layers: fine gravel, polished stone, glossy leaves, matte wood
- Accent details: bamboo water spout (optional), low matte planters, subtle house numbers
How To Recreate This Look:
- Start by clearing visual clutter; store hoses, bins, and tools out of sight.
- Add a base field of gravel; use a rake to create calm, repeating patterns.
- Layer one statement evergreen off-center; underplant with river stones.
- Install a low water bowl or simple fountain where you can hear it from the door.
- Style with diffused lighting and a simple bench; resist the urge to add color pops.
Why This Reads High-End: Negative space. Leaving intentional emptiness signals confidence and restraint. One beautiful evergreen looks curated, not sparse.
The Most Common Mistake: Adding too many accents. Zen needs discipline; every extra trinket steals from the quiet.
Pro Styling Tip: For photos, rake fresh patterns, then lightly mist the stones—water deepens tone and crisps the contrast against foliage.
Quick mindset reset: pick the mood that matches your home’s architecture and your bandwidth. The most “professional” front yards aren’t the most complicated—they’re the most consistent.
Mini-anecdote time: A friend of mine spent weeks agonizing over plant lists before realizing the real problem was her lighting. We added four low path lights and one tree uplight, and suddenly her house looked like a boutique hotel. The truth is, your yard at 8 pm is what people remember—plan for that moment.
Quick Checklist
- Commit to one clear mood before buying plants
- Use edging to keep beds crisp and paths contained
- Repeat 3–5 plant species for a cohesive look
- Choose warm, low lighting that grazes textures
- Size planters generously to match door height
- Balance hardscape and softscape at a 50/50 ratio
- Anchor the entry with one hero element (planter, tree, or sculpture)
- Use negative space; don’t fill every inch
- Pick a tight color palette and stick to it
- Hide hoses and bins; visual clutter kills the vibe
Frequently Asked Questions
How much should I budget to make my front yard look professionally landscaped?
For a small to medium front yard, plan on $800–$3,000 for a focused refresh and $3,000–$7,000 for a full redesign with hardscape changes. Choose one strong design direction and phase it if needed—path + lighting first, then planting.
My front yard is tiny. Which of these 7 home garden design ideas works best?
Go for the Curated Gravel Entry or the Cottage Layering with a Clean Twist. Both rely on clean edges and repetition, which read polished even in tight footprints. Use fewer, larger elements rather than lots of small pots.
I rent. Can I still make a front yard look designer without permanent changes?
Yes. Use landscape fabric topped with gravel to create a removable path, go big on planters for hedging effects, and add portable solar or plug-in lighting. Arbors can anchor in weighted planters, and a freestanding water bowl adds presence without digging.
What’s the most common mistake people make with front yard design?
Too many plant varieties and not enough structure. Decide on your bones first—path lines, edges, and lighting—then choose 3–5 plant species and repeat them for consistency.
How do I maintain these looks without constant work?
Install drip irrigation for borders, use mulch to suppress weeds, and choose plants suited to your sun and climate. Schedule one monthly “tune-up” session: edge, deadhead, sweep gravel, and wipe fixtures. It’s 45 minutes that keeps everything camera-ready.
Conclusion
Pick one idea and start. A defined path with crisp edges, a pair of tall planters at your door, or a few well-placed lights can shift your front yard from “fine” to “finished” in a weekend. The secret isn’t spending more on plants—it’s choosing fewer, bigger moves and repeating them with confidence.
Remember, luxury outside comes from texture, lighting, and restraint: the crunch of gravel, the soft wash of warm LEDs, the negative space that lets a single olive tree become a sculpture. Choose your mood, map your lines, and keep your palette tight. Your home deserves that satisfying, slow exhale every time you walk up to it.
You’ve got this. Choose one of these 7 home garden design ideas for a front yard that looks professionally landscaped, grab your gloves, and make that first cut line. The moment you see those crisp edges and that first light flick on, you’ll know you’re on the right path—literally.
About the Author

Krisztina P.Rendes, Founder of Home Style Vibes
Founder of Home Style Vibes
Krisztina Puskásné Rendes created Home Style Vibes as a cozy-modern lifestyle space where homemaking meets inspiration. Her goal is to help women create beautiful, organized, and peaceful homes they truly love — without overwhelm. You’ll find here heart-driven content on home decor, cleaning tips, easy family recipes, organization and decluttering, DIY home projects, plants, and seasonal ideas — all designed to bring more calm, comfort, and style into everyday life.