5 Christmas Window Decor Ideas That Glow From Inside and Out
You want your home to look like a warm, classic Christmas postcard from the street and feel like true holiday comfort from your sofa. But your windows? They either look dark and forgotten, or over-cluttered and awkward from the inside. If you’ve ever pressed your nose to the glass and thought, “Why doesn’t this look right?” these five Christmas window decor ideas will fix that. We’re talking tartan, evergreen, brass, ivory candles, and soft, warm light that flatters your rooms and winks to the neighborhood—classic red and green with an elegant, candlelit mood that photographs beautifully and holds up through every December gathering.
Each idea is designed to glow from inside and out, solve specific frustrations (cord chaos, glare, and “floating” decorations), and feel finished with details that don’t cost a fortune or take a weekend to install. Expect window-friendly greenery, velvet ribbon, white ceramic houses, berry sprigs, and warm white lights that don’t fight your tree—plus practical notes like how to avoid adhesive hooks letting go on cold glass. If you’re after photogenic, pin-worthy windows that finally make your whole home feel cohesive, start here. These ideas love Thanksgiving weekend through New Year’s, and several pieces can shift into January as quiet winter decor.
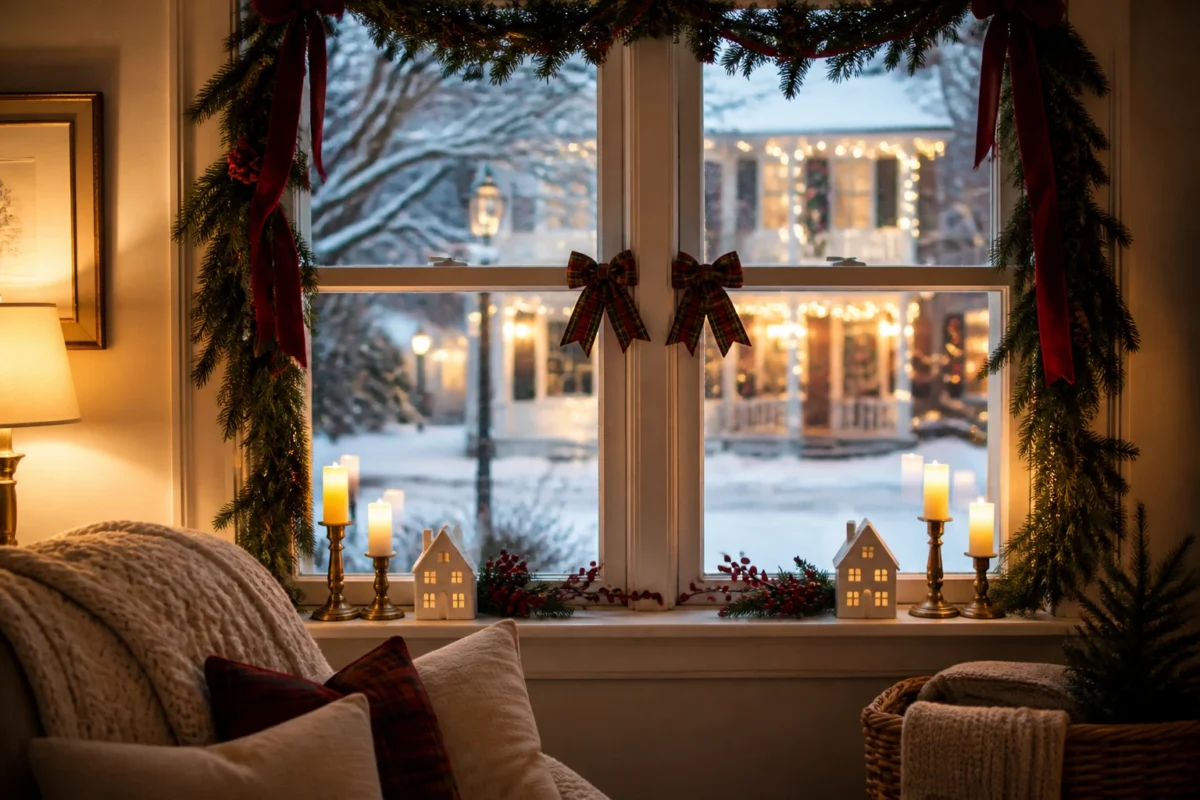
1. Tartan Sash Bows with Ivory Flameless Candles on a Double-Hung Living Room Window
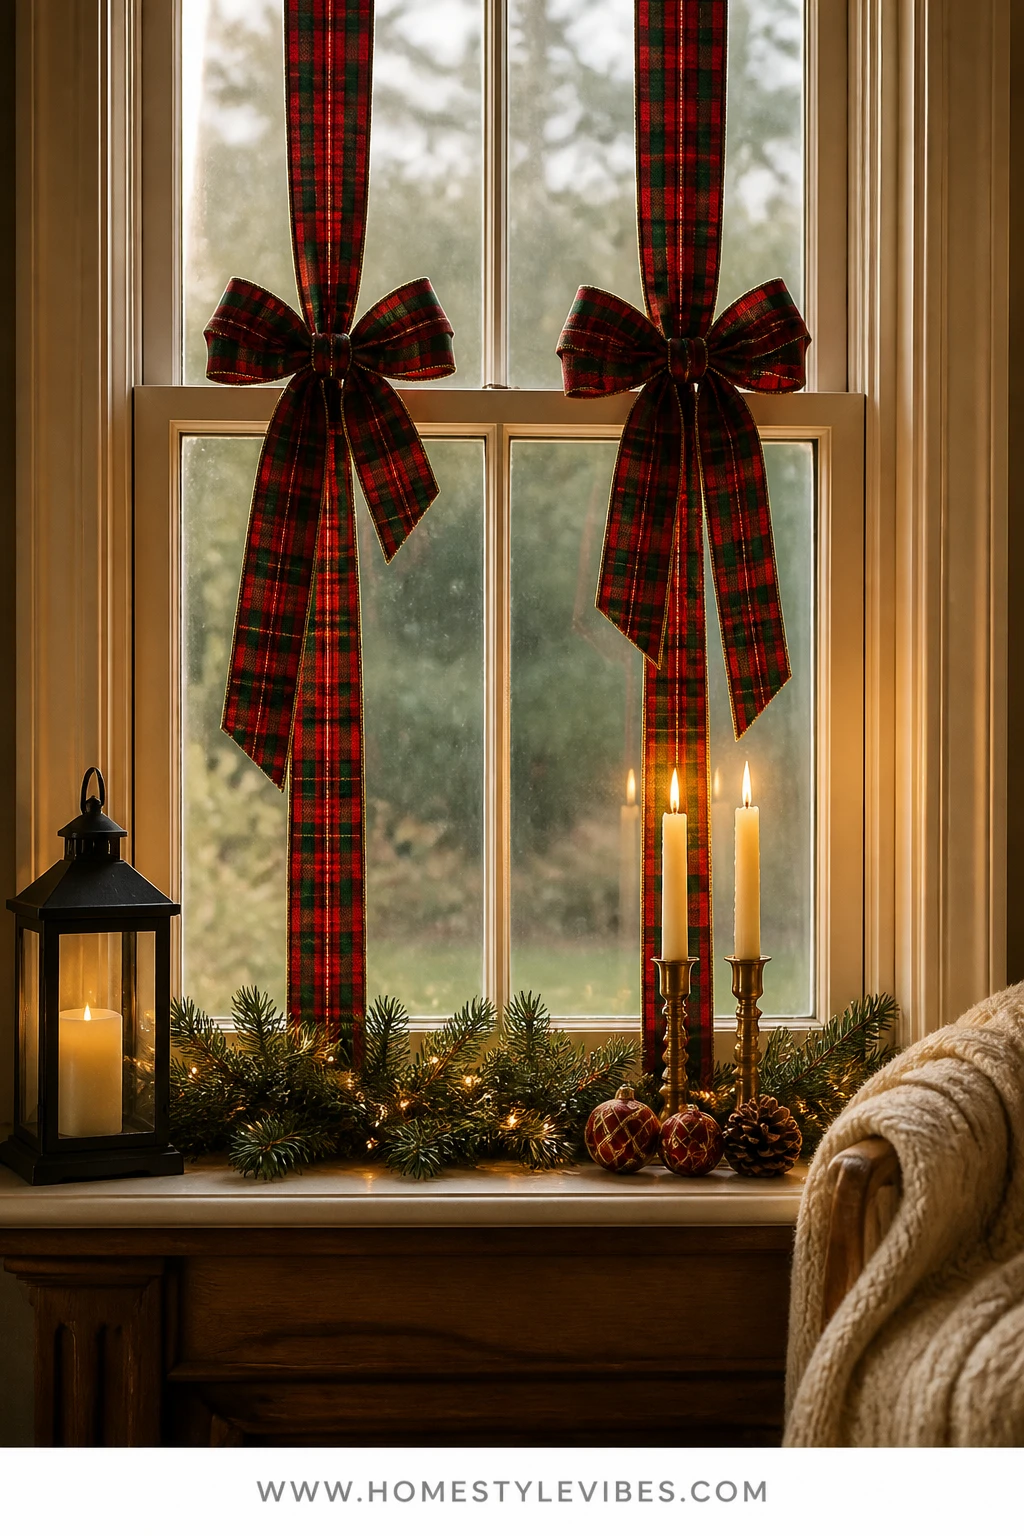
It’s that one window that never feels pulled together. You’ve tried random ornaments and a stray strand of lights, but it still reads scattered from the street and fussy up close. This look solves that with symmetry, texture, and the soft glow of flameless candles—pure classic Christmas, the Tartan Hearth mood done right.
Why it works: the tartan ribbon acts like a sash, drawing the eye vertically and visually framing the view, while ivory flameless tapers in black or brass holders provide a candlelit heartbeat across the sill. The palette—red and green tartan, evergreen, antique brass, and warm ivory—gives you that heritage feel without tipping into visual noise. It’s quick to set up, kid- and pet-friendly (no open flames), and everything stores flat. Lighting creates a warm white, flicker-like shimmer that reads beautifully through the glass at blue hour, and the candle reflections double the sparkle inside at night.
We’ve all seen windows that photograph flat. Here, ribbon streams create vertical depth, evergreen sprigs add soft edges, and the candle “line” anchors the whole composition so your photos capture twinkle bokeh without glare. Bonus: swap the tartan for a cream velvet ribbon on December 26 and keep the greenery and candles through January if you like a gentler winter look.
Variations:
- Small-space version: Use one bold tartan bow per window, centered, with two candles. Keep the greenery minimal—just one cedar sprig under each holder.
- Budget-friendly: Choose slim, battery-operated taper candles in simple black holders. Substitute satin ribbon in a tartan print for velvet if you need to cut costs.
Budget Breakdown:
- Tartan ribbon (2.5″ wired, 10 yards): $12–$25
- Flameless taper candles (set of 6): $20–$40
- Brass or black candleholders (thrift or new, 4–6 pieces): $24–$60
- Cedar or fir sprigs (fresh or faux): $8–$20
- Adhesive clear hooks for ribbon tails: $5–$10
Total Estimated Cost: $69 – $155
Best For: Traditional living rooms or family rooms where you want a polished, welcoming glow visible from the street. Perfect for households that love classic color and want a cohesive, fireplace-adjacent window moment from Thanksgiving through New Year’s.
Key Design Elements:
- Main holiday props: Tartan bows, ivory flameless tapers, evergreen sprigs
- Color palette: Red and green tartan, evergreen, antique brass, ivory
- Lighting strategy: Flameless tapers along the sill, warm white only
- Textile and ribbon layers: Wired tartan ribbon with generous tails
- Greenery and natural elements: Cedar or fir sprigs tucked under holders
- Accent details: Brass or matte black candlesticks, small brass bells tied to one bow
How To Recreate This Look:
- Measure your window height and cut two long lengths of tartan ribbon for each sash; secure at the top frame with clear adhesive hooks and let tails fall to the sill.
- Place 4–6 flameless taper candles in holders across the sill, evenly spaced.
- Tuck short cedar or fir sprigs under each candleholder base so greenery peeks out but doesn’t crowd the flame housing.
- Shape ribbon tails with your hands so they curve slightly inward and feel intentional from both sides of the glass.
- Tie one small brass bell at the knot of each sash for a subtle, traditional chime detail.
Why This Looks Expensive: Repetition and restraint. Matching candleholders in a simple finish, repeated at even intervals, and generous ribbon tails read like a bespoke installation. The tartan adds heritage without shouting.
Watch Out: Don’t place flameless candles right up against the coldest part of the glass. Some adhesives let go in chilly windows; warm the surface with a hair dryer on low before applying hooks, and test weight before committing.
Pro Styling Tip: For photos, dim overhead lights and let the tapers carry the scene; they’ll throw a warm line of glow that bounces in the glass and creates instant twinkle bokeh.
2. Cedar Garland Swag with Brass Bells and Warm White Micro-Lights on a Kitchen Sink Window
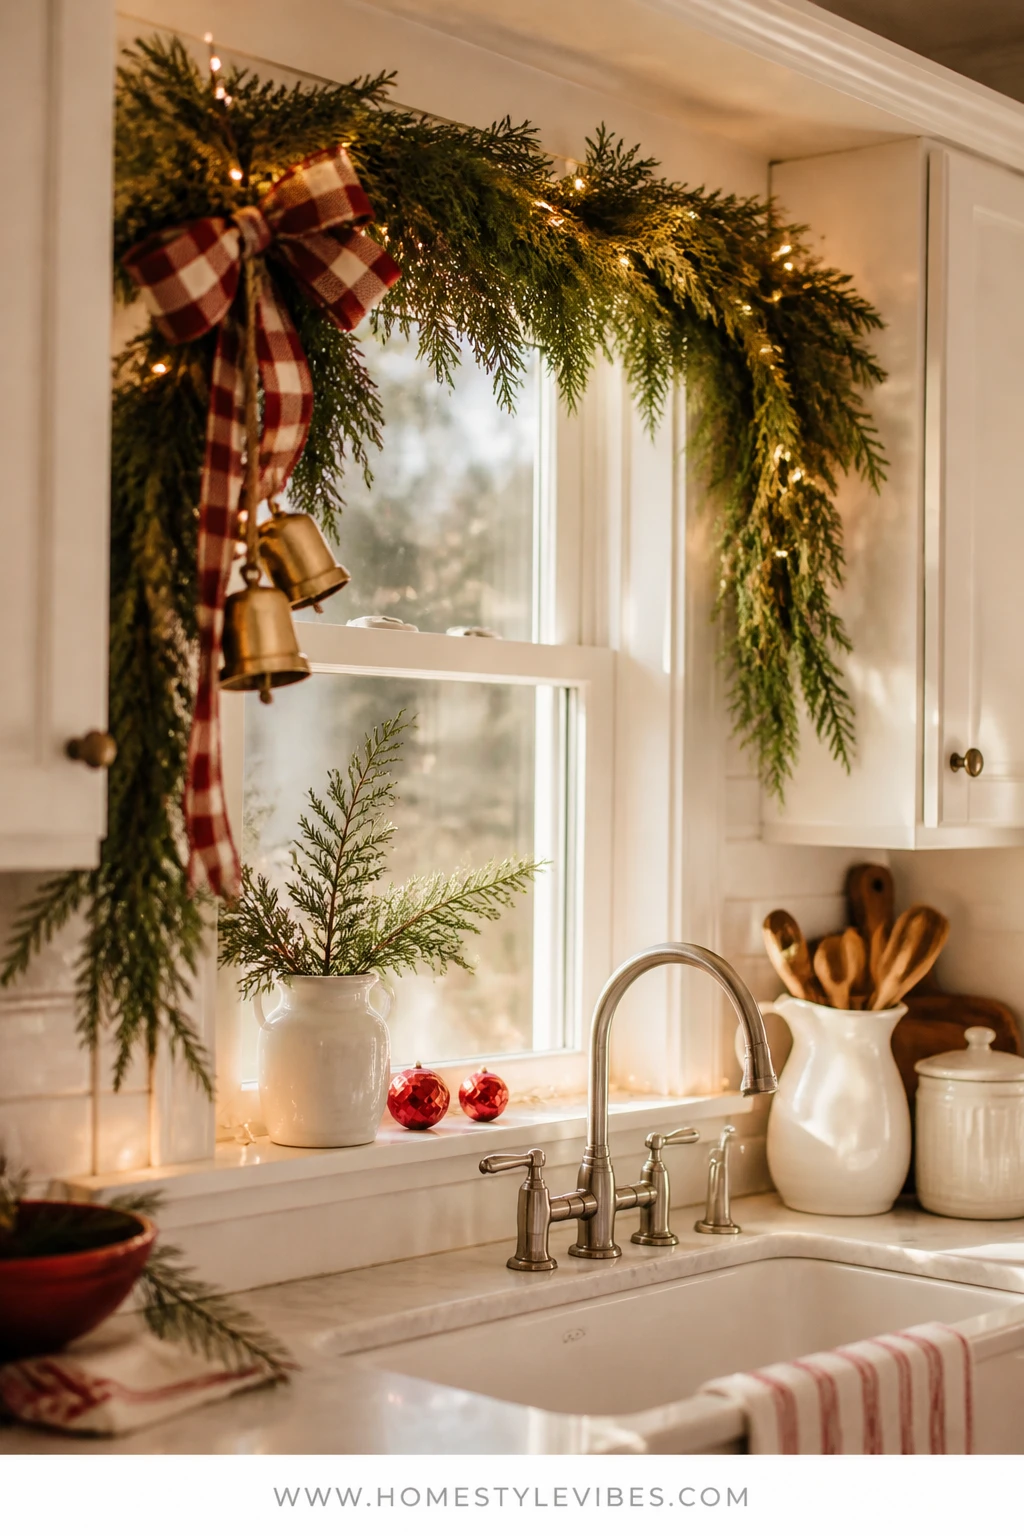
Kitchens swallow decorations. You hang a cute wreath and somehow it vanishes next to the faucet and dish rack. This cedar swag solves that by hugging the window’s top edge and trailing just enough to frame the view—soft greenery, warm lights, and one statement cluster of brass bells that chime faintly when you crack the window for fresh air.
The mood is candlelit classic without actual flames right by the sink. Warm white micro-lights tucked into fresh or faux cedar create a consistent, gentle glow that looks clean with tile and chrome. Brass bells add old-world warmth that plays nicely with brushed brass pulls if you have them. It’s a real home hero: it lives out of the way, stays safe from splashes, and takes ten minutes to hang once the hooks are set. If you pick faux cedar, it stores beautifully and goes up next year in a snap.
From the street, the garland outlines your kitchen window and the bell cluster anchors the center—no more “floating lights” effect. From inside, the garland softens edges and diffuses the gloom of early winter afternoons. I did this over my own sink last December and realized my nightly dishes suddenly felt like a little ritual. The glow kept me company, and the brass felt quietly festive even when the counters were, ahem, not.
Variations:
- Small window: Use a half-swag—cluster the bells on one side and trail cedar down the jamb like an asymmetrical scarf.
- Neutral-leaning: Swap the tartan tie for an ivory velvet bow on the bell cluster; same warmth, slightly softer read.
Budget Breakdown:
- Faux cedar garland (5–6 feet): $20–$45
- Warm white micro-lights (battery pack, 2 strands): $10–$18
- Brass bell cluster (3–5 bells): $12–$28
- Adhesive hooks or small nails for trim: $5–$10
- Velvet ribbon (red, green, or ivory): $6–$12
Total Estimated Cost: $53 – $113
Best For: Busy kitchens and sink windows where you want impact without counter clutter. Works beautifully from early December through New Year’s; remove bells after Christmas and keep the lit cedar through January for a wintery touch.
Key Design Elements:
- Main holiday props: Cedar garland, brass bells, micro-lights
- Color palette: Evergreen, antique brass, a hint of red/ivory ribbon
- Lighting strategy: Battery micro-lights woven into greenery, warm white only
- Textile and ribbon layers: Velvet bow securing bell cluster
- Greenery and natural elements: Cedar (faux lasts; fresh smells amazing)
- Accent details: Bell patina, maybe a small ceramic house on the sill if space allows
How To Recreate This Look:
- Install two small hooks at the upper corners of your window frame (wood, not drywall) to carry the garland weight.
- Drape the cedar garland in a soft U-shape, letting the center drop 6–10 inches.
- Weave micro-lights through the front of the garland so the bulbs face the room and the battery pack hides behind the trim.
- Tie a cluster of brass bells at the center with velvet ribbon, adjusting length so they rest just below the cedar curve.
- Fluff and stagger the cedar tips for a natural, layered look. Turn on lights and check from the street for balance.
Why This Feels Designer: The single focal point (bell cluster) and softly lit greenery feel edited and confident. You’re not decorating every inch—you’re choosing one statement and doing it well.
One Thing To Avoid: Don’t mix cool white lights with warm white in the same window. The clash reads chaotic and can make your tile look blue. Commit to warm white for kitchen coziness.
Pro Styling Tip: For night photos, place a small white dish or mug on the sill to catch the garland’s glow and give your camera a crisp highlight for depth.
Remember, this isn’t about recreating a showroom. It’s about making those lived-in corners feel finished and welcoming. If one idea clicks—start there and let the rest wait. One beautiful window beats five half-done ones every time.
3. Brass Lantern Trio with Red Velvet Ribbon in a Dining Room Bay Window
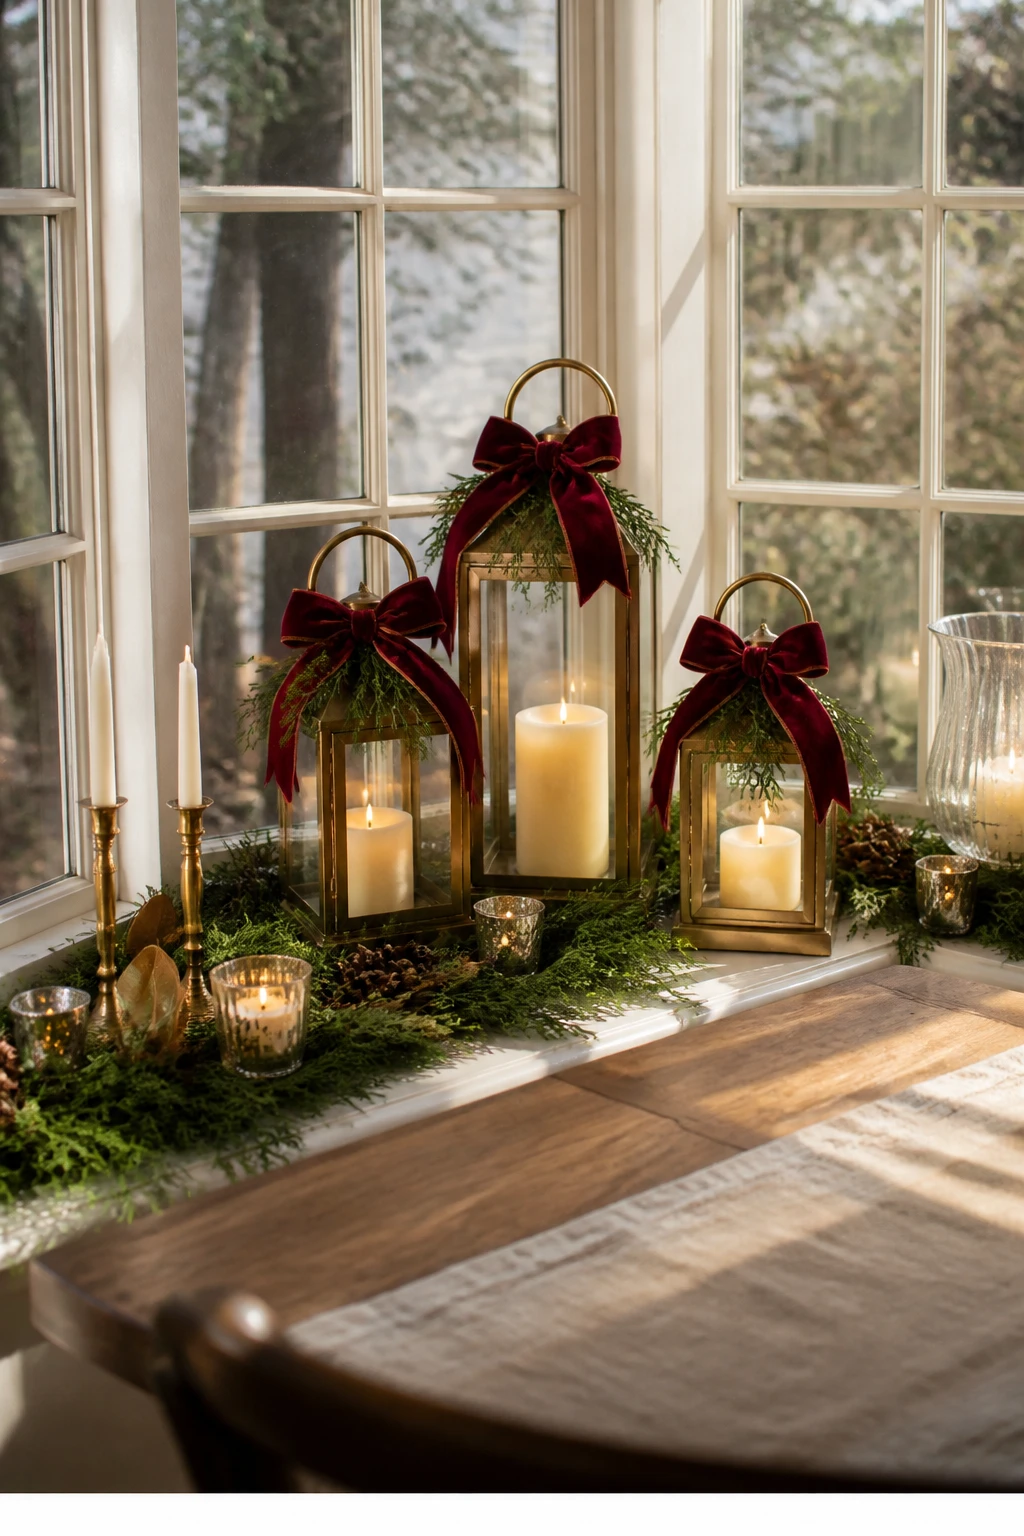
Bay windows can feel like a stage you never quite set. You try a random mix of decor and it either blocks the view or looks skimpy. A simple trio of brass lanterns—small, medium, and large—anchored with red velvet ribbon and evergreen sprigs brings instant, candlelit elegance without crowding your dinner table or fighting your chandelier.
This one leans into structure and proportion. The lanterns line up across the bay sill or the floor inside the window, staggered by size, each fitted with flameless pillar candles set to a timer. At dusk, the trio glows like a gentle chorus visible from your street while dining room guests get the quiet, ambient light that flatters faces and china patterns. Add a cedar ring at each base and a short length of red velvet around the handles, and you’ve got a classic palette that feels rich and old-world.
Real-home friendly? Absolutely. Lanterns are stable, safe, and easy to move for cleaning. They store inside each other in January. If you host Christmas Eve, this is the kind of glow that makes people linger over dessert. From the outside, those warm squares read as intentional architecture lighting—high end, not holiday-chaotic.
Variations:
- No bay window? Do the same trio along a wide dining window sill, keeping the tallest lantern toward the room’s center and the smallest toward the outside.
- Soft mode: Choose ivory velvet ribbon and remove the red on December 26. Keep the lanterns lit through winter for that calm, January candlelight vibe.
Budget Breakdown:
- Brass lanterns (set of 3 nesting): $80–$180
- Flameless pillar candles (3–4): $25–$45
- Cedar candle rings or loose clippings: $10–$20
- Red velvet ribbon (1″–2″): $6–$12
- Optional small brass bells: $6–$12
Total Estimated Cost: $127 – $269
Best For: Dining rooms with a bay or wide window where you want grown-up warmth and a hint of formality. Perfect from early December into February with ribbon swaps.
Key Design Elements:
- Main holiday props: Brass lanterns, flameless pillars, cedar rings
- Color palette: Brass, evergreen, ivory, accents of red velvet
- Lighting strategy: Timed flameless pillars for nightly glow
- Textile and ribbon layers: Short velvet ties on lantern handles
- Greenery and natural elements: Cedar or fir rings for soft edges
- Accent details: Small brass bells tied to one lantern for a subtle sparkle
How To Recreate This Look:
- Place the largest lantern on the center sill or floor of the bay, medium to the left, smallest to the right, leaving 6–10 inches between.
- Insert flameless pillars, testing the timer function so they come on at dusk automatically.
- Tuck cedar around each base, keeping it low so the lantern frames stay visible.
- Tie short velvet ribbons to the handles—no big bows, just clean tails for polish.
- Step outside at dusk to confirm the trio reads evenly from the street; adjust spacing as needed.
Why This Reads High-End: Lanterns introduce architectural geometry and weight. The nested sizes create rhythm, and the limited palette with brass and evergreen feels intentional and quiet-luxe.
Don’t Do This: Avoid mixing random lantern metals (chrome, oil-rubbed bronze, brass) in one window. Stick to one finish so your glow looks collected, not cobbled together.
Pro Styling Tip: Angle the lantern doors slightly toward the room for photos; the candle reflection will catch the brass edges and add depth to your shots.
4. White Ceramic Village with Evergreen Runners and Warm String Lights on a Front-Facing Bedroom Window Sill
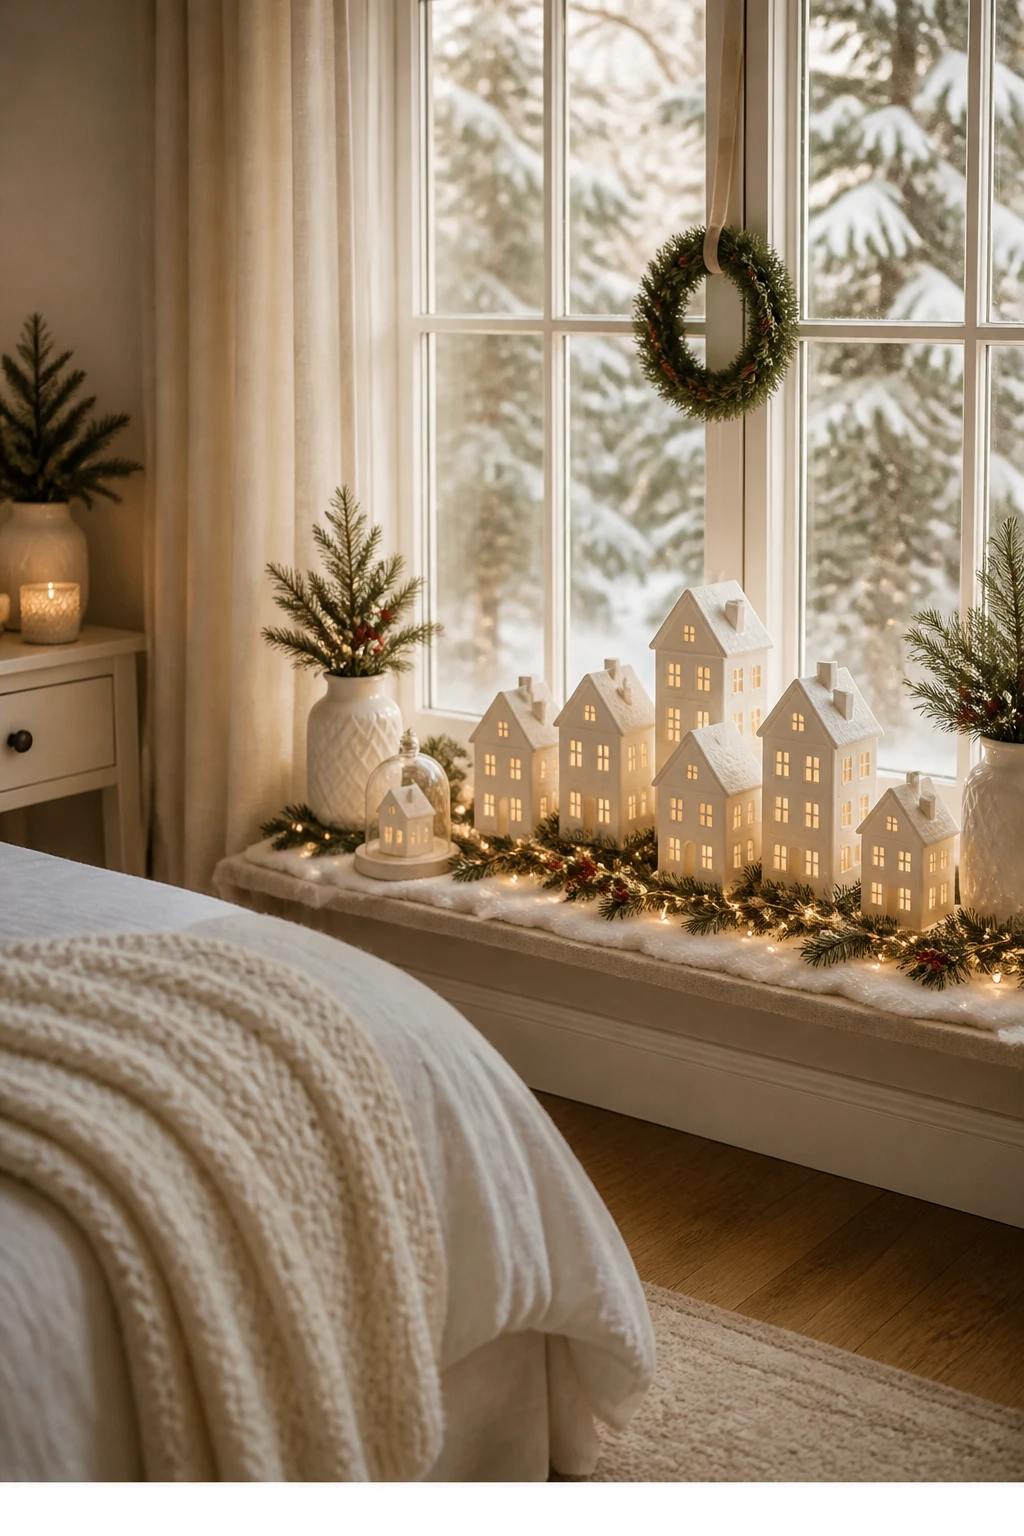
Bedrooms often get skipped because you think, “No one sees it.” But from the street, a softly glowing window upstairs feels like a storybook. Inside, a simple white ceramic village set along the sill with a low evergreen runner and warm string lights creates calm, nostalgic coziness—the kind that makes you read one extra chapter before lights out.
We’ve all lined up knickknacks that looked cluttered. The trick here is consistent scale and color: white ceramic houses, simple shapes, no extra colors. Thread a fine, warm string light through the houses (most have cutouts) and rest them on a bed of cedar tips so the light looks like streetlamps behind hedges. It’s neutral enough to live alongside any bedding, and the glow is so soft you can sleep with it on a dim timer if you want.
From outside, those little house windows twinkle like someone’s home. From inside, the village casts tiny highlights on the glass that read beautifully in photos—a little bokeh, a little sparkle, no harsh glare. It stores neatly in a clear bin with tissue, and the greenery runners can tuck into a flat under-bed box. The best part? You can transition this into January by pulling any red accents and keeping the village with simple green for winter nights.
Variations:
- Budget-friendly: Mix thrifted white cottages with paper houses. Keep to one shade of white for cohesion.
- Small sill: Choose three houses only—tall, medium, small—and flank with two bottle-brush trees in cream.
Budget Breakdown:
- White ceramic houses (4–7 pieces): $30–$90
- Warm white string lights (plug-in or battery, 1 strand): $8–$15
- Low-profile faux evergreen runner or loose tips: $12–$25
- Mini bottle-brush trees in cream (optional): $8–$15
Total Estimated Cost: $58 – $145
Best For: Primary or guest bedrooms with a visible street-facing window; creates a calming, nostalgic bedtime mood from early December through late January.
Key Design Elements:
- Main holiday props: White ceramic houses, bottle-brush trees
- Color palette: White, evergreen, warm ivory glow
- Lighting strategy: One warm strand threaded behind and through house cutouts
- Textile and ribbon layers: None needed—keep it serene
- Greenery and natural elements: Low faux cedar runner for softness
- Accent details: A single tiny brass bell near the tallest house for a wink of classic color
How To Recreate This Look:
- Lay the evergreen runner along the sill, keeping it low so blinds or curtains still operate.
- Arrange the ceramic houses with varied rooflines—tall at one end, stepping down in height across the sill.
- Thread the warm string light behind the houses and loop a few bulbs inside any cutouts for an interior glow.
- Add two cream bottle-brush trees near the smallest house for balance.
- Test at night and step back. Adjust spacing so the light pools feel even and the village reads as one scene.
Why This Looks Intentional: Monochrome shapes against greenery create a clean canvas that lets light tell the story. The village reads like a curated collection, not miscellaneous decor.
Watch Out: Don’t push lights hard against the glass. Condensation can happen on cold nights and fog your bulbs, making the scene look dull. Keep the strand an inch back.
Pro Styling Tip: Crack the curtain or shade just an inch so the fabric edge frames the village in photos—it adds softness and a sense of privacy.
If you’re feeling overwhelmed, pause. Pick the one window your family sees the most—living room, kitchen, or bedroom—and give it 20 focused minutes. The sense of “ahh, that’s better” will ripple through the rest of your decorating day.
5. Red Berry Wreath Trio with Brass Ribbon Ties on a Tall Entryway Window
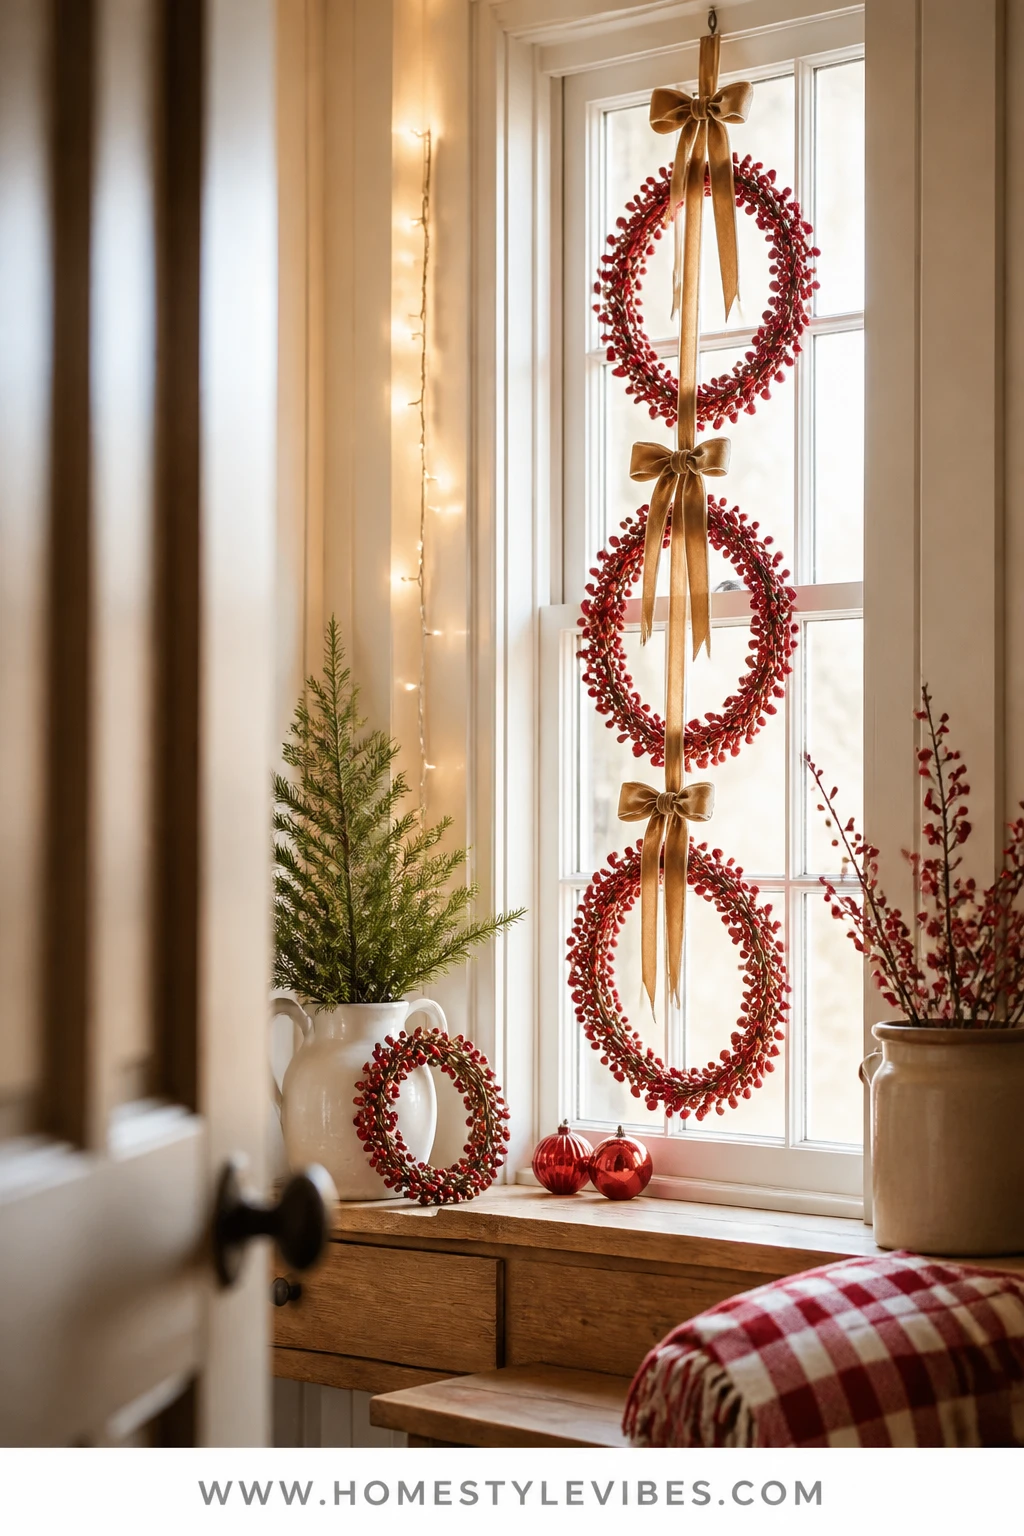
Entryway windows feel intimidating: tall panes, echoey light, and a constant worry about “Will this fall when the door slams?” The wreath trio solves it with balance and bright, classic color. Three slim red berry wreaths hang in a vertical column with brass-toned ribbon ties at staggered lengths. From the street, it’s bold and joyful. Inside, it pulls the eye upward and makes tall walls feel styled, not cavernous.
We’ve all hung one big wreath that looked orphaned. Three smaller wreaths stacked read architectural—like they belong with mullions. The brass ribbon (or satin in a brass shade) nods to antique hardware. Because the wreaths are slim, they won’t crowd blinds or curtains, and they store neatly in a single flat bin. Add a pair of battery LED fairy lights twisted into the top and bottom wreath only, so your center stays quiet and the glow feels subtly tiered.
Lighting matters here. Use warm white only and keep bulbs sparse—just a few points of light per wreath—so you get those tiny pinpricks reflecting in the glass. They look like holiday stars, not a headlamp. The composition photographs beautifully with height variation and repetition, the interior side feels polished, and the exterior read is a classic punch of color that says “welcome home.”
Variations:
- Muted take: Swap red berries for mixed evergreen mini wreaths, keep the brass ribbons and add one tiny bell to the middle wreath.
- Small window: Hang a single berry wreath centered with an extra-long brass ribbon tail pooled slightly on the sill for drama.
Budget Breakdown:
- Berry wreaths (3 slim, 12″–16″): $45–$120
- Brass-tone ribbon or satin (2″ wired), 10 yards: $12–$25
- Micro fairy lights (2 short strands, battery): $10–$18
- Clear adhesive hooks rated for 2–4 lbs (multiple): $6–$10
Total Estimated Cost: $73 – $173
Best For: Entryway or stair landing windows with height; ideal when you want a big holiday hello from the street and a finished, cohesive interior line of sight toward the foyer.
Key Design Elements:
- Main holiday props: Red berry wreaths (trio)
- Color palette: True red, brass ribbon, hints of evergreen if desired
- Lighting strategy: Sparse warm fairy lights in top and bottom wreaths only
- Textile and ribbon layers: Brass-tone wired ribbon with neat knots
- Greenery and natural elements: Optional cedar ties behind each wreath
- Accent details: A single small brass bell on the center wreath knot
How To Recreate This Look:
- Measure your window height and map three hanging points spaced evenly; mark lightly with painter’s tape.
- Attach clear hooks above the frame or to the top trim; loop long lengths of brass-tone ribbon over the hooks to create hanging straps.
- Secure the top and bottom wreaths first at slightly different lengths; center the middle wreath between them at an exact midpoint.
- Thread short fairy lights into the top and bottom wreaths, hiding battery packs behind the ribbon on the frame’s back side.
- Shape ribbon tails, trim to matching lengths, and add a single bell to the center knot for a subtle chime.
Why This Looks Expensive: Vertical repetition feels architectural. The brass ribbon reads tailored, and the deliberate decision to light only two wreaths adds tension and restraint—very designer.
The Most Common Mistake: Crooked spacing. Use a level app on your phone and step outside to confirm alignment from the street. Adjust ribbons, not hooks, if you’re off by a hair.
Pro Styling Tip: Shoot from the side so the ribbon depth shows; a slight angle lets the wreath edges cast delicate shadows on the wall for beautiful dimension.
Honest moment: spacing and hanging always take me longer than I expect. I’ve stood on a step stool moving a wreath an inch six times while my hot cocoa got cold. But when the street view clicks, it’s absolutely worth it. And once your anchors are in, next year’s setup takes five minutes.
Quick Checklist
- Commit to a warm white lighting temperature
- Repeat one element across the window (candles, bows, lanterns, wreaths)
- Use wired ribbon for sculpted, photo-friendly shape
- Anchor decorations with symmetry or a single focal point
- Hide battery packs behind trim or under greenery
- Test the look at dusk from inside and outside
- Place decor so blinds or curtains can still open
- Use clear hooks on painted trim for better grip in cold
- Mix brass or black hardware—avoid blending multiple metals in one window
- Keep greenery low-profile on sills for easy cleaning
Frequently Asked Questions
How early should I decorate my windows for Christmas?
Windows can go up the weekend after Thanksgiving, especially candlelight and greenery. If you decorate earlier, keep it simple—garland and warm lights now, add red ribbons and bells in December. That staggered approach keeps things feeling fresh.
Is fresh or faux greenery better for window decor?
Fresh cedar smells amazing and photographs beautifully, but near cold glass and heat vents it can dry and shed. Faux cedar wins on staying power and storage. IMO: use faux for windows you open often or that get sun, and reserve fresh for high-traffic, short-term moments like a party weekend.
How do I keep lights and candles safe near greenery and curtains?
Use flameless candles only, keep bulbs from resting directly on foliage, and maintain at least an inch of space from fabric. Set timers so lights aren’t running overnight and tuck cords or battery packs securely away from curious hands and paws.
What’s the most budget-friendly way to get a polished “glow from inside and out” effect?
Start with symmetry and repetition. A row of flameless tapers on the sill with two tartan sashes instantly reads finished. Add one small greenery element and call it done. Consistency beats lots of mismatched pieces.
How should I store these window decorations after the holidays?
Coil ribbon on cardboard to prevent creases, nest lanterns, and place ceramic houses in tissue within a labeled bin. Coil lights individually around paper towel tubes. Keep all window-specific pieces in one “Windows” bin so next year’s setup is a 10-minute job.
Bring It Home
You don’t need a thousand pieces to make your windows glow from inside and out. You need a clear idea, a warm light source, and one classic Christmas texture that repeats—tartan, cedar, brass, ivory candles. From a quiet ceramic village to a bold berry wreath trio, these looks prove that the right layers make a room feel finished and the street view feel inviting.
Here’s the truth: the glow that feels so magical from your sofa is the same glow that tells your neighborhood “something lovely is happening here.” Choose one window, pick your palette, and set the timer. You’ll catch that soft reflection in the glass at dusk, hear the tiny bell hush when the door closes, and know you nailed classic Christmas the way you always pictured it.
Start with one idea tonight. You’ve got this—and your home is about to look like the warmest postcard on the block.

About the Author

Krisztina P.Rendes, Founder of Home Style Vibes
Founder of Home Style Vibes
Krisztina Puskásné Rendes created Home Style Vibes as a cozy-modern lifestyle space where homemaking meets inspiration. Her goal is to help women create beautiful, organized, and peaceful homes they truly love — without overwhelm. You’ll find here heart-driven content on home decor, cleaning tips, easy family recipes, organization and decluttering, DIY home projects, plants, and seasonal ideas — all designed to bring more calm, comfort, and style into everyday life.