5 Fall Yard And Mailbox Decorating Ideas That Boost Curb Appeal Instantly
You want the magic of fall to greet you before you even reach the front door—glowing light, plaid layers, pumpkin-y abundance. But the second you step outside, reality hits: a tired mailbox, sparse steps, and a yard that looks more “end-of-summer meh” than “harvest postcard.” You love golden afternoon light and pumpkin-lined paths. You hate fussy, expensive projects that eat your weekend. These five fall yard and mailbox decorating ideas fix that tension—fast. They’re photogenic, cozy, and practical, and you can pull most of them together in a single afternoon for under $125 each. Expect saturated color, warm light, and a yard that finally looks like your Pinterest board—only real, and yours. Perfect for early September through Thanksgiving, especially if you love a generous, abundant vibe without babysitting your decor.
1. Pumpkin-Lined Mailbox With Golden Glow Lanterns and Leaf Garland
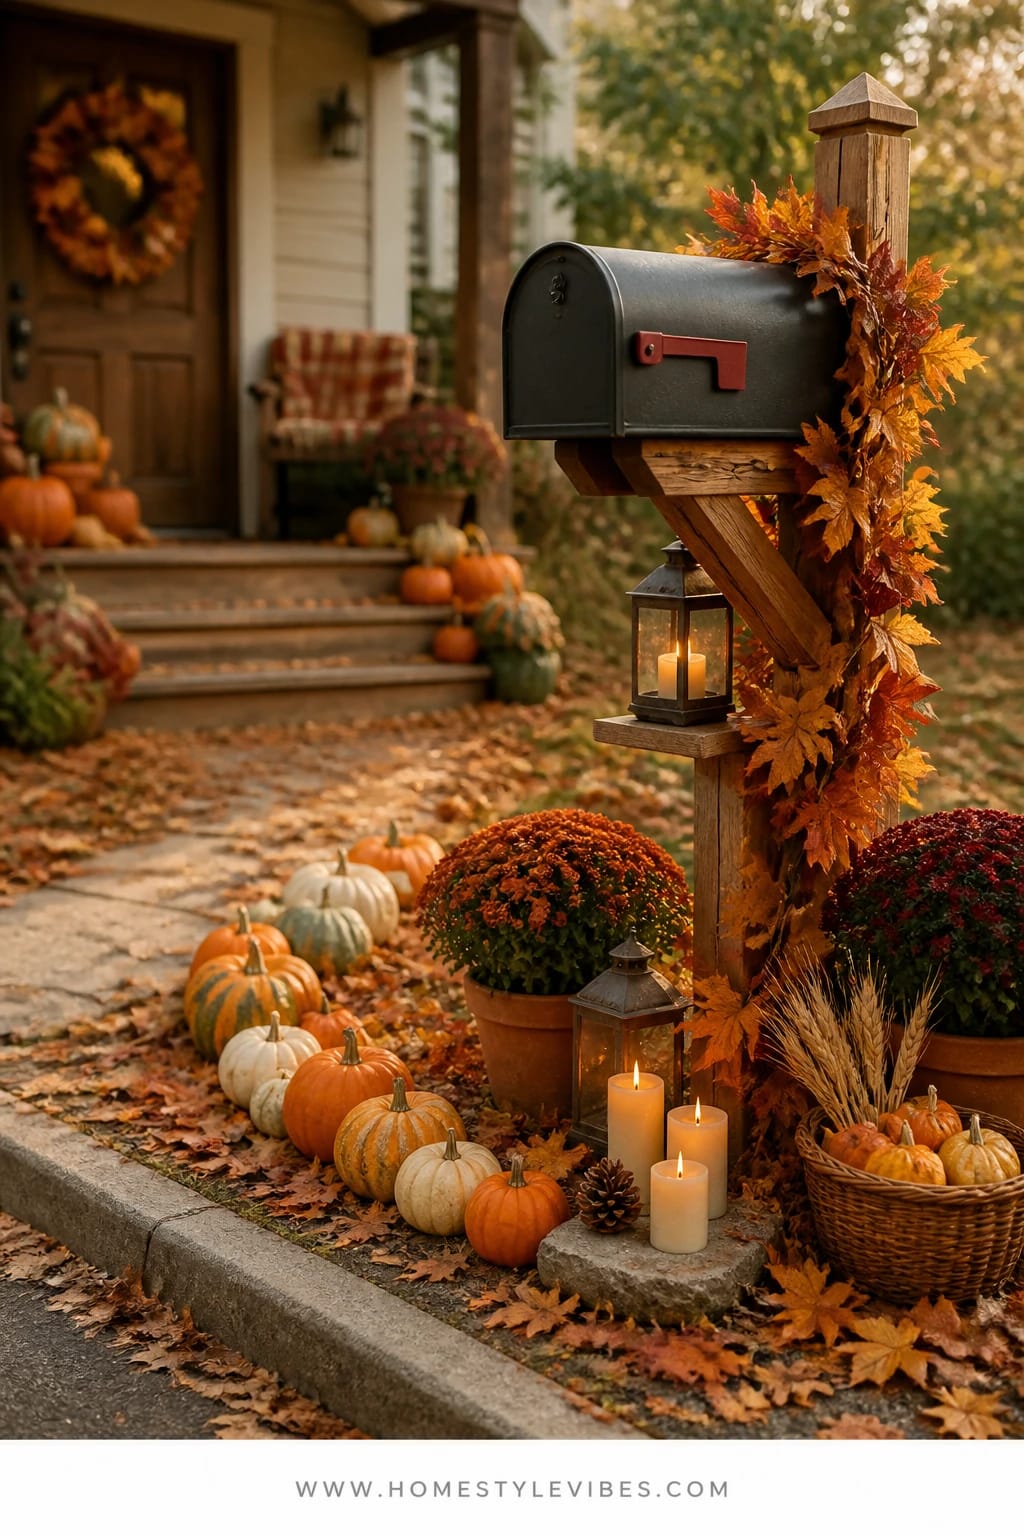
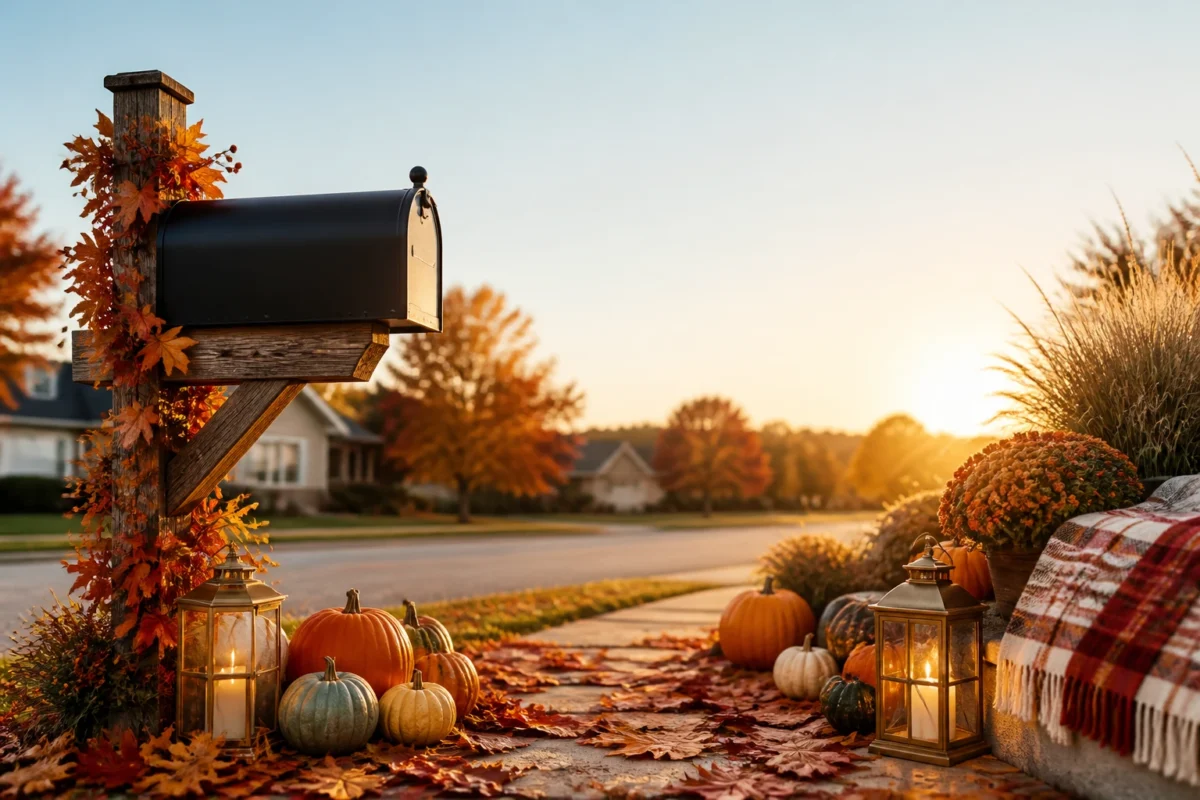
We’ve all been there: the mailbox is the first thing people see and somehow it always feels like an afterthought—tilted post, sad little flag, maybe a stray weed or two. You’ve tried sticking a mum nearby, but it still looks lonely and flat. This idea turns your mailbox into the fall greeter it deserves to be—warm, layered, and friendly—with a mini pumpkin runway and golden lanterns that cast the kind of glow you notice from the street.
The mood here reads “harvest welcome” with a hint of golden-hour romance. It works in the real world because it hugs a tiny footprint and relies on weather-friendly pieces: small pumpkins and gourds, a faux leaf garland wired around the mailbox arm, and battery-powered lanterns that can live outdoors. Warm lighting is the secret weapon. Those lanterns give a soft, amber wash that makes even the simplest mailbox look intentional, especially as the sun dips. Dried leaves, wood, and woven textures give you layers that read beautifully in photos—foreground pumpkins, mid-level lanterns, and the garland wrapping up high creates depth from every angle.
Styling variations make it easy to adjust. Small-space version: Use only three pumpkins clustered at the base with one petite lantern, plus a single swag of garland on the arm. Budget-friendly: Choose mini faux pumpkins from the dollar aisle and one mid-sized lantern; anchor with mulch so they don’t roll into the street. Prefer neutrals? Use white pumpkins, a subtle eucalyptus garland, and brass-finish lanterns for a softer, creamy look. Renter-friendly swap: Use removable outdoor hooks to secure the garland—no drilling into the post.
Budget Breakdown:
- Mini pumpkins/gourds (6–10): $10–$25
- Medium outdoor-safe lanterns (2): $30–$60
- Faux leaf garland (1–2 strands): $12–$30
- Battery-operated LED candles (2): $10–$20
- Zip ties/floral wire: $2–$5
- Doormat-style coir square or stepping stone for base: $8–$15
Total Estimated Cost: $72 – $155
Best For: Suburban or rural mailboxes with a visible post; anyone who wants instant curb appeal in under an hour and a warm evening glow that reads beautifully from the street through November.
Key Design Elements:
- Main seasonal props: Mini pumpkins, faux leaf garland, lanterns with LED candles
- Color palette: Burnt orange, amber, touches of deep green and rustic brown
- Lighting strategy: Battery lanterns placed at base and mid-height for layered glow
- Textile layers: Coir mat or small jute square to “ground” the pumpkin cluster
- Natural elements: Real pumpkins, fallen leaves tucked in for fullness
- Accent details: Brass or black metal lanterns, twine ties on the garland tails
How To Recreate This Look:
- Start with a quick tidy: pull weeds, brush dirt from the post, and place a coir mat or stepping stone at the mailbox base.
- Add your faux leaf garland, wrapping it around the mailbox arm and securing with floral wire or zip ties at discreet spots.
- Layer mini pumpkins at the base, starting with larger ones in back and tucking smaller gourds toward the front for a natural “spilled harvest” look.
- Place two lanterns: one at the base to the left, one perched mid-height on a small overturned pot or paver stone for dimension.
- Style with a few rogue leaves and a length of twine tied in a bow around the post for a casual finish. Turn lanterns on at dusk.
Why This Looks Expensive: The combination of layered heights (base pumpkins, mid-lantern, garland up high) creates a designer sense of scale, while the warm metal of the lanterns adds polish. That golden light washes imperfections away and makes everything look intentional.
Watch Out: Don’t overcrowd the base to the point that mowing gets tricky or mail delivery is blocked. Keep a clear path and leave at least one side open so packages can be dropped off without crushing pumpkins.
Pro Styling Tip: For photos, angle one lantern slightly toward the street so the glow hits the pumpkin sides—this deepens color and makes the curves pop on camera.
Quick Tip: If your mailbox leans, wedge a slim paver at the base and disguise it with leaves. The straighter posture makes the whole display feel finished.
Ready for more glow and texture? The next one is perfect if your steps feel bare even after pumpkins.
2. Warm String Lights Porch Steps With Rust Mums and Lantern Clusters
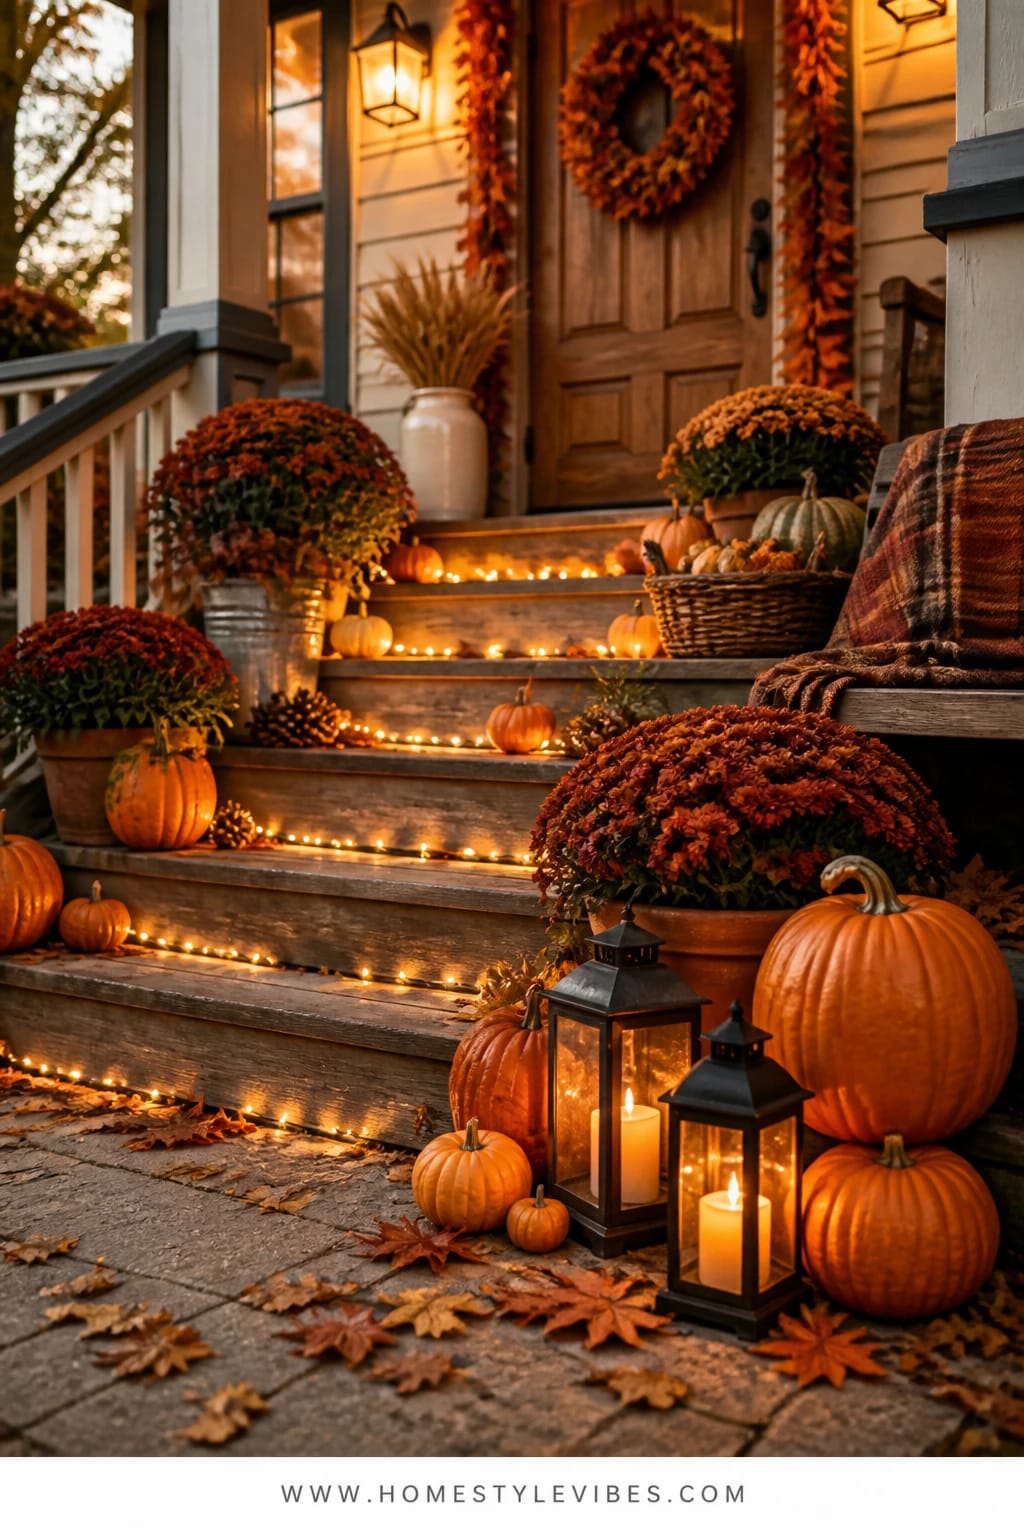
It’s that one spot that always feels off: the porch steps. You’ve lined them with pumpkins, you’ve tried one big mum, and it still looks like something’s missing. The truth is you need rhythm—a step-by-step “story” with warm string lights guiding the eye upward and rust-colored mums punching the color in all the right places.
This look creates cozy gathering energy. It feels like you could linger on the steps with a plaid blanket and cider as the sun drops. It works because you use multiples: pairs of lanterns, two or three mums in the same color family, and a gentle swoop of string lights that zigzag from rail to rail. Warm lighting fills the gaps and bounces off pumpkin skins, while weathered wood and woven baskets add texture that reads beautifully in photos. You’ll get depth from the staggered lantern heights, plus a glow that makes your porch look welcoming even after the clocks change.
Variations are easy. Small porch? Try mini lanterns and one string light swag under the railing. Neutral lover? Choose white mums and pale pumpkins with soft gold lanterns. Budget-conscious? Grab clearance lanterns with frosted glass and use one large, full mum split into two weathered baskets for symmetry. Renter or HOA restricted? Use Command outdoor light clips so you don’t have to staple anything to the railing.
Key Design Elements:
- Main seasonal props: Rust mums, assorted pumpkins, three to five lanterns, warm white string lights
- Color palette: Rust, cream, mossy green, and black or bronze metal
- Lighting strategy: Drape string lights at eye level, lanterns at foot level
- Textile layers: Plaid throw on the top step or side chair for softness
- Natural elements: Real pumpkins in mixed sizes, potted mums, clipped branches in a basket
- Accent details: A low vintage crate for height, black matte planters for the mums
Budget Breakdown:
- String lights (commercial-grade warm white): $20–$45
- Lanterns (3–5 assorted sizes): $40–$120
- Mums (2–3 large or 3–5 small): $18–$45
- Pumpkins (5–9 mixed sizes): $20–$50
- Outdoor light clips/zip ties: $5–$10
Total Estimated Cost: $103 – $270
Best For: Front porches with steps or railings; perfect for early October straight through Thanksgiving, especially if you host trick-or-treaters or evening gatherings.
How To Recreate This Look:
- Start with a sweep and a quick rail wipe-down so clips adhere well.
- Add string lights by clipping them along the railing in a soft zigzag, leaving a tiny drape between clips for a relaxed feel.
- Layer pumpkins on each step, mixing sizes and tucking smaller ones toward the inside edges for safety.
- Place mums at the outer corners of the bottom and middle steps to frame the path upward; repeat color for cohesion.
- Style lantern trios: one on the bottom step left, one mid-right, one at the top landing; stagger heights on crates or planters.
Why This Feels Designer: Repetition with restraint—matching mums, recurring lantern shapes, and a consistent warm light temperature—creates flow. The eye moves up the steps naturally, which makes the whole vignette feel curated.
One Thing To Avoid: Avoid cool-white lights. They flatten the pumpkins and fight against rust tones. Warm white (2200–2700K) is the secret sauce for that honeyed glow.
Pro Styling Tip: For photos at dusk, switch on lights ten minutes before sunset; the sky glow will be rich, and the string lights will sparkle without blowing out highlights.
Pause here. If your porch already feels good, the yard might need love next. Think low-maintenance and wildly photogenic.
Did You Know? Mums perk up after a deep watering from the base. If yours look droopy after a hot day, a nighttime soak often revives them by morning.
3. Dried Floral Pathway Urns With Amber Lantern Light and Pinecones
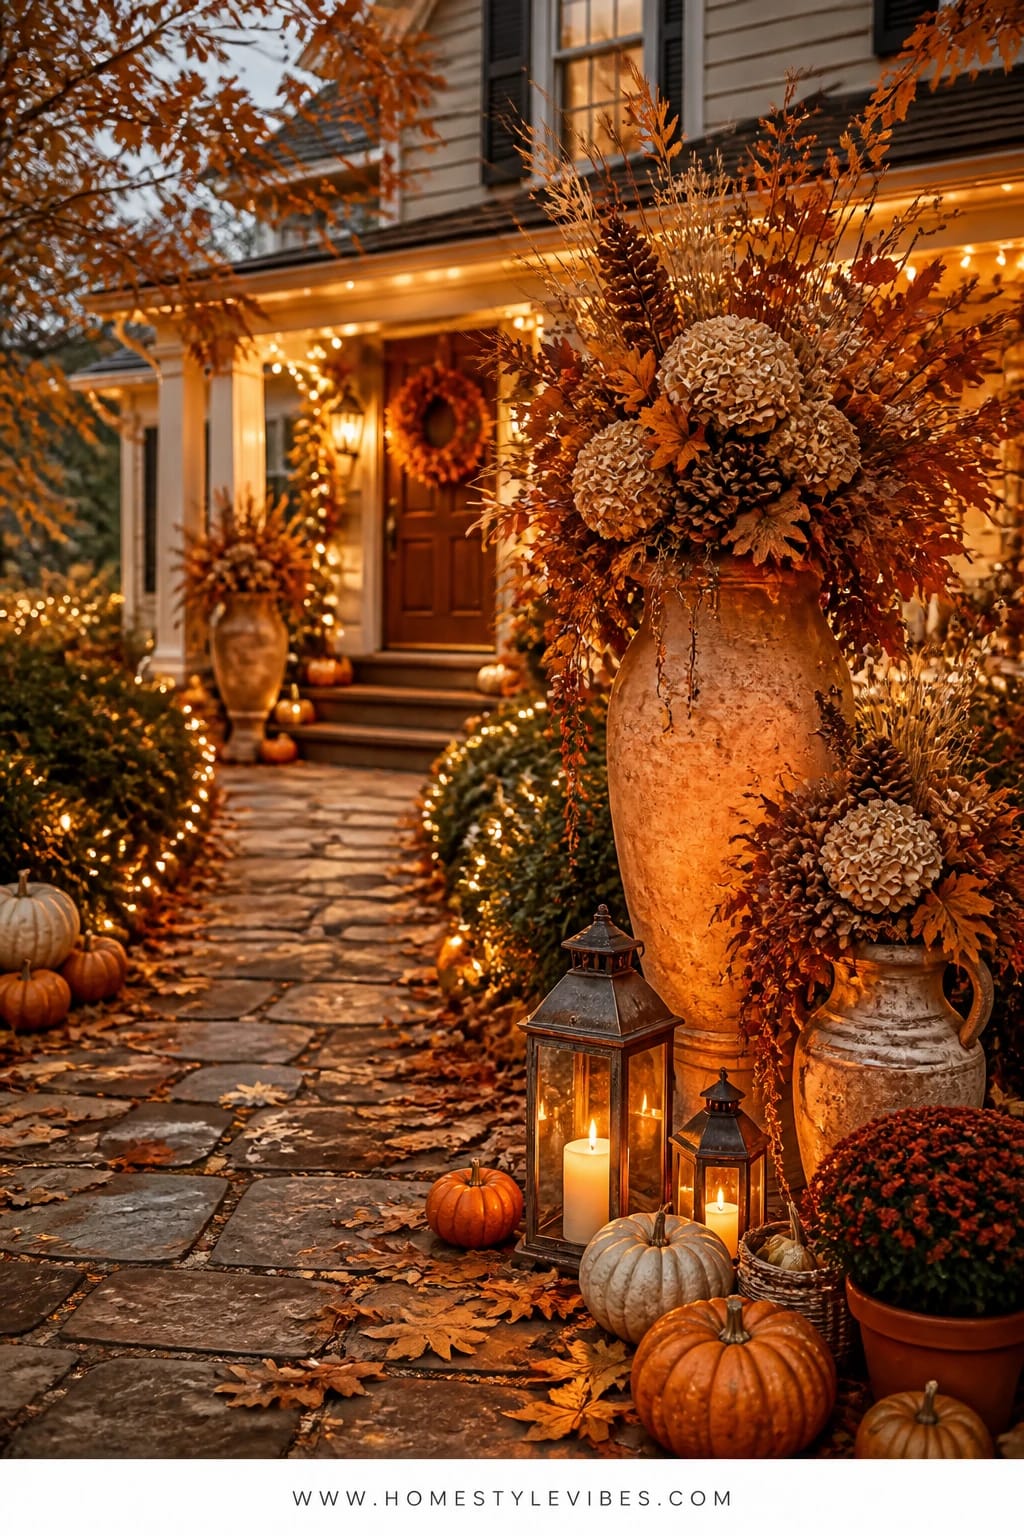
You want a front walk that feels like a fall storybook, but landscaping is pricey and you don’t have time for a full overhaul. You’ve tried a welcome mat and a wreath; the path still disappears into the shadows at night. Enter tall urns or planters at the start and midpoint of your walkway—filled with dried florals and pinecones—anchored by amber lanterns that pull guests forward with a soft, steady glow.
The mood is “old-world harvest.” It feels grounded, textured, and a little dramatic in the best way. This works in real homes because dried elements are low-maintenance, wind-friendly, and reusable next year if you store them well. Amber lanterns at ankle height light the path without blinding anyone, and the dried floral plumes add height that photographs beautifully. The materials—wheat, pampas, millet, pinecones, birch branches—bring in rich neutrals that add warmth without competing with your house color.
For a small-space tweak, use one substantial urn paired with a single lantern cluster and mirror the look with a basket on the other side. On a tight budget, upcycle a pair of thrifted planters with matte black spray paint and use foraged pinecones and branches. Prefer a moodier vibe? Swap pampas for deep burgundy stems and tuck in a few black-tinted faux leaves. This entire setup glides from September into Thanksgiving without a single water can in sight.
Budget Breakdown:
- Urns/planters (2): $40–$120 (thrifted or resin options lower the cost)
- Dried florals and wheat bundles: $20–$60
- Pinecones (bag): $8–$15
- Amber lanterns (2–4): $30–$80
- Floral foam or sand for stabilizing: $5–$10
Total Estimated Cost: $103 – $285
Best For: Homes with a front path or driveway edge that disappears at night; ideal for windy areas where live florals struggle.
Key Design Elements:
- Main seasonal props: Dried wheat/pampas stems, pinecones, amber lanterns
- Color palette: Amber, camel, taupe, chocolate brown, and a touch of burgundy if desired
- Lighting strategy: Lanterns at low height to skim light across the path
- Textile layers: None required; let the texture of dried botanicals do the work
- Natural elements: Foraged branches, pinecones, dried seed pods
- Accent details: Matte black or oil-rubbed bronze planter finishes
How To Recreate This Look:
- Start by placing planters at the start and midpoint of the path; fill the base with sand or stones for stability.
- Add floral foam inserts and push in tall pampas or wheat first, working tallest to shortest.
- Layer in millet, dried eucalyptus, and a few curly willow branches for movement.
- Top the urn surface with pinecones to hide foam and add a rustic cap.
- Place amber lanterns near the base of each urn; set candles on timers to turn on automatically at dusk.
Why This Reads High-End: Height variation and tonal layering. You’re using a monochrome palette of warm neutrals with repeat forms (cones, plumes, branches), which looks quietly luxurious and editorial in photos.
The Most Common Mistake: Skipping weight in the base. Tall arrangements can tip in a gust. Anchor with sand or stones and face the tallest plumes slightly back toward the house.
Pro Styling Tip: For photos, pull two pinecones just forward of the planter base to create foreground depth; it makes the scene feel lived-in and cinematic.
If you’re feeling the warm neutrals, keep reading. If you’re craving color, the next idea is a saturated, classic crowd-pleaser.
Quick Tip: Spritz dried stems lightly with hair spray to reduce shedding before big wind days. It keeps those wheat crumbs off your entry tiles.
Micro-story: I tried a dried arrangement on my own path last October and honestly couldn’t believe how much the neighbors commented. Not the pumpkins—the lantern glow on the dried wheat. It threw the softest light on our walkway and made even our cracked pavers look charming.
4. Burgundy Wreath Mailbox Arm With Plaid Bow and Lantern Glow
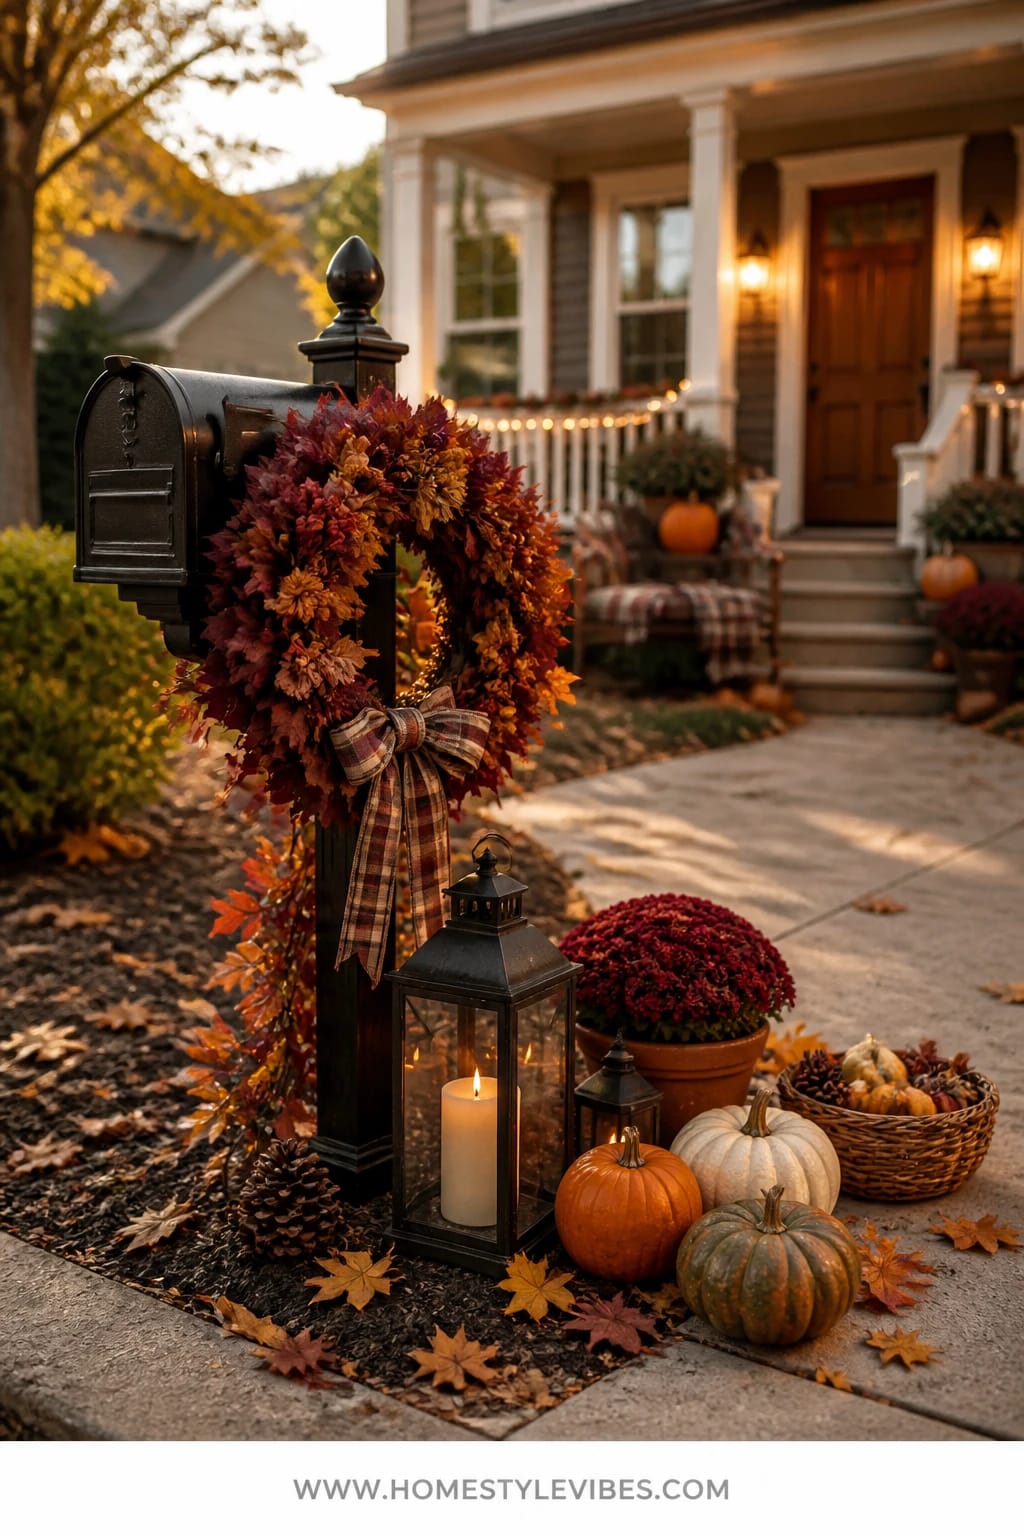
Have you ever thrown a wreath on the door and felt like something still wasn’t singing? Sometimes the front door isn’t the star—your mailbox can be. This look uses a statement burgundy wreath attached to the mailbox arm, finished with a generous plaid bow and a single lantern at the base for gentle glow. It’s quick, it’s tidy, and it breaks up all the vertical lines with a satisfying round pop of color.
The mood leans festive and polished with a clear focal point at eye level. It works for real homes because it’s low footprint, HOA-friendly, and easy to store. Warm lighting adds a dot of candlelit warmth that steadies the color saturation at dusk, keeping burgundy rich instead of muddy. The materials—grapevine base, faux burgundy florals, plaid ribbon, and a compact lantern—hold up well outside. In photos, that curve of the wreath paired with the crisp bow tails looks balanced and intentional.
Variations save you money and adapt to taste. Budget version: Use a pre-made grapevine base and add two burgundy picks plus eucalyptus. Neutral version: Go with a wheat wreath and cream plaid ribbon. Small-space mailbox cluster? Use a mini wreath and a 4-inch bow. Renter-friendly fix: Secure everything with removable outdoor hooks and floral wire so you don’t mark the post.
Budget Breakdown:
- Grapevine wreath base (14–18 inches): $12–$25
- Burgundy floral picks and leaves: $10–$25
- Plaid outdoor-safe ribbon (10 yards): $8–$15
- Small lantern with LED candle: $15–$30
- Outdoor hook/floral wire: $5–$10
Total Estimated Cost: $50 – $105
Best For: Compact front yards, townhomes, or anyone wanting bold color without a big footprint; perfect from late September through Thanksgiving.
Key Design Elements:
- Main seasonal props: Burgundy wreath, plaid bow, lantern with warm LED candle
- Color palette: Burgundy, cream, charcoal, and hints of sage
- Lighting strategy: One small lantern at the base to highlight the post; optional micro fairy lights woven in the wreath
- Textile layers: Plaid ribbon with wired edges for sculpted tails
- Natural elements: Grapevine texture, faux leaves with slight color variation
- Accent details: Matte black mailbox hardware, ribbon knot detail at the back
How To Recreate This Look:
- Start by centering your outdoor hook on the mailbox arm underside or front; test weight with the empty wreath.
- Add burgundy floral picks to the grapevine base, clustering them asymmetrically at 4 o’clock and 10 o’clock for movement.
- Create a large layered bow with wired ribbon; leave two longer tails and trim ends at an angle.
- Attach the bow to the top side of the wreath and secure the wreath to the mailbox arm with floral wire.
- Place a small lantern at the post base and tuck in two fallen leaves or a mini gourd to tie color downward.
Why This Looks Intentional: The circular form breaks the strong vertical of the post and the linear lines of the street. Repeating burgundy in two places—wreath and tiny accent at the base—creates a purposeful echo that feels styled, not random.
Don’t Do This: Don’t overload the wreath with too many types of florals. Stick to one hero color (burgundy) and one supporting greenery so it reads strong from the curb.
Pro Styling Tip: Photograph with your camera at mailbox height; the wreath fills the frame and the lantern glow peeks in at the corner for a cozy, editorial shot.
Did You Know? Wired ribbon bows can be “refreshed” after rain by blow-drying on low for 20 seconds while reshaping loops with your fingers.
Take a breath. You don’t have to do all five. If one idea is pulling at you, that’s the one to start with. This isn’t about recreating a showroom; it’s about making your home smile back at you when you pull into the driveway.
5. Plaid Blanket Yard Seating Nook With Burnt Orange Pumpkins and Candlelit Warmth
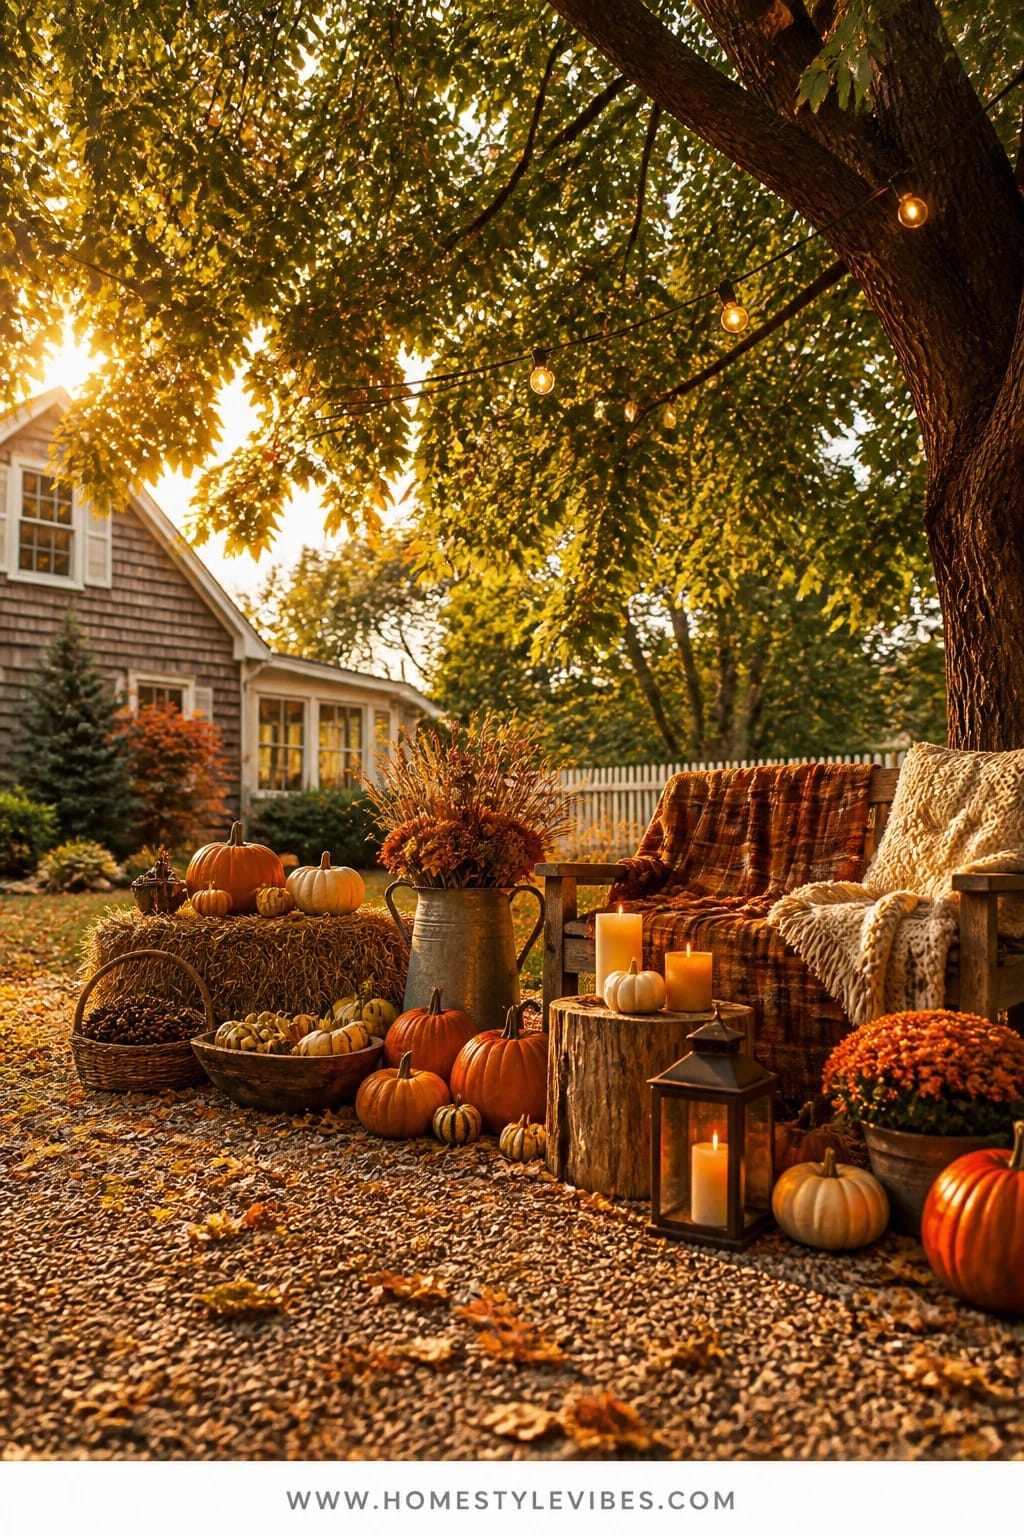
Let’s talk about the awkward front-lawn corner: a patch of grass under a tree, a forgotten bench, or a little gravel square that never gets used. You’ve placed a bench there before, but it looked lonely and kind of sad (especially after the first leaf dump). This idea turns that ignored spot into a mini fall lounge—plaid blanket, low table, pumpkins piled like you mean it, with candlelit warmth that makes even a Tuesday night feel special.
We’re going for cozy cabin warmth meets neighborhood-friendly hangout. It works because you anchor the space with textiles and height variation: a plaid throw over the bench or two Adirondack chairs, a low crate as a table, and a trio of burnt orange pumpkins to bring punchy color. Warm candlelight—use enclosed hurricane candles—turns the nook into a jewel box at dusk. Materials like warm wood, woven baskets, and chunky knits add texture that cameras love. You’ll get that layered, abundant feel without needing to plant a thing.
Two variations can make this ultra-practical. Small-space or shared yard? Use foldable camp chairs and a small woven stool as a table, stash everything in a lidded deck box when not in use. Neutral take: Cream and charcoal plaid with white pumpkins and taupe knit pillows. For a playful vibe, add a basket of blankets for neighbors during October movie night projected on the garage door—seriously, it’s adorable. Safety-wise, if you have kids or pets, swap real candles for remote-control LED pillars inside the hurricanes.
Budget Breakdown:
- Plaid blanket/throw: $15–$40
- Adirondack chairs or bench (if needed): $40–$200
- Crate or low table (thrifted or DIY): $10–$30
- Burnt orange pumpkins (3–5): $15–$40
- Hurricane candles/LED pillars (2–3): $20–$50
- Woven basket for blankets: $12–$25
Total Estimated Cost: $112 – $385
Best For: Front yards with a shady spot or near a tree; ideal if you like to wave at neighbors and want a lived-in, magazine-ready corner for photos or casual chats.
Key Design Elements:
- Main seasonal props: Plaid throw, stacked pumpkins, hurricane candles
- Color palette: Burnt orange, warm caramel, deep forest green, and cream
- Lighting strategy: Enclosed candles or LED pillars at table and foot level
- Textile layers: Plaid blankets, chunky knit pillows, optional outdoor rug
- Natural elements: Real pumpkins, foraged branches in a jug
- Accent details: Copper mug set on the crate, old hardcover books for height
How To Recreate This Look:
- Start by choosing the spot—ideally under a tree or where the sunset washes across.
- Add seating and drape a plaid blanket along the back for color and softness.
- Layer in a low crate or sturdy stool as a table, then place two hurricanes with candles.
- Place three to five burnt orange pumpkins on one side, staggering sizes for a casual pile.
- Style with a woven basket of extra blankets and a small vase of clipped branches for height.
Why This Looks Expensive: Textile abundance and controlled color. When you commit to a plaid palette and repeat burnt orange in two or three places, the nook reads curated. The candlelight softens everything and hides the imperfect lawn spots—trust me, we all have them.
Watch Out: Don’t place real flame near dry leaves. Clear a 2-foot debris ring around candles or go LED, especially on windy nights.
Pro Styling Tip: For the most photogenic setup, pull the pumpkins a few inches in front of the table so your camera can catch foreground color with the candle glow behind.
Quick Tip: If your throw keeps slipping, pin it under the top slat with discreet binder clips from the back. DIY hacks for the win.
Perspective check: You don’t need to cover every inch of your yard in decor. One strong moment—a mailbox that glows, steps that tell a story, or a tiny seating nook—can make your whole home feel ready for fall. If one idea resonates more than the others, that’s your starting line.
Quick Checklist
- Warm white string lights (2200–2700K)
- Mini and medium pumpkins in a single color story
- Two to five lanterns with timers
- Faux leaf garland for mailbox or railing
- Dried wheat or pampas for height
- Plaid ribbon with wired edges
- Plaid blanket or throw for seating
- Coir mat or stepping stone to ground displays
- Floral wire, zip ties, and outdoor hooks
- Woven basket for blankets or branches
- Amber LED candles for safe glow
- Pinecones and fallen leaves for filler
Frequently Asked Questions
How do I keep costs down if I want instant curb appeal on a tight budget?
Pick one zone: mailbox, steps, or a seating nook—don’t try to do all three at once. Reuse what you own (lanterns, baskets, crates), buy a single hero item like a big mum or a bold wreath, and fill in with foraged leaves, pinecones, and a few mini pumpkins. Limiting your color palette also makes it look more polished for less.
Should I use real or faux pumpkins and florals for these displays?
IMO, real pumpkins win for texture and color, especially outdoors. Use faux for anything elevated or near heat, and for the long-term (like garlands and wreaths). Dried florals are perfect for urns since they don’t need water and store well if kept dry and dusted.
My porch is tiny—can these ideas work in small spaces?
Yes. Scale everything down: one lantern, one mum, three mini pumpkins, and a short swag of lights or garland. Keep to one strong focal point instead of spreading out—your eye reads it as full and intentional.
What do I do with all this decor after the season ends?
Sort into labeled bins: “Lanterns and Lights,” “Garlands and Ribbon,” “Dried Stems,” and “Fall Textiles.” Wrap dried stems in tissue and store upright in a tall bin. Compost real pumpkins if they’re still fresh or leave a couple by the garden for critters—just keep them away from the house.
Are candles safe with kids and pets around these displays?
Go LED for anything on the ground or near fabrics. If you use real flame, keep it inside hurricanes and away from dry leaves. Set a timer so you’re not relying on memory during busy evenings.
When should I start decorating for fall outside?
Early September is perfect for garlands, lanterns, and dried florals. Add mums and real pumpkins in late September or early October so they last through Halloween and into Thanksgiving. If it’s still hot, start with faux pumpkins and swap in real ones once nights cool down.
What can I do if my landlord or HOA has restrictions on outdoor decor?
Use removable outdoor hooks, zip ties, and free-standing pieces like planters and lanterns. Keep displays low and within your area. A mailbox wreath with a plaid bow or a single lantern-pumpkin cluster usually passes without a note on your door.
Conclusion: Your Fall Curb Appeal, Done
Here’s the truth: you don’t need a huge budget or a full weekend to make your yard feel like fall. You need a focal point, warm light, and a few layered textures. Pick one of these five ideas—the pumpkin-lined mailbox, the string-lit steps, the dried-floral urns, the burgundy mailbox wreath, or the plaid seating nook—and give yourself one hour. That’s it. One hour to swap out “blah” for candlelit warmth and those little details you always notice in photos.
Cozy comes from the glow, the generous layering, and the small repeats that make a space feel finished: amber light on pumpkin curves, plaid against wood, a wreath echoed by a lantern at the base. Start with the spot you see first when you pull into the driveway. Let it greet you with a warm hello every day for the rest of the season.
You’ve got this. Light the lanterns, fluff the plaid, and let fall spill gracefully onto your curb. When the golden afternoon hits and your porch steps flicker to life, you’ll feel it—the house smiling back.
About the Author

Krisztina P.Rendes, Founder of Home Style Vibes
Founder of Home Style Vibes
Krisztina Puskásné Rendes created Home Style Vibes as a cozy-modern lifestyle space where homemaking meets inspiration. Her goal is to help women create beautiful, organized, and peaceful homes they truly love — without overwhelm. You’ll find here heart-driven content on home decor, cleaning tips, easy family recipes, organization and decluttering, DIY home projects, plants, and seasonal ideas — all designed to bring more calm, comfort, and style into everyday life.