5 DIY Fairy Garden Ideas That Create Pure Magic in Your Backyard
Let’s be honest: your backyard craves a little wonder. You want dew-sparkle mornings, soft moss under bare feet, and tiny doors that make kids gasp. But the pain point? Your outdoor space feels flat. The corners look forgotten. You’ve got planters, sure, but not a vibe. These 5 DIY fairy garden ideas fix that by layering texture, low lighting, and artisan-level details that turn “random pots” into a miniature world with scale, depth, and story—aka Pinterest fever dreams come true.
We’ll talk color—soft sage, inky slate, copper patina. We’ll talk materials—river stones, weathered wood, antique brass bells, fluted planters, real moss. And yes, we’ll make it look expensive (without the invoice) using scale, subtle lighting, and tonal layering. High-res photos? These setups devour golden hour and love a macro lens. If you adore quiet magic, twilight ambiance, and designs that entice kids and grown-ups to kneel and look closer, welcome home.
1. Woodland Threshold With Mossy Stone Steps And A Hidden Door
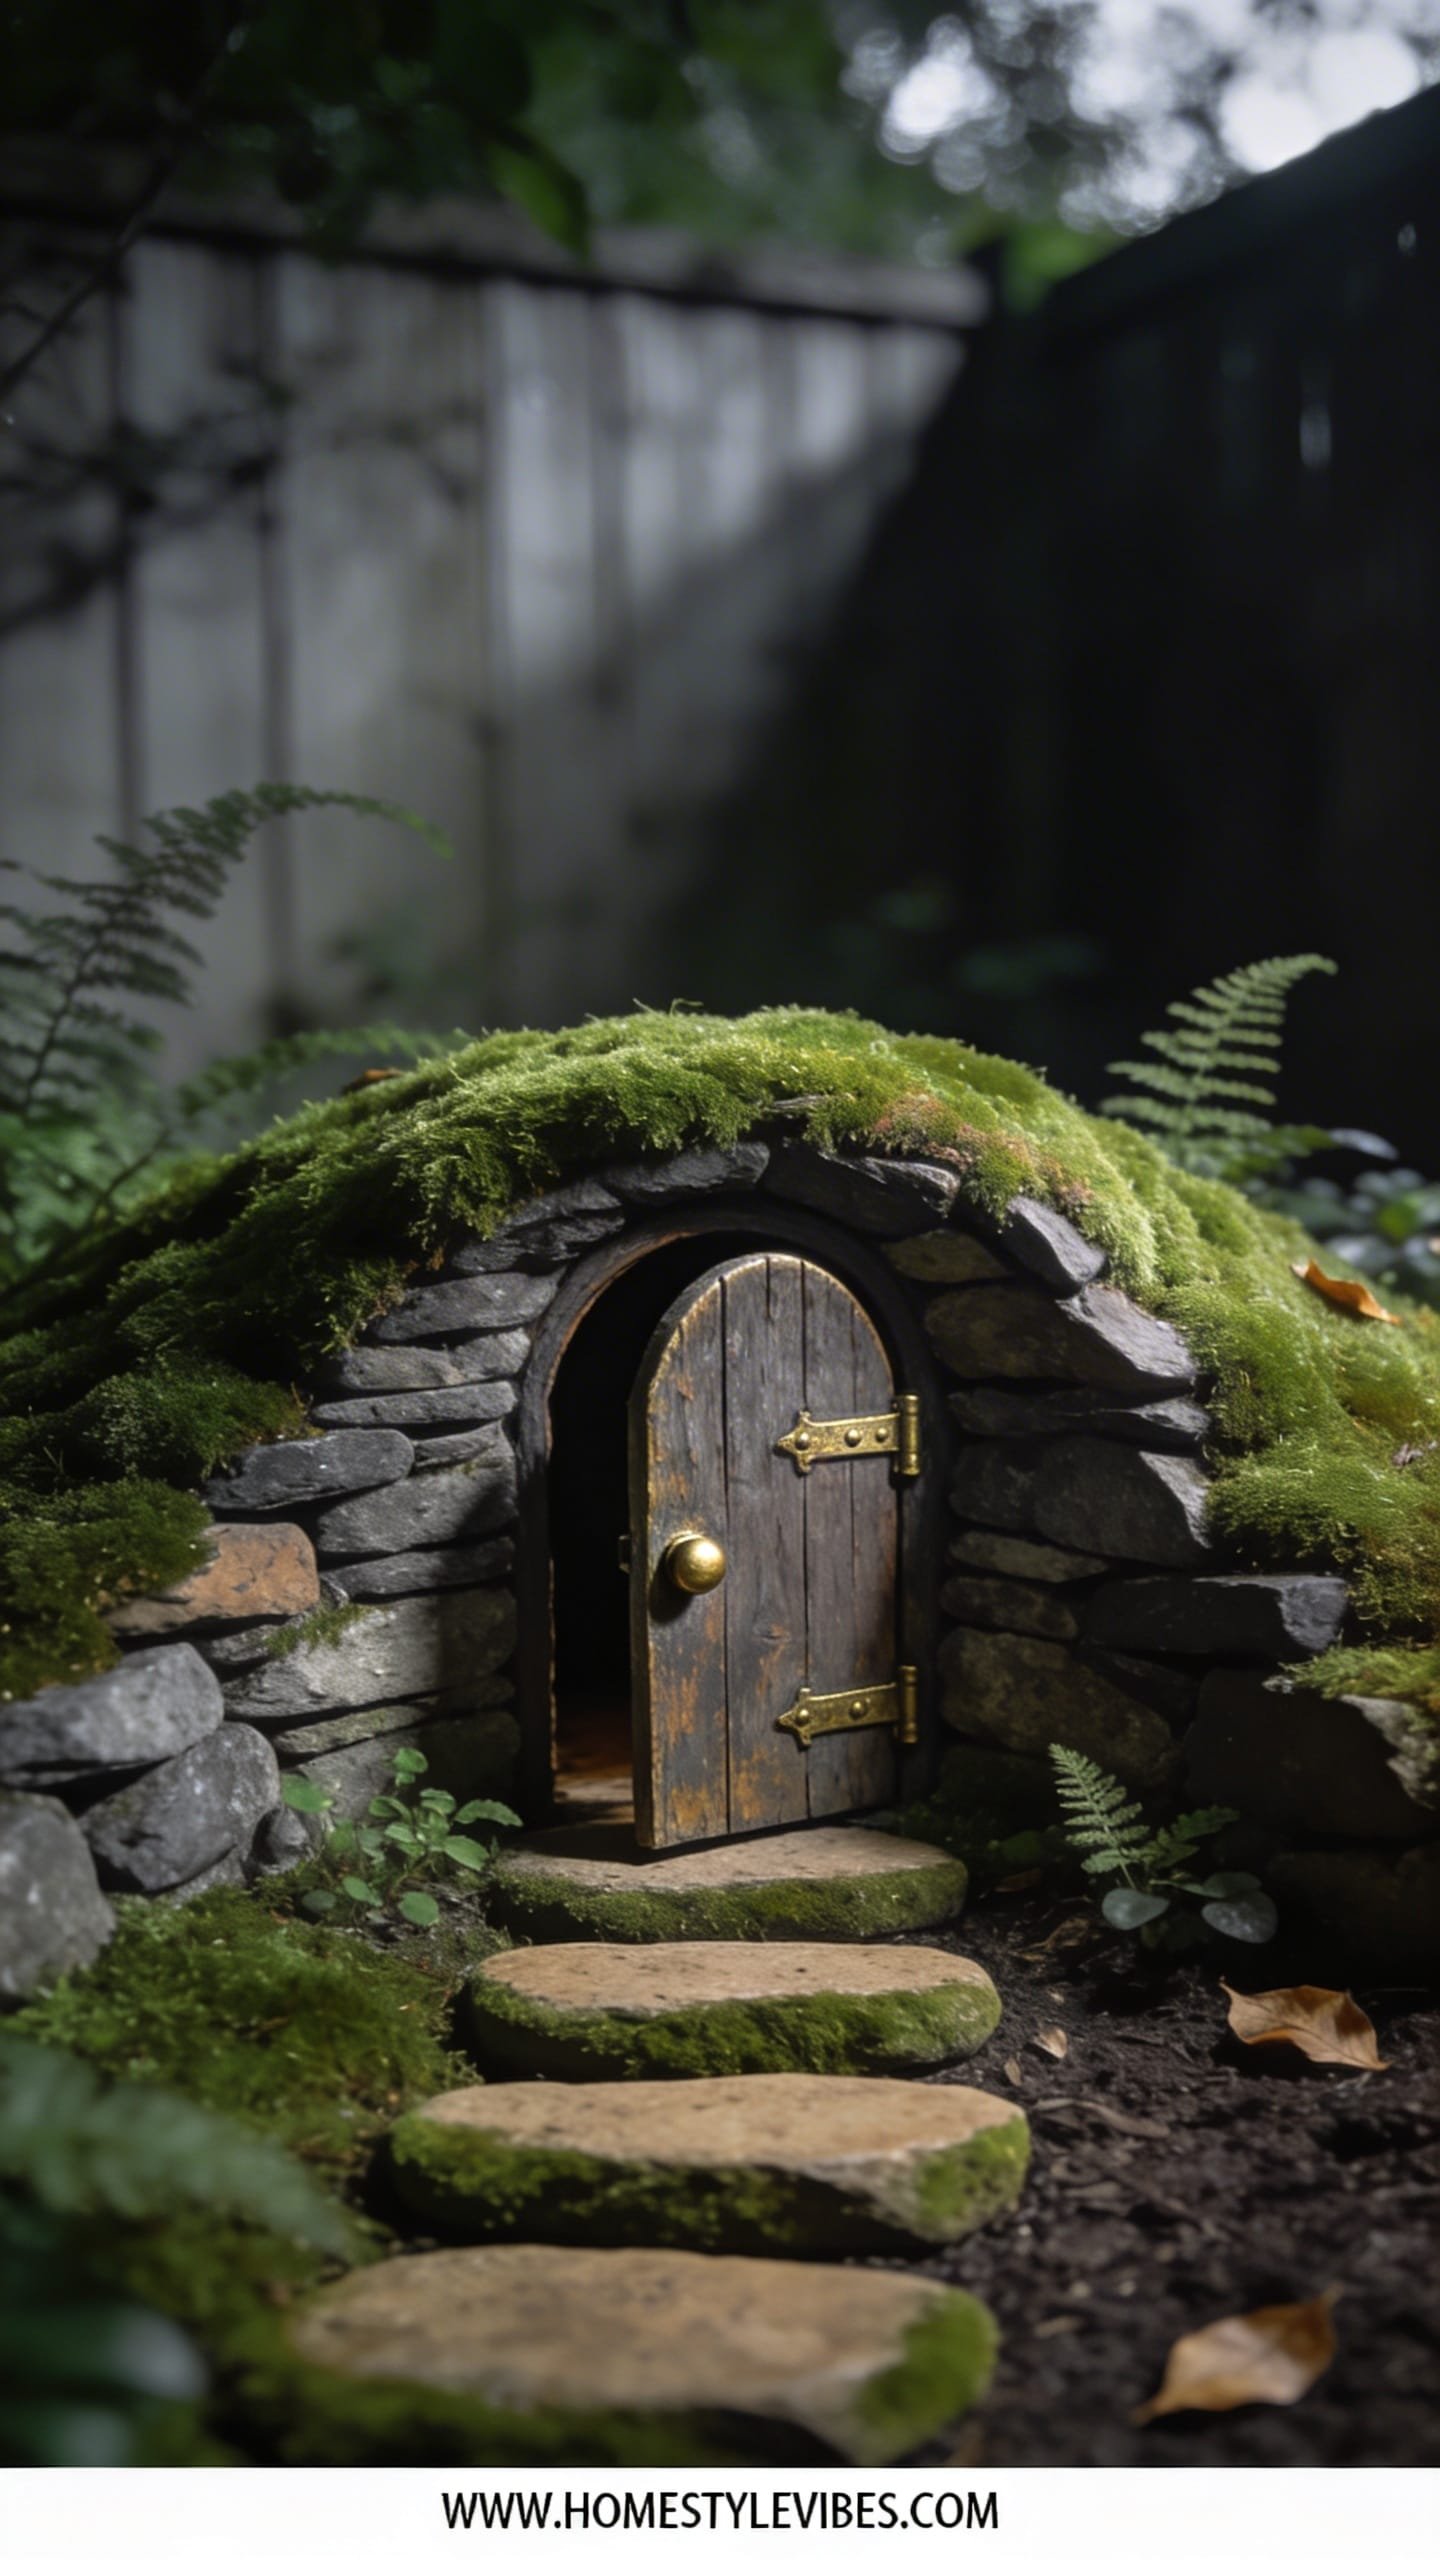
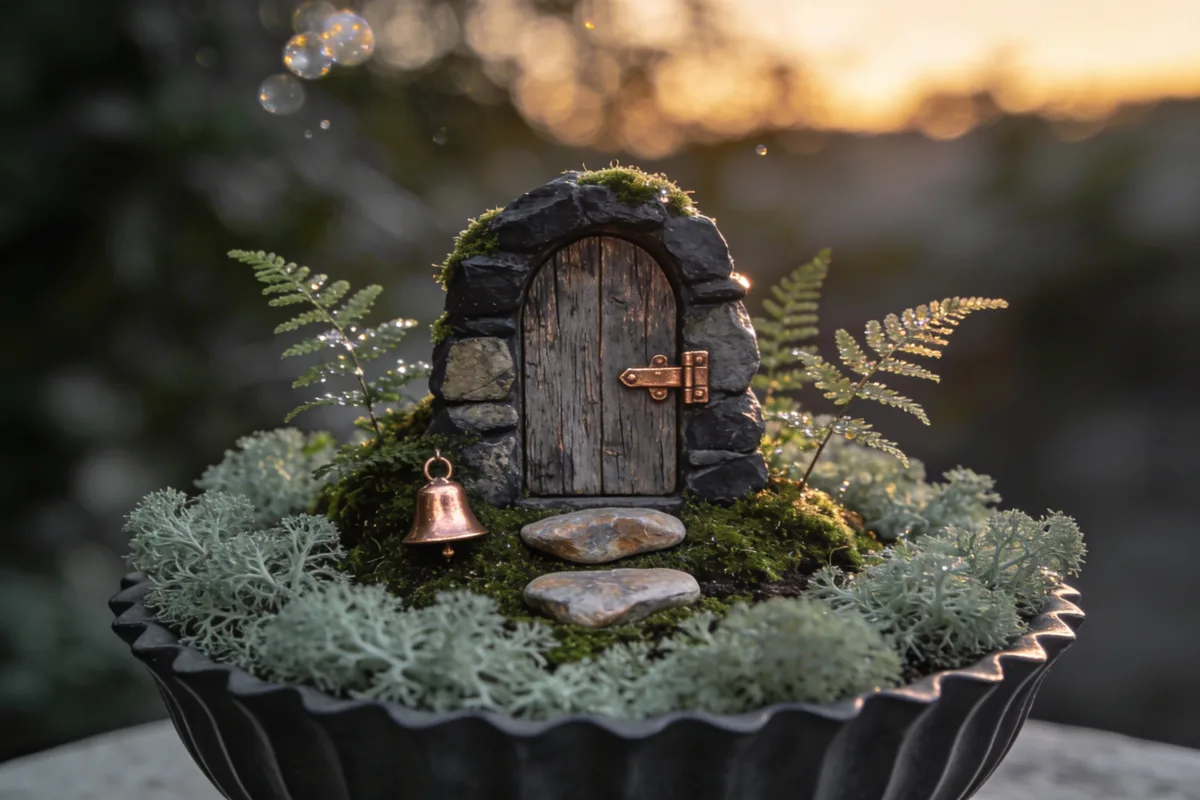
We’ve all been there: that awkward shady corner where plants sulk and mulch looks, well, tired. You’ve tried one sad hosta, but it still reads “maintenance zone,” not “enchanted threshold.” This design flips the script by framing a miniature doorway into a “hillside” of stacked stones and velvet moss. The mood feels ancient-forest cozy—think fern-scented air, the soft sigh of evening, and the click of tiny brass hinges. It’s perfect for small yards, renters with containers, or anyone with a tree trunk that begs for a story.
Why it works: shade gardens often look flat. By building stone steps in miniature—just three to five risers—and a half-buried, curved door at the top, you create elevation, shadow, and intrigue. Low pathway lights graze the stone, while reflective dew and glazed pebbles add that luxe glimmer. This nook thrives in dim light, which lets miniature LEDs sparkle, and the moss keeps everything lush and camera-ready year-round.
Why It Looks Expensive: tiny architectural details. A curved, cedar-shingled “rooflet,” burned-edge cedar door with a brass upholstery tack for a knob, and a narrow, mortared stone stoop. Consistency sells it—choose a tight palette (slate, moss, bronze) and repeat it. Finish with hand-brushed matte sealant for depth over gloss. It whispers “custom,” not “craft bin.”
Materials dominate: slate shards, river rock, foraged branches, preserved sheet moss, cedar scrap, antique brass tacks, tiny screw hooks, matte concrete pavers. The photographs sing thanks to layered shadows beneath step overhangs, moss texture against smooth stone, and a single pinpoint light on the tiny door. Bonus: it’s family-friendly and renter-adaptable (build in a low trough planter)
Variations:
– Budget-friendly: use foam faux-stone panels cut into “slabs,” sealed with exterior paint; dollar-store moss.
– Small-space: stage in a deep terracotta bowl with stacked pebbles, a miniature door propped against driftwood.
– Darker version: charcoal stones, inky bottle-glass accents, blackened hardware for moody woodland vibes.
– Renter-friendly: assemble in a whiskey barrel planter; no digging required.
Key Design Elements:
- Main materials: slate or river stones, preserved moss, cedar or balsa wood, brass tacks, pea gravel
- Color palette: forest greens, charcoal, clay-brown, aged bronze
- Lighting strategy: one low, warm LED stake light grazing steps; micro-fairy lights tucked in moss
- Furniture silhouettes: none—architectural miniatures (door, steps, rooflet) do the heavy lifting
- Texture layers: plush moss + rough slate + smooth pebbles + fine gravel
- Accent details (hardware, decor pieces, plants): brass knob, tiny lantern charm, ferns, baby tears, hellebores
How To Recreate This Look:
- Start with shape: mound soil or fill a low bowl planter to make a “hillside.”
- Add structure: stack flat stones to form miniature steps; stabilize with pea gravel and exterior adhesive where needed.
- Layer greenery: lay preserved moss around steps; tuck in miniature ferns or creeping thyme along edges.
- Install the feature: craft a small wooden door, stain it walnut, add a brass tack knob, and set it at the “top.”
- Style with sparkle: run a tiny warm micro-light string under the step lips; add a small lantern charm near the door.
Why This Looks Expensive: restrained palette, real stone, and shadow play. You’re leaning on natural materials and tiny, believable architecture—no neon colors, no plastic shine.
Common Mistakes To Avoid: don’t use uniform pea gravel only; it flattens the scene. Mix pebble sizes. Avoid over-lighting—keep it moody.
Pro Styling Tip: Angle one grazing light to catch the moss nap and the stair edges; shoot at twilight for soft contrast and creamy bokeh.
Keep scrolling—our next fairy world floats above the ground with a secret water shimmer.
2. Floating Teacup Waterfall Over a Mini Fern Grove
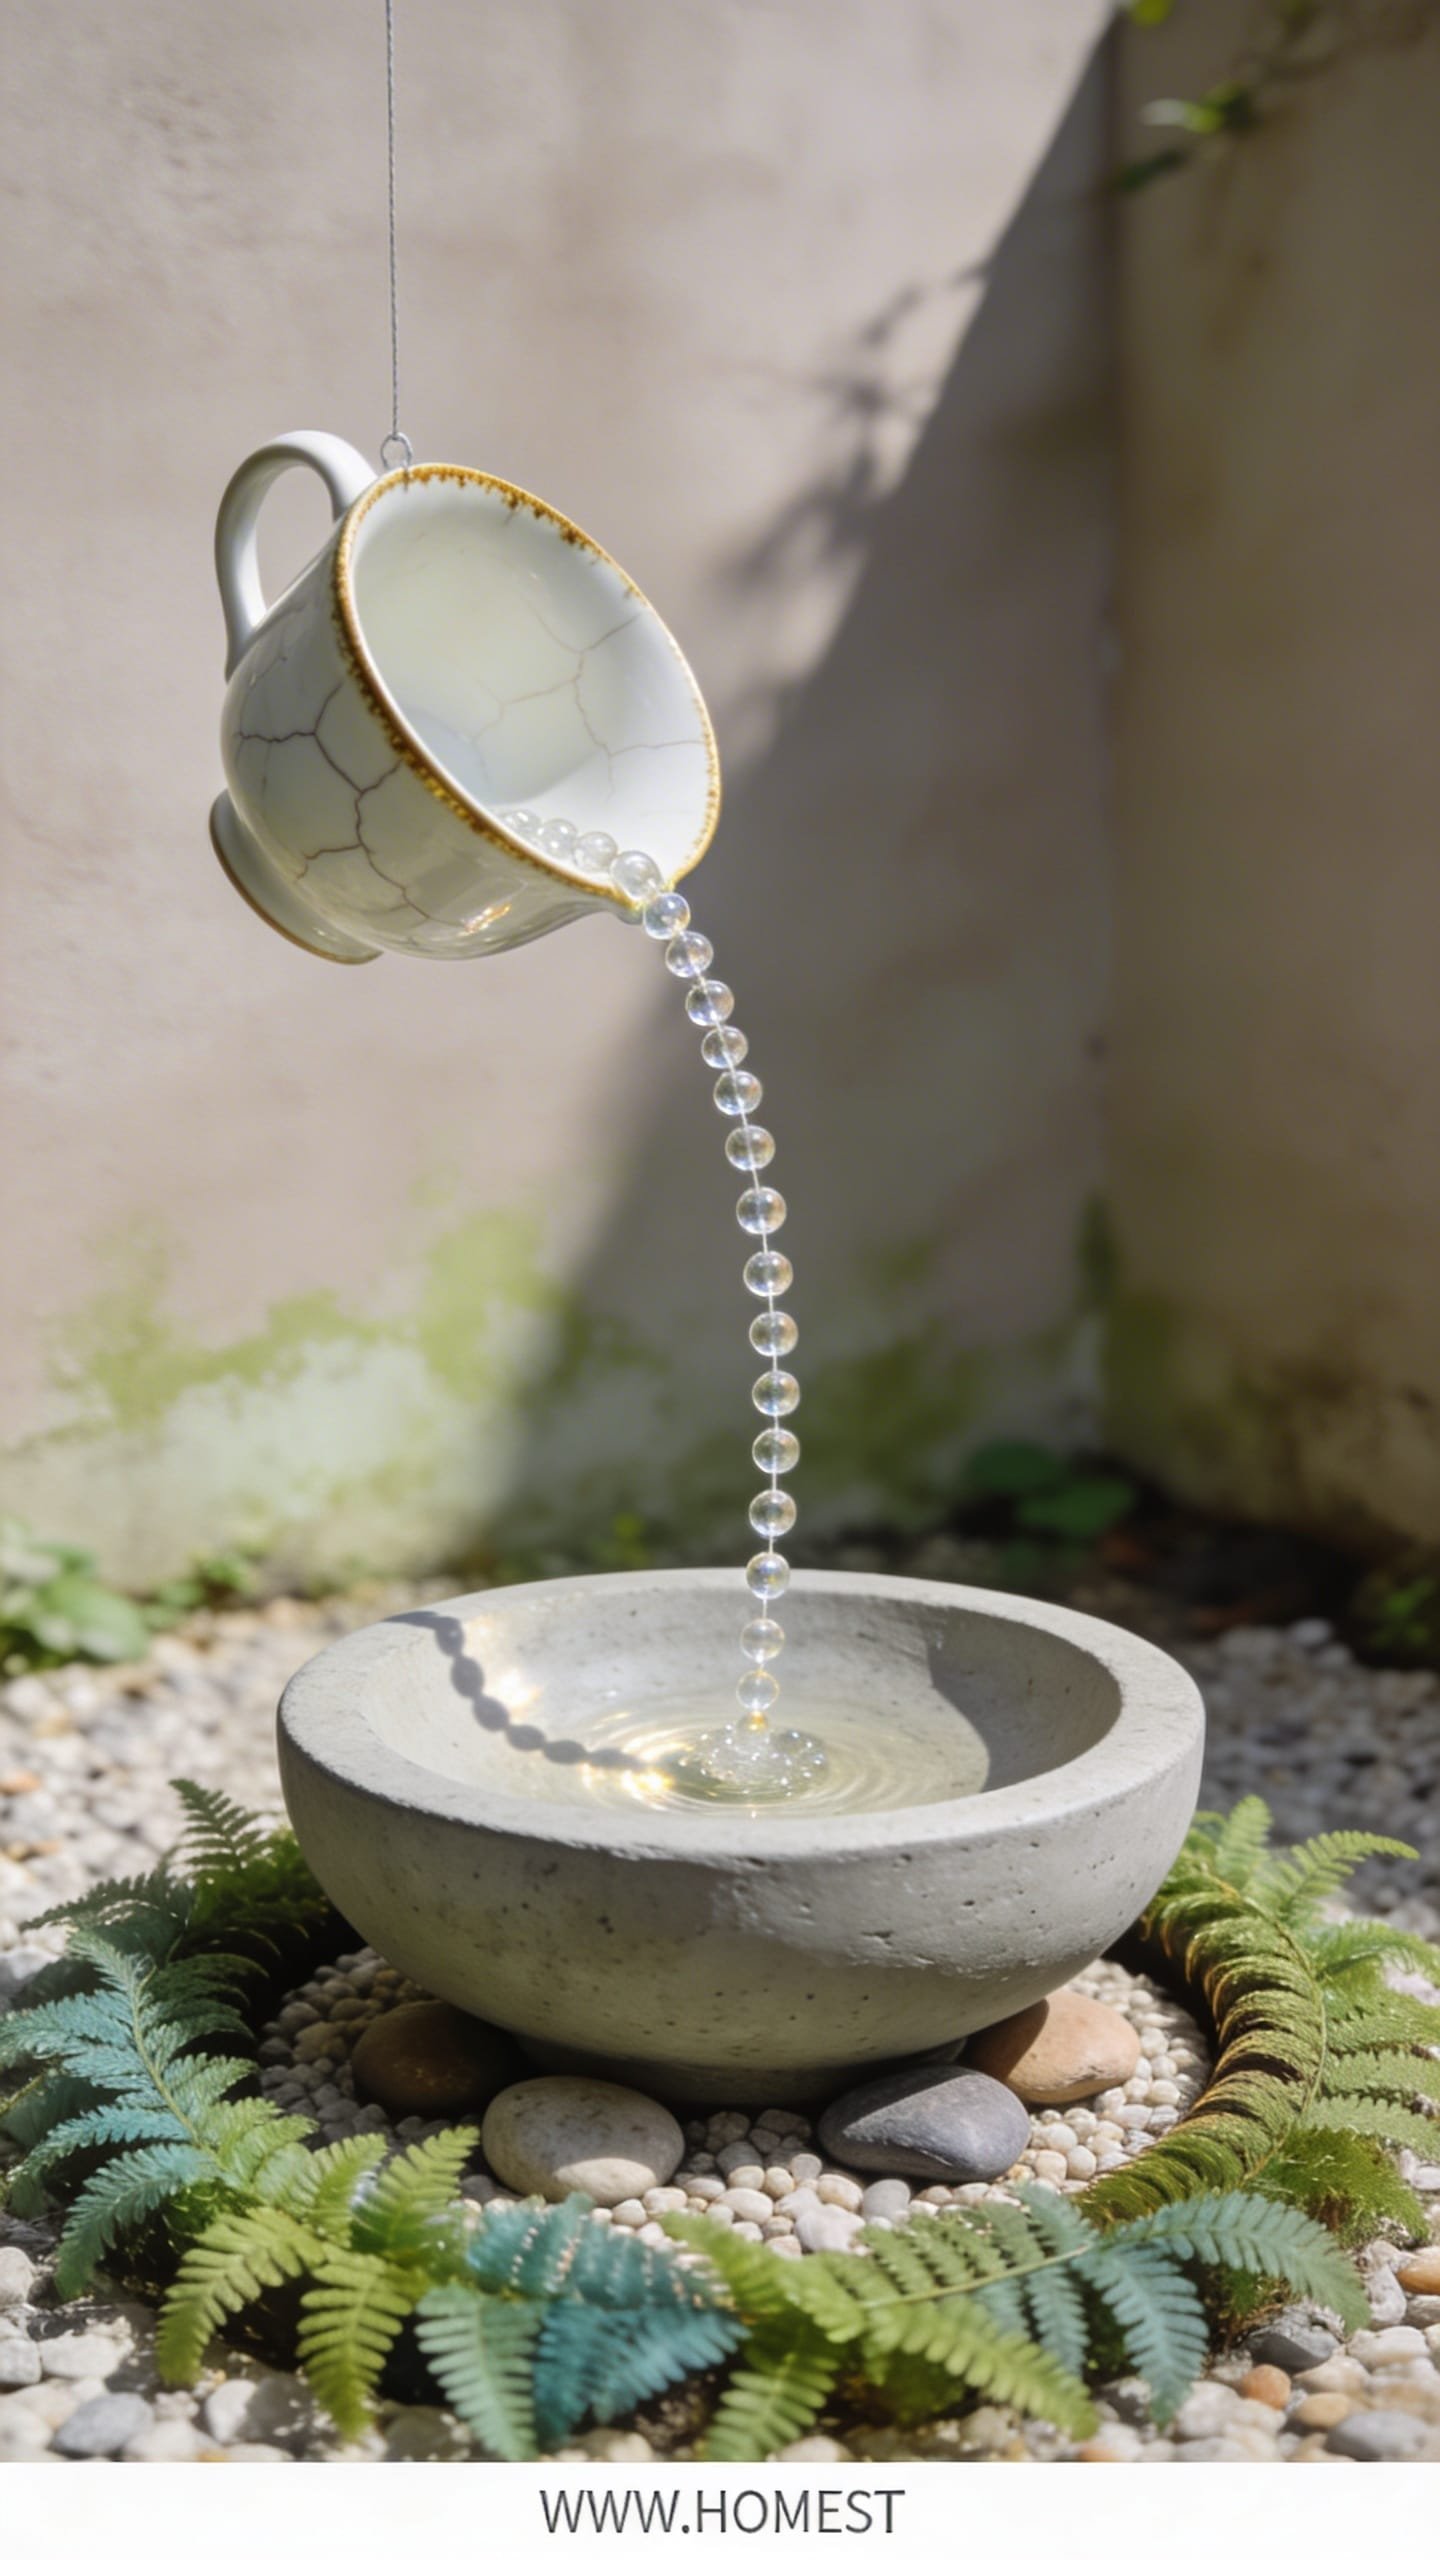
It’s that one corner that always feels off—too busy with pots yet somehow lifeless. You’ve tried stacking planters, but it still looks like a garden center aisle. Enter the floating teacup waterfall: a suspended vintage cup that “pours” a beaded stream into a fern-framed basin. The mood reads whimsical apothecary meets quaint tea garden—delicate, airy, and cool.
Why it works: vertical focus and motion in miniature. The cascading “water” (clear fishing line threaded with glass seed beads) catches light like morning dew. It thrives near shade to half-shade; ferns and moss add softness, while the reflective basin multiplies sparkle. It’s ideal for small spaces, balconies, or urban patios—no heavy digging, just clever layers and a single hero element.
Why It Looks Expensive: a strict materials language—matte black metal stakes, antique floral porcelain, brushed brass hooks, and glass beads in one cool tone (icy clear or pale aqua). Skip multicolor. Add a narrow slate plinth under the basin for that “curated” look you see in boutique hotels.
Dominant materials: vintage teacup and saucer, glass beads, fishing line, ferns (maidenhair if you’re fancy), preserved moss, slate tile, shallow ceramic bowl for the “pond,” and a micro water pump if you want real trickle. Photographs pop thanks to specular highlights on the beaded stream and the crisp silhouette of the cup against darker foliage.
Variations:
– Budget-friendly: thrift-store cup; acrylic beads; repurpose a pie pan as the basin with black river stones.
– Small-space: mount the cup over a single 8–10″ planter; still dramatic.
– Darker version: matte-black enamel mug, smoke-gray beads, deep green ferns for mood.
– Renter-friendly swap: use a shepherd’s hook; no drilling needed.
Key Design Elements:
- Main materials: porcelain teacup, glass seed beads, fishing line, ferns, slate, shallow basin
- Color palette: ivory, soft green, graphite, antique brass, clear/aqua highlights
- Lighting strategy: position to catch dappled afternoon light; optional micro uplight beneath the “pour”
- Furniture silhouettes: slender shepherd’s hook or wall bracket with a curved profile
- Texture layers: glossy beads + matte moss + feather-light fern fronds + smooth slate
- Accent details (hardware, decor pieces, plants): brass S-hooks, tiny ceramic toadstools, water-loving plants (Irish moss, lobelia)
How To Recreate This Look:
- Start with support: plant a shepherd’s hook or mount a steel bracket where you want the cup to “float.”
- Add the hero: hang the teacup by its handle from a discreet hook; stabilize it with clear line if needed.
- Layer the “water”: string 8–12 lines of glass beads onto fishing line; tie under the cup rim so they arc into the basin.
- Install the base: place a shallow bowl with black pebbles below; optional micro pump for a gentle ripple.
- Style with plants: nestle ferns and moss around the bowl; add a single tiny bench or ceramic mushroom for story.
Why This Looks Expensive: repetition and restraint. Multiple bead strands in the same tone create a luxe “sheet” of shimmer. The slate plinth reads gallery, not craft fair.
Common Mistakes To Avoid: don’t overcrowd with figurines—one or two max. Also, avoid colored gravel; it kills the antique feel.
Pro Styling Tip: For photos, back the cup with a dark leaf wall (think hellebore or camellia) to make the “water” sparkle like jewelry.
Ready for something more architectural? The next idea builds a tiny street—a village you can actually light up at dusk.
3. Cobblestone Lane With Lantern Arch And Miniature Market Stalls
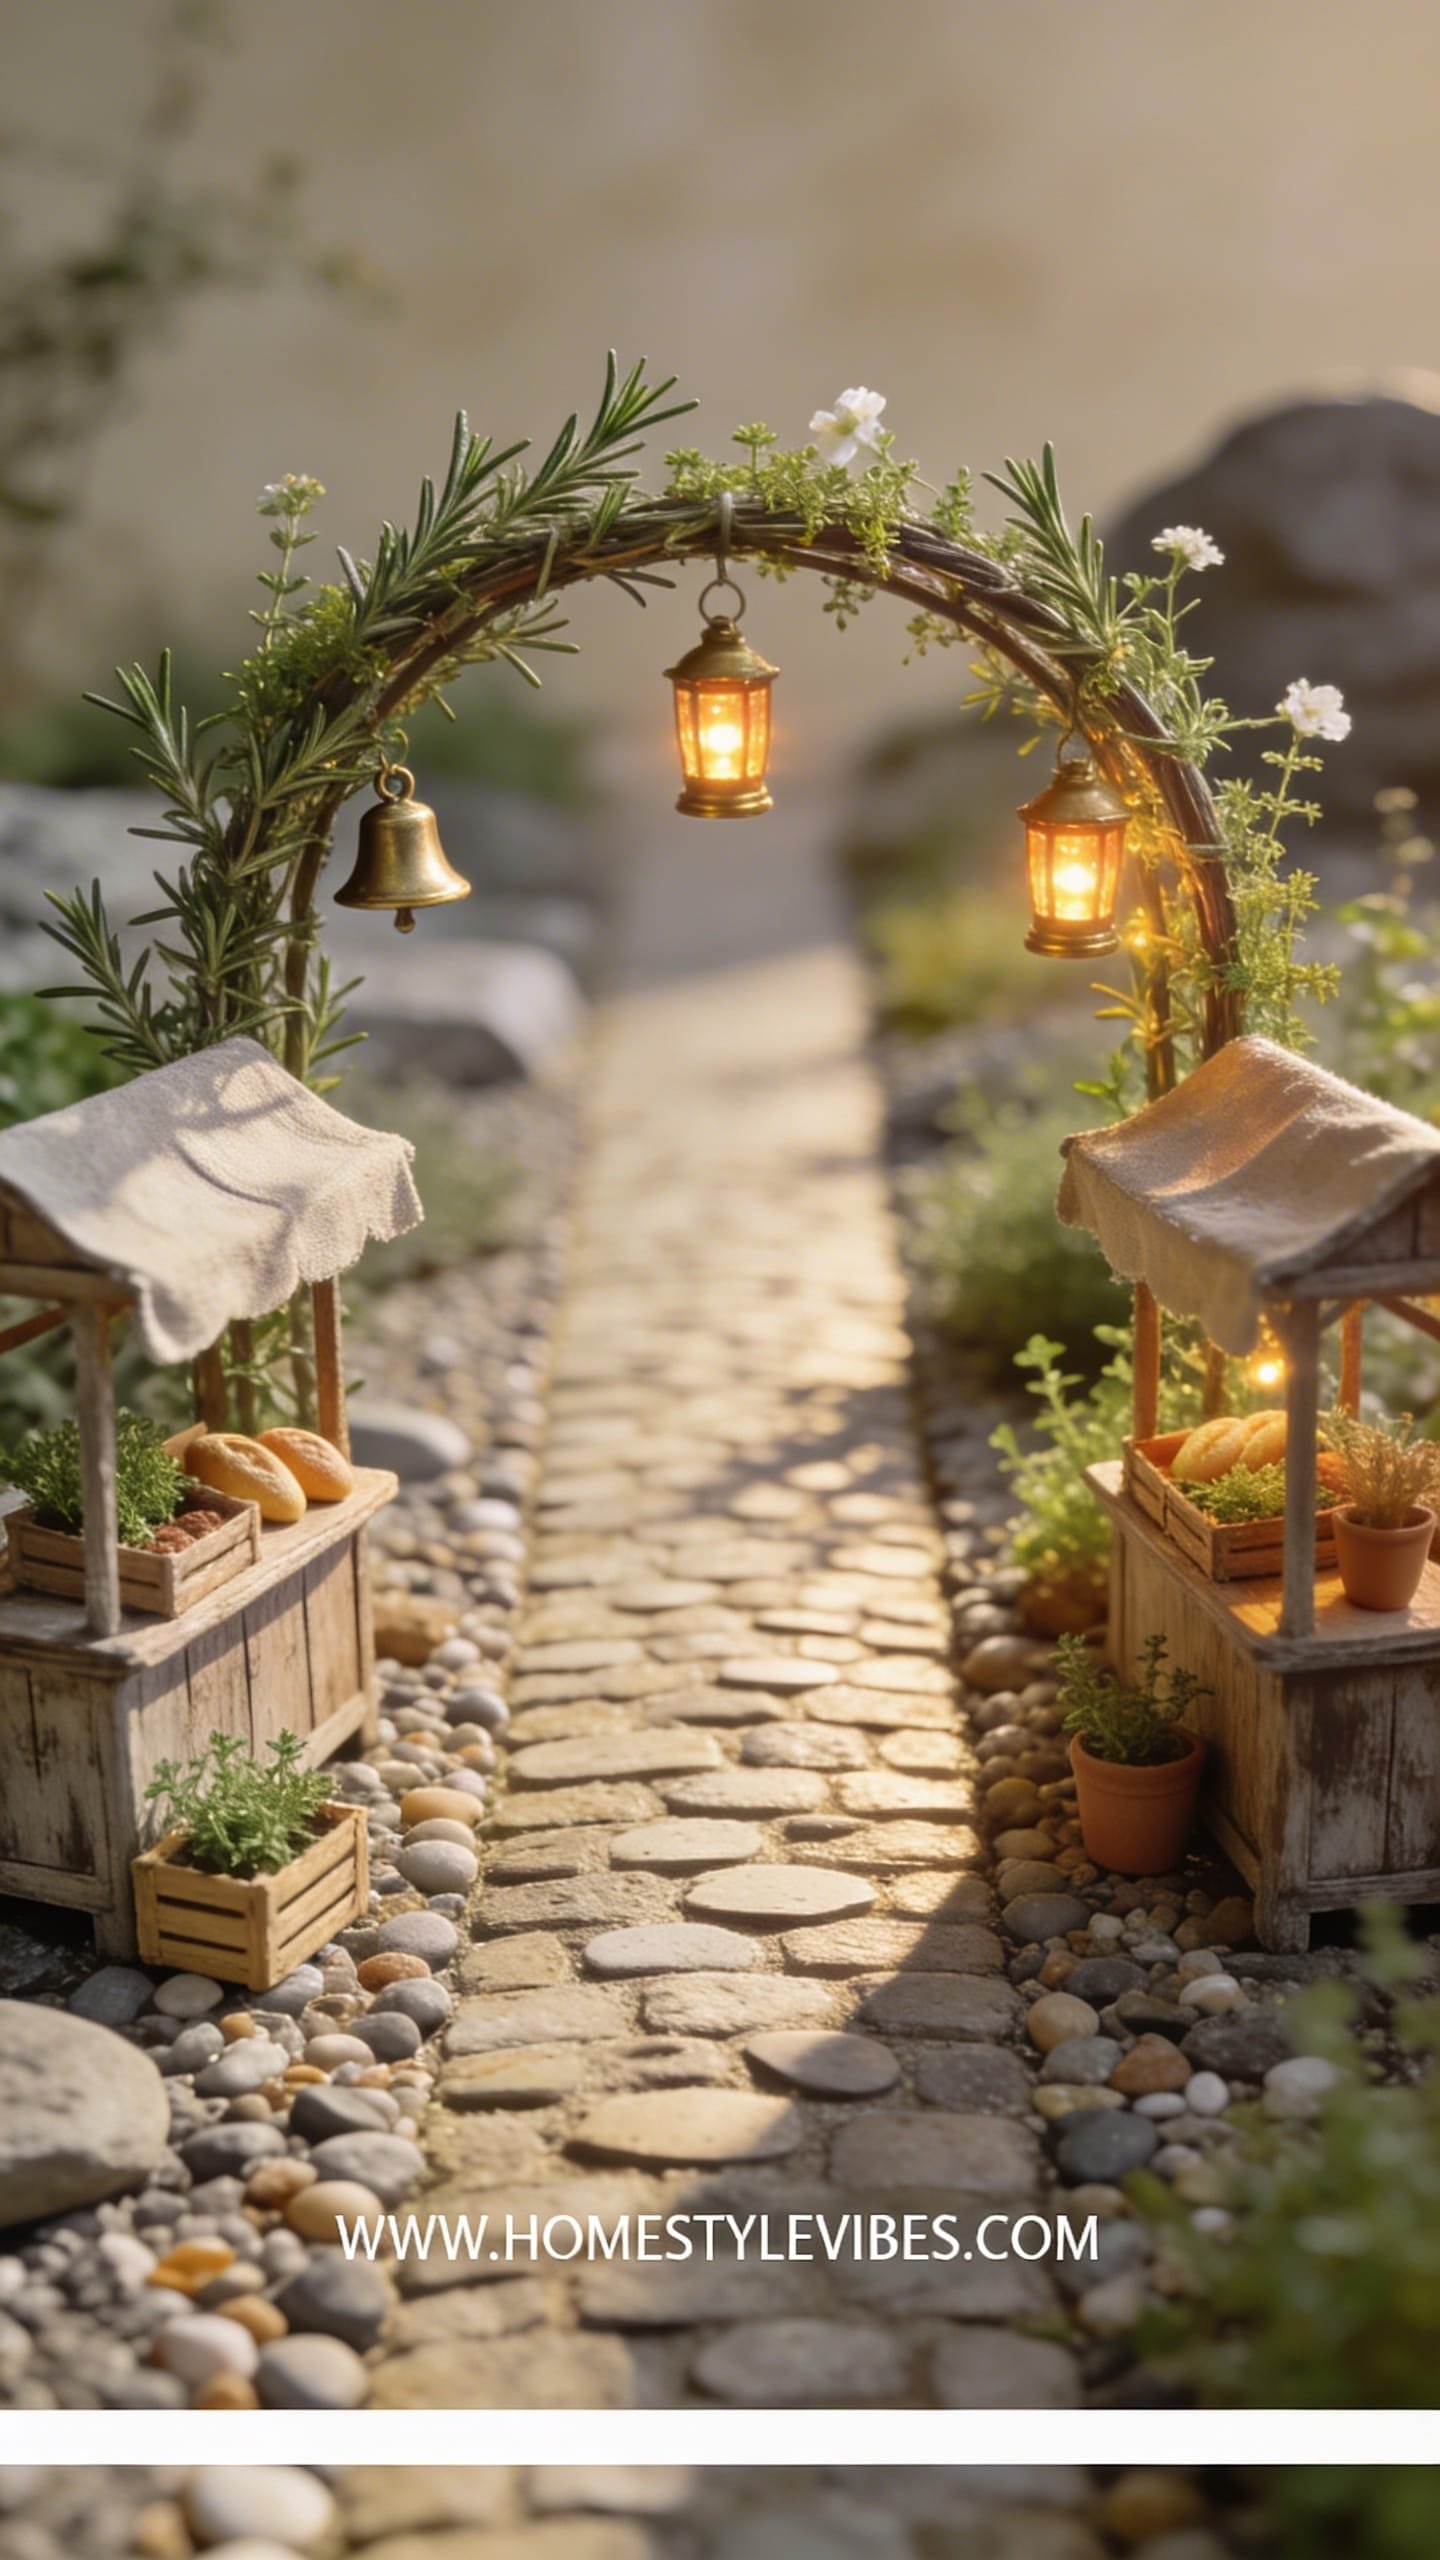
You’ve tried scattering cute fairy houses, but it still reads “toy drop zone,” not “old-world village.” We’ve all been there. The fix? A single, linear storyline: a cobbled lane under an arched trellis, flanked by two miniature market stalls. The mood is European alleyway—warm, bustling, and just a little romantic. Imagine rosemary brushing your fingers, a little bell that chimes when the wind turns, and soft amber lanterns at night.
Why it works: linear composition. Instead of random pieces, you design a pathway with clear sightlines—front to back. The trellis creates a frame, the stalls add scale and function, and tiny lanterns pull your eye down the lane. In small yards, this makes the space feel longer. In large gardens, it becomes a destination. It’s durable, kid-friendly, and easy to sweep clean.
Why It Looks Expensive: real cobbles (or hand-cut pavers), a well-proportioned arch, and repeated metals—brushed brass and iron. Choose a limited palette: warm stone, olive greens, and black. The miniature produce crates and linen swags add “artisan market” energy. Keep figurines matte; shiny plastic cheapens the scene.
Materials dominate: tumbled pavers, polymeric sand for tight joints, powder-coated metal arch, warm LED mini lanterns, cedar craft wood for stalls, linen scraps for canopies, herbs (thyme, rosemary, oregano), and dwarf boxwood for structure. The photos look editorial because of repeating verticals (stall posts), a leading-line path, and highlights from lantern glass contrasting textured stone.
Variations:
– Budget-friendly: use pea gravel as the lane with larger “stepping stones” at intervals; DIY arch from bamboo stakes.
– Small-space: create a half-lane along a planter edge; single stall; still charming.
– Darker version: basalt chips, black arch, smoky lantern covers, deep purple basil.
– Renter-friendly swap: build the entire scene in a long trough planter on casters; roll it to sunlight as needed.
Key Design Elements:
- Main materials: tumbled pavers, polymeric sand, cedar craft wood, metal trellis arch, mini LED lanterns
- Color palette: sand, olive, charcoal, warm brass, linen-ivory
- Lighting strategy: low-glow lanterns at knee height; soft uplight at the arch
- Furniture silhouettes: petite market stalls with simple slatted shelves and linen canopies
- Texture layers: rough stone + soft linen + fragrant herbs + aged metal
- Accent details (hardware, decor pieces, plants): tiny crates with faux lemons, copper bells, dwarf boxwood, thyme
How To Recreate This Look:
- Start with the path: excavate a shallow trench, level sand, and lay pavers with a slight camber; brush in polymeric sand.
- Add the frame: plant a metal arch centered over the lane’s midpoint; secure well.
- Layer structure: build two small cedar stalls (think 8–12″ wide), stain walnut, and place them opposite each other.
- Install lighting: attach mini lanterns to stall posts; run wiring discreetly behind pavers or use solar.
- Style with life: tuck herbs along the edges; add linen canopies and a tiny crate display for that “market morning” feel.
Why This Looks Expensive: cohesive materials, proper scale, and negative space. The open path between stalls gives the eye a breather—like a well-designed boutique window.
Common Mistakes To Avoid: don’t overcrowd the lane; leave at least 6–8″ of visible cobble. Avoid bright plastic accessories; go natural.
Pro Styling Tip: Shoot from a low angle down the lane to exaggerate depth. A spritz of water on pavers adds cinematic sheen.
Want a softer, more organic shape? Our next design curves and cascades like a mountain stream—no straight lines in sight.
4. Riverbank Terraces With Pebble Stream And Driftwood Bridge
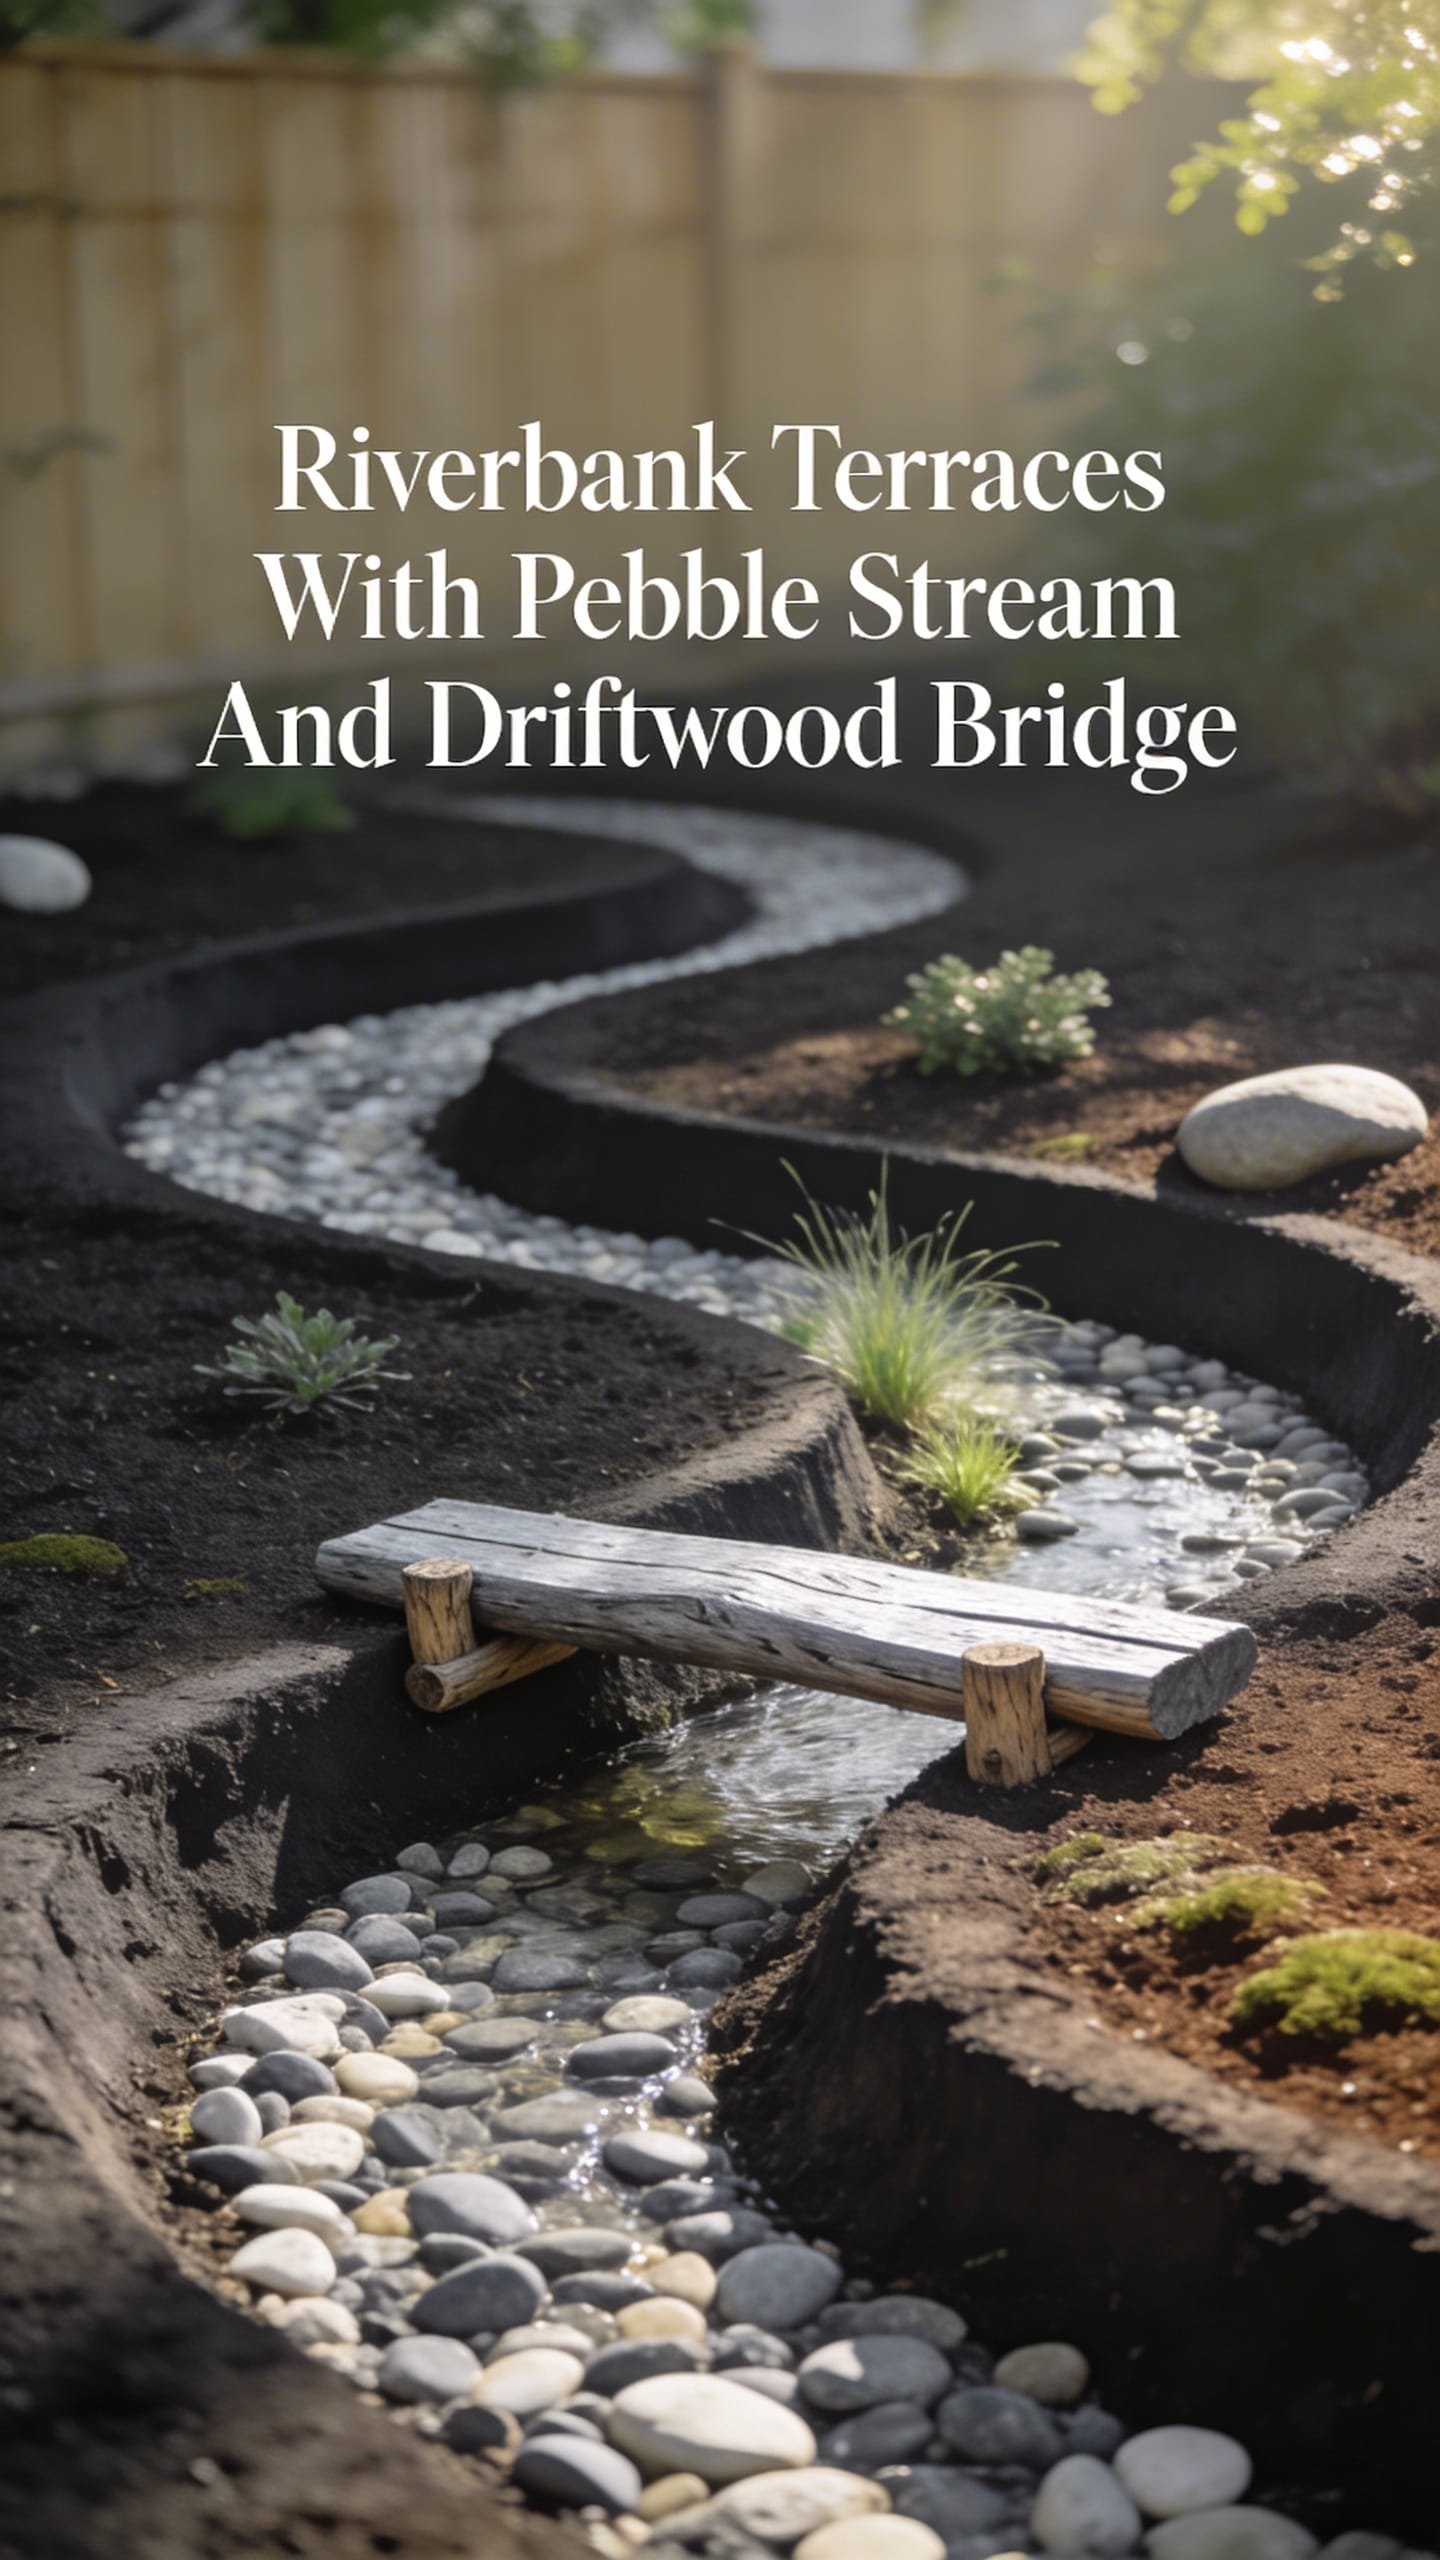
You’ve tried a birdbath or a fountain, but it still looks static—like decor, not a living scene. It’s that disconnect that keeps you from loving your backyard. This design uses terraced soil, a meandering pebble “stream,” and a simple driftwood footbridge to mimic a wild riverbank. The vibe is modern rustic-meets-national-park—calm, fresh, and grounded.
Why it works: movement and micro-topography. Terracing creates depth and shadow; the curving pebble stream leads your eye. Add a few tufts of grass (carex or dwarf mondo) and miniature irises near “water,” and suddenly the scale feels believable. Soft, indirect light keeps textures crisp—perfect for morning coffee moments.
Why It Looks Expensive: disciplined stonework and subtle grading. The stream bed uses three sizes of pebbles—coarse center, finer edges—like a real river. Dark slate “boulders” anchor corners. One graceful driftwood arch bridges the banks; not five. Add a matte-black micro-uplight that kisses the underside of the bridge for nighttime drama.
Dominant materials: mixed river pebbles, slate fragments, driftwood, dwarf grasses, sedum, creeping thyme, and a discreet bubbler if you want real water. Photos look premium thanks to the S-curve stream, variegated pebbles, and high contrast between smooth stones and tufted grasses.
Variations:
– Budget-friendly: use crushed gravel as the base with a top scatter of select river stones.
– Small-space: stage in a window box or 24″ trough with a single elegant bend; still magical.
– Darker version: prioritize black pebble and charcoal slate; add deep green mondo grass.
– Renter-friendly swap: craft the entire river in a large low planter; bridge rests on edges—no digging.
Key Design Elements:
- Main materials: river pebbles (three sizes), slate “boulders,” driftwood, dwarf grasses, sedum
- Color palette: stone-gray, charcoal, sage, soft black, silver-green
- Lighting strategy: hidden micro-uplight under bridge; subtle path markers if needed
- Furniture silhouettes: natural only—curved bridge, rounded stone clusters
- Texture layers: smooth pebbles + coarse slate + tufted grass + soft creeping groundcover
- Accent details (hardware, decor pieces, plants): tiny oar or fishing pole charm, blue glass “pools,” water snail shells
How To Recreate This Look:
- Start with terrain: create gentle terraces using soil and small retaining stones; compact lightly.
- Add the stream bed: carve an S-curve channel; lay coarser pebbles in the center, finer along edges.
- Layer structure: place slate “boulders” at bends and corners for weight and realism.
- Install the bridge: secure driftwood span across the narrowest part; anchor with hidden stakes if needed.
- Style with plants: add dwarf grasses along banks; tuck sedum and thyme into crevices; optional bubbler for sound.
Why This Looks Expensive: geological logic—stone size gradation, planted “erosion” points, and a single iconic bridge. Your eye reads it as landscape design, not decor.
Common Mistakes To Avoid: don’t lay one uniform pebble size; it looks fake. Avoid straight channels—streams should meander.
Pro Styling Tip: For photos, sprinkle a few darker wet stones near the “waterline” and keep banks matte-dry for instant contrast.
If your heart jumps for color and bloom-heavy drama, the next idea layers blossoms like couture ruffles—fairy runway, coming up.
5. Moonlit Bloom Court With Mirror Pond And Copper Fireflies
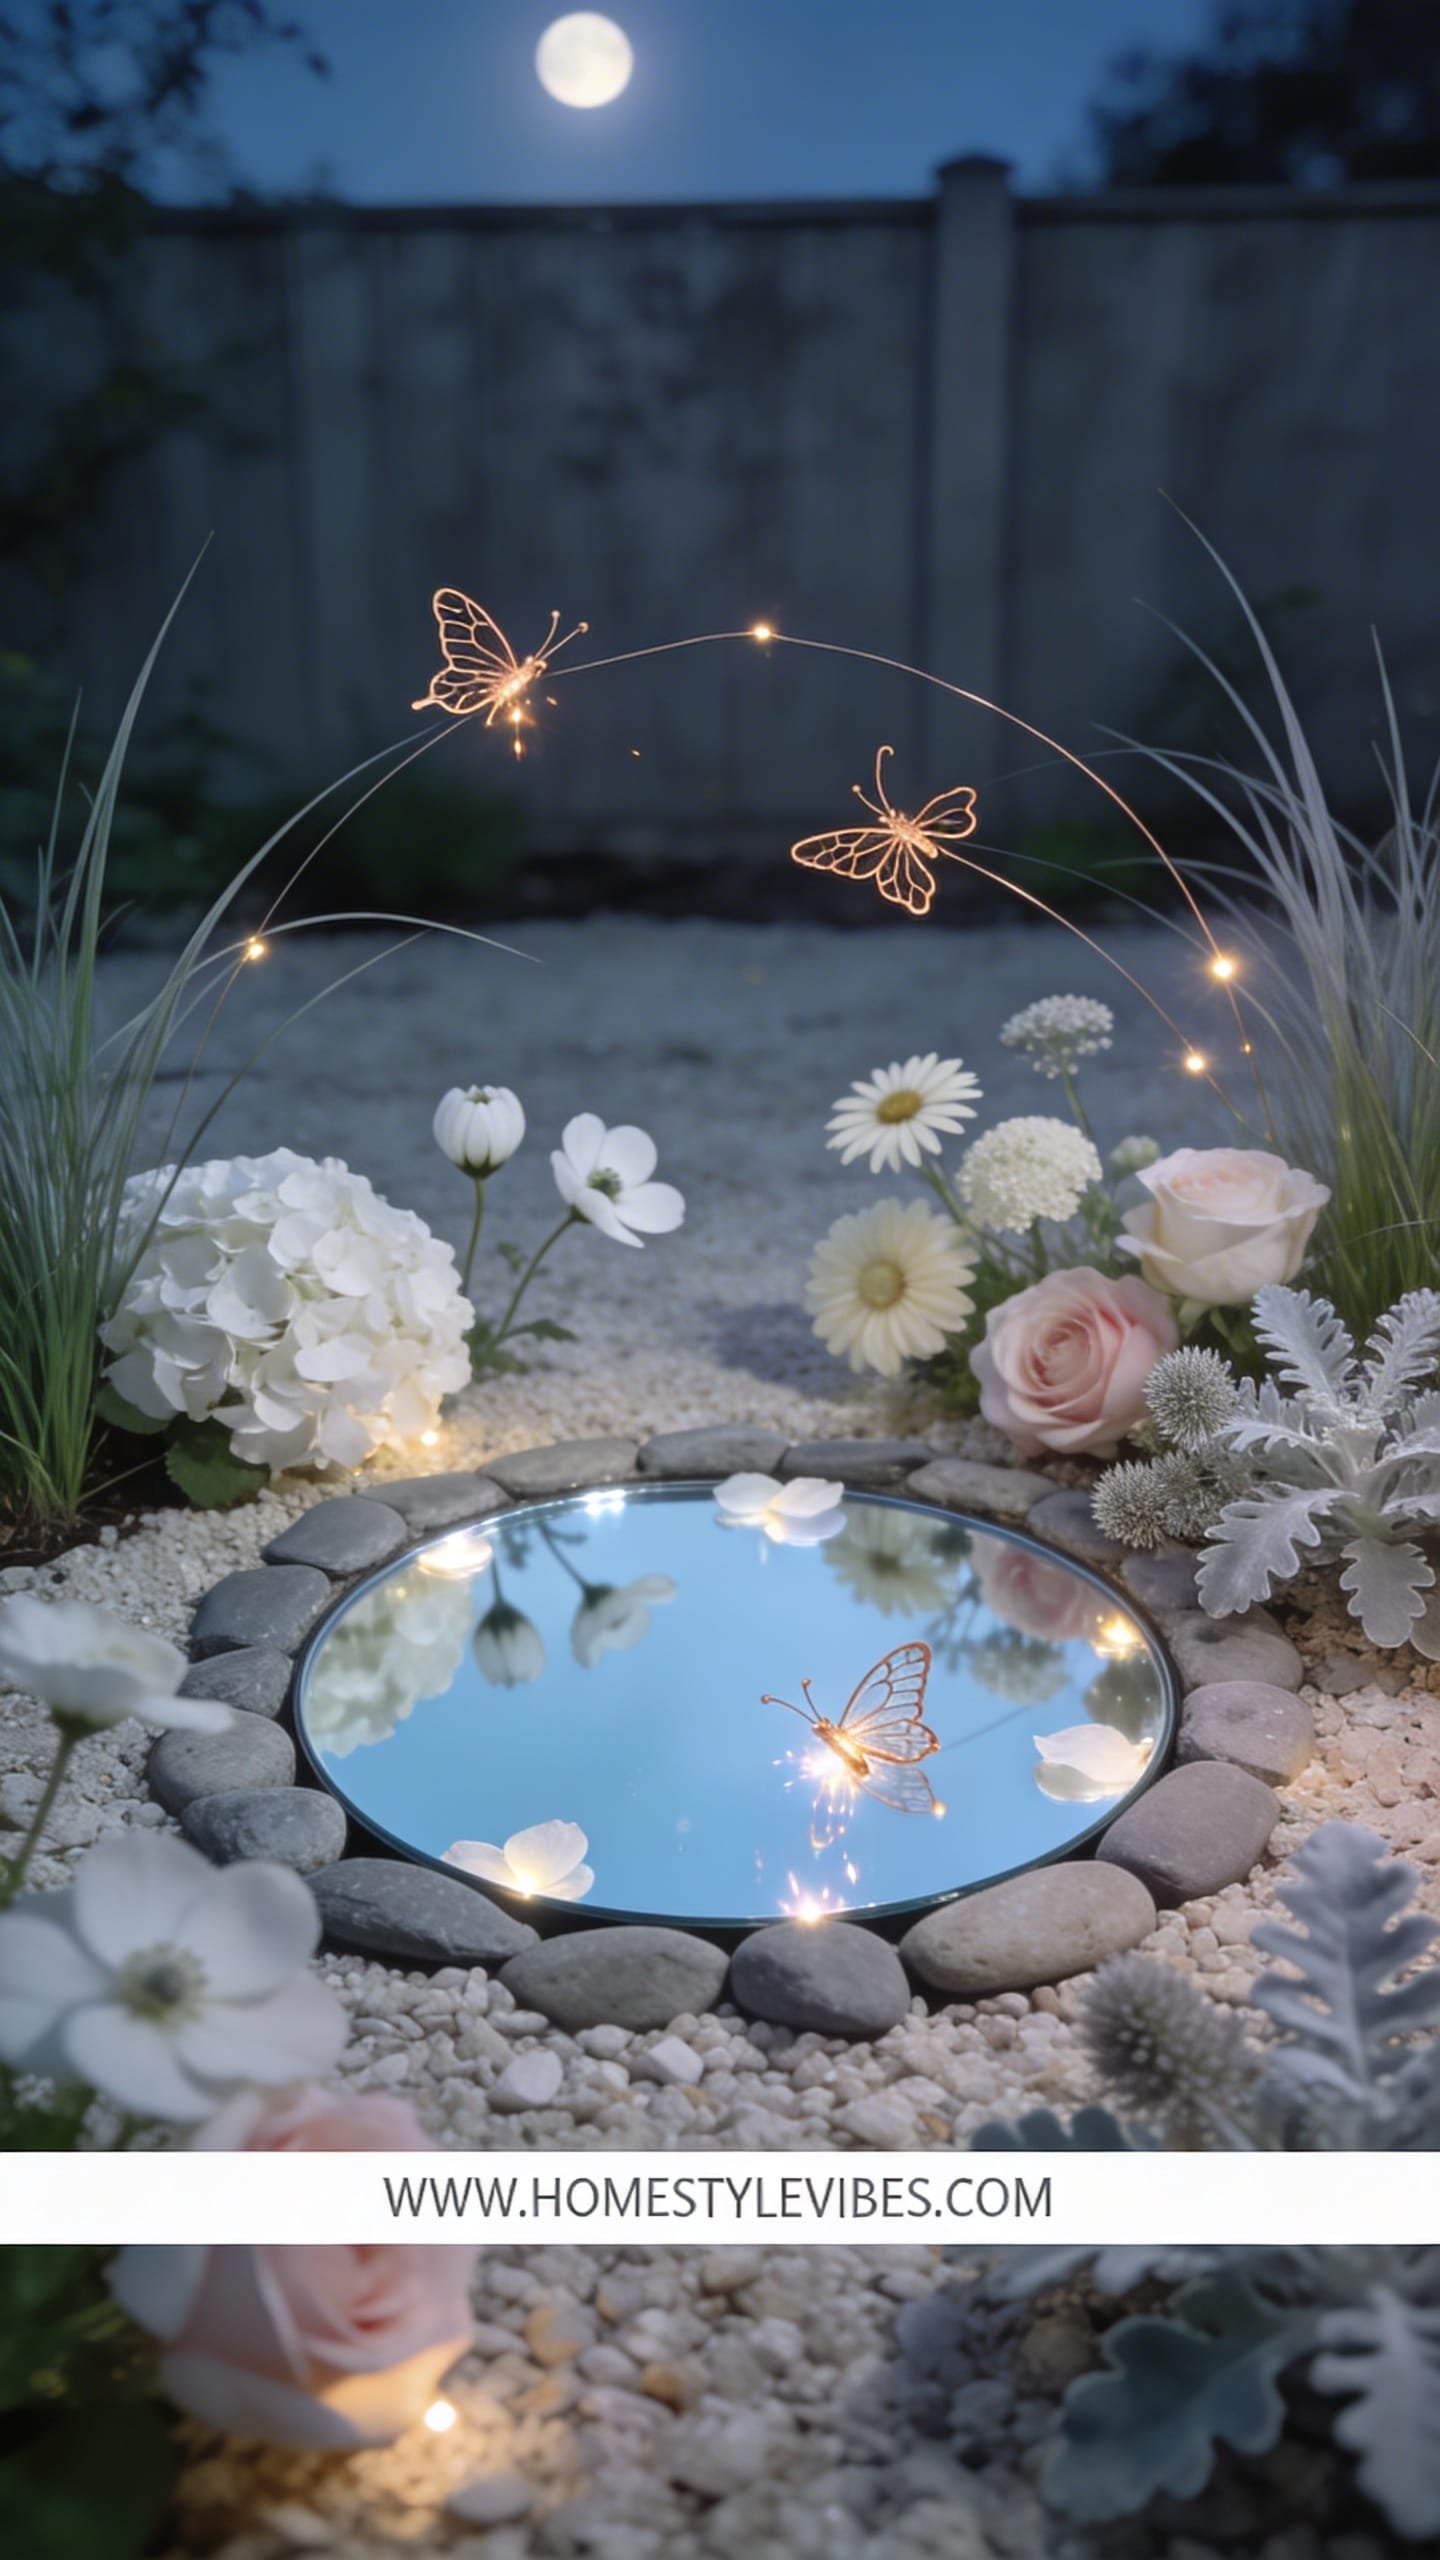
You’ve added flowers before, but chaos took over—too many colors, not enough shape. It still looked busy, not magical. This fairy garden leans into a lunar palette—whites, silvers, pale pinks—around a tiny mirror “pond,” with hand-cut copper “fireflies” that glow at dusk. The mood? Ethereal garden party meets moon ceremony. Soft, luminous, and wildly photogenic at night.
Why it works: color discipline plus reflection. The mirror pond throws light into petals; white florals glow even in low light. Copper picks up warmth from string lights and turns into tiny blinks after sunset. This design suits entertaining zones—you can place it near a patio for visible nighttime sparkle. Maintenance stays doable with perennial whites and drought-friendly silvery foliage.
Why It Looks Expensive: tone-on-tone planting and metallic details. Brushed copper wire “fireflies,” pearl-finished stones, and a matte-black rim for the pond channel that contrast—never compete. The limited palette reads intentional, like a designer’s mood board.
Dominant materials: round mirror (glass or acrylic), black concrete paver ring, white alyssum, dusty miller, silver thyme, moonbeam coreopsis, pale blush mini roses, copper wire, and tiny warm-white lights. Photographs love the highlight pops on petals, the inky black pond rim, and layered soft textures that play beautifully with shallow depth of field.
Variations:
– Budget-friendly: acrylic mirror tile backed with marine epoxy; painted terracotta rim in matte black.
– Small-space: a single 14″ planter with the mirror centered and a halo of white alyssum—instant moon motif.
– Darker version: add purple-black pansies and black mondo grass as accents; keep whites for contrast.
– Renter-friendly swap: build it in a low planter with a removable mirror insert; pack and move easily.
Key Design Elements:
- Main materials: mirror disk, concrete or terracotta ring, white and silver plants, copper wire, warm micro-lights
- Color palette: moon white, soft silver, pale blush, matte black, warm copper
- Lighting strategy: indirect uplight from behind foliage; fairy lights woven at low level
- Furniture silhouettes: circular pond with concentric planting rings for harmony
- Texture layers: glossy reflection + frosty foliage + petal softness + metallic sparkle
- Accent details (hardware, decor pieces, plants): pearl pebbles, etched moonstone charms, petite lantern stakes
How To Recreate This Look:
- Start with the pond: set a mirror disk flush with soil level; edge with a matte-black ring for crisp definition.
- Add structure: plant a tight white alyssum ring; back it with dusty miller and silver thyme for height/texture.
- Layer focal blooms: tuck in pale blush mini roses or moonbeam coreopsis as soft accents.
- Install glow: twist slim copper wire into simple “fireflies” (loops for wings), attach to thin stakes, and cluster them.
- Style with lights: weave warm micro-lights low through foliage; avoid direct glare on the mirror for subtlety.
Why This Looks Expensive: mood-board minimalism. Restraint on color, repetition of form, and a single luxe metallic make it feel curated, not cute-sy.
Common Mistakes To Avoid: don’t place the mirror in full, harsh sun; reflections can scorch leaves. Keep it shaded or dappled.
Pro Styling Tip: Shoot an hour after sunset; let the last ambient blue light kiss the whites while copper glows warm—high drama with zero filter.
So, which fairy garden are you building first—the mossy door, the floating teacup, the market lane, the riverbank, or the moonlit court? Pick one and commit. Give it a clear color palette, a focal feature, and just enough negative space around it to feel intentional. These mini worlds don’t need a yard overhaul—they need a frame, a story, and the right scale.
And here’s the real secret to that high-end, “how is this DIY?” look: texture + lighting + restraint. Texture gives you dimension and touchability—moss naps, stone edges, feathered ferns. Lighting sets the mood and makes shadows do the heavy lifting. Restraint keeps it elevated; when in doubt, remove one trinket and double down on a single hero element. Trust me, this is how designers make small spaces read like magazine spreads.
Give your backyard a pocket of wonder you’ll actually visit. Brew tea, wander out at dusk, and watch tiny lanterns blink on. You’ll hear the soft shuffle of leaves, smell rosemary or damp moss, and feel that shift—the world slows, your shoulders drop, and suddenly that forgotten corner holds a story. Not complicated, not expensive—just deeply, quietly magical. Exactly what you came here to make.