7 Outdoor Living Room Ideas That Make Your Patio Feel Like An Extension Of Your Home
You want a patio that feels like a seamless extension of your living room—somewhere you can curl up with a book, host friends, and linger past sunset. You hate the mismatched chairs, the harsh light, and that weird “outdoor furniture showroom” vibe. Picture this instead: linen-soft textures, layered wood and stone, gentle glows at eye level, and a layout that pulls you outside without a second thought. These 7 outdoor living room ideas will fix the lighting, the layout, and the comfort—so your patio looks stunning by next weekend and stays within a smart budget.
We’ll style color, furniture, textiles, and decor with intention so each design stands on its own. Think photogenic, Pinterest-worthy scenes: shadow play, warm wood grain, and coffee-table vignettes that make neighbors ask, “Where’d you get that?” If you love a relaxed, high-end vibe you can live in (kids, pets, potluck chaos and all), you’re in the right spot.
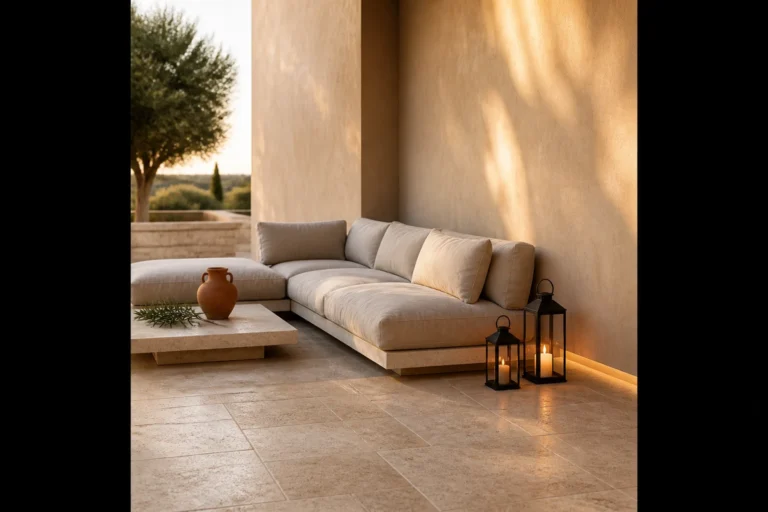
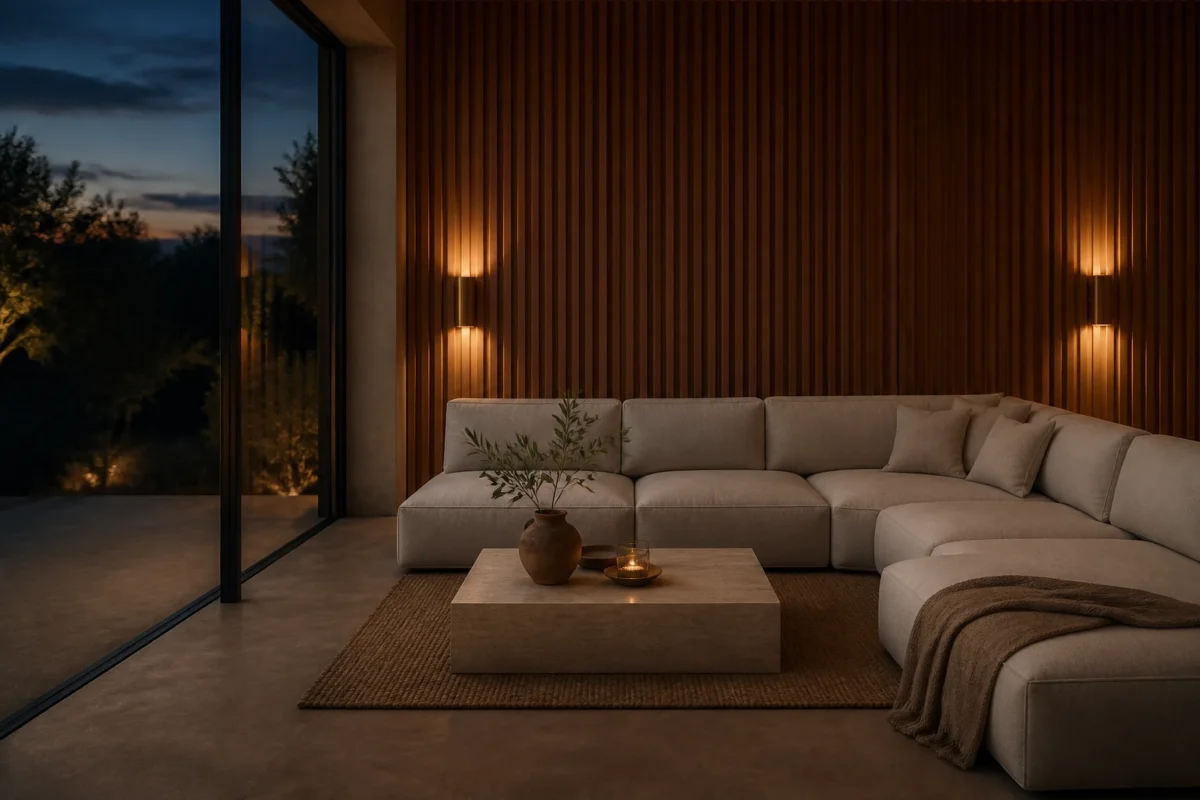
1. Cedar Slat Walls, Amber Twilight Glow, And A Deep Seat Modular Sectional
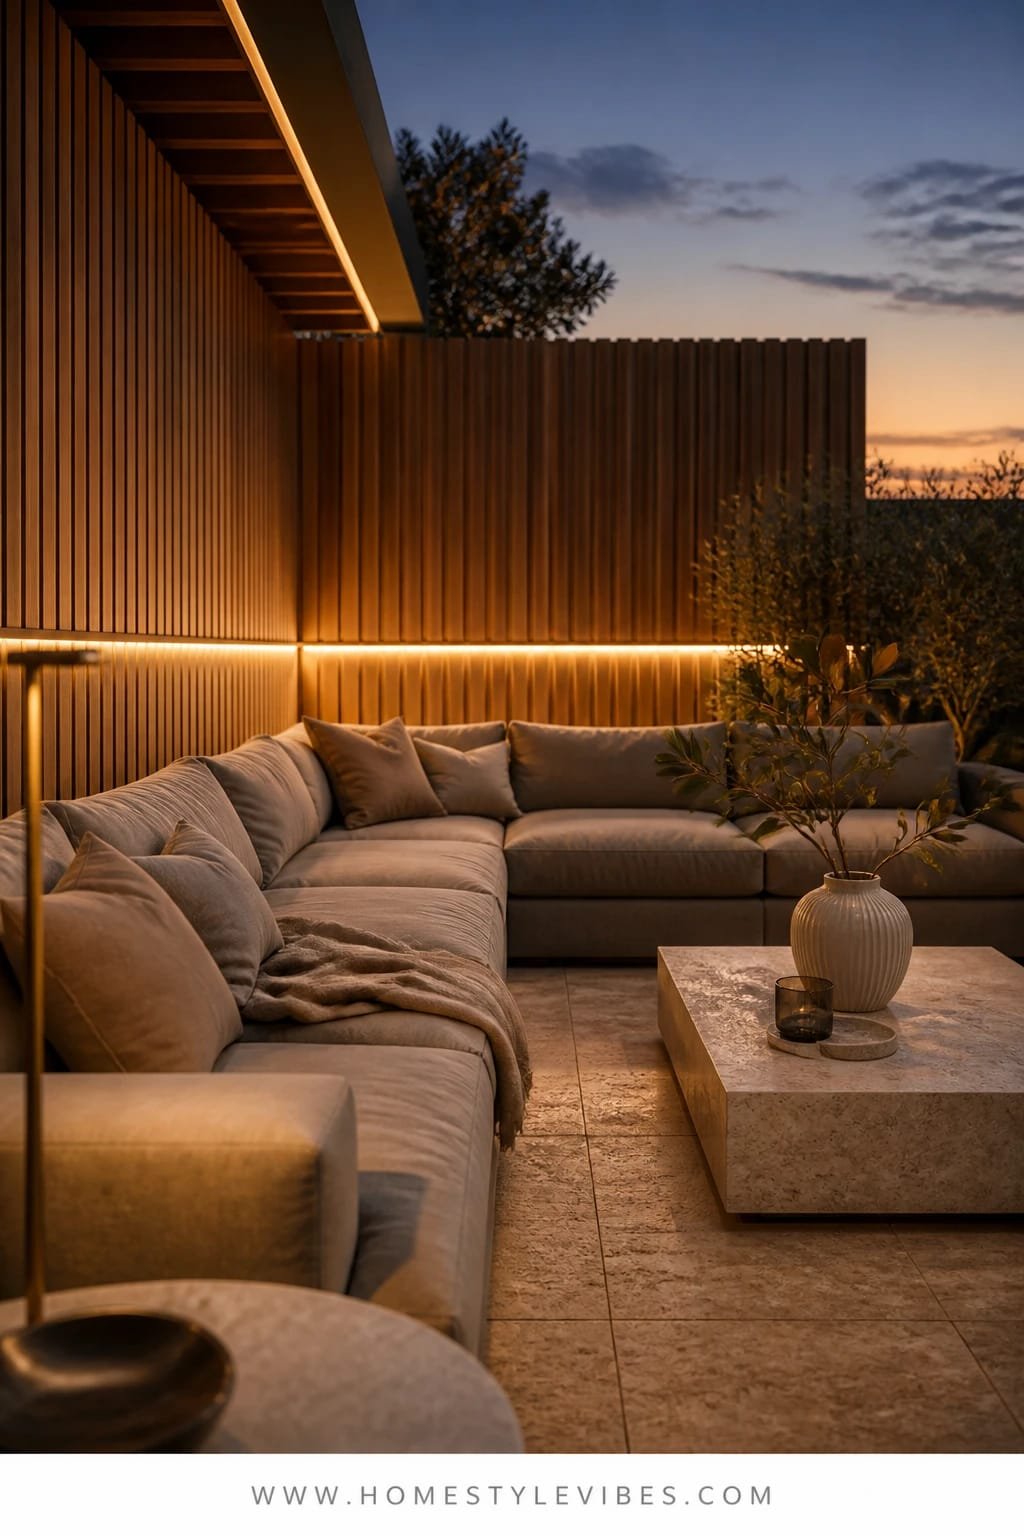
We’ve all been there: the patio looks fine at noon but turns cold and unfinished after 6 PM. You’ve tried string lights, but it still reads “temporary.” This design layers vertical cedar slats for architectural warmth, then adds amber-level lighting at seated height so faces look inviting, not washed out. The hero piece is a deep seat modular sectional—think sink-in cushions, indoor proportions, and a U-shape that says, “Stay a while.”
Mood-wise, expect cozy lounge meets boutique hotel terrace. It works beautifully in real homes because cedar slats mask ugly fences, add privacy, and soften sound. That amber glow makes every surface feel richer at night and flatters skin tones (hello, flattering selfies). The sectional brings living-room comfort outdoors and photographs beautifully: vertical lines from the slats, the plush horizon line of cushions, and low lit pools creating depth.
Variations you’ll love:
– Budget-friendly: Use stained pine or composite slat panels instead of cedar.
– Small-space version: Choose a two-piece loveseat with an ottoman to fake a chaise.
– Renter-friendly swap: Freestanding slat screens on planters with locking casters.
– Darker version: Char the wood (Shou Sugi Ban style) for charcoaled drama against warm light.
Budget Breakdown:
- Cedar slats or panels: $300–$1,200 (size dependent)
- LED wall sconces in warm 2200–2700K: $120–$400 (pair)
- Outdoor modular sectional: $900–$2,800
- Performance cushions/covers: $150–$500
- Low-pile outdoor rug: $120–$400
- Planters for screen anchoring: $80–$240
Total Estimated Cost: $1,670 – $5,540
Best For: Medium patios or balconies that need privacy and warmth; evening hosts who want flattering light, plus families who value durable seating.
Key Design Elements:
- Main materials: Cedar (or stained pine), powder-coated metal, performance fabric
- Color palette: Honey wood, putty, slate, and soft charcoal
- Lighting strategy: Amber wall sconces at 60–66 inches high, dimmable
- Furniture silhouettes: Low, deep, modular blocks; one strong coffee table
- Texture layers: Slatted wood, nubby textiles, matte planters
- Accent details: Olive-toned throw pillows, ceramic tray, sculptural lantern
How To Recreate This Look:
- Start with a slatted backdrop—mount cedar or place freestanding panels for privacy and architecture.
- Add a modular sectional with at least one corner piece to anchor the layout.
- Layer a low-pile rug that fits fully under front legs of the sofa for a finished look.
- Install dimmable sconces at seated-eye level in 2200–2700K, then test after sunset.
- Style with two large planters, a single oversized lantern, and 2–3 textured pillows.
Why This Looks Expensive: Vertical wood cladding plus restrained lighting creates a custom-built vibe, and the deep sectional reads “indoor luxury” instead of “patio set.” The scale and repetition of the slats mimic high-end hospitality design.
Watch Out: Don’t mount lights too high. Overhead glare kills coziness. Keep sconces near eye level and avoid bright white bulbs that make the wood look orange.
Pro Styling Tip: For photos, angle a floor lantern just out of frame to cast a soft triangle of light across the rug—instant depth and mood.
Keep scrolling—next up is for the color-shy minimalist who still wants softness.
2. Limestone Pavers, Milky Daylight Wash, And A Low Profile Fire Table
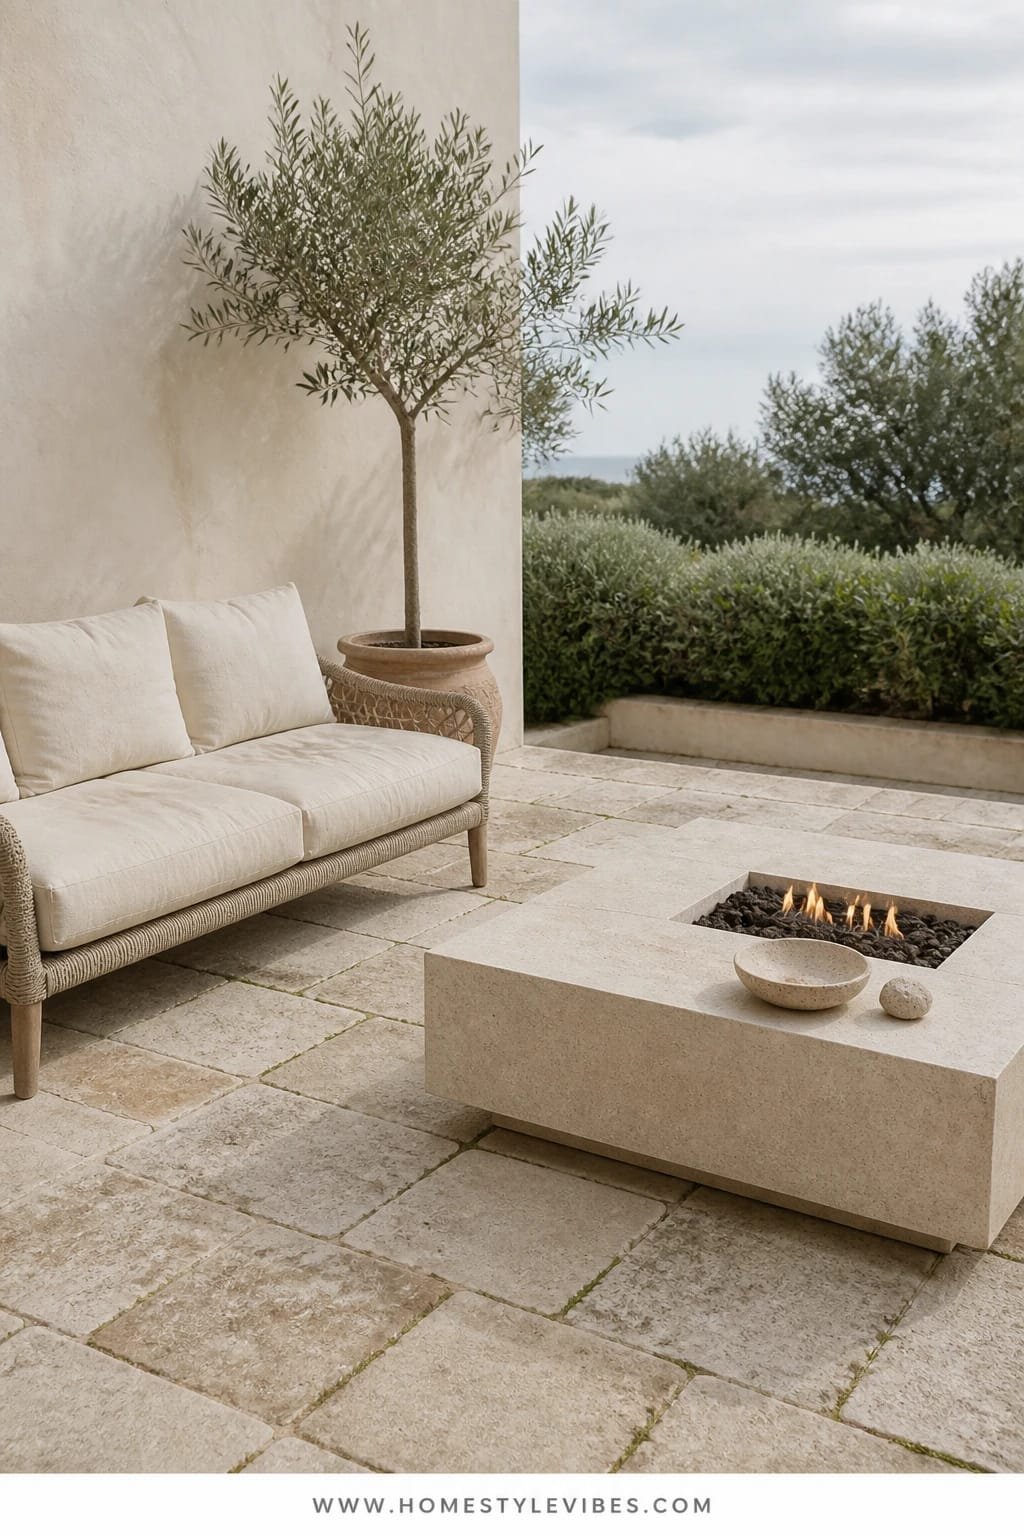
It’s that one corner that always feels off: great view, but visually flat. You’ve tried colorful pillows, but it still looks sparse. This setup is about lightness and texture instead of color. Limestone pavers ground the scene with calm, milky neutrals; the daylight reads soft and diffused; and a low-profile fire table brings a sculptural focal point without heaviness.
The feeling is modern Mediterranean—serene, breezy, and easy to maintain. It thrives in small spaces because the palette stretches the eye and the low fire table keeps sight-lines clear. Photographing it is a dream: the pavers bounce a gentle glow back onto faces, and the fire adds warm contrast at dusk.
Variations:
– Budget-friendly: Use porcelain tiles in a limestone finish.
– Small-space: A compact square fire bowl instead of a table.
– Renter-friendly: Interlocking deck tiles with a portable propane unit.
– Darker version: Swap to gray limestone and charcoal cushions for a cooler tone.
Key Design Elements:
- Main materials: Limestone or porcelain-look tiles, aluminum, tempered glass
- Color palette: Bone, sand, cloud gray, soft black accents
- Lighting strategy: Embrace natural light; add one low, warm uplight near a plant for evenings
- Furniture silhouettes: Low, armless lounge chairs and a slimline bench
- Texture layers: Smooth stone, thin linen, soft boucle-style outdoor textiles
- Accent details: Subtle black metal, glass hurricane, olive branches
Budget Breakdown:
- Limestone or porcelain pavers: $600–$2,000 (area size dependent)
- Low fire table or bowl: $350–$1,600
- Two lounge chairs: $300–$1,200
- Outdoor bench: $180–$600
- Rug (optional): $120–$350
- Planter uplight: $40–$120
Total Estimated Cost: $1,590 – $5,870
Best For: Compact patios or terraces with good natural light; design lovers who want a crisp, gallery-like outdoor living room.
How To Recreate This Look:
- Start with a pale, matte floor—limestone or porcelain in a soft bone tone.
- Add a low fire table centered between two low chairs to define the conversation zone.
- Layer slim bench seating along a wall to extend capacity without clutter.
- Install a single plant uplight that grazes a tree or tall shrub for nighttime texture.
- Style with one glass hurricane and a minimal tray; keep pillows tonal.
Why This Feels Designer: The quiet palette plus low sight-lines create negative space. That restraint lets texture and form do the talking—very editorial, very intentional.
One Thing To Avoid: Avoid busy patterns and lots of small decor. You’ll break the calm. Choose larger, fewer pieces instead.
Pro Styling Tip: Shoot during golden hour so the stone reads creamy, not cold—your photos will glow without filters.
Quick mindset check: You don’t need to copy everything. If one idea whispers “yes,” start there. Finished beats perfect, every time.
3. Woven Rattan, Dappled Morning Light, And A Curved Canopy Sofa
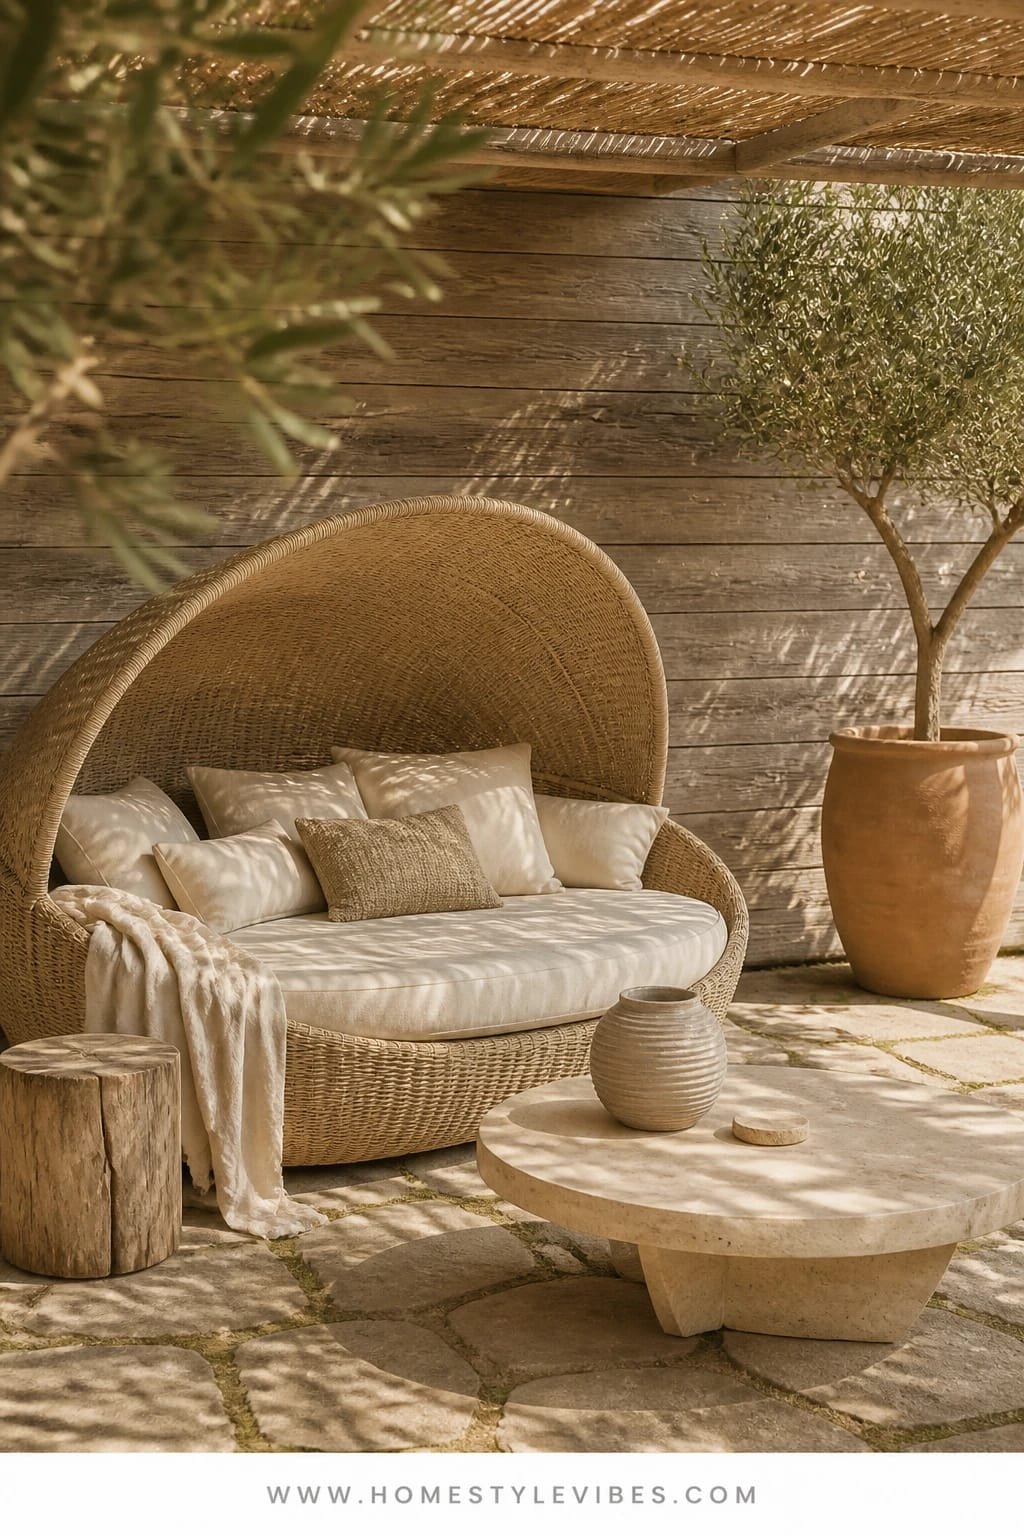
You want that lazy-Sunday vibe, but your patio seating feels stiff and “office lounge.” We’ve all been there. This look leans into curves and woven texture so the whole scene feels soft, rounded, and human. A curved canopy sofa instantly creates shade and intimacy; woven rattan adds airiness; and the dappled morning light makes every surface glow like a vacation café.
It works for families because rattan-look synthetics are tough and easy to wipe. Curves help with tight pathways and photograph beautifully—no hard corners chopping the frame. The light filtering through the canopy gives the prettiest patterned shadows across cushions. It’s the kind of patio living room that makes you linger over a second coffee without even trying.
Variations:
– Budget-friendly: Use a curved loveseat with a separate canopy or shade sail.
– Small-space: Choose a half-moon loveseat with nesting tables.
– Darker version: Espresso-tone rattan with moss-green cushions.
– Renter-friendly: Freestanding umbrella with tilting arm to fake the canopy effect.
Budget Breakdown:
- Curved canopy sofa: $800–$2,400
- Nesting side tables: $120–$450
- Outdoor rattan chairs (pair): $280–$900
- Shade sail or offset umbrella (if needed): $120–$600
- Outdoor cushions and covers: $120–$360
Total Estimated Cost: $1,440 – $4,710
Best For: Morning people, readers, and anyone who wants a loungey conversation nook with soft edges and light shade.
Key Design Elements:
- Main materials: Woven rattan (synthetic), powder-coated frames, performance fabric
- Color palette: Oat, camel, warm white, muted sage
- Lighting strategy: Natural dappled shade; add a portable lantern for late mornings
- Furniture silhouettes: Curved sofa, rounded chairs, oval or drum tables
- Texture layers: Basketweave, slubbed linens, soft fringe throw
- Accent details: Terracotta pots, a trailing vine, woven coasters
How To Recreate This Look:
- Start with a curved seating anchor and orient it toward your best view or brightest light.
- Add two rounded chairs angled slightly inward to hug the conversation.
- Layer in nesting side tables so drinks and books have a home.
- Install shade—canopy, sail, or offset umbrella—to create that filtered light pattern.
- Style with tonal cushions and one subtle pattern (thin stripe or tiny check).
Why This Reads High-End: Curves feel custom and generous. When everything isn’t a rectangle, the space relaxes. The soft silhouettes also photograph softer, which signals comfort and polish.
The Most Common Mistake: Skipping shade. Without it, rattan reads brassy at noon and cushions fade fast. Give the light something to pass through.
Pro Styling Tip: For photos, place a leafy plant just outside the frame to cast a lacey shadow across the sofa—instant depth and movement.
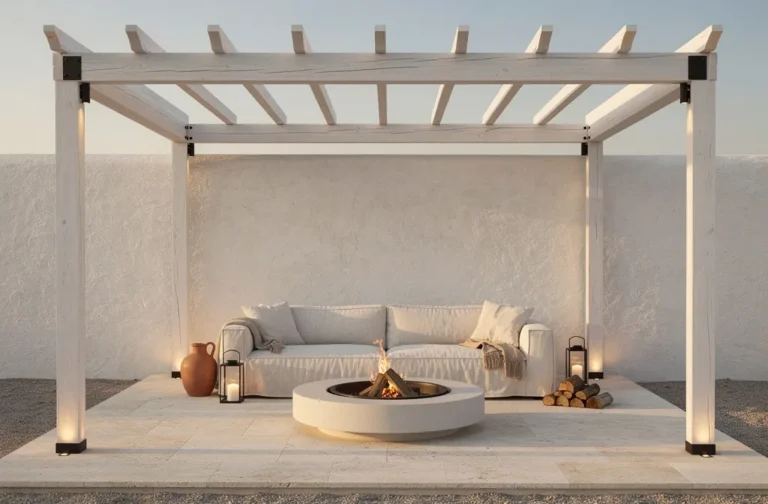
4. Blackened Steel Pergola, Candlelit Warmth, And A Slatted Dining Banquette
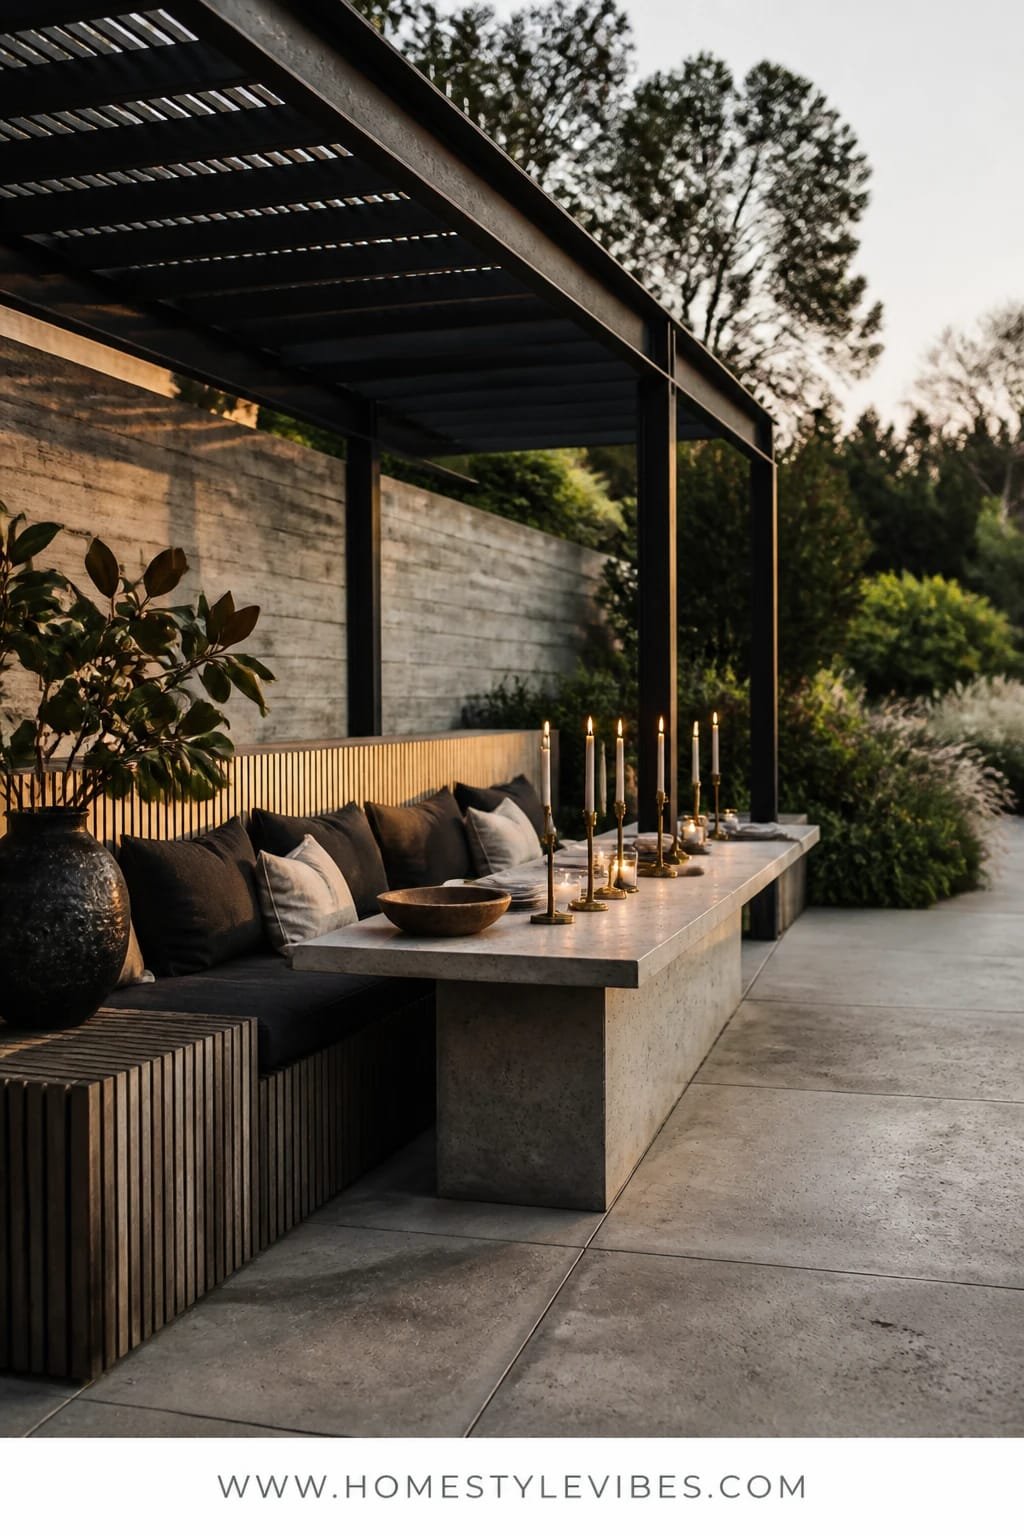
You want to host, but your patio layout fights you—chairs scattered, table too small, nowhere to land a platter. This design builds structure. A blackened steel pergola gives you strong lines overhead, candles bring intimacy, and a slatted dining banquette maximizes seating on one side while keeping a clean aisle on the other. It’s equal parts functional and mood-laden.
Mood: urban bistro meets indoor-outdoor loft. Families and frequent hosts love it because the banquette seats extra people without extra chairs. Candlelight and low lanterns carve out glowing pockets that read “fancy dinner” even on a Tuesday. Photographically, the dark pergola frames your shot while the candlelight punctuates like little constellations.
Variations:
– Budget-friendly: Wood pergola stained dark with off-the-shelf brackets.
– Small-space: Short pergola “frame” over just the banquette zone.
– Renter-friendly: Freestanding pergola kit plus a storage bench with cushion.
– Darker version: Add charred-wood banquette slats with linen-cushion contrast.
Budget Breakdown:
- Steel or wood pergola: $900–$4,500
- Built-in or freestanding slatted banquette: $400–$1,600
- Dining table (72–84 in): $400–$1,800
- Chairs (4–6): $240–$900
- Candle lanterns + hurricane set: $80–$280
- Outdoor cushion set: $150–$450
Total Estimated Cost: $2,170 – $9,530
Best For: Entertainers who need real seating, narrow patios that benefit from banquette efficiency, and anyone who loves dinner outdoors.
Key Design Elements:
- Main materials: Blackened steel or dark-stained wood, slatted timber, linen-blend cushions
- Color palette: Charcoal, linen, walnut, soft brass candlelight
- Lighting strategy: Candle clusters at table height; subtle string lights tucked under pergola beams
- Furniture silhouettes: Rectangular table, banquette bench, airy chairs with open backs
- Texture layers: Smooth metal, ridged slats, stoneware plates, gauzy runner
- Accent details: A single olive tree in a concrete pot, linen napkins, matte black flatware
How To Recreate This Look:
- Start by framing the zone with a pergola or freestanding frame aligned with your home’s architecture.
- Build or buy a slatted banquette the same length as your table for clean lines.
- Add a durable rectangular table with enough legroom under the banquette.
- Layer candles at multiple heights and tuck micro-string lights under beams for a subtle twinkle.
- Style with a textured runner, a single large planter, and neutral cushions for cohesion.
Why This Looks Intentional: The pergola creates a room-within-a-room, the banquette solves seating like a built-in, and the candlelight sets the tone. It reads planned, not pieced together.
Don’t Do This: Don’t push the table too far from the banquette; you’ll end up leaning. Aim for 12–14 inches from banquette edge to table for comfortable dining posture.
Pro Styling Tip: For moody photos, light candles only on the table’s left side and one lantern on the ground right side—this cross-lighting adds sculptural shadows.
Take a breath. This isn’t about recreating a showroom. It’s about building a space that feels like yours—and functions on your busiest days.
5. Travertine Tile, Soft Moonlight Spill, And A Sculptural Chaise Pair
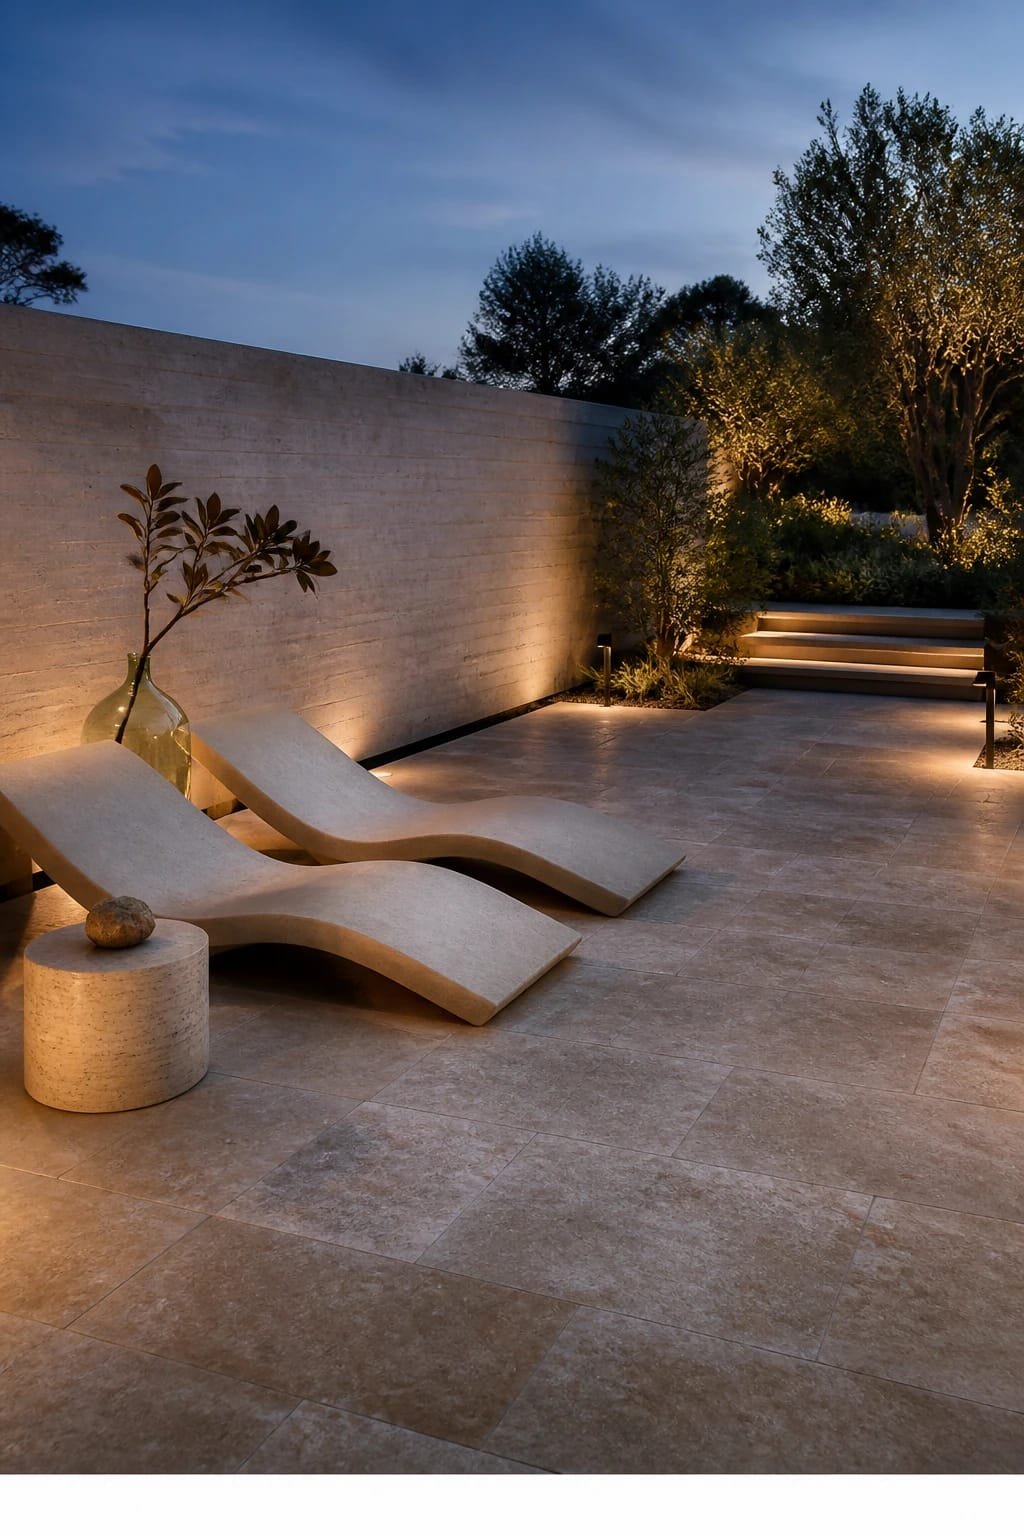
You crave “spa outside,” but the patio currently screams “gym locker room with a hose.” This concept edits down to two statement chaises with sinuous lines, set on a travertine floor that looks like a boutique resort. Lighting stays low and lunar—think soft spill that kisses edges, not spotlights that interrogate your deck boards.
The mood is hotel-spa calm. It works in real homes because two great chaises beat five mediocre chairs, and travertine or porcelain-look travertine cleans easily. Photos shine thanks to travertine’s mottled, creamy veining and the negative space around the chaises—it’s visual breathing room.
Variations:
– Budget-friendly: Porcelain tile with travertine print and powder-coated steel chaises.
– Small-space: One chaise plus a rounded ottoman.
– Darker version: Silver travertine with ink cushions.
– Renter-friendly: Interlocking tiles and portable solar stake lights aimed down.
Budget Breakdown:
- Travertine or porcelain-look tiles: $700–$2,400
- Two sculptural chaises: $500–$2,200
- Side table (stone or concrete): $120–$450
- Low path or step lights: $120–$300
- Textured towels/throws: $60–$180
Total Estimated Cost: $1,500 – $5,530
Best For: Sunseekers, poolside patios, or quiet corners that need one luxurious moment.
Key Design Elements:
- Main materials: Travertine (or porcelain), powder-coated frames, performance mesh
- Color palette: Cream, shell, dune, with black or espresso accents
- Lighting strategy: Low, shielded, downward-facing moonlight effect
- Furniture silhouettes: Curved, sculptural, low-slung chaises
- Texture layers: Stone veining, ribbed towel textures, linen throw
- Accent details: Stone side table, minimal planter, small stack of design books
Why This Feels Designer: Editing is the luxury. Two well-shaped pieces on a beautiful floor read far more “resort” than a cluster of average furniture. The moonlight effect avoids glare and keeps highlights buttery.
How To Recreate This Look:
- Start with a light stone base—real or porcelain travertine in a honed finish.
- Add two sculptural chaises, spaced so each gets air (30–36 inches apart).
- Layer a single heavy side table between them to center the vignette.
- Install shielded path or step lights and angle them to graze the tile, not faces.
- Style with two rolled towels and one quiet planter—done.
Watch Out: Don’t use glossy tile; it glares in sunlight and gets slippery. Choose honed or textured finishes for safety and a softer look.
Pro Styling Tip: Shoot from a slight overhead angle to catch the chaises’ curves and travertine veining in one frame—clean, editorial, irresistible.
6. Whitewashed Brick, Golden Hour Backlight, And A Double-Lounge Daybed
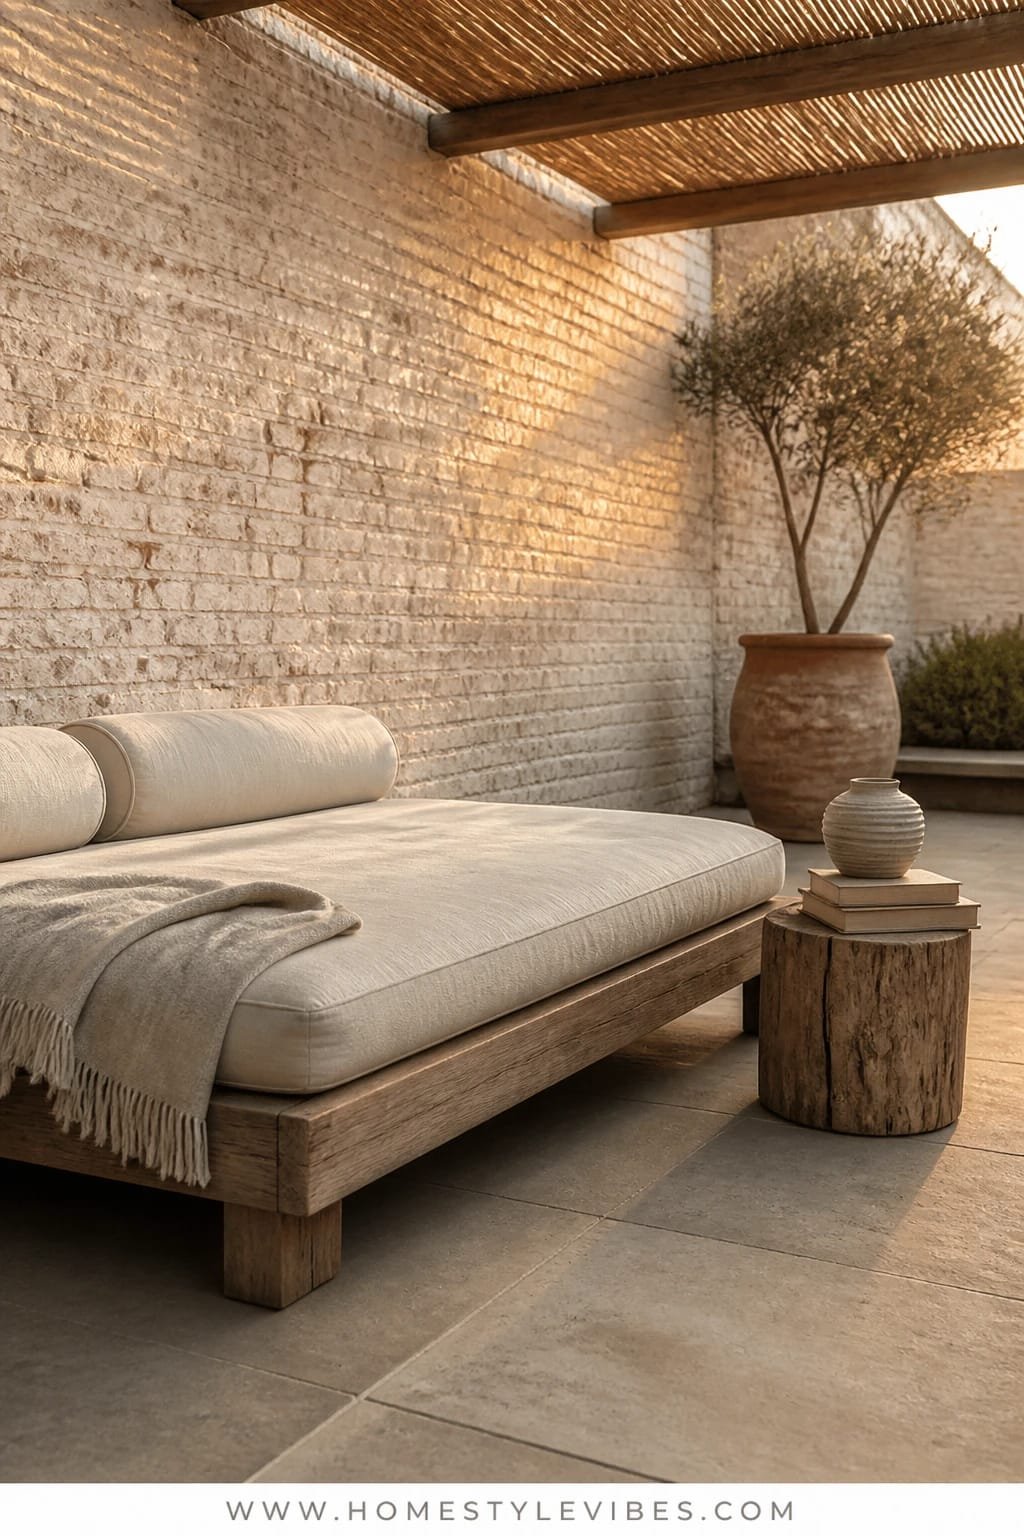
You want to stretch out with a book and a pet, but typical sofas feel fussy. A double-lounge daybed solves it with nap-grade comfort. Pair that with whitewashed brick to bounce golden hour light and you’ve got a patio living room that acts like your den. The backlit warmth at sunset turns photos syrupy and soft—honestly, it’s addictive.
This works well for mixed-use patios: reading by day, cocktails by night. Whitewashed brick is forgiving, renter-friendly with faux panels or paintable veneer, and low-maintenance. The daybed’s generous surface photographs as one elegant plane—no cushion clutter—and reads custom if you size it to the wall.
Variations:
– Budget-friendly: Pallet base with a fitted cushion and a tailored cover.
– Small-space: Narrow daybed with a wall-mounted ledge as a “floating” side table.
– Darker version: Warm gray wash on brick with rust-toned cushions.
– Renter-friendly: Lean a painted lattice panel over existing brick and use a freestanding daybed.
Budget Breakdown:
- Whitewash/brick veneer or paint: $80–$600
- Outdoor daybed (double lounge): $500–$1,800
- Custom cushion + covers: $220–$700
- Wall-mounted ledge or side tables: $60–$240
- Lanterns or cordless lamps: $80–$260
Total Estimated Cost: $940 – $3,600
Best For: Book lovers, afternoon nappers, pets, and anyone who wants an indoor-level comfort zone outside.
Key Design Elements:
- Main materials: Whitewashed brick, performance canvas, solid wood or metal frame
- Color palette: Chalk, wheat, rust or olive accent, soft black
- Lighting strategy: Golden hour backlight; add cordless lamps at low levels after dusk
- Furniture silhouettes: Rectangular daybed, thin ledge tables, oversized bolster
- Texture layers: Limey brick, canvas weave, nubby throw
- Accent details: Stacked books, a ceramic mug, grass in a clay pot
How To Recreate This Look:
- Start by whitewashing or painting the brick for a soft, light-bouncing surface.
- Add a wide daybed, centered on the wall, leaving 12 inches clearance each side.
- Layer a custom-fit cushion for a crisp line and two oversized bolsters for lounging.
- Install a slim wall ledge or two tiny side tables for drinks and a lamp.
- Style with a textured throw and one earthy-toned pillow for warmth.
Why This Looks Expensive: Monochrome brick plus one oversized piece feels editorial. The scale of the daybed says “bespoke” even if it’s store-bought.
One Thing To Avoid: Avoid six throw pillows. They look messy outside. Use two or three max, and let the cushion lines shine.
Pro Styling Tip: Time your photos 30 minutes before sunset so the brick glows and your fabrics pick up that honey tone—no filter required.
Micro-moment: Picture kicking off sandals, dog thumping their tail against the cushion, and the faint clink of ice in your glass as the sky warms. That’s the vibe we’re building.
7. Fluted Concrete, Soft Sage Light, And A Statement Outdoor Bar Cabinet
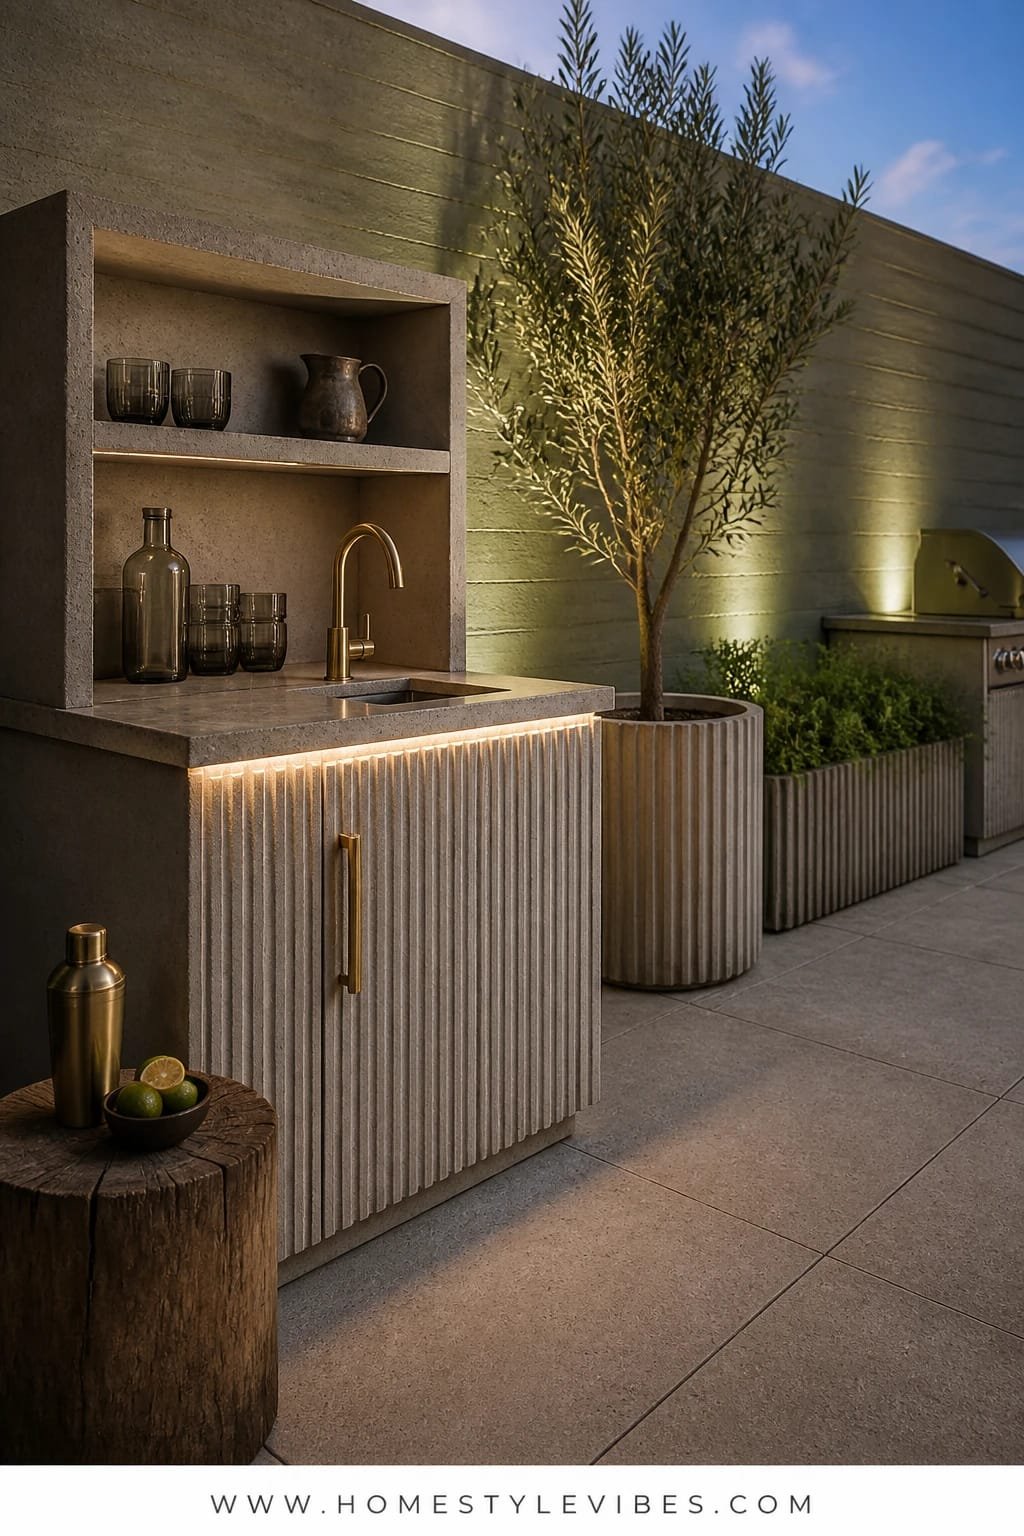
You want a “destination” corner for Friday nights, but the grill dominates and everything smells like burgers. A sculptural outdoor bar cabinet becomes the star—somewhere to mix, store, and display with a little theater. Surround it with fluted concrete elements (planters, side tables) and wash the wall in a soft sage-toned light. It’s moody, sophisticated, and very photogenic.
This approach wins in real homes because it carves a dedicated entertaining zone that doesn’t rely on the dining table. Fluted textures create shadow play, and the colored light adds ambiance without neon vibes. Photographs love the ribbing on concrete—those vertical grooves eat up light and make your shots feel editorial.
Variations:
– Budget-friendly: Metal storage cabinet painted satin black; add peel-and-stick fluted panels to planters.
– Small-space: Bar cart with a tall vase and a single sconce to anchor the look.
– Darker version: Deep green wall wash with bronze accents.
– Renter-friendly: Portable battery wall washer and a freestanding cabinet on casters.
Budget Breakdown:
- Outdoor bar cabinet: $350–$1,600
- Fluted concrete planters/tables: $200–$700
- Wall-wash light (sage-tinted filter or smart bulb): $60–$220
- Stools (pair): $160–$600
- Barware + tray: $60–$240
Total Estimated Cost: $830 – $3,360
Best For: Evening entertainers, compact patios that need a “moment,” and anyone who prefers cocktails to charcoal smoke.
Key Design Elements:
- Main materials: Fluted concrete, powder-coated steel, smoked glass
- Color palette: Sage light, charcoal, black, walnut or bronze accents
- Lighting strategy: One wall wash plus a pinpoint task light at the worktop
- Furniture silhouettes: Rectilinear cabinet, slim stools, cylindrical planters
- Texture layers: Ribbed concrete, matte metal, soft leather seat pads
- Accent details: Dried stems, ribbed glassware, a single art tile propped on the bar
Why This Reads High-End: A single statement cabinet with curated barware feels purposeful. The fluted texture adds designer detail and the colored wash sets a mood you can’t get from basic string lights.
How To Recreate This Look:
- Start with a weatherproof cabinet or bar cart and position it against a clean wall.
- Add fluted concrete planters symmetrically to frame the scene.
- Layer a sage-tinted wall wash (smart bulb or gel) for ambient color.
- Install a focused task light over the work surface for function.
- Style with ribbed glassware, a wooden tray, and one tall sculptural stem.
The Most Common Mistake: Overcrowding the bar. Leave negative space so the fluted textures and glass catch the light—clutter will kill the vibe.
Pro Styling Tip: For photos, chill a coupe glass so it fogs slightly—tiny detail, big editorial impact.
Perspective shift: If one section made your shoulders drop in relief, that’s the one to start with. Texture, light, and one standout piece—get those right and everything else clicks.
Quick Checklist
- Cedar or stained wood slats for warmth and privacy
- Amber, dimmable sconces at seated-eye level
- Low-profile fire table for a sculptural focal point
- Limestone or porcelain-look stone in pale tones
- Curved seating or canopy for gentle shade
- Blackened steel or dark pergola for structure
- Banquette seating to maximize capacity
- Honed travertine or lookalike tile for spa vibes
- Sculptural chaises with generous spacing
- Whitewashed brick to bounce golden light
- Oversized daybed with tailored cushion
- Fluted concrete pieces for shadow play
- Statement outdoor bar cabinet to anchor entertaining
- Portable lanterns or cordless lamps for layered glow
- Textured, performance fabrics in tonal palettes
Frequently Asked Questions
How do I make my patio feel like an extension of my living room on a tight budget?
Pick one hero move: either add a slatted wood backdrop for warmth or upgrade lighting to warm, dimmable fixtures. Then choose one substantial piece of seating (loveseat or two lounge chairs) and a rug big enough to anchor everything. Fewer, better pieces will make it feel finished.
My patio is tiny—won’t a sectional or daybed overwhelm it?
Choose one oversized piece instead of three small ones. A compact sectional or narrow daybed with a single side table actually simplifies the look and increases comfort. Keep colors tonal and use walls or railings for mounted lighting to save floor space.
How do I keep outdoor cushions clean and looking crisp?
Buy performance covers with zippers and store them vertically when not in use. Use cushion protectors under covers for shape, and brush debris off weekly. Spot clean with a gentle soap, and avoid fabric softener—it can attract dirt.
I rent—what can I do without drilling or permanent changes?
Use freestanding slat screens, interlocking deck tiles, battery-powered lights, and a portable bar cabinet. Shade sails can clip to planters or freestanding poles. Lean art or panels instead of mounting them.
What design mistakes make outdoor spaces look cheap in photos?
Too many small items, bright white bulbs, and rugs that are too tiny. Also, cluttered tabletops and visible cords. Prioritize scale (one or two big pieces), warm light, and tidy styling with two or three intentional accents.
The Wrap-Up: Your Patio, Finally Connected
Here’s the truth: a patio that feels like your living room comes down to texture, lighting, and one strong anchor piece. Pick cedar slats and amber sconces, or travertine and sculptural chaises, or a whitewashed brick wall with a daybed—just choose one lane and commit. You’ll be amazed how quickly the whole space starts to behave like a room you actually use.
Remember, luxury isn’t about stuffing in more furniture; it’s about restraint, warm light, and materials that feel good under your fingertips. If one idea from these outdoor living room ideas grabs you, start there this weekend. By next week, you’ll have a patio that looks like it belongs to your home—and honestly, to your life. You’ve got this. And when the sun drops and the amber glow clicks on? That’s your new favorite room.
PS: A friend of mine spent weeks agonizing over pillow colors before realizing the real problem was her lighting. She swapped to 2200K bulbs and, trust me, the entire patio went from “eh” to “invite the neighbors” in under 20 minutes. Sometimes the fix is simpler than you think.