6 Small Outdoor Living Space Ideas For Patios Balconies And Tiny Backyards
You want a breezy little sanctuary where the light hits just right, your coffee tastes better, and your shoulders drop an inch the second you sit down. But you hate the chaos—odd corners that don’t fit furniture, harsh shadows that make everything look cheap, and the constant feeling that your small outdoor space is more “storage zone” than sanctuary. Imagine warm textures underfoot, soft evening glow, and layered greenery that looks airbrushed in photos—without needing a contractor or a second mortgage. These 6 small outdoor living space ideas for patios, balconies, and tiny backyards were built to fix that exact frustration with clear steps, realistic budgets, and finishes that feel resort-level within 48 hours of effort.
Think photogenic and practical. Fewer pieces with more presence. Neutrals that breathe and a couple of color anchors so your feed-worthy corner doesn’t fade into the background. If you’ve been feeling stuck, this is your permission slip: pick one idea and give yourself a weekend to create the nook you actually live in, not just pass by.
Vibes range from modern Mediterranean to city-chic cozy. If you like calm textures, easy maintenance, and design that respects renters, you’re home.
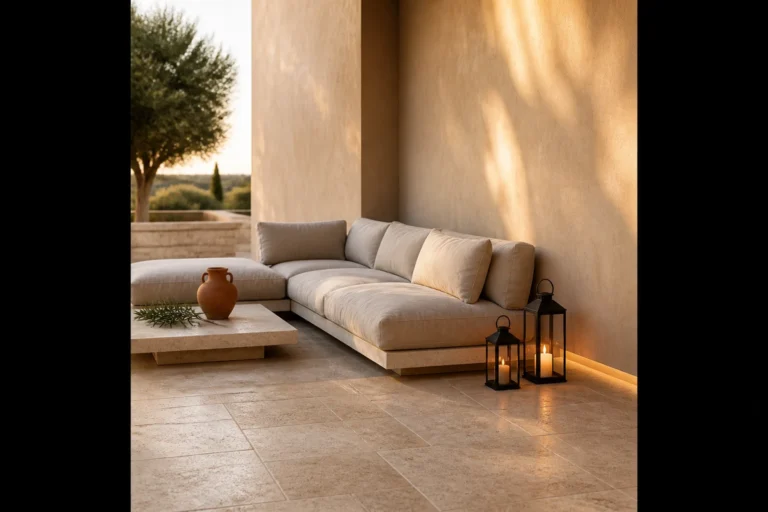
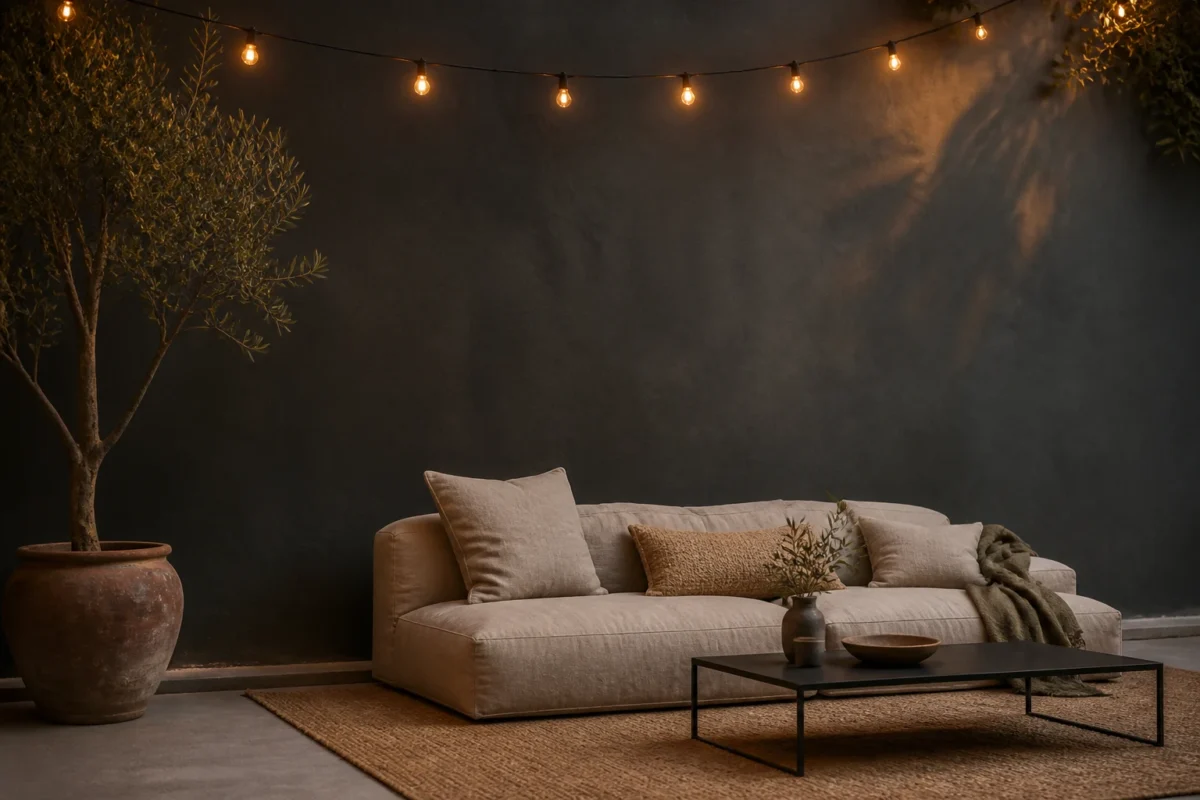
1. Charcoal Concrete Texture With Golden Hour String Lights And a Low-Slung Lounge Sofa
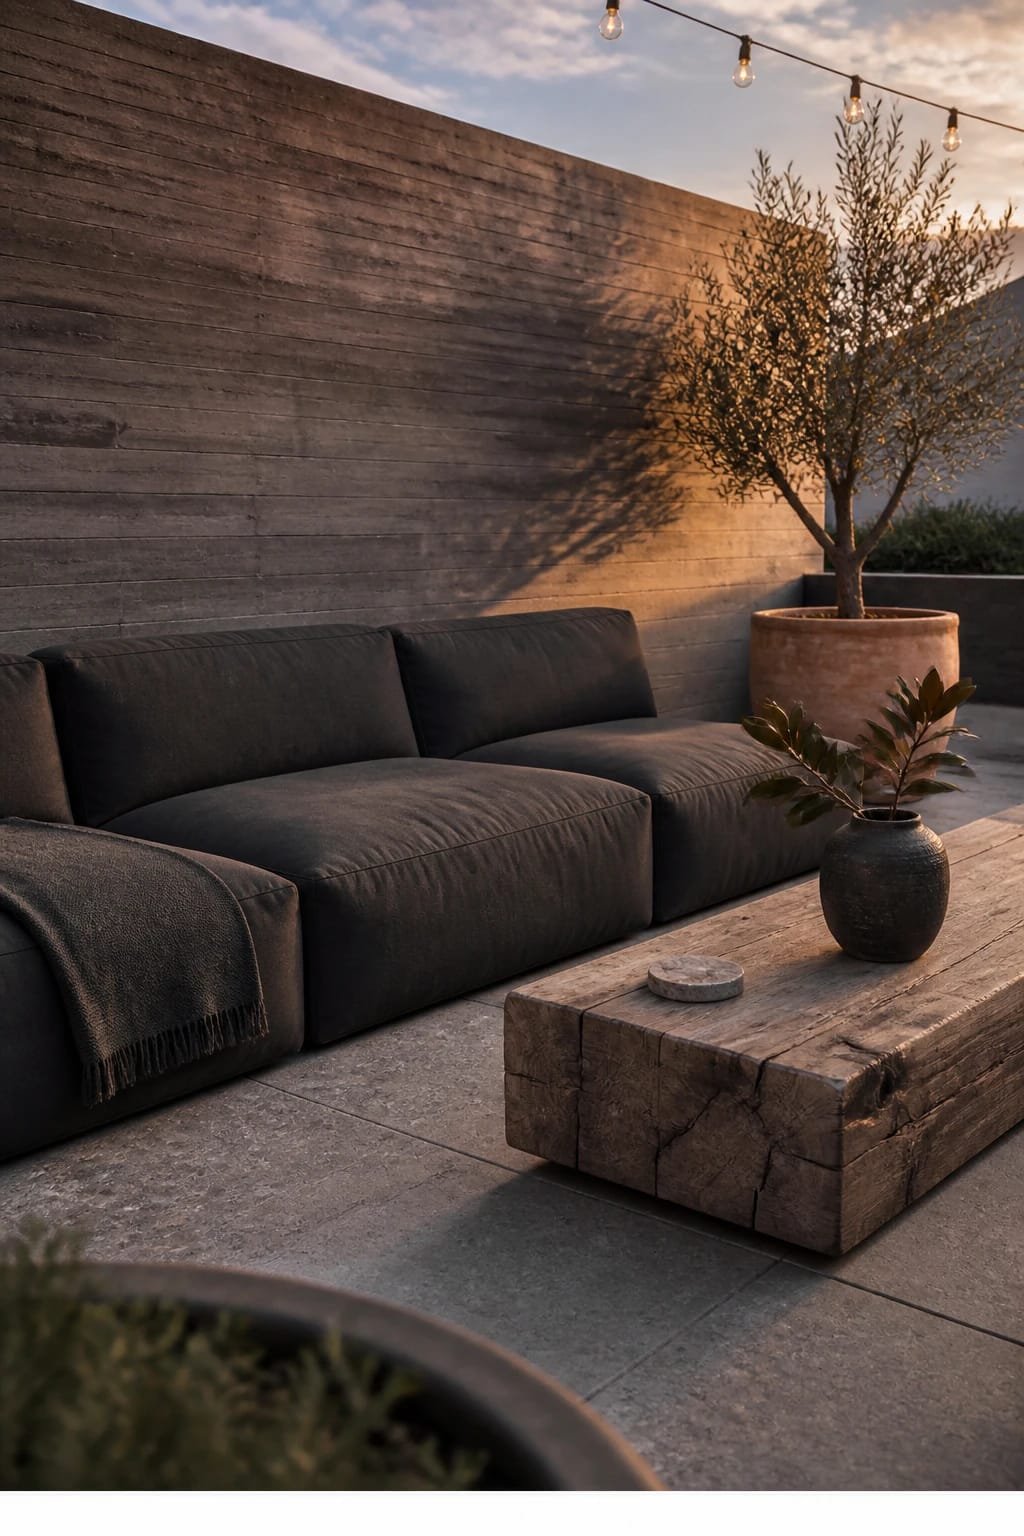
We’ve all been there: the patio feels like a parking spot for chairs that never get used. You’ve tried a dining set, but nobody lingers because it feels stiff and echoey. This design flips the script by leaning into a lounge-first layout with tactile concrete textures, warm string lighting, and a low-profile sofa that invites sprawling, reading, and sunset-sipping.
The mood is modern Mediterranean-meets-urban loft—moody charcoal surfaces, soft cushions, and a glow that feels like golden hour all evening. It works in real homes because the low sofa visually opens tight footprints while the string lights wash the walls with warm, flattering light. Concrete or concrete-look planters and pavers give weight and presence, which photographs beautifully against creamy cushions and a single olive or ficus tree. The depth comes from contrast: dark ground plane, light upholstery, warm lighting = instant editorial feel.
Variations: For a budget-friendly version, swap real concrete for concrete-effect outdoor tiles or interlocking patio pavers, and choose a powder-coated steel sofa frame with weather-resistant cushions. For renters, use outdoor rugs in a charcoal weave to fake a “concrete” base. Prefer moodier? Go with taupe or cinnamon cushions and deeper amber bulbs for the string lights.
Budget Breakdown:
- Low-slung outdoor sofa with cushions: $350–$1,200
- String lights with warm LED bulbs: $25–$120
- Concrete or concrete-look planters (2–3 sizes): $90–$300
- Outdoor rug in charcoal: $80–$250
- Side table in black metal or travertine-look: $60–$240
- Throw pillows in sand/ivory performance fabric: $40–$120
Total Estimated Cost: $645 – $2,230
Best For: Narrow patios or balconies that need lounging more than dining. Great for late-afternoon to evening use and households that want “one great seat” instead of five so-so ones.
Key Design Elements:
- Main materials: charcoal concrete, powder-coated metal, performance fabric
- Color palette: charcoal, ivory, sand, olive green
- Lighting strategy: string lights at 2700K for warm glow, low lamp or lanterns for depth
- Furniture silhouettes: low, boxy sofa; compact square side table; cylindrical planters
- Texture layers: concrete grain, woven rug, linen-like pillows
- Accent details: matte black lanterns, olive tree, a single terra-cotta pot for warmth
How To Recreate This Look:
- Start with a dark base: lay a charcoal outdoor rug or interlocking deck tiles to ground the zone.
- Add a low-profile lounge sofa against the longest wall to maximize seating without crowding.
- Layer a grid or gentle swag of string lights across the seating area—aim for 8–9 feet high.
- Install planters at varying heights; place the tallest in a corner to create a leafy “backdrop.”
- Style with two neutral pillows, one textured throw, and a compact side table for drinks.
Why This Looks Expensive: The restrained palette and low silhouette mimic boutique hotel lounges. Concrete reads “architectural,” while the warm, consistent lighting removes harsh shadows that make spaces feel cheap.
Watch Out: Don’t use cool white bulbs. They flatten textures and highlight dust. Stick to 2700K–3000K and avoid over-swagging lights; one clean line always looks sharper.
Pro Styling Tip: At dusk, light one lantern on the floor near the planter to catch leaves’ shadows on the wall—instant depth in photos.
Keep scrolling—if lounge life isn’t your vibe, the next one is a compact dining setup that still feels indulgent.
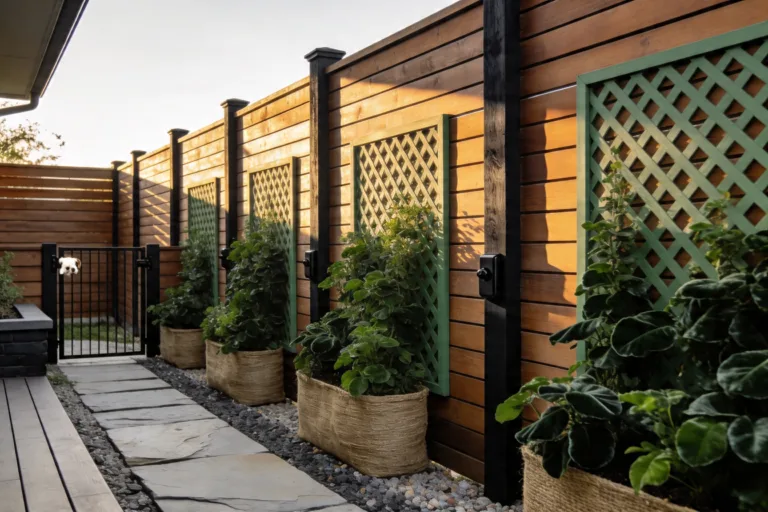
2. Honey Teak Slat Warmth With Soft Dappled Shade And a Foldable Bistro Dining Set
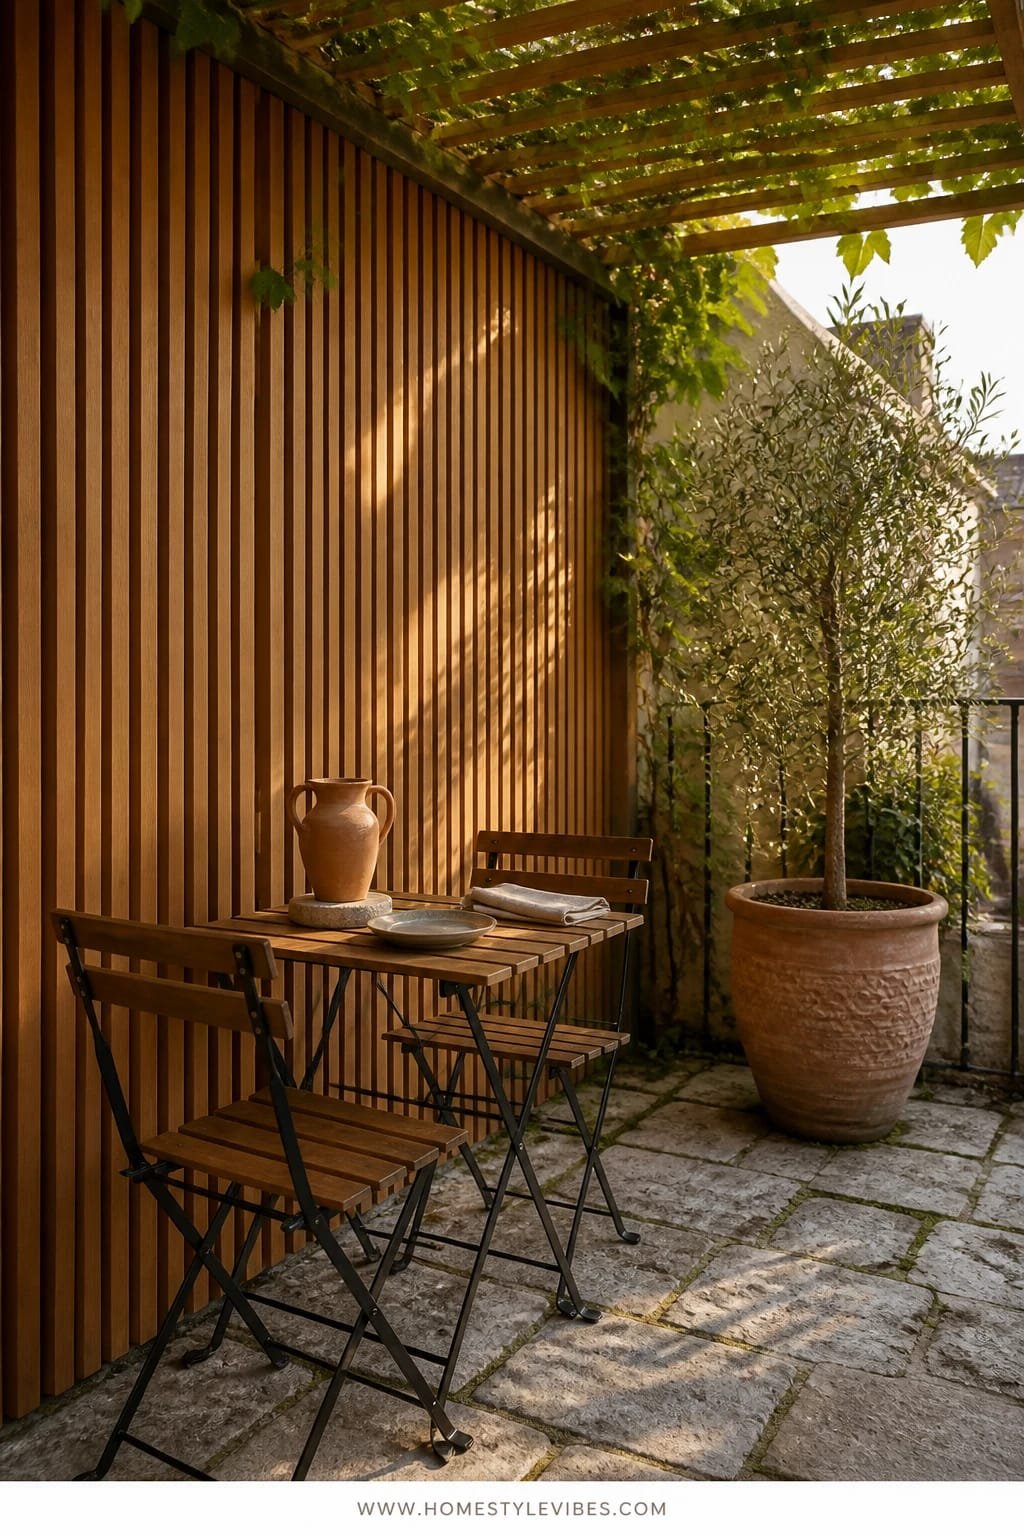
It’s that one corner that always feels off—the balcony that looks charming but sits unused because dining chairs scrape walls and nothing feels inviting at noon. This design solves the “I want to eat outside but my knees hit everything” problem with slim, vertical teak slats for warmth, a foldable bistro set for flexibility, and dappled shade that keeps glare out of your eyes.
The mood is European city balcony meets sunny Sunday brunch. Honey teak slats add texture without bulk and bounce warm light, while a canvas shade sail or adjustable umbrella softens midday sun. It works in small spaces because foldable pieces tuck away in seconds, and slatted surfaces photograph beautifully—those thin lines create subtle shadows that read luxe on camera.
Variations: On a tight budget, use bamboo reed fencing to fake the slat look and apply an outdoor wood oil for honey tone. For renters, use free-standing planters to anchor a shade sail with no drilling. Prefer a cooler scheme? Swap honey teak for grey-wash acacia and add slate textiles.
Key Design Elements:
- Main materials: honey teak or acacia, canvas, galvanized hardware
- Color palette: honey brown, cream, muted green, charcoal stripe
- Lighting strategy: fairy lights wrapped around railing; tea lights for evenings
- Furniture silhouettes: slim bistro chairs, round foldable table
- Texture layers: slatted wood, striped napkins, linen seat pads
- Accent details: herb planters, brass salt mill, ceramic carafe
Budget Breakdown:
- Foldable bistro set: $120–$400
- Wood slat panels or bamboo fencing: $60–$350
- Shade sail or compact umbrella: $40–$180
- Planter herbs (3–5 pots): $30–$80
- Outdoor string or fairy lights: $15–$45
- Linen seat pads/placemats: $25–$90
Total Estimated Cost: $290 – $1,145
Best For: Balconies and studio patios under 60 square feet; anyone who entertains 1–3 people and loves morning light but wants controlled shade at lunch.
How To Recreate This Look:
- Start by lining the railing or a wall with vertical wood slats or bamboo for warmth and privacy.
- Add a compact, round bistro table with foldable chairs for easy stowing.
- Layer shade with a small sail or a tilt umbrella positioned just off-center.
- Install railing planters with herbs—basil, thyme, mint—so breakfast smells incredible.
- Style with striped textiles, a small candle, and a ceramic carafe to keep the palette tight.
Why This Feels Designer: Small round tables, vertical lines, and controlled shade read curated. The light hitting honey wood pairs with striped fabric for instant editorial charm.
One Thing To Avoid: Overcrowding the tabletop. Two plates, one small vase or herb pot, and a carafe are plenty—clutter kills elegance and elbow room.
Pro Styling Tip: Photograph late morning when light filters through the slats—tilt chairs slightly and let the stripes run diagonally for dynamic lines.
Micro-story: A friend of mine agonized over balcony dining for weeks. The breakthrough came when she swapped a square table for a tiny round one—suddenly the door cleared, her knees didn’t bump, and she actually used the space every day for coffee.
Quick reset: Breathe. You don’t need all six ideas. If one feels like “you,” that’s your starting point. Build slowly and live in it for a week before adding more.
3. Limewash Plaster Softness With Candlelit Lantern Glow And a Built-In Bench Nook
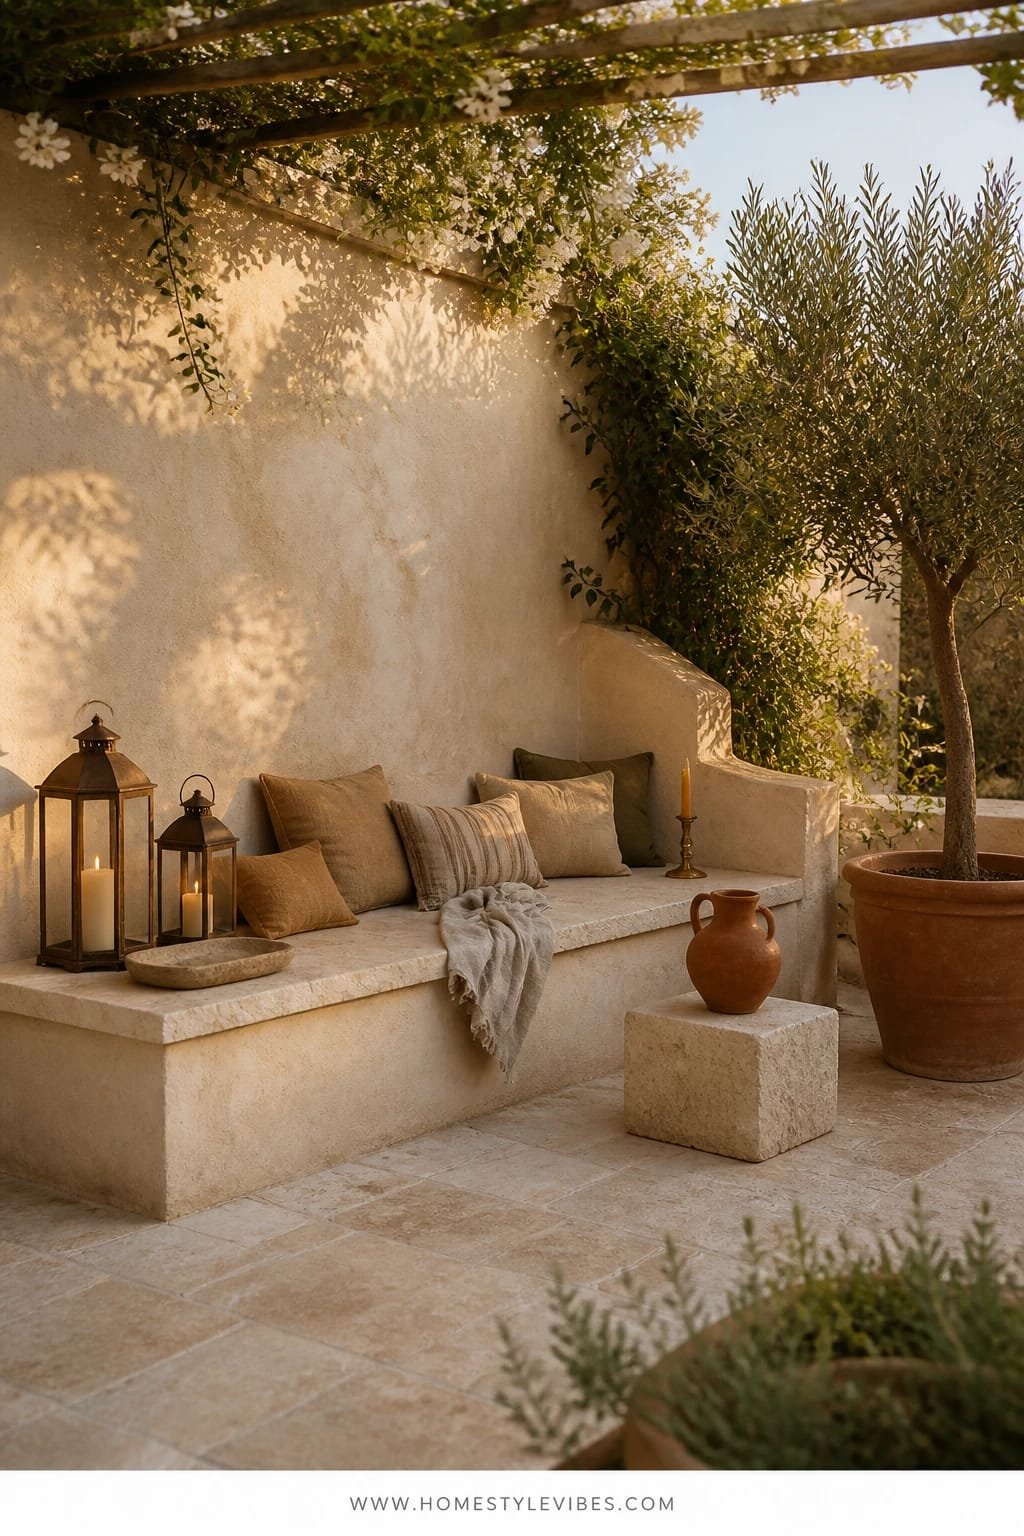
You’ve tried freestanding chairs, but it still looks cluttered and never feels like a destination. Enter the built-in bench: a single continuous seat that turns an awkward wall into a dreamy, candlelit nook. Limewash plaster on the back wall gives soft movement, like clouds at sunset, and makes even a tiny patio feel intentional.
The mood is cozy Mediterranean courtyard—muted walls, flickering lanterns, and layered textiles. In small spaces, a built-in bench beats scattered seating because it controls the footprint and gives you hidden storage below if you need it. Limewash bounces light with a matte, velvety softness that photographs like a magazine spread: zero glare, all nuance.
Variations: On a budget, create a “faux built-in” with two storage cubes and a plywood span, then cushion on top. Renters can use a freestanding bench pushed against a limewash-painted backdrop board. For a moody twist, go with warm taupe limewash and bronze lanterns with amber glass.
Budget Breakdown:
- Simple bench build or freestanding bench: $120–$600
- Limewash kit or mineral paint: $45–$140
- Outdoor bench cushion (custom or standard): $80–$280
- Lanterns (2–3 sizes): $40–$150
- Throw pillows in textured neutrals: $45–$150
- Low outdoor coffee stool or table: $60–$240
Total Estimated Cost: $390 – $1,560
Best For: Tiny backyards with one long wall, entry courtyards, or the dead zone under a window. Perfect for evening hangs and low-key dates at home.
Key Design Elements:
- Main materials: limewash plaster, wood bench base, outdoor foam
- Color palette: bone, sand, clay, soft black accents
- Lighting strategy: candle lanterns plus a discreet warm LED sconce
- Furniture silhouettes: rectilinear bench, rounded pillows, squat coffee stool
- Texture layers: limewash movement, nubby pillows, canvas cushion
- Accent details: thin black metal rail, small olive or lavender pot
Why This Reads High-End: The continuous bench line feels custom, and limewash introduces movement without busy patterns. Candlelight adds dimension and hides small imperfections.
How To Recreate This Look:
- Start by identifying a straight wall; measure seat height to ~17 inches and depth 22–24 inches.
- Add a bench or faux built-in; ensure ventilation if storing cushions underneath.
- Layer limewash on the wall in cross strokes for cloudlike movement.
- Install two lanterns of different heights on one side and a single lantern on the other for balance.
- Style with a long bench cushion, 2–3 pillows, and a compact coffee stool for trays.
The Most Common Mistake: Bench too shallow. Under 20 inches feels stingy; 22–24 inches encourages lounging and looks intentionally plush.
Pro Styling Tip: Shoot at twilight with lanterns lit; angle the camera so the limewash catches side light—texture blooms on screen.
Honest moment: Limewash can be tricky on the first coat—it looks blotchy at noon. Trust the process. By coat two, with warm light, it mellows into that soft, romantic finish you were picturing.
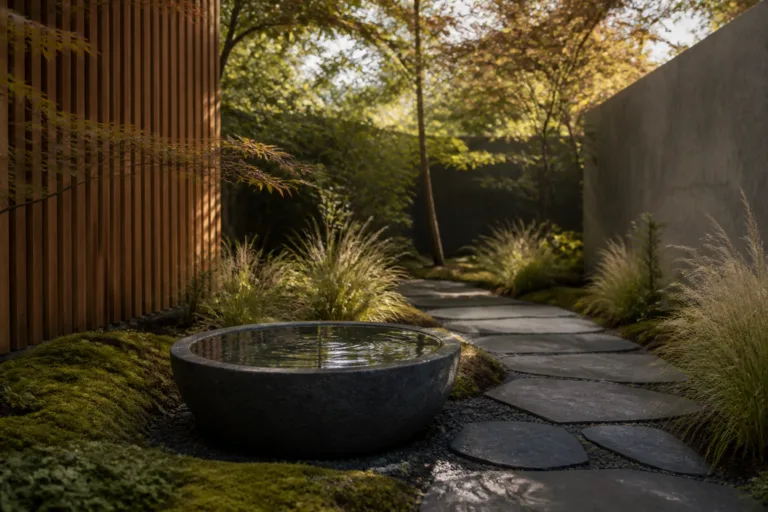
4. Woven Rattan Warmth With Diffused Lantern Light And a Compact Egg Chair Cocoon
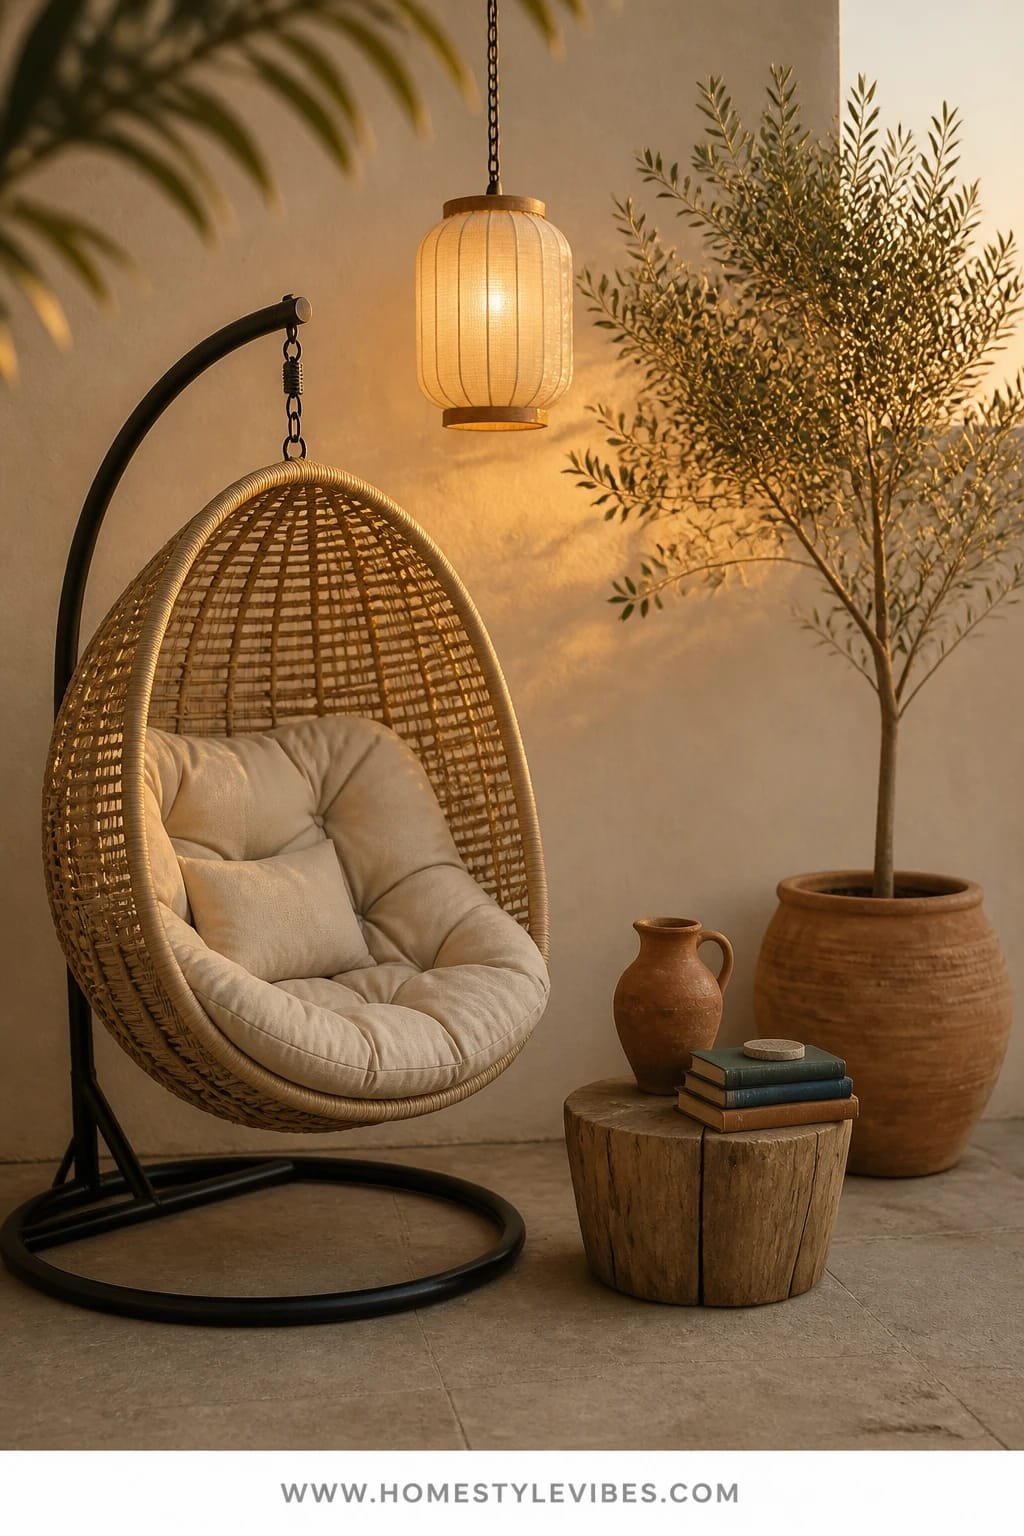
You love the idea of a reading corner outside, but chairs always feel too small or too exposed. A cocoon chair solves it. The woven rattan (or resin rattan) texture adds warmth and that beachy mood, while a fabric-diffused lantern or solar pendant softens the entire zone into a personal hideaway.
The vibe is cozy-boho meets resort cabana. It works for small outdoor living spaces because the egg chair offers big personality in a tight footprint—one statement piece equals fewer cluttered extras. Rattan texture photographs like a dream: those repeating weaves create gentle shadows that look high-end with minimal styling.
Variations: For a darker scheme, try espresso resin wicker with terracotta pillows. For renters, use a free-standing lantern and a plug-in pendant hooked to a plant stand. On a tiny balcony, pick a slim pod chair with partial weave and a foldable ottoman tucked underneath.
Budget Breakdown:
- Egg/pod outdoor chair: $200–$900
- Solar or plug-in fabric lantern: $35–$140
- Neutral outdoor rug (natural look): $70–$220
- Two pillows + lumbar: $45–$150
- Side drum table (ceramic or concrete-look): $80–$260
- Planter with trailing pothos or ivy: $25–$80
Total Estimated Cost: $455 – $1,750
Best For: Bookworms and night owls. Works beautifully on apartment balconies where one dramatic piece can carry the whole mood.
How To Recreate This Look:
- Start with a natural-look rug to soften concrete or tile and define the zone.
- Add the rattan egg chair slightly angled toward the best view or the door for easy access.
- Layer a diffused lantern overhead or to the side; warm 2700K light only.
- Install a side table big enough for a mug and a candle—nothing fussy.
- Style with one textured pillow, one smooth pillow, and a throw that visually ties to the rug.
Why This Looks Intentional: One hero chair, one side table, one soft light. Clear hierarchy makes small spaces read calm rather than random.
Don’t Do This: Avoid over-patterning. Let the rattan weave be the star; mix textures, not ten prints. Two complementary pillows max.
Pro Styling Tip: Photograph from slightly above seat height so the chair’s curve frames the shot—add a cup and open book to hint at use.
Mini anecdote: I tried a pod chair on a former shoebox balcony. The first night I sat there in a hoodie with a lantern glowing, I heard the city but didn’t feel it buzzing through me. That tiny cocoon earned its floor space.
Mindset break: Remember, this isn’t about recreating a showroom. It’s about building a space that actually feels like yours. If something looks great but doesn’t make you want to sit down, it’s a no.
5. Brushed Steel Clean Lines With Cool Moonlight LEDs And a Narrow Bar-Height Rail Table
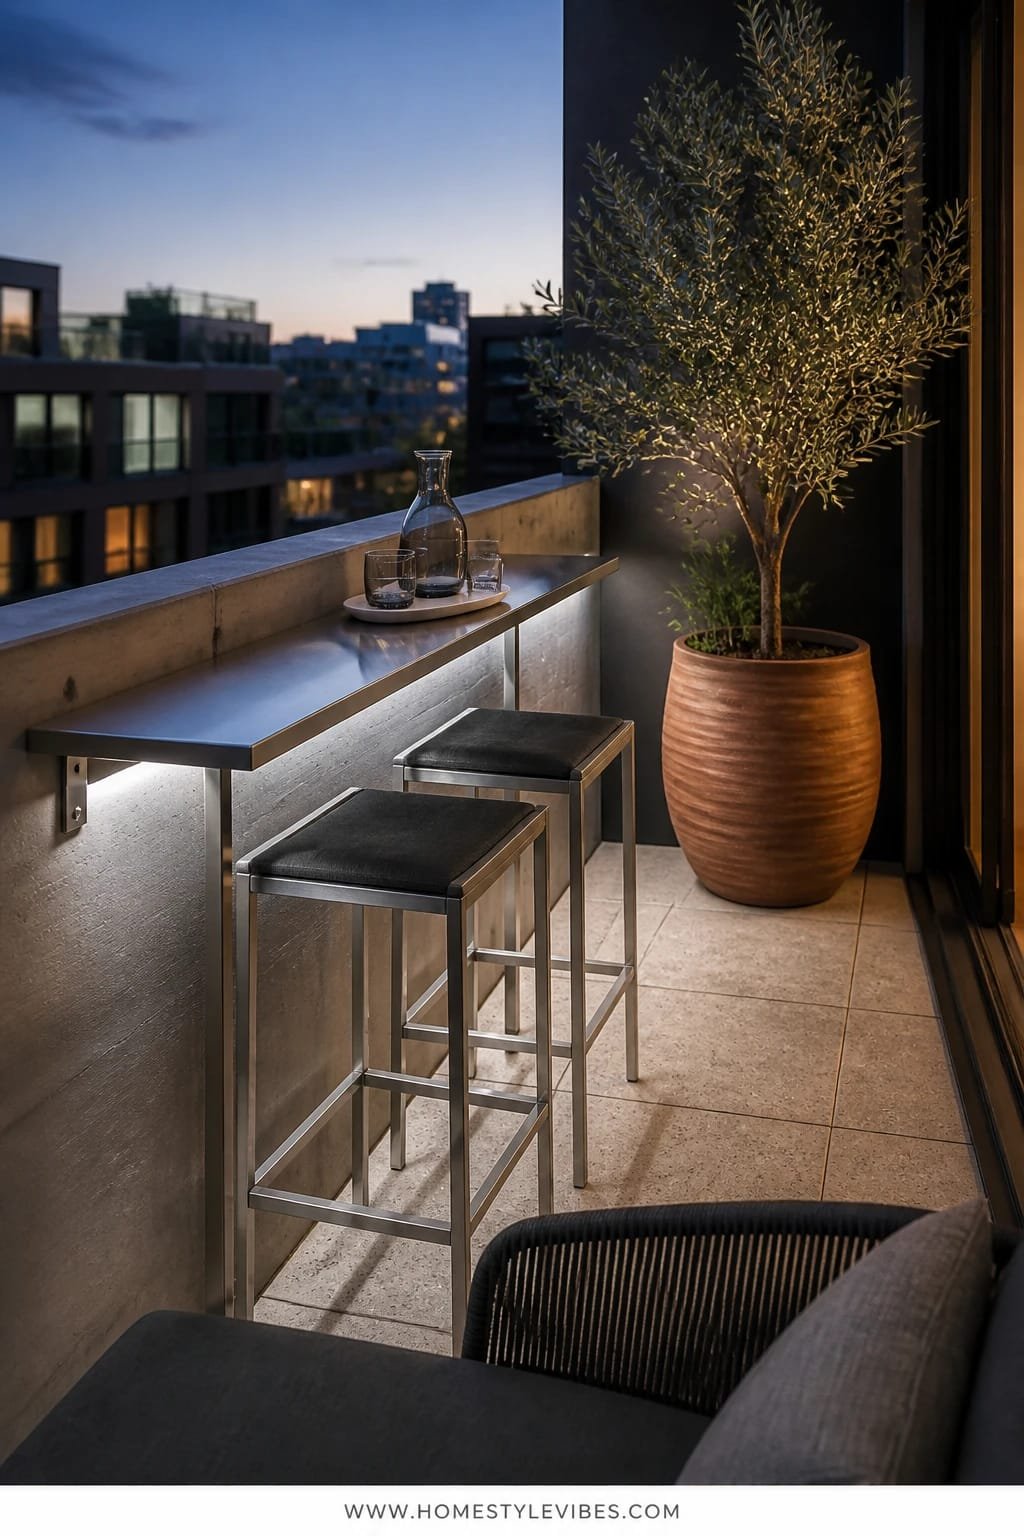
Small patios often become pass-throughs because dining tables feel bulky. Here’s the fix: a slim, bar-height rail table that hugs your balcony edge, brushed steel accents that read polished, and cool “moonlight” LEDs that make night drinks feel crisp and city-smart.
The mood is urban terrace meets rooftop lounge—sleek, tailored, and perfect for tiny footprints. It works for real homes because bar-height seating clears visual bulk and keeps floor space open, while a rail table maximizes the best view without sacrificing walkways. Brushed steel and cool LEDs photograph with that grown-up, editorial sheen; think shadow lines and glass highlights.
Variations: For renters, use clamp-on rail tables with no drilling. Prefer warmer? Use neutral LEDs at 3000K but keep clean-lined furniture. On ultra-tight balconies, use two backless stools that tuck fully under the ledge table.
Budget Breakdown:
- Rail-mount bar table (36–48 inches): $120–$380
- Two bar stools (backless): $90–$350
- LED strip or puck lights (cool white 3500–4000K): $25–$90
- Planter box in brushed steel or matte grey: $40–$160
- Coasters and small tray: $20–$60
Total Estimated Cost: $295 – $1,040
Best For: Apartment balconies with a view, solo dwellers or couples who like a quick drink spot, and anyone who needs clear floor space for folding bikes or storage.
Key Design Elements:
- Main materials: brushed steel, glass, composite decking
- Color palette: cool grey, soft black, white, eucalyptus green
- Lighting strategy: under-rail LED strips for glow without glare
- Furniture silhouettes: slim rectangles, backless cylinders or squares
- Texture layers: smooth metal, matte planter, glass reflections
- Accent details: a single sculptural succulent, low-profile tray
Why This Feels Designer: Restraint. The linear table, consistent metal finish, and strategic cool light create a calm, architectural vibe with almost no clutter.
How To Recreate This Look:
- Start by measuring railing width; choose a clamp-on bar table to match.
- Add two backless stools that tuck fully under the ledge for a clean read.
- Layer a dimmable LED strip under the rail for subtle night glow.
- Install one long planter box with a structured plant—no fluffy foliage.
- Style with a slim tray and two coasters; that’s it.
Watch Out: Mismatched metal finishes can look messy. Stick to one: brushed steel or matte black. Don’t mix chrome with brushed—those micro-reflections tell on you in photos.
Pro Styling Tip: Night shots pop when you include a single reflective element—a stemless wine glass or a small chrome spoon—to catch the LED line.
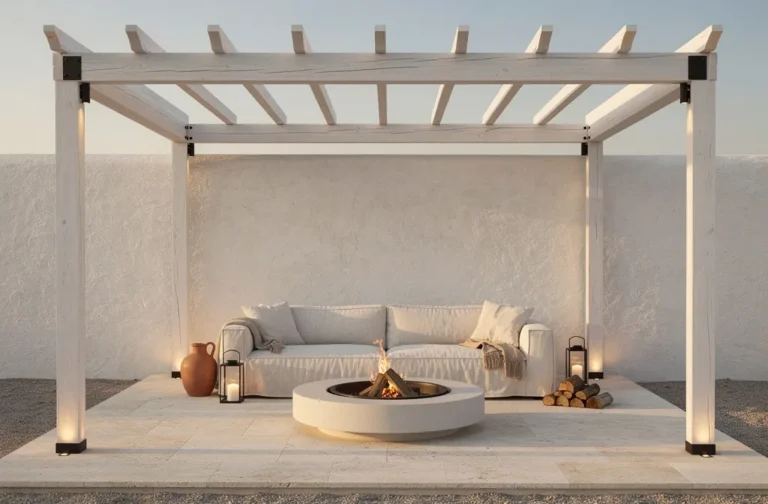
6. Whitewashed Brick Calm With Soft Morning Sun And a Modular Fire Pit Coffee Table
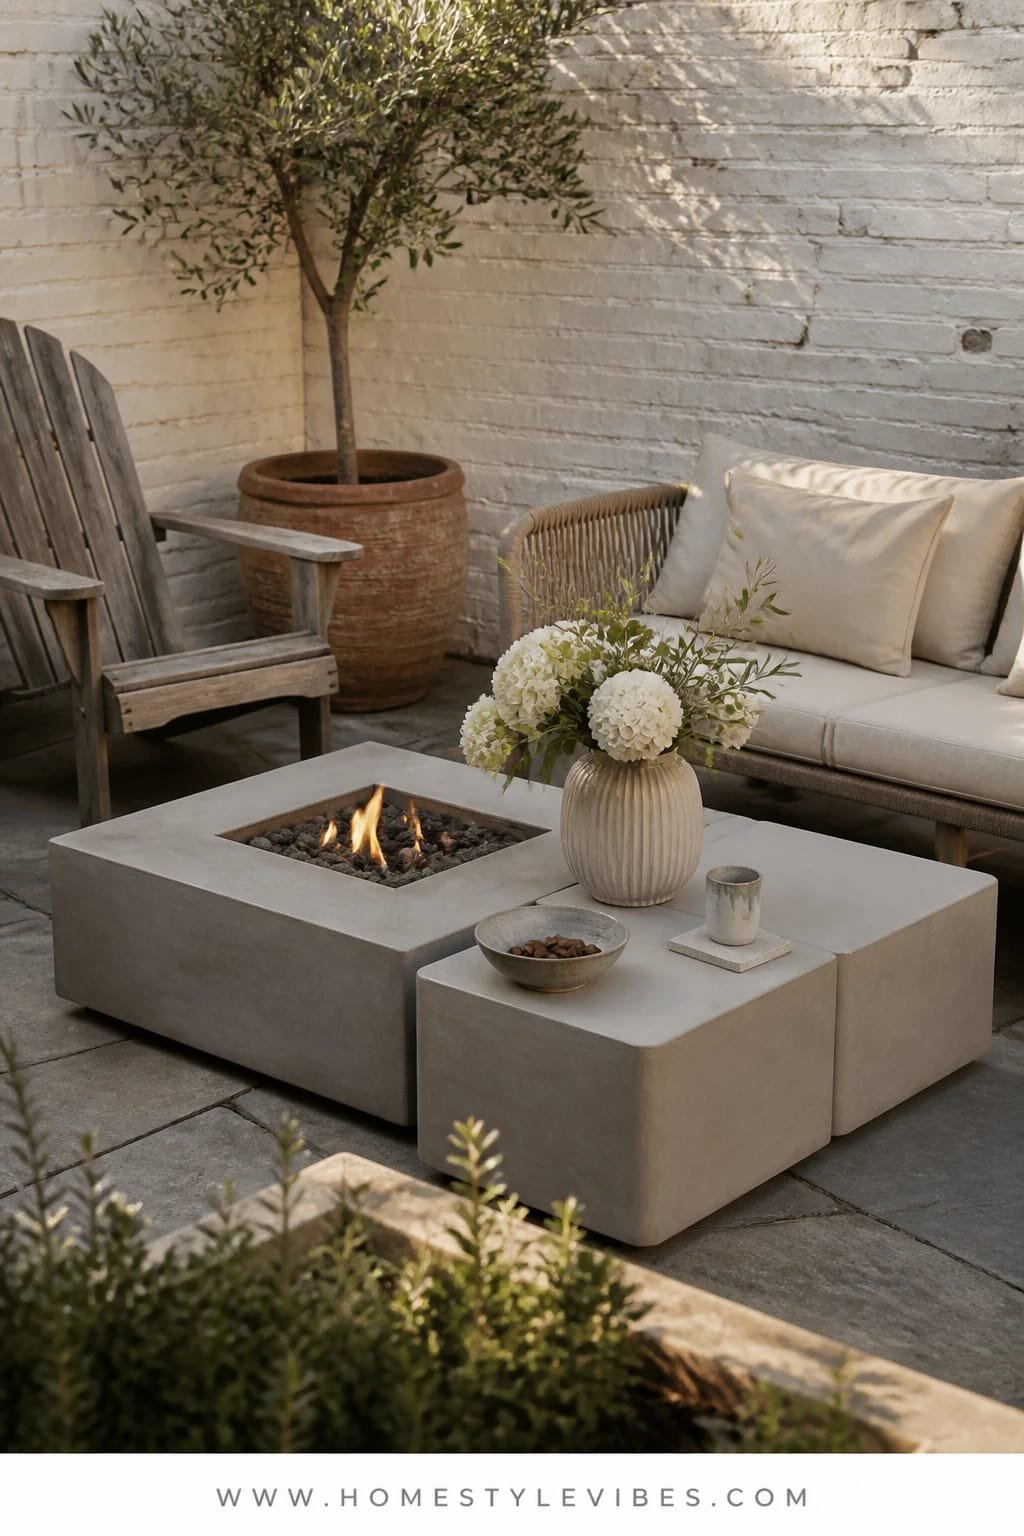
Maybe your tiny backyard feels cold and unfinished, especially in the morning. Whitewashed brick brightens everything, bouncing soft light onto plants and faces, while a compact, modular fire pit coffee table turns cool evenings into hangouts. The pairing creates a calm courtyard energy without the heaviness of full brick or a bulky fire feature.
The mood is serene cottage-meets-modern courtyard. It works in small outdoor living spaces because the whitewash tames visual noise and increases perceived space, and the multi-tasking fire pit doubles as a coffee table. Photographs? Chef’s kiss. The matte brick texture, gentle highlights, and flame glow create natural depth even on phones.
Variations: If you rent, use removable faux-brick panels you can whitewash and lean. For a softer look, use warm white instead of bright white. If open flame isn’t allowed, try a bioethanol tabletop fire or a faux-flame LED bowl with glass pebbles—surprisingly convincing after sunset.
Budget Breakdown:
- Whitewash paint or lime slurry: $30–$110
- Modular fire pit coffee table (propane or ethanol): $200–$900
- Modular seating cubes/ottomans: $120–$480
- Outdoor throw blankets and two pillows: $60–$180
- Planters with white flowers or silvery greens: $40–$160
- Low lantern or cordless table lamp: $50–$180
Total Estimated Cost: $500 – $2,010
Best For: Small patios or courtyards with morning or evening use. Great for chill nights, s’mores with kids, or solo journaling with a blanket.
Key Design Elements:
- Main materials: whitewashed brick, powder-coated metal, tempered glass
- Color palette: warm white, soft grey, sage, natural linen
- Lighting strategy: flame as focal light; a single portable lamp for task lighting
- Furniture silhouettes: modular blocks, low rectangular table
- Texture layers: chalky brick, linen throws, glass pebbles
- Accent details: galvanized bucket for kindling or blankets, rosemary pot
Why This Looks Expensive: A quiet, tonal palette with a single dynamic element (flame) feels curated. Whitewash unifies mismatched brick and makes everything appear intentional.
How To Recreate This Look:
- Start by cleaning brick and applying a diluted whitewash for a translucent, layered look.
- Add a compact fire pit coffee table at the center—confirm local codes and clearances.
- Layer modular seating around the table, leaving 18 inches clearance for legs and trays.
- Install a cordless lamp for reading light that won’t compete with the flame.
- Style with a neutral throw, two pillows, and planters in soft greens for calm edges.
Don’t Do This: Avoid high-gloss white on brick. It bounces glare and looks plastic. Keep it matte for texture and gentle light.
Pro Styling Tip: For photos, turn off overheads and let the flame and one side lamp do the work—skin tones look warmer and the brick texture sings.
Mindset nudge: If one idea resonated more than the others, that’s where you start. These aren’t hard rules; they’re shortcuts. Edit first, then add one strong move that earns its presence.
Quick Checklist
- Pick one dominant material (concrete, teak, limewash, rattan, steel, or brick)
- Choose a single light quality (golden warm, dappled shade, candlelit, diffused, cool moonlight, or flame glow)
- Select one statement piece (low sofa, bistro set, built-in bench, egg chair, rail bar table, fire pit coffee table)
- Commit to a tight 3–4 color palette
- Use one rug to define and soften the zone
- Add height variation with planters at two or three levels
- Use dimmable warm bulbs unless aiming for the sleek cool look
- Limit tabletop decor to one tray and one living element
- Leave at least 18 inches of clearance for easy movement
- Photograph at golden hour or twilight for soft, flattering light
Frequently Asked Questions
How do I design a small outdoor living space on a tight budget without it looking cheap?
Choose one dominant material and one statement piece, then keep accessories minimal. Concrete-look pavers, bamboo fencing, and clamp-on tables give you presence for less. Spend on lighting—warm, consistent light instantly upgrades everything.
I rent and can’t drill into walls or railings. Any renter-friendly options?
Yes. Use free-standing planters to anchor shade sails, clamp-on balcony bar tables, interlocking deck tiles, and removable panels for limewash or privacy screens. Plug-in or solar lanterns handle lighting with zero wiring.
My balcony is very narrow. How can I make it functional?
Think vertical and linear. Use a rail bar table with backless stools, or a low sofa against the longest wall. Keep circulation clear by choosing round edges and folding pieces, and avoid bulky armrests.
What’s the easiest way to keep outdoor textiles clean and fresh?
Choose performance fabrics, store cushions vertically when not in use to shed water, and use breathable covers. Keep a small deck box or bench storage for throws, and shake out dust weekly—quick habits beat deep cleans.
How do I avoid the “random patio furniture graveyard” look?
Set a clear focal point: lounge, dining, or bar. Match finishes across metals and woods, limit your palette to 3–4 colors, and anchor everything with a rug or consistent flooring. One hero piece beats five small ones.
Final Thoughts
Choose one idea that makes your shoulders drop. Maybe it’s the low charcoal lounge with golden string lights, or that tidy rail table where the city looks a bit more cinematic at night. Start there. Edit first, then add one statement piece and the right lighting—your small outdoor living space will finally invite you outside.
The truth is, luxury outdoors comes from texture, lighting, and restraint. You don’t need a lot. You need the right few things placed with intention. If you commit to one material, one light quality, and one hero piece, everything else falls into place.
You’ve got this. Brew something, throw open the door, and claim your corner. Small can be stunning—seriously.