7 Luxury Outdoor Living Space Ideas That Make Your Backyard Feel Like A Resort
You want your backyard to feel like a five-star escape with soft water sounds, layered textures, and that golden-hour glow that flatters everything. You hate the plastic chairs, the glare, and the weird patch that never feels “finished” no matter how many cushions you throw at it. Think breezy linens, honed stone underfoot, lantern light dancing across a matte limewashed wall. These seven luxury outdoor living space ideas will fix the specific eyesores that make your yard feel chaotic and give you a 30–90 day plan to make it look resort-level lush on a real-life budget.
Expect rich textures, color that reads expensive, and lighting that does more than just make things bright. These setups are wildly photogenic, Pinterest-worthy, and simple to maintain. Choose one to start, cap the spend where I note it, and enjoy a backyard you’ll actually use for late dinners, early coffees, and everything in between.
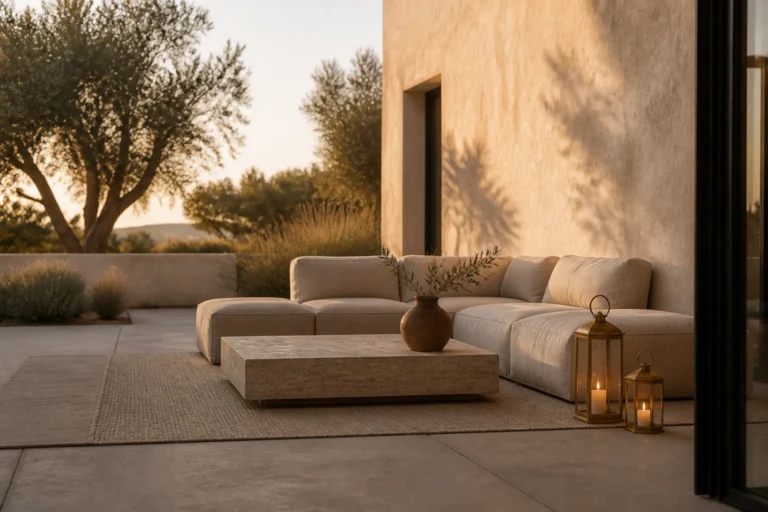
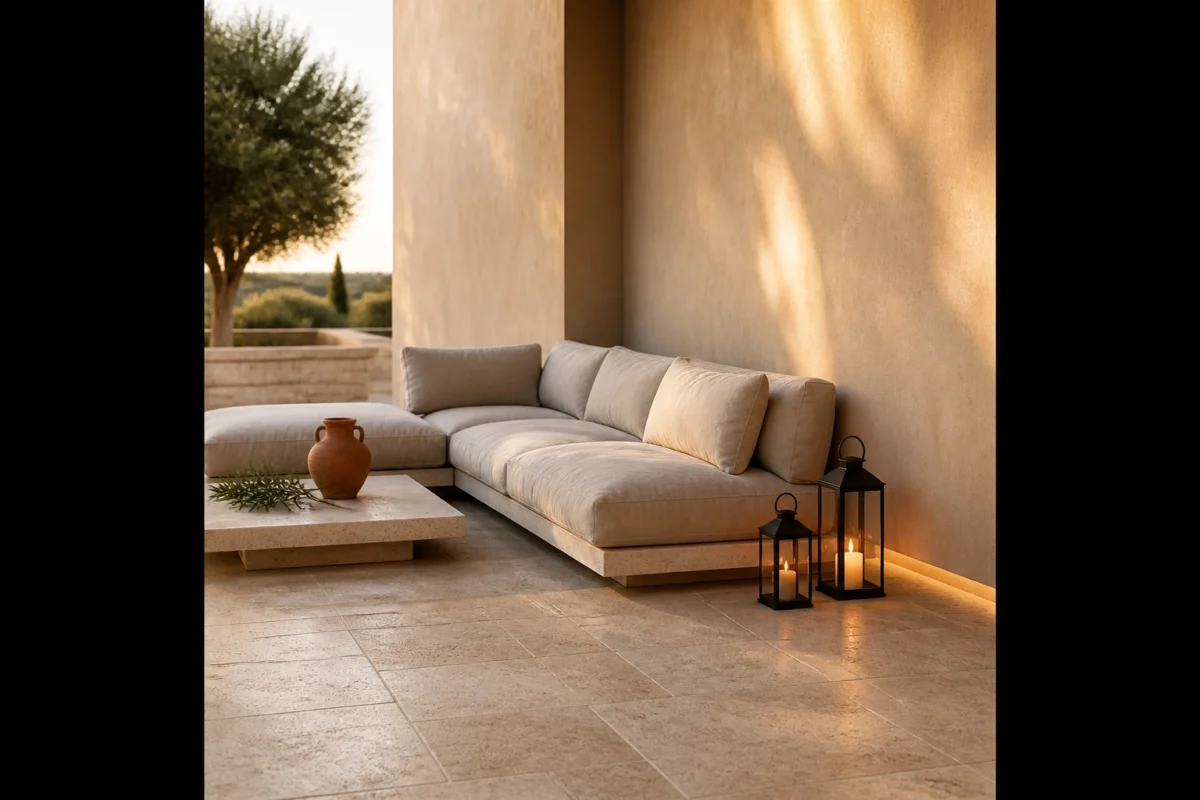
1. Travertine Terrace With Low-Glow Lantern Lighting And a Deep-Seat Lounge Sofa
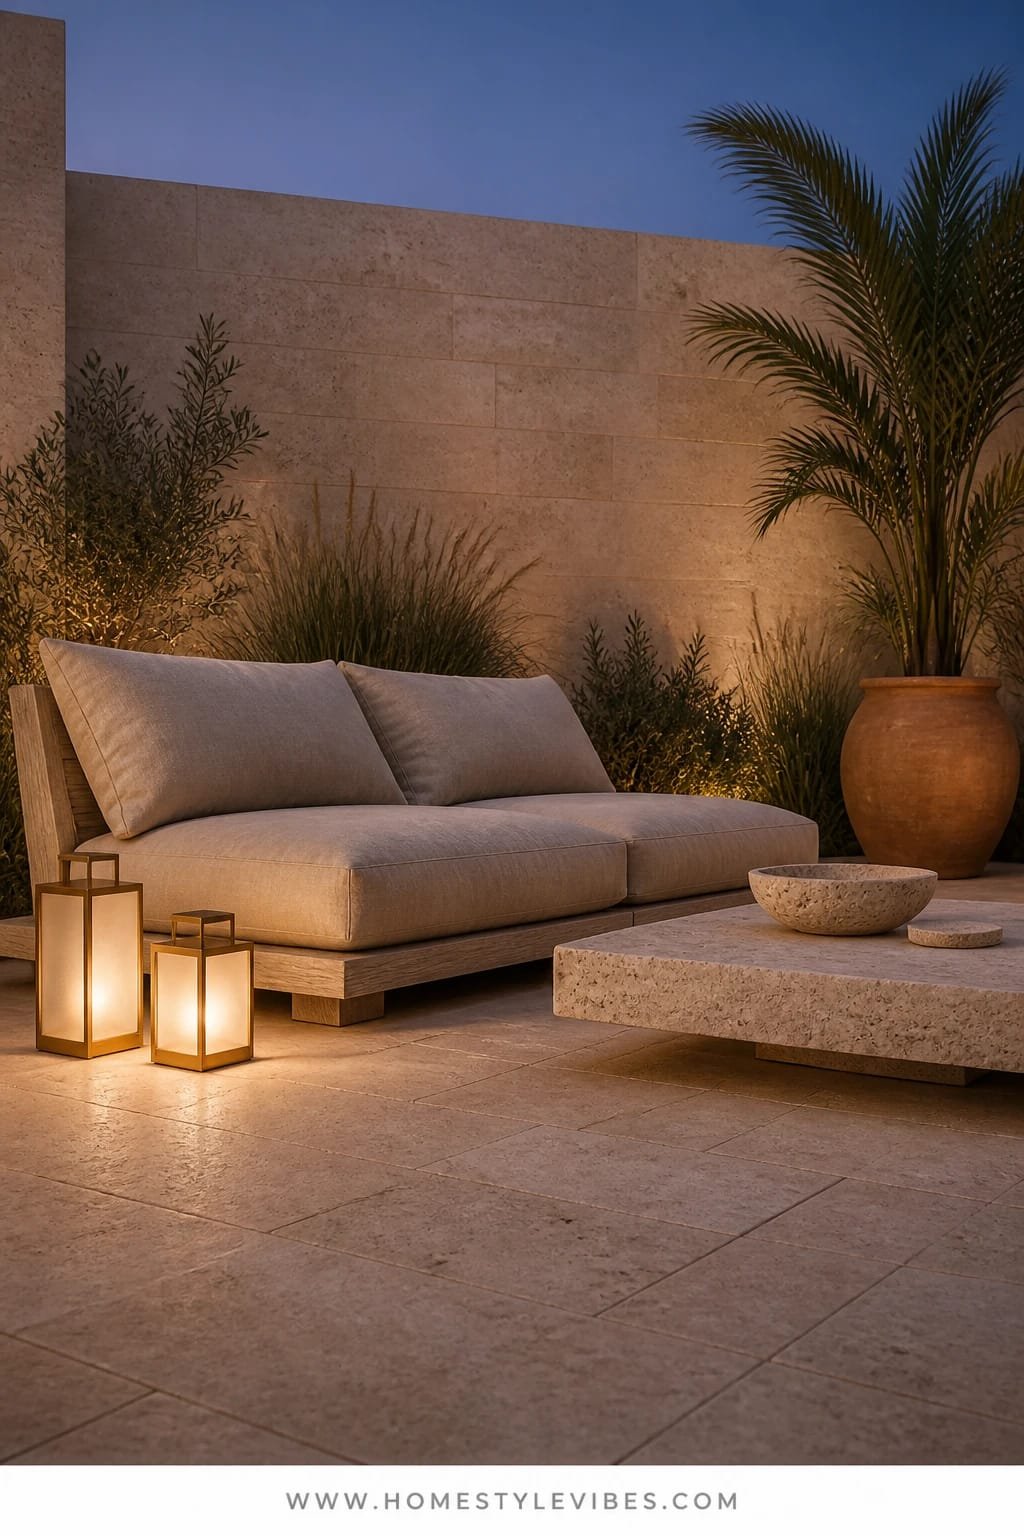
We’ve all been there: you buy a nice outdoor sofa, but everything still looks scattered and oddly temporary. The mood you want is hotel-lounge serenity—those cushiony seats that swallow tension and the hush of muted stone under a warm, low light. This design creates a calm, upscale terrace by pairing travertine (or porcelain lookalike) with oversized, low-slung seating and lanterns that cast a soft, directional glow, flattering both faces and fabrics.
It works in real homes because travertine tones down visual noise and reads as classic. If you’re in a small space, a porcelain paver in a light cream mimics that sandy luxury and cleans easily. Lighting matters: skip the overhead flood that bleaches everything. Go for waist-height lanterns and dimmable path lights to produce shadows and depth, which makes the area photograph beautifully—especially at dusk. Add charcoal cushions and one tonal throw for contrast. The sofa is your statement piece; it anchors the composition and sets the silhouette language for the rest.
Variations: Budget-friendly? Use porcelain pavers and a weather-resistant acacia frame sofa. Small patio? Try a two-seater plus an ottoman that doubles as a table. Renter-friendly? Float an outdoor rug over existing concrete and cluster lanterns with LED candles; no drilling required.
Budget Breakdown:
- Travertine or porcelain pavers: $8–$25/sq ft
- Deep-seat outdoor sofa (aluminum or teak): $900–$3,500
- Outdoor cushions in performance fabric: $200–$600
- Lanterns with LED candles: $60–$300
- Outdoor rug (9×12): $250–$900
Total Estimated Cost: $2,000 – $8,500
Best For: Medium to large patios that need a focal seating moment; anyone who entertains at night; summer to shoulder seasons.
Key Design Elements:
- Main materials: Travertine or porcelain travertine-look, teak/aluminum, performance fabric
- Color palette: Cream stone, charcoal cushions, warm brass/black metal lanterns
- Lighting strategy: Lower-than-eye-line lanterns, dimmable path lights, warm 2200–2700K bulbs
- Furniture silhouettes: Low, deep-seat, boxy lines
- Texture layers: Honed stone, matte fabric, natural wood grain, nubby pillows
- Accent details: Olive tree in a tall pot, slim metal side tables, one oversized ceramic bowl
How To Recreate This Look:
- Start with ground: install or lay large-format travertine or porcelain pavers in a running bond for subtle rhythm.
- Add your deep-seat sofa facing the best view; keep clearance on all sides for clean sightlines.
- Layer a large outdoor rug to visually “room-ify” the terrace; align the rug edges with paver seams if you can.
- Install dimmable, warm path lights and place two to three lanterns at staggered heights near seating corners.
- Style with a single hero planter (olive or bay) and a low tray with two sculptural objects for restraint.
Why This Looks Expensive: Consistent stone tone + low lighting equals intentional calm. Deep seating with few, quality textiles says “boutique resort,” not “waiting area.” Negative space around the sofa reads luxury.
Watch Out: Don’t mix too many stone tones. Keep pavers and planters within the same warm family. Avoid bright white cushions outside direct shade; they glare and stain faster.
Pro Styling Tip: Photograph at blue hour with only the lanterns and path lights on—the soft contrast makes the travertine glow and the cushions look plush.
Keep scrolling—next up solves the “beautiful but impractical” dining dilemma with texture-forward calm.
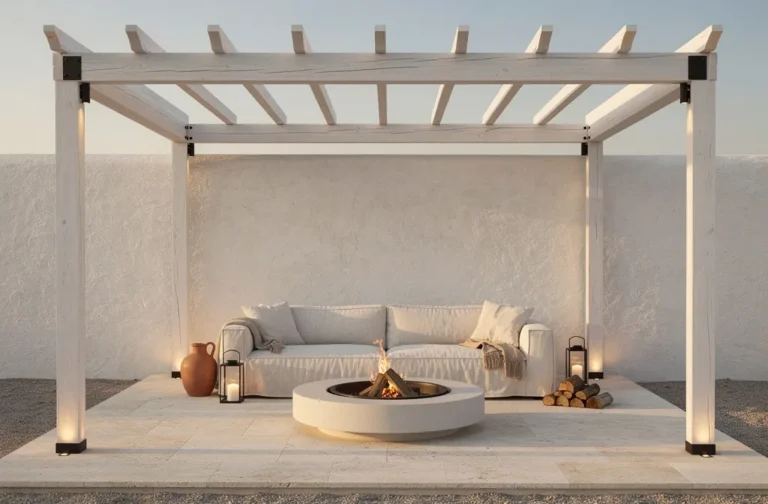
2. Cedar Slat Pavilion With Dappled Sunlight And a Sculptural Stone Dining Table
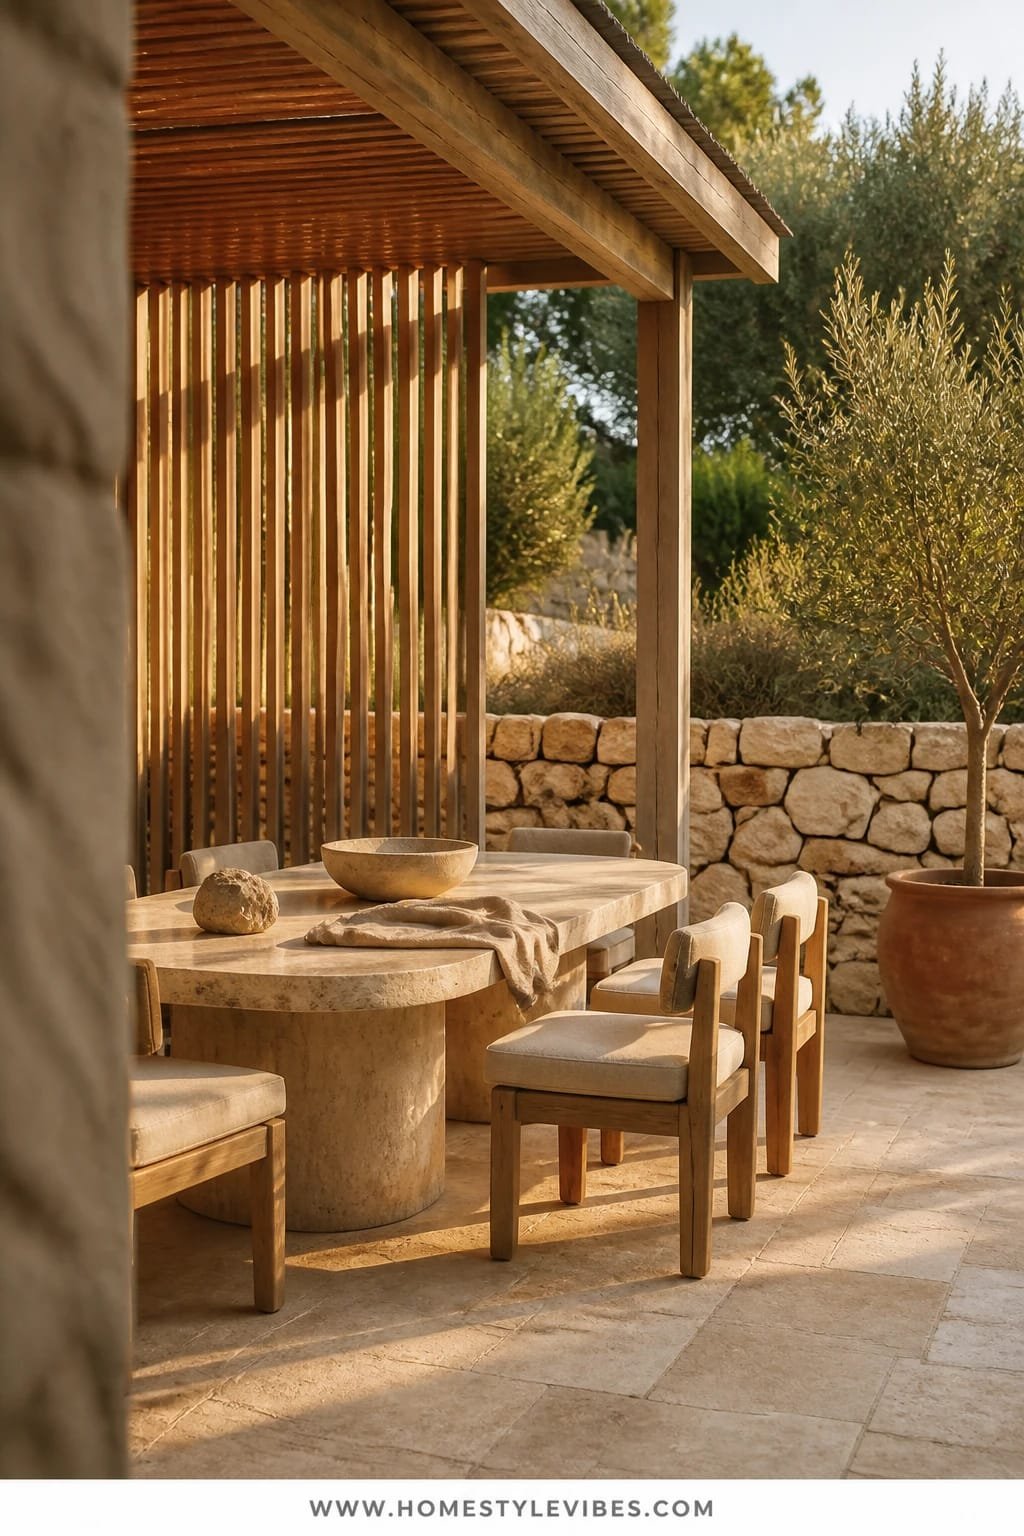
It’s that one corner that always feels off: your dining set looks nice in the morning but turns blinding at noon and too dark at night. A cedar slat pavilion filters harsh light into dappled shade, which instantly softens the scene and keeps meals comfortable across the day. The vibe feels modern Mediterranean meets coastal Australian—grounded, textured, beautifully timeless.
Here’s why it works in real life: slatted wood manages light without a heavy roof. You get airflow, sun protection, and that lovely stripey shade that photographs like a dream. A sculptural stone dining table underlines the resort energy; round or racetrack shapes stop the area from feeling like a conference setup. Maintenance stays reasonable with oiled cedar or thermally modified ash; choose sealed limestone or quartzite for the tabletop if you host often.
Variations: Budget-friendly? Build a freestanding cedar pergola kit and add reed panels for extra shade. Small-space? Use a 42–48 inch round stone bistro table. Renter-friendly? Metal-framed shade sail plus a faux-stone composite table for a similar silhouette.
Key Design Elements:
- Main materials: Cedar slats, honed stone, woven rush seats
- Color palette: Warm honey wood, putty stone, blackened steel accents
- Lighting strategy: String lights tucked along slats, candle hurricanes at table ends, 2400K festoons
- Furniture silhouettes: Curved stone top, slender-leg chairs
- Texture layers: Vertical slats, woven seats, linen runner, matte glaze ceramics
- Accent details: Branchy centerpiece, ceramic water pitcher, low shallow bowls
Budget Breakdown:
- Cedar pergola/pavilion kit: $1,200–$4,500
- Stone or composite stone dining table: $800–$3,000
- Outdoor dining chairs (set of 6): $600–$2,400
- String/festoon lights + dimmer: $100–$300
- Linen runner + ceramics: $80–$250
Total Estimated Cost: $2,800 – $10,450
Best For: Families who actually eat outside; medium patios; homes with hot midday sun.
How To Recreate This Look:
- Anchor the zone with a cedar pergola; align slats east-west if possible for even midday dapple.
- Place a sculptural stone table centered; allow 36–42 inches clearance all around for comfortable movement.
- Add chairs with woven seats for softness; mix two host chairs with arms for visual weight.
- Install string lights along the inner beam, not across the center, to avoid glare in photos.
- Style with a simple branch arrangement and two low hurricanes; keep the table 70% empty for that “reserved” look.
Why This Feels Designer: The controlled dapple, curved stone, and restrained tablescape show editing and confidence. Designers let materials star and keep surfaces largely clear.
One Thing To Avoid: Don’t hang lights too low. Eye-level bulbs cause squinting and cast harsh nose shadows at dinner. Keep bulbs 7.5–8 feet high.
Pro Styling Tip: For photos, dampen the cedar briefly; the wood deepens in tone, and the slat shadows become more graphic.
Quick mindset reset: You don’t need every idea to love your backyard. Pick the one that solves your biggest daily annoyance—glare at dinner, nowhere to lounge, or zero privacy—and start there. Momentum beats perfection.
3. Tadelakt Plaster Wall With Warm Sconce Glow And a Built-In Bench Lounge
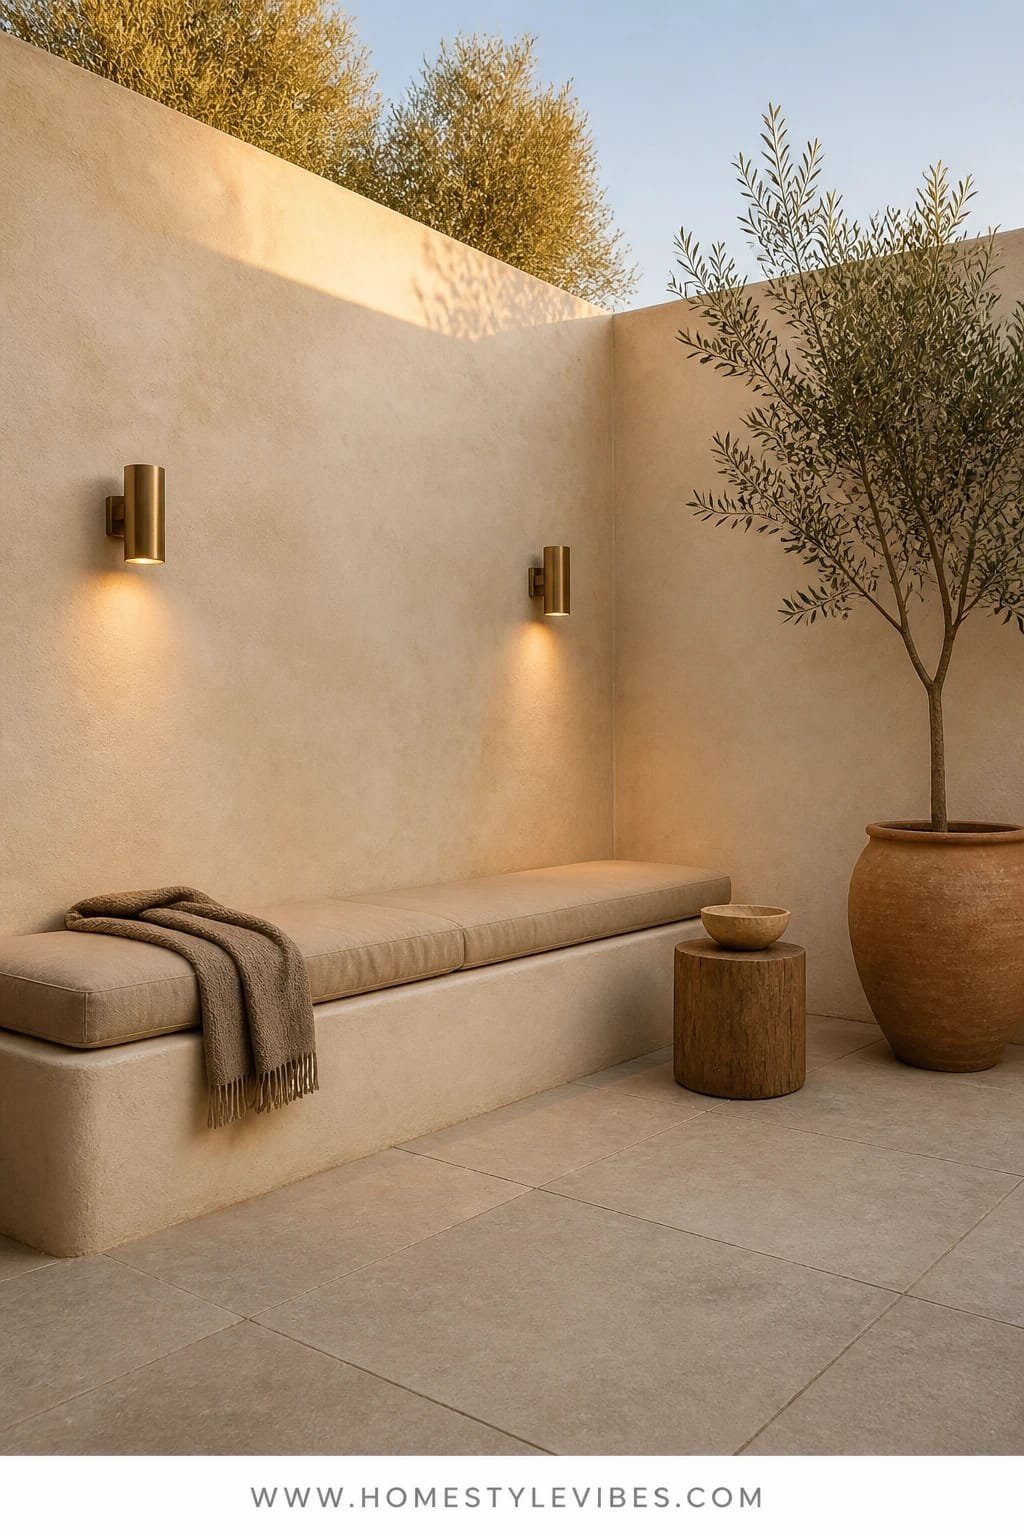
You’ve tried arranging chairs ten ways, but the corner still looks like furniture purgatory. A plaster feature wall with a built-in bench creates a clean architectural statement that sets the vibe instantly: spa-retreat meets modern Mediterranean courtyard. The tadelakt texture softens sound and light, and when you wash it with warm sconces, it gains quiet drama that’s impossible to fake.
It’s genius in small yards because you build seating into the perimeter, freeing floor space while adding major mood. Tadelakt (or limewash plaster alternatives) resists moisture and looks rich under raking light. Photographing it is a dream: the subtle sheen and micro-variations love shadow play. Style the bench with long lumbar cushions in earthy tones for a finished, high-end look without clutter.
Variations: Budget version? Stucco or lime paint on cement board and a standard masonry bench. Darker mood? Try a tobacco or clay-toned plaster with antique brass sconces. Renter-friendly? Faux the look with a painted masonry wall and a freestanding bench with a flush-to-wall profile.
Budget Breakdown:
- Tadelakt or lime plaster finish: $12–$30/sq ft
- Masonry bench build: $500–$2,000
- Outdoor sconces (pair): $180–$800
- Bench cushion + lumbars: $200–$700
- Side table in stone or powder-coated metal: $100–$400
Total Estimated Cost: $2,000 – $7,000
Best For: Small patios, urban courtyards, anyone craving privacy and a finished architectural moment.
Key Design Elements:
- Main materials: Tadelakt/lime plaster, masonry, performance textiles
- Color palette: Sand, tobacco, terracotta, blackened bronze
- Lighting strategy: Two sconces 60–66 inches high, 2200–2700K for warmth
- Furniture silhouettes: Built-in linear bench, round side tables for contrast
- Texture layers: Velvety plaster, stone, nubby cushions
- Accent details: Potted cactus or olive, one sculptural candleholder
How To Recreate This Look:
- Frame the feature wall location; plan electrical for sconces before finishing.
- Build or place the bench with a seat height of 16–18 inches; add a slight slope for comfort.
- Apply tadelakt or lime plaster; seal per product for outdoor use.
- Mount sconces and test bulb warmth at dusk; adjust wattage to avoid hot spots.
- Style with long lumbar cushions and a single oversized planter to anchor the end.
Why This Reads High-End: Built-ins signal custom work. The plaster’s subtle sheen catches light in a way paint never does, creating dimension with no extra objects.
The Most Common Mistake: Square bench corners that jab backs and thighs. Radius the front edge or use a bullnose to keep it comfortable and refined.
Pro Styling Tip: Shoot at late afternoon when the sconce light just kicks in; plaster gradations will pop while the sky stays soft.
4. Fluted Concrete Bar With Sunset Backlighting And Curved Rattan Bar Stools
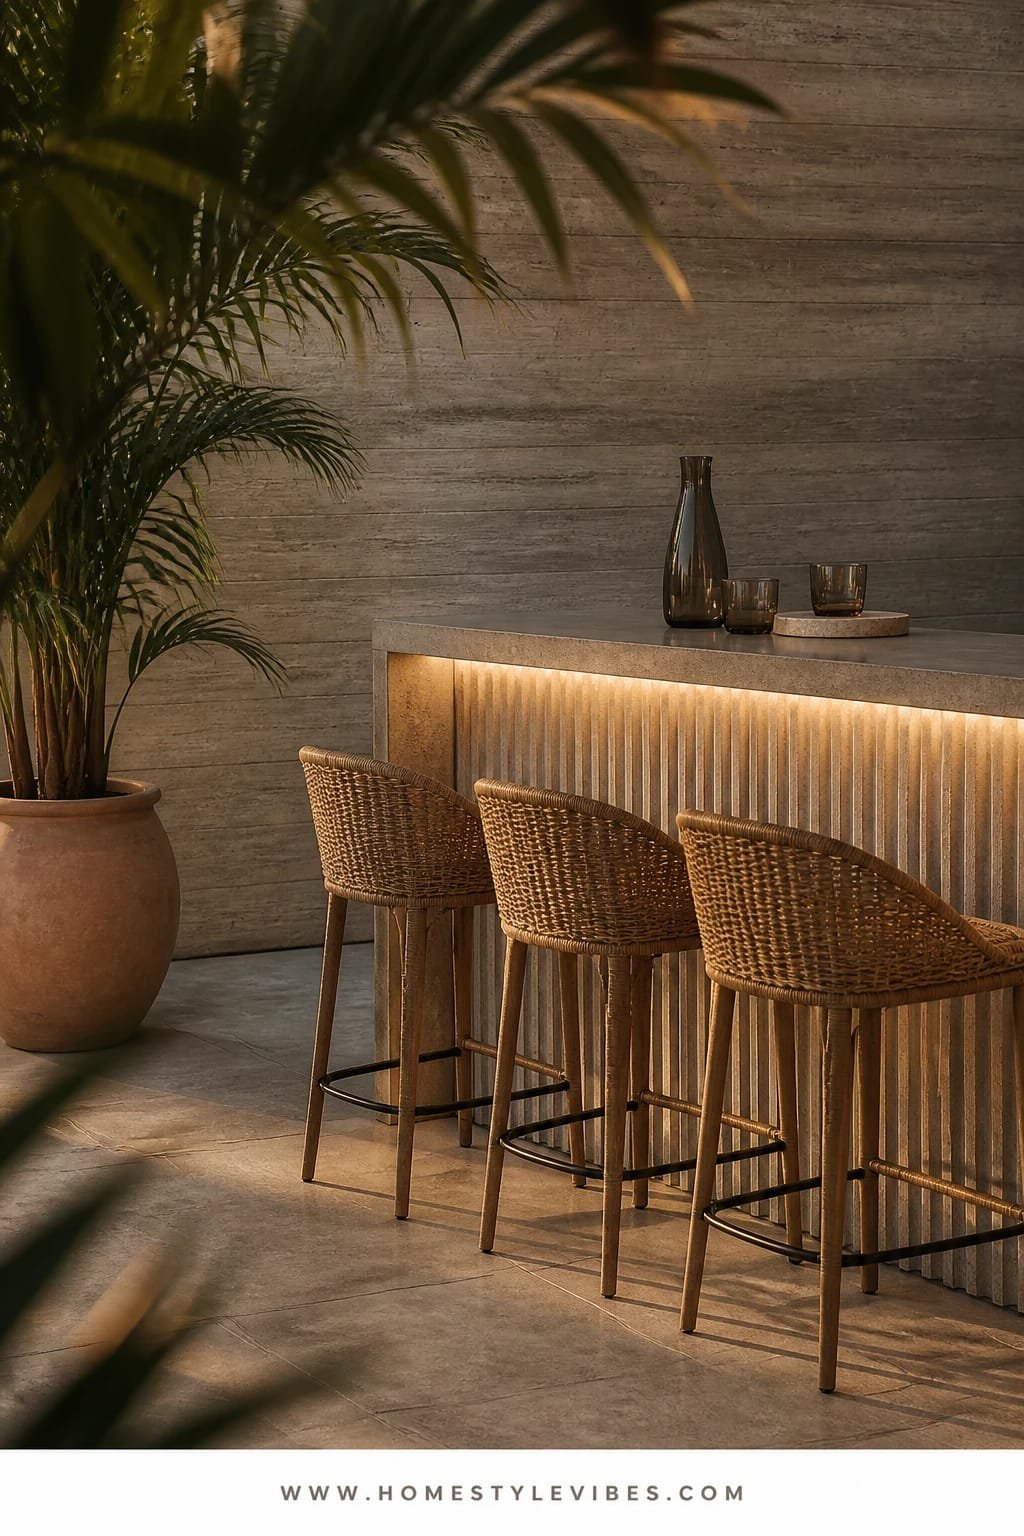
Hosting feels clumsy when guests hover around a random cooler. Create a destination: a fluted concrete bar that invites people to gather with a drink and a view. The mood is boutique rooftop—structured but playful—with curved rattan stools softening the concrete’s muscle. Backlighting at sunset turns the bar face into a sculptural glow, and suddenly you’re not “the house with a grill,” you’re running the chicest backyard cocktail hour on the block.
Why it works: concrete is durable, easy to wipe, and loves dramatic light. Fluting adds shadow lines that look fantastic on camera and disguise scuffs. Rattan keeps it from feeling cold. In small yards, a 6–8 foot bar with shallow depth creates flow without blocking the space. My friend installed something similar last summer; she spent weeks choosing stool fabrics before realizing the real upgrade was the LED strip under the counter lip—instant drama, tiny cost.
Variations: Budget? Use fiber-reinforced concrete panels over a wood frame; add stick-on fluted panels rated for outdoors. Darker vibe? Charcoal concrete with smoked glass votives. Renter-friendly? Folding bar cart with ribbed front panel wrap and portable LED lanterns.
Budget Breakdown:
- Concrete or GFRC fluted panels: $700–$2,500
- Countertop (concrete/stone): $600–$2,200
- Curved rattan stools (set of 3–4): $400–$1,200
- LED strip backlighting + transformer: $120–$350
- Ice well / bar caddy: $60–$250
Total Estimated Cost: $1,880 – $6,500
Best For: Entertainers, patios with a view axis, poolside hangouts.
Key Design Elements:
- Main materials: Concrete/GFRC, rattan, matte black metal
- Color palette: Soft gray or charcoal, warm rattan honey, black accents
- Lighting strategy: Hidden LED strip under bar lip, candle clusters at corners
- Furniture silhouettes: Curved-back stools, linear bar
- Texture layers: Fluted ribs, woven stool backs, smooth countertop
- Accent details: Small herb planters (mint, basil), matte shaker set
How To Recreate This Look:
- Build a straight or L-shaped frame; sheath with fluted concrete or outdoor-rated ribbed panels.
- Install a durable countertop; include a 10–12 inch overhang for knees.
- Affix warm LED tape beneath the overhang; test dimming at twilight.
- Position stools 24–26 inches seat height for a 36-inch bar top; allow 24 inches per stool.
- Style with a tight herb trio and one sculptural decanter; hide clutter in a caddy.
Why This Looks Intentional: Repetition of vertical ribs + a single curve motif ties the bar and stools together. The underlighting separates planes like a boutique hotel would.
Don’t Do This: Avoid glossy counters outdoors—reflections are blinding and show every water ring. Honed or matte surfaces age better.
Pro Styling Tip: For photos, dim the backlight to 30%, add two low candles, and turn off other ambient lights—your bar becomes the quiet star.
Take a breath. This isn’t about recreating a showroom. It’s about crafting a backyard that works for your rituals: morning coffee, kid snacks, weekend spritz hour. Start with the feature you’ll use most.
5. Porcelain Paver Pool Deck With Diffused Bollard Lights And a Canopy Daybed
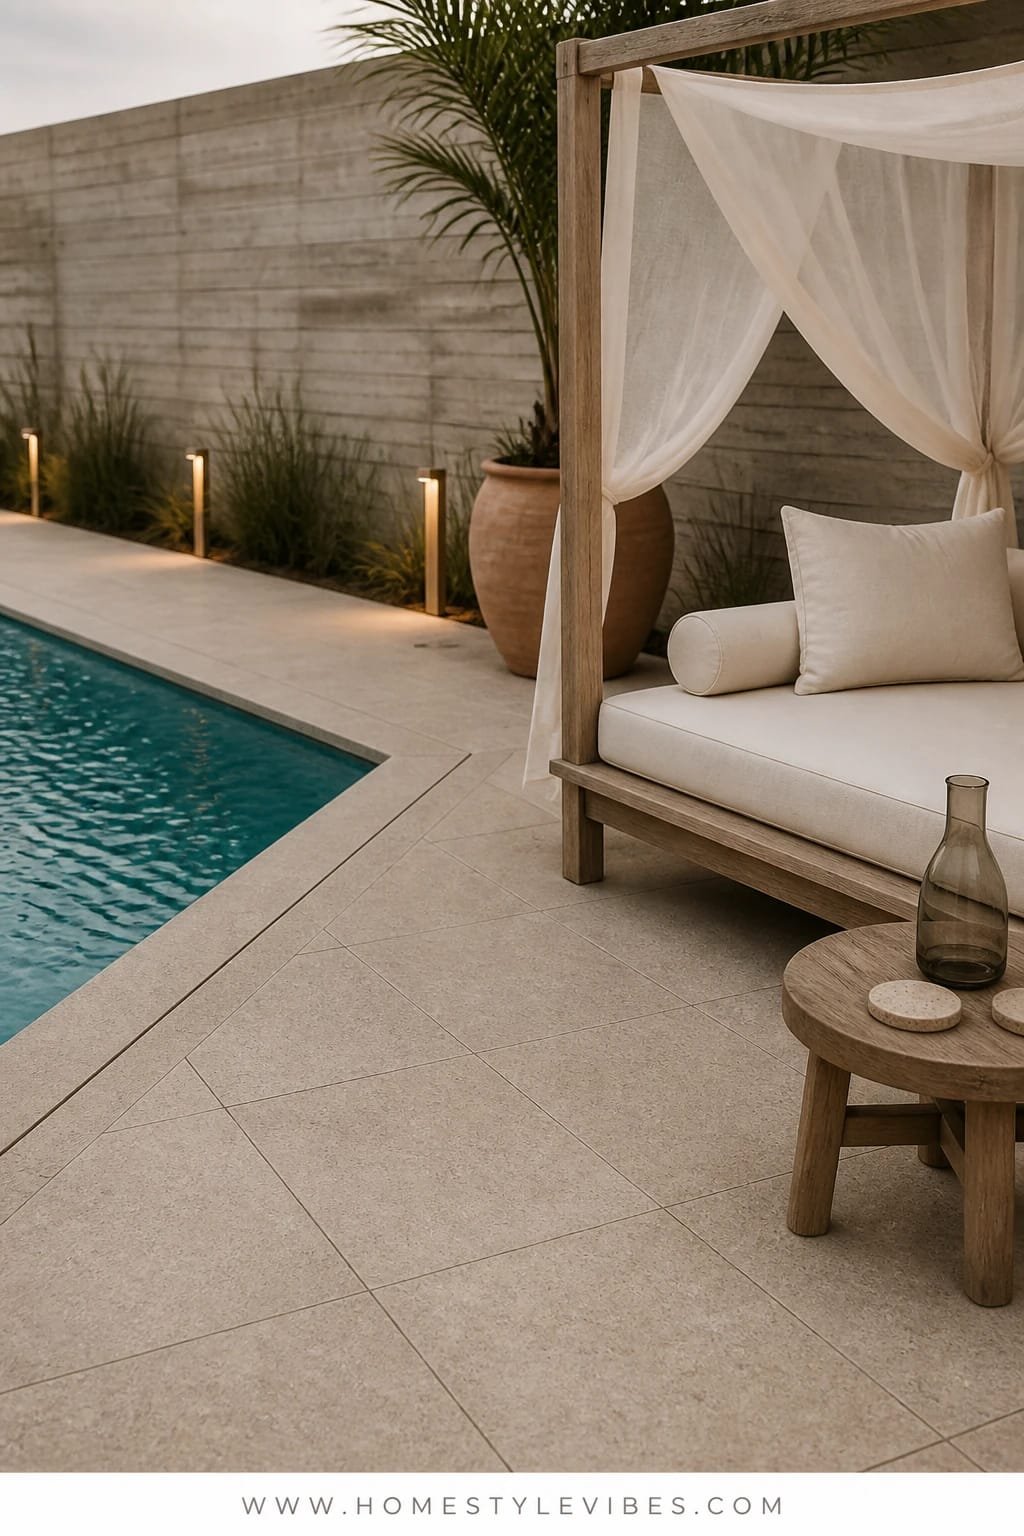
You love the look of a resort pool, but yours feels like a bright white baking sheet by noon. Porcelain pavers in a warm, matte finish solve the glare problem and stay cooler underfoot. Add a canopy daybed as your statement piece and suddenly you have a hideaway that blocks sun, creates privacy, and just begs for a book and a tall glass of something citrusy. The mood is hotel-spa—crisp, serene, beautifully edited.
It works practically: porcelain handles splashes, resists stains, and needs minimal sealing. Diffused bollard lights around the perimeter make evening swims safe and cinematic, with soft pools of light instead of blinding beams. Photographing this setup is easy because the matte deck absorbs light, the canopy introduces sculptural height, and the bollards add rhythm without hotspots.
Variations: Budget-friendly? Choose 24×24 porcelain squares on adjustable pedestals. Small yard? A single chaise with an arched canopy does the trick. Renter-friendly? Freestanding daybed and solar bollards; keep the existing deck and add a textured rug for a zone marker.
Budget Breakdown:
- Porcelain pavers + pedestals: $9–$20/sq ft
- Canopy daybed: $800–$3,500
- Bollard lights (4–6): $300–$1,200
- Outdoor side tables (pair): $150–$600
- Performance drapery panels for canopy: $120–$400
Total Estimated Cost: $2,500 – $10,000
Best For: Pool owners, sun-soaked yards, anyone who values low-maintenance elegance.
Key Design Elements:
- Main materials: Porcelain, powder-coated aluminum, performance fabric
- Color palette: Warm stone, bone/ivory textiles, soft black accents
- Lighting strategy: Evenly spaced bollards with frosted lenses, 2700K
- Furniture silhouettes: Canopy daybed with clean lines, round side tables
- Texture layers: Matte porcelain, gauzy drape, woven tray
- Accent details: One oversized striped towel, citrus tree in a ribbed pot
How To Recreate This Look:
- Choose a warm-tone porcelain with subtle veining; lay in a grid to keep it calm.
- Place the canopy daybed at the best angle to the view; secure drapes for wind.
- Install bollards 6–8 feet apart; aim for soft pools overlapping slightly.
- Add two side tables and a low woven tray; keep surfaces mostly clear.
- Style with one potted citrus and two heavyweight outdoor pillows for comfort.
Why This Looks Expensive: Matte finishes, controlled lighting, and one heroic piece (the daybed) send a strong, edited message. Luxury is restraint plus texture.
Watch Out: Don’t pick a blue-white paver; it reads cold and hospital-bright. Aim for creamy-beige with a hint of warmth.
Pro Styling Tip: Pull the canopy sheers halfway and clip them so they billow slightly; the movement adds life in video and softens hard lines.
6. Blackened Steel Fire Table With Ember Glow And a Linen-Blend Sectional
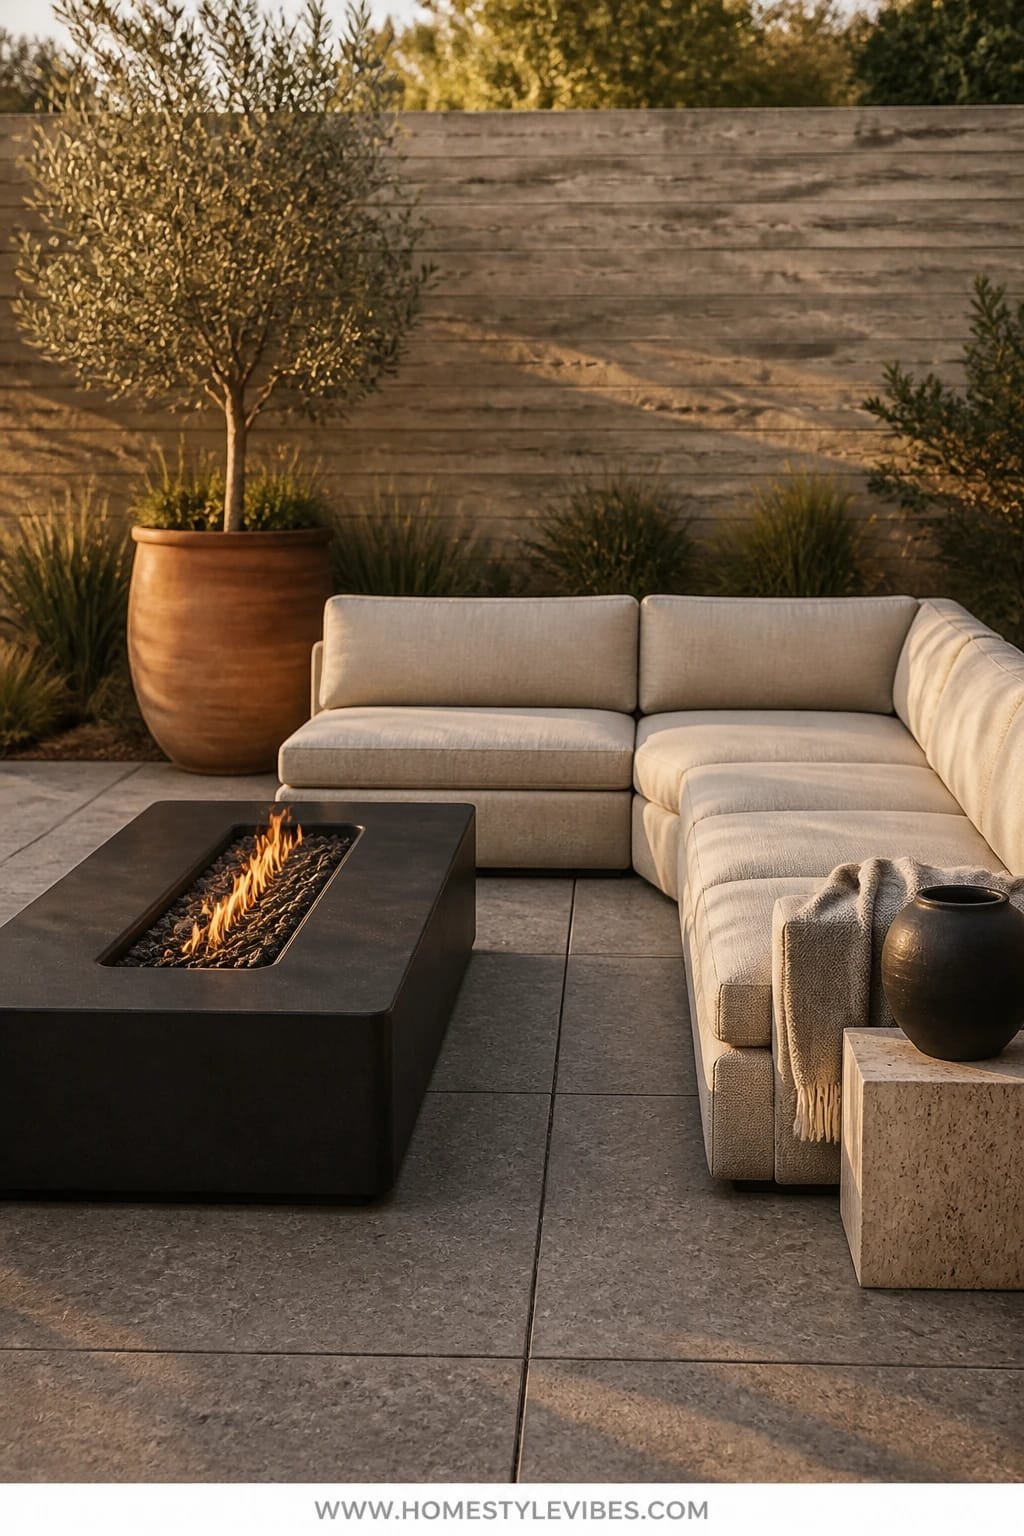
Cool nights are magical, but your old fire pit throws smoke in your face and seats everyone too far apart. A sleek blackened steel fire table changes the energy: controlled flame, cozy proximity, and a low visual profile that keeps sightlines clean. Pair it with a linen-blend outdoor sectional—yes, real-feeling fabric exists—and the mood turns earthy-luxe lodge meets modern courtyard.
In real life, it’s flexible and family-friendly. Steel fire tables come in gas or propane, which means no smoke, no mess, and reliable warmth. Lighting comes from the flame itself—flattering and rhythmic. Photographs benefit from the black steel’s matte finish; it anchors the composition and makes fabrics look lighter and more inviting. Last fall, I swapped our round pit for a rectangular steel table and honestly couldn’t believe the difference in hang time; we stayed out two more hours, no eye watering.
Variations: Budget? Powder-coated aluminum table with lava rock. Small space? A square fire table with a two-piece loveseat. Renter-friendly? Propane unit with a hidden tank side table and a modular sectional that breaks down for moves.
Budget Breakdown:
- Blackened steel or powder-coated fire table: $800–$3,000
- Linen-look performance sectional: $1,200–$4,500
- Cover + protective mat: $120–$350
- Outdoor pillows (4–6): $100–$360
- Side table or hidden tank cover: $120–$400
Total Estimated Cost: $2,340 – $8,610
Best For: Four-season patios, evening hosts, families who love s’mores without the campfire chaos.
Key Design Elements:
- Main materials: Blackened steel, performance linen-blend, lava rock or fire glass
- Color palette: Charcoal, oat, rust accents
- Lighting strategy: Firelight as primary, subtle path or step lights as backup
- Furniture silhouettes: Low-profile sectional, rectilinear fire table
- Texture layers: Matte metal, slubby fabric, stone coasters, wool-look throw
- Accent details: Low planter with grasses, match striker, marshmallow skewers in a jar
How To Recreate This Look:
- Position the sectional in an L with the fire table centered; ensure 18 inches between seat edge and table.
- Connect gas/propane safely; test flame height at dusk to avoid blowouts.
- Layer pillows in two tonal neutrals plus one warm accent like rust or olive.
- Add a single side table for drinks and a low planter to soften the corner.
- Keep a lightweight throw nearby for shoulder season nights.
Why This Feels Designer: Monochrome masses (black steel, oat fabric) create balance and intention. The flame provides movement and warmth, which reads high-end in photos and IRL.
One Thing To Avoid: Don’t crowd the perimeter with tons of little decor pieces. Let the fire breathe visually; clutter kills atmosphere fast.
Pro Styling Tip: Turn off surrounding lights for photos and let the flame reflect subtly in nearby metal or glass—instant depth.
Remember, this isn’t about spending endlessly. It’s about focusing on texture, light, and one statement piece per zone. If one idea resonates more than the others, that’s your starting point.
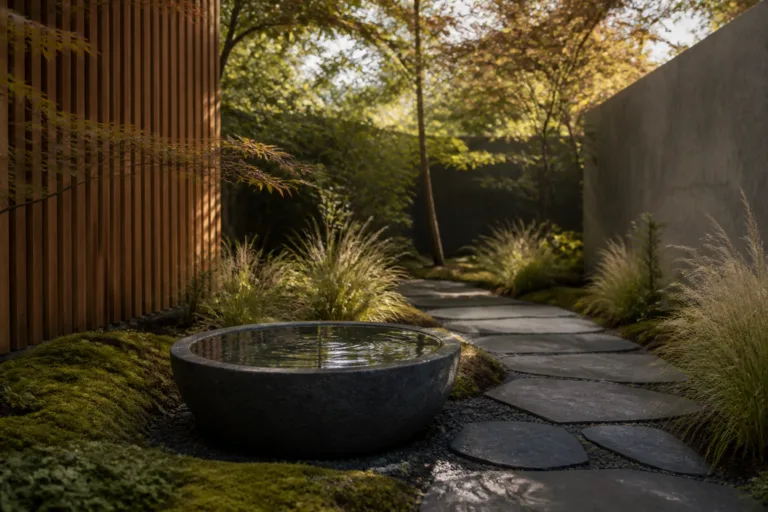
7. Zellige Tile Water Wall With Moonlit Reflection And a Teak Chaise Pair
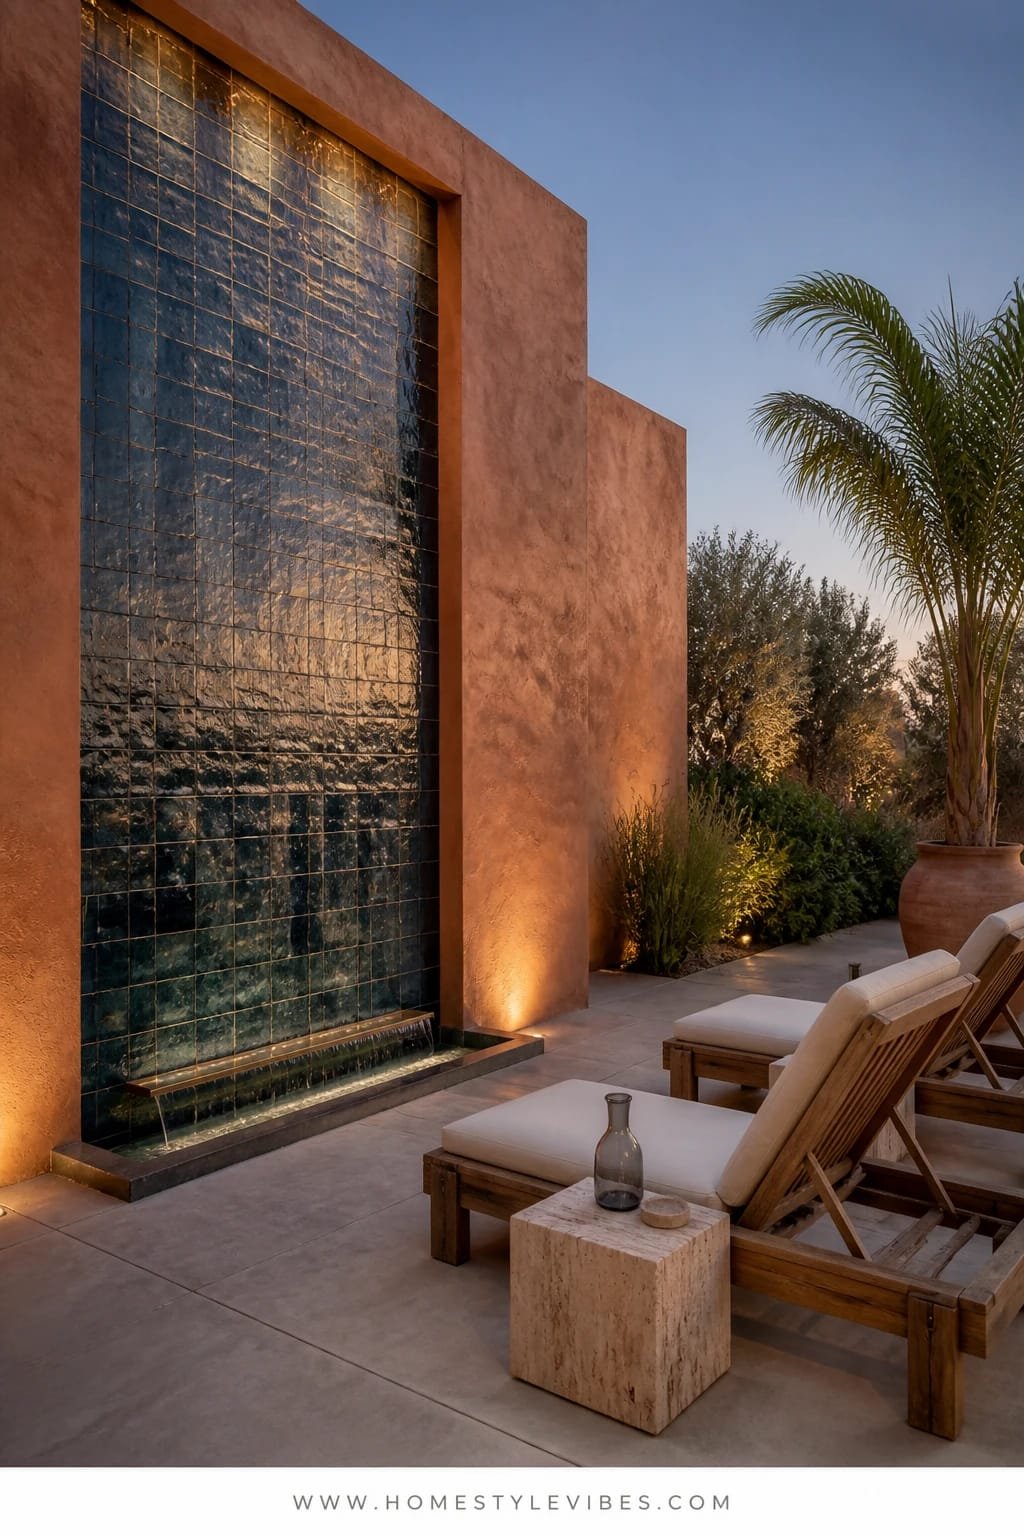
You crave the sound of water but worry about maintenance, splash, and placement. A vertical water wall tiled in zellige gives you that hypnotic trickle without a giant footprint. The mood is Moroccan-courtyard-luxe with a modern twist: moonlit reflections dance on the glossy, irregular tiles, and two teak chaises face the shimmer like prime hotel loungers.
Why it works at home: zellige’s imperfect surface refracts light and hides water spots. A slim recirculating basin keeps maintenance easy. Sound stays soft—more whisper than roar—so conversations remain clear. Photo-wise, the tile variation looks incredible at night; one well-placed uplight sends ripples of light across the wall, doubling the drama with almost no decor.
Variations: Budget? Glazed ceramic in a square 4×4 for a similar effect. Darker mood? Deep jade or midnight blue tile. Renter-friendly? Freestanding fountain bowl with stacked glossy pebbles and portable teak loungers.
Budget Breakdown:
- Zellige or glazed tile: $12–$35/sq ft
- Water wall kit/basin + pump: $800–$2,800
- Teak chaises (pair): $900–$2,400
- Outdoor cushion pads: $160–$420
- Low-voltage uplight: $80–$250
Total Estimated Cost: $1,952 – $5,905
Best For: Narrow side yards, courtyard nooks, anyone who needs a relaxing sound backdrop for reading or napping.
Key Design Elements:
- Main materials: Zellige/glazed tile, teak, stone basin
- Color palette: Sea-glass greens or inky blues, warm teak, patinated brass
- Lighting strategy: One angled uplight at the tile surface, 2700K
- Furniture silhouettes: Streamlined teak chaises, slim cushions
- Texture layers: Gloss tile, oiled wood, linen towel
- Accent details: Small brass hook for towels, potted papyrus or reed grass
How To Recreate This Look:
- Choose a sheltered wall; waterproof and prepare for tiling.
- Install the water wall basin and pump; test water flow before tiling the face.
- Set zellige in tight joints; accept variation—that’s the luxury.
- Place chaises 5–6 feet back for reflection viewing; add low cushions.
- Angle an uplight toward the tile; dim to avoid burnout on camera.
Why This Looks Expensive: Shine plus movement equals “wow.” Zellige gives you handcrafted irregularity, and the water turns it into living art with almost no styling needed.
Don’t Do This: Avoid pairing super-shiny tile with glossy metal nearby; you’ll get chaotic reflections. Keep surrounding finishes matte to let the wall perform.
Pro Styling Tip: For photos, mist the chaises lightly so teak deepens a shade; it sets off the tile’s gloss with a rich, natural contrast.
Quick Checklist
- Choose one dominant material per zone: stone, wood, plaster, or tile
- Commit to warm 2200–2700K lighting for relaxation areas
- Anchor each space with one statement piece (sofa, bar, daybed, water wall)
- Use matte finishes outdoors to avoid harsh glare
- Create dapple or diffused light with slats, sheers, or bollards
- Keep tabletops 60–70% clear for a finished, resort-like feel
- Layer two to three textures max: smooth, nubby, woven
- Align rugs and paver lines for a clean, editorial read
- Plan electrical early—sconces, LEDs, pumps need forethought
- Pick a restrained color palette with one contrast tone
Frequently Asked Questions
How do I get a luxury outdoor look on a tight budget?
Pick one zone and one statement piece—like a deep-seat sofa or a sculptural table—and keep everything else matte, simple, and tonal. Focus on warm lighting, a large rug to define the space, and one oversized planter instead of lots of small decor.
My yard is tiny. Which idea works best without feeling cramped?
A built-in bench with a plaster wall (Section 3) or a small pavilion dining setup (Section 2) uses vertical surfaces for impact and saves floor space. Round tables and slim chairs keep circulation comfortable.
I rent. What can I do that doesn’t require construction?
Float an outdoor rug, cluster lanterns, use freestanding shade (sails or a canopy daybed), and add a modular sectional. Portable solar or plug-in lights and a bar cart with ribbed panels mimic the custom look.
How do I maintain light fabrics and cushions outside?
Choose performance textiles, store cushions vertically so they dry fast, and use covers when rain’s coming. Spot clean with mild soap; avoid ultra-bright whites unless you have consistent shade.
What’s the biggest design mistake people make outdoors?
Flat, overhead lighting and too many small objects. Keep bulbs warm and low, and edit accessories—let materials, silhouettes, and one or two plants do the heavy lifting.
Conclusion
Luxury outdoors isn’t about buying everything new; it’s about choosing one hero material, dialing in the light, and giving your furniture room to breathe. Start with the idea that solves your biggest backyard headache—glare at dinner, nowhere to sit, not enough mood—and build from there. One zone finished well beats five zones halfway any day.
The truth is, resort energy comes from texture, lighting, and restraint. Stone that looks soft at dusk, fabric that feels tactile, and a single statement piece that quietly commands attention. Pick a look, set a budget, schedule a weekend, and watch your backyard start to feel like a place you can’t wait to come home to. You’ve got this—seriously.