6 Succulent Garden Bed Ideas With Rocks That Need Almost Zero Maintenance
You want that sun-dappled, sculptural succulent garden bed with rocks that looks like a boutique desert retreat—crisp edges, velvety greens, pale gravel that makes everything pop in photos. You hate the dead leaves, the weeds, and the constant watering and fussing that steals your weekends. Consider this your no-drama landscaping plan: six succulent garden bed ideas with rocks that stay stunning with almost zero maintenance. Each one solves a different frustration—drainage, weeds, awkward corners—while giving you a resilient, photogenic setup you can build in a Saturday and enjoy for years.
Picture milky quartz pebbles, charcoal slate, terracotta rust, and windswept boulders framing tight rosettes and chunky paddles. These layouts are designed for minimal watering, strong visual contrast, and long-term ease. If you cap your budget at under $800 per bed and carve out one focused weekend, you’ll have a Pinterest-worthy garden that actually behaves. Perfect for the “I want gorgeous, but I don’t want to babysit it” crowd.
1. Charcoal Basalt Border with Golden Hour Uplights and a Sculptural Agave Anchor

We’ve all been there: that strip along the driveway that grows nothing well and looks tired no matter what you plant. You’ve tried cheerful perennials and they wilted; you threw down mulch and it blew away. This setup is your antidote: a dramatic charcoal basalt rock border, warm low-voltage uplighting that hits at golden hour, and one bold agave that acts like a living statue. The mood is modern Mediterranean meets art gallery—lean, graphic, and ridiculously photogenic at sunset.
It works because basalt’s dark tone deepens succulents’ greens and blues while also hiding dust. The agave’s architectural form handles heat, drought, and neglect like a champ. Low-watt uplights turn everything kinetic once the sun dips, throwing gentle shadows and sculpting the edges of leaves. In small spaces, this design reads intentional—like you meant to keep the plant palette spare—so it never looks halfway done. It’s tough enough for family life and lends curb appeal that appraisers love.
Photographs come out crisp because the composition hits three big levers: contrast (charcoal rock vs pale-green agave), silhouette (spiky leaves), and glints of warm light that pull depth into the frame. If your driveway or side yard suffers flat, unforgiving light, the uplights save the day.
Variations to consider:
- Budget-friendly: Swap basalt chunks for crushed black lava rock; add one mid-size boulder for height and keep the agave as the star.
- Small-space: Use an agave parryi or dwarf whale’s tongue and two groupings of echeveria instead of multiple large agaves.
- Darker vibe: Incorporate smoked glass pebbles in a 12-inch ribbon along the border for a glossy, midnight shimmer at night.
- Renter-friendly: Use steel edging and build a raised gravel strip with a removable agave in a buried nursery pot camouflaged by rocks.
Budget Breakdown:
- Charcoal basalt rock or black lava rock: $120–$260
- Agave (medium to large specimen): $60–$180
- Low-voltage uplights (2–3 fixtures) + transformer: $140–$280
- Steel edging: $70–$130
- Weed barrier fabric: $25–$45
- Decomposed granite or gravel base: $60–$110
Total Estimated Cost: $475 – $1,005
Best For: Narrow driveway borders, side yards, or entry strips that need punch with minimal watering. Great for hot, sunny exposures.
Key Design Elements:
- Main materials: Charcoal basalt or black lava rock, decomposed granite, steel edging
- Color palette: Charcoal, smoky gray, pale green, warm brass/amber light
- Lighting strategy: Low-angle uplights focused on agave, warm 2700K bulbs
- Furniture silhouettes: None; hardscape and plant act as the sculpture
- Texture layers: Rough stone, smooth leaf blades, granular gravel
- Accent details: A single glossy black house number plaque nearby for cohesion
How To Recreate This Look:
- Start by trenching a clean edge and installing steel edging to define the bed’s outline.
- Add a base layer of decomposed granite and compact it to prevent dips.
- Lay weed barrier fabric, then pour your charcoal rock in a 2–3 inch layer.
- Plant your agave in a raised cone of gritty soil for perfect drainage, keeping the crown above the rock line.
- Install 2–3 warm uplights aimed just off-center on the agave to create shadow depth; test angles at dusk.
Why This Looks Expensive: Tight editing. One star plant, one deep-tone stone, and warm lighting read like a curated art piece instead of a random collection.
Watch Out: Don’t bury the agave’s crown beneath rock. Keep it slightly proud of grade to avoid rot, and keep the uplights at a distance to prevent heat stress.
Pro Styling Tip: Before shooting, mist the basalt lightly—wet stone darkens and the agave’s waxy leaves catch highlights for extra depth.
2. Pale Quartz Gravel Field with Cool Morning Light and Tiered Corten Planter Trio
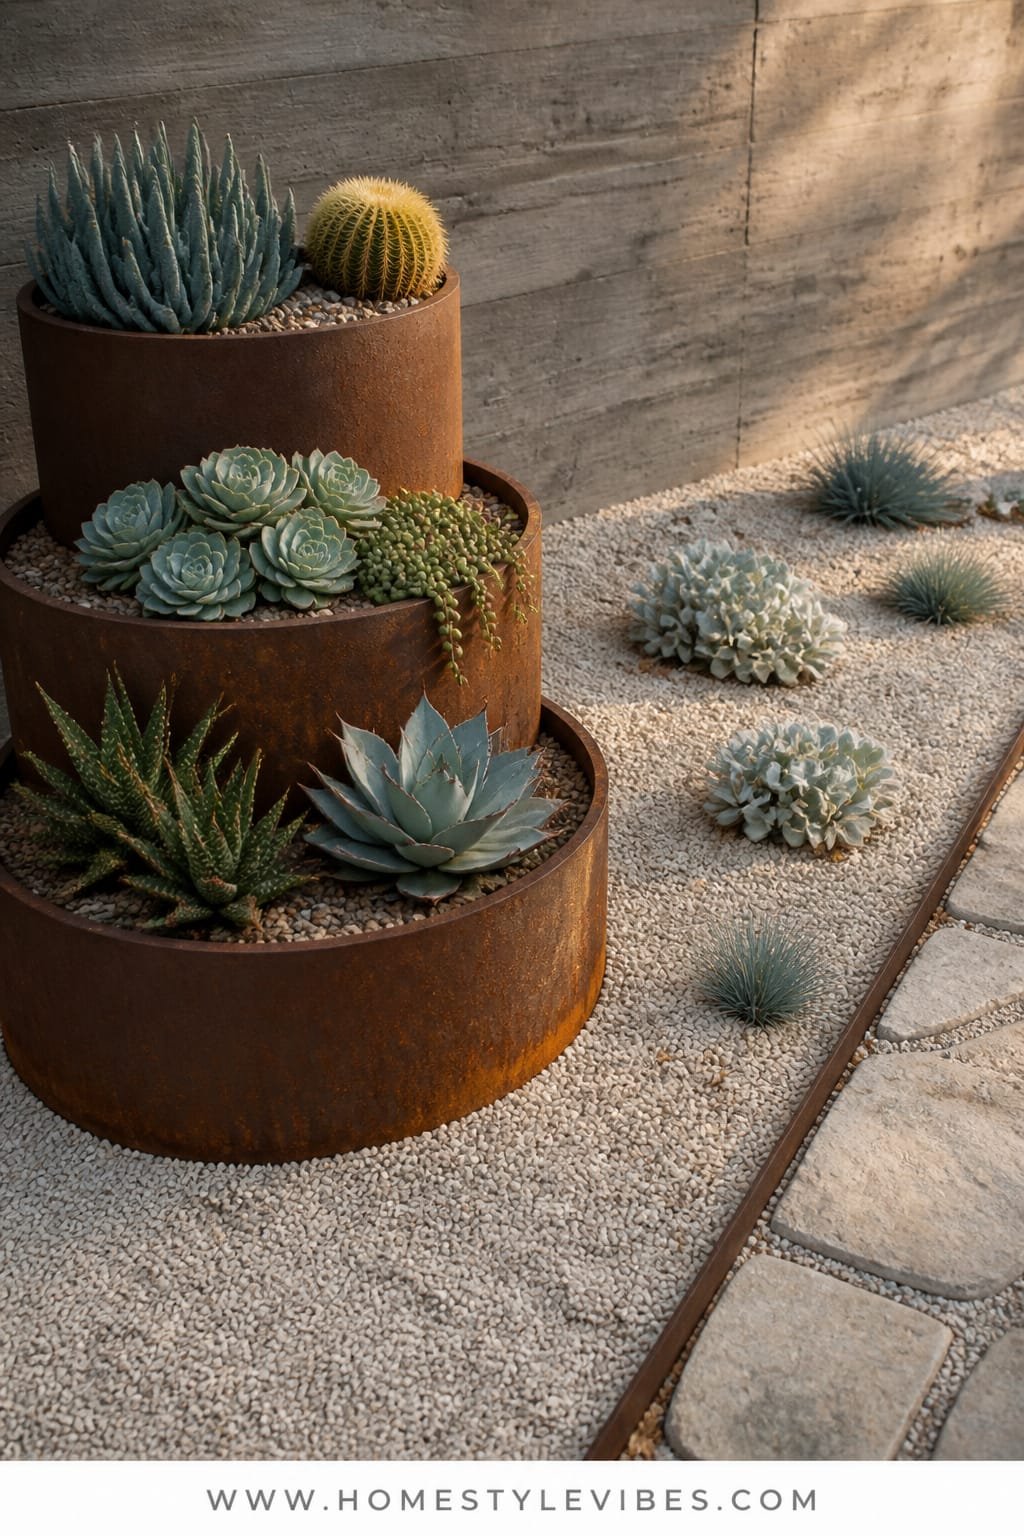
It’s that one corner that always feels off—too open, too plain, and a magnet for weeds. You’ve raked, you’ve mulched, you’ve lost patience. This design taps pale quartz gravel to bounce cool morning light and showcases a tiered set of corten planters that age into a rich, coppery patina. The vibe leans Japandi-meets-desert: calm, ordered, and serene with just enough warmth from the rusted steel to keep it friendly.
Why it works in real life: the quartz gravel acts like a giant reflector on overcast mornings and makes your succulents glow. Corten’s warm tone contrasts beautifully with silvery echeverias, blue chalk sticks, and ghost plant. Weeds struggle under a proper barrier, and the planters give you “containers within a bed” so you control soil quality and drainage effortlessly. Snap a photo at 9am and watch the cool, bright light make the whole thing feel airy.
This setup photographs like a magazine spread because you’ve got crisp negative space (the gravel field), architectural mass (the corten trio), and a coherent color story (white stone + copper + blue-green plants). Your eye flows, nothing shouts.
Variations to consider:
- Budget-friendly: Swap corten for painted galvanized stock tanks in a warm brown. Scuff the paint slightly for character.
- Small-space: Use two planters instead of three, staggered in height against a fence or low wall.
- Darker version: Replace quartz with pale gray pea gravel to dial back brightness while keeping the clean look.
- Renter-friendly: Group planters on a defined gravel rectangle framed by snap-in plastic edging.
Budget Breakdown:
- Pale quartz gravel: $90–$180
- Corten planters (set of 3 tiered sizes): $220–$480
- Weed barrier + pins: $35–$55
- Succulents (echeveria, senecio, sedum): $60–$140
- Edging (aluminum or composite): $80–$140
Total Estimated Cost: $485 – $955
Best For: Courtyards, front entry zones, or patios that get bright morning light. Homeowners who want a tidy, calm look with almost zero watering.
Key Design Elements:
- Main materials: Quartz gravel, corten steel, aluminum edging
- Color palette: White, coppery rust, sage, icy blue-green
- Lighting strategy: Natural morning light; optional subtle path lights on a timer
- Furniture silhouettes: Cylindrical or boxy planters with clean profiles
- Texture layers: Smooth gravel, satiny echeveria leaves, rusted metal grain
- Accent details: One vertical accent like a bamboo stake or minimal garden lantern
How To Recreate This Look:
- Frame the space with aluminum edging to keep the quartz neatly contained.
- Lay a weed barrier and pin it tight—no slack corners where weeds can sneak in.
- Set the corten planters in an offset triangle, tallest in back or toward the darkest side.
- Fill planters with gritty, fast-draining mix; plant echeverias in broad swirls with senecio as linear accents.
- Pour quartz gravel, rake to level, and leave a subtle meandering negative curve for movement.
Why This Feels Designer: The balance of negative space and form. There’s room for the eye to rest, which reads purposeful and calm—like a gallery layout but outdoors.
One Thing To Avoid: Don’t mix too many gravel colors. Two tones at most or you’ll lose the serene, high-contrast vibe.
Pro Styling Tip: For photos, tuck a single trailing sedum over a planter edge to break the line and add softness in the frame.
Remember, this isn’t about recreating a showroom. It’s about building a garden bed that actually fits your life. If one idea hits you in the gut, let that be your north star and ignore the rest for now.
3. Warm River Rock Drift with Dappled Shade and a Curved Bench Niche
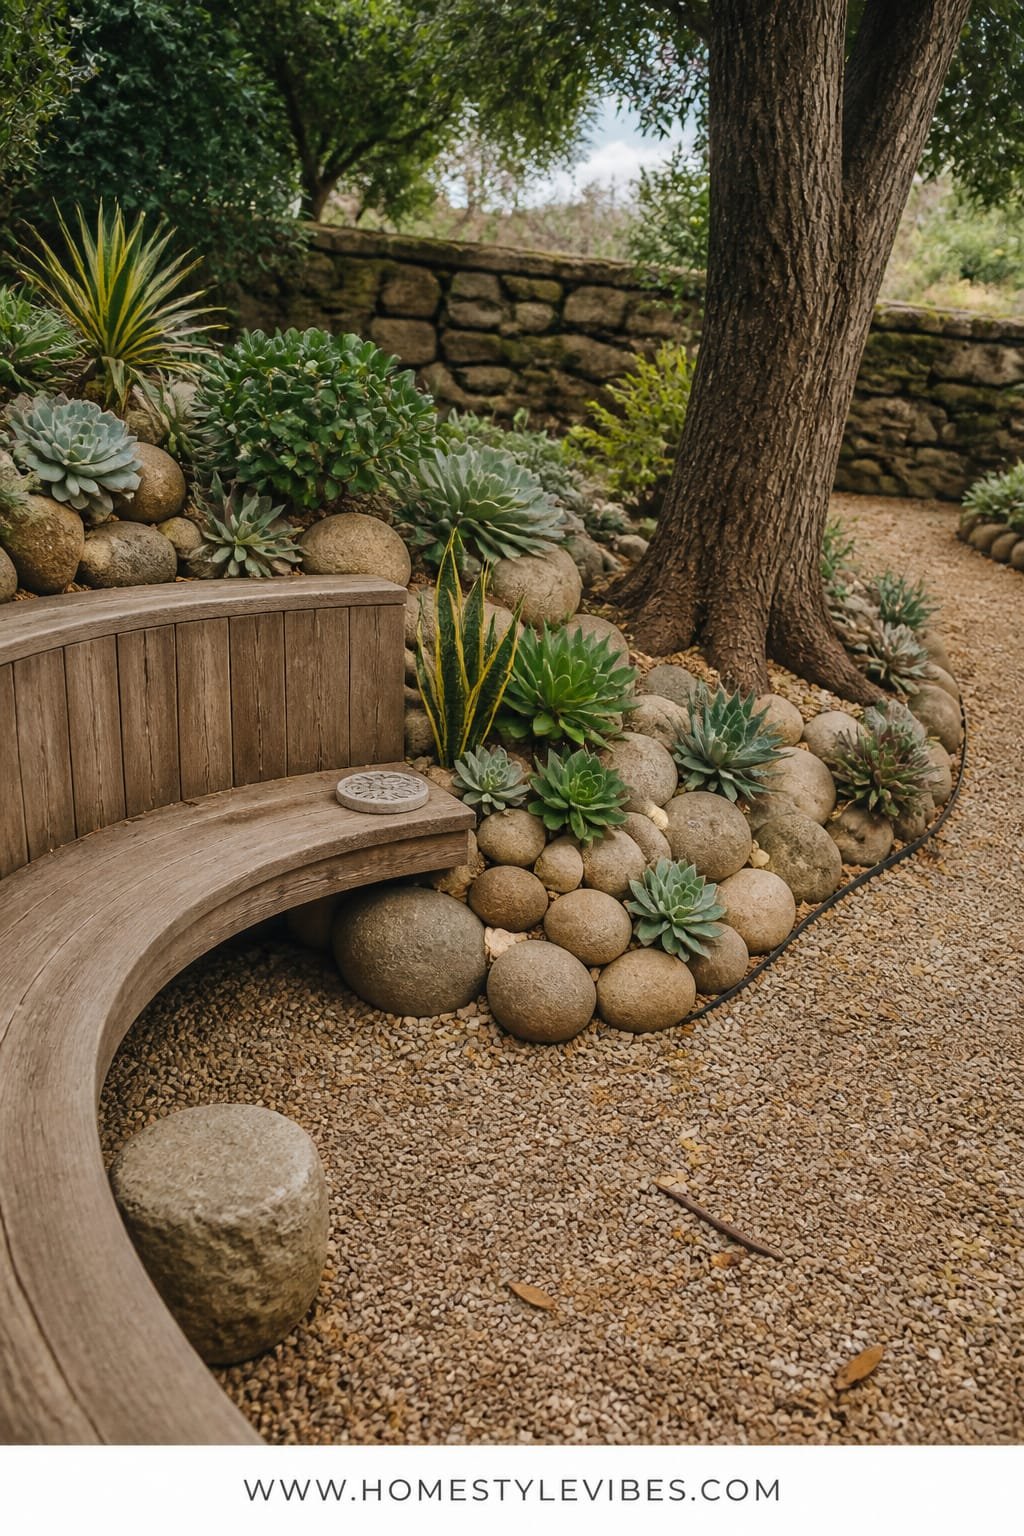
You want soft, organic flow around a mature tree, but every attempt turns into a muddy patch with awkward edges. Shade can be tricky for succulents, but many thrive in bright, dappled conditions. This warm river rock bed with a gentle meander wraps the tree like a hug and tucks in a curved bench niche—your morning coffee throne. The mood is naturalistic Californian, with a whisper of spa garden calm.
Why it works: Rounded river rock never competes with bark or roots; it looks intentional by default. The curved bench doubles as a visual anchor and a place to land, and it guides the path of sight through the bed. Choose partial-shade-friendly succulents like haworthia, gasteria, and certain aloes. In family spaces, the smooth stones stay friendly underfoot, and the bench invites actual use—not just pretty views.
Photos sing thanks to the play of light across rounded, matte stones and the swoop of the bench, which gives you a strong S-curve composition. The entire scene gains dimension as shadows change during the day.
Variations to try:
- Budget-friendly: Build the bench with stacked stone or a simple concrete block core finished with stucco or limewash.
- Small-space: Use a half-bench tucked against a fence; keep the stone palette tight.
- Darker mood: Choose deeper tan and caramel-toned stones; add a single bronze lantern for glow.
- Renter-friendly: Skip the bench and lay a portable teak stool; use roll-out weed barrier and shallow stone layer that’s easy to remove.
Budget Breakdown:
- River rock (2–4 inch mix): $150–$320
- Curved bench (prefab or built): $220–$650
- Shade-tolerant succulents: $70–$160
- Weed barrier + pins: $30–$50
- Edging (natural bender board): $45–$85
Total Estimated Cost: $515 – $1,265
Best For: Under-tree zones with dappled light, uneven terrain, and households that want a quiet reading spot with minimal yard work.
Key Design Elements:
- Main materials: River rock, natural bender board, bench stone or stucco
- Color palette: Warm tan, caramel, bark brown, deep green
- Lighting strategy: Primarily natural dappled light; add one subtle low bollard if needed
- Furniture silhouettes: Low curved bench with soft radius
- Texture layers: Smooth stones, bark, leathery aloe leaves
- Accent details: A single mossy boulder or driftwood piece near the bench base
Why This Reads High-End: Curves cost more to execute in most landscapes, so even a simple arc in your bench or stone edge instantly implies custom work.
How To Recreate This Look:
- Outline a soft, looping edge around the tree drip line with bender board; avoid tight circles.
- Lay weed barrier without choking the trunk flare; leave a breathing gap around the base.
- Build or place the curved bench where morning light grazes the seat for that “invited” feel.
- Plant shade-appropriate succulents in clusters near the bench and at visual stopping points.
- Top with river rock; tilt a few stones slightly to create “flow,” not a flat sea.
The Most Common Mistake: Plonking the bench dead center. Offset it slightly so the eye travels; that asymmetry feels more organic and less “park bench.”
Pro Styling Tip: Place a ceramic mug or book on the bench right before photographing—the human clue gives scale and warmth instantly.
Little mindset reset: scalability wins. If all you manage this weekend is a clean stone edge and one planted cluster, that’s still progress. Let the rest unfold over time.
4. Terracotta Shard Mosaic with Late-Afternoon Glow and a Low Concrete Fire Bowl
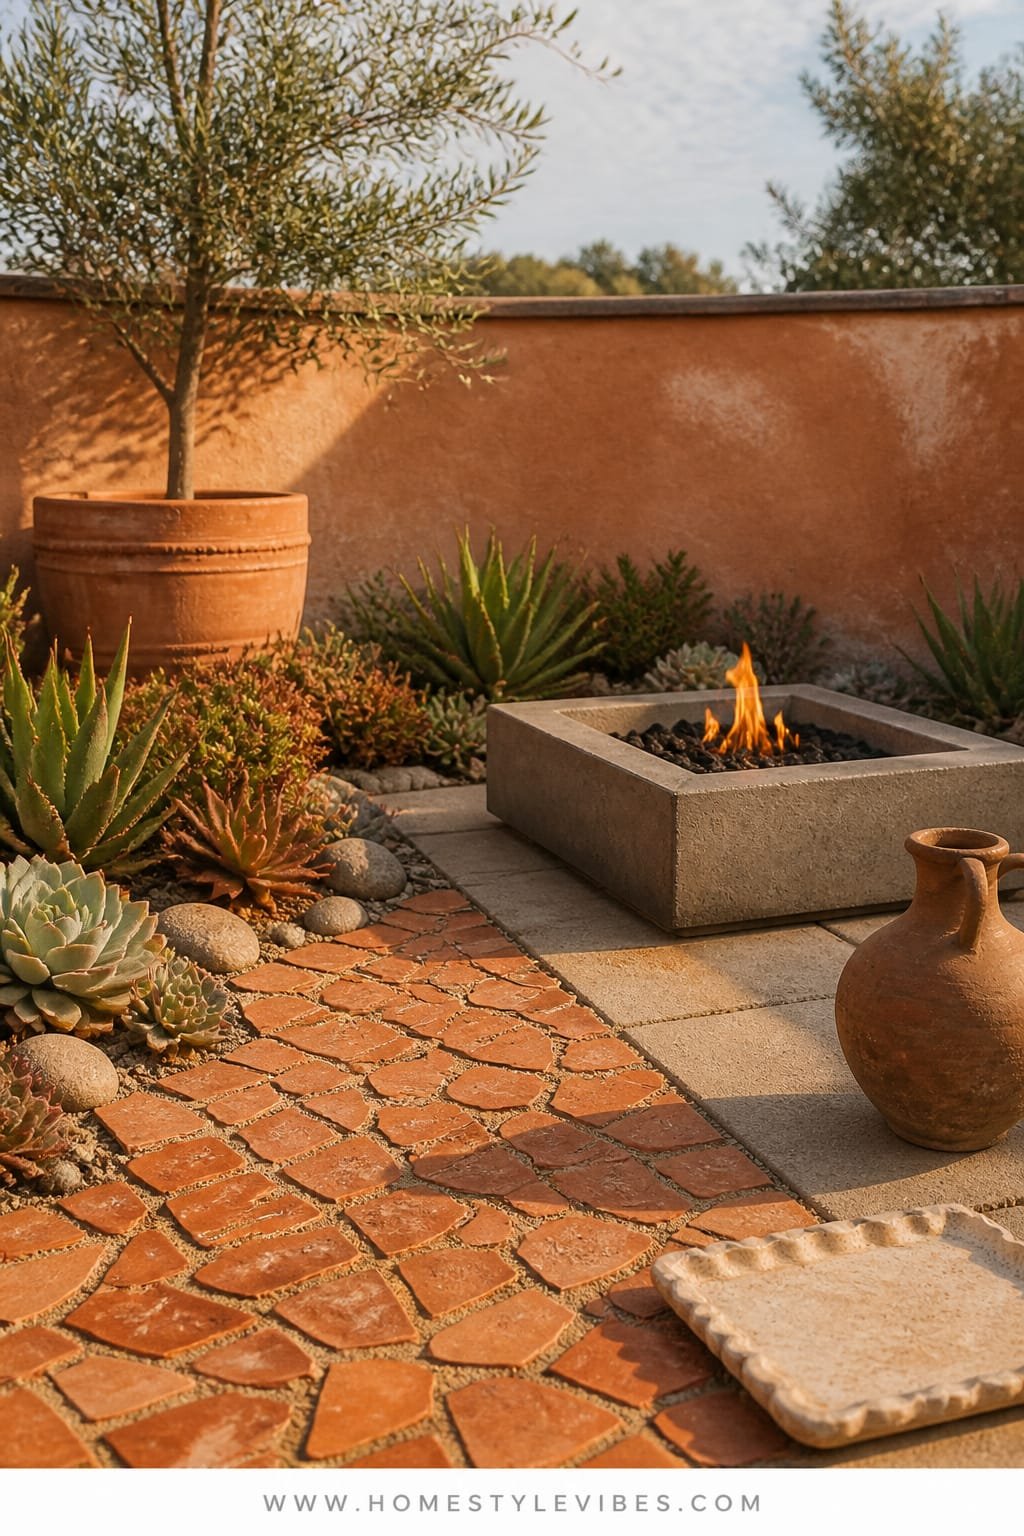
You’ve got a bare patio edge that feels cold and a little too modern. You want warmth, texture, and a spot that pulls friends outside for a glass of wine. Enter terracotta shards laid mosaic-style over gritty substrate, flanked by low succulents that love heat, and punctuated with a low concrete fire bowl. The mood is rustic Mediterranean courtyard with a hint of resort lounge—earthy, tactile, and wonderfully glowy after 5pm.
Here’s why it thrives: broken terracotta breathes and warms quickly under sun, creating a microclimate succulents adore. The mosaic texture hides dust and footprints, which means less “tidy-up” before guests. Fire bowls bring soft evening light that flatters terracotta’s rusty oranges and the chalky bloom on echeverias. In a real home, this looks like a built-in entertaining zone without the headache of a full hardscape remodel.
Photographically, shards give you micro-shadows and irregular rhythm—the camera loves that. Plant rosettes pop against terracotta’s warmth, and the fire glow sells the mood as golden and inviting.
Variations worth trying:
- Budget-friendly: Salvage old terracotta pots and tiles, break carefully, and mix in pea gravel to stretch coverage.
- Small-space: Create a single oval mosaic “rug” under a bistro table; tuck 3–5 succulents around the edge.
- Darker vibe: Add a ring of black lava rock around the fire bowl for a dramatic color hit.
- Renter-friendly: Build the mosaic on stepping stones or pavers you can lift later; keep the bowl propane and portable.
Budget Breakdown:
- Terracotta tiles or salvage: $80–$200
- Low concrete fire bowl (propane): $180–$450
- Succulents (heat-loving, low-growing): $60–$140
- Decomposed granite + sand base: $60–$120
- Edge restraint (steel or hidden plastic): $40–$80
Total Estimated Cost: $420 – $990
Best For: Patio perimeters, roof decks with good drainage, or any spot that begs for a cozy, low-lounge moment.
Key Design Elements:
- Main materials: Terracotta shards, decomposed granite, concrete
- Color palette: Burnt orange, warm gray, dusty green, charcoal accent
- Lighting strategy: Fire glow at dusk; optional string lights set to warm color temp
- Furniture silhouettes: Low, squat fire bowl and simple stools or poufs
- Texture layers: Rough shard edges, velvety rosettes, smooth concrete
- Accent details: Brass match striker, tiny clay chiminea as a sculptural nod
Why This Looks Intentional: Terracotta’s irregularity seems handcrafted, and the low fire bowl reads as a deliberate gathering point—two cues that whisper “custom.”
How To Recreate This Look:
- Define your “mosaic rug” area with hidden edging so the shards don’t migrate.
- Spread a compacted base of decomposed granite and a skim of sand for seating stability.
- Break terracotta carefully; lay shards in tight clusters with slight gaps for grit infill.
- Set the fire bowl slightly off-center; keep a 3-foot clear zone around it.
- Plant heat-loving succulents in small crescents that echo the bowl’s curve, then sweep grit between shards.
Don’t Do This: Avoid setting the fire bowl on unstable shards or uneven substrate—wobble equals stress and spills.
Pro Styling Tip: For twilight shots, light the bowl and place a single glass with an amber drink on a low side table—instant editorial warmth.
True story: a friend agonized over “the right” terracotta hue, then realized the magic wasn’t the color—it was the shard texture catching light. She stopped fussing, laid the mosaic, and the patio suddenly made sense.
5. Slate Shingle Cascade with Cool Moonlighting and a Weathered Steel Obelisk
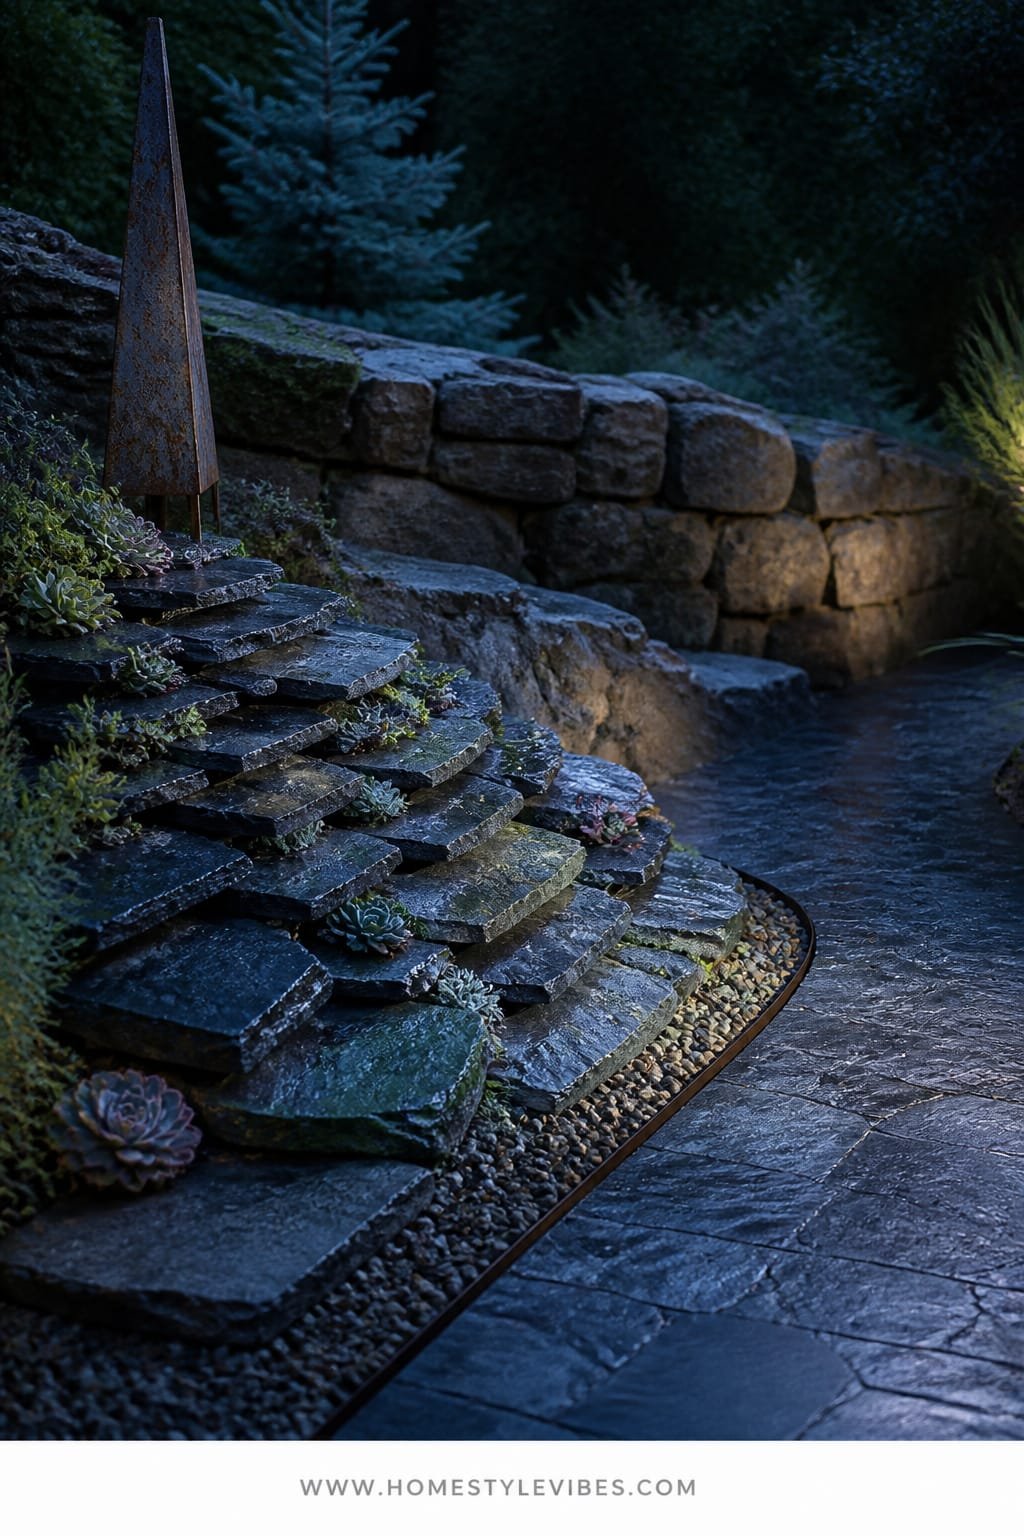
Sometimes a slope or a narrow side yard refuses to cooperate. Irrigation runs off, soil erodes, and any cute plant idea quickly looks messy. A layered cascade of slate shingles—think small, overlapping plates—solves the grade issue while giving you a sculptural, shadow-rich surface. Add a slender weathered steel obelisk and run cool-toned moonlighting from above. You get moody, modern drama with almost zero maintenance.
Why it works: Slate’s flat planes overlap to slow runoff and create tiny pockets where gritty soil can nestle succulents like sedum ‘Angelina’ or delosperma. The obelisk gives a strong vertical punctuation on a site that tends to flatten visually. Cool, soft moonlighting mimics a high, distant moon, creating elegant shadows with no harsh glare. In real homes, this reads purposeful and turns an eyesore slope into a design moment.
It photographs beautifully because of the stacking rhythm and the high-contrast highlights on slate edges. At night, the obelisk silhouette becomes a clean line for the camera to follow. Serious curb appeal with minimal fuss.
Variations:
- Budget-friendly: Use recycled roof slate or thin flagstone offcuts; vary the shingle size for a handcrafted look.
- Small-space: Create one or two stepped bands instead of a full cascade and repeat plant species for cohesion.
- Darker vibe: Introduce a thin ribbon of black Mexican beach pebbles cutting across the slate to punctuate the slope.
- Renter-friendly: Build a shallow framed “slope box” against a fence with stacked stone effect you can remove later.
Budget Breakdown:
- Slate shingles or thin flagstone: $180–$420
- Weathered steel obelisk: $120–$260
- Low-voltage downlights or tree-mounted lights: $140–$280
- Gritty soil mix + pins/mesh (for slope stabilization): $70–$140
- Succulents (sedum, delosperma, ice plant): $60–$130
Total Estimated Cost: $570 – $1,230
Best For: Sloped side yards or awkward strips where erosion and shade make traditional planting a pain.
Key Design Elements:
- Main materials: Slate shingles, weathered steel, gritty soil
- Color palette: Graphite, steel rust, lime-chartreuse greens
- Lighting strategy: Cool, soft downlighting from a high mount or nearby tree
- Furniture silhouettes: None; the obelisk acts as sculpture
- Texture layers: Layered slate, tiny groundcovers, rough steel patina
- Accent details: A subtle slate step or perch to invite inspection
Why This Looks Expensive: Layering stone in a cascade implies custom masonry. Even a DIY version reads bespoke because of the repetition and precision.
How To Recreate This Look:
- Create shallow terraces by digging mini shelves into the slope, stabilizing with landscape pins and mesh.
- Lay slate like shingles, overlapping downhill edges; keep rows slightly staggered for a natural look.
- Backfill with gritty mix between layers and plant sedum or ice plant in the crevices.
- Install the obelisk at the top third point—strongest visual impact lives off-center.
- Mount cool white downlights high and aim gently across the slate to graze the texture, not spotlight it.
One Thing To Avoid: Don’t trap pockets of fine soil without drainage behind the slate. Grit and gravel prevent rot and keep succulents happy.
Pro Styling Tip: Shoot at blue hour; the cool sky plus cool lights on graphite slate looks cinematic and crisp.
By the way, perfection is overrated. I once spent an hour futzing with slate alignment before accepting one slightly crooked row—and that tiny imperfection is what makes the cascade feel human and alive.
6. Decomposed Granite Courtyard with Warm Sunset Wash and a Low Limestone Trough Fountain
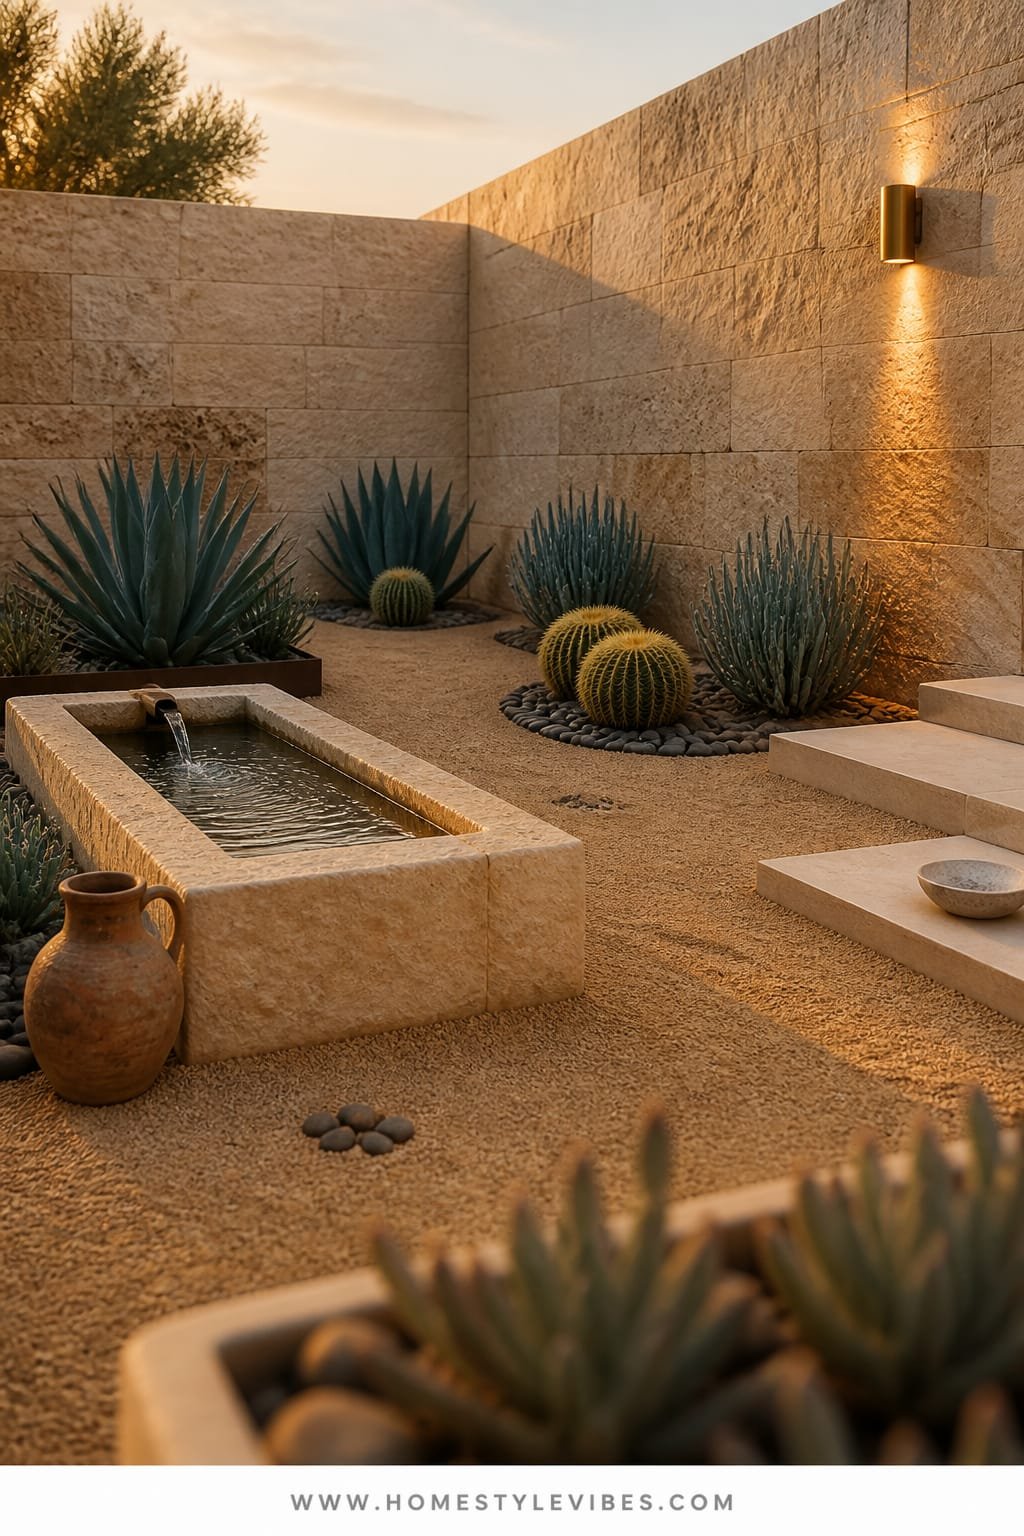
Maybe your patio feels flat and echoey, and every potted plant fries by July. You want a quiet courtyard that reads old-world and low-commitment. A decomposed granite (DG) field, a limestone trough fountain, and strategic clusters of hardy succulents create an unfussy, timeless oasis. The sunset wash—either from actual western exposure or a simple wall-grazing sconce—turns the limestone honey-gold in the evening. Calm. Grounded. The kind of place you actually sit and breathe.
Why it works: DG is permeable and forgiving; it compacts into a comfortable walking surface that drains instantly. Limestone’s soft grain pairs naturally with green-blue succulents like agave attenuata and kalanchoe thyrsiflora. The trough fountain adds movement without inviting algae horror shows—just enough circulation, minimal splash. For real homes, this is shock-proof landscaping: it survives drought, heat, and neglect while aging beautifully.
Photography loves the monochrome DG base—no visual noise. Limestone gives a luminous focal point, and the layered plant clusters add shape without chaos. Frame a shot during sunset and you’ll catch that honeyed glow like a postcard.
Variations:
- Budget-friendly: Replace limestone with a cast-concrete trough finished in a limewash tint; use solar pump kits to keep wiring simple.
- Small-space: One compact fountain, one agave, one echeveria bowl—repeat the DG field, keep it spare.
- Darker version: Use a sandy-tan DG blend and a charcoal-stained trough for a moodier contrast.
- Renter-friendly: Rest the trough on concrete pavers over DG for easy removal; no permanent footings.
Budget Breakdown:
- Decomposed granite + stabilizer: $160–$320
- Limestone trough fountain + pump: $350–$900
- Edging (steel or stone): $80–$160
- Succulents (agave, kalanchoe, echeveria bowl): $90–$200
- Low wall sconce or solar washer: $60–$120
Total Estimated Cost: $740 – $1,700
Best For: Courtyards, patios, or entry courts that crave calm presence and subtle movement with scant upkeep.
Key Design Elements:
- Main materials: Decomposed granite, limestone (or cast concrete), steel edging
- Color palette: Sand, honey, sage, chalky blue-green
- Lighting strategy: Warm wall wash at sunset; optional candle lanterns for softness
- Furniture silhouettes: Simple teak bench or two sling chairs
- Texture layers: Fine DG grit, honed limestone, fleshy leaf rosettes
- Accent details: A single woven basket or clay amphora near the fountain’s base
Why This Feels Designer: It’s restraint. An edited material palette and one quietly luxurious element—the fountain—create calm confidence without shouting.
How To Recreate This Look:
- Frame your courtyard zone with steel edging; set final grade to drain away from structures.
- Lay and compact DG in thin lifts with stabilizer for a firm, dust-minimized surface.
- Set the trough on leveled pavers; run the pump line discreetly or choose a self-contained kit.
- Plant succulents in tight clusters that echo the trough’s long axis; leave negative space for balance.
- Install a warm wall sconce aimed to graze the trough in late afternoon, or place a solar uplight behind it.
Watch Out: Skip fine soils near the fountain base—use DG and gravel to prevent splashback splatter and muddy edges.
Pro Styling Tip: For photos, angle a chair slightly toward the fountain and drape a lightweight linen throw—softens the scene and guides the eye.
Micro-moment: imagine stepping outside at 7:12 pm, phone on do-not-disturb, fountain whispering, light drifting across limestone. You stand there, shoes crunching DG, thinking, “Oh. This is why we do any of this.”
Mindset: Give Yourself Permission to Edit
If one idea resonates more than the others, that’s your starting point. Keep your plant list short and your stone choice even shorter. The truth is, restraint reads like confidence outdoors—especially in a succulent garden bed with rocks built for low maintenance.
Quick Checklist
- Choose one dominant rock: basalt, quartz, river rock, slate, terracotta shard, or DG
- Pick 1–2 hero succulents and repeat them
- Install a proper weed barrier and pin it tight
- Use steel or aluminum edging for clean lines
- Elevate crowns of agaves and aloes for drainage
- Aim lighting to graze surfaces, not blind them
- Mix a gritty soil: cactus mix plus extra pumice
- Leave intentional negative space for calm
- Test light angles at dusk before final placement
- Keep a handheld blower for fast leaf cleanup
Frequently Asked Questions
How much should I budget for a small succulent garden bed with rocks?
For a 4×8 foot bed, plan for $350–$900 depending on rock type, edging, and whether you add lighting. Stone and edging eat most of the budget; plants are surprisingly affordable if you buy smaller sizes and let them bulk up.
Will these designs work in cold climates?
Yes, but choose cold-hardy succulents like sempervivum and sedum for outdoor beds, and consider burying nursery pots in rock so you can lift tender varieties before frost. The rock base and edging approach stays the same.
How do I keep weeds from showing through the rocks?
Use high-quality weed barrier pinned every 12–18 inches with overlaps of at least 6 inches. Pre-emergent granules in early spring help, and spot-pull early sprouts before roots establish. Most beds need a quick check once a month, tops.
What if my space is tiny—like a narrow apartment patio?
Shrink the footprint and focus on one star element: a single corten planter on quartz gravel or a mini DG field with one agave in a buried pot. Tight palettes look purposeful in small spaces and require almost no maintenance.
I’m renting. Can I build any of these without upsetting my landlord?
Yes. Use removable edging, lay rock over a breathable barrier, and plant in disguised nursery pots. For lighting, go solar or battery. When you move, lift the pots, roll up the fabric, and leave the site clean.
Final Thoughts
Pick one idea. Not all six. Maybe it’s the charcoal basalt border and the agave that looks like it owns the sidewalk, or the quiet DG courtyard with the limestone trough. Start small, build clean edges, and let texture and light do most of the talking. You’ll be shocked how finished a space feels when the materials agree with each other.
Luxury outside isn’t about quantity—it’s texture, lighting, and restraint. One dominant rock, one statement silhouette, one warm (or cool) light strategy. That’s the secret. FYI, succulents are happiest when you ignore them a little. Let them settle, then watch them glow.
You’ve got this. Saturday, a rake, a few bags of stone, and one beautiful plant you can’t stop staring at. By Sunday night, you’ll be scrolling your own photos thinking, “Wait—did I just make my yard magazine-cute?” Yes. Yes you did.