6 Indoor Herb Garden Ideas For Apartment And Small Space Kitchens
You want a kitchen that smells like fresh basil and looks like a Pinterest board come alive. You hate the cluttered windowsill jungle, the gnats, and the sad, leggy cilantro that gives up right before taco night. You dream of filtered light on glossy leaves, creamy ceramics, and a tiny daily ritual that makes dinner feel intentional. These six indoor herb garden ideas solve the small-space headache with smart, photogenic setups you can pull off in a weekend for under $300 per concept.
Think calm surfaces, warm wood, slim fixtures, and that just-watered-soil scent. Each design fixes a specific pain point—no counter space, poor light, ugly planters, or zero renter permissions—and builds a vibe: modern Mediterranean, soft Japandi, warm industrial, and more. Expect clean lines, color stories that flatter greenery, and layered textures that make your kitchen look styled, not stuffed. These are highly Instagrammable without trying too hard—and they actually work in small apartments.
If you’ve felt stuck because you think you need a perfect south-facing window or a chef’s kitchen, you don’t. Pick one idea. Give it 90 minutes. Cap your spend at $250. Watch your kitchen feel finished and your food taste brighter. Cozy, photogenic, and wildly practical—this is for anyone who wants herbs on hand and a little joy on the counter.
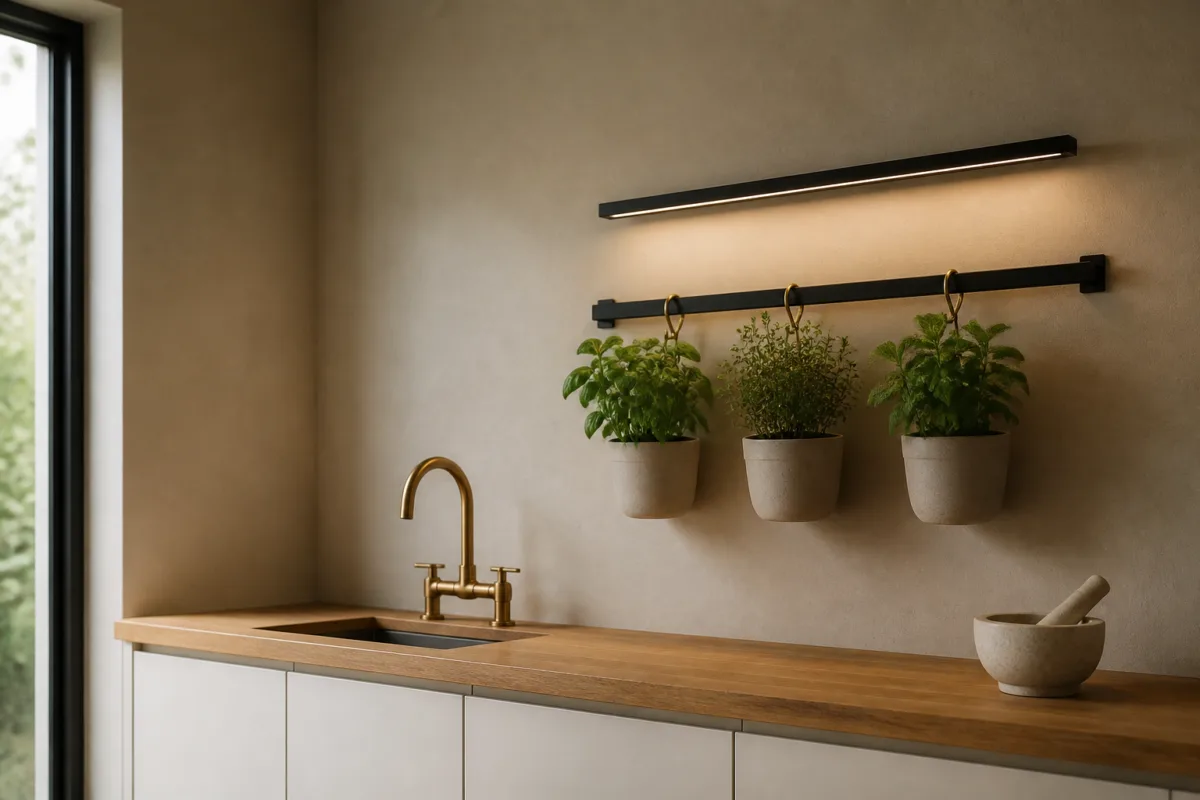
1. Matte Black Rail with Warm LED Wash and Brass Hooks
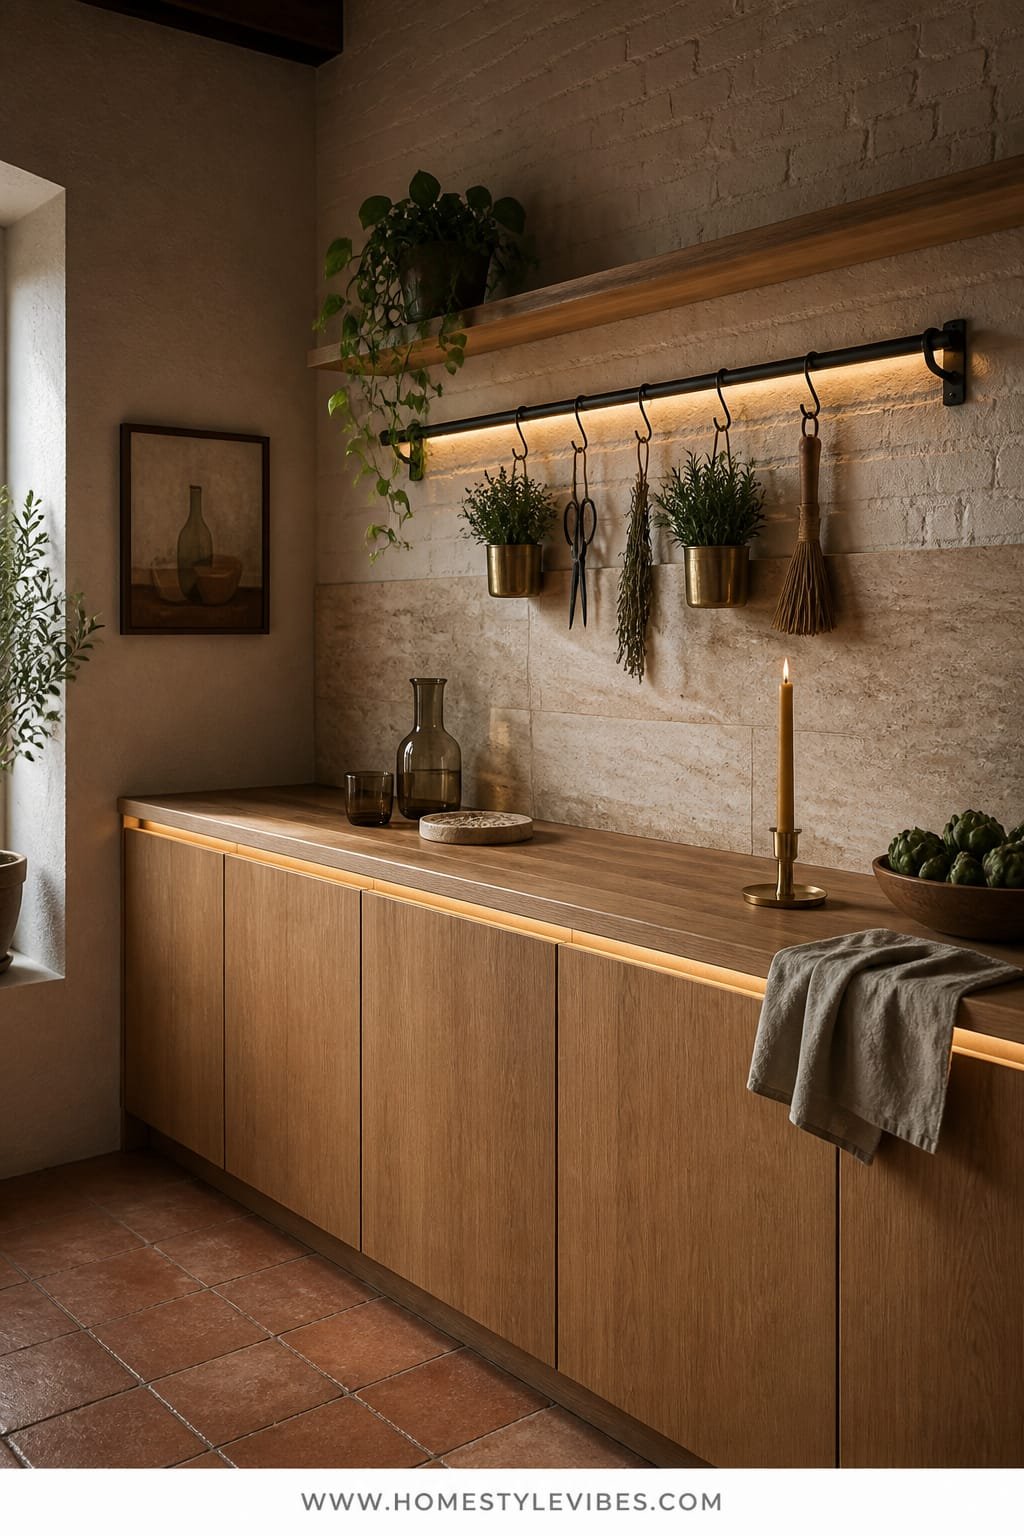
We’ve all been there: a countertop covered in mismatched pots, a tangle of chargers, keys, and that sad thyme from the grocery store. This rail setup creates a clean, linear moment that feels intentional and grown-up. The mood is warm industrial meets quiet luxury—matte black hardware, a soft amber glow from under-cabinet LEDs, and little glints of brass. It works in rentals and tight galley kitchens because it lifts everything off the counter and lines it up like a thoughtful vignette.
Here’s why it shines in real homes: a single horizontal gesture makes a tiny kitchen feel wider. The warm LED light gives herbs the gentle brightness they crave and casts flattering shadows on the wall. Go matte black on the rail for contrast, brass S-hooks for a small jewel moment, and slim terracotta or black ceramic hanging pots so the plants read as the star. Photos love this combo—dark hardware, green leaves, and a toasty light gradient create depth without clutter.
Variations: Budget-friendly? Use a $20 curtain rod and brass spray paint on basic hooks. Renter-friendly? Command hooks to mount the rod or choose a tension rod inside a niche. For darker kitchens, shift to satin nickel hooks and cream planters to keep things airy.
Budget Breakdown:
- Matte black rail or rod: $20–$60
- Warm 2700K–3000K LED strip or puck lights: $25–$70
- Brass or brass-finish S-hooks (10–12): $12–$30
- Lightweight hanging planters (4–6): $30–$90
- Potting mix + perlite + drip trays/inserts: $15–$30
- Herb starts (basil, parsley, thyme, mint): $16–$30
Total Estimated Cost: $118 – $310
Best For: Narrow kitchens with limited countertop, renters who can’t drill much, and anyone who wants a crisp, high-contrast look that photographs beautifully at night.
Key Design Elements:
- Main materials: Powder-coated black metal, brass accents, terracotta/ceramic
- Color palette: Black, brass, cream/terracotta, vibrant green
- Lighting strategy: Continuous warm LED wash under cabinets or a slim wall-mounted bar
- Furniture silhouettes: Linear rail, cylindrical hanging pots
- Texture layers: Matte metal, smooth ceramic, leafy gloss
- Accent details: Tiny brass labels, a black watering mister, linen towel nearby
How To Recreate This Look:
- Measure the wall span and mount a matte black rail centered between cabinets or above backsplash.
- Install a warm white LED strip under the cabinet to graze the wall behind the herbs.
- Hang 4–6 planters with brass S-hooks, staggering heights by 2–3 inches.
- Fill pots with well-draining mix; plant basil near light, thyme/rosemary near ends.
- Style with a small black tray for scissors and a linen towel to soften the vignette.
Why This Looks Expensive: Strict repetition—same rail finish, same pot silhouette, consistent hook style—reads as designed. The warm light turns green leaves into glossy focal points and hides small imperfections. The little hit of brass feels like jewelry on a little black dress.
Watch Out: Don’t overload the rail. Heavy planters can bow cheap rods and overshadow the line. Keep weight even and pick lightweight planters or insert plastic liners inside decorative pots.
Pro Styling Tip: For photos, dim the LED to 70% and shoot slightly from the side to catch leaf texture and that gentle shadow scallop on the wall.
Keep scrolling—next up is for anyone with zero wall space but a sunny windowsill and a love for sculptural moments.
2. Fluted Oak Ledge with Cool Morning Light and a Slim Glass Trough
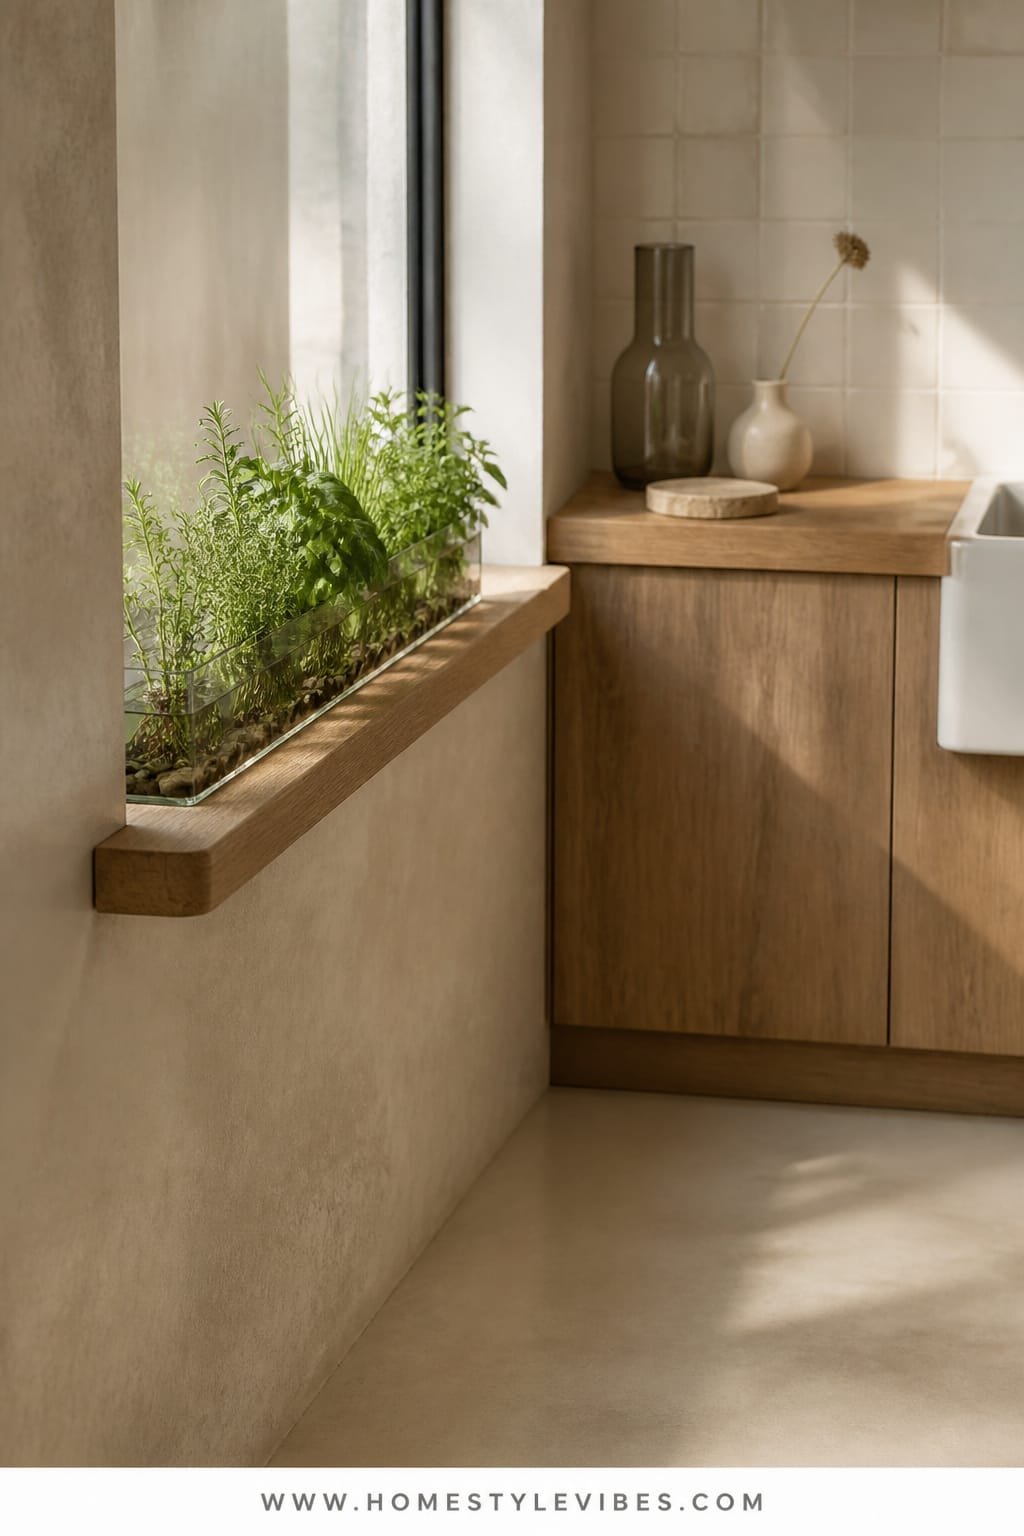
It’s that one corner that always feels off: the windowsill that collects random jars, rubber bands, and one lone clove of garlic that looks like it’s learned sadness. This design turns that spot into a calm, textural stage. The mood: soft Japandi meets urban greenhouse. A fluted oak ledge lines up with your sill, and a slim glass trough holds a micro-collection of herbs in water or pebbles—no messy soil, just roots and light.
Why this works in small kitchens: you add only three inches of depth but gain serious style. Fluting introduces rhythm and gentle shadow; oak keeps it warm and friendly. A clear glass planter lets light pass through and visually “thins” the whole setup. Morning light is magic here—cool, crisp, and perfect for herbs like mint and basil that love bright conditions without mid-afternoon scorch.
It photographs like a design magazine because of contrast and restraint: textured wood, transparency, and fresh green. Let the glass trough span most of the ledge so it reads as one long line. Ground the scene with a pale linen café curtain below the sash if you want softness without killing the light.
Variations: Budget-friendly? Use a pre-made fluted trim piece and a basic pine board stained honey. Renter option? A removable ledge that wedges into the sill with felt pads. Darker room? Swap oak for whitewashed ash and pick a frosted glass trough to bounce light.
Budget Breakdown:
- Fluted oak trim + ledge board: $45–$120
- Satin clear finish or beeswax: $10–$20
- Slim glass trough planter (24–36 inches): $20–$60
- LECA/clay pebbles or clean gravel: $10–$20
- Cuttings or herb starts (hydro-friendly): $12–$28
- Low-profile brackets or adhesive mounts: $8–$22
Total Estimated Cost: $105 – $270
Best For: Windows with 3–4 hours of bright light, minimalists who hate visual clutter, and anyone who likes a tidy watering schedule.
Key Design Elements:
- Main materials: Fluted oak, clear glass, linen textile
- Color palette: Honey wood, crisp whites, transparent neutrals, fresh green
- Lighting strategy: Natural morning light; optional sheer curtain to diffuse
- Furniture silhouettes: Long rectangular trough, slim ledge
- Texture layers: Ribbed wood, smooth glass, soft linen
- Accent details: Tiny copper plant markers, a narrow brass tray for shears
How To Recreate This Look:
- Measure sill width and add a 3–4 inch fluted oak ledge that sits flush or slightly proud.
- Finish with clear satin to keep that natural, low-sheen look.
- Set the glass trough centered; fill with pebbles and water or go hydroponic with LECA.
- Add herbs: basil, mint, green onion regrowth, thai basil cuttings for sculptural leaves.
- Clip a short café curtain if needed; keep it just below the trough’s base for airiness.
Why This Feels Designer: A single material story—oak fluting plus transparent glass—creates harmony. The long, uninterrupted line reads custom, even when it’s DIY. Roots visible through water add a subtle “botanical lab” vibe that feels curated, not cutesy.
One Thing To Avoid: Don’t cram too many varieties. Five to seven plants max keep the line clean and prevent a swampy, algae-prone mess. Refresh water weekly and trim roots when they get unruly.
Pro Styling Tip: Wipe the trough until it squeaks; glass smudges kill the photo. Then place one lemon or a wooden salt cellar at one end to anchor the frame and guide the eye.
Quick reset: No, you don’t need to copy everything. If one idea clicks, start there. Progress beats perfection, and the only “rule” is that it should feel good to you when you make tea at 6 a.m.
3. Whitewashed Brick Niche with Soft Overhead Glow and a Compact Tiered Stand
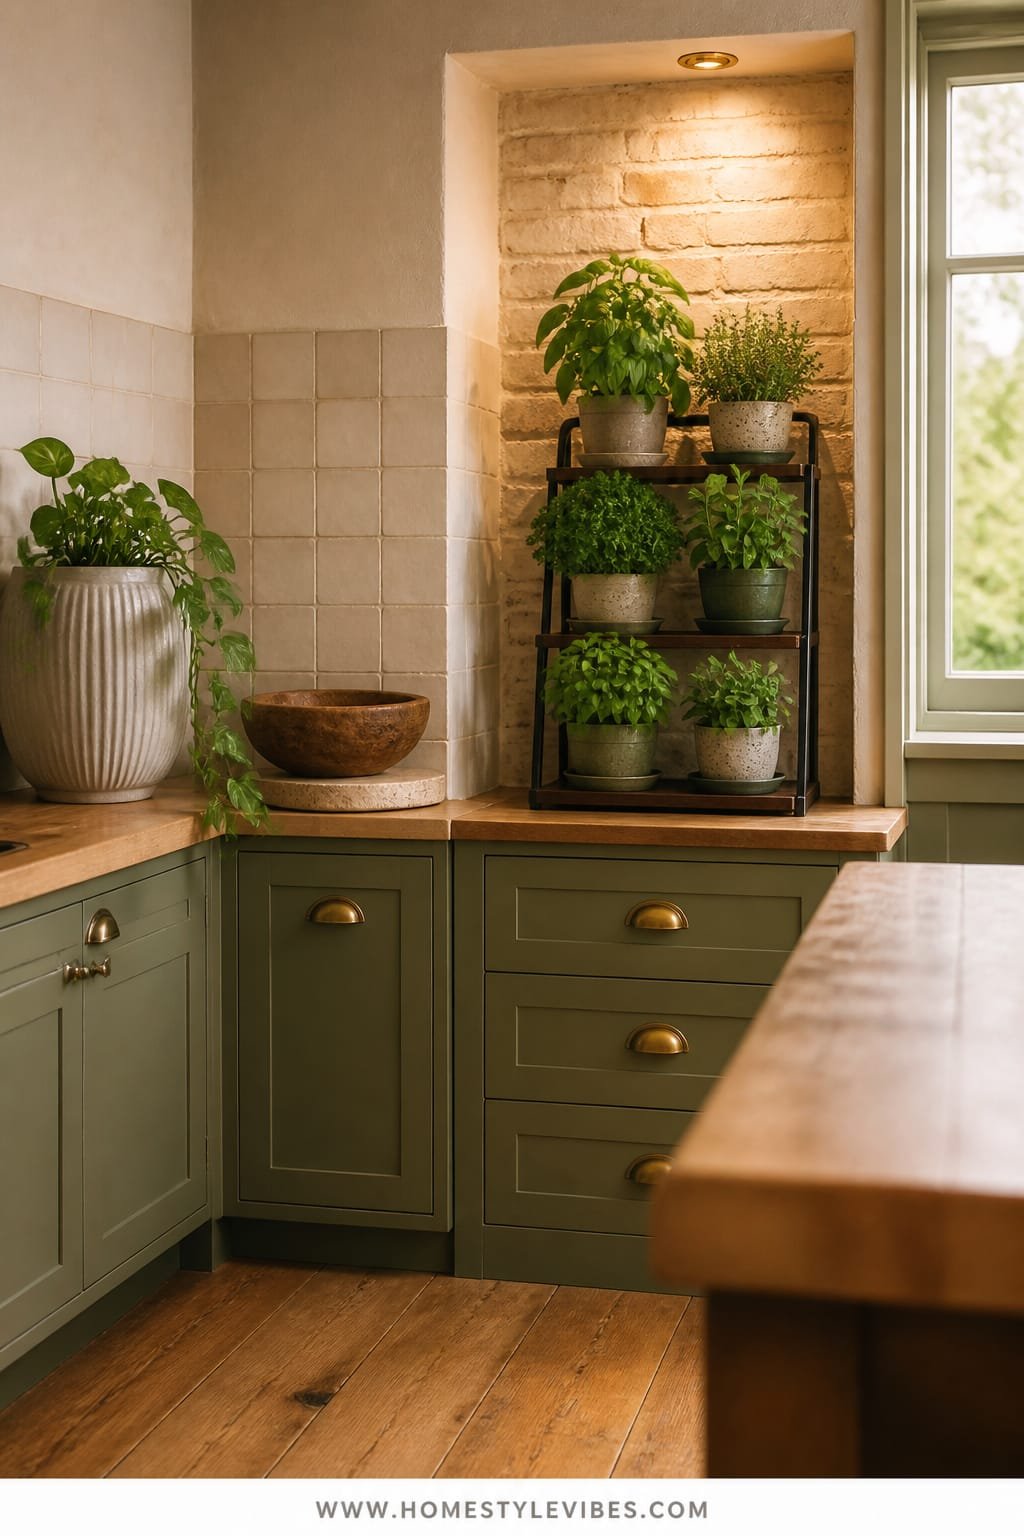
You’ve tried lining up herbs on the counter, but it still looks messy and steals precious prep space. This idea lives inside a small wall niche or even just a shallow corner: whitewashed brick as a textured backdrop, a gentle overhead glow from a pendant or puck light, and a compact, tiered stand that stacks herbs vertically like a mini market display. The mood is cozy farmhouse meets urban loft—warm, tactile, and unfussy.
Why it works: vertical layers create more usable storage in less than one square foot, and brick gives a crafted, storied surface that makes greenery pop. Whitewash bounces light back onto leaves, so even a soft bulb feels sufficient. It’s durable, family-friendly, and keeps watering spills contained on one easy-to-wipe stand.
Photographs love brick because those micro-shadows add dimension, especially with a warm bulb. Keep the stand in wood or powder-coated white for lightness, and mix pot shapes—footed ceramic for basil, squat terracotta for thyme—to create height variation that feels styled, not accidental.
Variations: Budget-friendly? Use faux brick panels and lime paint for a textured wash. Renter-friendly? Stand a whitewashed cutting board as the “backdrop” and group a 2-tier cake stand in front. Darker version? Go limewash in a mushroom beige and switch to a frosted glass pendant to spread light.
Budget Breakdown:
- Thin brick or faux brick panel: $35–$120
- Limewash or watered-down paint: $12–$45
- Compact 2–3 tier stand: $25–$90
- Mini puck light or small pendant: $18–$70
- Assorted planters + saucers: $24–$80
- Herb starts + soil: $20–$40
Total Estimated Cost: $134 – $445
Best For: Apartments with an awkward corner, anyone who wants the “styled shelf” vibe without open shelving, and cooks who like multiple herbs within arm’s reach.
Key Design Elements:
- Main materials: Whitewashed brick, wood/metal tiered stand
- Color palette: Chalky whites, warm neutrals, fresh green
- Lighting strategy: Soft, centered overhead glow; dimmable if possible
- Furniture silhouettes: Round or rectangular tiered stand with slim posts
- Texture layers: Matte brick, smooth ceramics, leafy gloss
- Accent details: A small olive oil cruet, mortar and pestle, linen runner under the stand
How To Recreate This Look:
- Define the niche or corner. If no niche, create a backdrop with faux brick or a limewashed panel.
- Install a small puck light overhead and set it to warm white.
- Place the tiered stand centered; check clearance for taller herbs up top.
- Pot herbs by growth height: rosemary/top, basil/middle, thyme + oregano/bottom.
- Style practical accessories on the bottom tier so it feels like a micro prep station.
Why This Reads High-End: Texture that looks aged—whitewashed brick—instantly suggests permanence. Layering light from above onto that surface creates cinematic depth. A tiered stand concentrates the eye and says, “this was designed,” not “this just happened.”
The Most Common Mistake: Overwatering on a tiered stand. Use saucers and check drainage; water in the sink, then return plants once excess drains off.
Pro Styling Tip: Angle the top tier 10–15 degrees toward your main viewing point so you see glossy leaves, not just soil tops, in photos and everyday life.
4. Honed Marble Windowsill with Cool Daylight and a Linear Self-Watering Trough
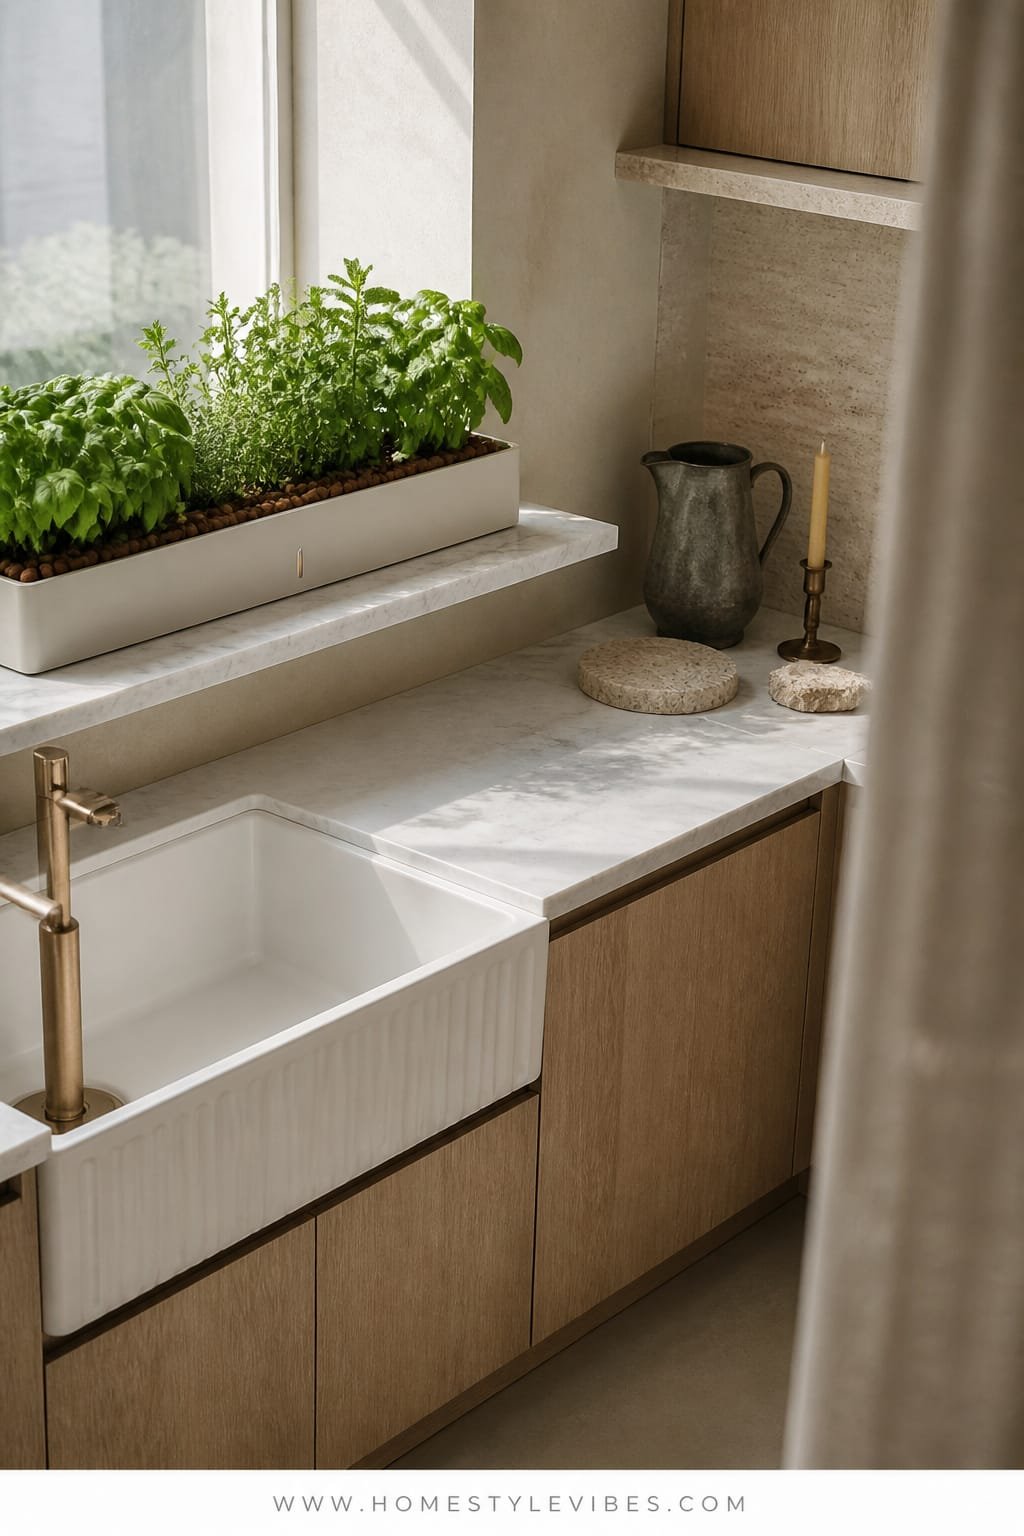
You love the idea of herbs, but you forget to water. Or you travel. Or you just don’t want soil drama near your cutting board. This is the set-it-and-enjoy-it solution: a honed marble (or faux marble) sill extension that feels crisp and airy, a linear self-watering trough planter, and cool daylight that keeps everything perky. The vibe is modern Mediterranean—white, mineral, uncomplicated.
Real-life perks: honed stone handles splashes, wipes clean fast, and doesn’t glare in photos. A self-watering insert stabilizes moisture so your basil doesn’t crash after a weekend away. Cool daylight from a north or east window keeps the color of green true and vivid, which matters more than you think when you want your space to look fresh, not yellowed.
Why this photographs beautifully: marble veining provides movement without busy-ness, while the matte finish softens reflections. A long, low planter reads like custom millwork when it spans most of the sill. The leaves cast delicate shadows on the stone that make even a Monday morning feel styled.
Variations: Budget-friendly? Use a faux marble shelf board and a white resin trough. Renter-friendly? A no-drill sill board that rests on silicone bumpers. Darker room? Choose a white planter to reflect every bit of light and swap to herbs that tolerate lower light like parsley and mint.
Budget Breakdown:
- Honed marble or faux marble shelf board: $60–$180
- Linear self-watering trough (24–36 inches): $30–$120
- Wicking system/inserts (if not included): $10–$25
- Potting mix with perlite or coco coir blend: $12–$22
- Herb starts: $16–$30
- Silicone bumpers/low-profile brackets: $6–$14
Total Estimated Cost: $134 – $391
Best For: Busy cooks, frequent travelers, and kitchens with consistent indirect light that want a sleek, low-maintenance look.
Key Design Elements:
- Main materials: Honed marble (or lookalike), matte white resin, silicone
- Color palette: Soft white, mineral grey veining, bright green
- Lighting strategy: Maximize cool daylight; no warm bulbs directly above if you want crisp greens
- Furniture silhouettes: Long, rectangular trough; super-low profile
- Texture layers: Honed stone, matte planter, glossy leaves
- Accent details: Slim stainless herb scissors, tiny pebble mulch to hide soil
How To Recreate This Look:
- Measure and install a honed marble or faux slab on the sill; keep it slightly proud for a shadow line.
- Set a self-watering trough centered, wicks pre-soaked.
- Pot herbs tightly for a lush look—basil, parsley, mint—leaving a finger’s width at the rim.
- Add a thin layer of decorative pebbles to keep soil tidy and reduce gnats.
- Top off the reservoir weekly; trim often to keep plants bushy.
Why This Looks Intentional: One gesture, repeated: long slab, long planter, continuous green. Minimal materials, consistent color temperature from daylight, and tidy surfaces tell your brain “this is under control.”
Don’t Do This: Don’t mix warm accent bulbs directly overhead with cool daylight here. Mixed color temperatures make marble read dingy and greens look off. Keep it cool in this zone.
Pro Styling Tip: For photos, place one cut sprig in a small glass next to the trough; it hints at use and adds a sparkle line against the stone.
Perspective pause: If you feel indecisive, pick your constraint first—no drilling, low light, or low maintenance—and let that decide the design. Constraints are clarity in disguise.
5. Powder-Coated Steel Pegboard with Neutral Task Lighting and Modular Shelves
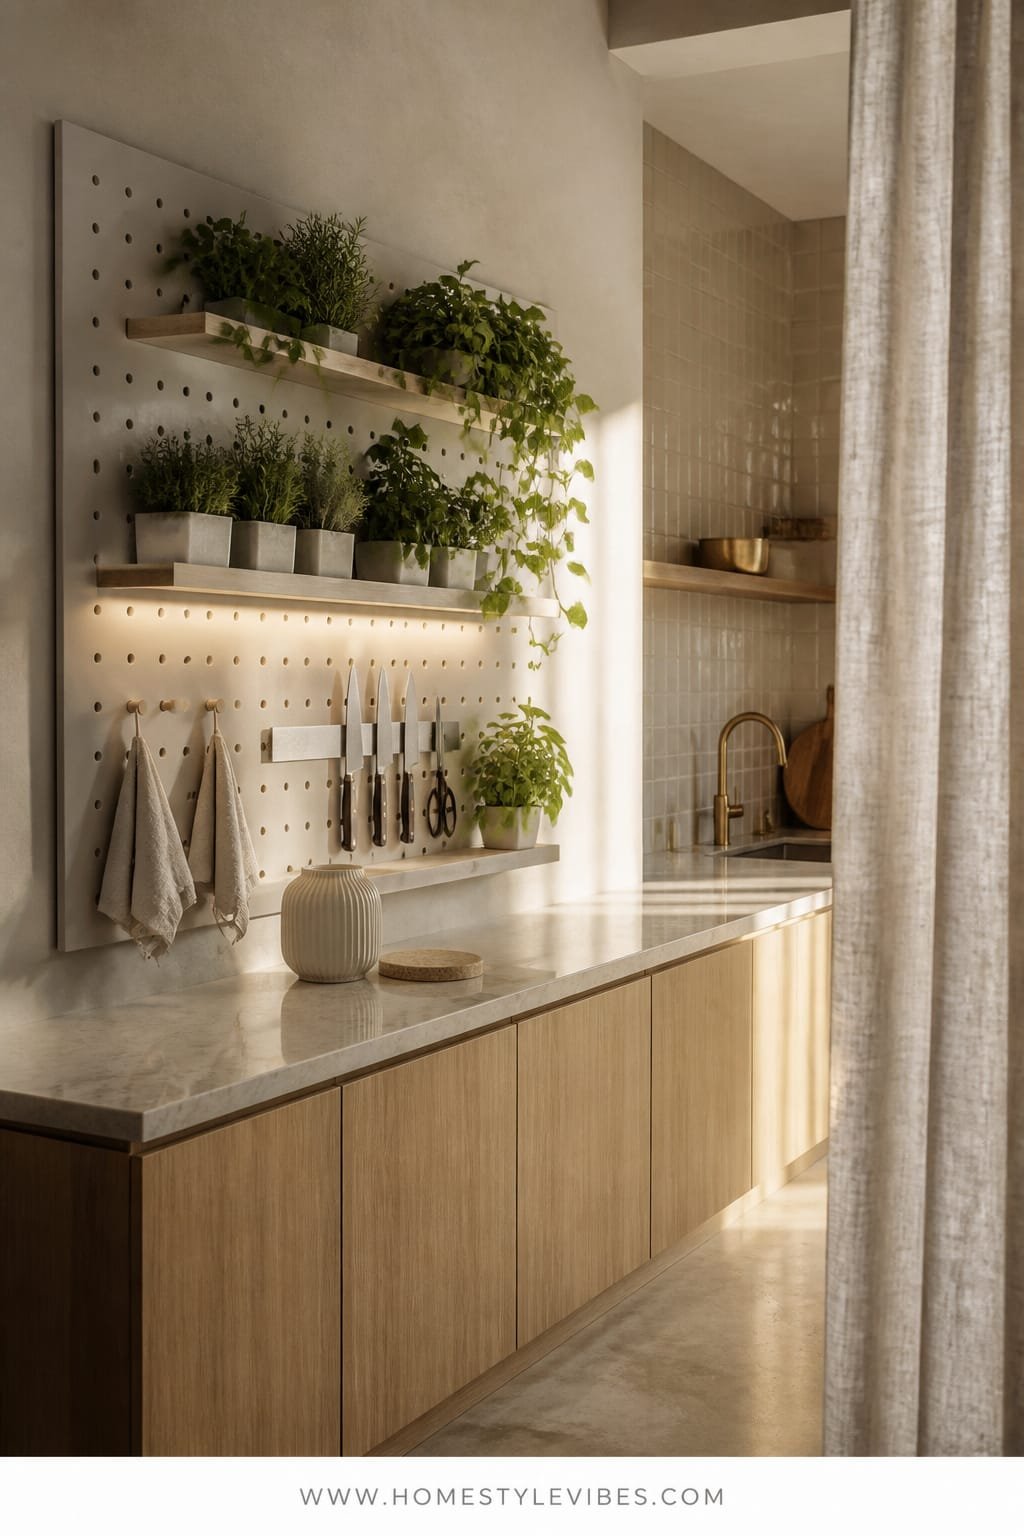
Small kitchen, zero storage, and you want herbs, knives, and towels off the counter. The pegboard is your multitasker. Not the garage vibe—this is powder-coated steel in a fresh neutral, slim birch shelves, and soft task lighting that makes the whole wall useful. The mood is Scandinavian utility meets café prep wall: clean, modular, and deeply practical.
Why this wins in real apartments: every square inch works hard. Moveable shelves adjust to plant growth and seasonal swaps. Add a magnetic strip for scissors, a mini shelf for sea salt, and a cup for plant markers. The neutral paint keeps it calm, and the light washes down evenly so nothing looks harsh. Photographing it is easy because the peg grid gives you natural alignment and rhythm—no weird tangents.
Variations: Budget-friendly? A smaller panel and basic hooks. Renter version? Lean a panel against the wall behind a counter with rubber feet and a small anti-tip bracket. Darker palette? Go olive or mushroom paint on the pegboard and matte black shelves for moodier kitchens.
Budget Breakdown:
- Powder-coated steel pegboard: $45–$120
- Modular shelves + pegs/hooks: $25–$90
- Neutral LED task bar or sconce: $30–$80
- Planters with drainage trays: $24–$60
- Magnetic strip + accessories: $15–$35
- Herbs + soil: $18–$35
Total Estimated Cost: $157 – $420
Best For: Tiny rentals, cooks who love to tinker with layout, and anyone who wants herbs plus tools in one tidy command center.
Key Design Elements:
- Main materials: Powder-coated steel, birch/ply shelves, matte planters
- Color palette: Warm white or mushroom, light wood, green, small black accents
- Lighting strategy: Even task lighting above; 3500K–4000K for true color
- Furniture silhouettes: Rectangular grid, thin shelves
- Texture layers: Smooth metal, soft wood grain, leaf shine
- Accent details: Label tape, tiny clock, microfiber cloth clipped under a shelf
Why This Feels Designer: It’s the balance of utility and restraint. Limited colors, repeating shapes, and thoughtful negative space make it look custom. The grid provides built-in composition rules you can’t mess up.
How To Recreate This Look:
- Mount pegboard centered above counter; confirm studs or use proper anchors.
- Install a neutral LED task bar or an adjustable sconce above to wash the surface.
- Add two short shelves and one longer shelf; stagger heights for tall herbs.
- Hang a magnetic strip for shears and add a small cup for plant tags and twine.
- Pot herbs in matching planters; place daily-use varieties at eye level.
One Thing To Avoid: Avoid mixing too many planter shapes and colors. Choose one silhouette, two max, or it turns chaotic fast.
Pro Styling Tip: Keep one empty shelf or open span. Breathing room is the secret to those clean, editorial shots.
6. Limewashed Alcove with Golden Afternoon Light and a Petite Wall-Mounted Trough Sink
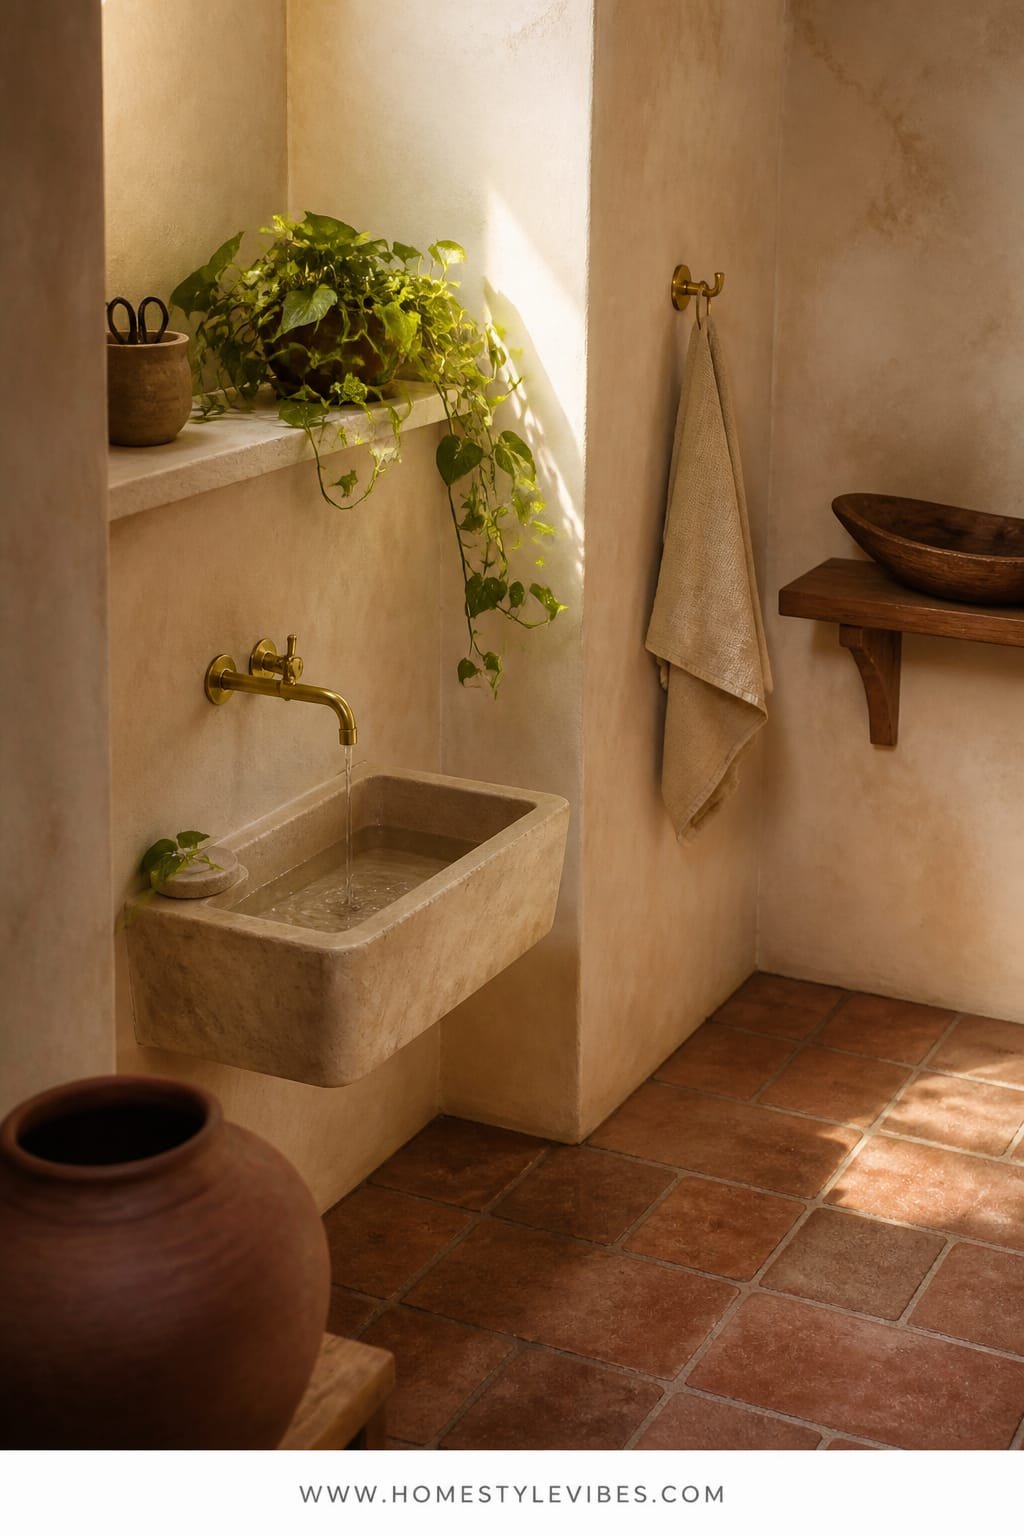
Confession: sometimes I want a herb corner that feels like a tiny courtyard in Rome, even if my “courtyard” is a 24-inch slice of wall between the fridge and a door. This is for the romantic cooks: a soft limewashed alcove, a petite wall-mounted trough sink or basin to catch drips, and herbs draping from a shallow ledge. The light is golden and forgiving; the vibe is modern Mediterranean meets old-world utility.
We’ve all been there—plants struggle because watering is a chore. Here, you water without moving anything. The mini trough basin collects extra drips, so you stop doing that panicked “grab the paper towels” sprint. Limewash adds that soft, velvety texture that looks incredible in afternoon light, and a simple brass or black spout completes the scene. It’s practical, yes, but it reads like a destination inside your kitchen.
It works in real apartments when you think small: a 12–18 inch wall basin, a narrow top ledge for pots, and one gentle sconce to rake light across the limewash. Maintenance stays easy because everything’s contained. Photographs glow—limewash diffuses reflections, water gives a subtle sparkle, and the herbs look lush against the tactile wall.
Variations: Budget-friendly? Skip the plumbed spout and use a petite, wall-mounted basin purely as a drip catcher; empty it weekly. Renter-friendly? A narrow freestanding basin on a slim console with a removable limewashed panel behind it. Darker, moodier version? Go with a clay-rose limewash and an aged brass sconce.
Budget Breakdown:
- Limewash paint + brush: $35–$90
- Petite wall-mounted trough sink or enamel basin: $70–$220
- Simple spout or faux spout fixture: $45–$150
- Shallow oak or stone ledge: $25–$80
- Wall sconce, warm 2700K: $40–$130
- Planters + herbs + soil: $30–$80
Total Estimated Cost: $245 – $750
Best For: Corner nooks, style lovers who want a tiny ritual spot, and kitchens that glow in late afternoon.
Key Design Elements:
- Main materials: Limewash, enamel/ceramic basin, oak or stone ledge
- Color palette: Sand, chalk, warm brass/black, deep green
- Lighting strategy: One warm sconce angled to graze the wall; keep bulbs dimmable
- Furniture silhouettes: Shallow ledge, petite basin
- Texture layers: Velvety wall, glossy enamel, leafy softness
- Accent details: Small hand brush, linen apron hook, terra cotta saucers
How To Recreate This Look:
- Tape off a vertical rectangle and limewash in 2–3 clouded coats for movement.
- Mount a shallow ledge at eye level; secure well for multiple small pots.
- Install a petite basin or wall-mounted drip catcher below.
- Add a warm sconce above; aim the light so it kisses the wall, not blasts plants.
- Arrange herbs—trailing mint and thyme on edges, basil and parsley center.
Why This Looks Expensive: The materials feel tactile and storied. Limewash reads bespoke. A tiny basin hints at custom millwork even if it’s a smart hack. Golden light unifies everything under a gentle glaze.
Watch Out: Don’t use a glossy paint in this zone; reflections flatten the wall and make it look cheap. Also, keep saucers under every pot—easy watering is the point.
Pro Styling Tip: Let one sprig tumble over the ledge; asymmetry adds life and makes the photo feel candid, not staged.
Real talk moment: I once tried to force a Parisian bistro vibe in a north-facing kitchen with no windowsill. It flopped. The fix wasn’t more décor; it was a simple rail with consistent light. Once I stopped fighting the room and worked with its light and layout, everything clicked. If one idea here calls your name, that’s your green light.
Quick Checklist
- Choose one location with consistent light
- Pick one planter style and repeat it
- Match bulb color temperature to your daylight
- Add a dimmer or on/off remote for control
- Group herbs by watering needs
- Use saucers or self-watering inserts
- Layer one tactile backdrop (fluting, limewash, brick)
- Keep one empty span for visual breathing room
- Trim herbs regularly from the top
- Wipe planters and glass before photos
Frequently Asked Questions
How much should I budget for an indoor herb garden in a small kitchen?
Most of these setups land between $120 and $400, depending on materials. The cost drivers are lighting, planters, and any specialty surfaces like marble or limewash. You can hit the vibe under $200 with a rail, simple pots, and a decent LED strip.
What if my kitchen barely gets any natural light?
Go with designs that include dedicated lighting, like the matte black rail with warm LED wash or the pegboard with task lighting. Choose herbs that tolerate lower light, such as parsley, mint, and chives, and keep lights on a 12–14 hour timer.
I’m a renter—can I do this without drilling?
Yes. Use tension rods for rails, adhesive hooks for lightweight planters, lean a pegboard with anti-tip brackets, or create a removable ledge with felt pads. Faux brick panels, limewashed boards, and no-drill lighting strips keep your deposit safe.
How do I avoid gnats and messy soil indoors?
Use well-draining mix with perlite, add a thin pebble layer on top of soil, and water in the sink before returning pots. Self-watering troughs and hydroponic setups (LECA in a glass trough) also cut down on soil-related pests.
What are the most common design mistakes with indoor herb gardens?
Mixing too many planter styles, ignoring light color temperature, and overcrowding. Also, placing thirsty herbs next to drought lovers leads to inconsistent care. Keep a cohesive look with repeated shapes, coordinated lighting, and herb groups by water needs.
Conclusion
Pick one of these indoor herb garden ideas and claim a single square foot. That’s it. You don’t need a farmhouse sink or eight hours of sun to have fresh basil by Thursday. You need consistent light, one material story, and a setup that makes watering easy. In small kitchens, luxury comes from texture plus lighting plus restraint. Fluting against glass, limewash under a warm sconce, a matte rail with a soft LED—these details make the room feel finished and your herbs thrive.
Start where your eyes keep landing: the windowsill, the blank wall, the awkward corner. Commit to one design, repeat materials, and let green do the rest. You’ll cook better, your kitchen will look quietly stunning, and you’ll have that little daily ritual that makes home feel like yours. You’ve got this—seriously, your future pesto is cheering you on.