7 Terrace Pergola And Gazebo Ideas For The Most Stylish Outdoor Shade
You want a terrace that feels like golden-hour magic—the kind of outdoor shade that’s cool, calm, and cinematic. But the sun blasts your seating by noon, the furniture looks washed out, and the vibe turns from “spritz and pages” to “squint and sweat.” This collection of 7 terrace pergola and gazebo ideas solves that specific frustration with smart structure, layered texture, and light you can actually live under. Expect photogenic setups, realistic budgets, and a finish line you can hit in 2 weekends or less. If you crave effortless, camera-ready shade for reading, gathering, or quietly pretending to water plants while eavesdropping on birds, this one’s for you.
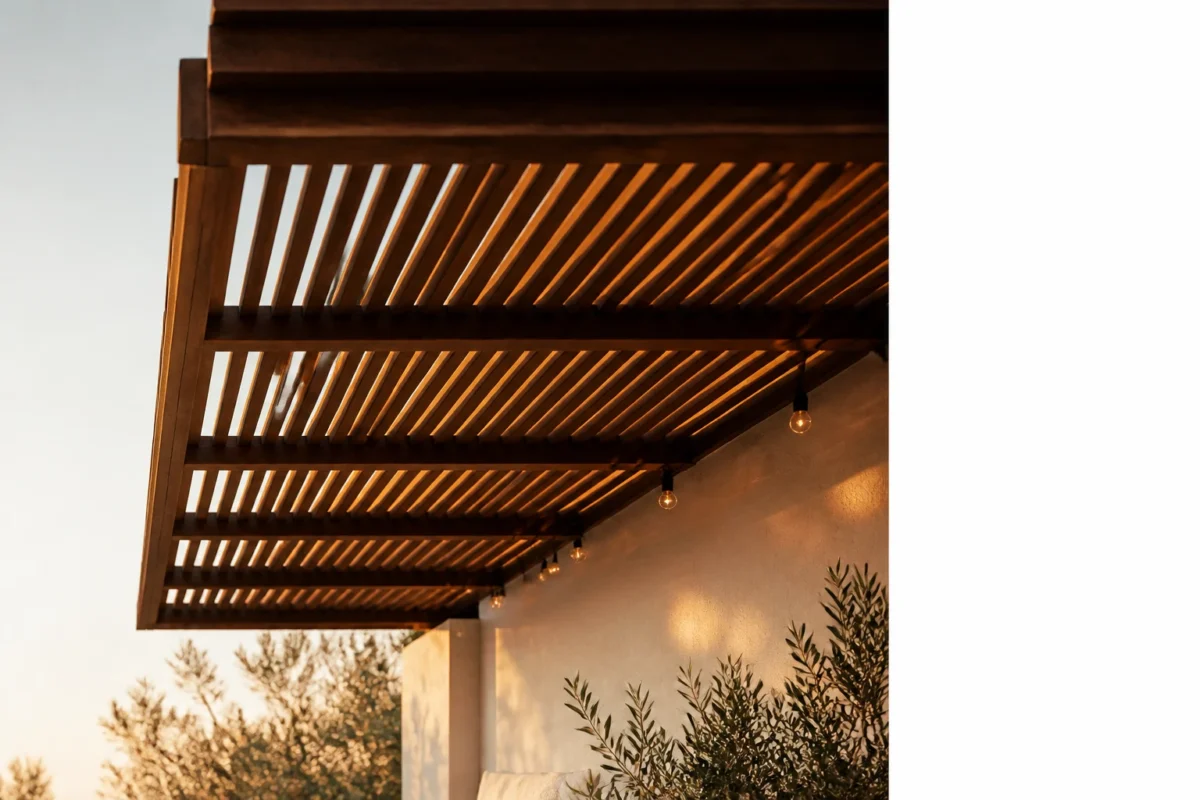
1. Cedar Slat Pergola with Dappled Light and a Built-In Concrete Bench
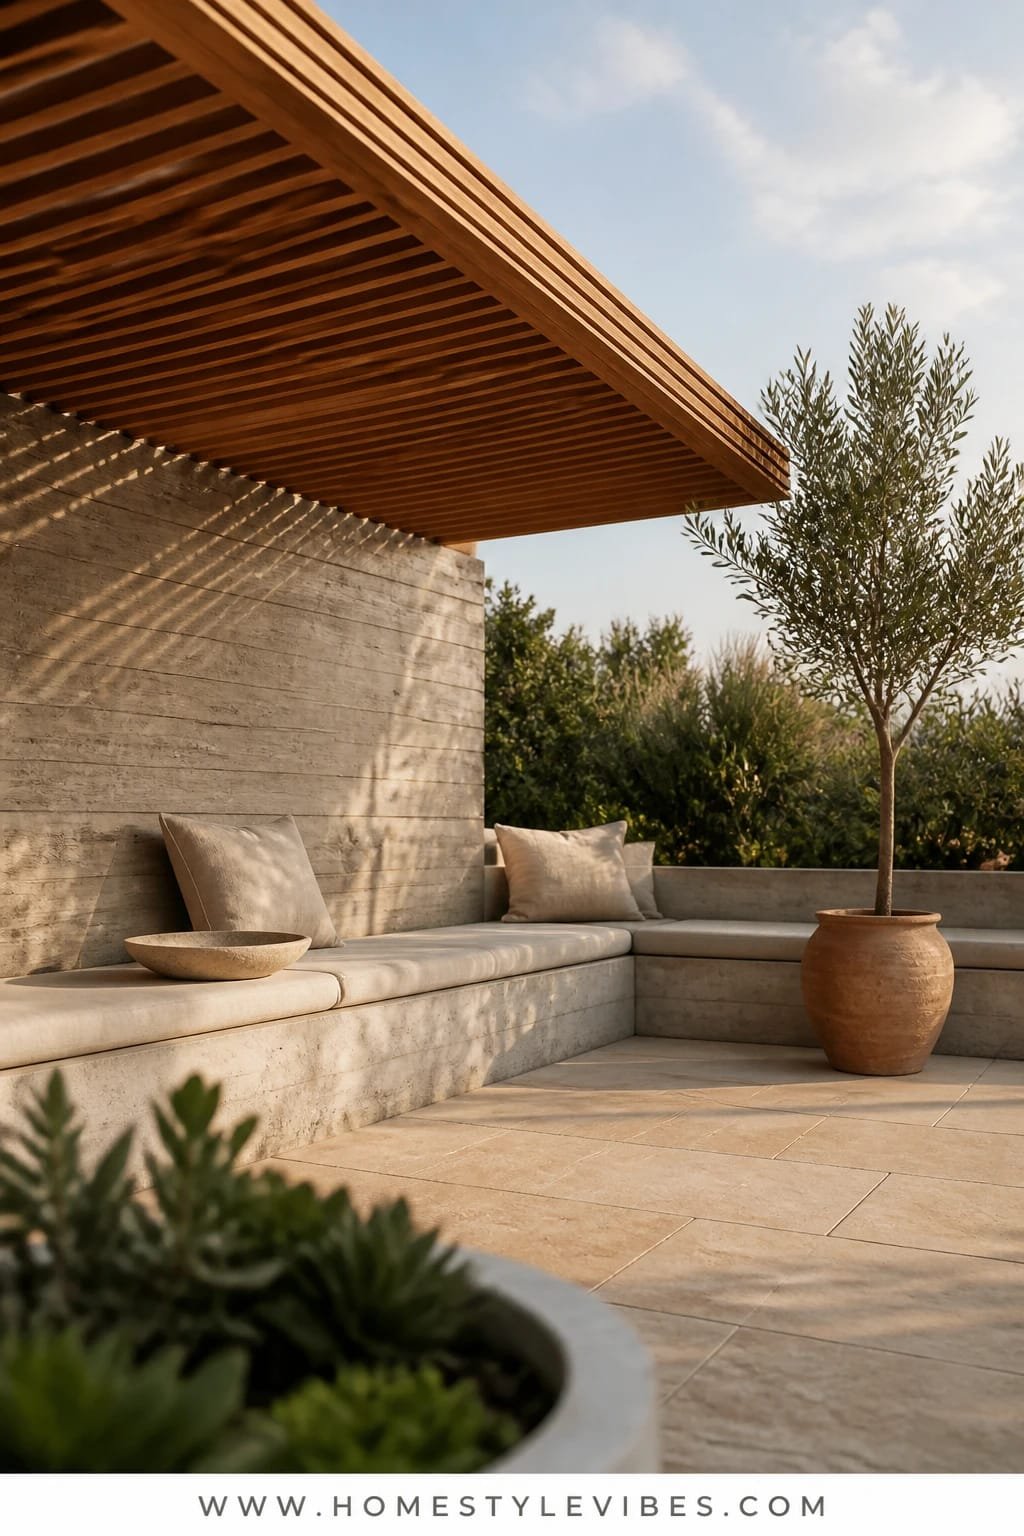
We’ve all been there: the terrace feels flat at noon, blinding at 2 pm, and too exposed at dinner. You’ve tried umbrellas, but they wobble in the wind and hog precious floor space. This design creates a serene, modern Mediterranean mood with warm cedar, sculpted concrete, and slivers of dappled light that soften everything—your face, your furniture, your entire afternoon. It works beautifully on small terraces because the built-in bench hugs the perimeter, turning dead edges into generous seating while the pergola’s open slats let heat rise and prevent that trapped, stuffy feel.
Lighting here is quiet but effective: a string of low-wattage festoon bulbs tucked along the rafters and one discreet up-light aimed at a potted olive tree. Cedar slats introduce long, graphic shadows that photograph like a dream—those lines create depth and rhythm your phone camera will love. Plus, the concrete bench grounds the scene so rugs don’t look floaty. For a renter-friendly variation, swap the poured bench for modular concrete-look planters with a slim cushion. For shade control, add retractable linen panels or bamboo shades you can pull and tie back. Darker version? Stain the cedar a moody espresso and layer charcoals and rust textiles for a sultry, fall-dinner vibe.
Budget Breakdown:
- Cedar lumber and hardware: $600 – $1,400
- Concrete bench (poured or precast blocks): $350 – $900
- Outdoor cushions and textiles: $150 – $500
- Festoon string lights and dimmer: $60 – $180
- Potted olive tree or tall grass: $80 – $250
Total Estimated Cost: $1,240 – $3,230
Best For: Small-to-medium terraces that need structure without bulk; warm climates where airflow matters; anyone who loves modern Mediterranean notes and crisp, photogenic shadow play.
Key Design Elements:
- Main materials: Cedar slats, smooth concrete, linen, matte black hardware
- Color palette: Honey wood, bone, soft gray, olive green accents
- Lighting strategy: Festoon bulbs and one tree up-light for drama
- Furniture silhouettes: Built-in linear bench, low-profile coffee table
- Texture layers: Slatted wood, stonewashed linen, concrete, woven jute rug
- Accent details: Black brackets, ceramic lanterns, olive branches
How To Recreate This Look:
- Start with a simple slat pergola: 4 posts, beams, and tight-spaced rafters to create shade lines.
- Add a perimeter bench: poured-in-place or precast blocks with a smooth trowel finish.
- Layer a jute or polypropylene rug to anchor the bench-and-table zone.
- Install festoon lights along rafters and place one up-light behind a potted olive or grass.
- Style with bone-colored cushions, a linen throw, and two black ceramic lanterns.
Why This Looks Expensive: Continuous lines and a restrained palette read intentional. The built-in bench feels architectural, and the negative space between slats adds depth like high-end resorts do.
Watch Out: Don’t space slats too far apart. You’ll lose shade and the shadows will look patchy. Aim for 2–3 inches of gap for that soft, dappled effect.
Pro Styling Tip: Shoot in late afternoon so the slat shadows cross your cushions at an angle—instant editorial texture without filters.
Craving something lusher? Scroll on—greens, gauze, and curved edges ahead.
2. Powder-Coated Aluminum Pergola with Cool Shade and a Canopy Daybed
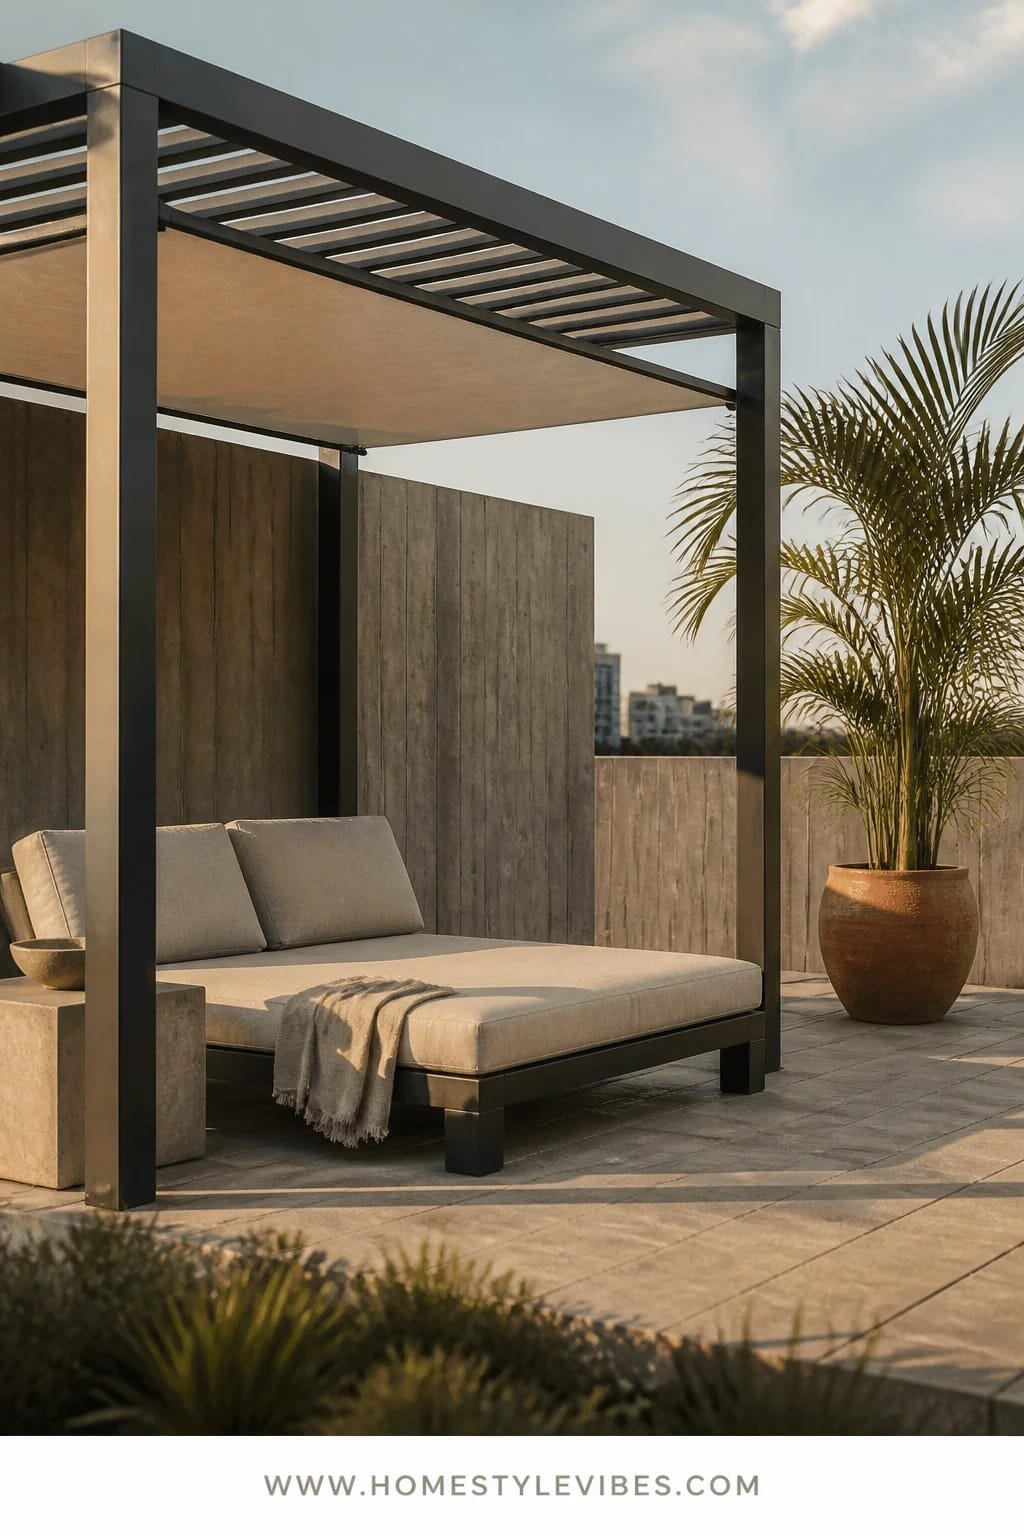
It’s that one corner that always feels off: too hot for midday naps, too bright for screens, and no matter what you add, it looks unfinished. This sleek, powder-coated aluminum pergola pairs with a canopy daybed to give you resort-calm shade and an unapologetically lounge-forward mood. Why it works in real life: aluminum handles rain and sun without warping, the clean lines flatter urban terraces, and the canopy daybed turns the smallest footprint into a destination. Bonus—aluminum reflects a trace of light, so the space feels airy, not gloomy.
Lighting affects everything here. Indirect LED strip lighting tucked into the underside beam washes the frame and bounces off the canopy’s fabric, giving you a soft, hotel-style glow. Photographs quite beautifully because the monolithic daybed silhouette contrasts against the pergola frame—one bold shape against another. Budget version? Use a simple outdoor sofa with a mounted canopy kit. Renter-friendly swap: free-standing aluminum frame with sandbagged bases and a canvas sling canopy. Darker, moodier take: graphite frame, taupe canopy, oxblood pillows. Small space? Choose a twin-size daybed oriented against a back wall.
Budget Breakdown:
- Aluminum pergola kit: $1,200 – $3,500
- Canopy daybed or outdoor lounge: $600 – $2,200
- LED strip lighting + transformer: $120 – $300
- All-weather curtains (optional): $120 – $280
- Outdoor rug (low pile): $80 – $250
Total Estimated Cost: $2,120 – $6,530
Best For: Urban terraces and rooftops dealing with sun glare; low-maintenance lifestyles; design lovers who want strong lines and a dedicated lounge zone.
Key Design Elements:
- Main materials: Powder-coated aluminum, acrylic canvas, performance upholstery
- Color palette: Graphite, cool white, taupe, single accent hue
- Lighting strategy: Hidden LED wash under beams, optional lanterns for warmth
- Furniture silhouettes: Boxy daybed, slim frame pergola, minimal side tables
- Texture layers: Smooth metal, matte canvas, low-pile rug, brushed ceramic
- Accent details: Tie-back curtains, oversized bolster pillow, sleek tray
Why This Feels Designer: Tight geometry, minimal color, and one oversized focal piece (the daybed) create a clear hierarchy—no visual clutter, just confidence.
How To Recreate This Look:
- Start with a graphite or white aluminum pergola kit sized to your terrace.
- Add a canopy daybed with a firm cushion; keep throw pillows to two colors max.
- Install LED strips under the crossbeam; add a dimmer for twilight clarity.
- Layer a thin outdoor rug to frame the footprint without looking bulky.
- Style with a ceramic tray, a single sculptural plant, and one lantern for warmth.
One Thing To Avoid: Overloading with small decor. Multiple little pieces break the calm and make the daybed feel like a clutter shelf.
Pro Styling Tip: Leave negative space around the daybed’s base so shadows can collect—your photos will look more dimensional, not flat.
If one idea resonates more than the others, that’s your starting point. You don’t need all seven. Choose the one that solves your sun problem and layer details only after the structure earns its place.
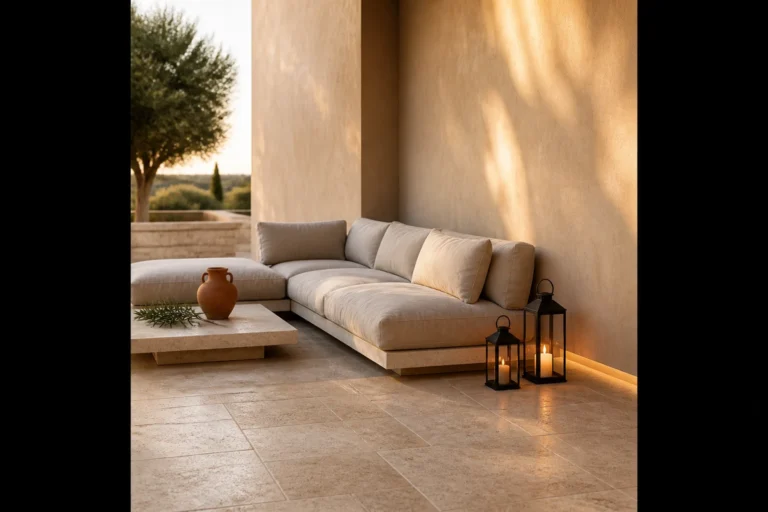
3. Whitewashed Brick Gazebo with Warm Lantern Glow and a Round Teak Dining Table
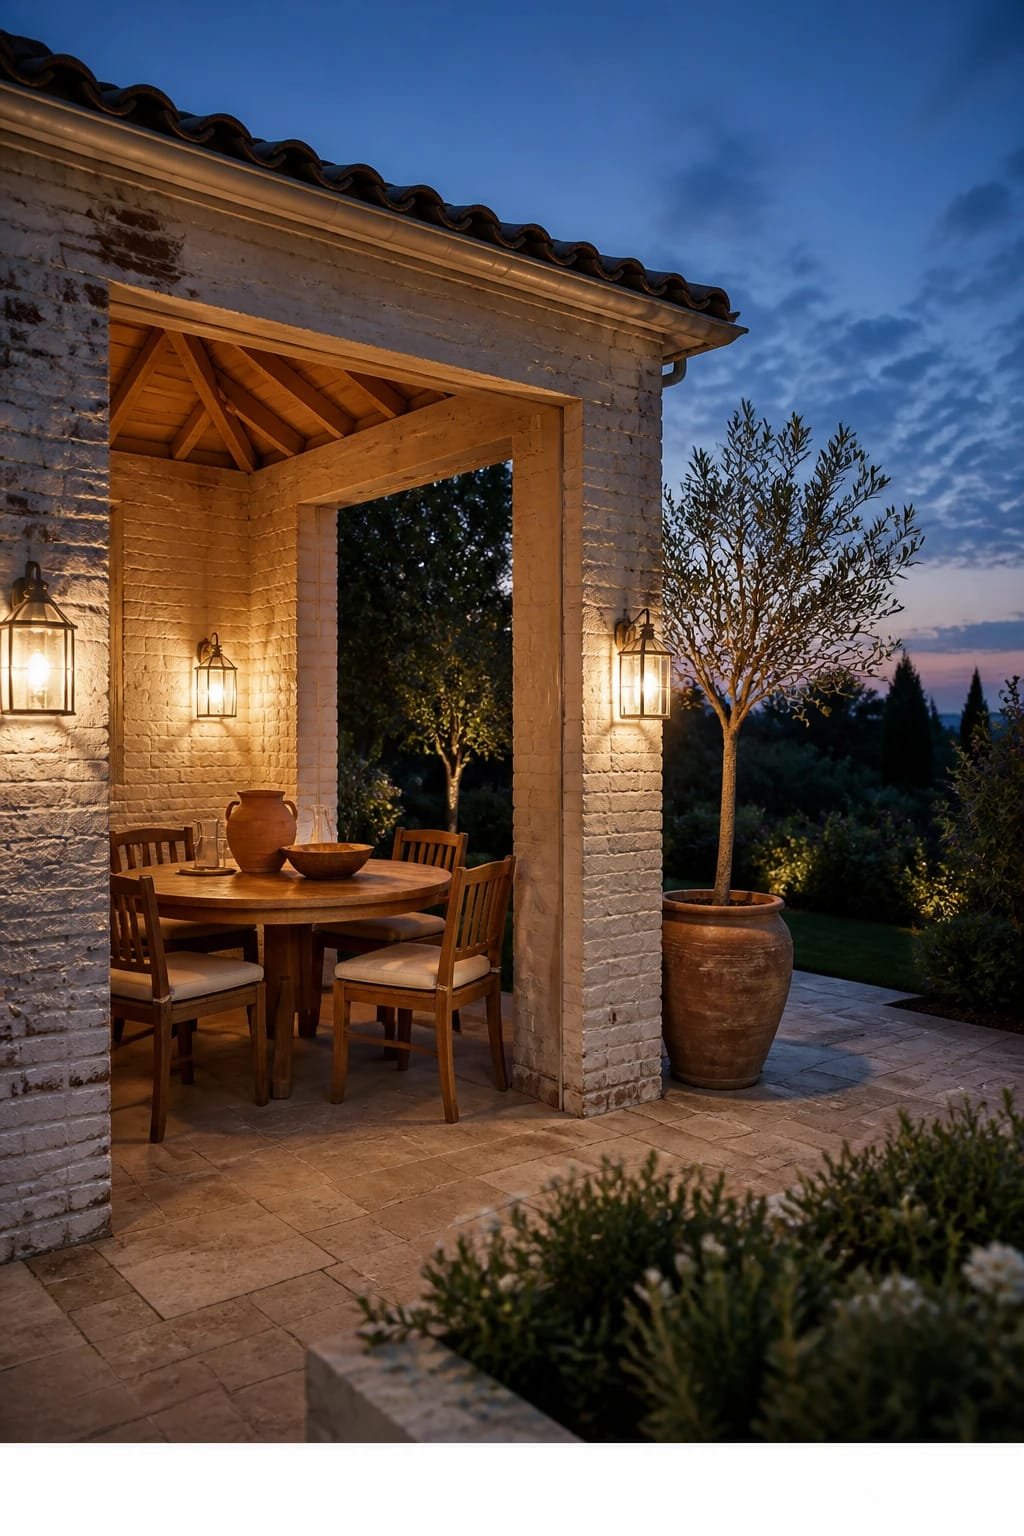
You want dinner outside without the race-against-the-sun routine. But loose umbrellas never cover the whole table, and food looks strangely colorless under harsh LEDs. Enter a compact whitewashed brick gazebo that frames a round teak table like a hug. The mood is coastal farmhouse meets European courtyard: textured walls, warm lantern light, and the tactile comfort of a circular table that pulls people closer—no awkward corners, no one gets the “bad seat.”
Here’s why it works in real homes: brick is durable and forgiving, whitewash keeps it fresh, and the enclosed feeling blocks wind without feeling cave-like. Lighting is everything—two wall lanterns at eye level make faces glow naturally during dinner and photograph with that soft amber magazine warmth. Small-space version? Create a half-gazebo with one L-shaped brick wall and a pergola roof. Budget option: use brick veneer panels and lime paint for the same vibe. Darker winter version: keep the brick raw, hang iron lanterns, and add plaid blankets over chair backs for texture.
Budget Breakdown:
- Brick or brick veneer + mortar: $800 – $2,400
- Whitewash or lime paint: $60 – $200
- Round teak table (4–6 seats): $600 – $1,800
- Lantern-style sconces + dimmer: $180 – $500
- Chairs with washable cushions: $300 – $900
Total Estimated Cost: $1,940 – $5,800
Best For: Dinner-forward terraces, breezy locations, families that want a year-round dining nook with great light for photos and conversations.
Key Design Elements:
- Main materials: Brick/veneer, limewash, teak, antique brass or black metal
- Color palette: Chalky white, honey teak, charcoal, olive or navy accent
- Lighting strategy: Warm wall lanterns at seated eye height, candle cluster on table
- Furniture silhouettes: Round table, slat-back or wishbone-inspired dining chairs
- Texture layers: Rough brick, washed linen, woven placemats, matte ceramic
- Accent details: Climbing vine trellis, striped table runner, hurricane candles
How To Recreate This Look:
- Build or clad a partial gazebo wall; whitewash bricks for soft texture.
- Place a round teak table centered under the roof; ensure 36 inches clearance around.
- Wire or mount two lantern sconces at 60–66 inches from floor.
- Add chairs with neutral cushions; tie on with strips for wind days.
- Style with linen napkins, a vine in a clay pot, and candlelight for flicker.
Why This Reads High-End: The tactile mix—chalky brick against smooth teak and warm metal—creates contrast that looks layered and intentional in person and on camera.
The Most Common Mistake: Hanging lights too high. Keep lanterns lower so faces glow and the table shines without glare spots on plates.
Pro Styling Tip: For photos, scatter three short candles instead of one tall one—the light pools feel richer and more even.
Ready for something softer and breezier? Let’s lean into fabric and breeze control next.
4. Bamboo Lattice Pergola with Soft Diffused Light and a Hanging Egg Chair
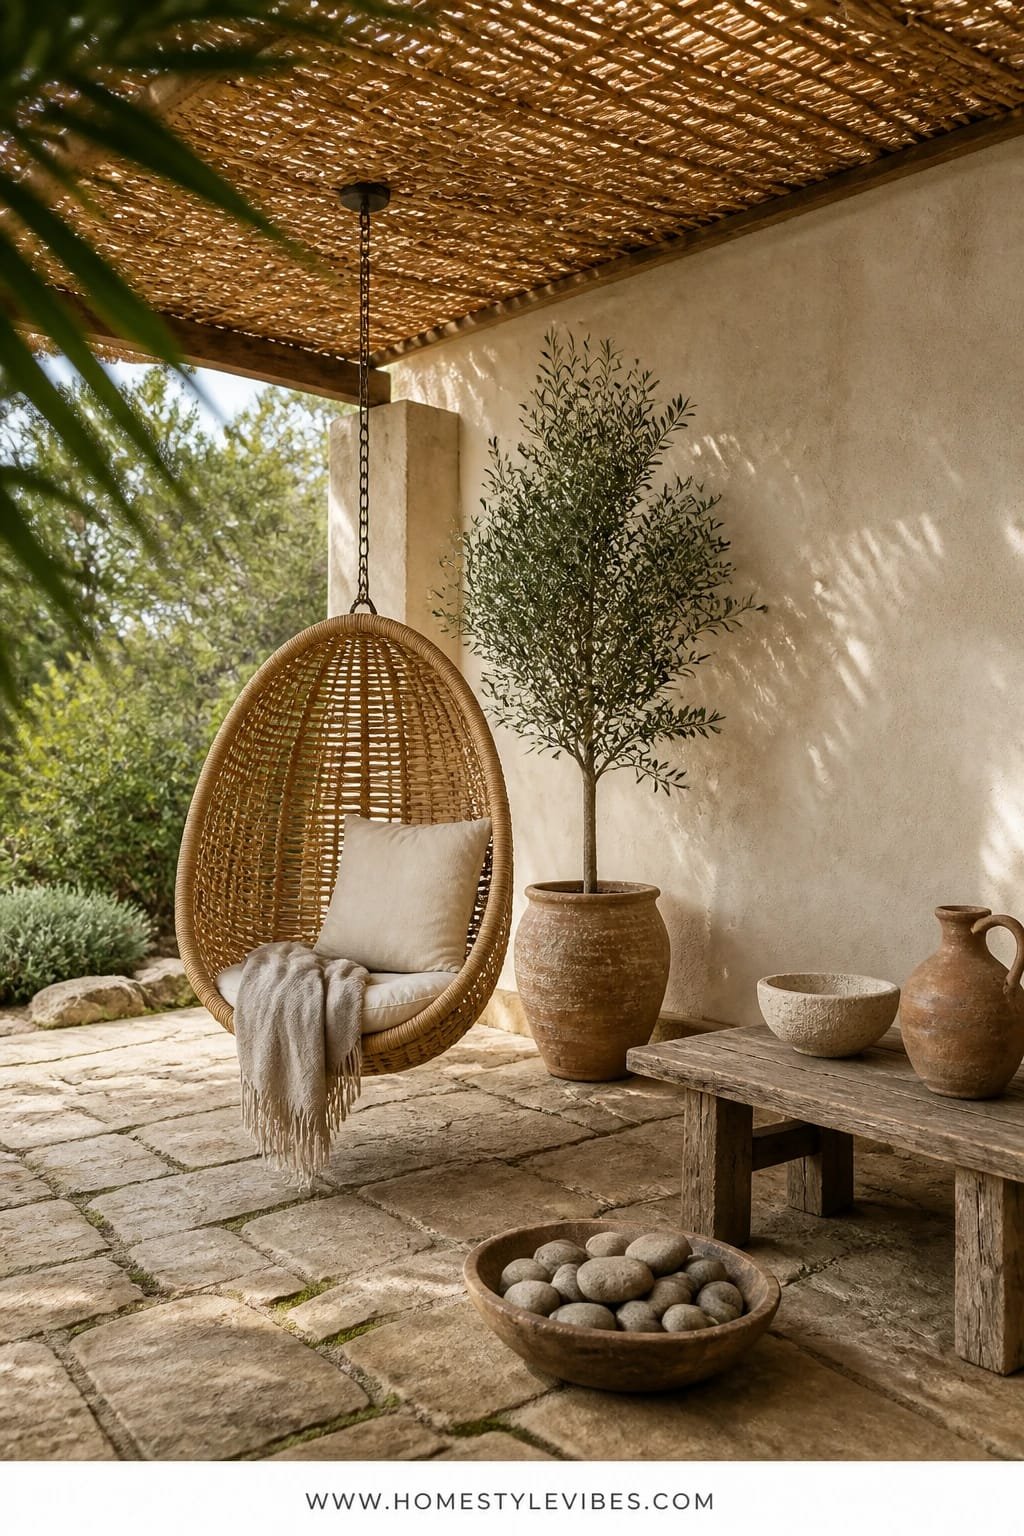
You’ve tried curtains, but they flap awkwardly and tangle. The corner still feels underdressed. This bamboo lattice pergola delivers a dreamy, boho-Japandi mood with gauzy, filtered light and a sculptural hanging egg chair that practically begs for a paperback. It works in real homes because bamboo is light to handle, naturally textured, and the lattice rooftop creates a softer diffusion than flat panels—no harsh bands, just gentle glow. The hanging chair saves floor space and becomes a focal point without a heavy footprint.
Photographs beautifully thanks to overlapping patterns: lattice, woven chair, slubbed cushion, maybe a striped rug. If you rent, mount a standing egg chair or use a freestanding hammock frame. Budget tweak: swap bamboo for reed fencing mounted to a simple wood frame. Darker palette idea: charcoal chair cushion, rust throw, and a sable-toned rug for late-summer evenings. For families, anchor the look with a low, rounded coffee table—no sharp corners near swinging seats.
Budget Breakdown:
- Bamboo poles or fencing + wood frame: $250 – $700
- Hanging egg chair + hardware or stand: $200 – $650
- Outdoor rug (woven or flatweave): $90 – $250
- Sheer outdoor curtains (optional): $60 – $180
- Planters with tall grasses: $80 – $240
Total Estimated Cost: $680 – $2,020
Best For: Cozy nooks, reading corners, renters who need lighter materials, terraces that get bright but not brutal midday sun.
Key Design Elements:
- Main materials: Bamboo/reed, powder-coated chain or stand, cotton-linen performance fabric
- Color palette: Sand, oat, black accents, sage
- Lighting strategy: Solar fairy lights woven through lattice, one lantern on floor
- Furniture silhouettes: Curved egg chair, round table, cylinder planters
- Texture layers: Cane, slubbed fabric, braided rug, soft grasses
- Accent details: Tassel pillow, ceramic bells, rope tie-backs
Why This Looks Intentional: Repeating circles—the chair, table, and planters—create a theme that reads cohesive, not random. Even with eclectic textures, your eye knows where to rest.
How To Recreate This Look:
- Build a simple pergola frame and attach bamboo lattice or reed fencing as the roof.
- Safely mount a hanging egg chair to a beam or choose a standing version.
- Layer a flatweave rug and a soft floor cushion to balance the vertical chair.
- String solar lights through the lattice for sparkle without cords.
- Style with tall grasses for movement and a striped throw for contrast.
Don’t Do This: Overstuff the area with side tables. One small table is enough—too many interrupt the serene swing zone.
Pro Styling Tip: Angle the chair 15 degrees from the lattice lines so the photo captures intersecting patterns—instant depth.
Remember, this isn’t about recreating a showroom. It’s about building a terrace that fits your routines—coffee at 8, emails at 10, feet up by 6. If you love one material, start there and let the rest support it.
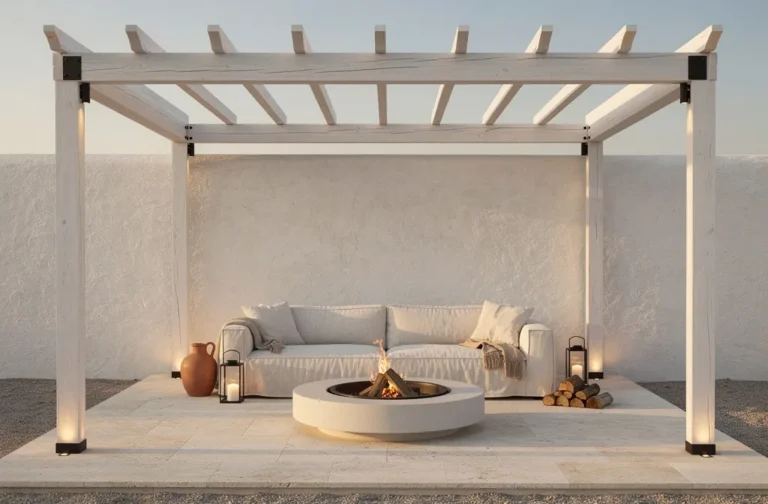
5. Fluted Concrete Pergola with Golden Hour Uplighting and a Fire Bowl Sofa Set
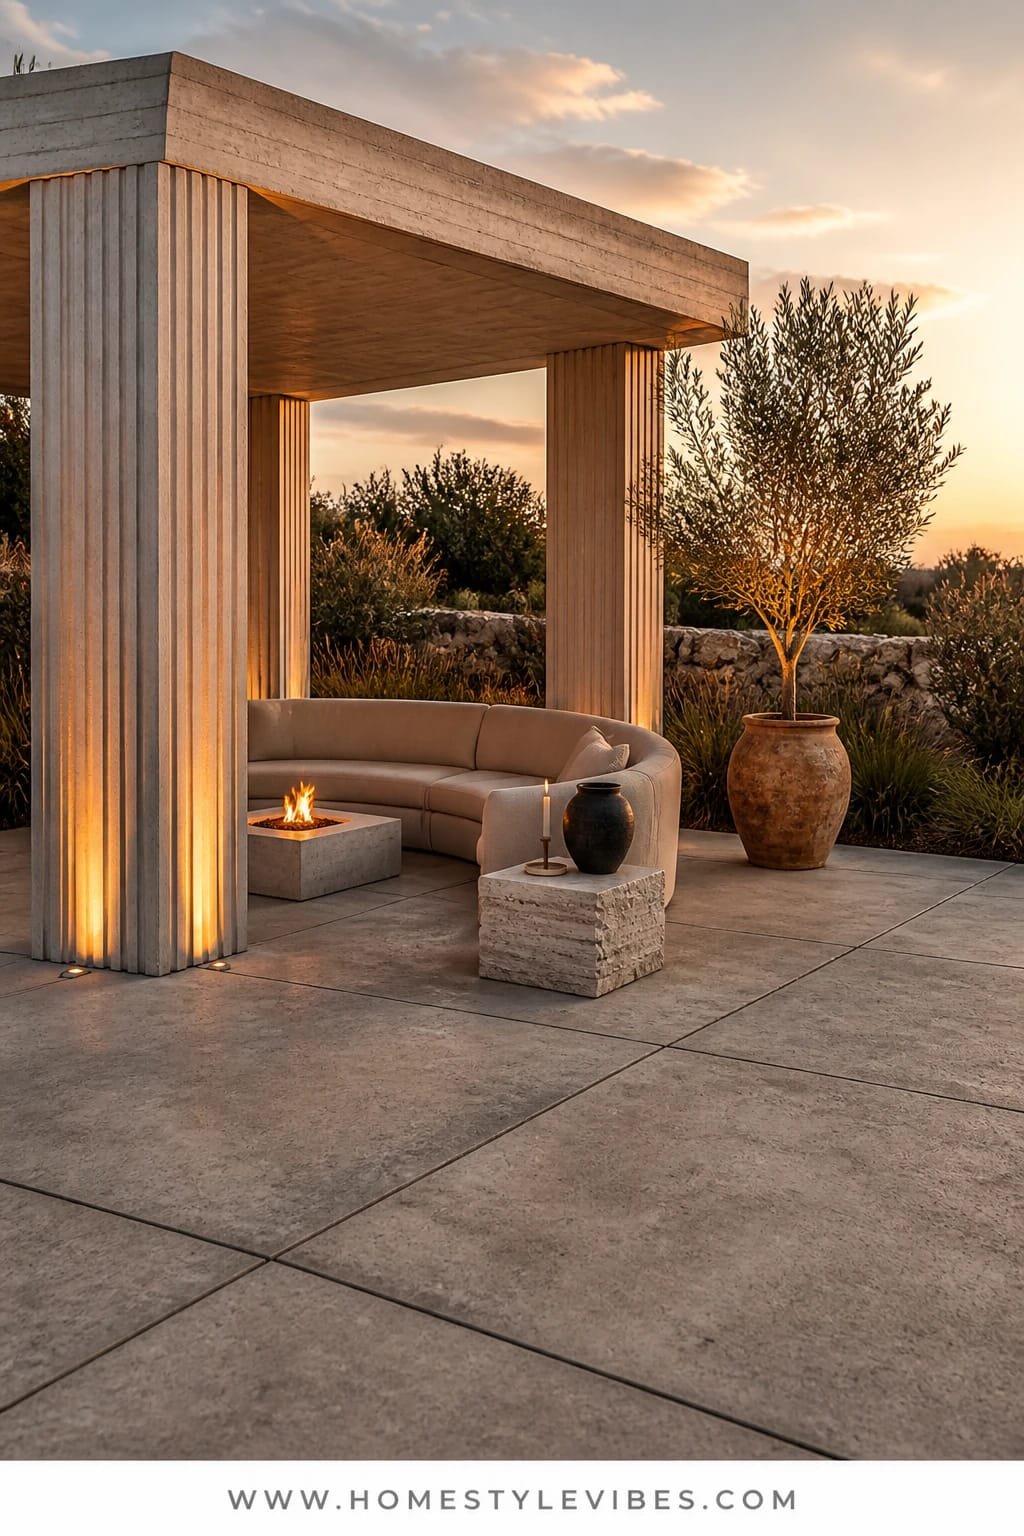
You want drama without clutter. But every time you add decor, it looks fussy. This sculptural approach leans into fluted concrete posts paired with a low fire bowl and a curved outdoor sofa. The mood is warm ambient luxe—think boutique hotel courtyard where conversation flows and the photos glow. It works for real homes by centralizing the action: one large curve facing a focal flame, under a solid shade structure that blocks overhead glare. Evening uplighting grazes the flutes and creates shadow texture that reads expensive without a lot of “stuff.”
In small spaces, choose two fluted columns front-only and keep the rear supports smooth to save cost. For a budget version, use fluted fiber-cement wraps or pre-made fluted panels around standard posts. Darker palette? Charcoal cushions, bronze fire bowl, olive planters. Renter approach: portable gas fire bowl and a pergola with detachable fluted sleeves. I tried a similar uplight-graze trick on my own patio last fall and honestly couldn’t believe the difference—simple lights, huge payoff.
Budget Breakdown:
- Concrete or fiber-cement fluted wraps: $500 – $1,800
- Pergola frame (steel or wood): $900 – $2,500
- Curved outdoor sofa: $900 – $2,800
- Gas fire bowl + tank cover: $400 – $1,200
- Uplights (2–4) + transformer: $150 – $380
Total Estimated Cost: $2,850 – $8,680
Best For: Entertaining terraces, sunset gatherings, cooler nights, anyone who wants sculptural, low-clutter impact.
Key Design Elements:
- Main materials: Fluted concrete or fiber-cement, steel or wood frame, stone
- Color palette: Stone gray, ecru, bronze, olive
- Lighting strategy: Uplights grazing columns; hidden step lights for pathways
- Furniture silhouettes: Curved sofa, circular fire bowl, low drum side table
- Texture layers: Ribbed concrete, boucle-look outdoor fabric, smooth stone
- Accent details: Bronze tongs/lid, oversized planters, low lumbar cushions
Why This Looks Expensive: Repetition and scale. The flutes echo around the space, while one over-scaled curve anchors the sitting area—pure editorial presence.
How To Recreate This Look:
- Install or wrap pergola posts with fluted panels; keep spacing consistent.
- Place a curved sofa facing a centered fire bowl; allow 24–30 inches clearance.
- Position two uplights to graze the fluted faces; add a third if columns are wide.
- Use a stone or concrete-look rug to visually “ground” the fire zone.
- Style with two large planters and keep accessories minimal for calm impact.
One Thing To Avoid: Mixing too many metals. Choose bronze or black and commit; scattered finishes make this look messy fast.
Pro Styling Tip: Photograph at twilight with the fire on and uplights at 70%—you’ll catch warm/cool contrast and clean column shadows.
Now for something breezy and layered, with plants doing half the work.
6. Galvanized Steel Frame Pergola with Lush Vine Shade and a Stone Water Feature Bench
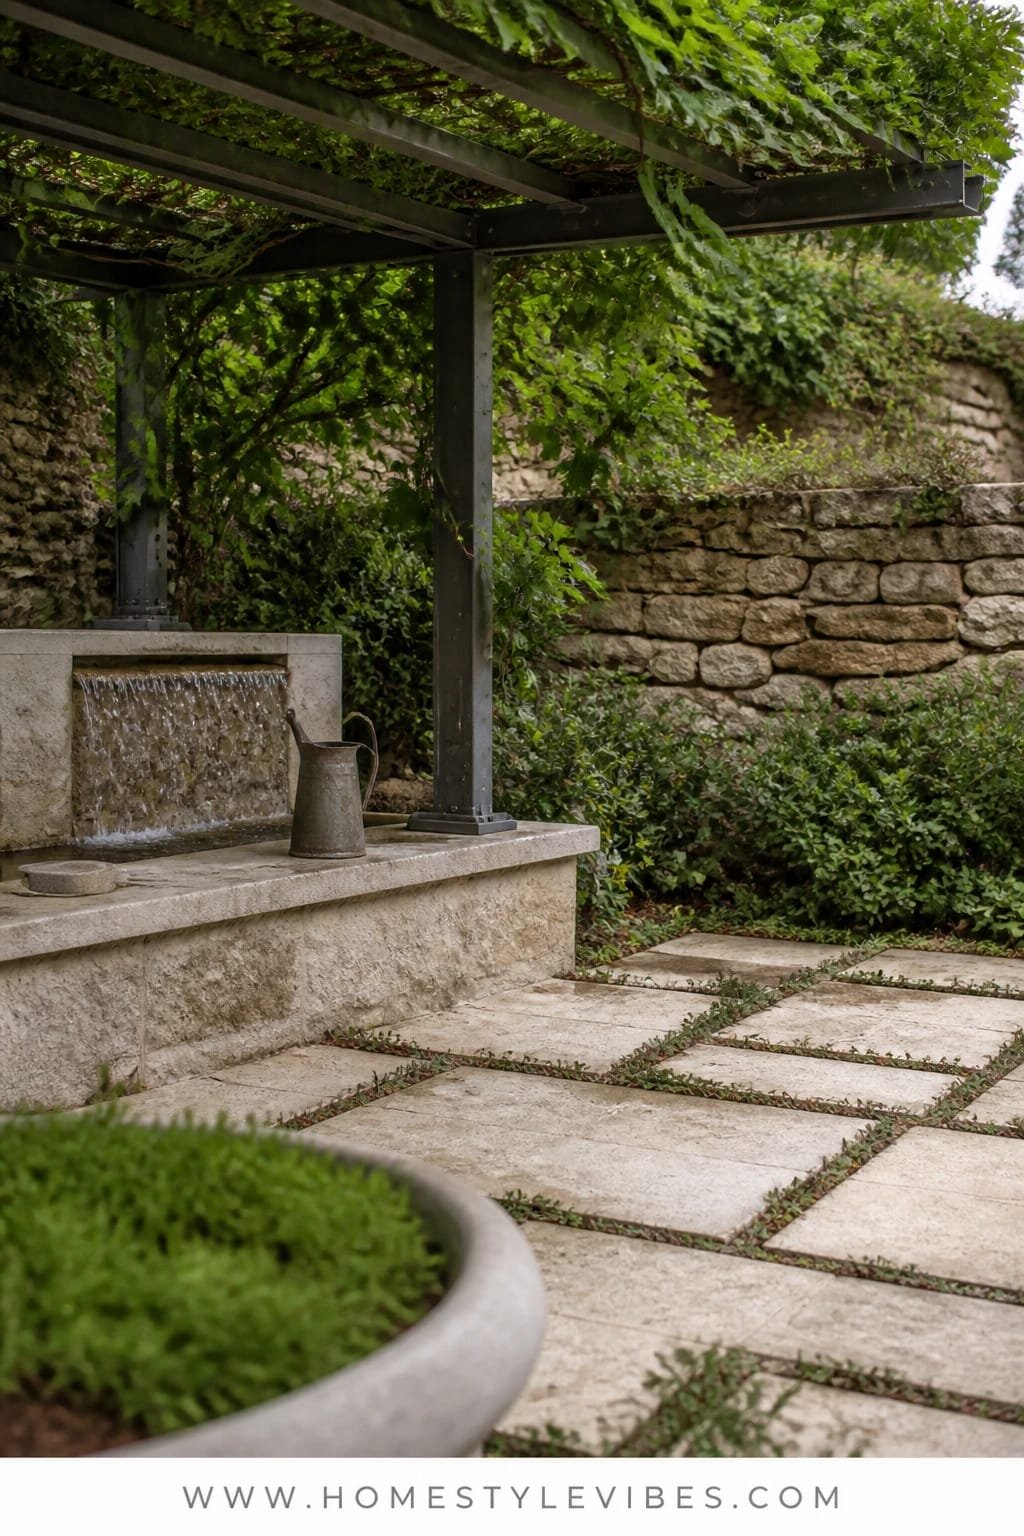
You crave green shade, but potted plants fizzle out or look random. A galvanized steel pergola trained with fast-growing vines creates living shade that cools the terrace by several degrees. The mood leans modern Mediterranean courtyard: layered greens, softly splashing water, and stone textures that age beautifully. It works because steel is thin yet strong, giving you more visual lightness while vines do the heavy shading. A small recirculating stone fountain behind a low bench brings that spa-adjacent sound that masks street noise.
Lighting is subtle: tiny spotlights at the base of vines, just enough to catch leaves and cast lacey shadows at night. Photographs gorgeously thanks to the interplay of matte steel, glossy leaves, and rough stone. Budget version: powder-coated DIY steel kit plus jasmine or star jasmine for faster coverage. If you rent, go with freestanding trellis panels tied to planters. Darker tone? Use slate-gray cushions and volcanic stone planters. Small space? One frame, one bench, and two planters will still feel lush.
Budget Breakdown:
- Galvanized steel pergola frame: $900 – $2,200
- Vines + large planters + soil: $200 – $600
- Stone bench or stacked stone seat wall: $400 – $1,500
- Recirculating water feature: $180 – $650
- Leaf spotlights + timer: $100 – $260
Total Estimated Cost: $1,780 – $5,210
Best For: Sun-exposed terraces, noise-buffer needs, plant lovers who want living shade that gets better each season.
Key Design Elements:
- Main materials: Galvanized steel, natural stone, glazed ceramic planters
- Color palette: Slate, olive, mineral white, soft charcoal
- Lighting strategy: Discreet leaf uplights, no overhead glare
- Furniture silhouettes: Linear bench, compact bistro or lounge chairs
- Texture layers: Smooth steel, veined stone, glossy leaves, nubby cushions
- Accent details: Aged terracotta, mossy stones, brass watering can
Why This Feels Designer: The living layer is the luxury. Most terraces ignore canopy and sound; this one choreographs both—shade from above, water at ear height.
How To Recreate This Look:
- Assemble a slim steel pergola; anchor securely to terrace or planters with ballast.
- Set two large planters at corners; plant vigorous vines and train with soft ties.
- Place a stone bench along a back edge; tuck a small fountain behind or to one side.
- Add leaf spotlights aimed up the vines; put them on a dusk-to-dawn timer.
- Style with mineral-toned cushions and one weathered pot for patina.
Watch Out: Choosing slow growers if you need shade fast. Ask for varieties that thrive in your sun exposure and climate—wrong plant, wrong place equals disappointment.
Pro Styling Tip: Mist leaves right before shooting; they catch light better and look lush instead of dusty.
Feeling energized? One more curveball—something you can install in a weekend with tools you already own.
7. Treated Pine Pergola with Warm String Lights and a Fold-Down Bar Counter
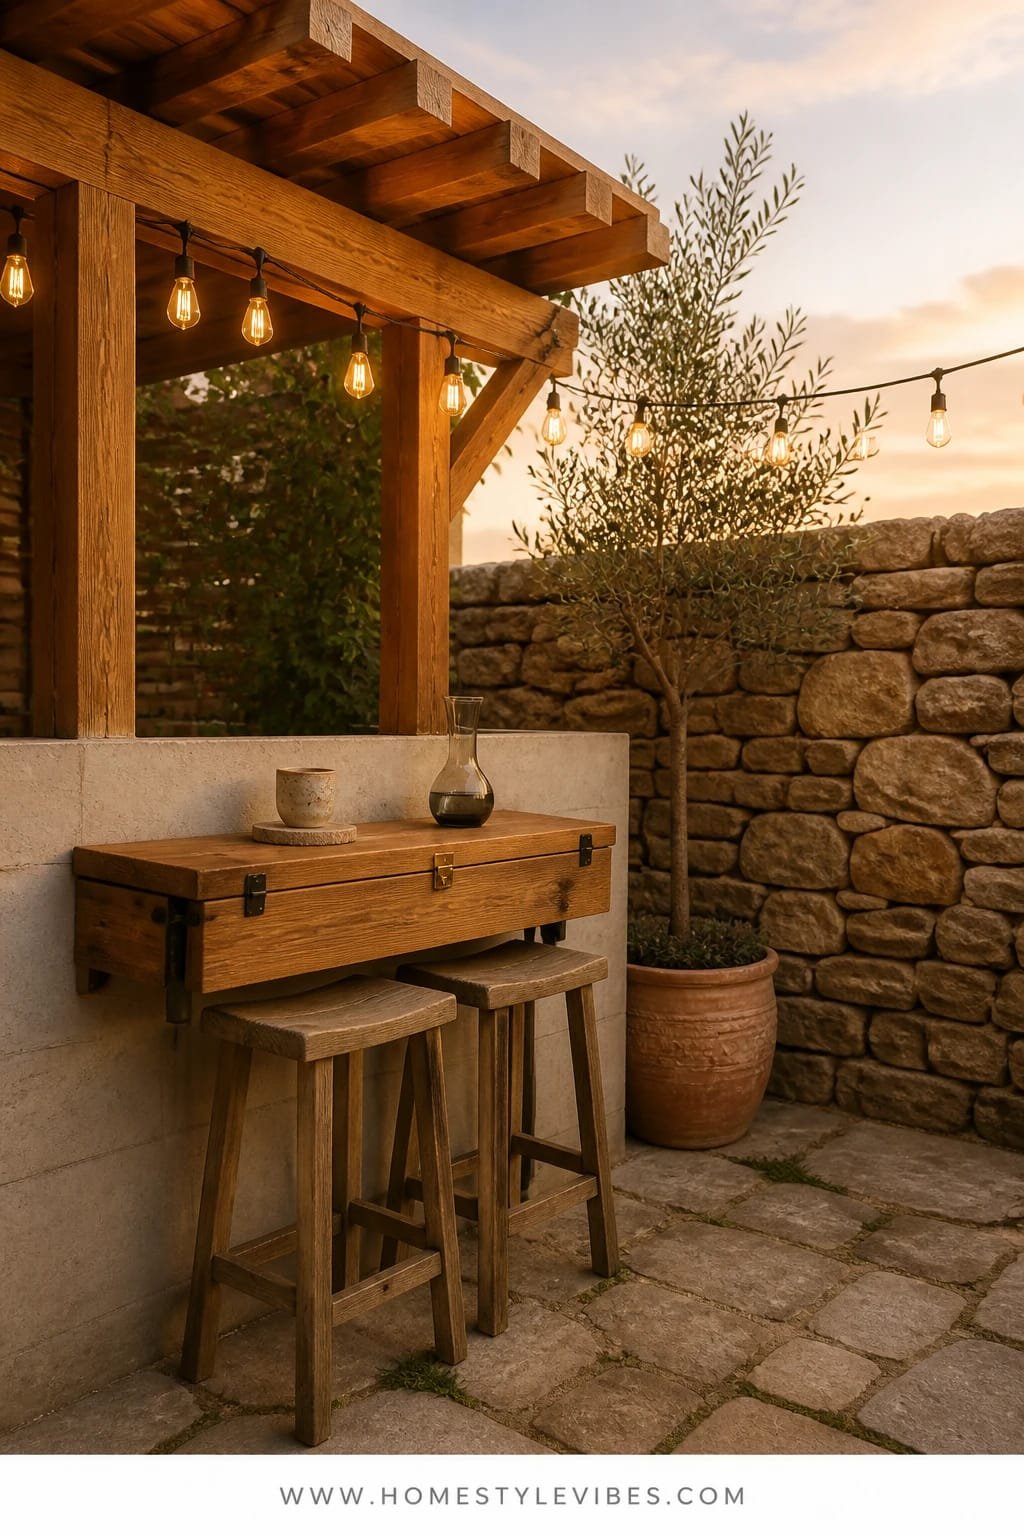
You want the party perch, but the budget says “chill.” Treated pine to the rescue. Pair a straightforward pine pergola with a fold-down bar counter and a couple of tall stools to make a micro entertaining zone that feels social even on a tiny terrace. The vibe is casual coastal—warm light, natural wood, and the satisfying click of a latch when the counter flips down for morning coffee. Pine takes stain well, and with the right sealant, it stands up to the elements long enough to prove the concept.
Why it works in real homes: you get shade plus function. The fold-down bar doubles as prep space or a laptop perch. Lighting is friendly—warm string lights zigzagged under the beams at eye level. Photographs well because the bar front becomes your styling canvas: a bowl of citrus, a small vase of herbs, a striped towel over the stool. Budget version: use fence post anchors and off-the-shelf lumber. Renter-friendly swap: freestanding pergola with weight bags and a clamp-on bar shelf. Darker look: walnut stain, black stools, and cognac leather seat pads for cozy evenings.
Budget Breakdown:
- Treated pine lumber + brackets: $250 – $700
- Outdoor sealant/stain: $40 – $120
- Fold-down bar hardware + lumber: $90 – $260
- Bar stools (2): $120 – $360
- String lights + hooks: $40 – $120
Total Estimated Cost: $540 – $1,560
Best For: Small terraces, renters, first-time builders, weekender projects; spring-to-fall hosting with low commitment.
Key Design Elements:
- Main materials: Treated pine, galvanized brackets, canvas or bamboo shade
- Color palette: Honey wood, warm white, navy stripe, fresh green
- Lighting strategy: Zigzag string lights under beams at 7–8 feet height
- Furniture silhouettes: Slim bar stools, narrow flip-down counter, compact cooler box
- Texture layers: Wood grain, canvas, striped cotton, matte ceramics
- Accent details: Herb planter, enamelware, bottle opener mounted to post
Why This Looks Expensive: Honest materials, clean symmetry, and a single hero function (the bar). When things do double duty, they read thoughtful, not cheap.
How To Recreate This Look:
- Build a basic pergola frame with treated pine; keep lines square and simple.
- Sand and stain; seal edges and end grains carefully to avoid swelling.
- Install a fold-down bar on one post bay using a piano hinge and folding brackets.
- Hang string lights in a zigzag at consistent intervals for even glow.
- Style with two stools, a striped towel, and a small herb planter within reach.
The Most Common Mistake: Forgetting to pre-drill and seal cut ends. That’s how pine drinks water and warps. Take 10 extra minutes—you’ll thank yourself in August.
Pro Styling Tip: For photos, toss a linen napkin over the bar edge to break the straight line—your eye loves that soft interruption.
Here’s a quick mindset reset: pick one structure and commit. The secret isn’t buying more decor—it’s choosing the right shade strategy, then letting textiles and light do the polishing. One well-built idea beats five half-finished ones every time.
Quick Checklist
- Cedar slats for graphic dappled shade
- Built-in concrete bench for perimeter seating
- Aluminum pergola frame for low-maintenance structure
- Canopy daybed as a bold focal lounge
- Whitewashed brick or veneer for a cozy dining gazebo
- Wall lanterns at seated eye height for flattering light
- Bamboo lattice for soft, diffused glow
- Hanging egg chair for sculptural seating
- Fluted post detail to add architectural texture
- Uplights to graze columns and create drama
- Galvanized steel frame with fast-growing vines
- Small water feature to mask noise and add calm
- Treated pine pergola for a weekend build
- Fold-down bar counter for micro entertaining
- Warm string lights on a dimmer for mood control
Frequently Asked Questions
How do I choose between a pergola and a gazebo for my terrace?
Pergolas work best when you want airflow and layered light; gazebos shine when you need more enclosure for wind or dining. Look at your sun path and wind: if you need a roofed nook and wall-mounted lights, go gazebo; if you want flexible shade with climbing plants or retractable panels, choose a pergola.
What’s the most budget-friendly way to get stylish outdoor shade fast?
A treated pine pergola with string lights and a simple canvas or bamboo cover hits the sweet spot. It’s affordable, doable in a weekend, and instantly makes the terrace feel finished. Keep the design simple and spend a little extra on stain and good hardware.
My terrace is tiny. Which of these ideas won’t overwhelm it?
Go for the bamboo lattice with a hanging or standing egg chair, or the aluminum pergola with a compact lounge. Both keep the footprint light and let you carve out one clear function: reading or relaxing. Use a small rug to define the zone without shrinking the space.
I’m renting. Can I still build something that feels permanent?
Yes. Choose freestanding pergola kits with weighted bases, modular benches, and clamp-on bar shelves. Bamboo or reed lattice panels zip-tie to frames, and string lights can hook onto removable adhesive clips. You’ll get the vibe without drilling into building surfaces.
How do I keep outdoor textiles and wood looking good over time?
Pick performance fabrics with UV resistance, use breathable covers when not in use, and brush off dust regularly. For wood, seal cut ends and re-seal annually. Also, prop cushions vertically after rain so air can circulate—pooling water is the enemy.
Conclusion
Start with one move that solves your real-life pain point: too much sun at noon, awkward dinners, or a corner that never feels inviting. Pick the pergola or gazebo idea that addresses that exact friction, then layer lighting and texture. You’ll be shocked how quickly the space starts to feel like a destination rather than a pass-through.
The truth is, luxury outdoors comes from three things: honest materials, considered light, and restraint. You don’t need a dozen accessories; you need one strong structure, soft textiles, and lighting that flatters skin and stone. Choose your favorite idea, book a Saturday, and give yourself the shaded terrace you actually use.
You’ve got this. Seriously—one weekend, one structure, and your terrace will finally look like the mood board you’ve been saving for years.