6 Rooftop Terrace Garden Ideas That Turn Any Rooftop Into A Green Oasis
You want a breezy rooftop terrace garden that feels like a secret park in the sky. You hate the glare, the concrete heat, the way plastic planters fade into sad gray. You want dappled light, soft textures, and plants that don’t shrivel by July—but tricky layouts, wind, and upkeep keep getting in the way. These six rooftop garden ideas fix that—clever layouts, real-life plant pairings, and light strategies that make your terrace photogenic, cozy, and easy to maintain on a realistic budget and timeline. Expect lush greens, sculptural pots, and a few “wait, why didn’t I try that sooner?” swaps that look like a $15k designer install but can be done for under $4k in a weekend or two. Perfect for anyone who wants a green oasis that earns its likes and actually works for everyday life.
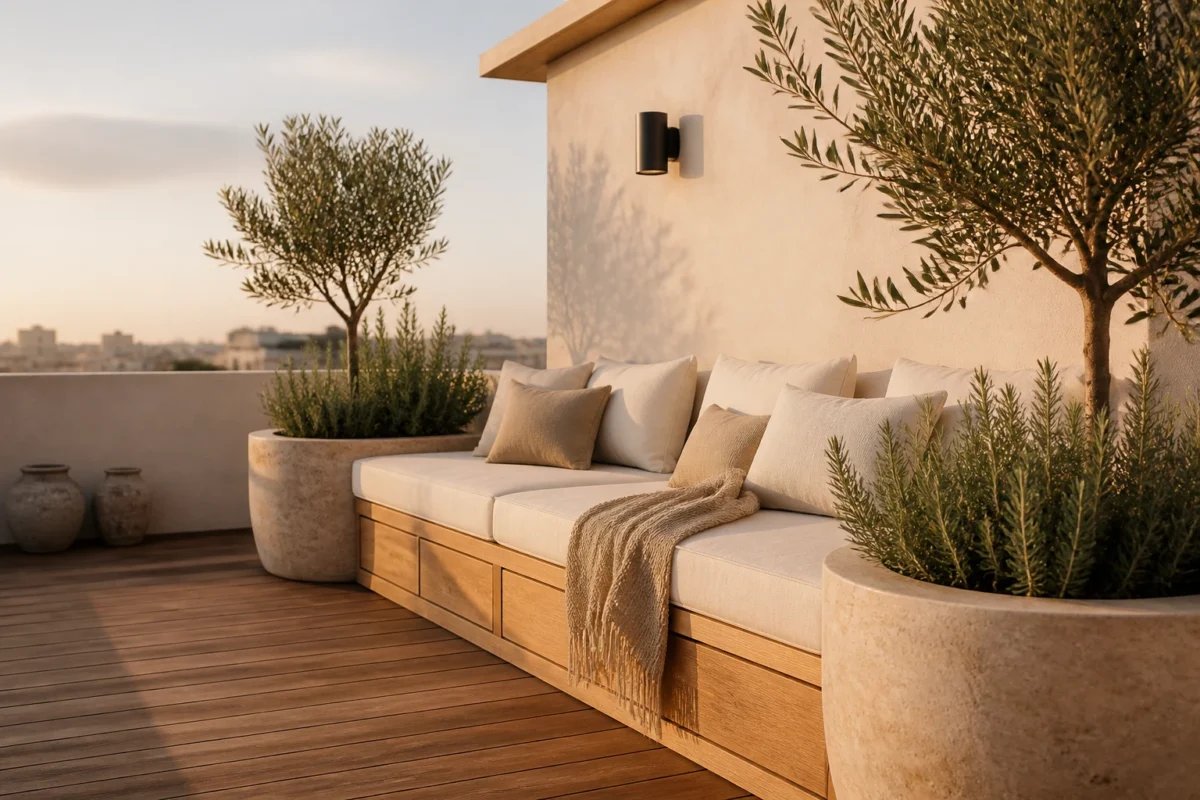
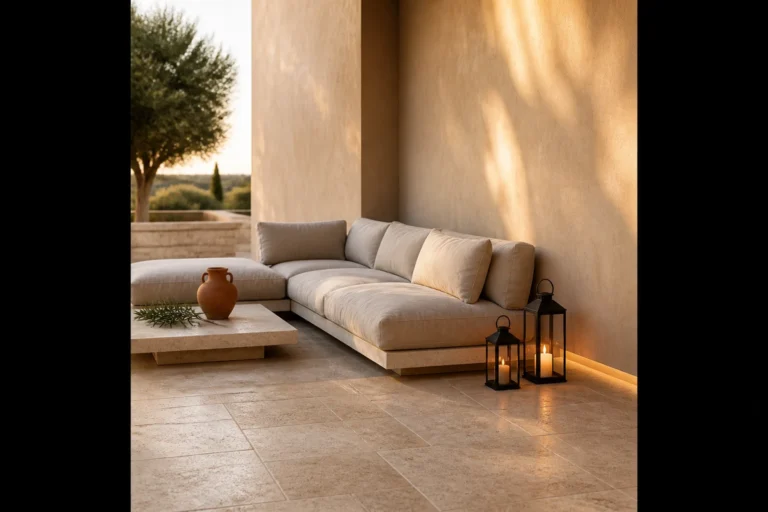
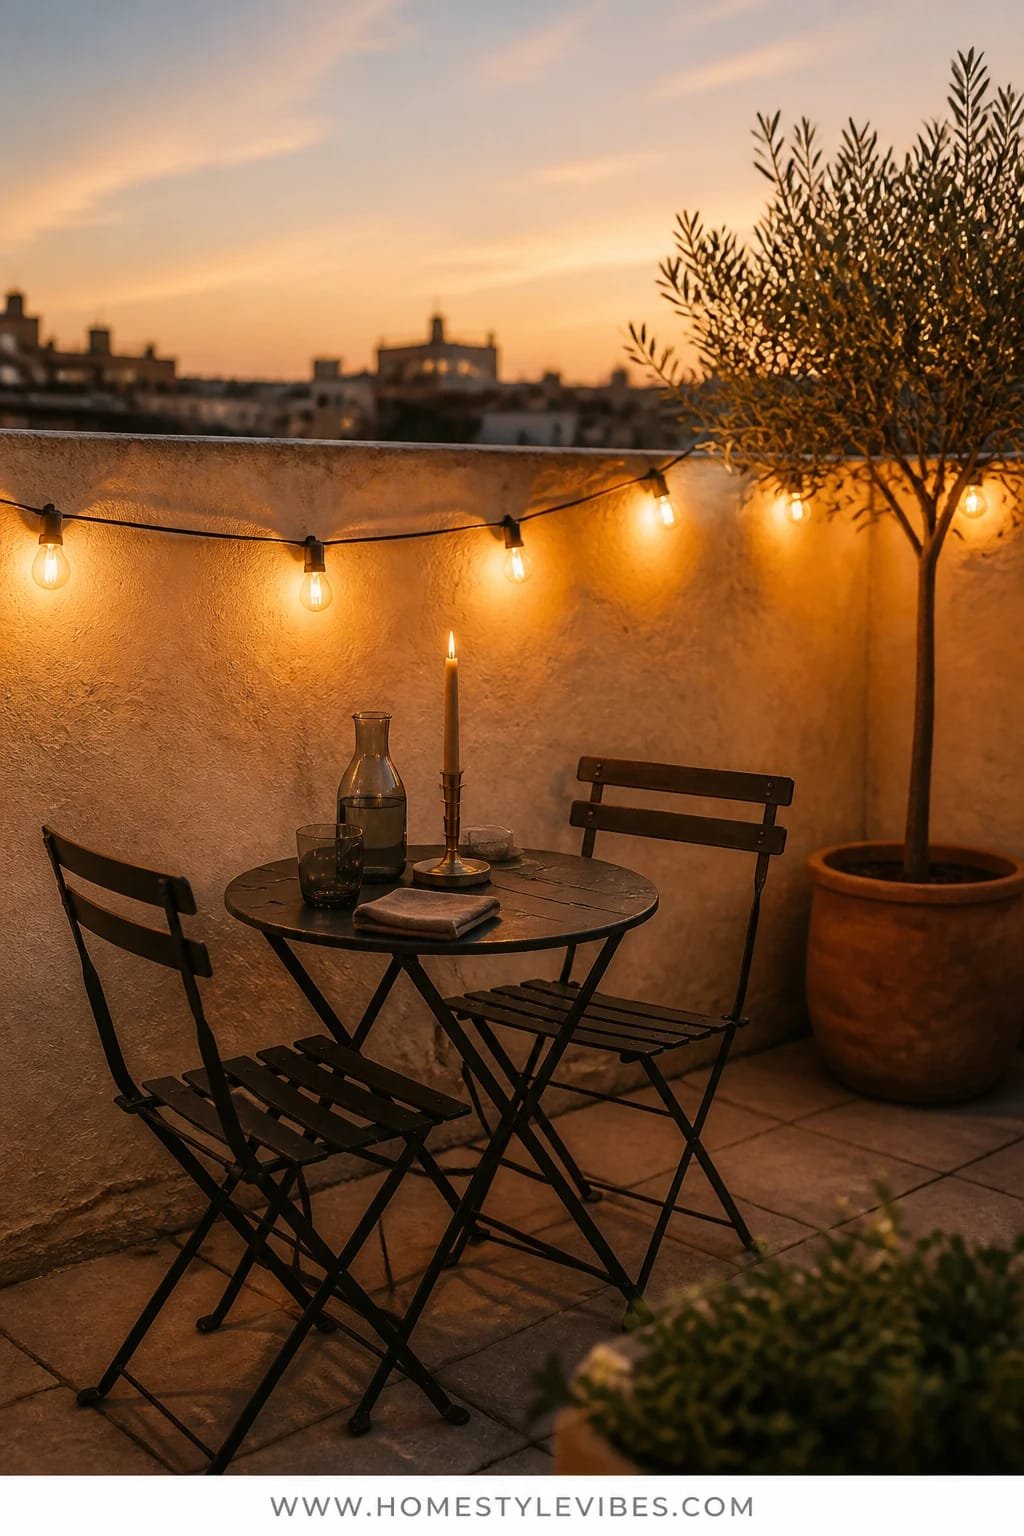
1. Travertine Planters, Golden Hour Glow, And A Built-In Bench With Storage
We’ve all been there: the rooftop looks big until you start adding furniture, then suddenly you’re dodging legs and staring at half-dead pots. This layout chases calm and order. A continuous built-in bench with hidden storage anchors the perimeter, travertine-look planters bring sun-warmed elegance, and the soft, low-angle “golden hour” lighting turns evenings cinematic. The mood? Modern Mediterranean meets city chill—like an outdoor living room where your shoes come off and the day melts away.
Here’s why it works in real homes: the bench doubles seating and storage (cushions, garden tools, board games), planters line the edges to block wind and create privacy, and warm LED strip lights under the bench deliver glow without glare. Travertine, real or porcelain-look, photographs beautifully because it catches light in a velvety way. You get layered depth: rough limewash walls, smooth stone textures, boxwood or rosemary spheres for form, and one sculptural olive tree as the “pause point.” That’s the trick—one commanding plant with supporting cast.
Variations: For a budget-friendly version, use cement-fiber planters in a travertine finish and a DIY bench frame with exterior-grade plywood plus weatherproof cushions. Small space? Shorten the bench and use a corner L-shape to free up circulation. Renter-friendly? Skip built-ins and use two storage benches pushed together, then flank with planters to mimic a custom run.
Budget Breakdown:
- Storage bench build or two modular storage benches: $350 – $1,400
- Travertine or travertine-look planters (4–6 mixed sizes): $300 – $1,200
- LED strip lights + outdoor-rated transformer: $120 – $400
- All-weather cushions + covers: $200 – $700
- Plants: olive tree, rosemary, boxwood, thyme: $180 – $600
- Limewash or mineral paint for back wall: $60 – $140
Total Estimated Cost: $1,210 – $4,440
Best For: Rectangular rooftops that need seating and storage; sun-exposed terraces where evening hangouts matter; anyone who wants a clean, photo-ready backdrop that always looks intentional.
Key Design Elements:
- Main materials: travertine or porcelain-look stone, limewash wall, outdoor wood or composite bench
- Color palette: warm stone, olive green, herbaceous deep greens, creamy white
- Lighting strategy: under-bench LEDs, one dimmable wall sconce, and candles for depth
- Furniture silhouettes: low-profile bench, cube/rounded planters, one café table
- Texture layers: boucle or canvas cushions, ribbed planter ridges, nubby throw
- Accent details (hardware, decor pieces, plants): brass hooks, terra-cotta herb pots, a single sculptural lantern
How To Recreate This Look:
- Start with the bench: measure the longest wall and plan a built-in or line up two storage benches.
- Add planters in stepped heights along the back edge for scale and privacy.
- Layer an olive tree as the focal point, then sphere-form rosemary and low thyme beneath.
- Install warm-white LED strips under the bench lip and one low-glare wall sconce at eye level.
- Style with stone-toned cushions, a throw, and two lanterns clustered on one side for asymmetry.
Why This Looks Expensive: The continuous line of the bench reads custom, while layered planter heights and one strong focal plant create designer-level hierarchy. The warm under-bench glow softens shadows and frames the whole terrace as a curated composition.
Watch Out: Don’t pick icy blue LED strips. They flatten stone and make skin tones look cold. Aim for 2200K–2700K. Also, leave a 2-inch ventilation gap behind the bench so cushions dry properly after rain.
Pro Styling Tip: Shoot at dusk with the LEDs on and one candle lit; place the tallest planter one-third from the photo’s edge to create that pleasing rule-of-thirds tension.
2. Weathered Teak Decking, Cool Shade Light, And A Curved Daybed Nook
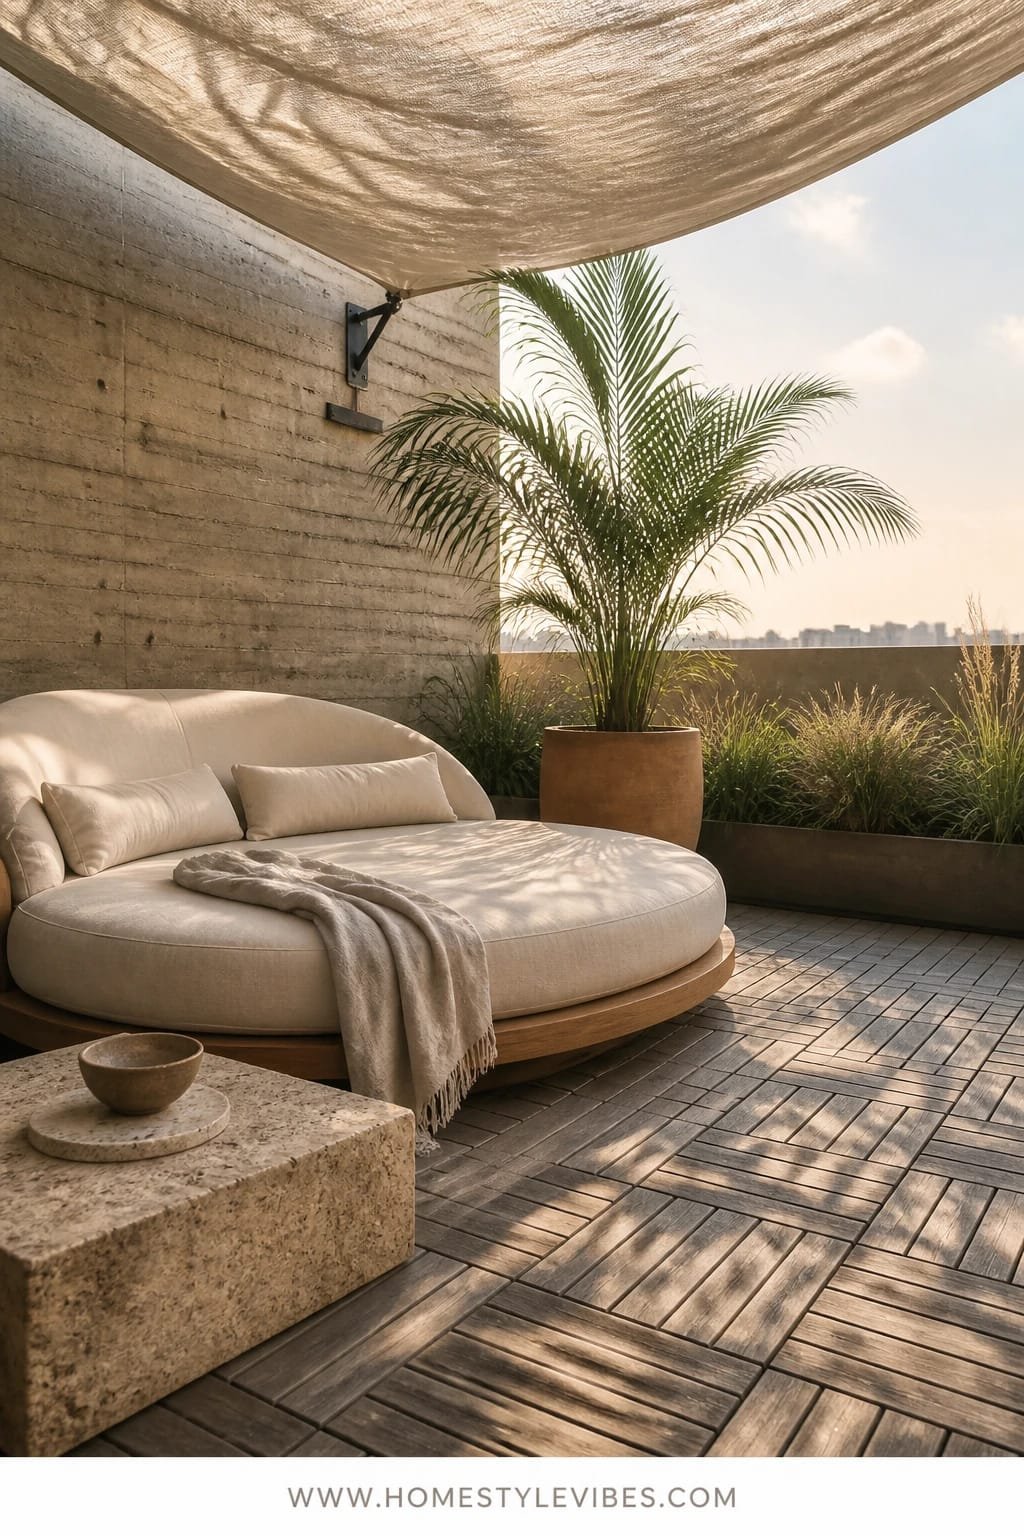
It’s that one corner that always feels off—too hot at noon, too bland in photos, too awkward for chairs. This setup turns that trouble spot into a spa-like corner with a curved daybed that hugs the body, dappled shade from a light sail or pergola, and weathered teak deck tiles that age gracefully. The vibe is hotel-spa with a sprinkle of Ibiza—airy, tactile, and nap-approved.
Why it works IRL: curving one big piece (the daybed) solves the “tetris of chairs” problem while inviting lounging. Shade cloth or slatted pergola softens the harsh top-down sun that makes rooftops brutal and unphotogenic. Weathered teak tiles click together and look better as they age, plus they’re renter-friendly and low-maintenance with a quick oil once a season. In photos, the curve, the negative space around it, and the repetition of slats in the decking create rhythm and sophistication.
Variations: Budget-friendly? Use composite deck tiles and a half-moon outdoor chaise instead of a custom daybed. Small space? Go for a round papasan-style lounger that fits in a 5-foot radius. Renter swap: tension shade sail that hooks to planters and a freestanding umbrella base.
Key Design Elements:
- Main materials: weathered teak or composite slat tiles, canvas shade sail, performance upholstery
- Color palette: silvery wood, chalky white, soft charcoal, sage
- Lighting strategy: diffuse up-light on plants, one floor lantern for evening
- Furniture silhouettes: curved daybed, small rounded side table
- Texture layers: canvas shade, woven basket planters, slatted deck pattern
- Accent details: striped outdoor pillow, linen throw, low bowl planter with trailing dichondra
Budget Breakdown:
- Deck tiles (100–160 sq ft): $500 – $1,600
- Curved daybed or papasan lounger: $350 – $1,500
- Shade sail/pergola kit: $120 – $900
- Planters and trailing greenery: $150 – $450
- Lantern + LED candles: $60 – $180
Total Estimated Cost: $1,180 – $4,630
Best For: Sun-baked corners, wind-exposed rooftops that need a calm retreat; anyone who wants lounge seating that photographs beautifully and encourages actual naps.
How To Recreate This Look:
- Start with snap-in deck tiles; run them in one direction for visual calm.
- Add a shade sail or slatted screen positioned to block noon sun without killing sky views.
- Place the curved daybed in the shade zone, leaving 24 inches of circulation on at least two sides.
- Layer one large planter with an upright grass (like feather reed) and one trailing plant near the curve to soften edges.
- Finish with a low side table, one lantern, and two pillows in a narrow stripe for scale.
Why This Feels Designer: One exaggerated curve against linear decking gives high-contrast geometry. The shade sail’s soft triangle frames the sky, while the lounger’s continuous line signals confidence and restraint.
One Thing To Avoid: Don’t scatter five tiny chairs “just to have seating.” Commit to one substantial lounge piece. Clutter kills the spa vibe faster than you can say sunscreen.
Pro Styling Tip: For photos, tuck the throw under one pillow edge so a corner drapes naturally—creases read real, not staged.
Pause before scrolling—the next one is for the plant lover who wants abundance without chaos.
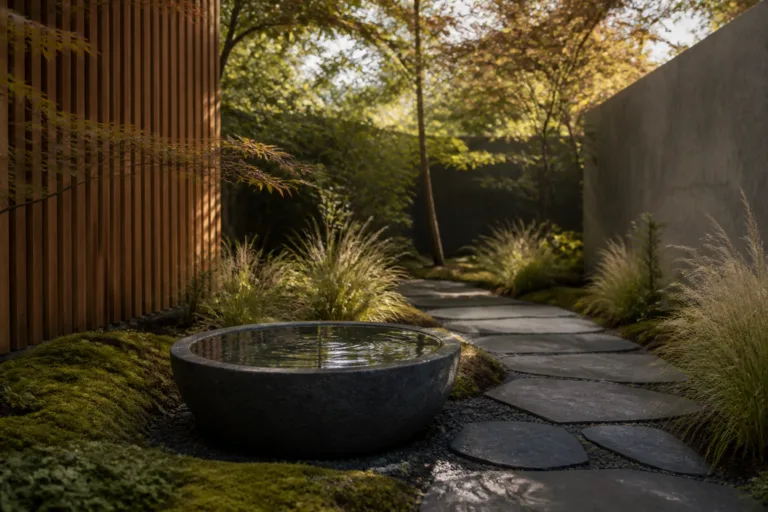
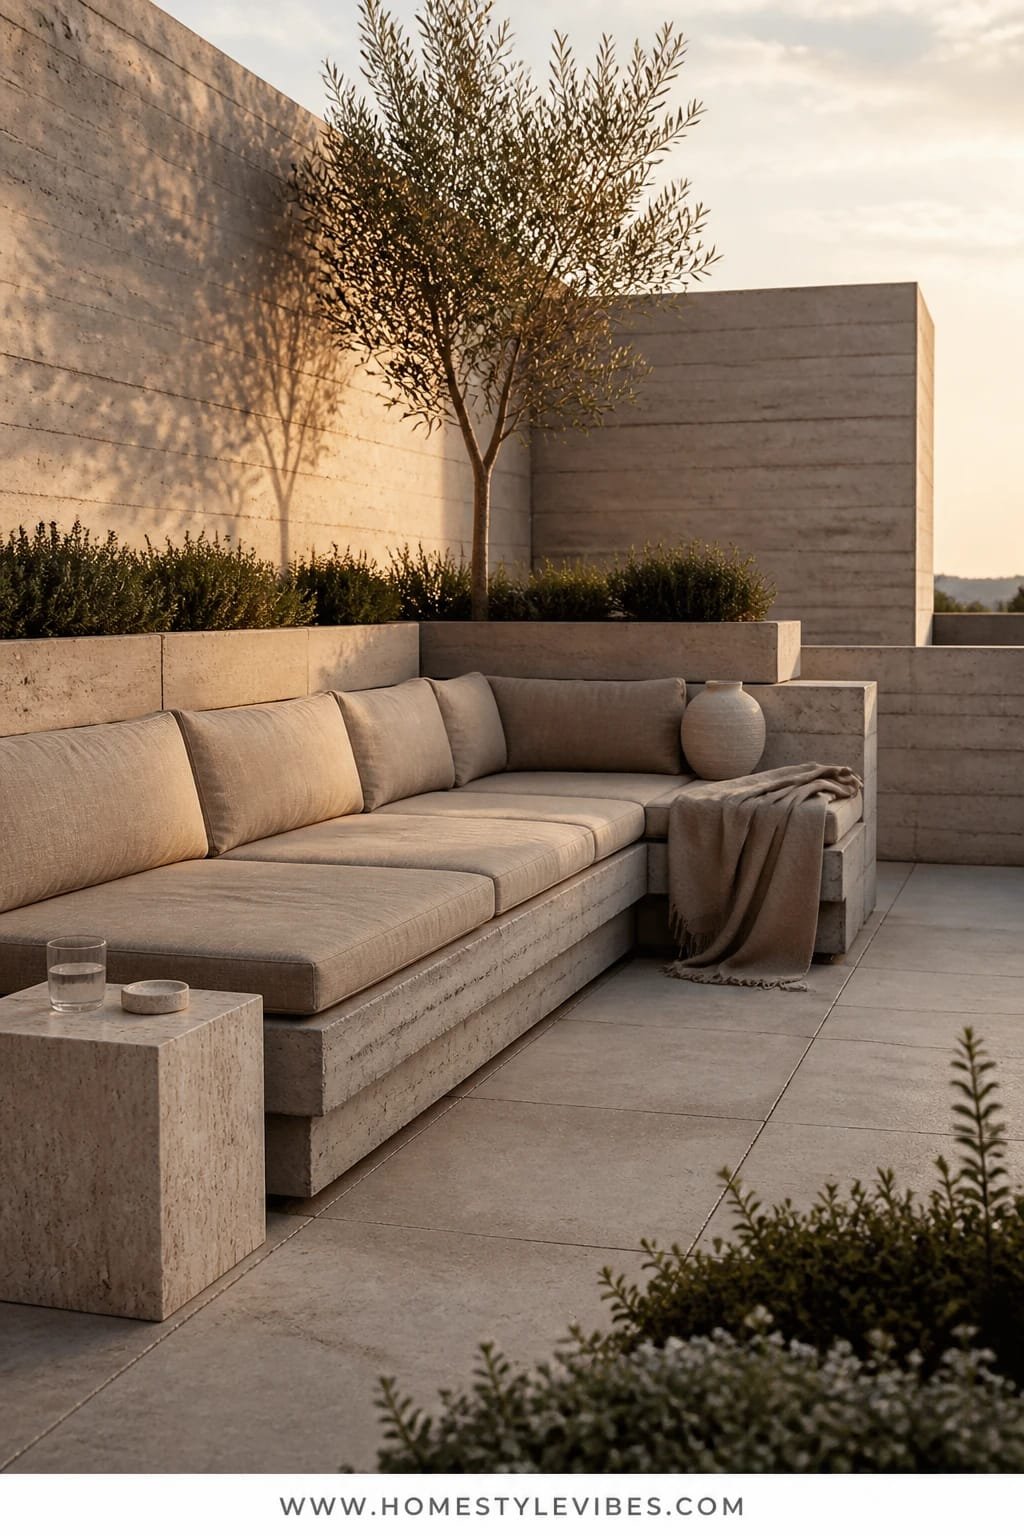
3. Corten Steel Planters, Dappled Morning Light, And A Slim Water Rill Feature
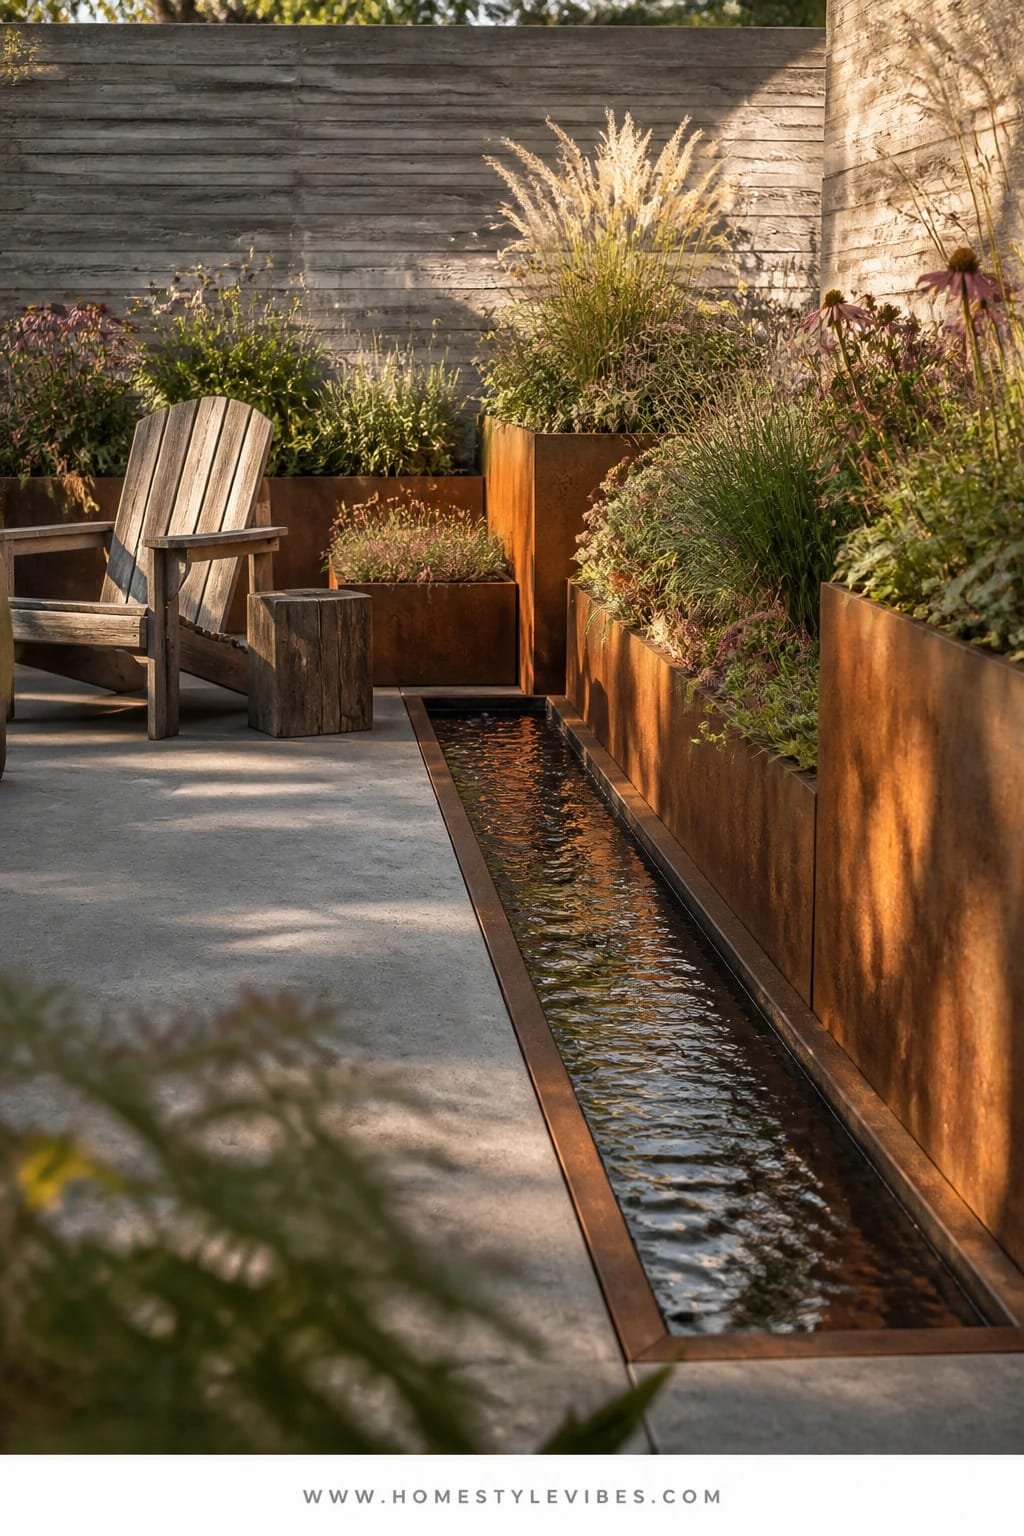
You’ve tried random pots and mismatched heights, but it still looks flat. This approach layers a chorus of heights and textures with rust-kissed Corten steel planters that glow at sunrise, a slim linear rill or recirculating fountain that adds sound and reflection, and a planting mix designed for rooftop conditions. The mood is urban meadow meets art gallery—soft, wild movement set against sculptural metal.
It works because the planters create a strong perimeter and visual weight, the water feature calms the city soundtrack, and the plant palette (ornamental grasses, echinacea, sedum) laughs at sun and wind. In photographs, the Corten’s warm patina sings against cool greens and concrete, while the water surface captures sky light for free sparkle. My friend Ellie obsessed over flower colors for weeks before realizing her real issue was movement—once she added grasses, the whole terrace came alive on breezy afternoons.
Variations: On a tighter budget, use rust-effect paint on galvanized planters. No plumbing? Choose a self-contained rill or a long trough fountain with a pump. North-facing? Swap echinacea for heuchera and carex for softer shade tolerance.
Budget Breakdown:
- Corten planters (3–5 large, 2–4 medium): $600 – $2,200
- Linear rill or trough fountain with pump: $250 – $1,200
- Plant mix (grasses, perennials, sedums): $200 – $650
- Pebbles or river rock top-dress: $60 – $180
- Outdoor mat or stepping pavers for access: $80 – $300
Total Estimated Cost: $1,190 – $4,530
Best For: Long, narrow rooftops; city noise masking; anyone who wants wild texture that still reads intentional and curatorial.
Key Design Elements:
- Main materials: Corten steel, river rock, concrete or composite pavers
- Color palette: weathered rust, blue-green grasses, soft cream blooms, charcoal accents
- Lighting strategy: early morning light, one low uplight on the tallest grass, discrete path markers
- Furniture silhouettes: slim bench, narrow café table tucked to the side
- Texture layers: feathery plumes, glossy water, matte steel, gritty stone
- Accents: one abstract sculpture, matte black watering can, subtle bird-friendly plant picks
How To Recreate This Look:
- Map a rhythmic planter layout: tall-tall-medium-small-repeat along the edge.
- Place the rill parallel to the planters for a calming, linear read.
- Plant in drifts: groups of the same grass for impact, then sprinkle perennials as “notes.”
- Top-dress soil with river rock to look finished and reduce evaporation.
- Add one slim bench opposite the planters to view the movement head-on.
Why This Reads High-End: Honest materials—steel, stone, water—age with dignity. Repetition and drift planting create museum-level cohesion that feels deliberate instead of chaotic.
The Most Common Mistake: Mixing too many one-off plant varieties. Pick 3–5 species and repeat them. Your future self (and your camera roll) will thank you.
Pro Styling Tip: Photograph at golden morning light when seed heads catch the sun—grasses throw delicate shadows that look like pencil sketches across the pavers.
Remember, this isn’t about recreating a showroom. It’s about building a rooftop terrace garden that matches your life—your coffee ritual, your dog’s nap spot, your Tuesday night pasta. If one idea clicks, start there and let the rest evolve later.
4. Limewash Plaster Walls, Soft Amber String Lights, And A Foldable Bistro Set
Small rooftop? Tiny budget? You still want romance. You hate how basic folding chairs look under harsh bulbs. This setup leans into European café charm with limewash plaster walls that glow at night, velvety amber string lights that flatter literally everyone, and a classic bistro table that folds away after a long dinner. The vibe is Paris-by-way-of-your-stairwell—cozy, imperfect, and deeply charming.
Here’s why it works: limewash adds movement and depth to otherwise flat parapet walls, turning any light source into warm shadow play. The string lights at 2200K–2400K cast amber, not office white, and the foldable set respects small footprints. Photographing this is a cheat code: matte walls, warm pools of light, and a single vase of herbs read editorial with zero fuss. I tried limewash on my own terrace last fall and couldn’t believe how it softened the “utility roof” vibe in one afternoon.
Variations: Budget? Use mineral paint or a textured roller for a faux limewash effect. Renter-friendly? Hang lights on removable hooks and zip ties to planters. Need color? Add a dusky terracotta tablecloth to up the warmth.
Budget Breakdown:
- Limewash or mineral paint + brush kit: $90 – $220
- String lights (warm amber) + outdoor extension: $60 – $180
- Foldable bistro set: $80 – $300
- Planter with scented herbs (lavender, basil): $40 – $120
- Lantern or tabletop oil lamp: $35 – $90
Total Estimated Cost: $305 – $910
Best For: Compact rooftops, rental spaces, balcony-to-rooftop hybrids; folks who love late dinners, candlelight, and low-maintenance setups.
How To Recreate This Look:
- Prep walls with primer if needed; apply limewash in overlapping X strokes for movement.
- Hang string lights in soft swags, not taut lines—aim for eye-level to mid-height, not overhead glare.
- Place the bistro set where you catch a breeze, not where the door blocks traffic.
- Add one herb planter within arm’s reach of the table for scent and instant garnish.
- Finish with a candle or oil lamp; amber glass ups the mood.
Why This Looks Intentional: The patina from limewash plus the amber lighting gives your terrace a story. Even scuffs look purposeful against texture-rich walls.
Don’t Do This: Avoid stark white LEDs and stainless chairs together—they reflect glare and make everything feel cafeteria-ish. Keep finishes matte or brushed.
Pro Styling Tip: For photos, turn off the overhead utility light near the door; let just the string lights and candle lead. Grainy night shots feel cinematic with texture-forward walls.
5. Fluted Wood Screens, Cool Moonlight LEDs, And A Trough Vegetable Bar

You want to grow food, but you don’t want your rooftop to look like a hardware store aisle. This design marries structure and utility: vertical fluted wood screens for privacy and shadow play, crisp cool-moonlight LEDs that make greens look hyper-fresh after sunset, and a linear trough “vegetable bar” where salad literally meets scissors. The mood sits at the intersection of Japandi and urban homestead—clean lines, honest materials, intentional productivity.
Why it works at home: the fluted screens tame wind and hide neighbors without a full wall, while the trough keeps edibles in neat rows. Moonlight-tone LEDs (3000–3500K) make it easier to harvest at night and photograph produce with that just-picked pop. Maintenance stays simple: drip irrigation with a timer, compost-amended soil, and a few integrated hooks for tools. It’s family-friendly and teaches kids where food comes from, without sacrificing style.
Variations: Tight budget? Use reed or bamboo rolls for a similar vertical rhythm. Small space? Do a half-length trough plus two stacking planters. DIY-friendly? Build the fluted look with alternating 1×2 and 1×3 cedar battens on a simple frame.
Key Design Elements:
- Main materials: cedar or thermally modified wood, powder-coated troughs, matte black brackets
- Color palette: honey wood, deep greens, soft black hardware, white grout-toned floors
- Lighting strategy: under-shelf LED strips with diffusers, one focused task light over the trough
- Furniture silhouettes: slim prep shelf, backless stools for quick snacks
- Texture layers: ribbed wood, leafy gloss, smooth powder coat, woven jute rug
- Accents: herb scissors, magnetic chalk labels, terra-cotta watering spikes
Budget Breakdown:
- Fluted screens (DIY or prefab panels): $280 – $1,200
- Trough planters (2–3) + soil and compost: $200 – $600
- LED task lighting + transformer: $100 – $350
- Drip irrigation kit with timer: $90 – $240
- Slim shelf + two stools: $150 – $500
Total Estimated Cost: $820 – $2,890
Best For: Food lovers, families, and rooftops that need both privacy and productivity; great for spring through fall with winter herbs under cover.
Why This Feels Designer: Repeating vertical lines sculpt the space, while the linear trough reads like a custom bar. The materials speak the same visual language—cedar, matte black, deep green—so the utility pieces disappear into the concept.
How To Recreate This Look:
- Install fluted screens on the windward side, leaving 1–2 inches between battens for airflow.
- Place troughs parallel to the screen; run drip lines under the rim and connect to a timer.
- Add a slim shelf behind the trough for tools, bowls, and a cutting board.
- Install cool-neutral LED strips under the shelf for nighttime harvests.
- Label rows with chalk tags; group lettuces by color gradient for visual satisfaction.
One Thing To Avoid: Overplanting tall tomatoes in shallow troughs. Keep vines to one end with a trellis, and let the rest be cut-and-come-again greens that stay tidy.
Pro Styling Tip: For a photo, harvest half a row so you see the fresh-cut line—it signals abundance and care without chaos.
If you’re feeling decision fatigue, breathe. You don’t need to tackle lighting, seating, and plants in one weekend. Choose one lever—structure, light, or texture—and let it lead. The rest can layer on with time.
6. Honed Concrete Pavers, Sunset Coral Accents, And A Fire Table Conversation Pit
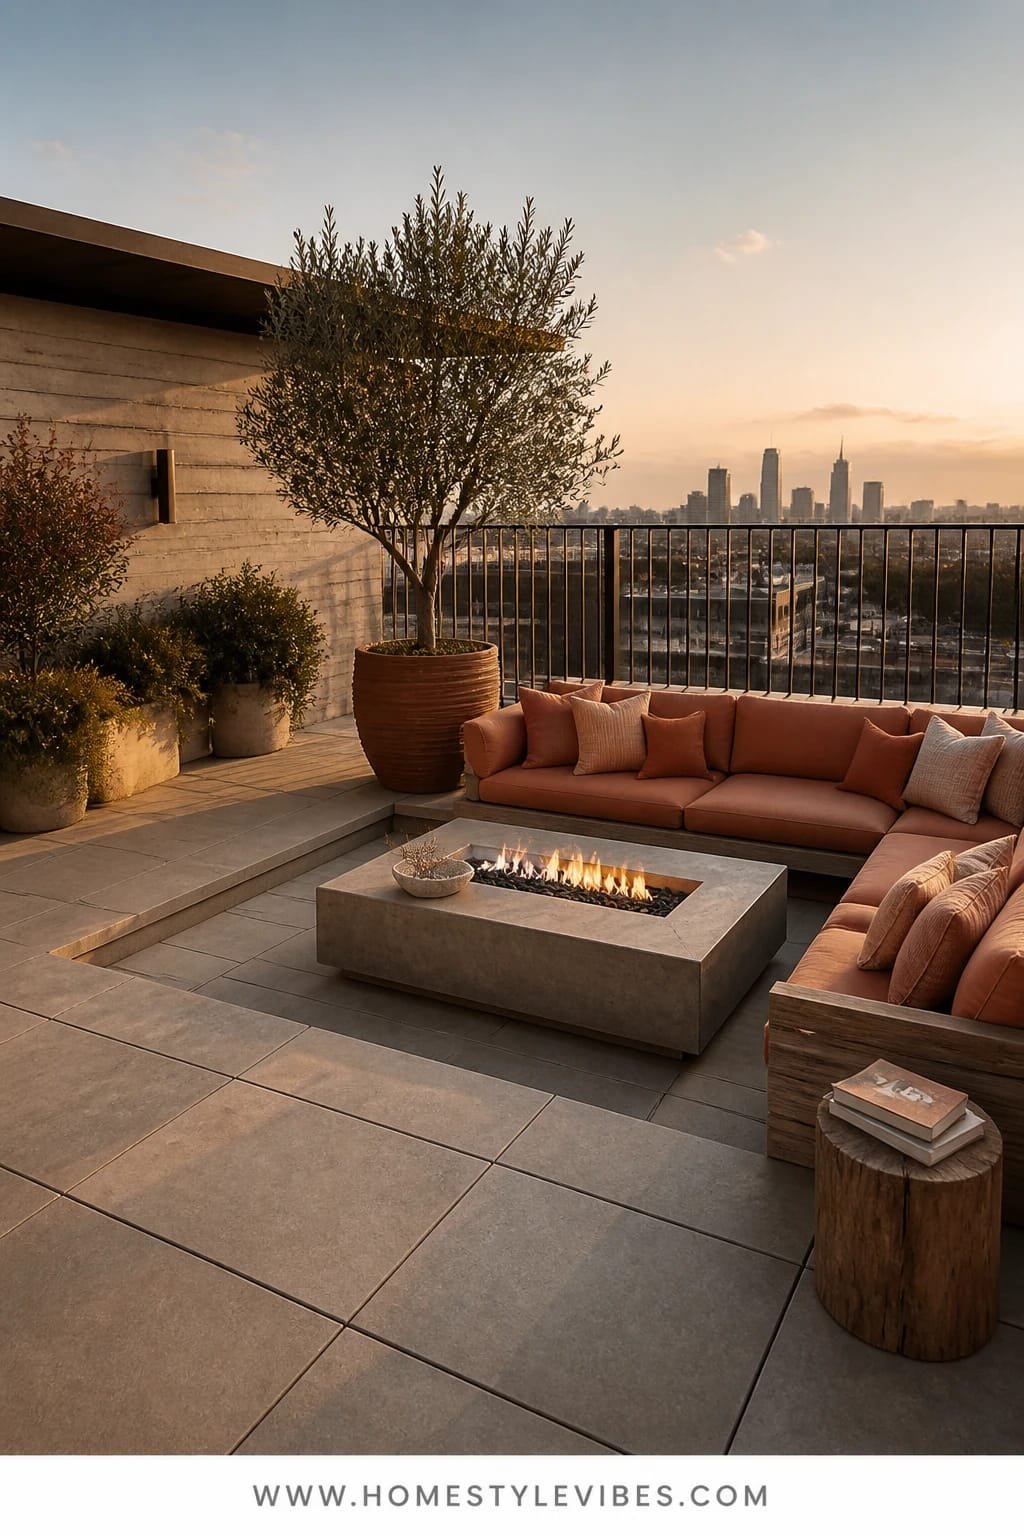
Evenings are perfect on the roof, but the seating never feels quite right. It’s either too spread out to chat or too cramped to relax. This design pulls people inward: a slightly sunk or framed “conversation pit” zone using honed concrete pavers for a soft modern base, sunset coral textiles for warmth against city grays, and a rectangular fire table that anchors the chat. Mood-wise, think boutique hotel lounge—low, luxe, and meant for long stories.
Here’s why it works: a clear boundary (paver change or low ledge) signals “gather here,” which fixes the floaty, ungrounded feeling many rooftops have. Honed concrete pavers don’t scream at the eye; they absorb light gently and avoid that weird speckled shadow cheap pendants cast on walls. The fire table’s horizontal flame creates flattering side light, while coral pillows fight the default gray-on-gray that most rooftops fall into. A micro-story: I once laid out three different lounge sets on a client’s roof; none felt right until we pulled them tighter, dropped the seating height, and lit the center. Magic.
Variations: Budget-conscious? Use concrete-look porcelain on pedestals and a propane tabletop fire bowl. Small roof? Two love seats facing each other with a narrow fire strip. Renter? Define the area with an outdoor rug in a concrete print and a portable fire bowl where allowed by code.
Key Design Elements:
- Main materials: honed concrete or concrete-look porcelain, powder-coated aluminum frames, performance fabrics
- Color palette: soft gray base, sunset coral, tobacco leather, olive green
- Lighting strategy: firelight primary, perimeter solar path lights secondary
- Furniture silhouettes: low modular sofas, rectilinear fire table, one sculptural side chair
- Texture layers: nubby woven pillows, brushed metal, smooth pavers, suede-look throws
- Accents: olive tree in a tall pot, match striker, stacked design books that can live outdoors
Budget Breakdown:
- Pavers or porcelain on pedestals (100–160 sq ft): $900 – $3,200
- Modular outdoor seating (2–3 pieces): $800 – $3,000
- Fire table + gas line or propane tank hide: $400 – $2,000
- Textiles (pillows, throw, rug): $180 – $600
- Planters + olive or ficus: $150 – $500
Total Estimated Cost: $2,430 – $9,300
Best For: Social rooftops, sunset cocktail hours, fall evenings; medium to large terraces with room for a focused seating zone.
Why This Looks Expensive: The pit effect concentrates visual energy, so every dollar you spend is visible in one frame. Low seating, controlled color, and a single line of flame read like a boutique lounge, not a patio furniture aisle.
How To Recreate This Look:
- Define a rectangle with pavers or an outdoor rug; keep proportions around 8×10 or 10×12 feet.
- Place low sofas facing each other, 30–36 inches apart, with the fire table centered.
- Add two coral cushions per seat and one neutral lumbar to ground them.
- Place one tall plant at a back corner to bookend the scene and balance visual weight.
- Use small, dim path lights behind seating to create a halo and keep edges safe.
Watch Out: Don’t push seating too far from the fire. Keep knee-to-flame distance under 24 inches so it feels intimate and warm without scorch.
Pro Styling Tip: For photos, light the fire at dusk, kill all overheads, and angle the camera so the flame line cuts across the lower third—instant editorial mood.
Here’s a gentle truth: not every rooftop terrace garden idea works for every building or every person. Wind, rules, and budget shape the outcome. The win comes from picking a focus—material, light, or a single hero piece—and editing the rest. Restraint plus texture plus flattering light will always beat a scatter of “almosts.”
Quick Checklist
- Choose one dominant material (travertine, teak, Corten, limewash, cedar, or concrete)
- Commit to a lighting temperature (2200–2700K warm or 3000–3500K cool-neutral)
- Add one statement anchor (olive tree, curved daybed, rill, bistro set, trough bar, fire table)
- Repeat plants in drifts for cohesion
- Use planters in stepped heights for depth
- Top-dress soil with gravel or river rock
- Define one zone with a bench, rug, or paver change
- Run drip irrigation with a timer for sanity
- Hide cords, tanks, and tools with storage
- Photograph at dusk or early morning for soft light
Frequently Asked Questions
How much should I budget for a small rooftop terrace garden makeover?
For a compact terrace, $600–$2,000 covers planters, a hero piece (like a bistro set or lounge chair), warm string lights, soil, and 6–10 resilient plants. Add $300–$600 for deck tiles or a rug to define the zone. Lighting and one standout material give you the biggest visual impact per dollar.
What plants actually survive rooftop wind and sun?
Go for structural herbs (rosemary, thyme), grasses (feather reed, blue fescue), succulents (sedum), and tough perennials (echinacea, lavender, salvia). In partial shade, try heuchera, carex, and chives. Group plants by sun and watering needs to simplify maintenance and keep them happy.
I rent—how can I try these ideas without making permanent changes?
Use snap-in deck tiles, storage benches instead of built-ins, removable hooks for lights, and freestanding screens. A trough planter on casters and a portable fire bowl (if allowed) give the vibe without drilling. Limewash-style paint can be swapped for mineral paint that cleans off more easily.
How do I handle drainage and avoid water damage?
Always raise planters on risers, use saucers or tray liners, and top-dress with gravel to reduce splash. If you’re installing a fountain, keep it self-contained and check with your building about waterproofing layers before adding heavy features. Drip irrigation with a timer prevents overflows from hose forgetfulness.
What’s the most common design mistake on rooftops?
Too many small, unrelated items. Do fewer, bigger moves: one continuous bench, a cluster of large planters, or a single lounge piece. Repeat materials and plant species for cohesion, and choose warm or cool lighting once—don’t mix temperatures.
Final Thought
Pick one idea that makes your shoulders drop—maybe it’s the built-in bench with golden glow, or the curved daybed under that forgiving shade. Start there. A rooftop terrace garden doesn’t win on quantity; it wins on clarity: a dominant material, flattering light, and one hero piece that sets the mood.
The secret isn’t fancy furniture—it’s textures that age well, lighting that flatters skin and stone, and the confidence to edit. Add plants in repeats, hide the clutter, and let the wind do the styling. You’ve got this—your green oasis is closer than you think, and trust me, it’s going to feel like your favorite part of the whole home.