6 Small Terrace And Balcony Ideas That Make Every Square Foot Count
You want a little outdoor sanctuary with sun-warmed wood, soft textiles, and that “weekend coffee tastes better here” feeling… but your tiny balcony laughs at your bistro set and swallows your plants whole. You love the idea of sunset dinners; you hate tripping over chairs to reach the door. You crave linen cushions, dappled light, and a seat that actually fits you and your laptop. These six small terrace and balcony ideas fix the flow, tame the clutter, and make every inch earn its keep—most can be pulled off in a weekend with a budget cap under $1,000 per zone. Expect photogenic layers, practical layouts, and textures that read rich on camera—and in real life. If you live for quiet mornings, city twinkle nights, or somewhere in between, one of these will feel like home.
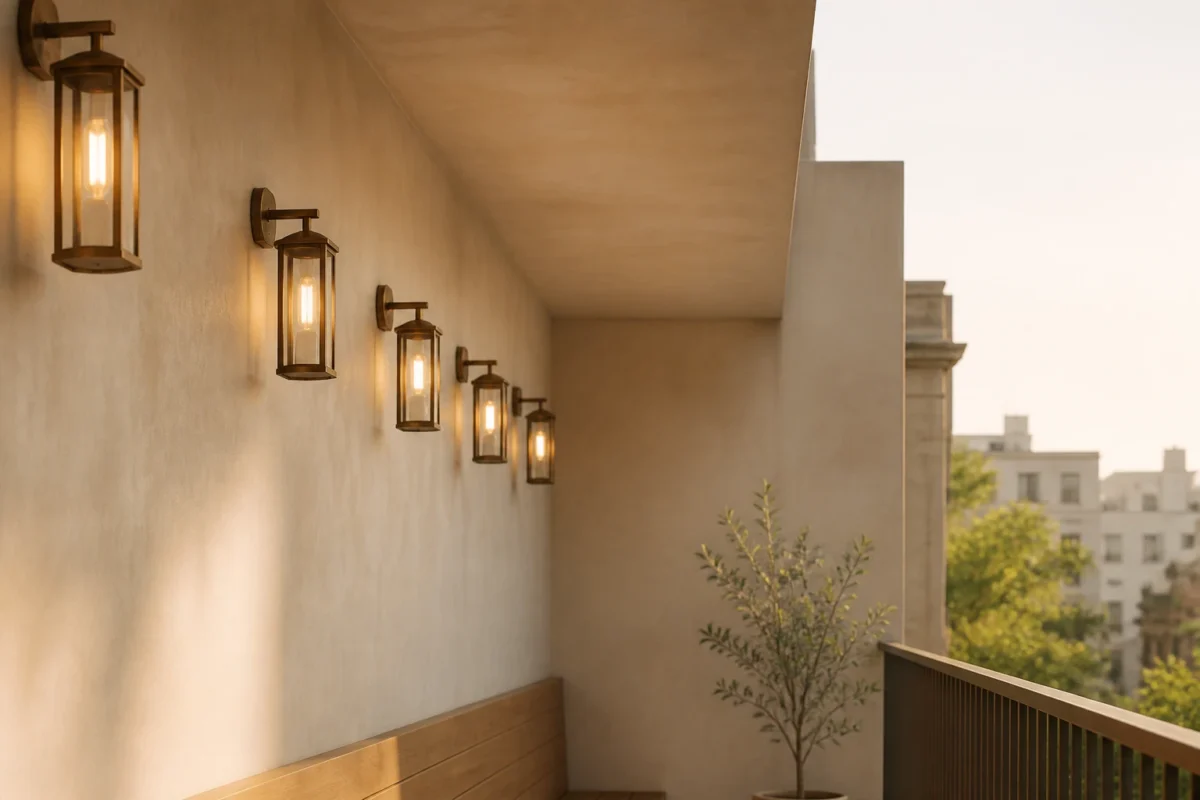
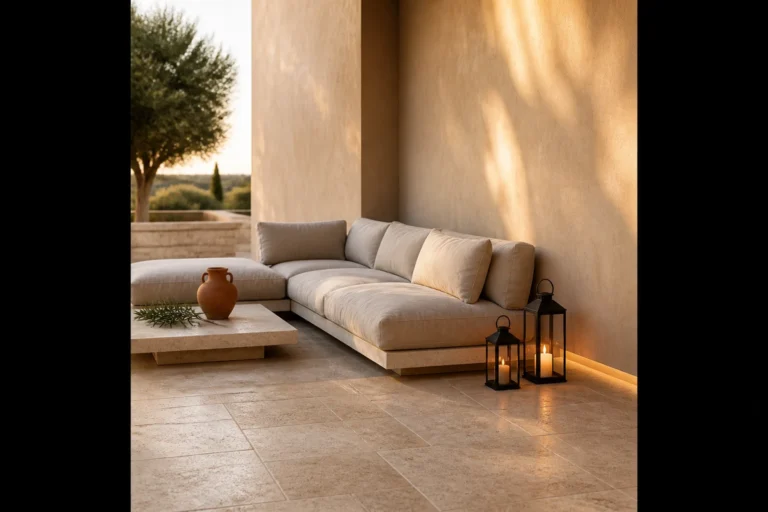
1. Teak Slat Floor With Warm Lantern Glow and a Narrow Built-In Bench
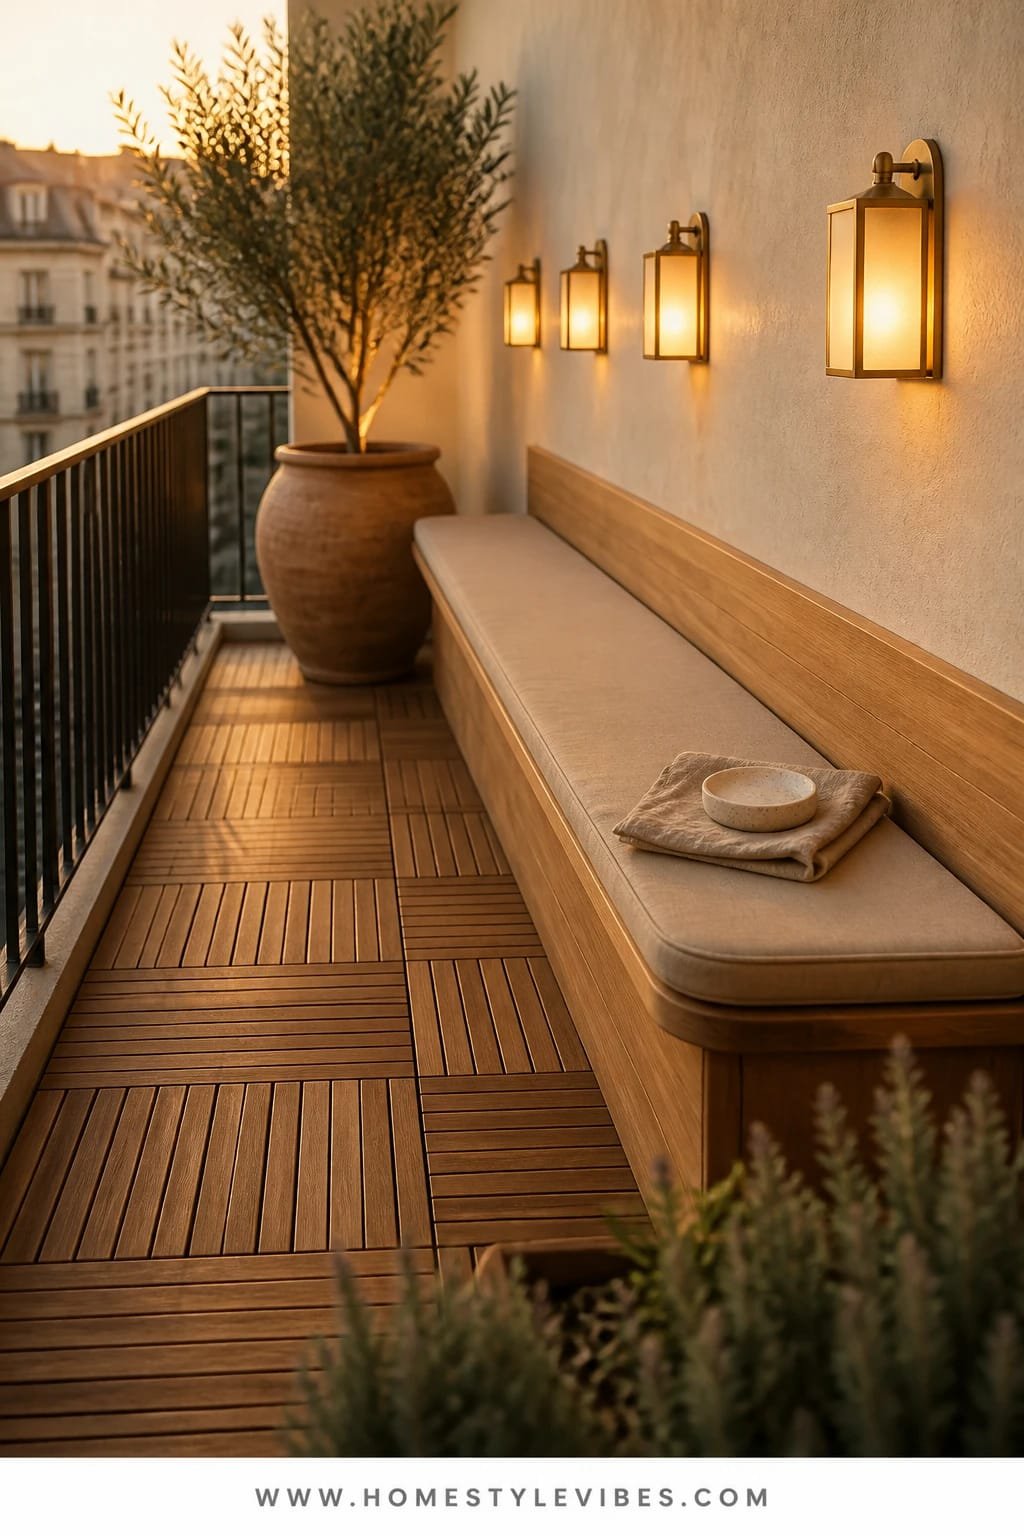
We’ve all been there: the balcony is long and skinny, and every chair you try looks like a space hog. You’ve tried the folding café set, but it still feels cluttered and underwhelming. This setup embraces a single wall-hugging built-in bench in weather-friendly teak, a run of lantern-style LED lights for that warm glow, and a slatted modular floor that clicks together like a dream. The result is calm, purposeful, and hospitality-level cozy.
Modern Mediterranean in mood, it balances clean lines with tactile warmth. It works because the asymmetric layout pushes all mass to one side, leaving a clear walking lane. That instantly makes any small terrace or balcony feel bigger. Lighting sits low and soft, creating depth at dusk and no harsh “cheap fixture” shadows on your walls. Teak—sealed or naturally weathering to a silvery tone—adds dimension that photographs beautifully, especially when the slat pattern runs perpendicular to the longest sightline.
Variations? Budget-friendly: swap solid teak for acacia or composite slat tiles. Small-space version: bench depth at 16 inches with a flip-up storage seat. Renter-friendly: use a freestanding storage bench with locking casters and no-drill smart battery lanterns. Darker vibe: stain the bench a deep walnut and pair with smoky gray cushions for moody evenings.
Budget Breakdown:
- Modular teak or acacia slat tiles: $120–$400
- Narrow outdoor bench (DIY or ready-made): $180–$600
- Outdoor bench cushion + 2 lumbar pillows: $90–$250
- LED lantern set (battery or solar): $40–$120
- Planter pair (tall + low): $60–$180
- Outdoor sealer or teak oil: $15–$30
Total Estimated Cost: $505 – $1,580
Best For: Long, narrow terraces and city balconies where every inch counts. Great for renters or homeowners who love coffee-at-dawn moments and reading nooks.
Key Design Elements:
- Main materials: Teak (or acacia) slat flooring, outdoor foam, UV-resistant fabric
- Color palette: Honey wood, sand, oatmeal, olive green accents
- Lighting strategy: Low, warm lanterns at staggered heights for glow and depth
- Furniture silhouettes: Slim, straight-lined bench with a single soft cushion
- Texture layers: Slatted wood, linen-textured cushions, matte ceramic planters
- Accent details: Two tall grasses, one sculptural herb planter, a woven tray
How To Recreate This Look:
- Start with slat floor tiles running perpendicular to your view so the eye travels across.
- Add a slim bench aligned to one side; secure or weigh it so it stays stable.
- Layer a single bench cushion and two small lumbar pillows in a tone-on-tone palette.
- Install LED lanterns at different heights: floor, bench, and eye-level hook.
- Style with one tall grass planter at the far end and a low herb pot near the seat.
Why This Looks Expensive: Controlled palette, one strong line (the bench), and layered light read curated—not crowded. The slat texture breaks up flat surfaces while the lanterns create soft shadows that feel boutique-hotel.
Watch Out: Don’t crowd with extra chairs. One seat and one walkway win. Also, avoid cool-white bulbs; they flatten the warmth of wood and make evening photos look harsh.
Pro Styling Tip: Angle the lanterns slightly so light grazes the bench front—those micro-shadows show off the wood grain in photos.
Keep scrolling—next up swings the spotlight to tactile comfort and color that breathes life into tight corners.
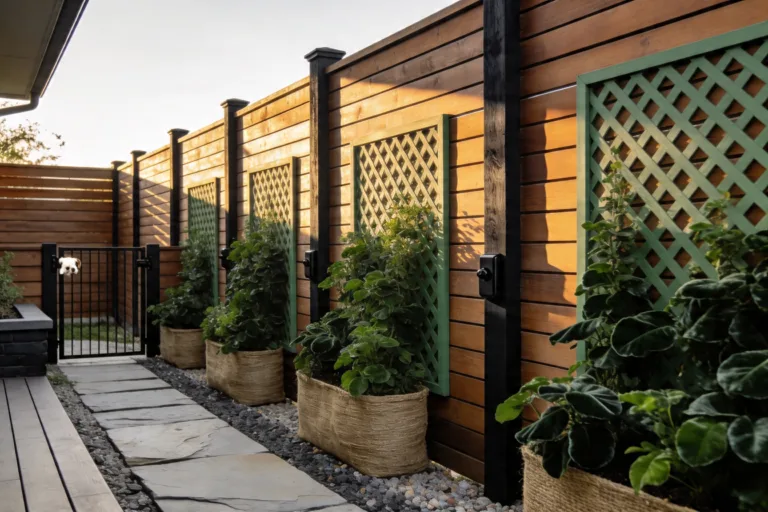
2. Rattan Weave With Dappled Shade and a Folding Bistro Table That Disappears
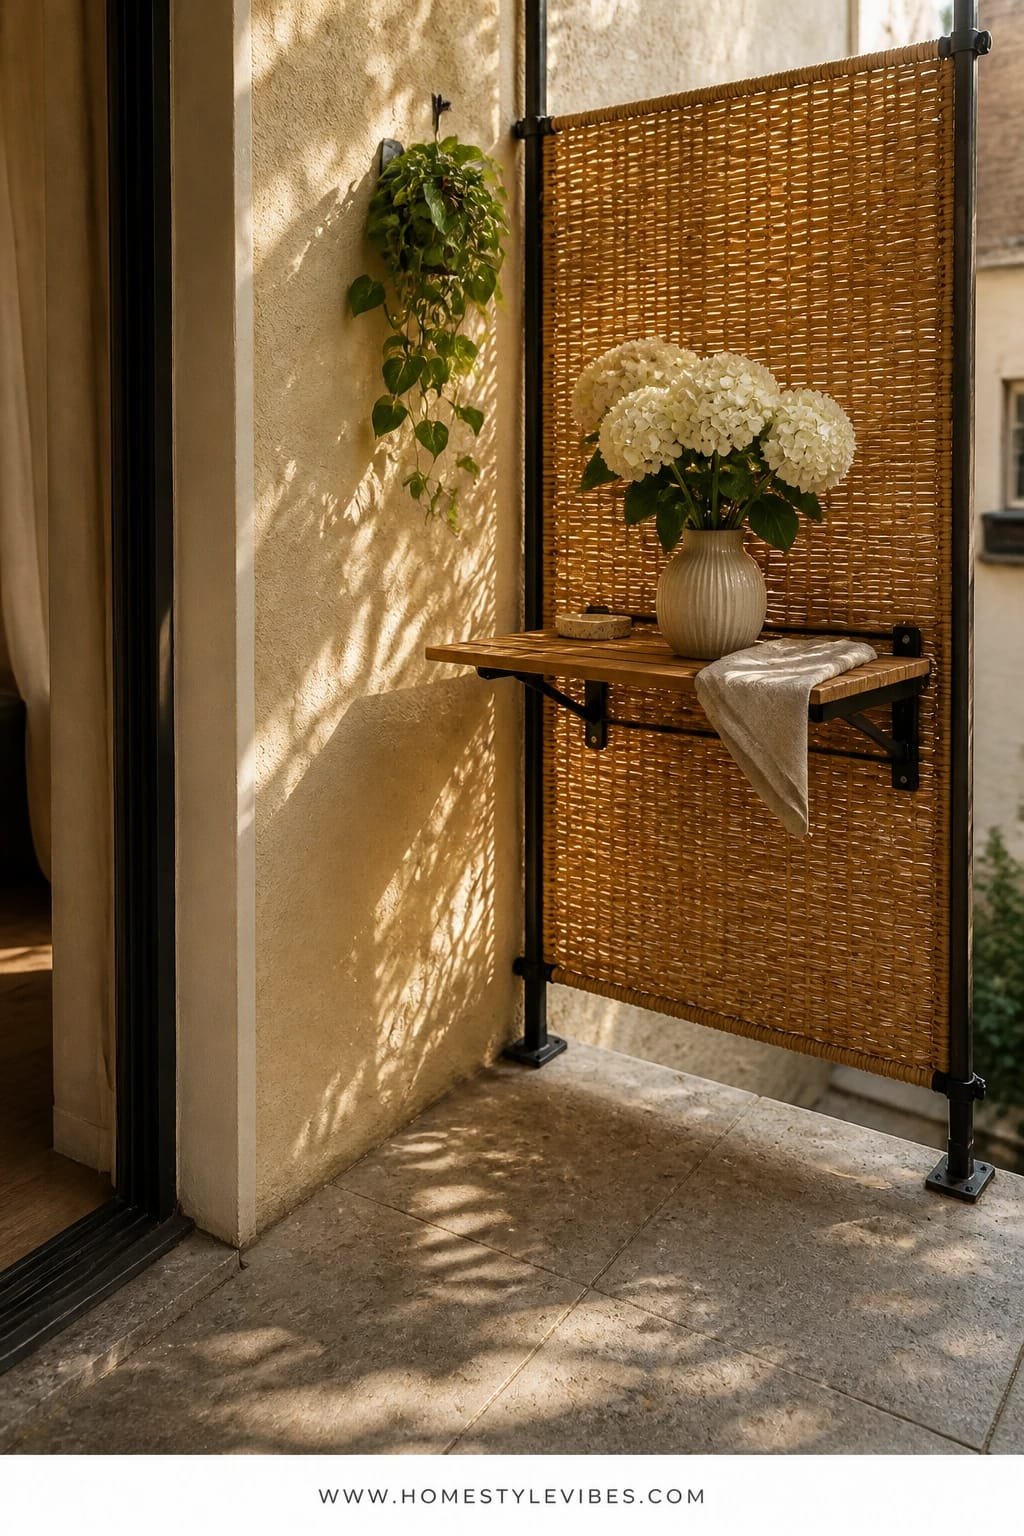
It’s that one corner that always feels off: too sunny at noon, too bare at night, never quite inviting. You hang a plant; it still looks spare. The fix is a rattan weave screen that throws a soft, dappled shade pattern, paired with a wall-mounted folding bistro table that tucks away like a secret. Suddenly, lunch al fresco doesn’t require playing furniture Tetris.
Cozy European courtyard energy, but easy to maintain and renter-friendly with no-drill options. The woven texture reads warm in photos and adds instant depth even when the table is folded. Light filters through the rattan during the day to create moving shadows; at night, a string of micro fairy-lights tucked along the top edge gives a delicate halo. This works in real homes because everything collapses—so you can practice yoga at 7 and host dinner for two at 8.
Switch-ups: Budget version uses synthetic rattan screening on zip ties. Darker palette? Go espresso weave with rust linen seat pads. For super-tiny balconies, choose a 20-inch wide half-moon table that clips to the railing. Renter-friendly? Removable adhesive hooks and railing clamps avoid drilling into walls.
Key Design Elements:
- Main materials: Rattan or synthetic weave, powder-coated steel, outdoor cotton-linen
- Color palette: Toasted caramel, terracotta, sage, soft black
- Lighting strategy: Edge-lit fairy lights and one clamp-on lantern
- Furniture silhouettes: Slim bistro chairs, half-moon folding table
- Texture layers: Woven screen, linen cushions, terracotta saucers
- Accent details: Clipped herb pots, small striped tablecloth for dinner nights
Budget Breakdown:
- Rattan or synthetic privacy screen: $60–$220
- Wall- or railing-mounted folding bistro table: $70–$180
- Two slim bistro chairs: $90–$250
- Fairy lights (outdoor-rated): $20–$40
- Herb rail planters (set of 2): $30–$80
- Seat pads + small runner: $40–$120
Total Estimated Cost: $310 – $890
Best For: Micro balconies, renters, and anyone who loves to eat outside but needs easy storage and shade.
How To Recreate This Look:
- Start by attaching the rattan screen to your railing or wall with zip ties or clamps.
- Add the folding table centered to the widest section for balance.
- Layer two slim bistro chairs and seat pads in a warm neutral tone.
- Install fairy lights along the top of the rattan, hiding the wire in the weave.
- Style with two clip-on herb pots and a small striped cloth you only bring out for meals.
Why This Feels Designer: The disappearing table and repeating weave deliver a purposeful rhythm. When folded, the negative space reads intentional, not empty. Also, the edges glow while the center stays calm—very editorial.
One Thing To Avoid: Avoid busy patterns on both the seat pads and tablecloth. Choose only one; competing patterns fight the rattan texture and can look messy in photos.
Pro Styling Tip: Offset the table slightly from center and place one chair on a diagonal—those angles make a tiny terrace look dynamic in a shot.
Pause. Breathe. If one idea is clicking more than the others, that’s your starting line. You don’t need all six—just the one that solves your biggest daily annoyance.
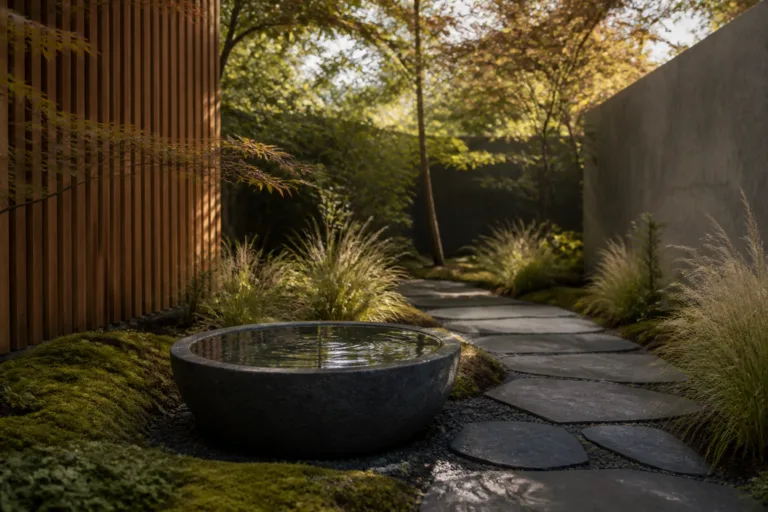
3. Textured Concrete Planters With Golden Hour Uplighting and a Compact Corner Lounge Chair
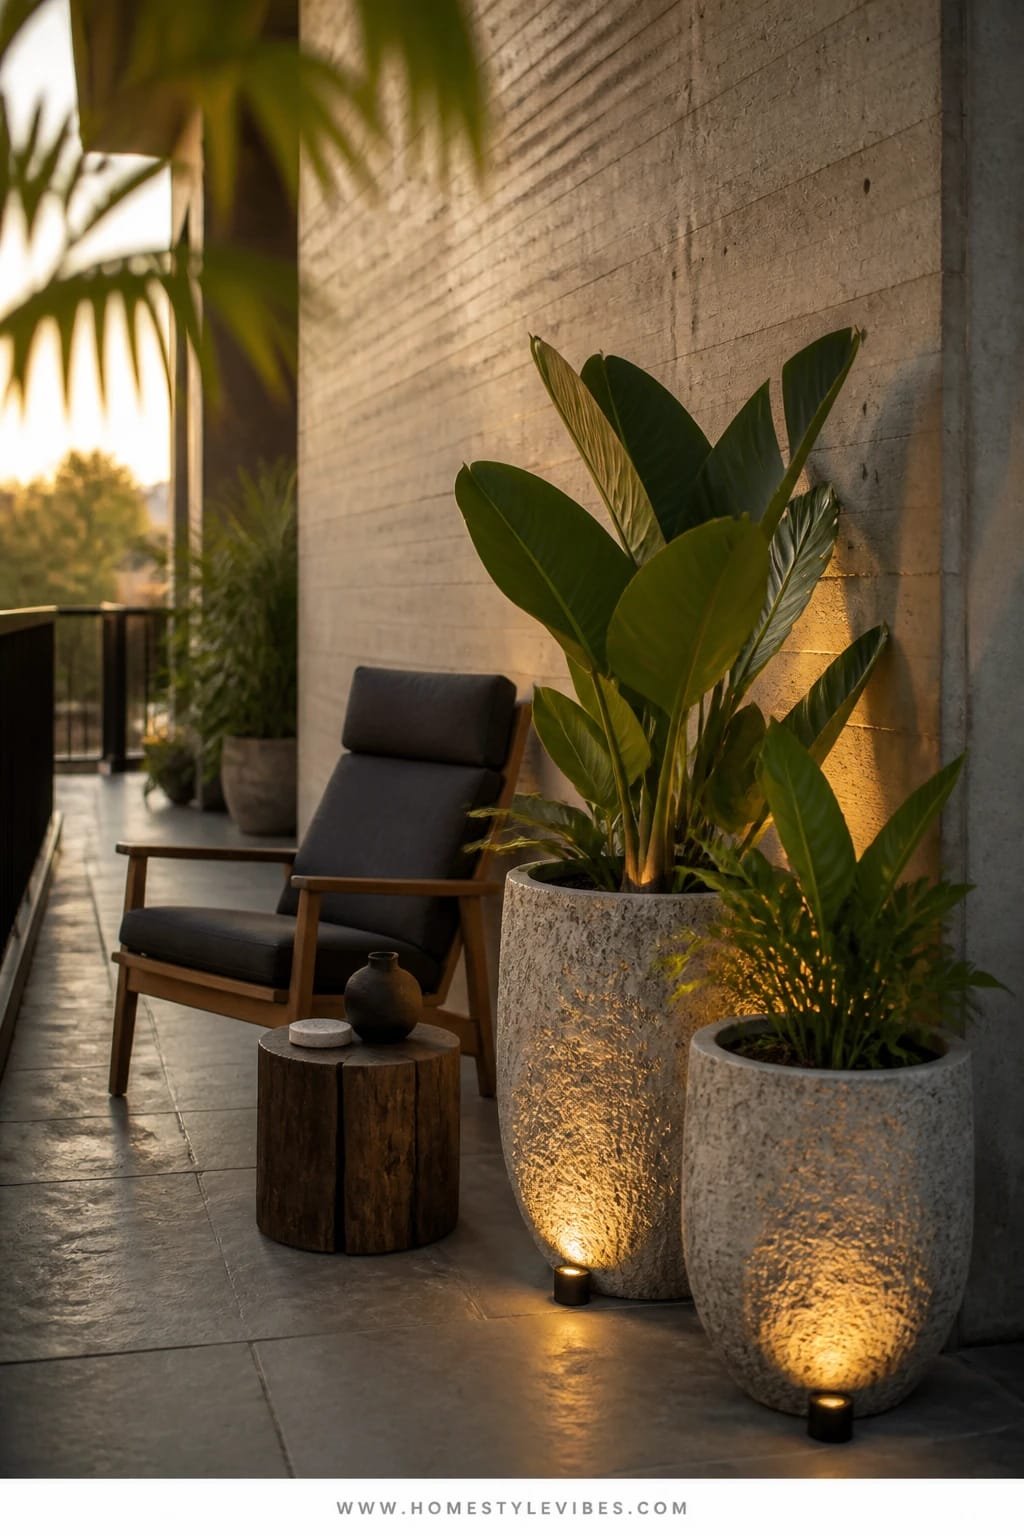
You want that “glass of wine after work” corner, but your balcony feels like a hallway. You’ve tried scattering small plants, and they all look lost. Instead, cluster oversized textured concrete planters, spotlight them with low uplights for drama at dusk, and add one compact lounge chair with a high back. It turns a pass-through into a destination.
This setup reads modern, sculptural, and calm. It works in real homes because scale beats clutter—two or three large planters look tidy and expensive, while a single substantial lounge chair says “stay.” Uplighting pushes light up the foliage, which doubles your visual height and creates that luxe shadow play on walls. If your terrace is shaded, the planters still deliver weight and texture that photograph beautifully in soft light.
Budget take: use fiberstone or fiberglass planters that mimic concrete without the weight. Darker mood: charcoal planters, deep green foliage, and a black powder-coated chair frame. Renter-friendly? Use battery puck uplights with adhesive bases and go for easy-drain planters to avoid any water drama.
Budget Breakdown:
- Two large concrete or fiberstone planters: $180–$500
- Compact lounge chair (outdoor-rated): $180–$600
- Battery or solar uplights (2–3): $40–$150
- Potting mix + plants (tall grass + trailing vine): $60–$180
- Outdoor throw + lumbar pillow: $40–$120
Total Estimated Cost: $500 – $1,550
Best For: Small terraces that feel like corridors and need a focal point. Ideal for evening unwinders and anyone who wants a “one good chair” moment.
Key Design Elements:
- Main materials: Concrete/fiberstone, powder-coated metal, performance fabric
- Color palette: Cement gray, charcoal, olive, cream
- Lighting strategy: Ground-level uplights aimed at planters and backdrop wall
- Furniture silhouettes: High-back compact lounge with low arms
- Texture layers: Poured look planters, nubby throw, matte metal
- Accent details: Simple side drum table, one sculptural branch
How To Recreate This Look:
- Start with two large planters, one tall grass and one with a structured plant (like a dwarf olive or ficus, if your climate allows).
- Add a compact lounge chair toward the corner, angled into the plants.
- Layer a nubby throw and one lumbar pillow for comfort and contrast.
- Install uplights behind or in front of the planters for wall shadows.
- Style with a small side table for your drink and book—keep it uncluttered.
Why This Reads High-End: Fewer, larger elements suggest intention and budget. Uplighting transforms greenery into architecture, and concrete texture reads editorial under mixed light.
The Most Common Mistake: Choosing planters that are too small. Go big—your balcony won’t shrink, it will actually feel more grounded.
Pro Styling Tip: For photos, water the plants lightly right before—the leaves catch specular highlights that make them look lush.
4. Fluted Wood Panels With Soft Amber Strip Lighting and a Slim Bar Ledge
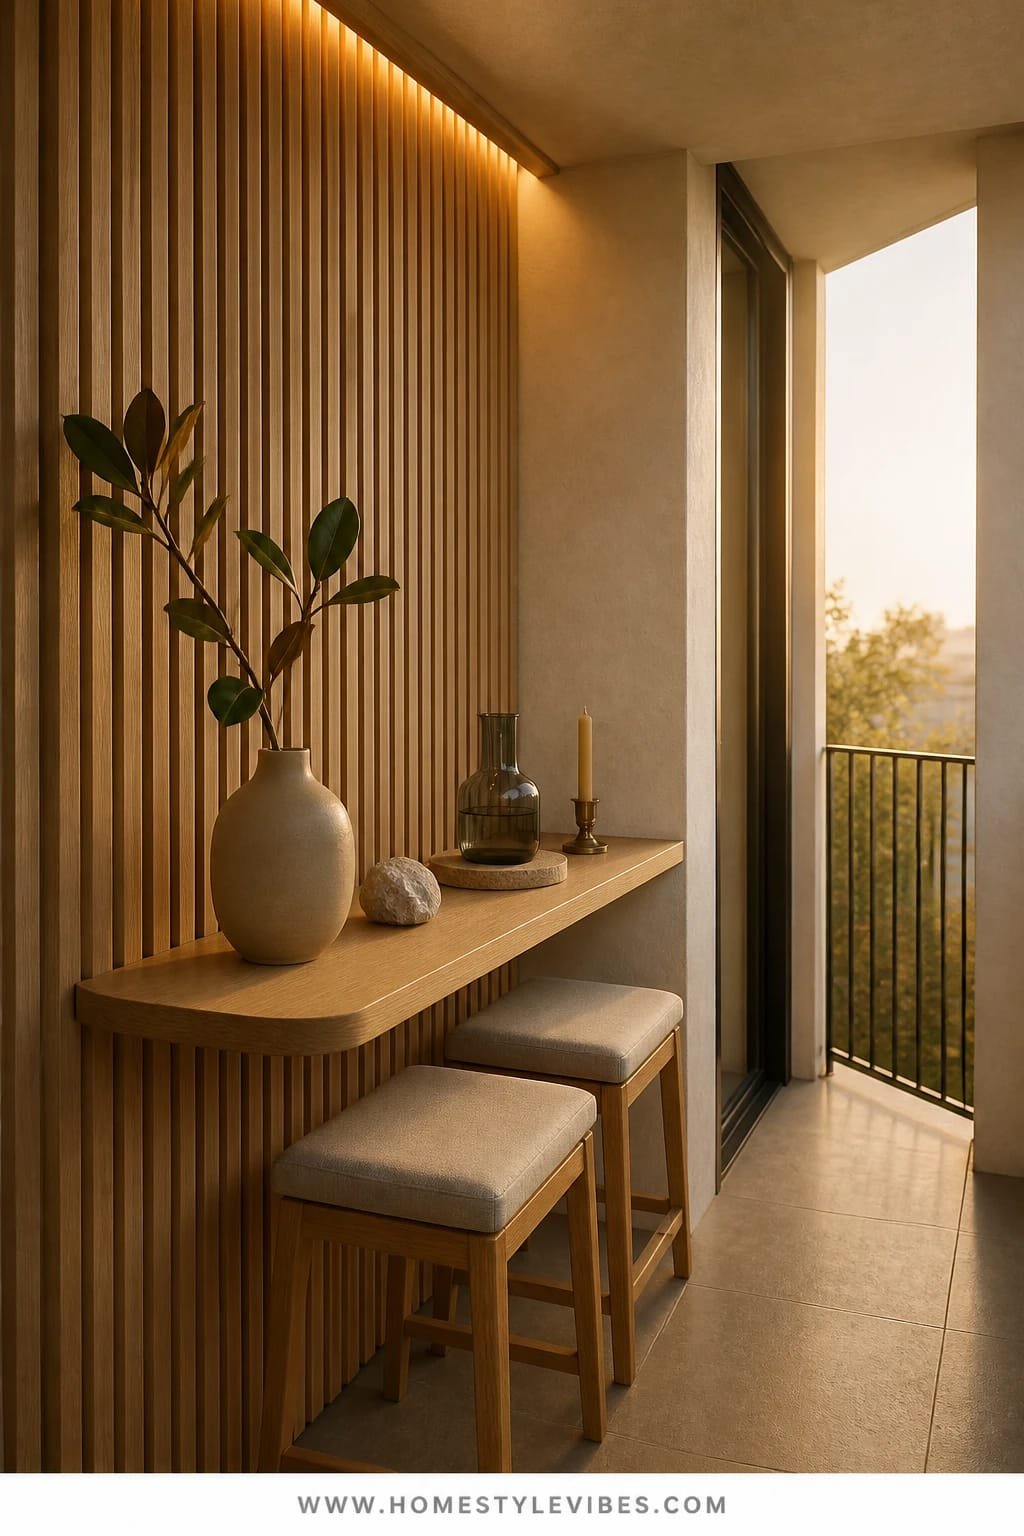
You want a place to linger with a friend and a glass of something chilled, but two chairs and a table just won’t fit. A wall-mounted bar ledge solves it—especially paired with vertical fluted wood panels and a hidden amber LED strip that washes the texture. The combination feels intimate, urban, and head-turning on camera.
I tried a version of this on a client’s 40-inch-deep balcony last fall and honestly couldn’t believe the difference. The vertical flutes instantly stretched the height, the bar gave function without bulk, and the under-ledge glow made the whole thing feel like a boutique wine bar. It works because everything floats: no floor clutter, just clean lines and a couple of stools.
Want durability? Use thermally modified wood or composite fluted panels. On a budget, go for vertical slats spaced evenly over a painted exterior-grade backing. For a darker, moodier palette, stain the flutes walnut and choose cognac leather stools. Renter route: mount a freestanding bar ledge unit that braces at floor and ceiling with tension—no drilling.
Key Design Elements:
- Main materials: Fluted wood slats, exterior-grade LED strip, powder-coated stools
- Color palette: Warm oak, amber light, matte black accents
- Lighting strategy: Concealed LED grazing down flutes + one candle lantern
- Furniture silhouettes: Slimline backless stools that tuck under
- Texture layers: Ribbed wood, matte metal, smooth stone coasters
- Accent details: Small wall planter, two stemmed glasses, low-profile bottle tray
Budget Breakdown:
- Fluted panels or DIY slats + weather finish: $160–$600
- LED strip (IP65) + dimmer + channel: $80–$220
- Wall-mounted or tension bar ledge: $120–$300
- Two slim stools: $140–$360
- Small wall planter + greenery: $30–$90
Total Estimated Cost: $530 – $1,570
Best For: Ultra-narrow balconies where seated dining won’t fit but sipping and snacking will. Perfect for city apartments and condo terraces.
How To Recreate This Look:
- Start by planning your panel height; leave a small top reveal for LED glow to graze the ribs.
- Add fluted panels centered on the view from inside; seal for weather.
- Layer a bar ledge at standing elbow height (around 42 inches) to keep sightlines open.
- Install dimmable amber LED under the top reveal or ledge lip; hide the driver inside.
- Style with two backless stools and a small planter to soften the line.
Why This Looks Intentional: Vertical rhythm plus concealed light feels architectural. The bar ledge gives function without “furniture sprawl,” and the glow catches the flutes for instant drama.
Don’t Do This: Don’t run the LED in a bright, cool white. It flattens wood grain and reads clinical. Also, avoid overly wide stools that stick out into the walkway.
Pro Styling Tip: For evening shots, dim the strip to 40%—you’ll get better shadow definition on the flutes and more mood in-camera.
Remember, this isn’t about recreating a showroom. It’s about building a small terrace or balcony that frees up your routine and makes weekday evenings feel like… something.
5. Matte Black Rail With Cool Moonlight String Lights and a Modular Storage Coffee Table
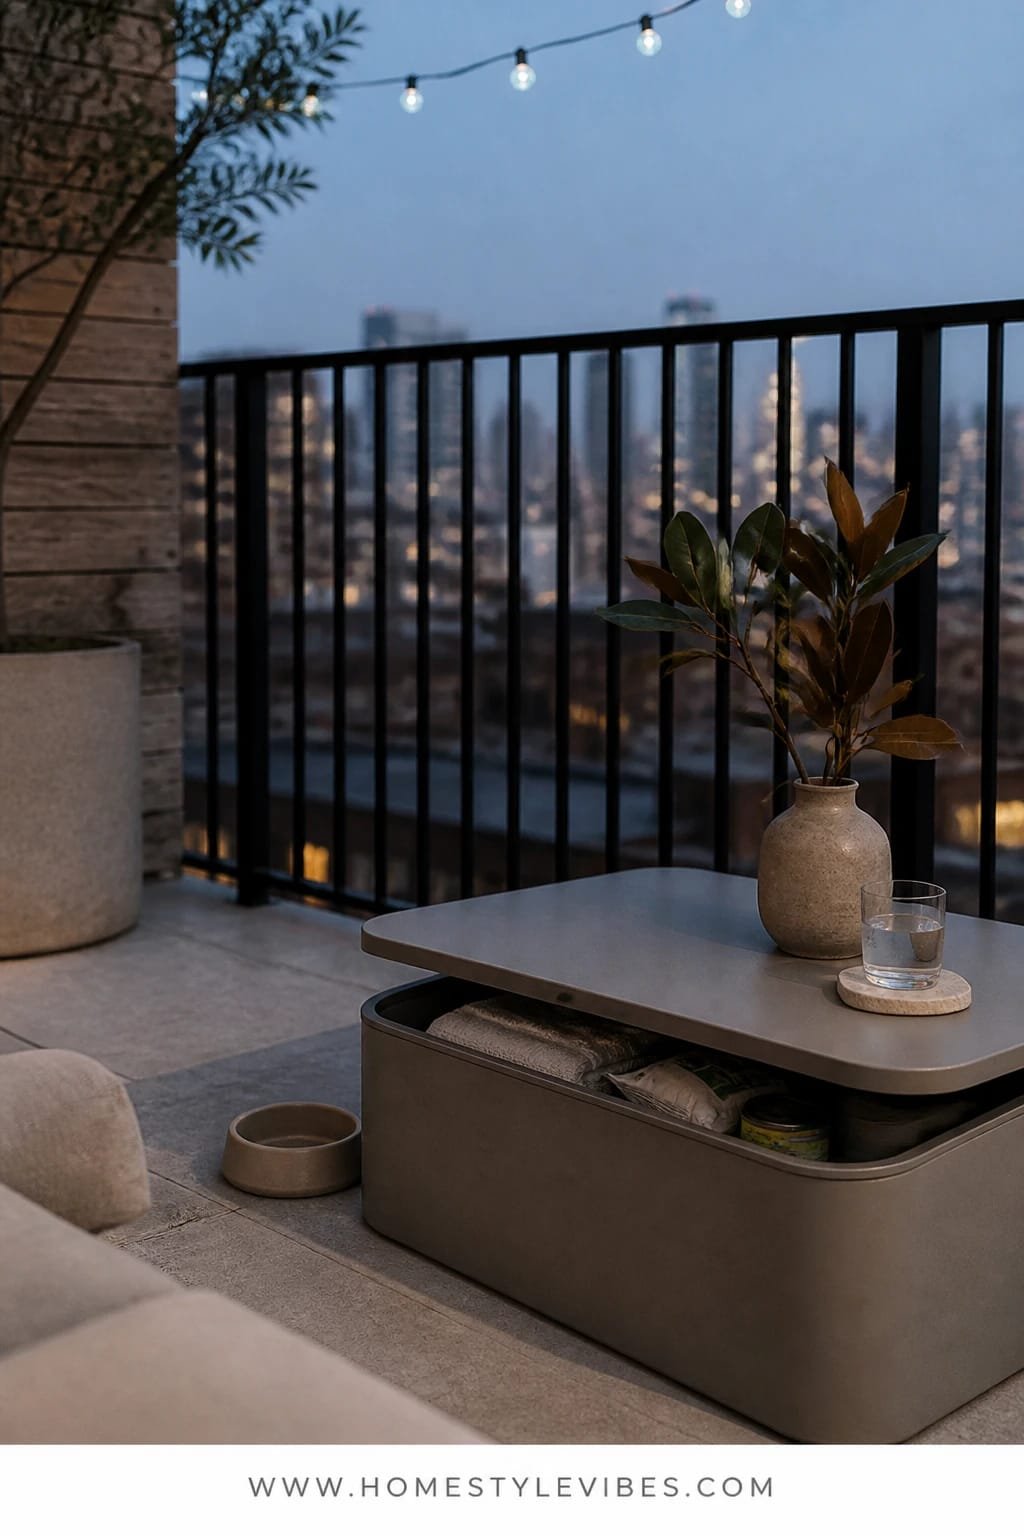
You’ve got stuff: potting soil, citronella, that extra throw, the dog’s water bowl. And it’s constantly underfoot. Here’s the move—compress storage into a single modular coffee table with a hinged top, paint or wrap the rail in matte black for crisp contrast, and hang cool-toned “moonlight” string lights high for an evening sparkle that feels chic, not kitschy. Your balcony goes from messy catchall to minimalist lounge.
Think Japandi-meets-urban. The high-contrast black rail visually frames the view, the storage table swallows the clutter, and the cool light adds that twilight clarity that reads incredible in photos against dark metal. It works in real homes because everything has a place—and the table doubles as a footrest or extra seat. Maintenance stays low: wipe the rail, stash the bits, done.
Variations: Budget-friendly table? Repurpose an outdoor deck box with a cushion on top. Warmer vibe? Use soft-white strings and swap the black rail for deep bronze. Renter-friendly: Use magnet-backed or clip-on string light hooks and a peel-and-stick matte black vinyl wrap on the rail instead of paint.
Budget Breakdown:
- Matte black exterior paint or vinyl wrap: $30–$120
- String lights (cool white, outdoor-rated) + clips: $35–$100
- Modular storage coffee table: $150–$500
- Outdoor rug (neutral): $70–$220
- Two floor cushions or low poufs: $80–$240
- Planter with upright herb or rosemary: $30–$80
Total Estimated Cost: $365 – $1,260
Best For: Small terraces with clutter creep and low seating needs. Ideal for renters or pet owners who need quick-stash options.
How To Recreate This Look:
- Start by cleaning and refinishing the rail in matte black or applying a vinyl wrap.
- Add moonlight string lights overhead in a gentle swag; keep lines neat and symmetrical.
- Layer the modular storage coffee table centered on an outdoor rug for softness.
- Install two floor cushions or poufs for flexible seating that tucks under.
- Style with one tall herb planter for scent and a tray on the table for remote/bug spray.
Why This Feels Designer: Black framing creates a gallery effect for the outdoors. The concealed storage keeps surfaces clean, so every photo reads calm and purposeful.
One Thing To Avoid: Avoid mixing two different light temperatures (cool string lights with warm lanterns). Pick a lane or it will look accidental and clashy.
Pro Styling Tip: Wipe the rail right before shooting—matte finishes show dust. Add one reflective surface, like a low glass or metallic tray, to catch twinkle light.
Small confession: I once obsessed over the perfect outdoor cushion color for weeks, only to realize the real problem was my rail—glossy beige that reflected every light awkwardly. A quick matte black coat fixed the vibe instantly. Sometimes the “big change” is the frame, not the furniture.
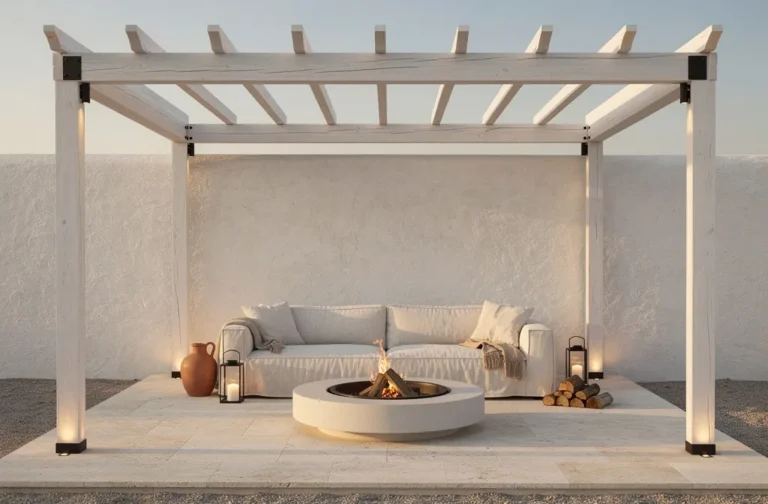
6. Limewash Wall With Soft Dawn Light and a Curved Loveseat With Integrated Planters
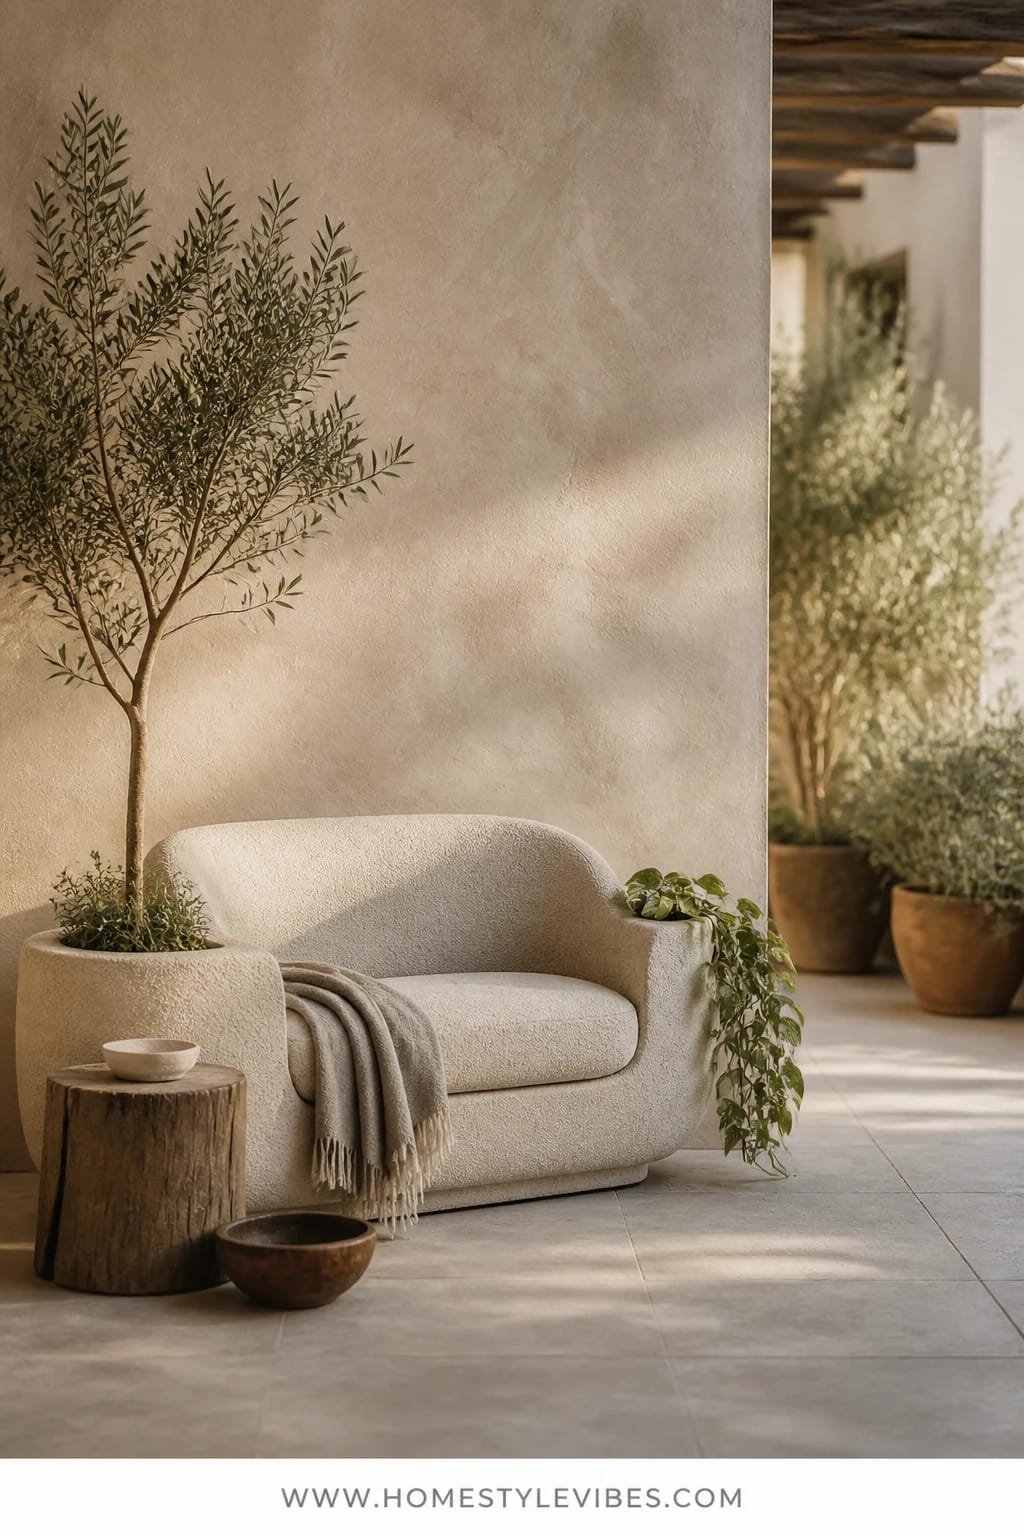
You want romance. Not frills—romance as in “we might order dessert, too.” But small terraces can feel boxy and transactional. Enter a limewashed feature wall that catches soft dawn light in velvety swirls, and a curved two-seater loveseat with planters built into its ends. It’s sculptural, plush, and shockingly space-savvy.
This reads Mediterranean calm with a hint of boutique hotel. Limewash gives movement and softness that paint can’t match; it drinks light and returns it with a powdery glow. The curved loveseat breaks the balcony’s straight lines, opening up conversation angles while the integrated planters keep greenery tight to the form—no extra stands needed. Photos love it because there’s depth in the wall, curve in the seat, and a natural vignette formed by the planters.
Budget or renter-friendly swaps: Use a removable peel-and-stick limewash-look mural if you can’t paint. If integrated planters aren’t available, flank a small curved loveseat with two rounded pots tucked close to mimic the silhouette. Darker version: taupe or clay limewash with olive upholstery for moodier mornings.
Budget Breakdown:
- Limewash kit or faux-finish paint: $90–$220
- Curved two-seater outdoor loveseat: $300–$1,000
- Two planters (if not integrated) + plants: $120–$300
- Outdoor cushion set in performance fabric: $120–$280
- Small arched outdoor mirror for depth (optional): $60–$180
Total Estimated Cost: $690 – $1,980
Best For: Small terraces or balconies that can fit one sculptural piece. Perfect for couples, weekend brunchers, and anyone who loves cozy conversation corners.
Key Design Elements:
- Main materials: Limewash finish, curved aluminum or teak frame, performance boucle or canvas
- Color palette: Chalky cream, soft clay, olive leaves, brass accents
- Lighting strategy: Gentle morning light, one low lantern for nights
- Furniture silhouettes: Curved loveseat with round arms/planters
- Texture layers: Powdery wall, nubby cushions, leafy softness
- Accent details: Tiny arched mirror to bounce light, round jute mat
How To Recreate This Look:
- Start by limewashing the main wall; work in irregular strokes for organic texture.
- Add a curved loveseat centered on that wall, leaving at least 18 inches to the rail.
- Layer two seat cushions and one lumbar in a lighter tone than the wall.
- Install one low lantern or candle holder for evenings; keep light gentle.
- Style with two round planters hugging the loveseat’s ends for a built-in feel.
Why This Looks Expensive: Curves signal custom. Limewash adds depth and nuance that flat paint can’t. Together they create a soft, editorial backdrop that feels crafted.
Watch Out: Don’t overfill planters with tall, busy plants that compete with the loveseat. Choose compact, rounded varieties to echo the curve.
Pro Styling Tip: Shoot early morning or golden hour—limewash glows best with angled light, not noon glare.
If you’ve read this far, take a breath. You’re not designing a stage set; you’re carving out a little pocket of outdoors that makes your life smoother. Start with the idea that solves your main pain point—storage, shade, flow, or mood—and build out from there.
Quick Checklist
- Choose one dominant material: wood, rattan, concrete, or limewash
- Define a single light temperature: warm candlelight or cool moonlight
- Commit to one statement piece: bench, lounge chair, bar ledge, or curved loveseat
- Plan a clear path from door to rail (minimum 20 inches)
- Use 2–3 large planters instead of many small ones
- Anchor with a slim rug or slat flooring for visual cohesion
- Repeat one color tone across cushions and accents
- Hide cords and drivers; conceal lighting whenever possible
- Keep decor low and edges soft for better photos
- Seal or weather-proof all wood and fabrics
Frequently Asked Questions
How much should I budget to redo a small balcony without overspending?
Pick one concept and cap it at $600–$1,200. Prioritize flooring or one big seating piece, then add lighting and 1–2 planters. Those three categories do the most visual work.
I rent—how do I do this without drilling or painting?
Use click-together floor tiles, clip-on or tension-mounted ledges, adhesive hooks for lights, and vinyl rail wraps. For walls, go with removable limewash-look murals or freestanding privacy screens.
My balcony is tiny—like, 3 feet deep. What will actually fit?
A narrow bench (16-inch depth), a wall-mounted folding table, or a bar ledge with backless stools. Keep circulation clear and scale planters large but few—tall and slim beats short and wide.
How do I keep everything looking clean outside?
Choose performance fabrics with removable covers, fiberstone or composite planters, and matte finishes that hide fingerprints. Store small items inside a lidded table or bench. Schedule a five-minute wipe-down once a week.
What’s the most common small terrace mistake I should avoid?
Mixing too many materials and light temperatures. Keep to one dominant texture and a single warm or cool lighting plan. Also, avoid filling the center with furniture—hug the perimeter.
Final Thoughts
Pick the idea that solves your biggest friction first. If clutter makes you dread stepping outside, choose the storage table. If your space feels tight, try the slim bench with lantern glow. When in doubt, remember the formula: texture + lighting + restraint. Those three do the heavy lifting, and they photograph like a dream.
The truth is, a small terrace or balcony doesn’t need more stuff—it needs better structure. One hero material, one clear path, one moment of light. Start this weekend, set your budget, and build that first corner. You’ll know you nailed it when your morning coffee lasts five minutes longer than it used to—no grand reveal needed, just a quiet feeling that your little outdoor room finally works. You’ve got this, and it’s going to look beautiful—seriously.