6 Rooftop Bar And Lounge Ideas For The Ultimate Outdoor Entertainment Space
You want a rooftop bar and lounge that feels like a boutique hotel after golden hour—moody, layered, and magnetic. But the wind, the neighbors, the lack of a plan, and that awkward drain pipe keep turning date-night vibes into camping-chair chaos. Picture soft uplighting on textured walls, cushioned seating that actually invites lingering, and a bar setup that works as hard as it wows. These six rooftop bar and lounge ideas will fix the frustrating mix of “almost there” and “why doesn’t this feel finished?”—with clear steps, a realistic budget range, and a layout that photographs beautifully for your Pinterest board.
Expect specific textures, sun-smart materials, and lighting that makes your space glow instead of glare. Give yourself one weekend per idea and a budget cap per concept so you can stop doom-scrolling and start clinking glasses. If you love layered neutrals, coastal calm, or a sultry city mood, there’s a vibe here designed for you—and your actual life, not a showroom fantasy.
1. Charred Cedar Cladding, Amber Glow Lighting, and a Curved Concrete Bar
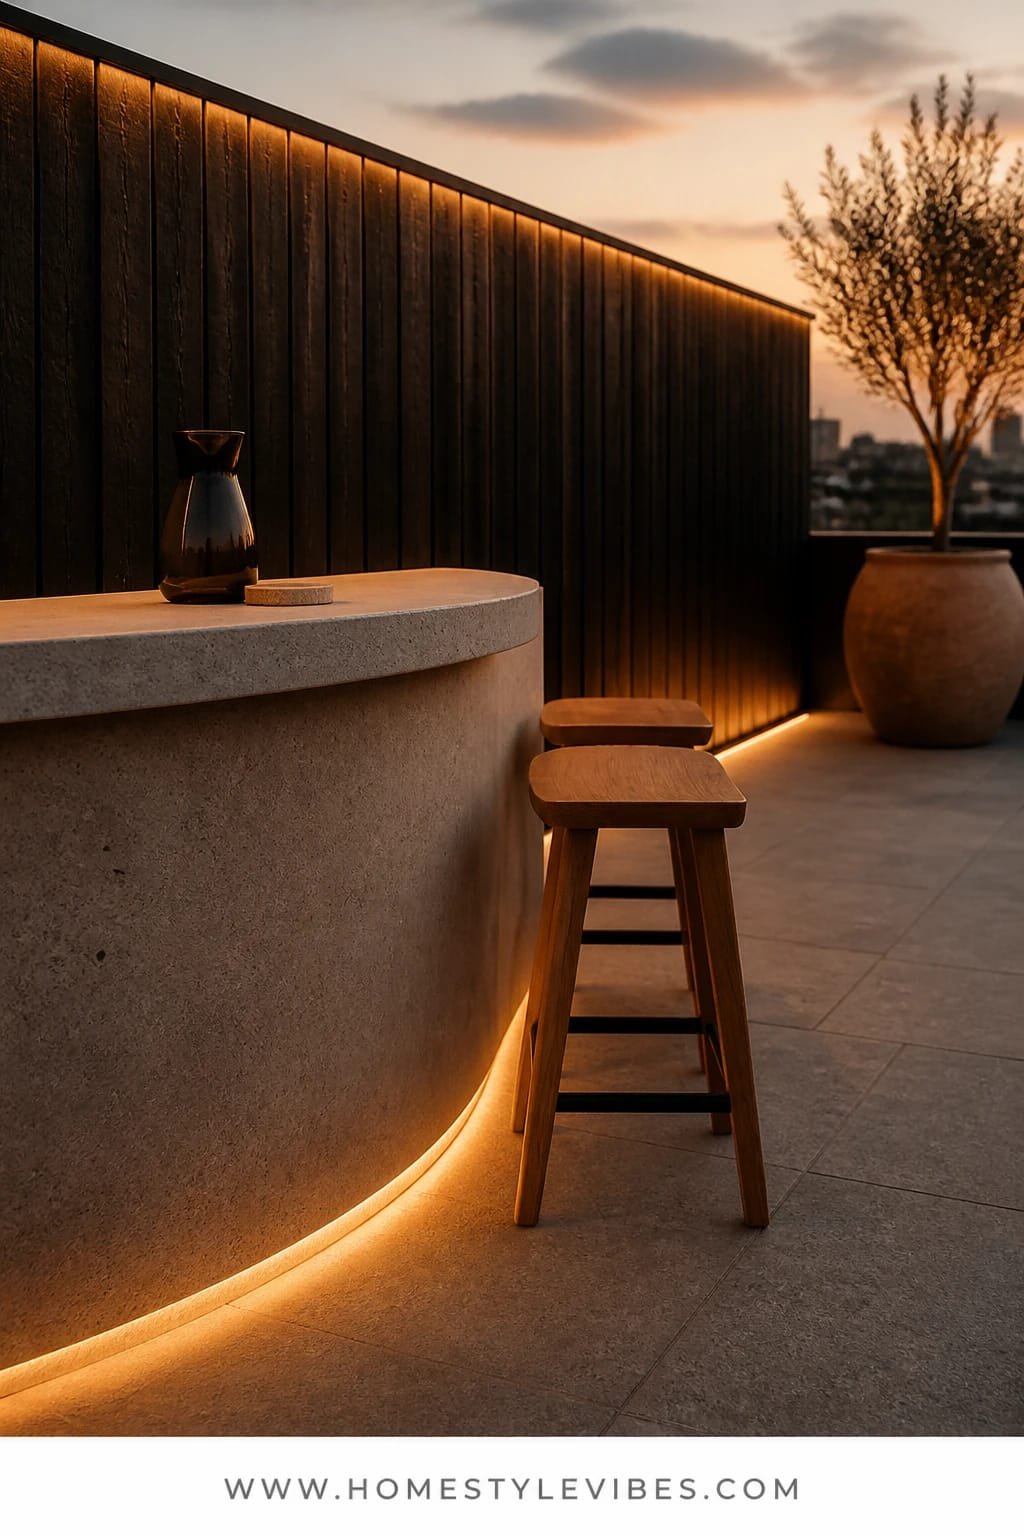
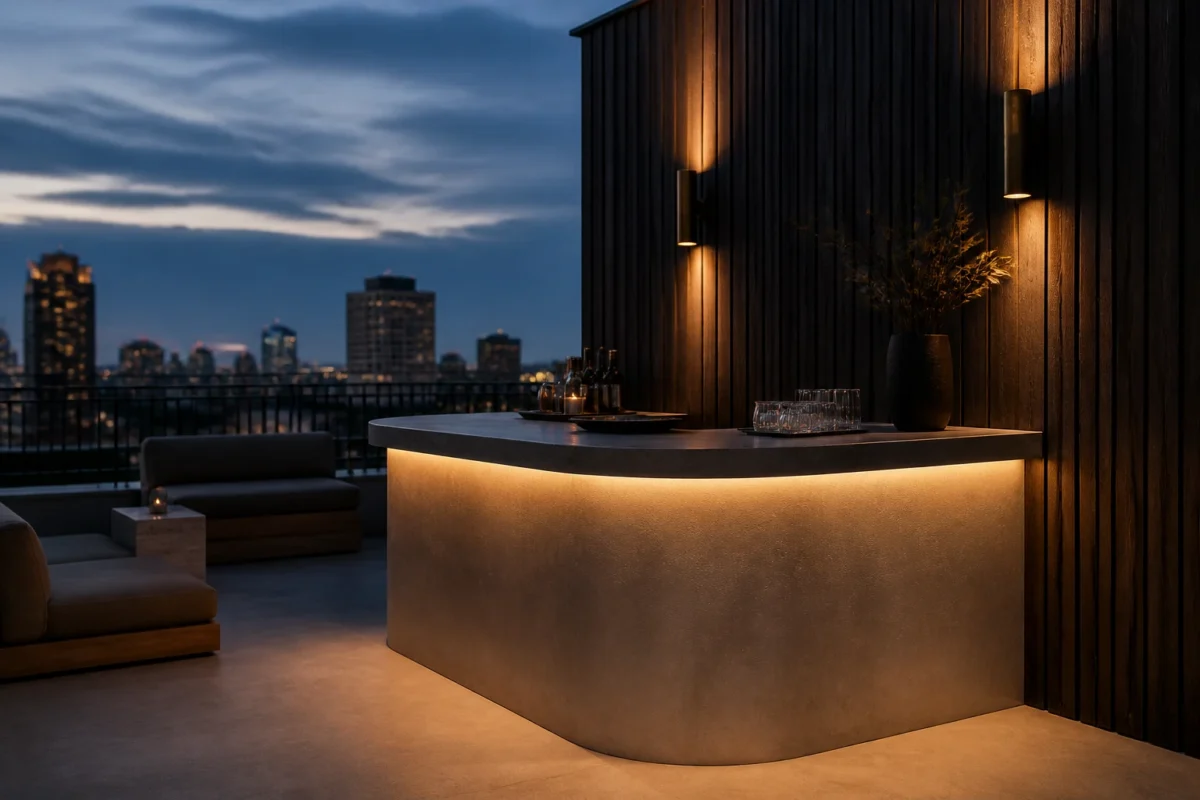
We’ve all been there: you add a bar cart, a couple of stools, and somehow it still reads “temporary.” The cure is a power trio—material, light, and form—that does the heavy lifting. Charred cedar (Shou Sugi Ban) adds drama and resilience; a curved concrete bar softens lines and handles weather; and an amber glow from warm LEDs makes faces look incredible after sunset. The mood? Urban sanctuary with a touch of Japanese modern. It works in small or large rooftop decks because it hugs edges, hides utilities, and creates one statement moment that anchors everything.
Lighting matters hugely. Amber LEDs tucked under the bar lip and behind cedar slats create depth and sculpt shadows, which is why this photographs like a magazine spread. The cedar’s texture adds visual noise reduction—no harsh reflections, just soft gradations. Maintenance stays reasonable since charred cedar resists the elements and concrete shrugs off spills. Got a smaller rooftop? Shrink the radius of the bar and opt for a micro bar sink with a single under-counter fridge. Renter-friendly? Install cedar on a freestanding screen wall and use a precast concrete-look bar top over a modular base.
Variations: Budget-friendly version swaps real Shou Sugi Ban for charred-look stain on pine and uses a pre-made curved counter module. Darker version leans into blackened steel foot rails and smoked glass accessories. Family-friendly tweak: upholster stools with outdoor performance fabric in a tawny camel so they hide marinade mishaps.
Budget Breakdown:
- Charred cedar cladding: $12–$22/sq ft
- Curved concrete bar (precast or poured): $1,800–$4,500
- Warm LED strip lighting + driver: $150–$400
- Bar sink + faucet: $250–$700
- Under-counter fridge: $600–$1,200
- Outdoor bar stools (set of 3–4): $450–$1,200
Total Estimated Cost: $3,500 – $8,000
Best For: City rooftops that need one bold focal point; couples who host late-night hangs; fall and shoulder seasons where warm light and heat retention shine.
Key Design Elements:
- Main materials: Charred cedar, cast concrete, blackened steel accents
- Color palette: Charcoal, warm taupe, amber, soft black
- Lighting strategy: Hidden warm LED strips, under-bar glow, backlit slats
- Furniture silhouettes: Curved bar front, low-backed stools, slimline cabinetry
- Texture layers: Charred wood grain, smooth concrete, matte metal
- Accent details: Foot rail, smoked glassware, evergreen potted grasses
How To Recreate This Look:
- Start with a cedar slat wall on one side to hide utilities and anchor the bar.
- Add a curved concrete bar front with a durable stone or concrete top.
- Layer warm LED strips beneath the bar lip and behind cedar panels.
- Install an under-counter fridge and a small sink; keep fronts matte black.
- Style with camel-toned stools, smoked glass candleholders, and tall grasses.
Why This Looks Expensive: The curved concrete reads custom, the charred cedar brings artisanal depth, and the restrained palette lets light and shadow do the talking. The eye reads “intention,” not “assortment.”
Watch Out: Don’t pick a cool white LED. It flattens skin tones and makes cedar look cheap. Also, ensure the bar toe-kick is set back enough so stools tuck cleanly—clutter kills the curve.
Pro Styling Tip: Shoot at blue hour: the warm LEDs against a moody sky create cinematic contrast and creamy highlights on the concrete radius.
Quick Tip: Add a dimmer. Outdoor spaces read flat at one brightness. A dimmer gives you dinner, date night, and “just one more” settings with a single dial.
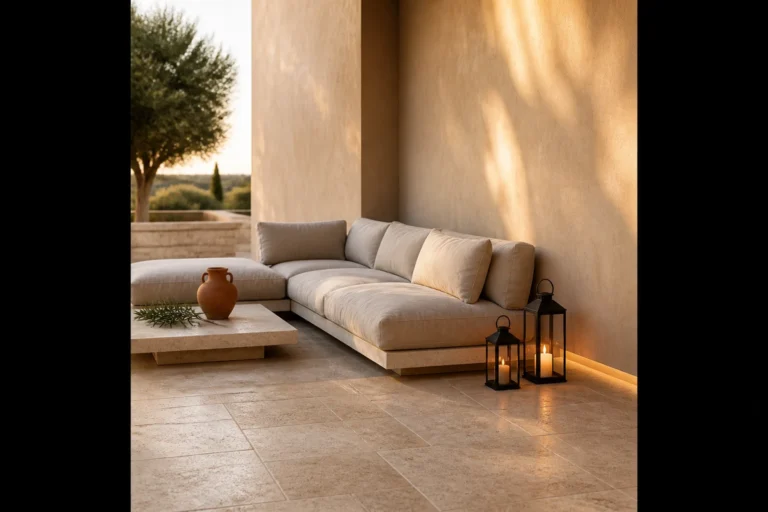
2. Honed Travertine Surfaces, Diffused Candlelight, and a Built-in Daybed with Bolsters
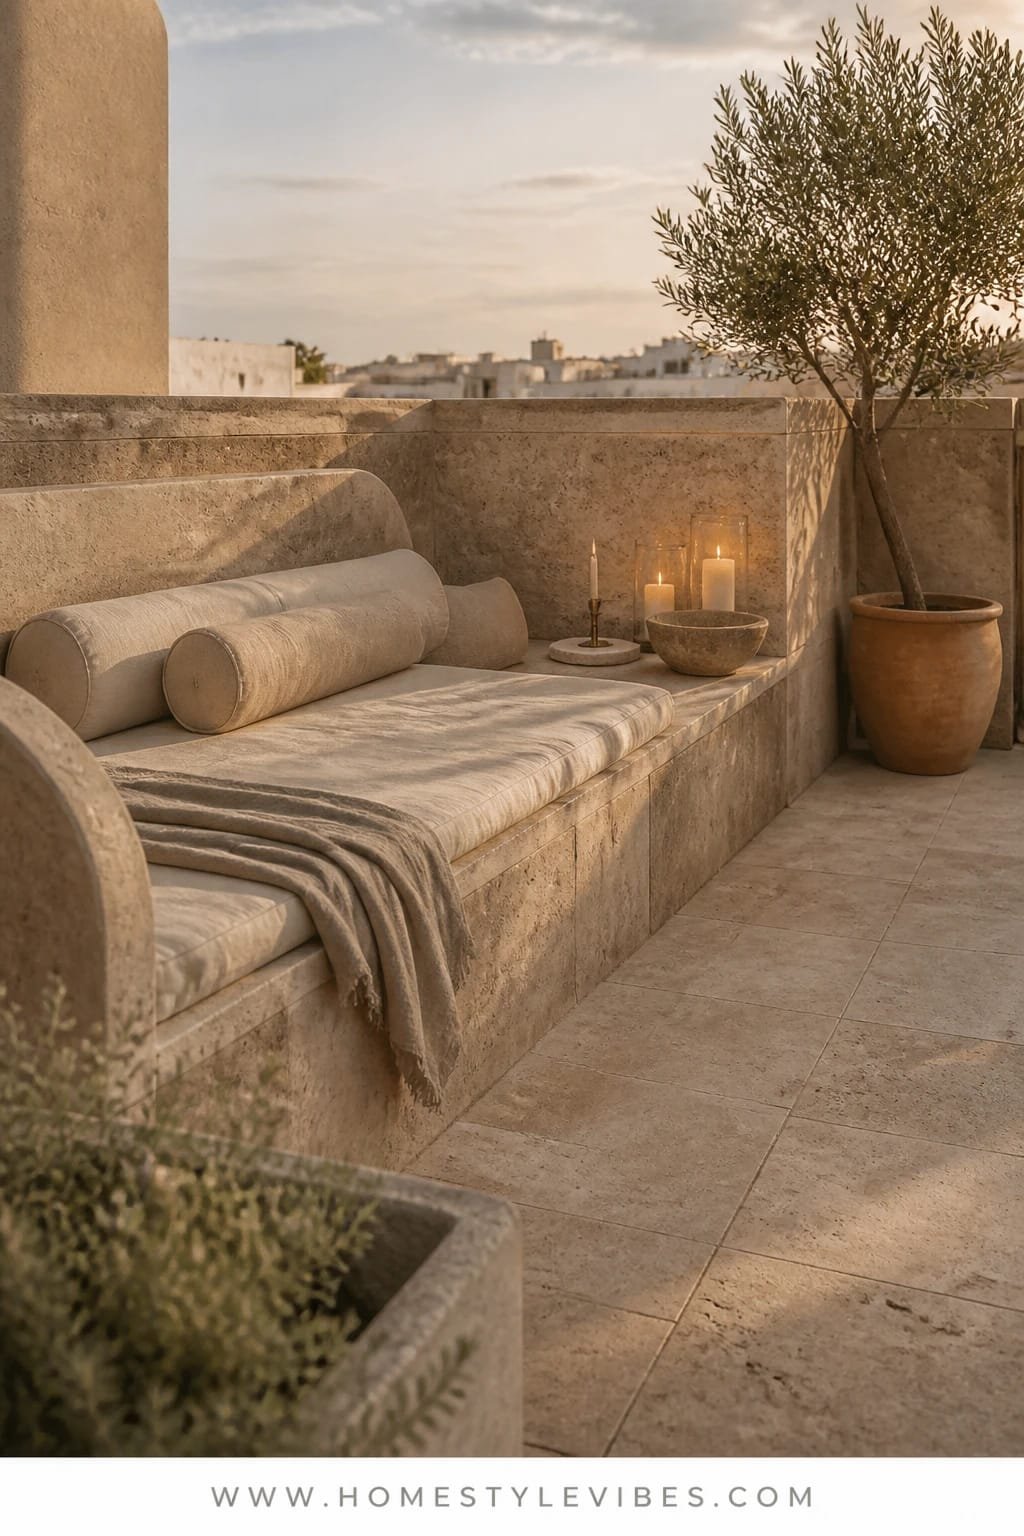
It’s that one corner that always feels off—an empty rectangle where no one sits. Enter a built-in daybed lined with bolsters and a honed travertine side ledge. The vibe is modern Mediterranean: sun-bleached neutrals, sand-washed stone, linen that pools a little. Why it works? Travertine’s soft movement plays beautifully with low, diffused candlelight, creating a lounge zone where guests naturally sprawl. Even better, a built-in daybed is space-smart and visually calming—especially on tight rooftops where every inch counts.
I tried something similar on a friend’s tiny terrace last fall. She fought me on the bolsters until the first movie night; then we had to pull people off the daybed like cats from a warm laptop. Photographs like a dream because honed stone kills glare and linen eats shadows; the contrast between stone and fabric brings editorial depth. Maintenance stays gentle: choose sealed travertine or a travertine-look porcelain if you want zero fuss, and pick performance linen for washable covers.
Variations: Budget swap to travertine-look porcelain tiles with mitered edges. Small-space version uses a loveseat-length bench with a single bolster. Renter-friendly option: a freestanding wood bench topped with a 6-inch foam cushion in linen and a travertine side table instead of stone ledge.
Budget Breakdown:
- Honed travertine slab or tile: $18–$45/sq ft
- Built-in bench frame + cushion: $600–$1,500
- Performance linen cushion covers: $150–$400
- Outdoor lanterns + candle set (LED or real): $80–$200
- Weatherproof bolsters (2–4): $100–$280
Total Estimated Cost: $1,600 – $4,000
Best For: Smaller rooftops needing a soft focal point; mellow hosts who love sunset naps and long chats; summer nights with a sea breeze mindset.
Key Design Elements:
- Main materials: Honed travertine, linen, light oak or painted bench frame
- Color palette: Bone, sand, oat, pale olive
- Lighting strategy: Lanterns with diffused candlelight, hidden step lights
- Furniture silhouettes: Low daybed, rounded bolsters, chunky stone ledge
- Texture layers: Matte stone, nubby linen, woven rattan tray
- Accent details: Olive tree in a terracotta pot, raw-edge throw, ceramic tumblers
How To Recreate This Look:
- Start with a low built-in bench along the railing for efficient seating.
- Add a honed travertine slab or tile cap as a side ledge for drinks.
- Layer a deep foam cushion in performance linen and add two long bolsters.
- Install soft step lights or small puck lights along the base.
- Style with lanterns, a terracotta planter, and a woven tray for height changes.
Why This Feels Designer: Consistent tones across stone, textiles, and candlelight create a cohesive story. Nothing shouts, everything whispers—and that calm reads luxe.
One Thing To Avoid: Shiny stone. Glossy surfaces glare under string lights and photograph harshly. Stick to honed or satin finishes to get that creamy, quiet look.
Pro Styling Tip: Pull the daybed 2 inches off the wall to create a tiny shadow line. It adds dimension on camera and avoids scuffed paint.
Remember, this isn’t about recreating a showroom. It’s about building a rooftop bar and lounge that supports how you live—quiet evenings, messy friends, or both. If one idea resonates more than the others, that’s your starting point.
3. Brushed Aluminum Framing, Cool Coastal Light, and a Slatted Pergola with Retractable Canopy
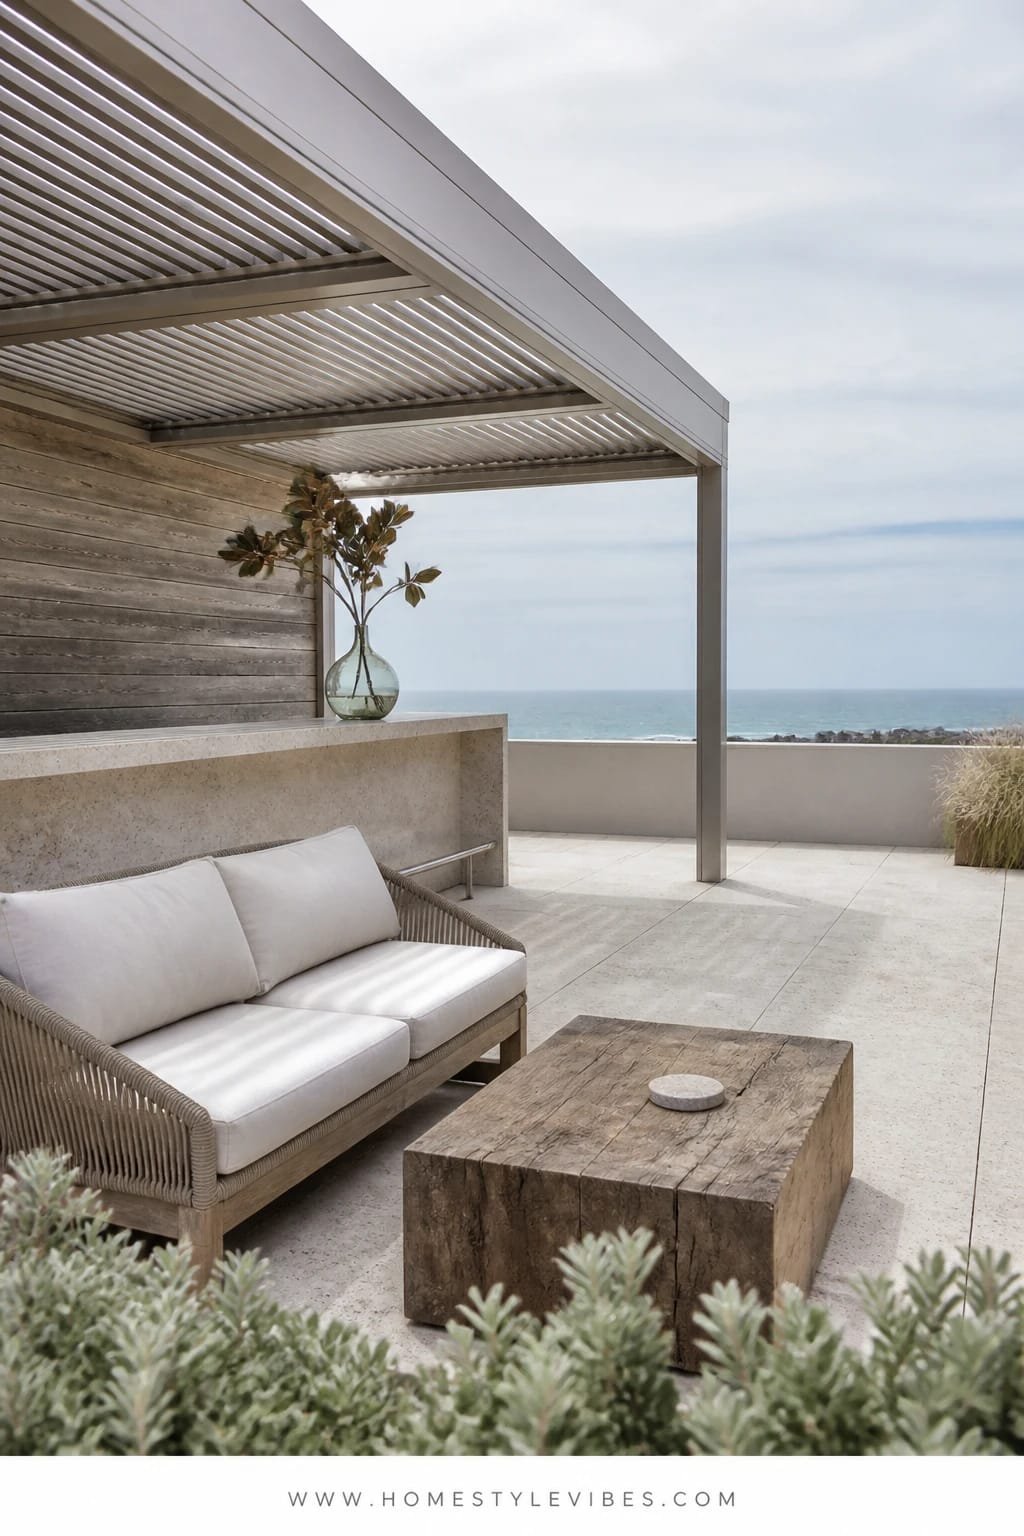
You’ve tried umbrellas, but it still looks patchy and screams “patio furniture aisle.” A slatted pergola with a retractable canopy solves glare, wind, and scale all at once. The brushed aluminum frame feels airy, modern, and sturdy, while cool coastal light filtering through slats keeps the rooftop calm at midday. The mood is contemporary coastal—clean lines, pale woods, and salt-air colors without kitsch.
Here’s why it works in real life: clear zones. The pergola defines your lounge versus bar area without adding walls that kill the view. Retract the canopy for stargazing; extend it when the sun fires at eye level. Photographically, the slats create rhythmic shadows on floors and cushions, giving you editorial stripes that scream summer magazine cover. Maintenance? Aluminum doesn’t rust, the canopy unhooks for cleaning, and built-in tracks mean fewer wobbly parts than DIY shade sails.
Variations: Budget-friendly swap to powder-coated steel. Small-space version uses a single-bay pergola over a bistro set. Renter-friendly hack: freestanding pergola kit with weighted planters as anchors (check building codes and wind ratings).
Budget Breakdown:
- Aluminum pergola frame (10×12): $2,500–$6,500
- Retractable canopy fabric: $300–$900
- Outdoor sectional or modular chairs: $1,000–$2,500
- Side tables in marine-grade materials: $200–$600
- Outdoor rug (UV-stable): $200–$500
Total Estimated Cost: $4,200 – $11,000
Best For: Sun-exposed rooftops; brunch hosts; homes in coastal or high-glare regions needing shade that still feels light and airy.
Key Design Elements:
- Main materials: Brushed aluminum, Sunbrella-style fabric, teak accents
- Color palette: Mist, pale gray, seafoam, driftwood
- Lighting strategy: Recessed strip in pergola beam, small up-lights at posts
- Furniture silhouettes: Low-profile sectional, slim tables, sling-back chairs
- Texture layers: Smooth metal, tight-weave fabric, slatted wood
- Accent details: Nautical rope knot doorstop, matte ceramic planters, striped lumbar pillows
How To Recreate This Look:
- Start by defining the lounge zone with a pergola footprint that fits your deck.
- Add a retractable canopy and test sightlines—keep the skyline open.
- Layer a low sectional in a cool-toned performance fabric.
- Install slim LED strips inside a pergola beam for nighttime glow.
- Style with striped pillows, a pale rug, and matte planters for softness.
Why This Reads High-End: Architectural shade sets a strong silhouette against the sky. The regular slat rhythm and cohesive metal finish make everything else feel intentional and custom.
The Most Common Mistake: Choosing a canopy color that’s too bright. It color-casts your skin and drinks weirdly. Stick to soft grays or off-whites that reflect heat and play nice with evening LEDs.
Pro Styling Tip: Angle the sectional 10–15 degrees off the pergola grid to introduce tension lines that look dynamic in photos without losing flow.
Did You Know? Most rooftop glare problems come from light bouncing off nearby glass buildings. A canopy with a matte surface drastically reduces that secondary reflection, which is why your space feels calmer instantly.
4. Speckled Terrazzo Flooring, Sunset-Peach Uplight, and a Vintage-Inspired Cart Bar with Oversized Wheels
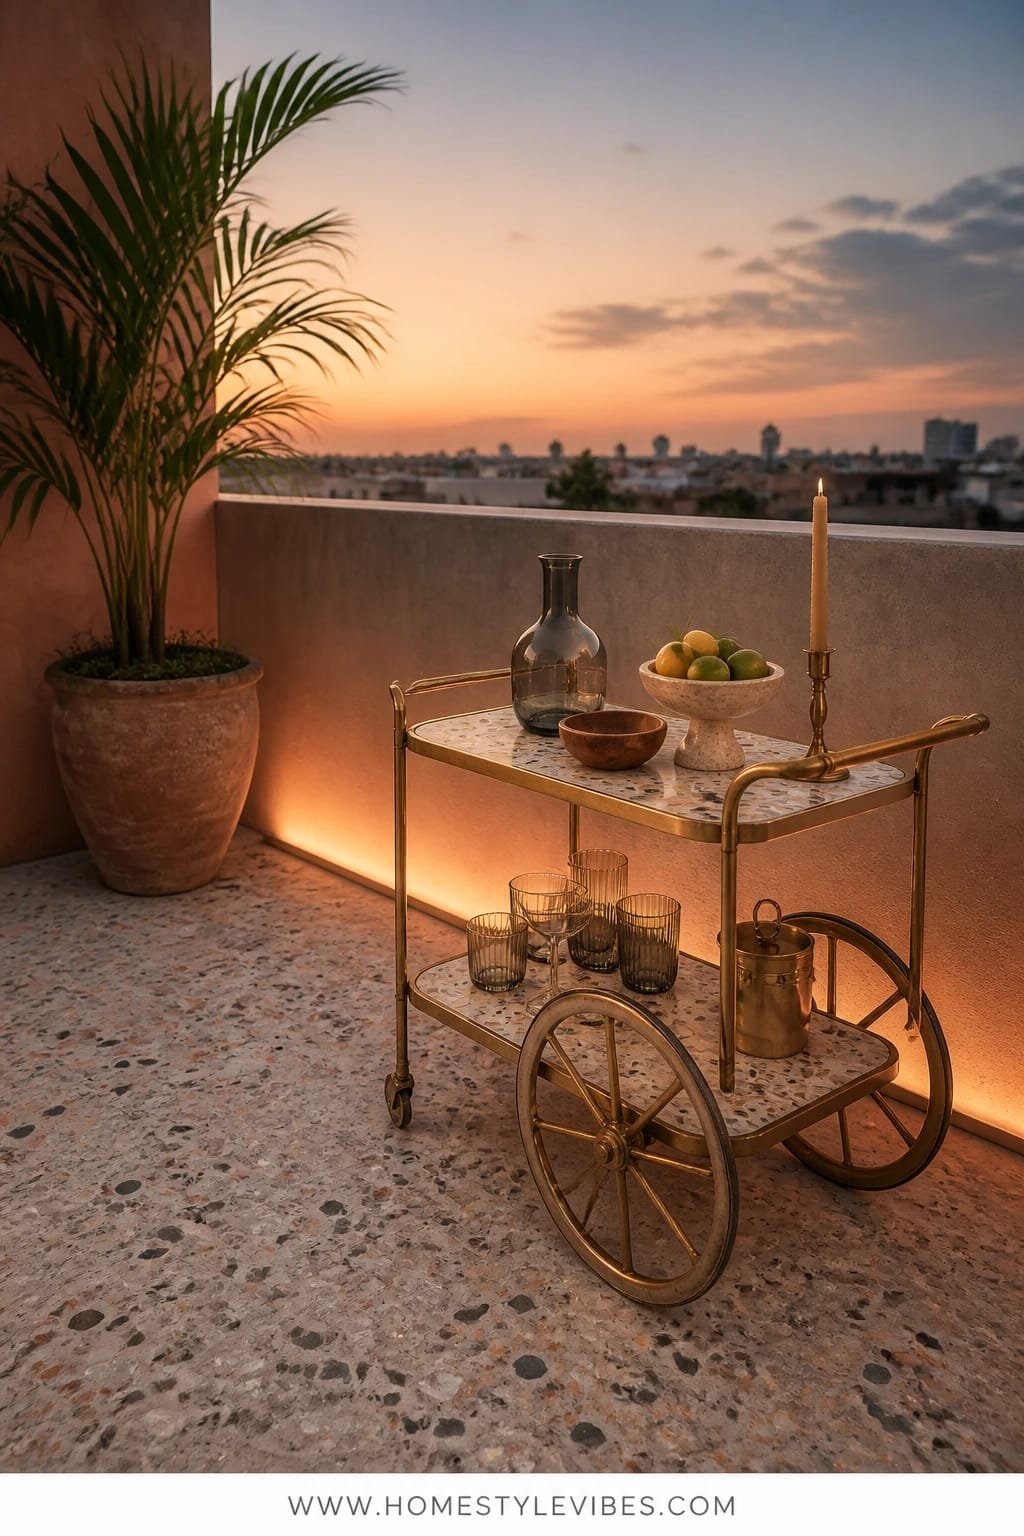
Guests keep hovering near the door because your flooring feels cold and the bar lacks personality. Terrazzo is the unsung hero here—playful, tough, and forgiving. Pair it with a vintage-inspired cart bar on big, statement wheels and you’ve got a movable party. The sunset-peach uplight? That’s your secret mood filter, tinting glassware and terrazzo flecks for a warm, flirty vibe.
Why it works: terrazzo hides dust and pollen better than plain concrete and feels “finished” without high maintenance. The cart bar handles tight spaces and transforms a static layout into a flexible one—you can roll the drinks station to suit headcount. Photos love terrazzo because micro-speckles add texture without stealing focus; the peach light brings a soft color wash that flatters skin and cocktails alike.
Variations: Budget version uses terrazzo-look porcelain tile or epoxy flake flooring. Darker mood? Pick a charcoal terrazzo with copper and blush chips. Renter-friendly? Use interlocking terrazzo-look deck tiles and a freestanding bar cart you can wheel inside when the lease ends.
Budget Breakdown:
- Terrazzo flooring (poured or tile): $10–$35/sq ft
- Vintage-style bar cart with oversized wheels: $300–$1,200
- Uplights with peach gels or smart bulbs: $120–$300
- Outdoor bistro chairs (set of 4): $300–$800
- Cafe tables, powder-coated: $150–$400 each
Total Estimated Cost: $2,000 – $6,000
Best For: Social butterflies, renters, and small rooftops that benefit from flexible layouts and whimsical details.
Key Design Elements:
- Main materials: Terrazzo, powder-coated metal, rattan or cane accents
- Color palette: Cream, blush, copper, graphite speckle
- Lighting strategy: Low uplights with peach filters aimed at planters or walls
- Furniture silhouettes: Round cafe tables, curved-back bistro chairs, bar cart
- Texture layers: Speckled floor, woven seat pads, frosted glass barware
- Accent details: Oversized wheels, scalloped umbrella edge, copper ice bucket
How To Recreate This Look:
- Start by resurfacing the floor with terrazzo tile or terrazzo-look interlocking tiles.
- Add a mobile bar cart with big wheels—go tall for a strong profile.
- Layer peach-toned uplights against a wall or planter group.
- Install two to three round cafe tables to scatter conversation spots.
- Style with blush napkins, a copper ice bucket, and patterned coasters.
Why This Looks Intentional: The cart’s oversized wheels act like jewelry, terrazzo ties everything together, and the subtle color wash unifies the scene in photos. Nothing feels random.
Don’t Do This: Avoid super bright terrazzo chips in primary colors unless you’re fully committing to a retro palette. Mixed signals create visual noise on a small rooftop.
Pro Styling Tip: Group cafe tables in a loose triangle so they read as a vignette from the entry. Triangles are photogenic and feel balanced without symmetry.
Progress over perfection wins here. Pick one anchor material—the cedar, the stone, the terrazzo—and build around it. The rest becomes easy once the anchor speaks clearly.
5. Fluted Teak Panels, Soft Dappled Light, and a Crescent Banquette with Integrated Planter
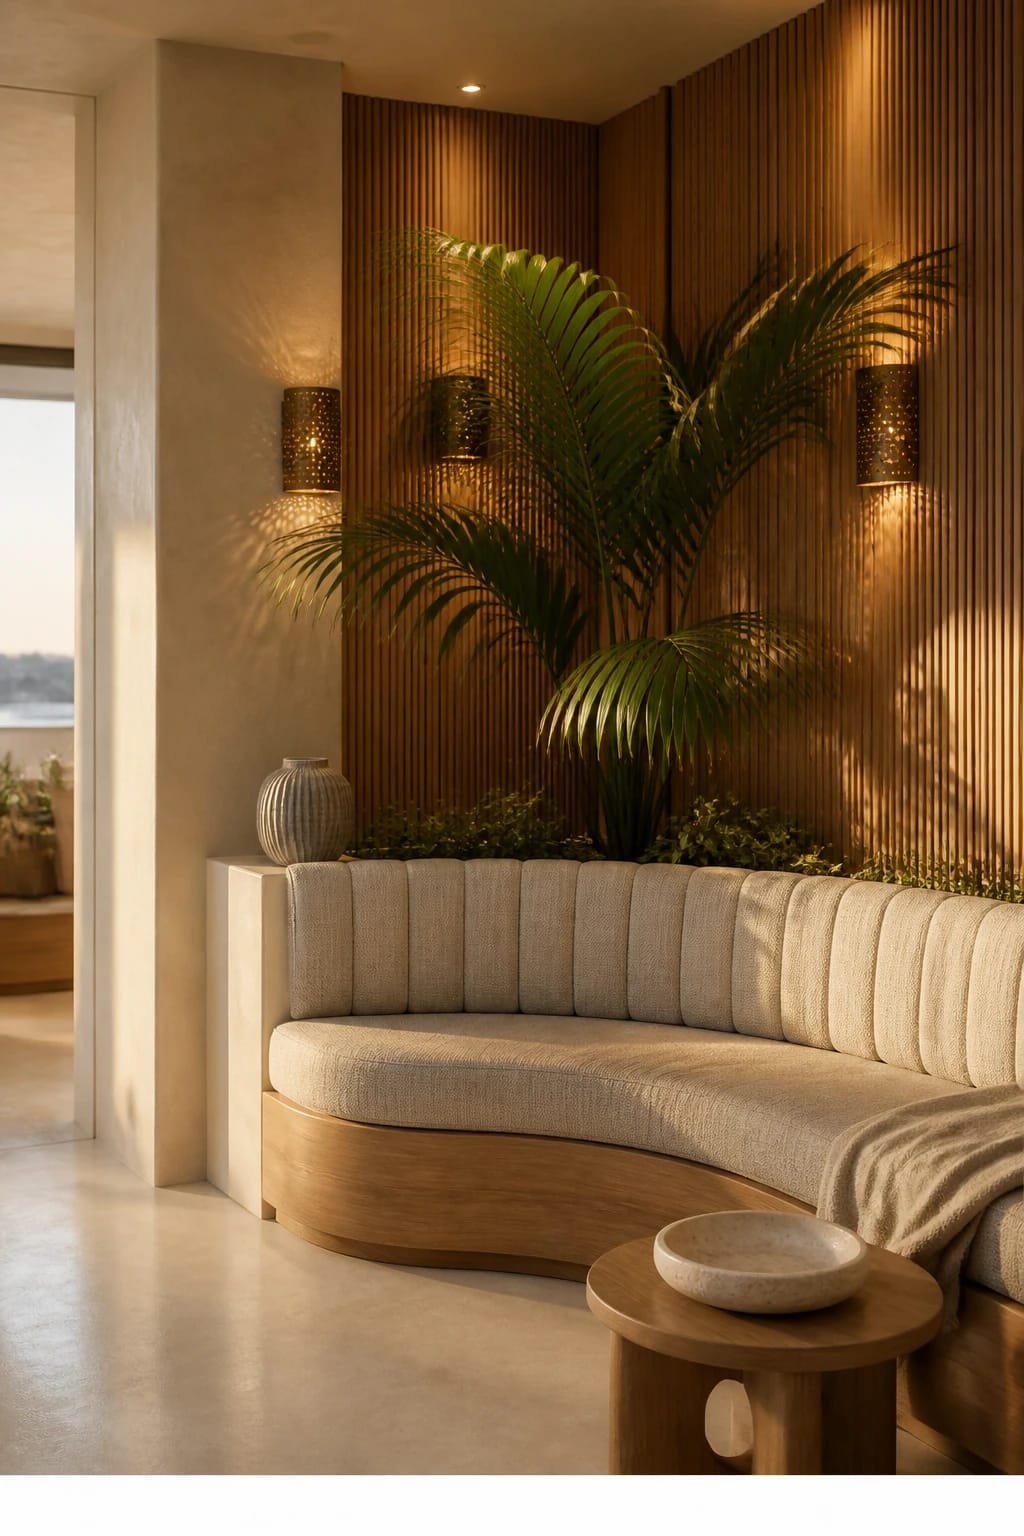
There’s always that dead perimeter where furniture hugs the railing and no one feels cocooned. A crescent banquette flips the script, wrapping seating inward and adding an integrated planter at one end. Use fluted teak panels behind it for elegance and tactile warmth. The light should be soft and dappled—think perforated sconces or micro-downlights that pepper the panels without hot spots. The mood skews boutique-resort-meets-Japandi.
Real-home perks: a curved banquette seats more people in less space and looks effortlessly tailored. Fluted teak handles weather and brings subtle shadow play. Maintenance becomes manageable with removable cushion covers and drip irrigation tucked into the planter. Photographs? The flutes create vertical texture that reads crisp even on phone cameras, while the planter adds organic asymmetry.
Variations: Budget swap to fluted composite panels rated for outdoors. Small-space version halves the curve and uses a demi-lune table. Darker look? Smoke-stain the teak and use charcoal cushions with bone piping. Renter-friendly? Freestanding curved bench with a fluted screen placed behind it.
Budget Breakdown:
- Fluted teak panels or composite: $15–$40/sq ft
- Crescent banquette frame + cushions: $1,200–$3,200
- Integrated planter with drip kit: $300–$800
- Perforated sconces or mini-downlights: $180–$500
- Round pedestal table: $250–$700
Total Estimated Cost: $2,900 – $7,200
Best For: Medium rooftops craving intimacy; dinner parties where everyone shares plates; homeowners who want sculptural seating without blocking views.
Key Design Elements:
- Main materials: Teak, performance upholstery, powder-coated aluminum
- Color palette: Honey, mushroom, graphite, eucalyptus green
- Lighting strategy: Dappled downlights + perforated wall sconces
- Furniture silhouettes: Crescent banquette, pedestal table, low ottomans
- Texture layers: Fluted wood, boucle or micro-basketweave cushions, leafy greens
- Accent details: Bone piping, matte hardware, herb planting for scent
How To Recreate This Look:
- Start by mapping a crescent footprint that leaves a clear path to the bar.
- Add fluted teak panels as a backdrop; align seams for rhythm.
- Layer cushions in a textured neutral and add subtle piping for polish.
- Install small downlights aimed to graze the flutes, not blast faces.
- Style with an herb planter at the banquette end and a round pedestal table.
Why This Looks Expensive: Curves cost more to build, and even when they don’t, they read as custom. The vertical fluting plus curved seating creates deliberate tension that photographs as “architected.”
Watch Out: Don’t push the banquette too tight to the table. Leave 18–20 inches from seat edge to table edge so knees fit. Crowded equals awkward.
Pro Styling Tip: Place the tallest plant at the banquette’s open end to “cap” the curve and frame faces in photos with greenery.
Quick Tip: If budget is tight, spend on one custom element—like the banquette—and keep tables and stools simple and matte. One custom piece convinces the eye that everything is tailored.
6. Board-Form Concrete Planters, Indigo Twilight Lighting, and a Monolithic Island with Waterfall Edge
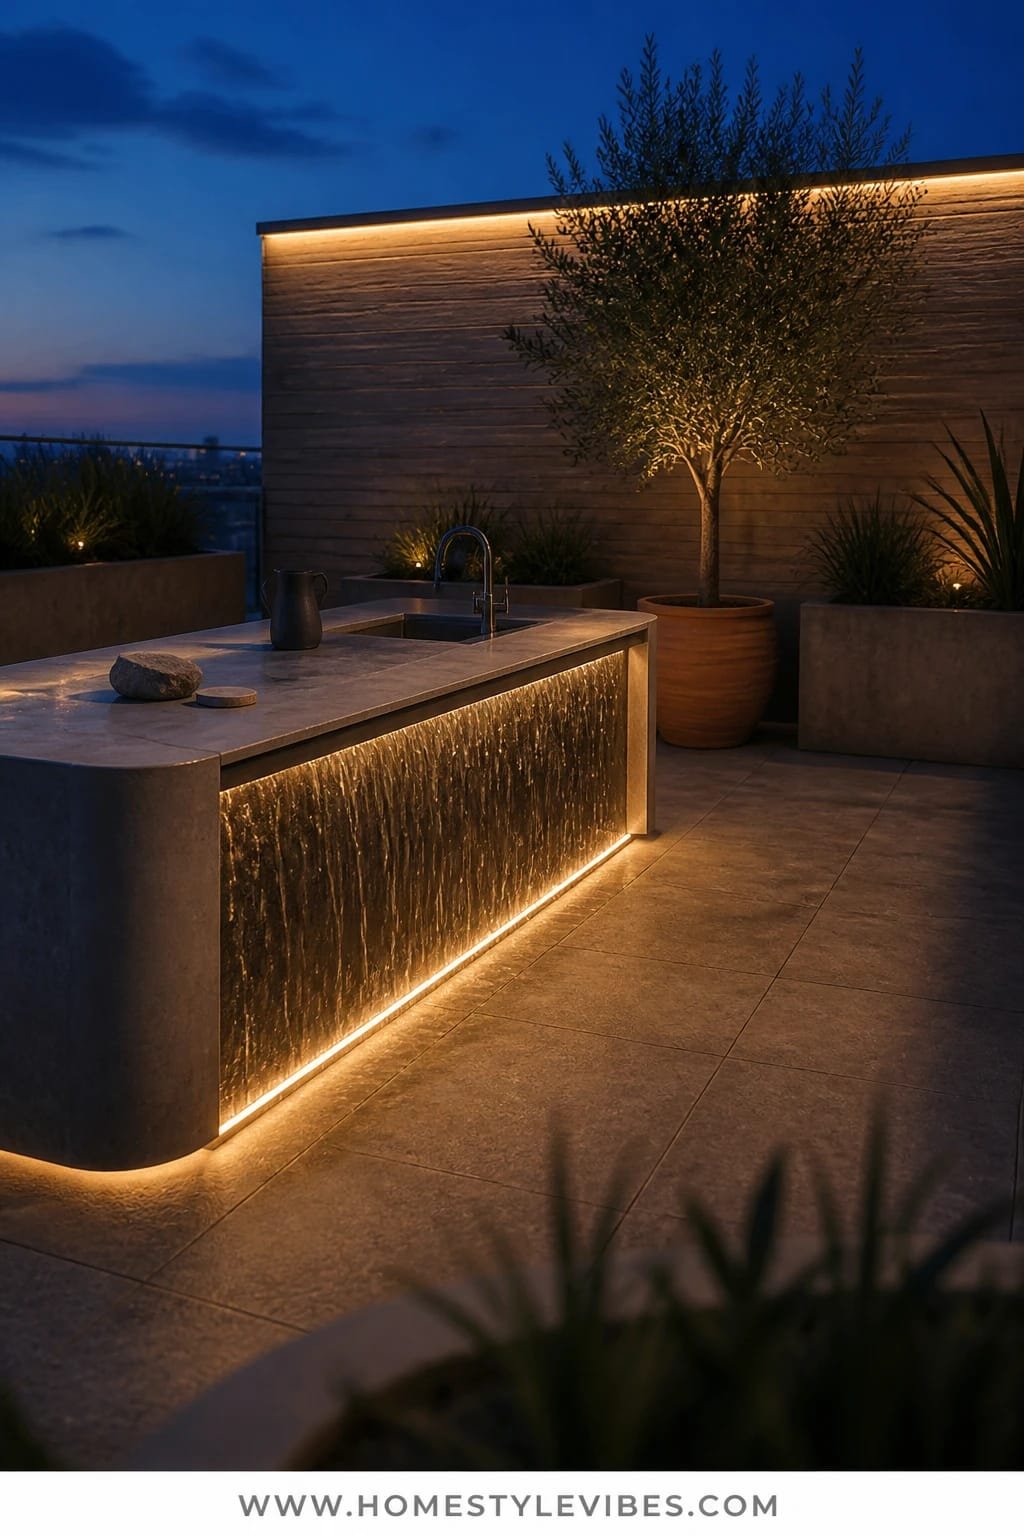
You love a bold, architectural rooftop bar idea, but cluttered accessories and mismatched furniture keep hijacking the look. Go monolithic: a central island with a waterfall edge in sintered stone or concrete-look porcelain, flanked by board-form concrete planters. The indigo twilight lighting sets a moody, cinematic tone without veering nightclub. The mood is urban minimalism—high contrast, strong lines, and restrained styling.
Here’s why this read works: a single, heavy visual anchor makes everything else feel disciplined. Board-form textures add warmth to the concrete family and catch light in subtle striations at dusk. Indigo-tinted LEDs or filters give a gentle cool wash that balances the city’s warm sodium streetlights. In photos, the island’s crisp edges pair with soft planter shadows for sculptural drama—like a set piece on a rooftop stage.
Variations: Budget-friendly? Use concrete-look porcelain slabs over a pressure-treated core. Small-space version shrinks island depth and replaces seating with two sculptural stools. Renter-friendly swap: a freestanding stainless grill-station island with faux waterfall panels attached via magnets (yes, seriously) and lightweight GFRC planters.
Budget Breakdown:
- Waterfall island in sintered stone or porcelain: $2,000–$6,000
- Board-form concrete planters (GFRC): $400–$1,200 each
- Indigo outdoor LED strips or gels: $100–$300
- Minimalist stools (2–4): $300–$1,000
- Under-island storage doors (matte black): $200–$600
Total Estimated Cost: $3,000 – $9,000
Best For: City rooftops craving a strong focal point; serious home mixologists who want a generous work surface; spaces with skyline views that benefit from clean lines.
Key Design Elements:
- Main materials: Sintered stone, GFRC concrete, matte black metal
- Color palette: Graphite, smoke, inky blue, soft steel
- Lighting strategy: Cool twilight wash on perimeter, warm task lights at island
- Furniture silhouettes: Blocky island, backless stools, rectangular planters
- Texture layers: Board-form grain, satin stone, soft herb foliage
- Accent details: Minimal pulls, linear drain cover, slim rail for glassware
How To Recreate This Look:
- Start by placing the island where it aligns with the best sightline; center it on a visible axis.
- Add board-form planters parallel to the island to emphasize lines.
- Layer cool indigo LEDs at the perimeter and keep task lighting warm over the island.
- Install matte black doors on the working side for hidden storage.
- Style with two bold objects max: a tall branch arrangement and a sculptural ice bucket.
Why This Feels Designer: Restraint. One monumental gesture beats five small features. The cool-warm light interplay adds sophistication and keeps the scene moody, not murky.
One Thing To Avoid: Over-accessorizing the island. Three small items read as clutter on camera. Pick one tall, one low, and walk away.
Pro Styling Tip: Wipe edges before guests arrive; dusty lines show up under cool LEDs and break the monolith effect.
I’ll confess: getting lighting color right is tricky. A friend spent weeks agonizing over furniture tones before we realized the real problem was the harsh blue-white bulbs. We swapped to warmer task lights and a cooler perimeter wash, and suddenly the rooftop felt like a private bar, not a parking lot.
Quick Checklist
- Choose one anchor material: cedar, travertine, aluminum, terrazzo, teak, or sintered stone
- Commit to a lighting temperature per zone and add dimmers
- Create a focal element: curved bar, built-in daybed, pergola, cart bar, crescent banquette, or monolithic island
- Use performance textiles with removable covers
- Hide utilities behind slats, panels, or plant groupings
- Add one sculptural plant to cap a curve or frame a view
- Keep finishes matte or honed outdoors to avoid glare
- Plan pathways before furniture lands—18–36 inches is your flow sweet spot
- Limit accessories to a tight color story
- Photograph at blue hour for soft shadows and skin-friendly light
Frequently Asked Questions
How much should I budget to create a rooftop bar and lounge without overspending?
Pick one of the six concepts and allocate 70% to your anchor element (bar, pergola, banquette, or island), 20% to lighting, and 10% to styling. Most readers land between $2,000 and $9,000 depending on materials and size.
My rooftop is tiny. Which idea works best without feeling cramped?
Go for the built-in daybed with travertine ledge or the vintage-style cart bar. Both maximize seating and function while keeping the footprint light and flexible.
I rent. What can I do that won’t risk my deposit?
Choose freestanding pergolas anchored with weighted planters, interlocking deck or terrazzo-look tiles, modular benches, and a moveable bar cart. Add plug-in or solar lights and skip hardwiring.
How do I keep outdoor fabrics and cushions looking good over time?
Use performance textiles with removable covers, rinse pollen monthly, and store cushions vertically when not in use to prevent moisture pockets. Choose medium tones (camel, mushroom) that hide stains.
What’s the most common rooftop design mistake I should avoid?
Mixing too many finishes and light temperatures. Keep to one or two hero materials and coordinate lighting warmth per zone so faces and materials look cohesive at night.
The Wrap-Up: Your Rooftop, But Finally Finished
Start with one idea that makes your shoulders drop when you read it. Maybe it’s the curved concrete bar and amber glow that turns weeknights into quiet date nights, or the crescent banquette that finally makes dinner for six feel effortless. Commit to a single anchor material, then layer lighting with intention. Less furniture, better textiles, and a dimmer—those three choices will carry you.
The truth is, luxury outdoors comes from texture that calms glare, lighting that sculpts shadows, and restraint that lets the skyline breathe. Pick your rooftop bar and lounge concept, follow the steps, and trust your gut. You’re closer than you think to a space that photographs beautifully and lives even better. Now grab the good glasses. You’ve got a rooftop to finish—seriously, you’ve got this.