6 Penthouse Terrace Ideas That Make City Living Feel Like A Private Resort
You want your penthouse terrace to feel like a sun-drenched escape—the kind of place where mornings start with dappled light and evenings sink into an amber glow. But the reality? Street noise, too-bright light, awkward furniture that never quite fits, and a view that looks better from the inside than when you’re actually out there. This guide unlocks six complete, photogenic, and totally doable penthouse terrace ideas that crush those exact frustrations with texture, lighting, and furniture choices that work in real life. You’ll pick one concept, cap your initial budget under $7,500 if needed, and make your terrace feel like a private resort in as little as a single weekend refresh. Expect blissed-out mornings, cocktails that actually feel special, and the kind of light that flatters everyone at golden hour.
These designs are styled to be Pinterest-worthy without the try-hard energy. If your style swings modern Mediterranean, boutique hotel, or earthy minimal—you’re home. And if you just want somewhere that makes weekday dinners feel like vacation? You’ll find your signature move here.
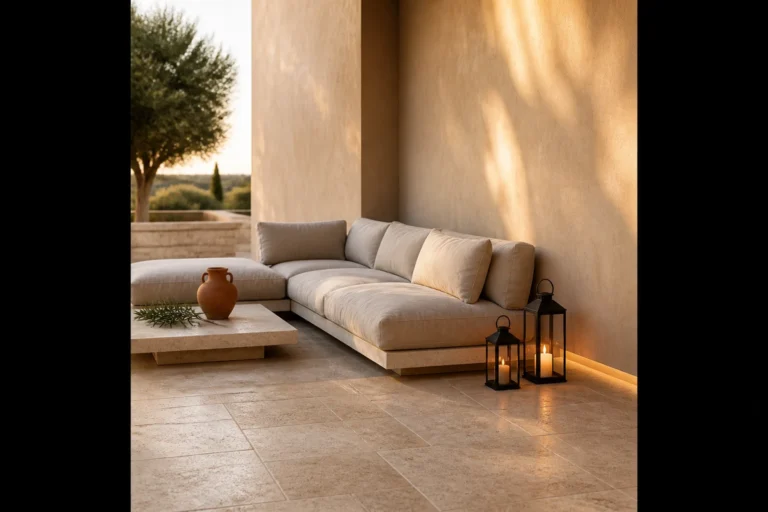
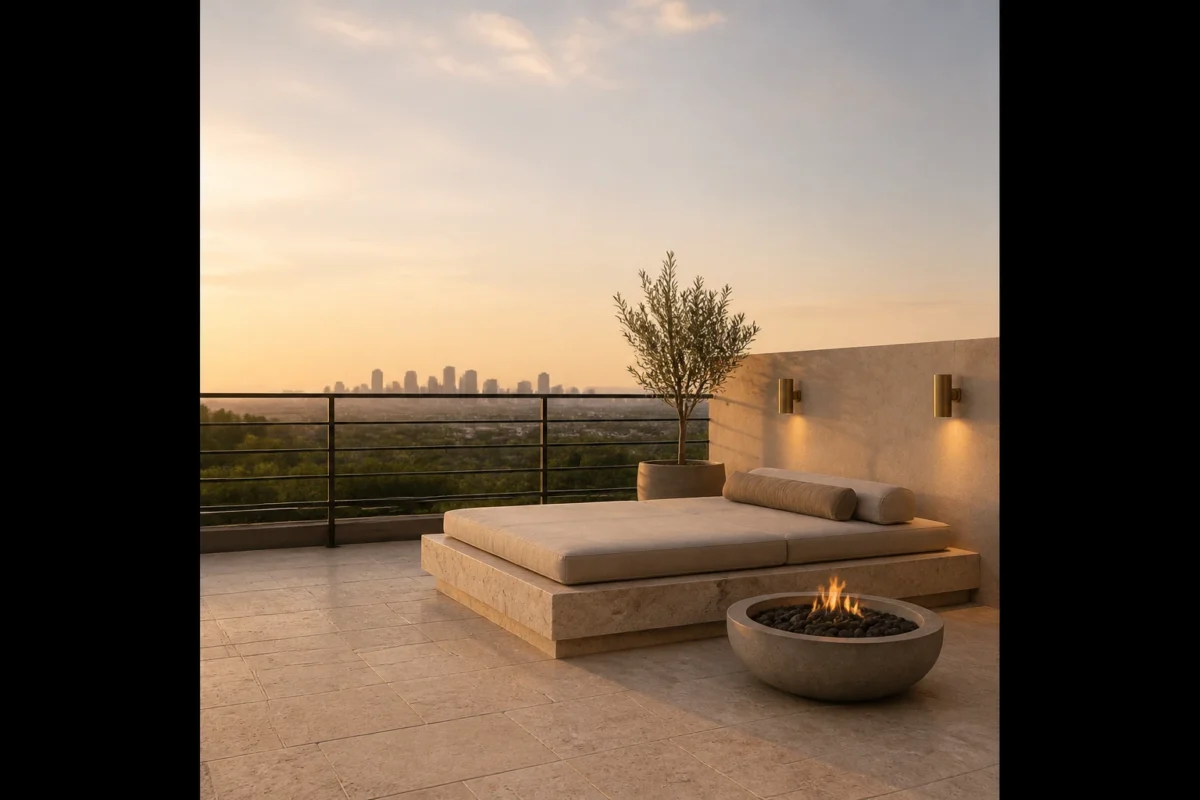
1. Travertine Daybed Terrace With Honeyed Sunset Sconces And a Low-Fire Bowl
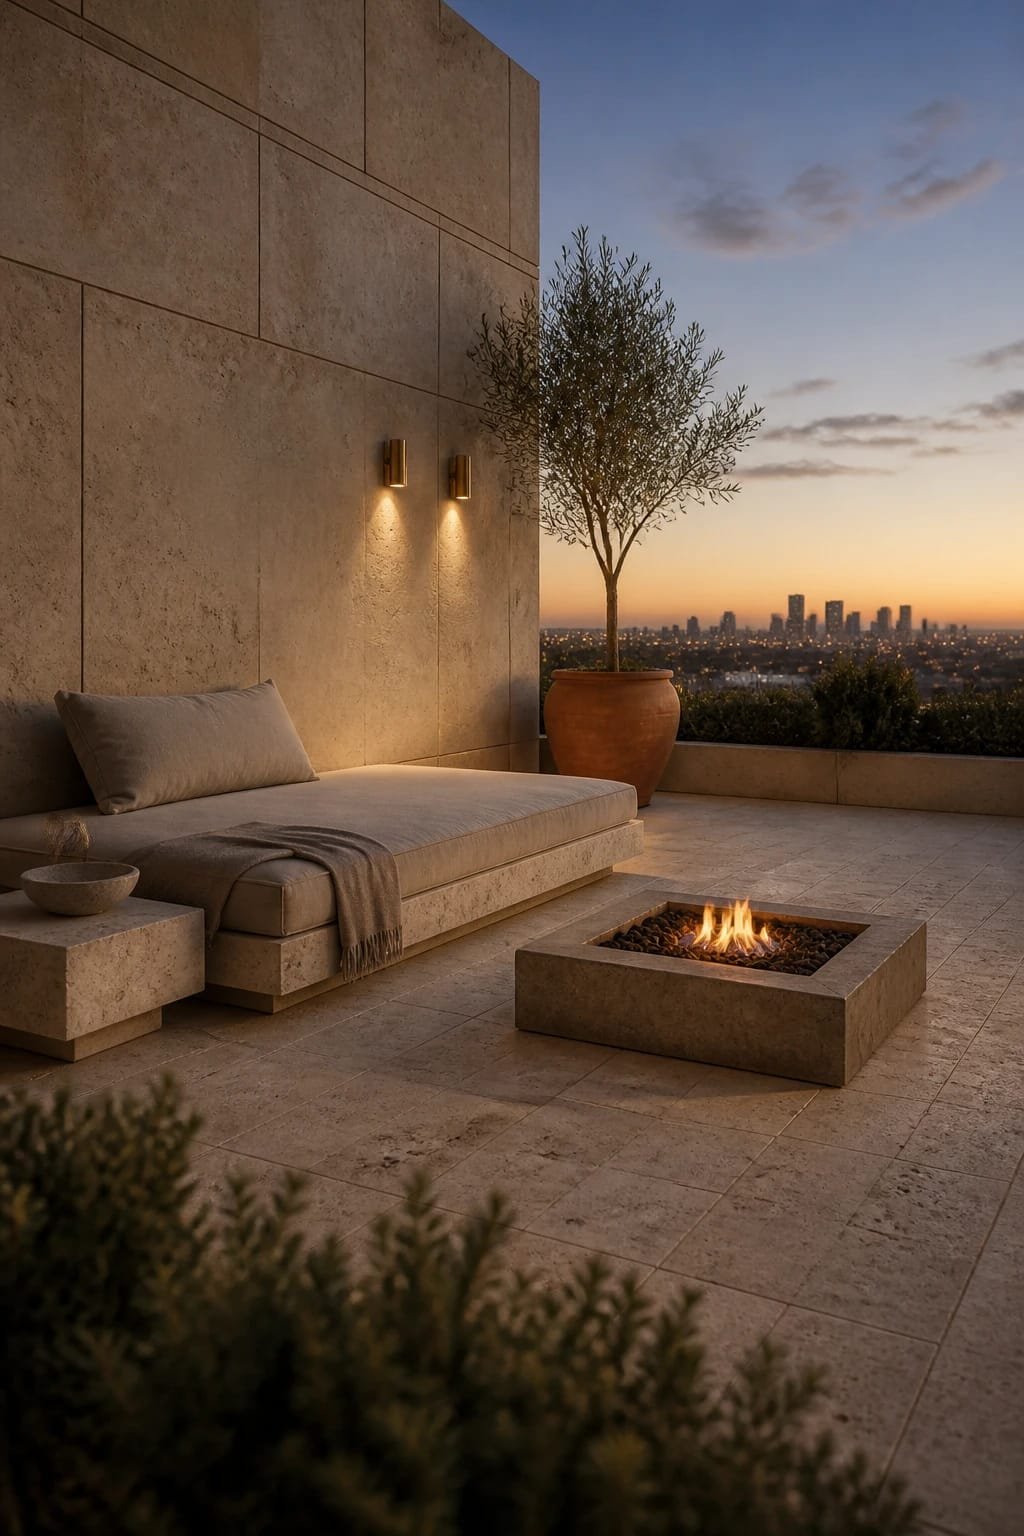
We’ve all been there: the terrace that somehow looks better from inside your living room. You step out and it’s harsh, flat, and a little echoey. This setup resets the vibe with stone warmth, low lounge seating, and light that literally softens your silhouette. Think creamy travertine under bare feet, a sculptural daybed that says “stay,” and a small fire bowl that gives the city skyline a slow, radiant heartbeat.
This mood skews hotel-spa meets modern Mediterranean—serene but not sterile. It suits city terraces because everything’s low-slung, so you keep your views and the space feels larger. Lighting does the heavy lifting: honeyed sconces and the fire bowl create layered pools of light, so faces look warm and surfaces glow instead of glare. Travertine wins here because it photographs like magic: it bounces soft light and shows subtle texture that adds depth in every snapshot.
Two variations to make it yours: a budget-friendly route that swaps real travertine for porcelain-look pavers and uses a tabletop ethanol fire bowl; or a renter-friendly version with interlocking deck tiles and plug-in sconces with waterproof shades. For small spaces, choose a twin-width daybed and skip side tables in favor of a single, thick, stone cube.
Budget Breakdown:
- Porcelain travertine-look pavers or slabs: $8–$18/sq ft
- Outdoor daybed with performance cushions: $900–$2,400
- Wall sconces (dimmable, warm 2200–2700K): $160–$600/pair
- Compact ethanol or gas fire bowl: $250–$1,200
- Weatherproof side table (stone or powder-coated): $180–$650
- Performance throw pillows and blankets: $120–$300
Total Estimated Cost: $2,200 – $5,500
Best For: Compact terraces that need softness and glow without blocking the view. Works beautifully for sunset loungers and quiet readers; perfect in spring through late fall.
Key Design Elements:
- Main materials: travertine (or porcelain-look), powder-coated metal, performance linen
- Color palette: sand, cream, soft taupe, charcoal accents
- Lighting strategy: low flame + warm sconces for layered glow; dimmers are non-negotiable
- Furniture silhouettes: low, monolithic, rounded corners
- Texture layers: stone grain, slubby linen, smooth metal
- Accent details: a single olive tree in a limestone pot, a heavy glass match cloche, low-profile tray
How To Recreate This Look:
- Start with flooring: lay travertine or porcelain-look pavers; align seams with your exterior door frame for a considered look.
- Add a low daybed against the longest railing side to preserve circulation.
- Layer a single, sculptural stone side table; keep heights nearly flush with the daybed seat.
- Install two warm-dim sconces flanking the door; set to 40% at dusk for best skin tones.
- Style with three oversized pillows (24-inch) and a single striped throw for quiet pattern.
Why This Looks Expensive: The restrained palette and low, sculptural forms read deliberately edited. Travertine’s soft reflectivity creates that “whispered luxury” vibe—nothing shouts, everything hums.
Watch Out: Don’t pick cool-white bulbs. They’ll make the stone look chalky and the city feel sterile. Choose 2200–2700K LEDs and test at night before committing.
Pro Styling Tip: Shoot at civil twilight with lights at half-dim; angle the camera low so the fire bowl and daybed edge layer in the foreground for depth.
Quick Tip: For windy terraces, add hidden Velcro strips under seat cushions to keep styling locked in during photo days.
2. Teak Slat Lounge With Soft Amber String Lights And a Modular Sectional
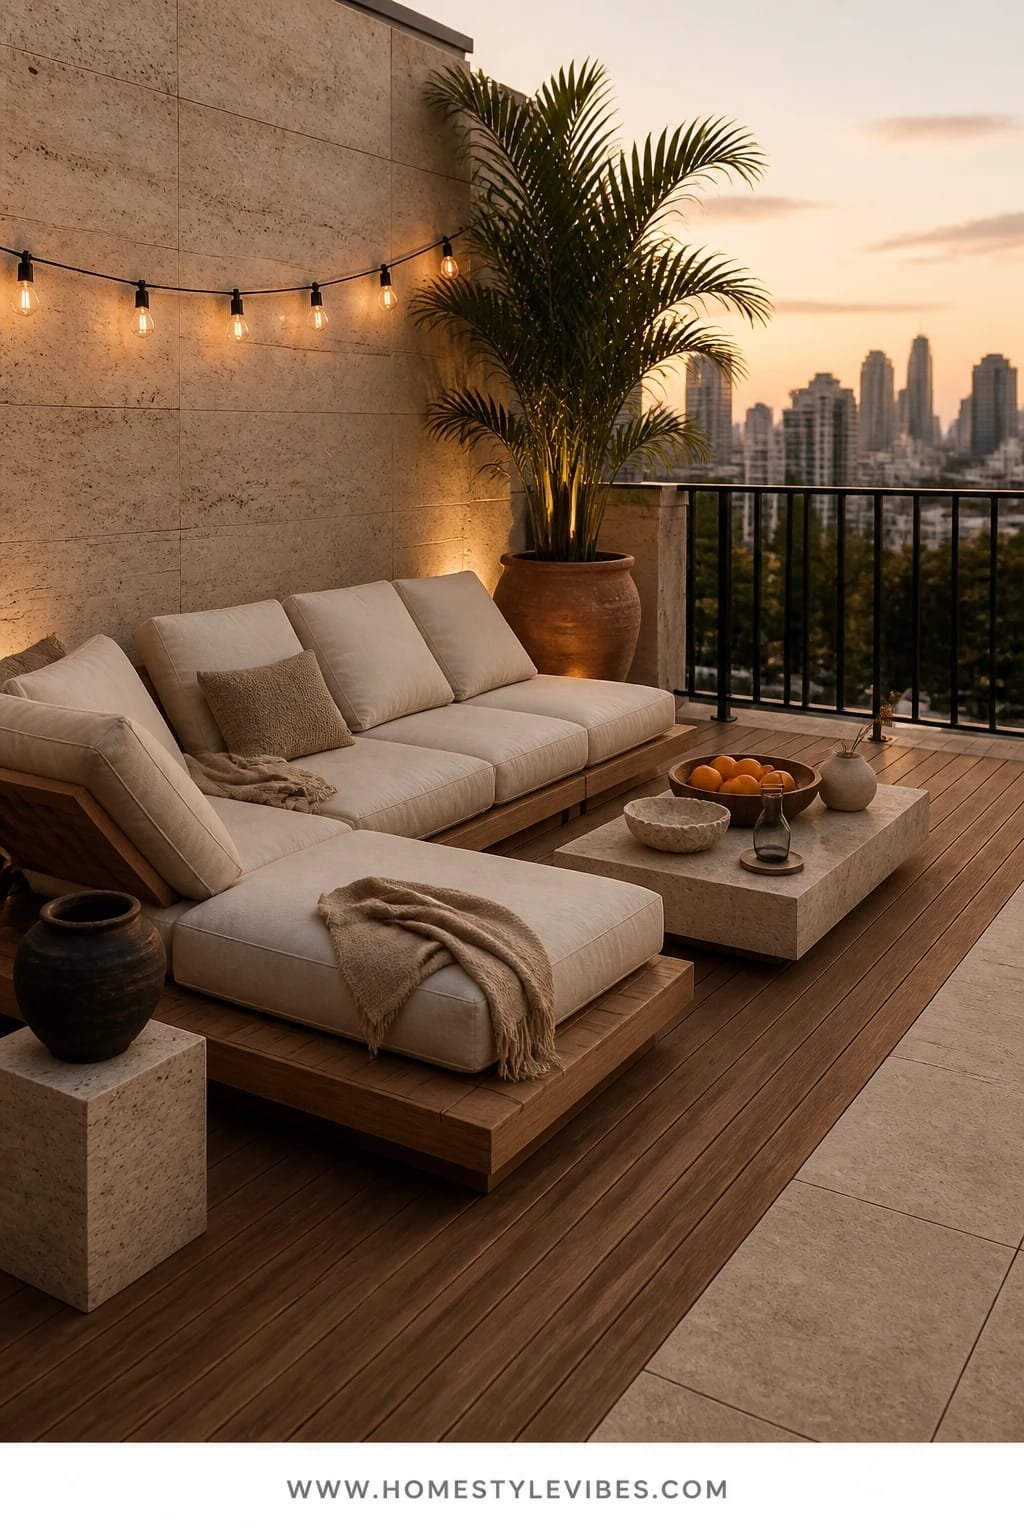
It’s that one corner that always feels off—too many odd angles, nowhere to perch with a group, and furniture that drifts in a wind gust. A teak slat deck with a modular sectional solves the layout headache with crisp lines and movable comfort. Pair it with soft amber string lights and you get instant bistro energy without the clutter.
This creates a cozy, social lounge—think boutique rooftop in Lisbon. Why it works: the consistent slat direction visually expands the footprint, while the modular sectional adapts to parties, movie nights, or solo lounge days. Lighting here isn’t about drama; it’s about a canopy of glow that flatters faces and makes everything look inviting in photos.
Try two variations: small-space? Choose a two-piece corner sectional plus a round ottoman that doubles as a table. Budget-conscious? Use eucalyptus instead of teak, oil it seasonally, and hang shatterproof LED strings on discrete black posts clamped to planters—no drilling.
Key Design Elements:
- Main materials: teak (or eucalyptus), performance rope, tempered glass or ceramic for tables
- Color palette: warm wood, off-white cushions, soft charcoal accents
- Lighting strategy: amber string lights in two staggered rows; one dimmable floor lantern for depth
- Furniture silhouettes: modular boxes with radius corners
- Texture layers: smooth wood, braided rope, nubby outdoor textiles
- Accent details: striped lumbar pillows, a woven tray, potted rosemary for scent
Budget Breakdown:
- Teak slat tiles or deck boards: $10–$22/sq ft
- Modular outdoor sectional: $1,400–$3,200
- LED string lights (commercial grade): $90–$220
- Planter posts or railing clamps: $60–$180
- Round ottoman/table: $180–$600
- Lanterns (battery or plug-in): $60–$200
Total Estimated Cost: $1,900 – $4,400
Best For: Entertainers who need flexible seating on a medium-size terrace. Great year-round with throw blankets and a portable heater.
How To Recreate This Look:
- Lay slat decking all in one direction; run boards perpendicular to the view to draw the eye out.
- Build your sectional against the windward side; secure clips between modules.
- Hang string lights in a gentle V shape, 9–10 feet high if possible, using planters as anchors.
- Add a round ottoman and a low side table to avoid pointy traffic jams.
- Style with two patterns max: a thin stripe and a micro-check for a subtle layer.
Why This Feels Designer: Repetition. Teak slats, rope details, and rounded forms create rhythm. That harmony reads polished on camera and calmer in person.
One Thing To Avoid: Over-lighting. Two strings are usually plenty; three starts to feel like a theme park. Keep the glow, skip the glare.
Pro Styling Tip: Tuck a dimmable lantern behind the sectional corner to backlight the cushions—instant depth and better nighttime photos.
Did You Know? The cheapest way to make outdoor seating feel custom is matching seat heights. Aim for 16–18 inches across all pieces for a seamless look that photographs like a built-in.
If one idea resonates more than the others, that’s your starting point. You don’t need all six—one fully realized concept beats five half-finished corners every time.
3. Concrete Plinth Dining With Warm Edison Pendants And a Sculptural Banquette
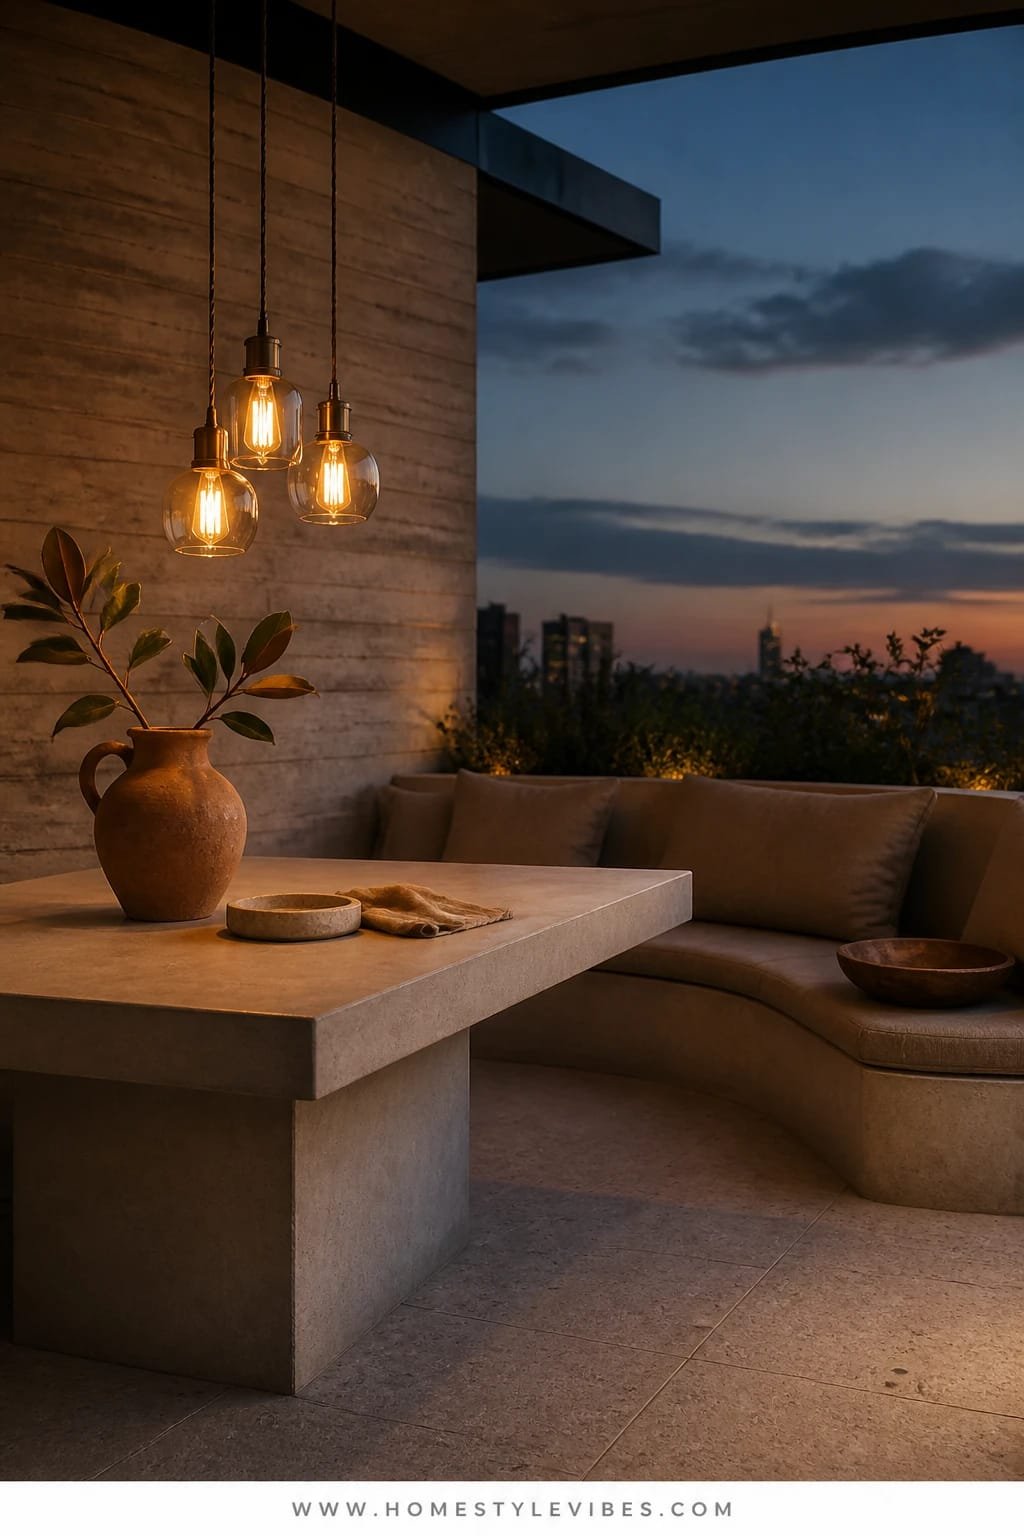
You’ve tried a bistro table out here, but it still looks accidental—like you borrowed it from your neighbor’s balcony. A concrete plinth table changes everything. Add a sculptural banquette that hugs the perimeter and a cluster of warm Edison pendants, and suddenly weekday dinners feel like you booked the chef’s table.
The mood leans urban resort: crisp, architectural, and quietly dramatic. It works beautifully in real homes because the banquette uses the perimeter efficiently, leaving center space open for circulation and dancers (yes, you). Lighting sets the scene with pendants that pool light over plates, creating restaurant-level focus and flattering shadows. Concrete loves a camera—the matte surface avoids reflections and throws subtle contrast against soft textiles.
Variations: small-space version with a half-plinth table against the railing plus stools that tuck. Renter-friendly? Use a concrete-look pedestal base with a separate stone or porcelain top, and opt for plug-in pendants that run along a taut wire with adhesive clips.
Budget Breakdown:
- Concrete or concrete-look plinth table: $900–$2,800
- Custom or modular banquette with outdoor cushions: $1,200–$3,500
- Cluster pendants (outdoor-rated, warm 2200–2700K): $240–$900
- Weatherproof rug under table: $180–$500
- Dining chairs or stools (2–4): $300–$1,200
Total Estimated Cost: $2,820 – $8,900
Best For: Food lovers who want a destination dining zone. Works on medium-to-large terraces with at least one wall or column for pendants.
Key Design Elements:
- Main materials: concrete, performance boucle or canvas, powder-coated steel
- Color palette: bone, graphite, espresso, a single herbaceous green
- Lighting strategy: pendant cluster over the table, indirect glow on the banquette base
- Furniture silhouettes: blocky table, crescent or L-shaped banquette, slim chairs
- Texture layers: matte concrete, plush seat pads, woven rug
- Accent details: weighted napkins, ceramic carafe, clipped bay leaves in a low vase
Why This Reads High-End: The monolithic table. A bold, simple shape telegraphs confidence and reduces visual noise. That restraint looks intentional and expensive.
How To Recreate This Look:
- Sketch your layout: choose a corner or railing for the banquette; leave 36 inches clearance at minimum.
- Position the plinth table centered on the banquette curve or angle.
- Hang pendants at staggered heights (26–32 inches above table) for a soft, intimate cone of light.
- Ground the area with a rug that fits fully under the banquette and front table legs.
- Style with a single centerpiece—low and wide—so sightlines stay open.
The Most Common Mistake: Going too small with the table. Underscaled pieces make terraces read like leftovers. Fill the footprint confidently—your photos and dinners will thank you.
Pro Styling Tip: For night shots, dim pendants to 60% and kill all other lights; let the table float in a halo for that moody editorial moment.
Quick Tip: If you’re worried about weight, choose GFRC (glass fiber reinforced concrete). It keeps the look, drops the pounds, and your building manager relaxes.
4. Limewash Privacy Wall With Golden Hour Up-Lighting And a Curved Chaise
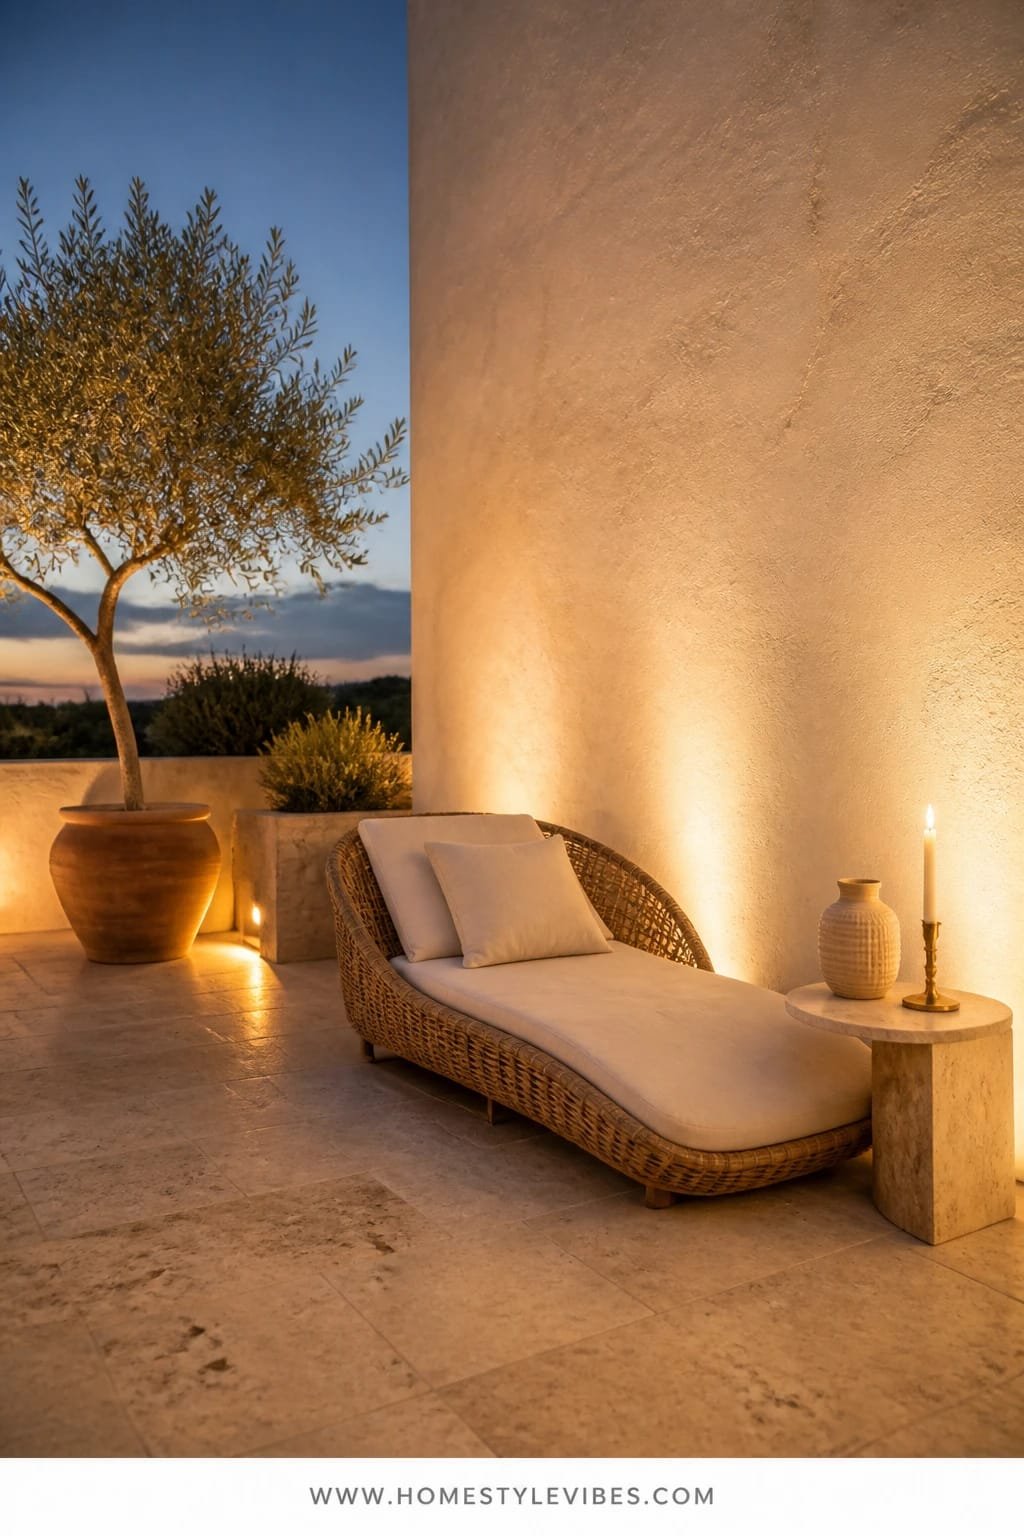
There’s always that one sightline that kills the magic—a neighboring HVAC unit, a not-so-chic billboard, or just too much exposure. A limewash privacy wall fixes the view without feeling heavy, and a curved chaise turns the newly sheltered corner into your afternoon sanctuary. Up-lighting at the base paints the limewash with golden hour even after sunset.
Expect a quiet, romantic mood—soft Mediterranean with painterly texture. It thrives in real homes because limewash hides small imperfections and ages beautifully outdoors; it’s forgiving and photogenic, catching shadows that give your terrace instant depth. Curved furniture softens the architecture and makes a petite footprint feel like a hug.
For a renter-friendly tweak, use freestanding planters as a wall with limewash-finished fiberclay panels. Small-space sister version: a single S-shaped chaise plus a petite pedestal table that holds only what you need—a paperback and an iced latte. I tried a mini version of this on my own slice of terrace last fall, and honestly, the paint’s subtle movement in late light did more for my stress levels than any candle ever has.
Key Design Elements:
- Main materials: limewash finish, fiberclay or stucco panels, performance boucle
- Color palette: warm white, oat, muted sage
- Lighting strategy: floor up-lights grazing the wall, no overheads to maintain softness
- Furniture silhouettes: curved chaise, rounded pedestal side table
- Texture layers: chalky wall, plush chaise, rough ceramic planter
- Accent details: espalier jasmine, oxidized brass watering can, linen lumbar pillow
Budget Breakdown:
- Limewash kit or mineral paint: $80–$240
- Freestanding privacy panels or planter wall: $350–$1,200
- Curved outdoor chaise: $600–$2,000
- Up-lights (IP65, warm 2700K): $120–$380
- Pedestal side table: $150–$500
Total Estimated Cost: $1,300 – $4,300
Best For: View control and solo lounging. Ideal for wind-prone terraces that benefit from a calm corner.
How To Recreate This Look:
- Create a privacy run using panels or planters; step the height if building codes require.
- Apply limewash in irregular strokes; two coats give depth, three add drama.
- Place up-lights 8–12 inches from the base of the wall to graze texture vertically.
- Set the curved chaise slightly off-center; leave negative space for a relaxed composition.
- Style with one trailing plant and a textured throw to break the solid forms.
Why This Looks Intentional: The wall, light, and chaise all curve and flow together. That cohesion feels designed, not assembled from random online finds.
Don’t Do This: Avoid cool grays in limewash outdoors—they read flat under daylight and bleak at night. Warm neutrals handle shifting light better and photograph richly.
Pro Styling Tip: Capture the wall from a shallow angle so the light rakes across the texture—instant dimension without filters.
Did You Know? Most limewash gets prettier with rain cycles. The mineral variation increases, which cameras read as depth—no filter, just weather.
Remember, this isn’t about recreating a showroom. It’s about building a terrace that actually works for your Tuesdays, not just your Saturdays.
5. Rattan Canopy Nook With Dappled Shade Light And a Swing Chair
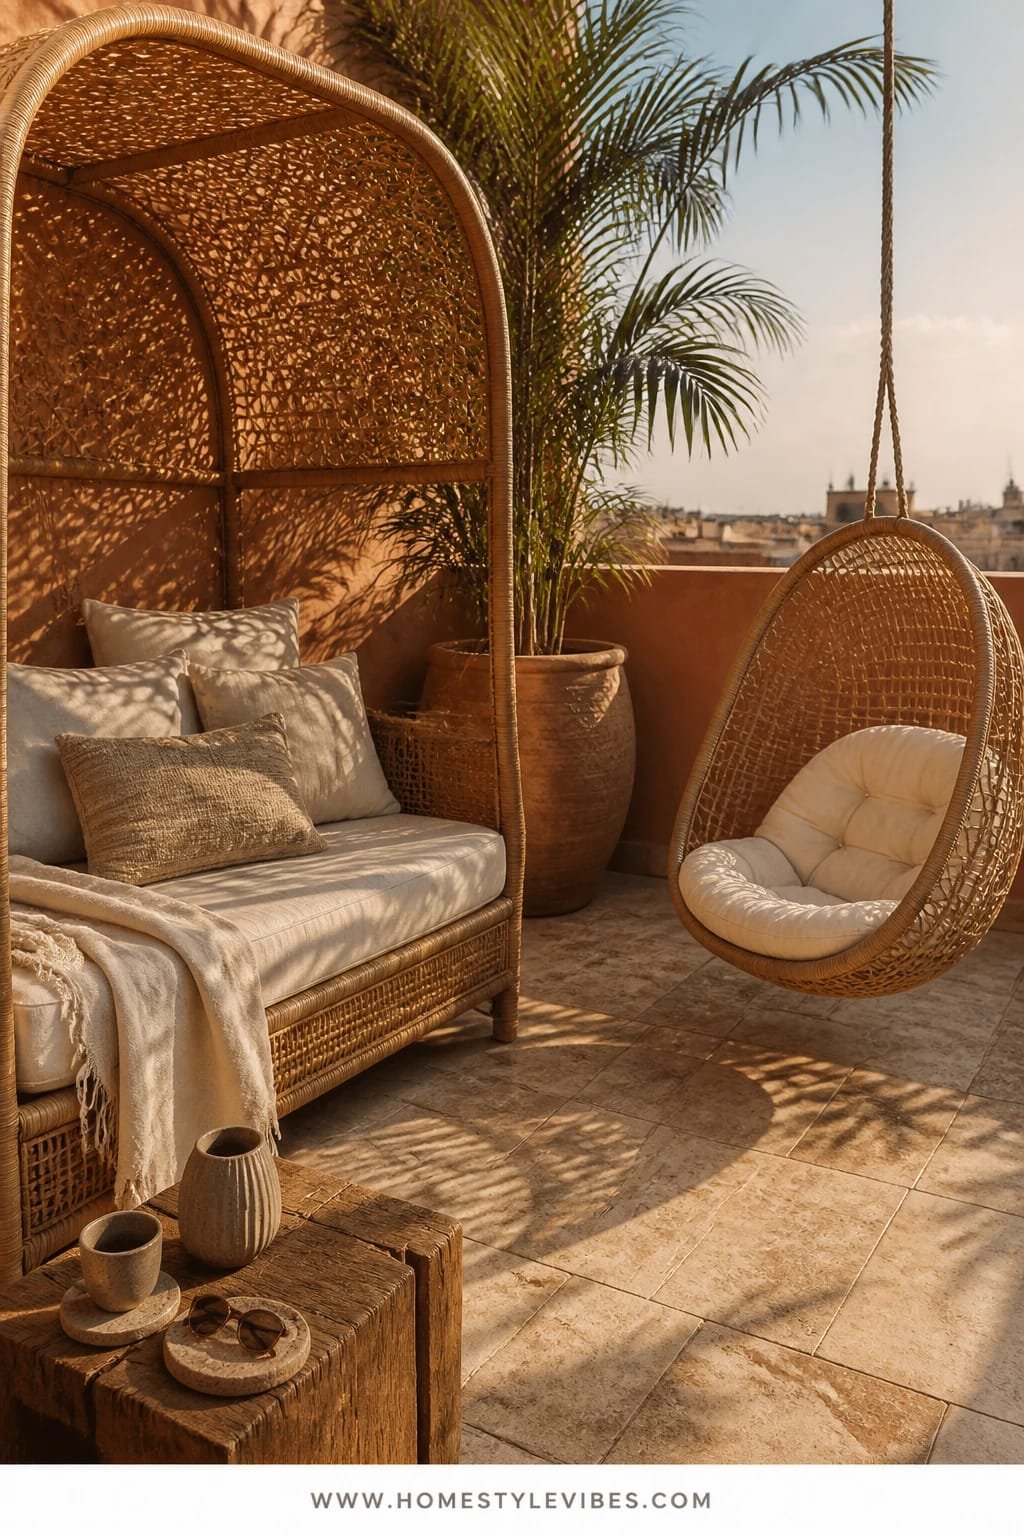
You love sun—but hate squinting. You crave shade—but hate anything that feels heavy. A rattan canopy gives you that dappled, leaf-like light pattern that makes midday usable and afternoons dreamy. Add a suspended swing chair as the statement piece and watch your terrace become everyone’s favorite reading corner.
This mood is tropical-boutique with a whisper of boho, but executed with restraint so it reads chic, not cluttered. It’s great for families and renters because the canopy can be freestanding and the swing chair—hung from a beam or a sturdy stand—becomes the hero without crowding the footprint. Rattan photographs beautifully; the open weave casts lace-like shadows that make even a simple cushion look considered.
Variations: for a darker, moodier take, choose espresso-stained rattan and olive cushions; for small terraces, scale to a single swing and a tiny marble-topped bistro table that doubles as a laptop perch. My friend obsessed over paint colors for weeks before realizing her daylight was the true issue—adding a rattan shade changed everything in one afternoon.
Budget Breakdown:
- Freestanding rattan or faux-rattan canopy: $600–$1,800
- Hanging swing chair + stand or rated beam hardware: $300–$1,200
- Outdoor cushions in performance fabric: $150–$400
- Compact side table (stone or terrazzo): $180–$600
- Floor lanterns or solar stakes: $60–$240
Total Estimated Cost: $1,290 – $4,240
Best For: Shade lovers and readers; ideal for terraces that scorch at noon. Seasonal from spring to early fall, with throws for shoulder months.
Key Design Elements:
- Main materials: rattan or resin-wicker, powder-coated steel frames, terrazzo or marble accent
- Color palette: honey, straw, warm white, olive or rust for contrast
- Lighting strategy: low lanterns and glow from within the canopy; avoid overhead spots
- Furniture silhouettes: rounded swing, slim side table, airy canopy frame
- Texture layers: woven cane, slubby linen, smooth stone
- Accent details: striped bolster, tiny bell chime, potted palms for soft fronds
How To Recreate This Look:
- Position the canopy where midday sun hits hardest; angle it to create latticed shade on seating.
- Assemble the swing with rated hardware; confirm weight limits and wind exposure.
- Anchor with a compact stone table; keep heights under arm-level for relaxed ergonomics.
- Add two floor lanterns inside the canopy zone for evening sparkle.
- Style with one patterned cushion and one solid for balance; skip excess tassels.
Why This Looks Expensive: Light play. The dappled pattern creates movement across surfaces, which looks custom and editorial—even with simple furniture.
Watch Out: Avoid too many weaves at once. One hero rattan plus simple solids wins; competing patterns read messy on camera.
Pro Styling Tip: Photograph between 11 a.m. and 2 p.m. when the shadow lattice is strongest—frame the swing slightly off-center for a casual, lived-in feel.
Quick Tip: If your building is wind-prone, zip-tie clear fishing line between canopy legs and railings for discreet stability during gusts.
6. Fluted Cedar Bar With Amber Backlighting And a Slimline Pizza Oven
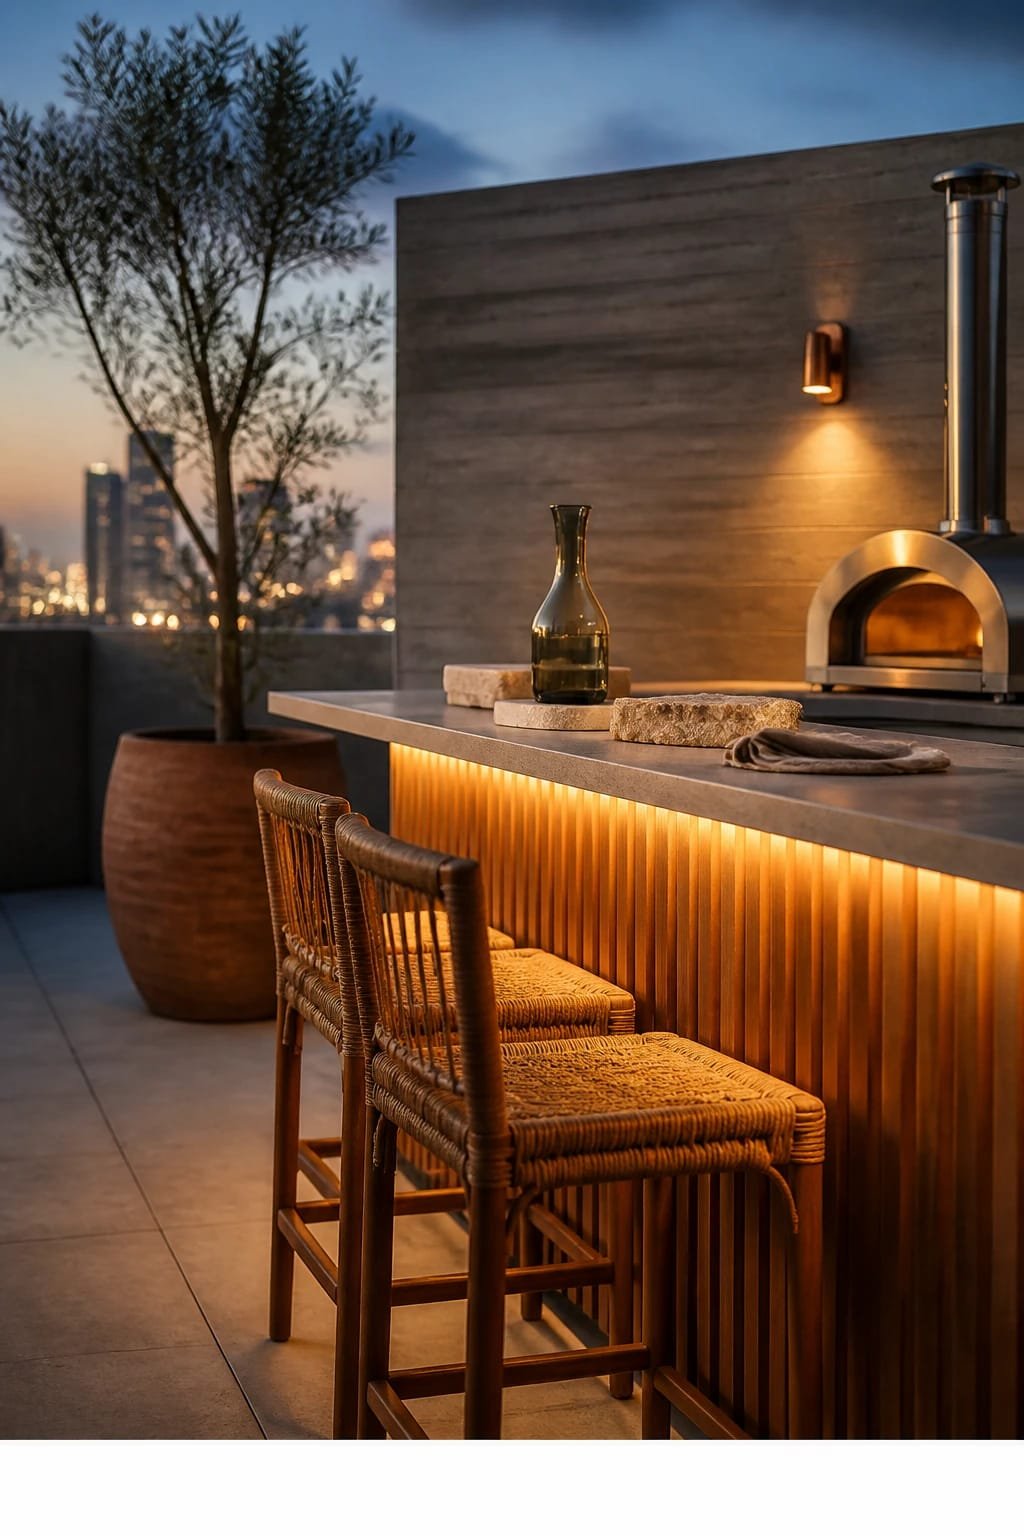
Entertaining on a terrace sounds dreamy—until you realize you’re stuck shuttling between kitchen and outdoors, sweating, while everyone else relaxes. A fluted cedar bar, softly backlit, makes hosting effortless and photogenic. Add a slimline pizza oven and you’ve basically created a boutique rooftop pizzeria that happens to be at home.
The vibe is warm contemporary with a wink of alpine spa. It works for real life because vertical fluting hides scuffs and stretches the eye up, while cedar withstands weather with proper oiling. The amber backlighting turns bottles into jewels at night and gives you that editorial “glow box” effect. Also, pizza. Enough said.
Variations include a budget-friendly resin-fluted facade over a standard cabinet frame, or a renter version using a freestanding bar cart with peel-and-stick fluted panels and a portable electric oven. For small terraces, go single-module with a pull-out cooler drawer and fold-down prep shelf.
Budget Breakdown:
- Fluted cedar cladding + outdoor-grade base: $900–$2,400
- LED backlighting (IP65 strip + diffuser): $120–$380
- Slimline pizza oven (gas or wood pellet): $300–$900
- Compact undercounter fridge or cooler drawer: $400–$1,200
- Bar stools (2–3): $240–$900
- Heat-resistant counter (porcelain or stainless): $400–$1,200
Total Estimated Cost: $2,360 – $6,980
Best For: Hosts who love ritual—aperitivo hour, pizza nights, or mocktail tastings. Ideal on medium terraces with clearances for heat and ventilation.
Key Design Elements:
- Main materials: cedar fluting, porcelain slab, stainless trim
- Color palette: honeyed wood, matte black hardware, warm white light
- Lighting strategy: under-counter amber backlight + one task sconce
- Furniture silhouettes: slim stools with footrest, narrow bar depth
- Texture layers: ribbed wood, satin metal, smooth stone
- Accent details: smoked-glass bottles, linen bar towels, a single terracotta herb pot
Why This Feels Designer: The vertical rhythm of fluting looks custom, and the backlight creates depth without clutter. It’s the kind of restraint pros lean on when square footage is tight.
How To Recreate This Look:
- Measure a narrow footprint (16–22 inches deep) to keep traffic flow clear.
- Build or buy a base cabinet; clad fronts with fluted cedar strips, finished with marine oil.
- Install an IP65 LED strip behind a frosted diffuser under the counter lip.
- Position the pizza oven on a heat-resistant surface; check clearances and wind direction.
- Style with two stools and a low bowl of lemons—done.
One Thing To Avoid: Over-styling the back bar. Too many bottles kill the editorial effect and complicate cleanup. Curate five favorites and hide the backup.
Pro Styling Tip: For nighttime shots, chill the space lights and let the bar lighting carry the scene; it deepens shadows and makes the cedar texture pop.
Did You Know? Warm LEDs around 2400K make drinks look richer and skin look candlelit. Cooler LEDs make everything feel cafeteria. Choose warmth—always.
Here’s the mindset reframe: luxury isn’t about more pieces; it’s about sharper edits. Choose one statement, one lighting move, one texture story—and commit.
Quick Checklist
- Travertine or porcelain-look pavers
- Low, sculptural daybed with performance cushions
- Warm-dim outdoor sconces (2200–2700K)
- Compact fire bowl or ethanol burner
- Teak or eucalyptus slat decking
- Modular outdoor sectional with connectors
- Commercial-grade amber string lights
- Concrete plinth dining table
- Curved or L-shaped banquette seating
- Clustered outdoor-rated pendants
- Limewash privacy wall or panels
- IP65 up-lights for grazing texture
- Rattan canopy for dappled shade
- Hanging swing chair with rated hardware
- Fluted cedar-clad bar module
- Amber LED backlighting with diffuser
- Slimline pizza oven with heat-safe counter
- Single-statement plants in substantial pots
- Performance textiles in warm neutrals
- One restrained pattern per zone
Frequently Asked Questions
How do I keep costs under control when building a resort-like penthouse terrace?
Pick one hero move per idea—like the daybed, the plinth table, or the fluted bar—and let everything else be simple. Use porcelain-look stone, resin fluting, and plug-in lighting to mimic pricier materials. Cap your plan at three purchases to start, then layer over time.
My terrace is tiny. Can I still pull off these looks?
Absolutely. Scale down to one anchor piece: a twin daybed, a two-piece sectional, a half-plinth table, or a single swing chair. Keep furniture low, avoid tall backs that chop sightlines, and choose round side tables to keep circulation smooth.
What about maintenance and weather—will these materials hold up?
Choose performance fabrics, powder-coated metals, porcelain slabs, and resin or sealed natural woods. Oil cedar and eucalyptus seasonally. Store cushions vertically in a deck box when not in use, and use furniture clips so modules don’t drift in wind.
I rent. Can I do any of this without drilling into the building?
Yes. Use interlocking deck tiles, planters as posts for string lights, freestanding privacy screens, and plug-in or battery lights. For pendants, run a taut wire between planters with adhesive clips and use swagged cords—no holes needed.
What’s the most common design mistake on a penthouse terrace?
Underscaled furniture and cool lighting. Go bigger and lower with your anchor piece, and keep bulbs warm (2200–2700K). This pair alone makes city terraces feel like a private resort—seriously.
Closing Thoughts
Pick one idea—just one—and start. Maybe it’s the travertine daybed glow or the cedar bar with pizza nights that become your new ritual. Give yourself a single weekend and a clear cart, and you’ll feel the shift the first time the lights dim and the city hum becomes background music.
The truth is, luxury outdoors doesn’t come from price tags. It comes from texture that loves light, lighting that flatters skin, and the confidence to edit. Keep your palette tight, your silhouettes low and sculptural, and your bulbs warm. That’s the recipe for a penthouse terrace that reads like a private resort.
You’ve got this. Start with the piece you can’t stop thinking about, then add the light that makes it sing. When you sit back with a glass of something cold and the skyline does its thing, you’ll know you nailed it.