5 Meditation Garden In Your Backyard (Step By Step)
You want a quiet corner that calms your nervous system on contact. You hate the patchy lawn, the random plastic planters, and that neighbor’s AC unit that hisses through every attempt at deep breathing. You’re picturing filtered light on stone, grasses that sway just enough to slow your heart rate, and a seat that actually invites stillness. These five meditation garden ideas fix that mess with specific, photogenic solutions you can finish in weekends, each with a clear budget path and step-by-step flow. Think textures, grounded color, and lighting that flatters your space—and your face—because yes, this can be gorgeous and practical. If you crave a backyard that looks spa-level in photos but works on a Tuesday at 6:12 a.m., you’re in the right place.
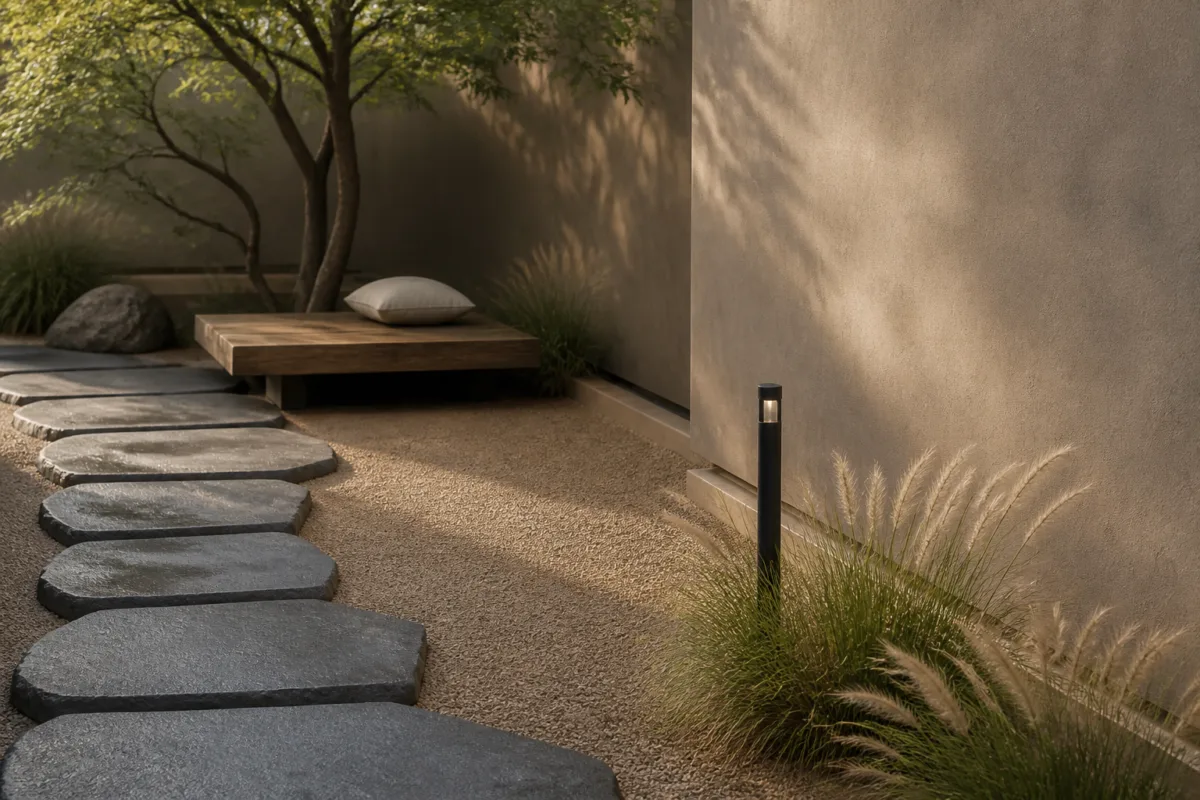
1. Basalt Stone Grounding Path With Dappled Morning Light And A Low Teak Platform Bench
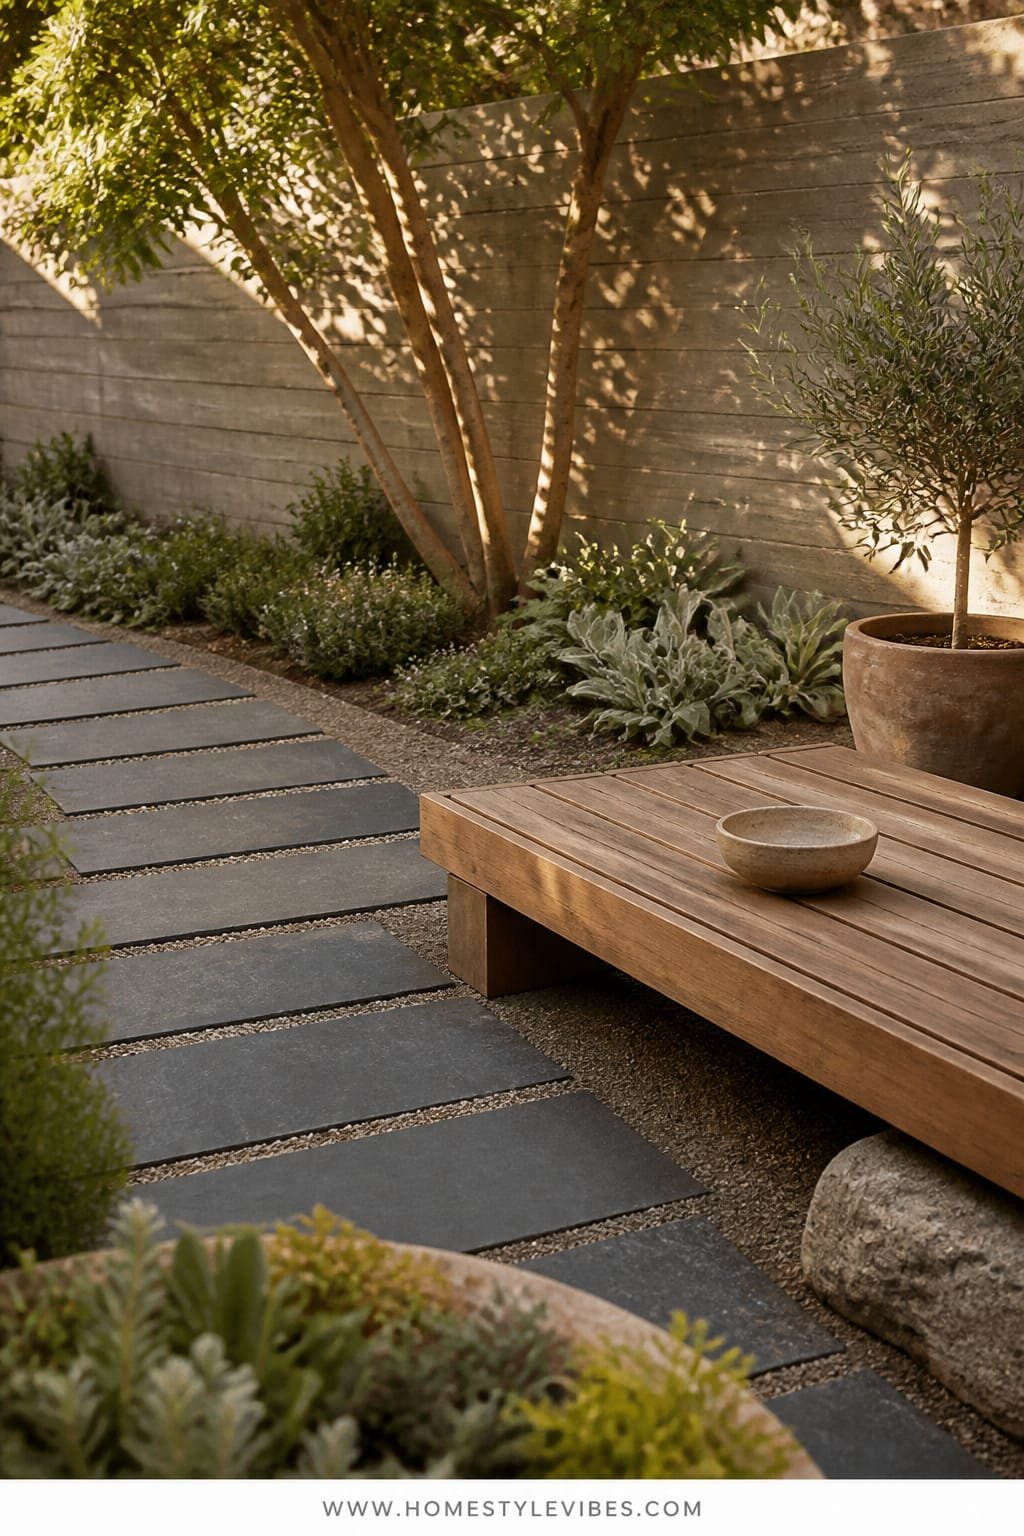
We’ve all been there: you step into your yard ready to breathe, then immediately trip over hoses and get a face full of glare from a blindingly white fence. This design creates a grounded, modern Mediterranean mood that stays calm because the materials do the heavy lifting. Basalt stepping stones on a bed of fines carve a clear path, dappled morning light filters through a small canopy tree, and a low teak platform bench anchors the ritual. It’s serene, forgiving, and works beautifully in real homes where kids want to run around later and you need a space that won’t show dirt every time it drizzles.
Here’s why it works: matte textures eat harsh light, and the slim silhouette of a teak bench keeps things feeling airy. Basalt and gravel make your garden look intentional, not fussy. That soft dappling creates cinematic shadows at sunrise, which is when you’ll actually use this meditation garden. The design photographs beautifully because of the contrast between dark stone and soft foliage—shadows create depth and a gentle vignette around your subject (you, breathing and unbothered).
Variation ideas keep it flexible. Budget-friendly? Use concrete pavers stained charcoal instead of basalt and choose an acacia bench with a teak-tone oil. Small space? Tighten the stepping stones into a short arc and pair with a dwarf olive tree in a tall, narrow planter to pull the eye up. Renter-friendly swap: lay pavers over weed barrier without adhesive and choose a freestanding shade sail or an adjustable wooden trellis for that dappled light. Darker version? Lean into moody greens with black mondo grass and deep plum heuchera for contrast.
Budget Breakdown:
- Basalt stepping stones or charcoal pavers: $6–$18 per sq ft
- Decomposed granite or fines: $4–$8 per sq ft installed
- Teak or acacia platform bench: $180–$700
- Dwarf canopy tree (Japanese maple/olive): $120–$450
- Landscape fabric + steel edging: $60–$180
- Soft underlighting (solar stake lights): $40–$120
Total Estimated Cost: $600 – $3,200
Best For: Narrow side yards or small back patios that need a clear focal route; homeowners who prefer low-water planting and crave a morning ritual spot.
Key Design Elements:
- Main materials: Basalt/charcoal pavers, decomposed granite, oiled teak
- Color palette: Charcoal, soft olive green, warm wood, silver-gray gravel
- Lighting strategy: Morning-focused dapple via a single canopy tree, subtle ground-level solar lights
- Furniture silhouettes: Low, linear bench with a wide stance
- Texture layers: Rough stone, fine gravel, feathery grasses, velvety foliage
- Accent details: Slim steel edging, black ceramic bowl planter, linen throw cushion
How To Recreate This Look:
- Start with layout: mark a gentle S-shaped path at least 30 inches wide that leads to a quiet back corner.
- Add a base: remove grass, level soil, lay landscape fabric, and spread 2–3 inches of fines or decomposed granite.
- Layer stepping stones: set basalt or charcoal pavers 2–3 shoe-lengths apart, checking for stable footing.
- Install your bench: place the low teak platform at the path’s end, square to the fence for calm alignment.
- Style with foliage: add a small canopy tree for dappled light; flank with grasses (carex, festuca) and one dark-leaf plant for contrast.
- Finish with light: tuck two or three solar stake lights low and away from direct eye lines to graze the path at dawn.
Why This Looks Expensive: The palette is restrained and tonal. Dark stone against soft greens reads quiet and high-end, while the low-slung bench feels custom—even when it’s a sensible buy. The steel edging gives you those crisp lines that scream “intentional.”
Watch Out: Don’t scatter too many plant varieties. More than five different plants in a small meditation garden starts to feel busy and undermines the calm. Also, level your stones—wobbly footing kills the vibe fast.
Pro Styling Tip: For photos, mist the stones lightly so their color deepens and the contrast pops against the pale gravel.
Keep scrolling if your yard bakes in the afternoon or you crave the sound of water without a high-maintenance pond.
2. Honed Limestone Circle With Warm Twilight Glow And A Curved Concrete Meditation Seat
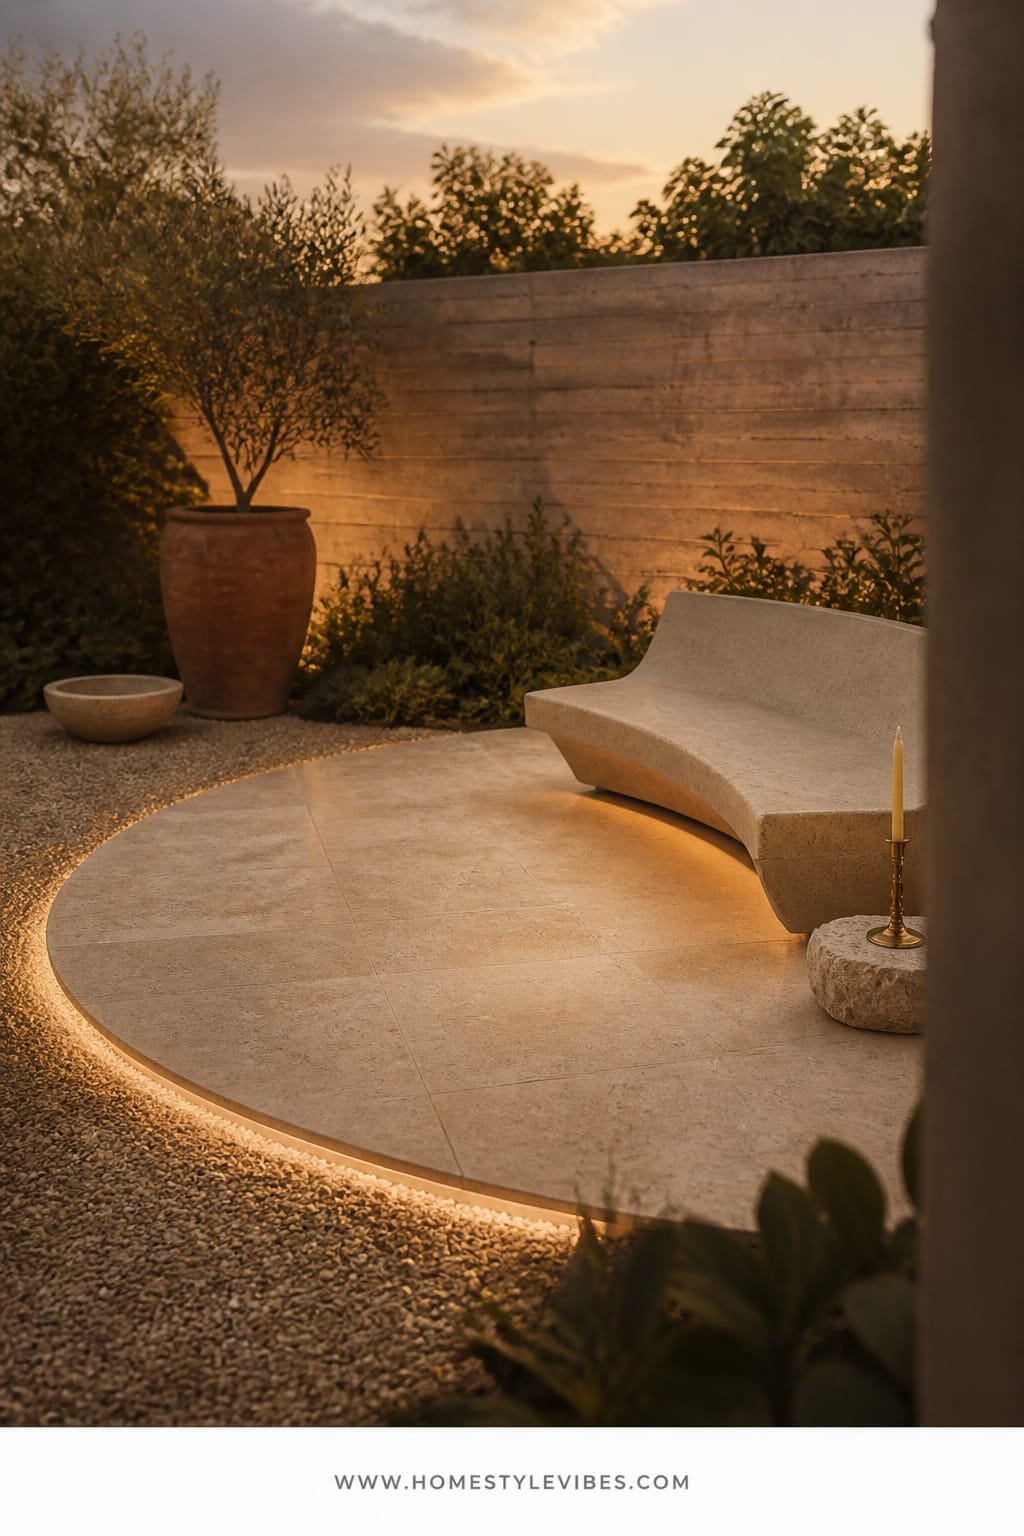
It’s that one corner that always feels off—you tried a bistro set and a lantern, but it still looks like “backyard storage.” This design leans into soft curve energy for a hotel-spa mood that flatters at sunset. A limestone paver circle sets a ceremony space, the lighting warms like candlelight, and a curved concrete meditation seat gives you a sculptural anchor. It reads grown-up and grounded, not fussy.
Why it works in real homes: circles calm the eye and solve awkward angles, especially in yards with too many hard lines. Honed limestone reflects just enough light to glow at dusk, while the concrete seat won’t rot, wobble, or need seasonal babying. The look photographs beautifully thanks to gentle geometry—circle plus curve—paired with a warm amber light that makes skin look soft and plants look lush.
Two smart variations: on a budget, use limestone-look porcelain or even circular concrete pavers with polymeric sand for tight seams. If your space is tiny, make a 6-foot micro-circle and tuck the seat outside the edge to save floor space. Renter-friendly? Build a circle with modular deck tiles in a pale stone finish and use a fiberglass-look curved bench that you can move later. Want a moodier version? Swap in darker limestone and underplant with ferny textures for shadow play.
Key Design Elements:
- Main materials: Honed limestone pavers, smooth concrete seat, warm brass accents
- Color palette: Soft cream, greige, olive green, warm brass
- Lighting strategy: Twilight focus—hidden up-lights on grasses and a single warm lantern at knee height
- Furniture silhouettes: Curved bench with integrated back or simple arc
- Texture layers: Smooth stone, fine pebbles at the perimeter, soft foliage (thyme, fescue, dwarf mondo)
- Accent details: Brass path markers, a single oversized ceramic vessel
Budget Breakdown:
- Honed limestone or porcelain circle kit: $9–$22 per sq ft
- Curved concrete bench: $300–$1,200
- Low-voltage warm up-lights: $120–$320
- Perimeter pebbles + edging: $80–$250
- Soft planting (grasses, thyme): $120–$260
Total Estimated Cost: $1,000 – $3,500
Best For: Courtyard patios, oddly shaped yards, or anywhere you want a defined, ceremonial spot for breathwork or evening tea.
How To Recreate This Look:
- Map a circle: use a stake and string to draw your radius; aim for 8–10 feet wide for comfortable seating.
- Prepare the base: excavate 3–4 inches, add compacted base rock, then a fine sand layer.
- Lay stone: set your honed pavers from the center out, tapping level and keeping joints consistent.
- Place the seat: align the curved bench so it echoes the circle edge; keep 30 inches of knee space.
- Plant softly: circle the perimeter with grasses and creeping thyme to soften the edge.
- Light it right: install one or two low-voltage up-lights aimed through grasses and a single knee-height lantern near the seat.
Why This Feels Designer: The circle removes decision fatigue—it’s a single, sculptural move. Warm light at knee height (not face height) keeps the glow intimate. The restraint of one big vessel and one bench avoids the “catalog pile-up.”
One Thing To Avoid: Don’t push the bench directly against a fence. Give it 8–12 inches so plants can frame behind it. Also, skip cool blue LEDs; they flatten everything and kill the cozy twilight mood.
Pro Styling Tip: Shoot photos just after sunset when the sky is cobalt and the warm fixtures read like candlelight—instant editorial contrast.
Wish your yard could hush traffic noise? Next up is the water element that quiets a buzzing brain and a busy street.
Remember, this isn’t about recreating a showroom. It’s about building a backyard meditation garden that actually meets you where you are—your light, your budget, your schedule. If one idea resonates more than the others, that’s your starting point. You don’t need all five.
3. Charred Cedar Fence Backdrop With Soft Amber Lantern Light And A Black Slate Sitting Pad
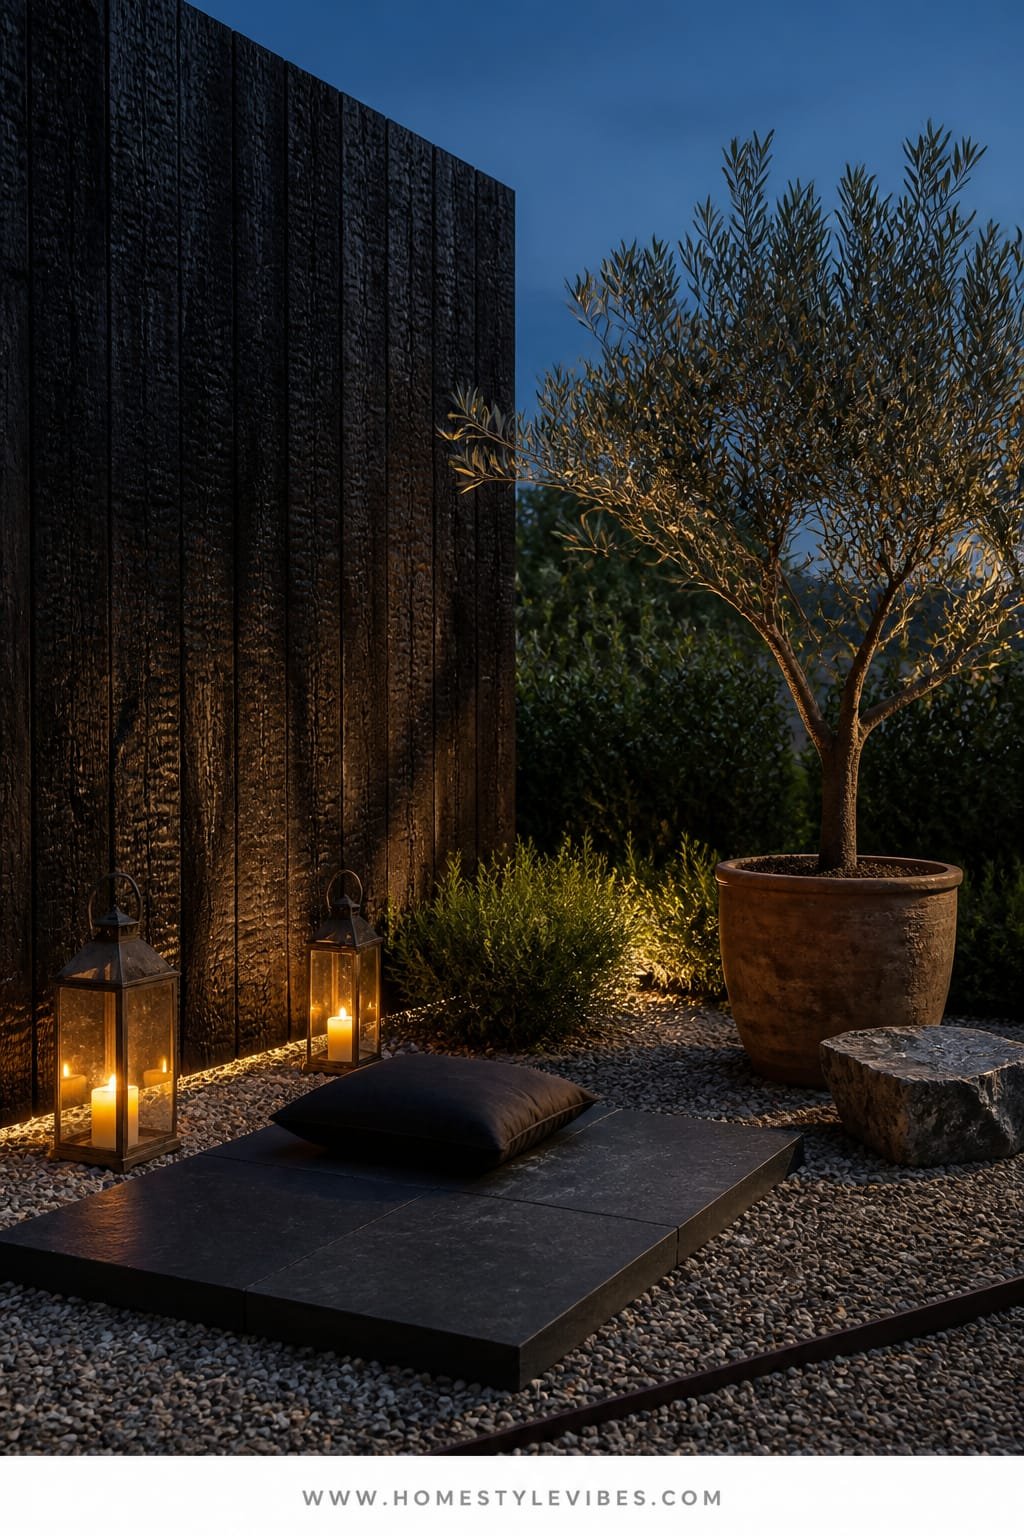
You want a private, cocooned corner, but the neighbor’s second-story window stares straight into your soul. You’ve tried tall plants and a lattice screen, but it still reads “temporary.” This design fixes sightlines with a charred cedar (shou sugi ban) fence panel, adds a moody black slate sitting pad for structure, and warms everything up with amber lantern light. The mood: urban zen meets modern cabin. It’s cinematic at night and shadow-rich during the day.
Here’s why it works: charred cedar drinks light and makes greens pop. The black slate creates a crisp “stage” for a meditation cushion or a low floor stool, and that contrast makes the composition look finished. It’s practical for small yards and narrow side returns, because vertical surface area does the heavy lifting. Maintenance stays minimal: cedar weathers well, slate hides dust, and lanterns on timers mean you don’t fuss with switches.
Styling flexibility? Big time. Budget version: use black-stained fence boards with a matte sealer instead of true char. Renter-friendly: freestanding cedar panel anchored in planters filled with rock for stability, plus interlocking slate-look deck tiles. Darker version: add black mondo grass and purple ajuga to deepen the palette. Small space tweak: reduce the pad to 5×5 feet and opt for a foldable zafu that stores neatly in a side basket.
Budget Breakdown:
- Charred cedar panel or black-stained fence boards: $8–$18 per sq ft
- Slate or slate-look tiles: $6–$14 per sq ft
- Lanterns (battery or low-voltage amber): $60–$240
- Planters + grasses: $150–$400
- Cushion or low stool: $45–$180
Total Estimated Cost: $900 – $3,200
Best For: Tight urban yards, side returns, and anyone who meditates at night or pre-dawn and wants moody privacy.
Key Design Elements:
- Main materials: Charred or black-stained cedar, black slate, matte metal
- Color palette: Deep black, graphite, evergreen, touches of bronze
- Lighting strategy: Low amber lanterns at foot level, indirect glow that grazes the fence
- Furniture silhouettes: Floor-level seating, slim side table, tall cylindrical planter
- Texture layers: Charred grain, cleft slate, glossy leaves, linen cushion
- Accent details: Bronze pull ring on lantern, stone incense dish, quiet wind chime
How To Recreate This Look:
- Define your backdrop: install a 6–7 foot charred cedar panel or black-stained fence section.
- Create the pad: lay compacted base and mortar-set slate tiles, or use interlocking deck tiles for speed.
- Soften edges: place two tall planters flanking the pad with grasses or bamboo (clumping only).
- Add light: nestle two amber lanterns at opposite corners; aim light across the slate, not into eyes.
- Seat smart: add a cushion or low stool and a small side perch for tea or a notebook.
Why This Reads High-End: Tonal depth plus matte finishes. Black on black with strategic warm highlights feels curated and custom. The slate edge lines stay razor-clean, which is a detail most DIY spaces miss.
The Most Common Mistake: Using shiny black paint that reflects every stray light source, including your neighbor’s porch bulb. Go matte or satin at most. Also, avoid busy plant mixes—choose two species and repeat.
Pro Styling Tip: Angle one lantern behind a grass clump so blades catch light and cast ripple-like shadows on the fence for instant texture in photos.
Want movement and sound? The next garden folds in water in a way that won’t turn into a mosquito party.
Confession: the first time I installed a black fence wall, I panicked on day two. It looked too dark. Then the plants went in, the lanterns clicked on at dusk, and suddenly it felt like a boutique courtyard. Sometimes you need to trust the process through the awkward middle.
4. Weathered Corten Steel Edge Beds With Soft Diffused Shade And A Minimal Stone Water Bowl
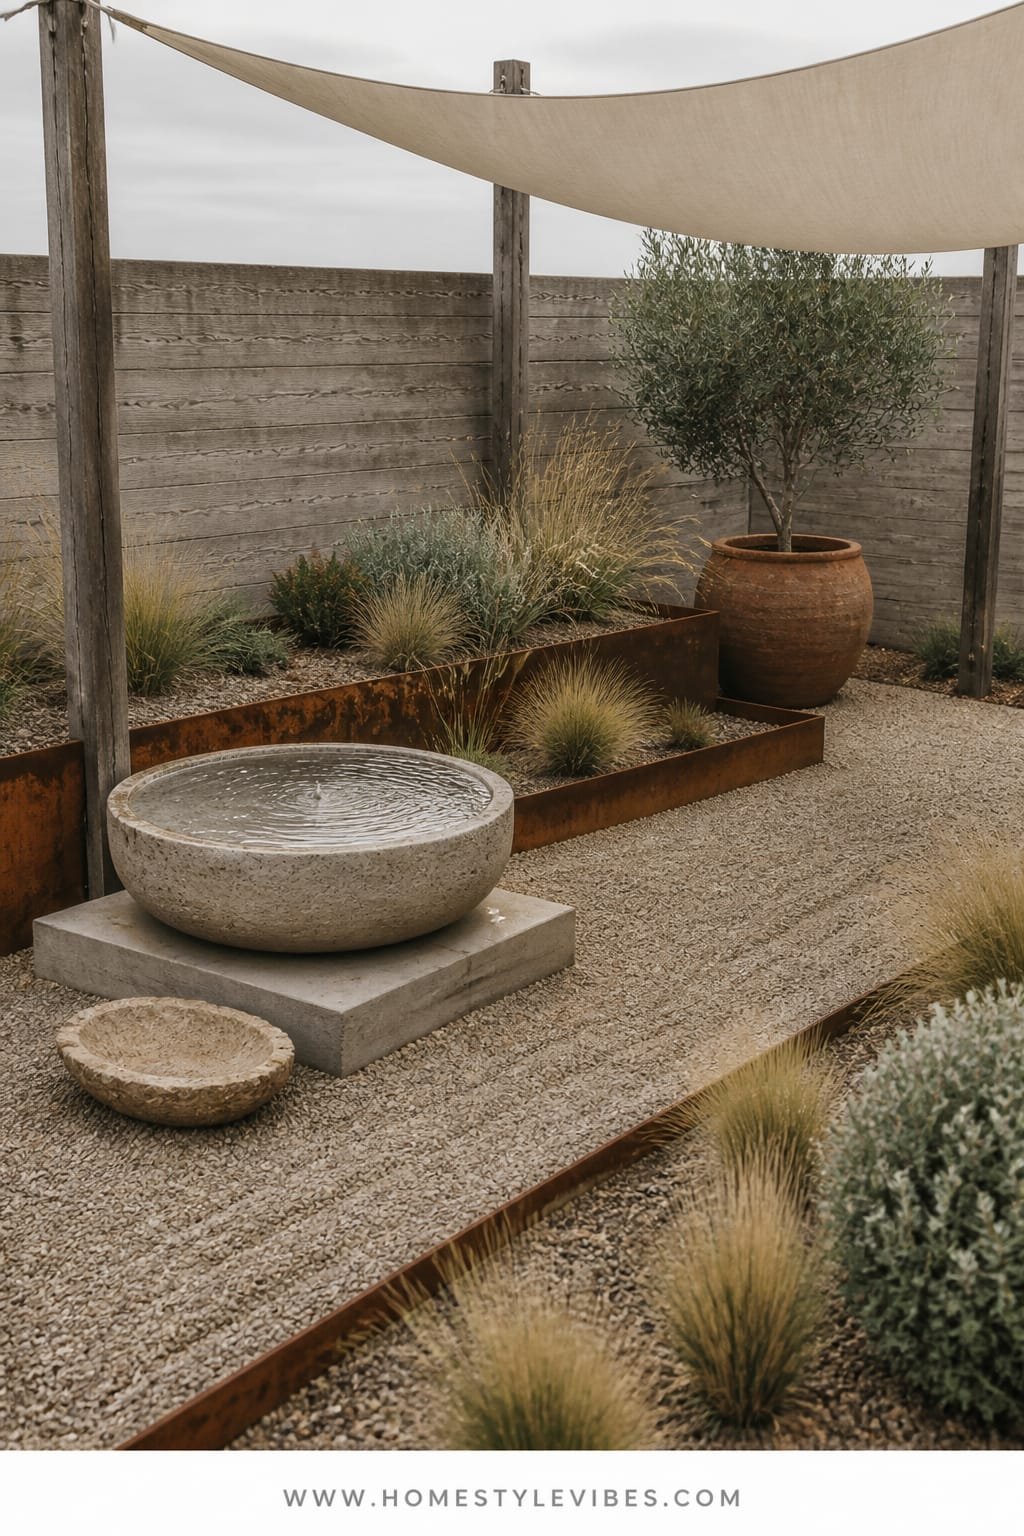
You love the idea of water but hate the maintenance of a pond. You want that soft hush that makes your shoulders drop but refuse to babysit a pump all summer. This design layers low Corten steel edges—those handsome, weathered-orange planters that look like sculpture—with diffused shade from a simple fabric canopy and a single stone water bowl with a recirculating pump. The vibe skews Japandi-meets-desert garden: sculptural, quiet, and insanely photogenic.
Why it works: Corten’s warm patina plays beautifully with cool greens and gray stone, and it looks good messy—rain streaks, leaf litter, all welcome. A fabric shade sail filters harsh light, which is the enemy of calm. The water bowl gives you sound with minimal splash, and because the reservoir is hidden under polished pebbles, mosquitos can’t access standing water. Real homes need durable, low-touch elements, and this combo delivers.
Variations make it attainable. Budget path: use rust-colored powder-coated steel edging instead of true Corten and swap the stone bowl for a ceramic-look version. Small space: one 3×3 foot Corten cube, one compact bowl, two grasses, done. Renter-friendly: freestanding planters on furniture sliders and a plug-in fountain bowl you can pack when you move. Darker mood: black pebbles in the bowl and shadow-loving plants (asplenium ferns, black mondo) under the canopy.
Budget Breakdown:
- Corten edging/planters: $10–$24 per linear foot or $200–$600 per planter
- Shade sail + posts/hardware: $150–$500
- Stone or ceramic water bowl + pump: $180–$800
- Polished pebbles/river rock: $60–$180
- Planting (grasses, ferns, low shrubs): $180–$450
- Outdoor GFCI and extension concealment: $80–$200
Total Estimated Cost: $850 – $2,900
Best For: Sun-heavy yards that need softness; households craving sound masking for street noise; anyone who meditates mid-day and needs shade.
Key Design Elements:
- Main materials: Corten steel, river rock, stone or ceramic bowl
- Color palette: Warm rust, charcoal gray, deep green, driftwood beige
- Lighting strategy: Late-afternoon soft light via a shade sail; optional micro-spot on water bowl for evening sparkle
- Furniture silhouettes: No chair required—kneeling mat or low cushion beside the bowl
- Texture layers: Patina steel, smooth pebble, broad-leaf plants, linen shade
- Accent details: Subtle bamboo ladle, low footstool, hidden cable clips
How To Recreate This Look:
- Define a frame: install Corten planters in an L-shape to hug a corner and create a natural “room.”
- Set your shade: anchor a triangular sail so light filters in from one side, not directly overhead.
- Place the bowl: position slightly off-center, then add a recirculating pump and top with pebbles to hide hardware.
- Choose plants: combine one structural shrub, two grasses, and a groundcover for simplicity.
- Conceal cords: run the pump cable along planter edges; secure with rust-colored clips.
Why This Looks Intentional: The warm-cool material dialogue—rust next to gray stone—reads like a deliberate palette, not a random yard collection. The single water bowl is a strong focal point you can compose around, which keeps your eye calm.
Don’t Do This: Skip splashy sprays or multi-tier fountains in small spaces; they add noise clutter. Also, avoid bright white shade sails—they glare. Choose oatmeal, sand, or light gray for gentler diffusion.
Pro Styling Tip: For photos, drop a single green leaf into the bowl and shoot from above; the gentle ring ripple screams serenity without feeling staged.
Take a breath. If you only do one thing this month, decide your light: morning dapple, twilight glow, or soft shade. Pick that first and the rest slots into place.
5. Smoothed River Pebble Carpet With Cool Dawn Light And A Woven Rattan Swing Chair
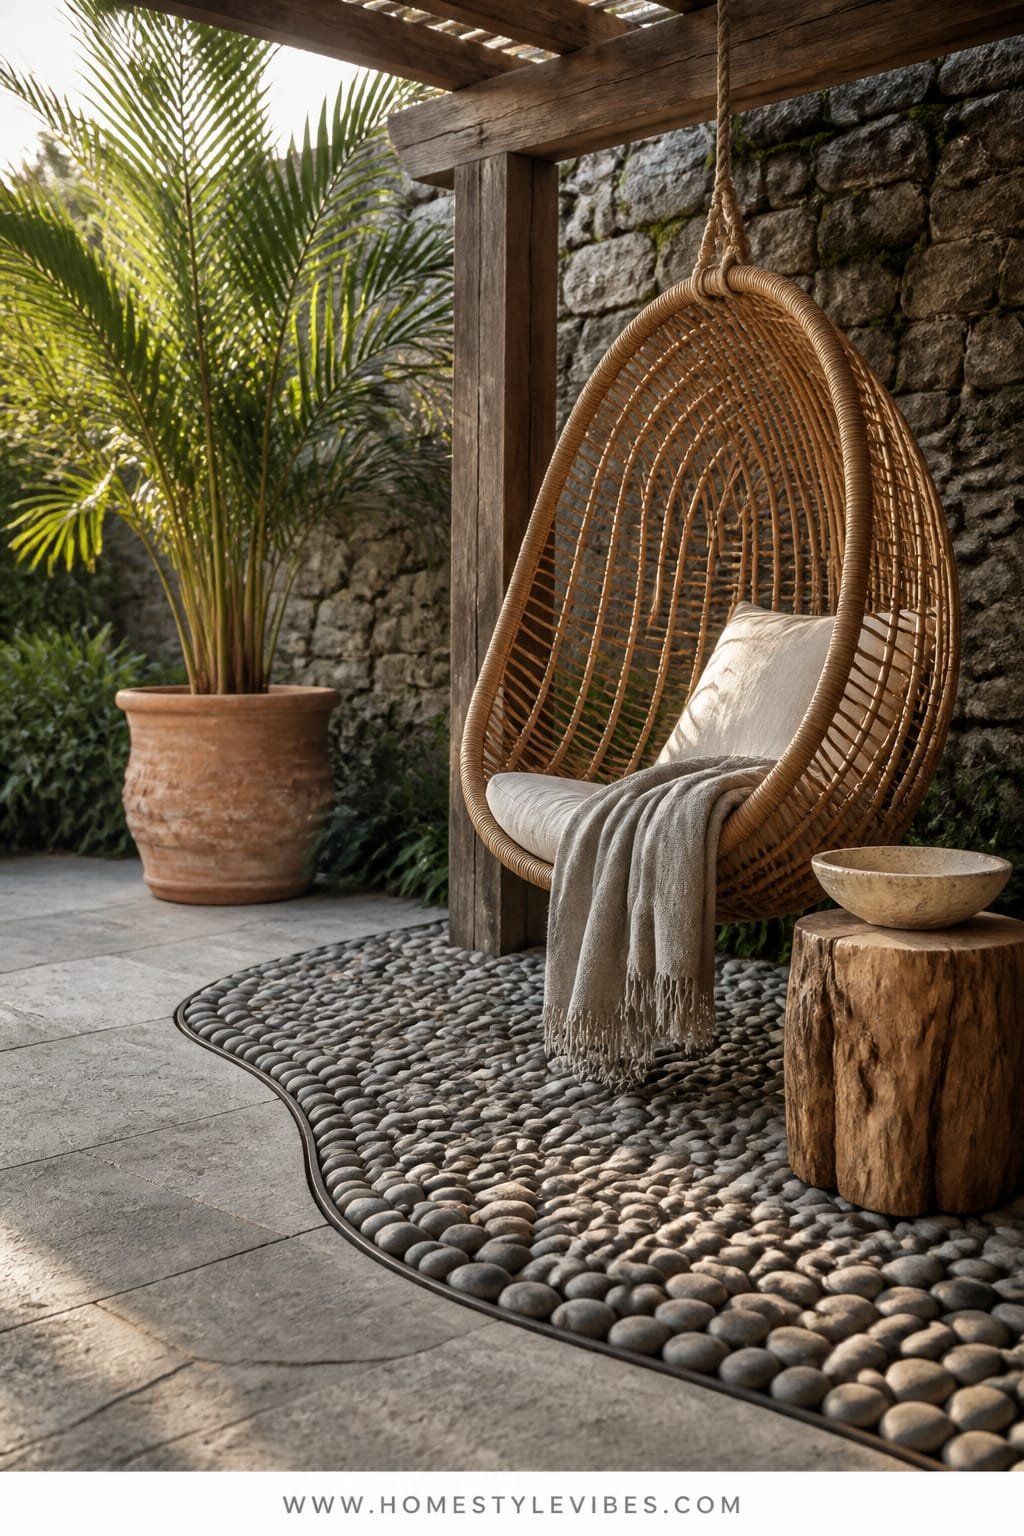
You want comfort, but every chair you tried felt like patio furniture, not a place to be still. The idea here is tactile therapy underfoot with a bit of playful movement up top. A river pebble “carpet” massaged by bare feet sets the foundation, cool dawn light keeps it crisp and awake, and a woven rattan swing chair cradles you without feeling heavy. The mood is coastal-jungle calm—clean, airy, a hint of vacation without the kitsch.
Here’s why it works in real life: pebbles drain, so no soggy lawn stress; the swing scratches that fidgety itch without pulling you out of your body; and the light makes mornings feel intentional. The setup photographs beautifully because the chair’s open weave casts lacy shadows on the pebble carpet—texture on texture, flattering on skin and plants alike.
Practical variations make it approachable. Budget version: use tumbled gravel topped with a small framed pebble “rug” in the center. Small-space version: a 4×6 foot pebble pad with a single-post swing chair or a freestanding A-frame. Renter-friendly: interlocking pebble tiles over a deck plus a portable swing frame that folds flat. Darker palette: black pebbles with deep green foliage and a graphite-colored chair cushion.
Budget Breakdown:
- River pebbles or interlocking pebble tiles: $5–$12 per sq ft
- Metal chain or A-frame for swing: $150–$450
- Woven rattan or synthetic swing chair: $180–$700
- Border edging (steel or composite): $60–$160
- Planting (broad-leaf tropicals or hardy lookalikes): $140–$380
- Cool-tone lanterns or path markers: $50–$180
Total Estimated Cost: $700 – $2,500
Best For: Early risers, smaller patios, and anyone who needs a sensory reset before the day attacks your inbox.
Key Design Elements:
- Main materials: River pebble, rattan/synthetic weave, powder-coated metal
- Color palette: Soft gray, sand, leafy green, natural rattan
- Lighting strategy: Embrace natural cool dawn light; add subtle, neutral lanterns for pre-dawn use
- Furniture silhouettes: Cocoon-like hanging chair, slim planter stands
- Texture layers: Pebble underfoot, woven seat, waxy leaves, linen cushion
- Accent details: Minimal rope ties, neutral bolster pillow, stone side table
How To Recreate This Look:
- Frame the zone: outline a rectangle or oval with metal edging to contain the pebbles.
- Prep base: remove grass, compact soil, lay weed barrier, and pour 2–3 inches of pebbles.
- Hang the swing: use a rated beam or a freestanding A-frame; test for clearance and sway.
- Balance the sightline: add two tall planters behind the swing to create a green backdrop.
- Add the comfort layer: a neutral cushion and a small stone table for tea or a candle.
Why This Looks Expensive: Negative space. You avoid overfilling with furniture, so the swing becomes a sculptural moment. The pebble “carpet” reads custom, and the tight, neutral palette keeps it chic instead of beach-bar kitschy.
Watch Out: Don’t install the swing too low. Hang it so your knees bend at 90 degrees without dragging toes—too low looks sad and feels awkward. Also, go with rounded pebbles; sharp gravel ruins the whole barefoot ritual.
Pro Styling Tip: Shoot from ground level across the pebble field so the chair silhouette cuts cleanly against foliage—instant magazine vibe.
A quick story: a friend of mine spent weeks agonizing over plant species for her meditation corner. She finally admitted the problem wasn’t the plants; it was that her chair faced the trash cans. We rotated the layout 45 degrees, added a slim hedge, and she started using the space daily. Layout beats plant lists every time.
Quick Checklist
- Pick your light: morning dapple, twilight warmth, or soft shade
- Choose one dominant material: stone, wood, steel, or pebble
- Define a clear focal point: bench, seat, water bowl, or swing
- Limit your plant palette to 3–5 species max
- Use matte finishes to avoid glare
- Add low, warm lighting for evening calm
- Edge everything for crisp lines and easy maintenance
- Conceal cords and irrigation with clips or trenches
- Plan for drainage under gravel or pebble areas
- Keep one surface empty for breathwork or a cushion
- Test sightlines seated before you commit
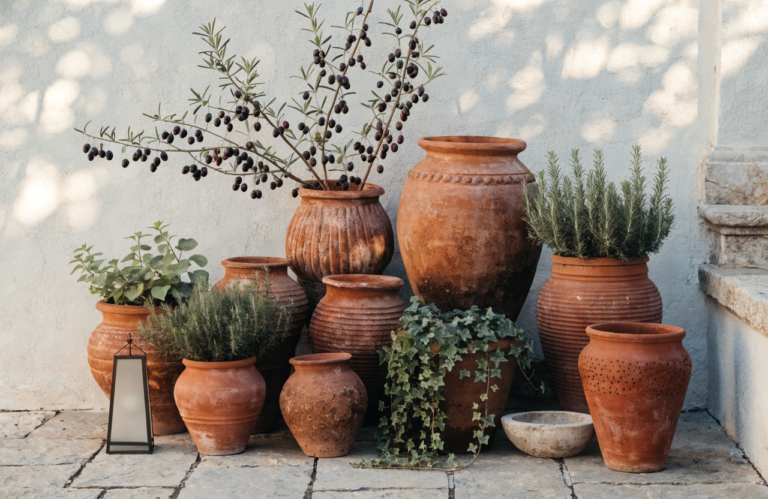
- Use one oversized vessel instead of many small pots
- Time your photos at golden hour or blue hour
- Keep a small reset kit nearby for fast cleanups
- Stick to a tight color story that suits your home’s exterior
Frequently Asked Questions
How much should I budget for a simple backyard meditation garden?
Plan for $600–$1,200 for a basic setup with gravel, a bench or cushion, and a few plants. Add lighting and a nicer material like limestone or Corten, and you’ll likely land in the $1,500–$3,000 range. Water features or custom fencing push it higher. Start with one investment piece and build in phases.
What if my space is tiny or awkwardly shaped?
Use shapes that correct the awkwardness. A circle instantly organizes odd angles; an L-shaped planter creates a “room” in a corner. Keep pathways at least 30 inches wide and pick one focal piece—a bench, a bowl, or a swing—to avoid clutter. Small doesn’t mean cramped if your lines are clean.
I’m a renter—can I do this without upsetting my landlord?
Yes. Use interlocking deck tiles, freestanding screens, planters on sliders, and solar or battery lighting. Choose a portable bench or swing frame. Lay gravel or pebble over weed barrier without adhesives so removal is easy. Save all receipts and take before photos to restore if needed.
How do I maintain these gardens without adding chores?
Choose materials that hide life: dark stone, matte finishes, and plant species that don’t shed constantly. Schedule a 10-minute weekly sweep, a monthly top-up of gravel, and a quarterly rinse of lantern glass. For water bowls, add a few drops of enzyme clarifier and clean the pump filter every few weeks in peak season.
What’s the most common design mistake with meditation gardens?
Too many small items and zero edge definition. A dozen tiny pots reads chaotic. Choose one oversized vessel, use clear edging on gravel or pebble zones, and keep your plant list short. Also, mind the light—harsh glare is the enemy of calm. Diffuse it or design for times of day you’ll actually use the space.
Closing Thoughts
Pick one idea from these five meditation gardens and claim a corner this weekend. Maybe it’s a basalt path to a low teak bench, or a single stone water bowl that hushes the street. Keep the palette tight, keep your edges crisp, and choose lighting that flatters the scene you’ll see when your eyes open after a deep breath.
The truth is, luxury outdoors comes from texture, light, and restraint. Matte stone next to soft foliage. One strong focal point instead of five almost-good ones. Warm glows cast low, not in your eyes. Do that, and your yard stops feeling like a list of chores and starts feeling like a ritual you look forward to.
You’re closer than you think. Choose your light, pick your anchor, and map the first line on the ground. Ten minutes from now, you could be sitting in your backyard, hearing the soft hush of leaves and realizing, oh—this is what calm looks like. Seriously, you’ve got this.