5 Diy Patio Garden Ideas for a Relaxing Outdoor Corner
You want a serene little patio nook where the air feels softer, your shoulders drop, and a simple glass of iced tea tastes like a tiny vacation. You hate that your current outdoor corner feels awkward, exposed, or totally underwhelming—plastic chairs, a dusty plant that’s hanging on for dear life, and lighting that makes everything look flat. Picture this instead: sunlight filtering through leaves, a layered rug underfoot, the quiet clink of a watering can, and textures that feel calm and grounded. These 5 DIY patio garden ideas will help you fix the specific issues that keep your outdoor corner from feeling like an exhale—on a doable budget and in a single weekend per project.
Each design hits a common pain point: furniture that looks pieced together, planters that feel random, lighting that’s either too harsh or too dim, and the endless question of where to start. I’ll show you how to style a small patio for impact, how to work with mixed light, and how to make your space camera-ready without feeling try-hard. This is Pinterest-worthy without the pressure—think up to $600 per design, easy weekend builds, and smarter styling that actually fits your life. If you live for cozy corners, Saturday morning coffee rituals, and low-key entertaining, this is your blueprint.
1. Soft Mediterranean Courtyard With Potted Olive Alley
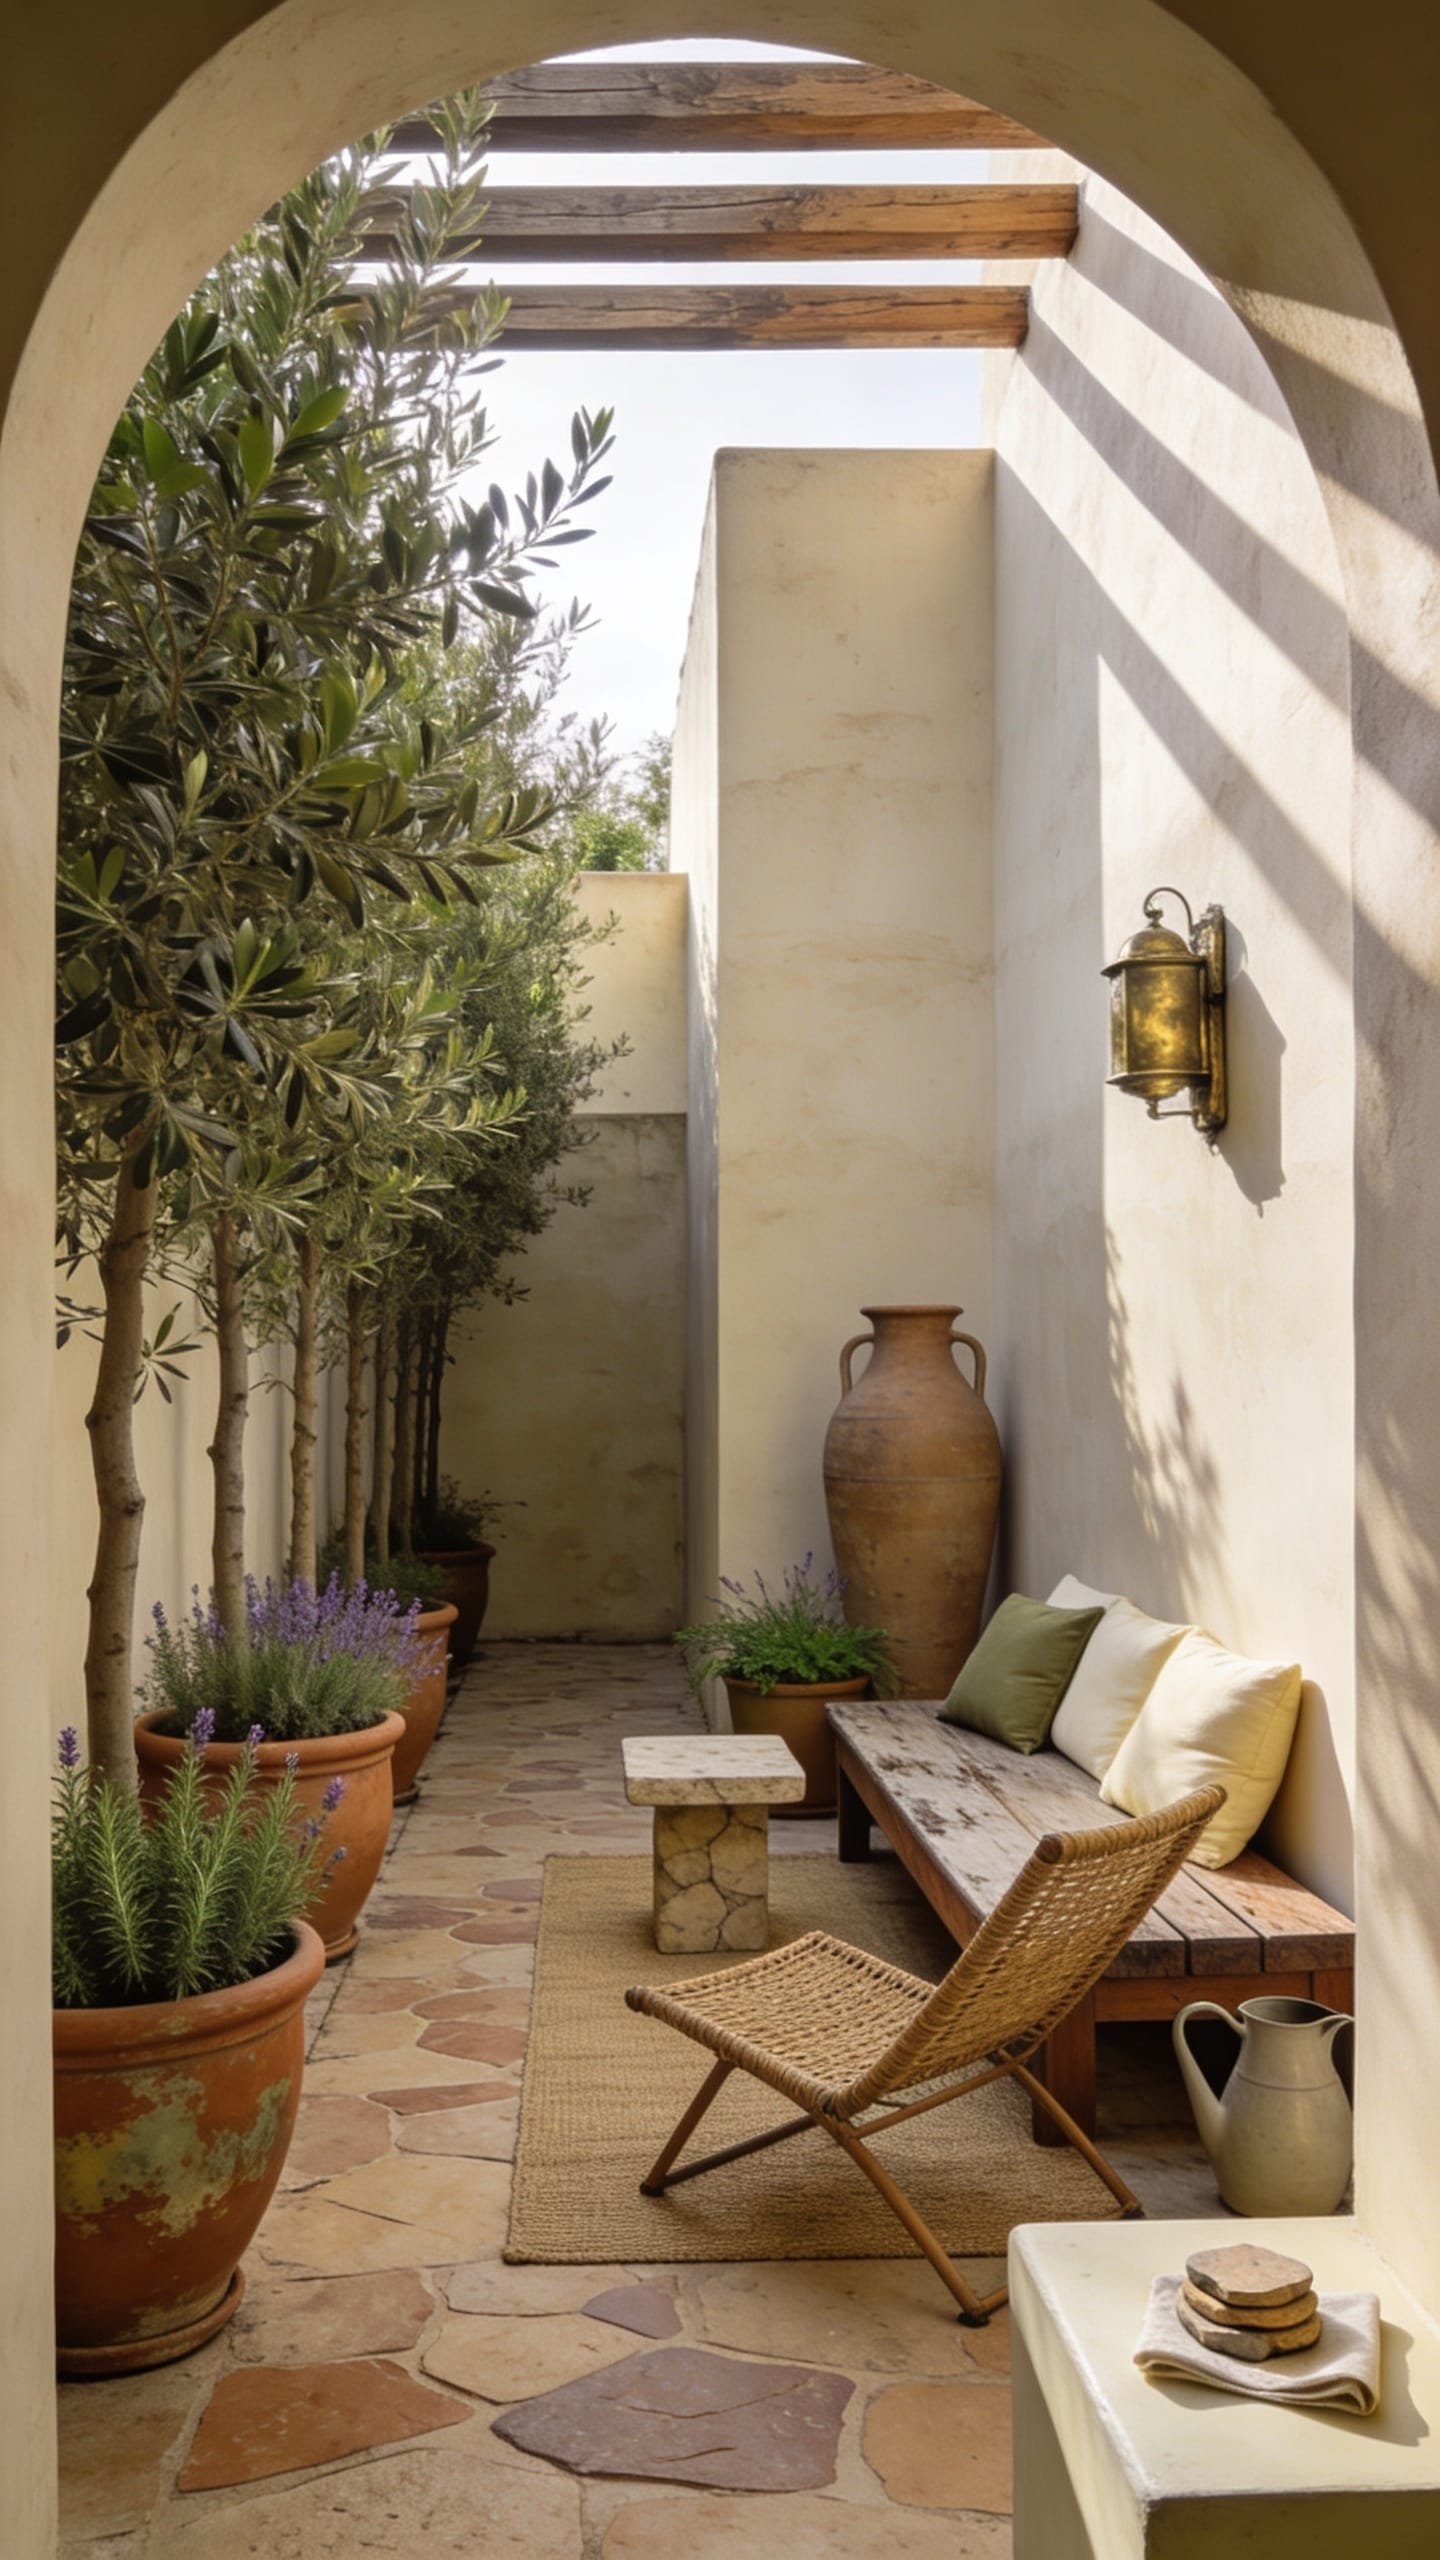
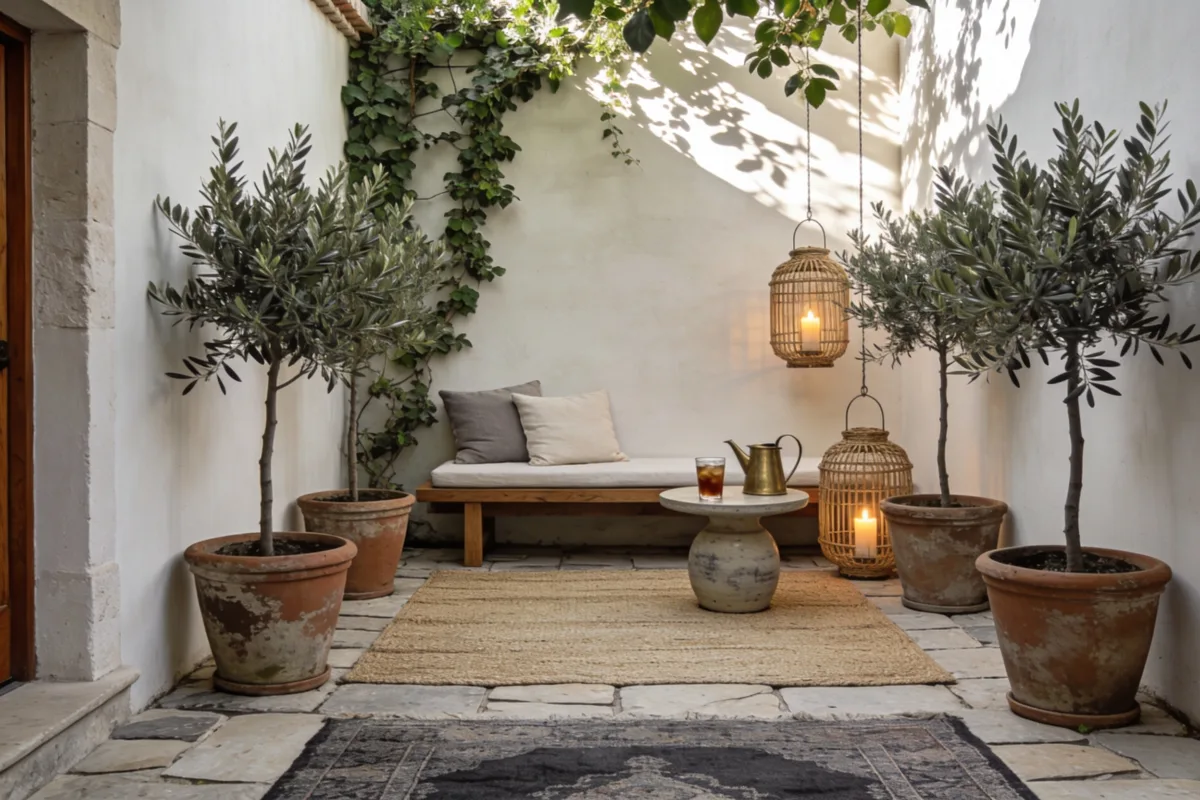
We’ve all been there: you want your patio to feel like a calming escape, but every time you step outside, the space looks scattered—too many small planters, nowhere to rest your drink, and a sun patch that makes the seating feel unusable by noon. This Soft Mediterranean Courtyard idea is made for that exact frustration. It leans into a sandy, limewashed palette with terracotta, olive greens, and quiet natural woods. The mood is hotel-spa-meets-vacation-rental you never want to leave—soft breezes, dappled shade, and a subtle, herbal scent from rosemary drifting over the tile.
Why it works in real homes: the plan is modular. You stage a “potted olive alley” of slim trees (real or faux if your climate disagrees) that creates privacy without heavy fencing. Layer in a low teak bench, a ceramic side table, and two textured outdoor cushions in flax and ecru. The lighting matters here—you want warm globes or low garden spotlights hitting the pots from below, creating poetic shadows at dusk. Materials dominate the look: terracotta, weathered teak, ivory outdoor fabric, and limewash on a backdrop wall if you’ve got one. Photos shine because the neutral base lets textures do the talking—rough clay against smooth ceramic, soft fabric next to chiseled stone. It’s the kind of contrast that looks impossibly high-end, even if it’s all DIY.
Variations help this land in different homes: go budget-friendly by using painted concrete planters in a warm clay color and swap teak for a eucalyptus bench. Do a small-space version with two tall pots instead of four and a foldable bistro chair beside a tiny ceramic table. Prefer moodier? Choose smoked olive cushions and aged brass lanterns, and let the plants be a deeper green. Renters can use removable outdoor rugs and lightweight planters on rolling caddies.
Budget Breakdown:
- Two to four tall terracotta or fiber-clay planters: $40–$120 each
- Olive trees or dwarf alternatives (bay laurel, dwarf lemon): $50–$150 each
- Outdoor bench (teak or eucalyptus): $120–$350
- Ceramic side table: $60–$150
- Outdoor cushions and throw: $40–$120
- String globe lights or low-voltage spotlights: $25–$120
- Outdoor limewash or paint for backdrop: $30–$90
Total Estimated Cost: $365 – $1,100
Best For: Small to medium patios with partial sun. Great for those who love a quiet morning ritual, wine-at-dusk moments, or a reading nook that doubles as a chic photo backdrop.
Key Design Elements:
- Main materials: Terracotta, weathered teak/eucalyptus, limewash, ceramic
- Color palette: Sand, warm white, olive green, soft charcoal accents
- Lighting strategy: Warm globe string lights or low garden uplights for plant shadows
- Furniture silhouettes: Low bench, compact ceramic drum table
- Texture layers: Rough clay, soft woven throws, smooth ceramic glazes
- Accent details (hardware, decor pieces, plants): Brass lanterns, rosemary and thyme planters, olive or bay trees
How To Recreate This Look:
- Start with two tall planters placed in a gentle curve to frame your seating area.
- Add dwarf olive trees or bay laurel; use high-quality potting mix and top with pea gravel for a polished finish.
- Layer a low wooden bench, angled slightly so it faces your best view—or the prettiest wall.
- Install globe string lights overhead or place two garden spotlights to graze the planters from below.
- Style with textured cushions, a light throw, a ceramic side table, and a shallow bowl of lemons for a shot of color.
Why This Looks Expensive: Height variance and large-scale planters read custom. The pea gravel top-dress hides soil and makes every pot look editorial. The warm, controlled palette avoids the “garden center grab-bag” vibe.
Watch Out: Don’t cram too many small pots around your seating. One or two commanding planters make a stronger statement than five little guys fighting for attention.
Pro Styling Tip: Shoot at golden hour with your uplights on; the layered shadows from the olive leaves add depth and almost cinematic warmth on camera.
If this soft Mediterranean moment is your love language, the next idea leans into sensory texture even more—think touchable, cozy, and layered.
2. Cedar Slat Sanctuary With Water Ripple Tray
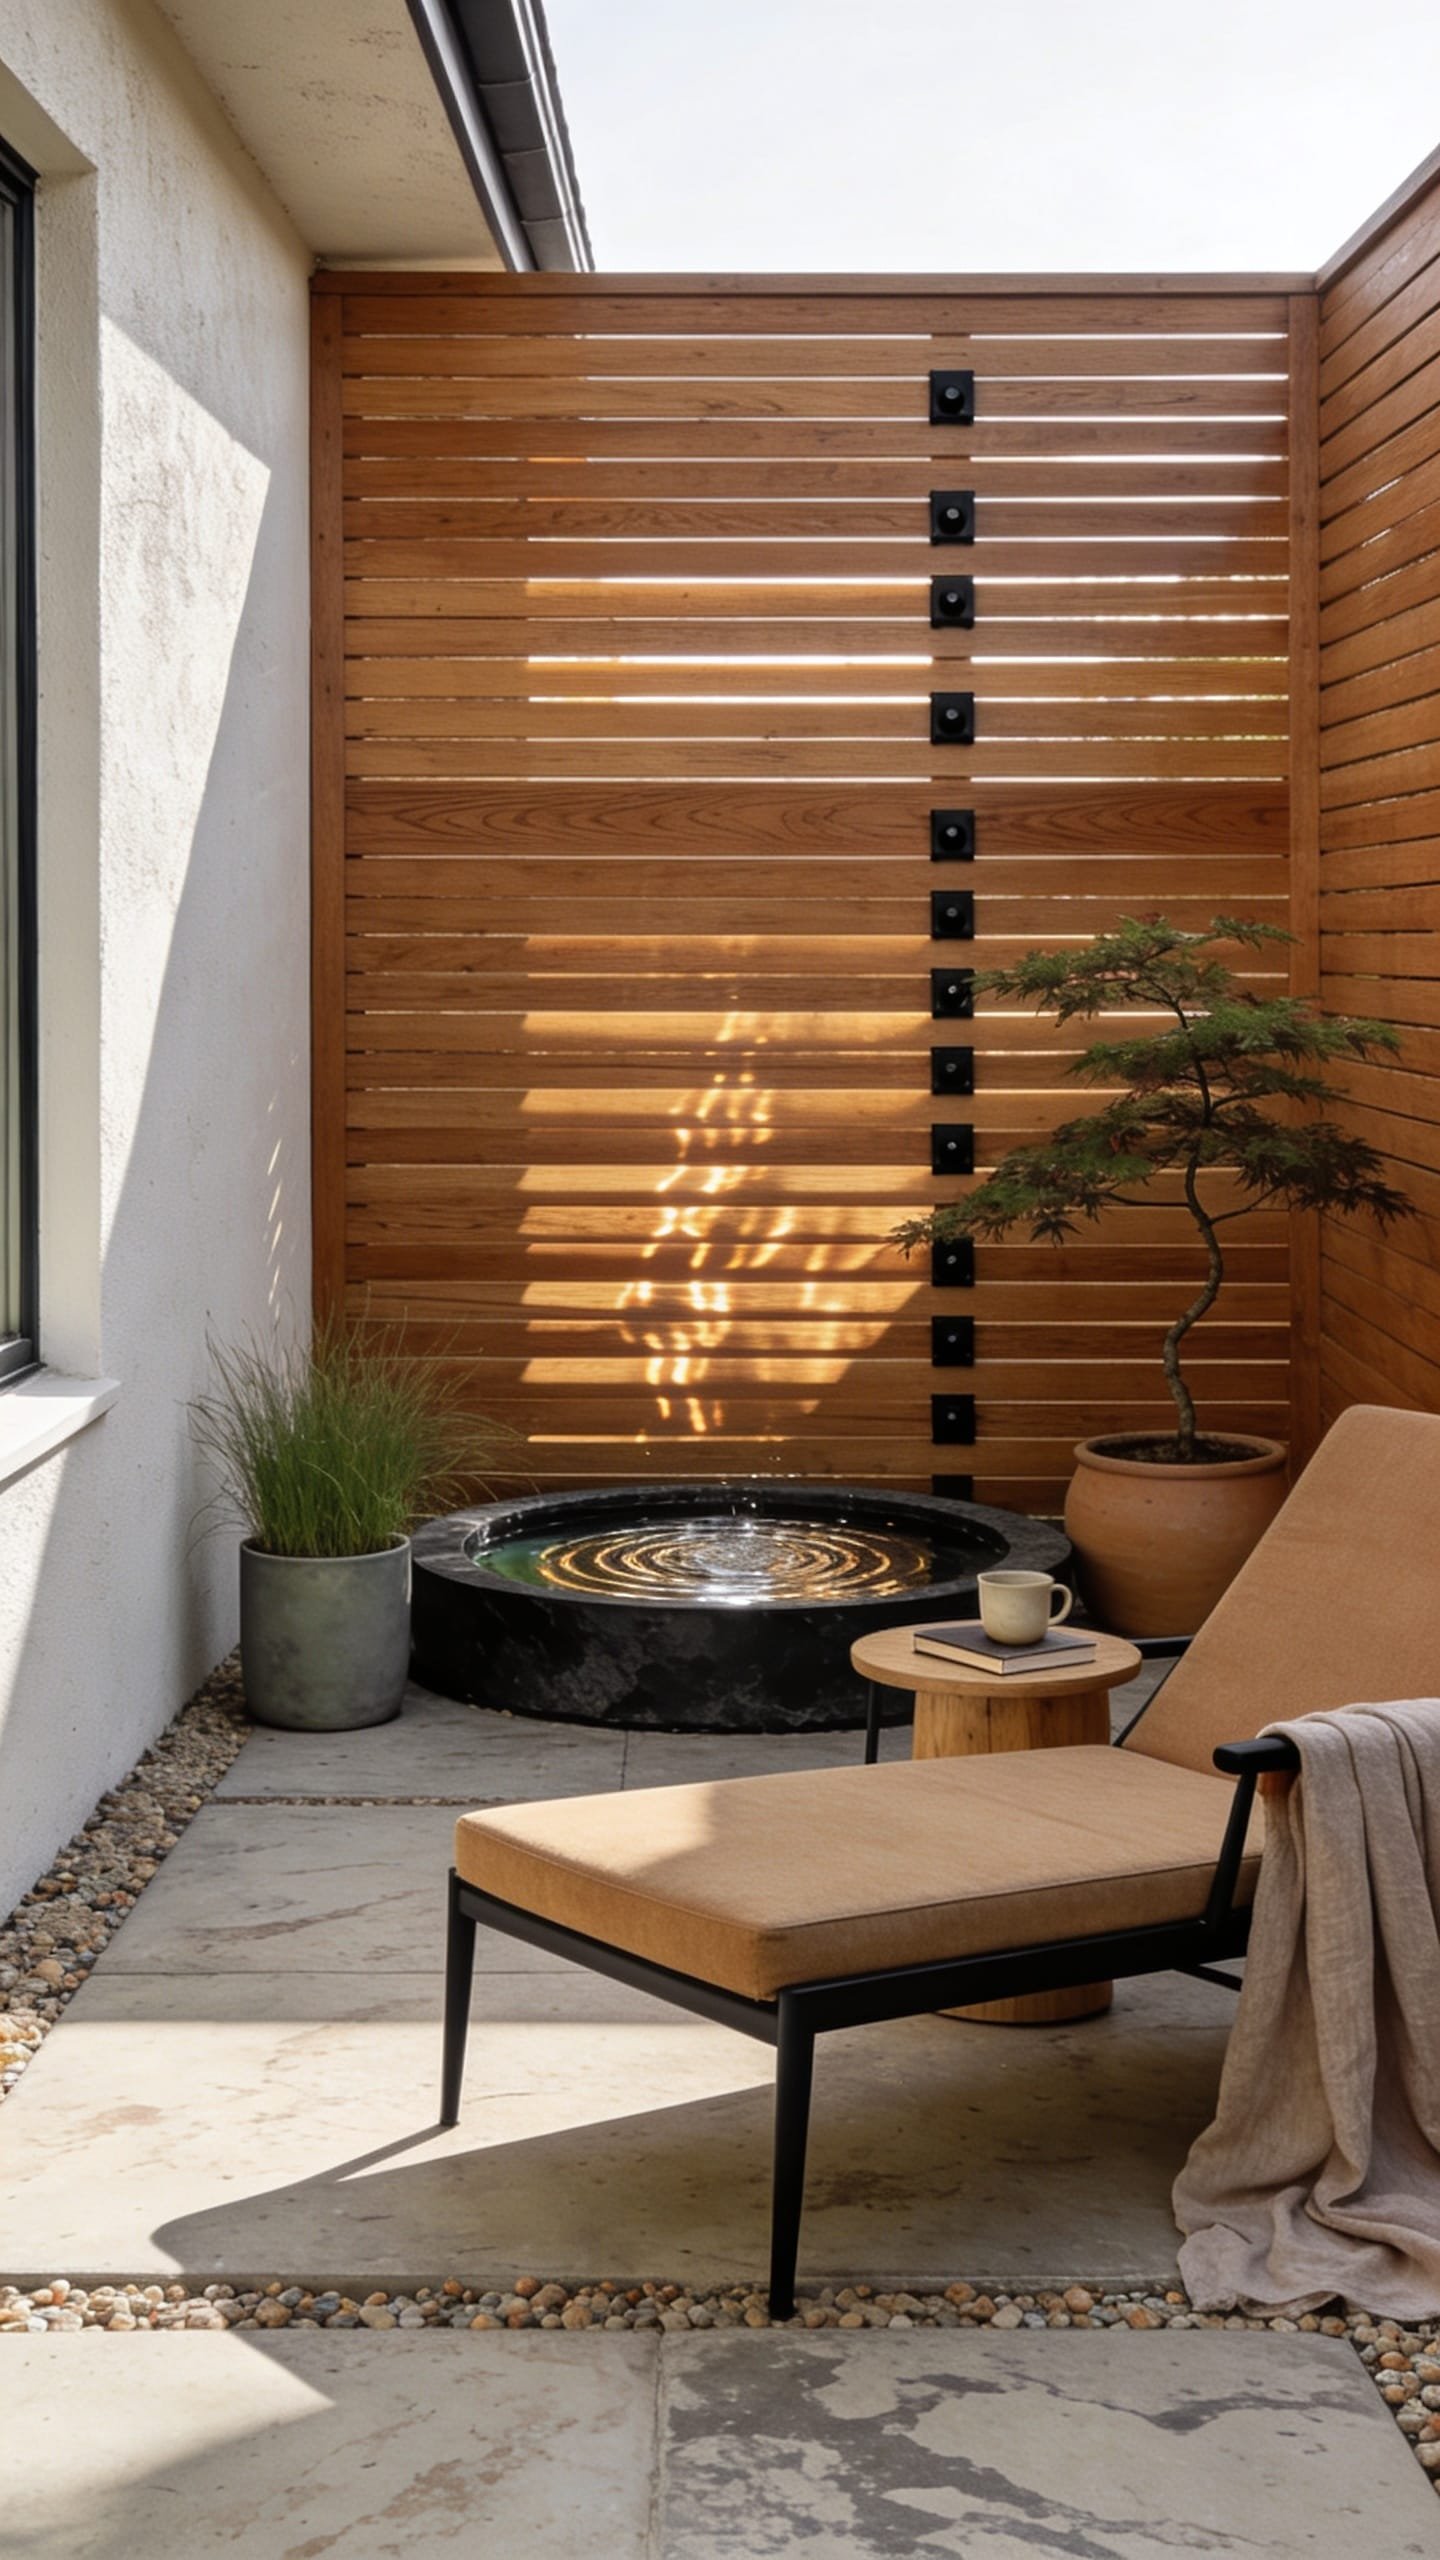
It’s that one corner that always feels off—too open, not enough privacy, and nowhere to anchor a scene. You’ve tried adding a chair, but it still looks like a chair floating in space. The Cedar Slat Sanctuary solves the “now what?” zone with an easy vertical slat screen you can DIY in a day and a simple water ripple tray that brings sound into your patio garden. The mood sits between Japandi calm and modern spa—cedar, matte black accents, and watery reflections that flutter on the slats when the sun hits just right.
This setup works for renters and owners because the slat screen can be freestanding or attached to simple planter boxes for ballast. Lighting can stay minimal: a single warm sconce or magnetic battery puck lights hidden along the slats for evening glow. Why it photographs beautifully: the lines give your camera something to read, and the water tray catches the sky, doubling light without a single bulb. Materials do the heavy lifting—untreated cedar, tumbled basalt pebbles, and matte ceramic planters. It’s a calm, tactile composition that makes any small patio corner feel like a destination.
Variations: Budget-friendly option uses pine treated with exterior stain instead of cedar and a shallow galvanized tub for the water tray. For tiny balconies, scale the slats to 24–30 inches wide and mount them to a planter box with locking casters. Darker version? Use black-stained slats with brushed brass hooks for hanging herbs in matte black pots. Renter-friendly swap: tension-mounted vertical posts with bamboo rolls in front, plus a tabletop water bowl you can bring inside.
Key Design Elements:
- Main materials: Cedar or pine slats, matte black hardware, basalt pebbles, ceramic planters
- Color palette: Honeyed wood, charcoal, soft white, green from foliage
- Lighting strategy: One warm sconce, puck lights tucked behind slats for glow
- Furniture silhouettes: Low, boxy lounge chair, narrow bench or pouf
- Texture layers: Ribbed wood, smooth water surface, pebbled ground
- Accent details: Brass hooks, ferny plants, small herb planters
Budget Breakdown:
- Cedar or pine slats, plus screws: $80–$220
- Planter boxes or simple base frame: $60–$180
- Shallow metal or ceramic water tray: $30–$120
- Basalt pebbles: $15–$40
- Outdoor lounge chair or pouf: $120–$350
- Battery puck lights or simple sconce: $20–$90
Total Estimated Cost: $325 – $1,000
Best For: Narrow patios or balconies needing a focal wall. Ideal for meditative morning routines or a small corner that needs visual privacy without building a full fence.
How To Recreate This Look:
- Start by assembling a simple slat panel: vertical slats spaced 1–1.5 inches apart on two horizontal rails.
- Add a weighted base using planter boxes or anchor the panel to an existing railing if allowed.
- Layer a shallow water tray on a low stand; fill with water and a handful of pebbles to keep it grounded.
- Install one warm sconce or tuck puck lights behind the slats for a soft after-dark glow.
- Style with a lounge chair, a linen cushion, and a fern or rubber plant to soften the geometry.
Why This Feels Designer: The slat texture creates rhythm and frames your plants like art. The water surface adds movement and catchlights—the tiny glints that make photos look magazine-level.
One Thing To Avoid: Don’t crowd the water tray with decor. Leave negative space so the reflection reads clearly; otherwise it just looks like a birdbath with clutter.
Pro Styling Tip: For photos, angle the slats slightly relative to the sun so you get diagonal shadows; that dynamic pattern gives your images instant depth.
Pause for a breath. If one idea pulled at you more than the others, that’s your starting point. You don’t need every element—just the pieces that make your shoulders drop when you step outside.
3. Layered Gravel Lounge With Fire Bowl and Herb Edge
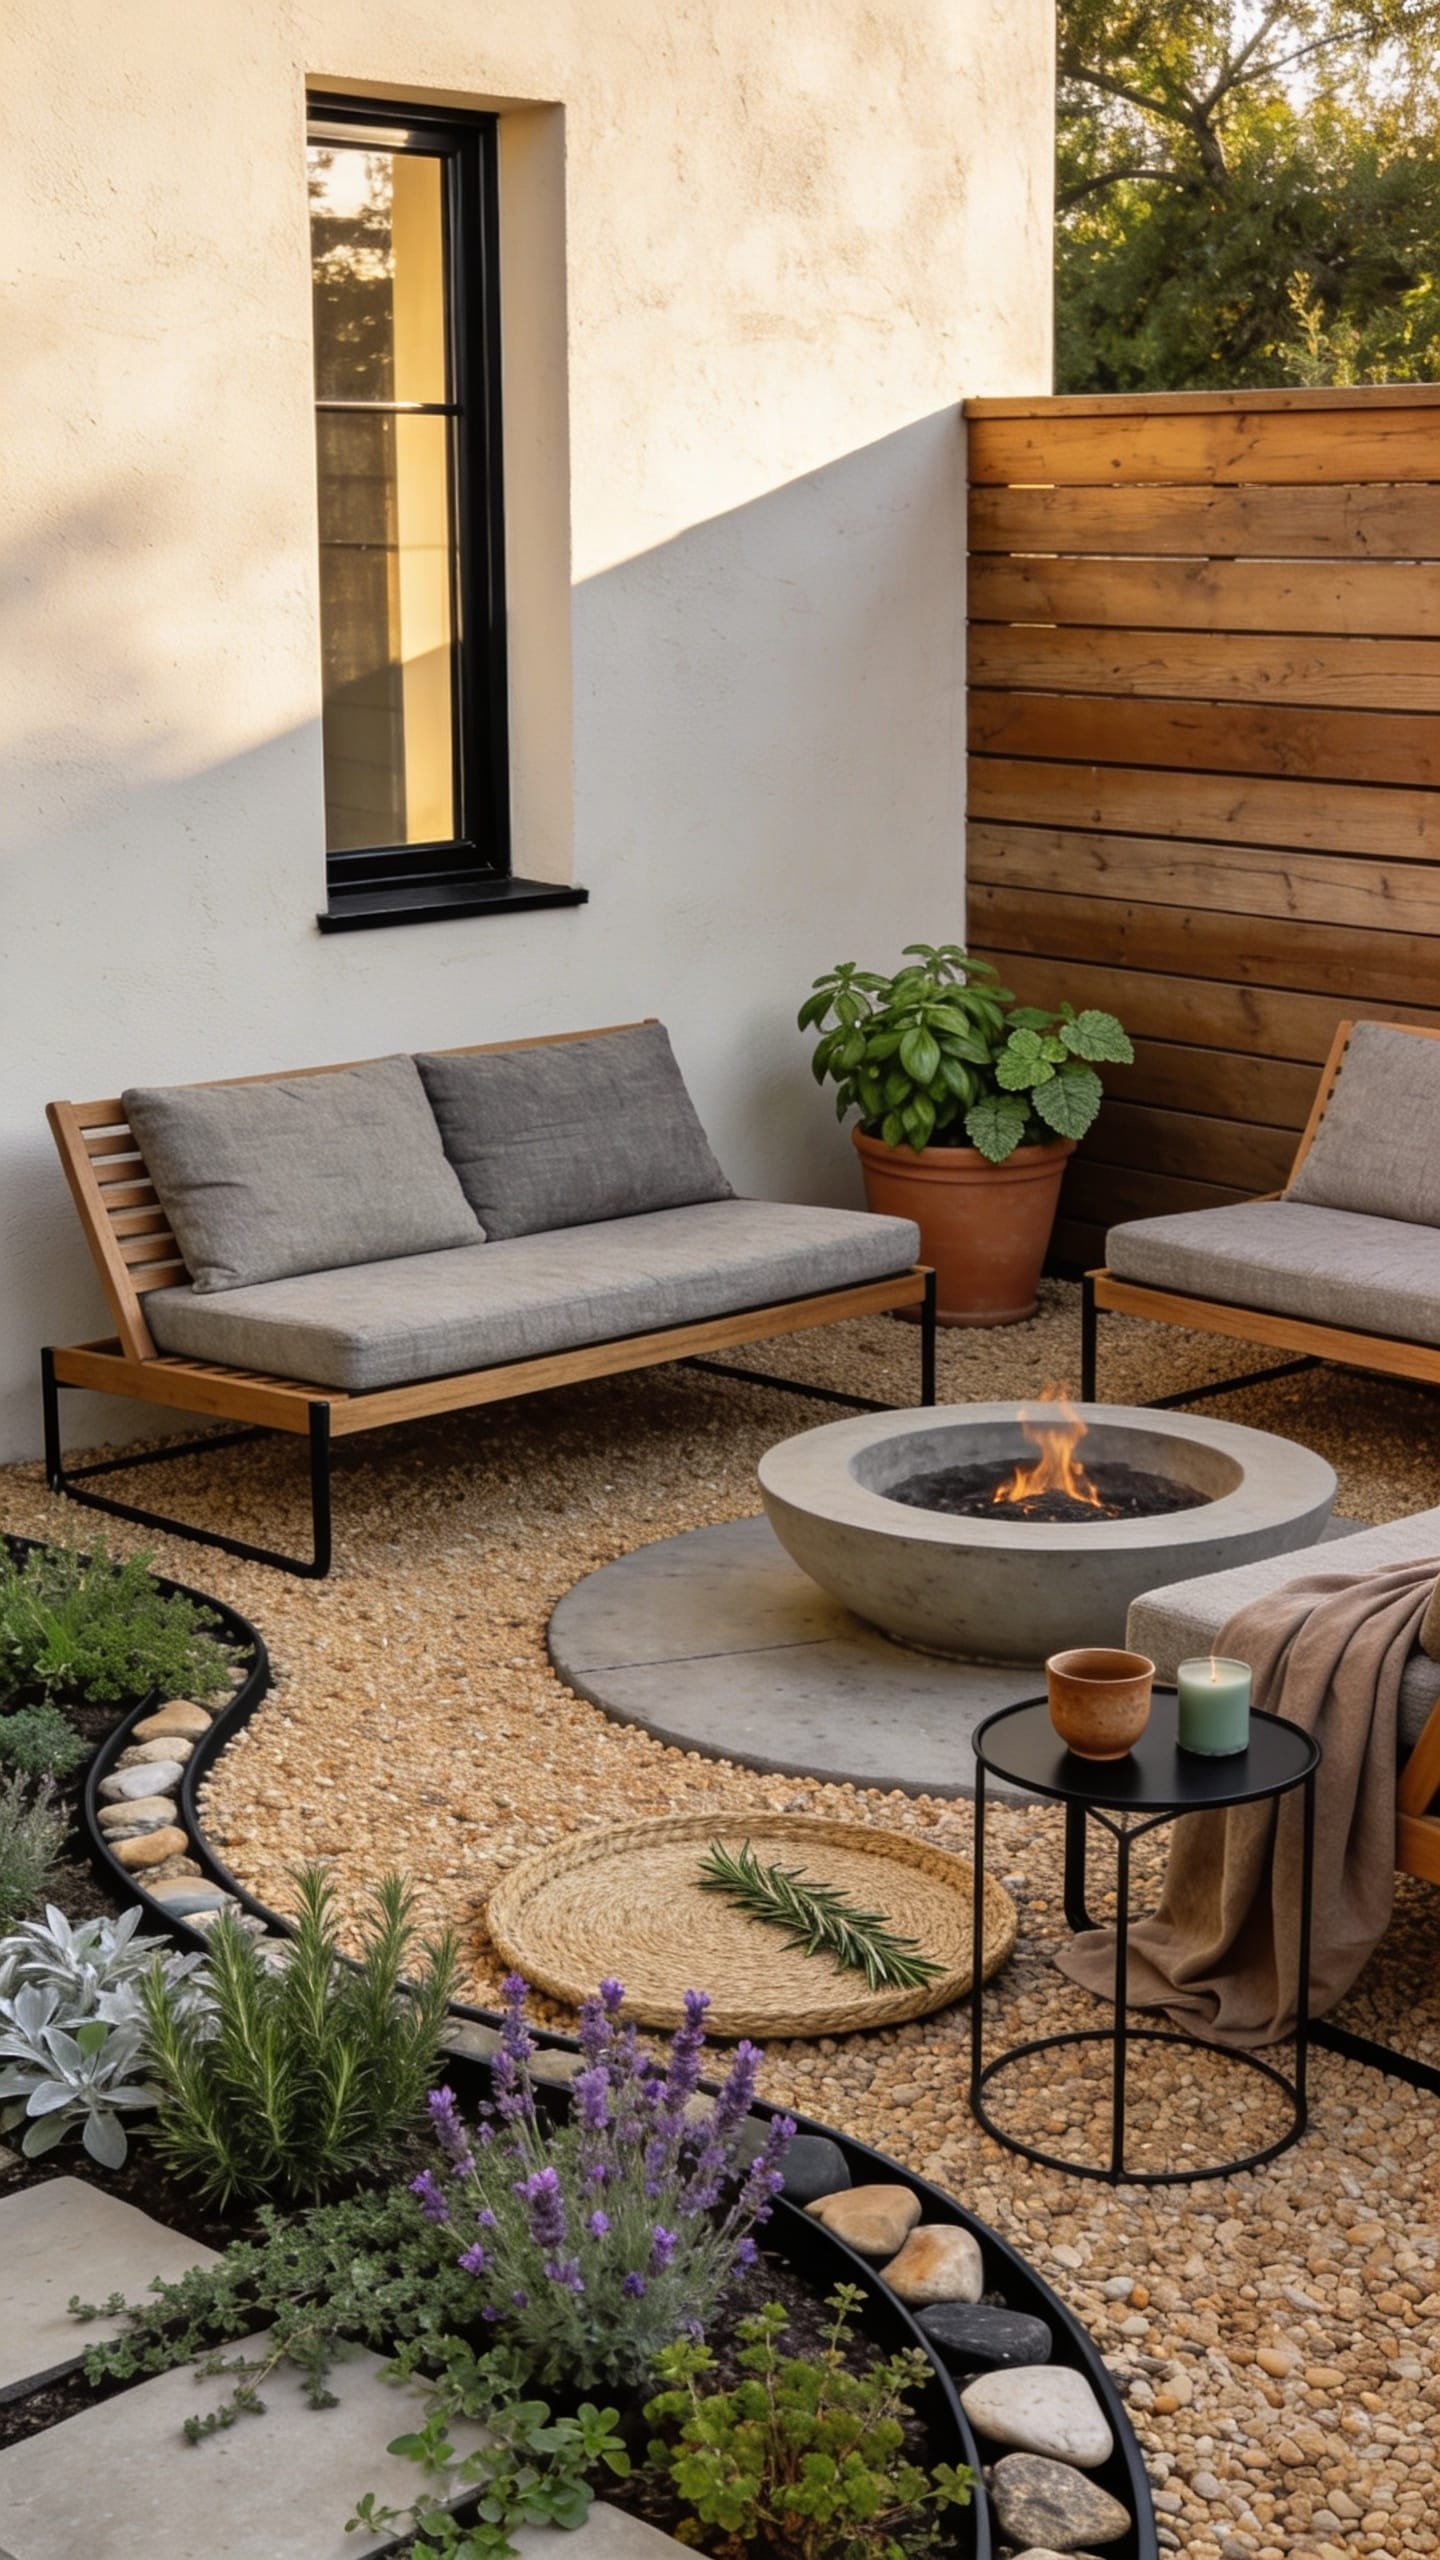
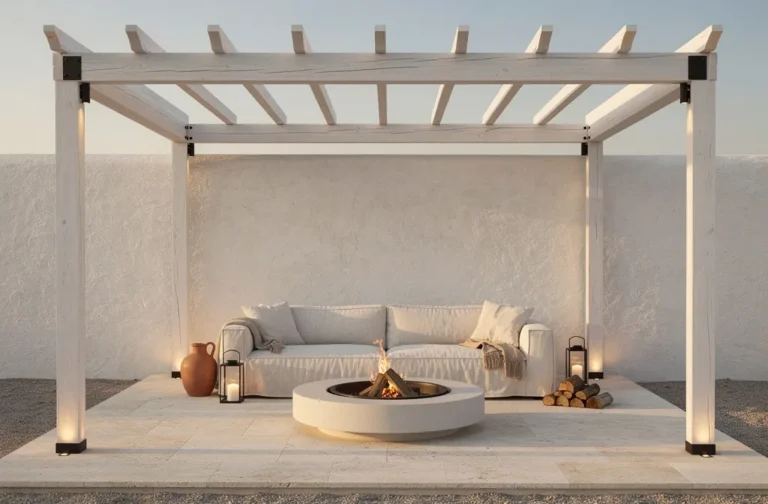
You love the idea of a cozy patio evening, but the floor situation is chaos—cracked concrete, awkward pavers, or a patchy deck that doesn’t invite bare feet. The Layered Gravel Lounge addresses the “what do I do with this floor?” puzzle by floating a defined seating zone on pea gravel with a simple border, a low fire bowl, and a soft-edged herb garden that adds scent and life. This one leans into modern Mediterranean with a whisper of Scandinavian restraint—think stone, linen, muted black, and lots of plant fragrance at ankle height.
Why it works in real life: gravel is forgiving and relatively inexpensive, and it lets you design a shape that fits your odd corner—oval, rounded square, or crescent. Lighting here is about warmth and containment: a few lanterns near the ground and the soft flicker from a tabletop or small fire bowl. The composition photographs beautifully because the gravel reads as texture on camera, and the clean edges make the seating area look intentional. Materials are tactile and inviting: pea gravel, corten or concrete fire bowl, slatted teak or powder-coated steel chairs, and linen cushions with robust piping so they still feel structured, not slouchy.
For small spaces, skip the full border and use a thick outdoor rug on top of a smaller gravel pad. Budget version swaps the fire bowl for a cluster of large candles inside hurricane lanterns. Want moodier? Use darker basalt gravel, charcoal cushions, and copper-toned planters. Renter-friendly tweak: build a temporary frame with garden edging and landscape fabric you can remove later.
Budget Breakdown:
- Pea gravel and landscape fabric: $80–$200 (size dependent)
- Metal or composite edging: $40–$120
- Fire bowl (tabletop ethanol or small wood-burning): $60–$300
- Outdoor chairs (2): $180–$600
- Lanterns and candles: $25–$90
- Herb starters (thyme, oregano, chamomile, mint in pots): $20–$60
Total Estimated Cost: $405 – $1,370
Best For: Patios with rough surfaces, homeowners wanting a defined lounge spot, or anyone who loves hosting small gatherings with easy cleanup.
Key Design Elements:
- Main materials: Pea gravel, metal edging, concrete/corten, teak or steel seating
- Color palette: Stone gray, charcoal, warm wood, soft green, linen ivory
- Lighting strategy: Low lantern glow plus fire bowl flicker
- Furniture silhouettes: Low-slung lounge chairs, rounded fire bowl
- Texture layers: Crunchy gravel underfoot, smooth bowl, structured linen cushions
- Accent details: Herb edging, hurricane lanterns, a folded wool throw for shoulder season
How To Recreate This Look:
- Start by sketching your seating zone shape; mark it with twine and stakes.
- Add landscape fabric, secure edges, and pour 2–3 inches of pea gravel; tamp lightly.
- Layer your fire bowl in the center with a stable base.
- Install lanterns near the perimeter and line herbs along one edge or in low planters.
- Style with two lounge chairs angled slightly toward each other, a petite side table, and textured cushions.
Why This Reads High-End: A defined ground plane instantly says “designed,” not improvised. The simple geometry and repetition (two chairs, one bowl, repeating herbs) feel edited and calm.
The Most Common Mistake: Skipping the edging. Without a defined boundary, gravel creeps everywhere and the whole thing reads messy within a week.
Pro Styling Tip: For photos, water the gravel lightly right before you shoot; the darker stones show more contrast with chairs and planters.
Halfway point check-in: remember, this isn’t about copying a showroom. It’s about building a little corner that supports how you actually live. If you always curl your legs up while reading, choose a chair that hugs you back.
4. Boho Shade Sail Nook With Layered Textiles and Climbing Vines
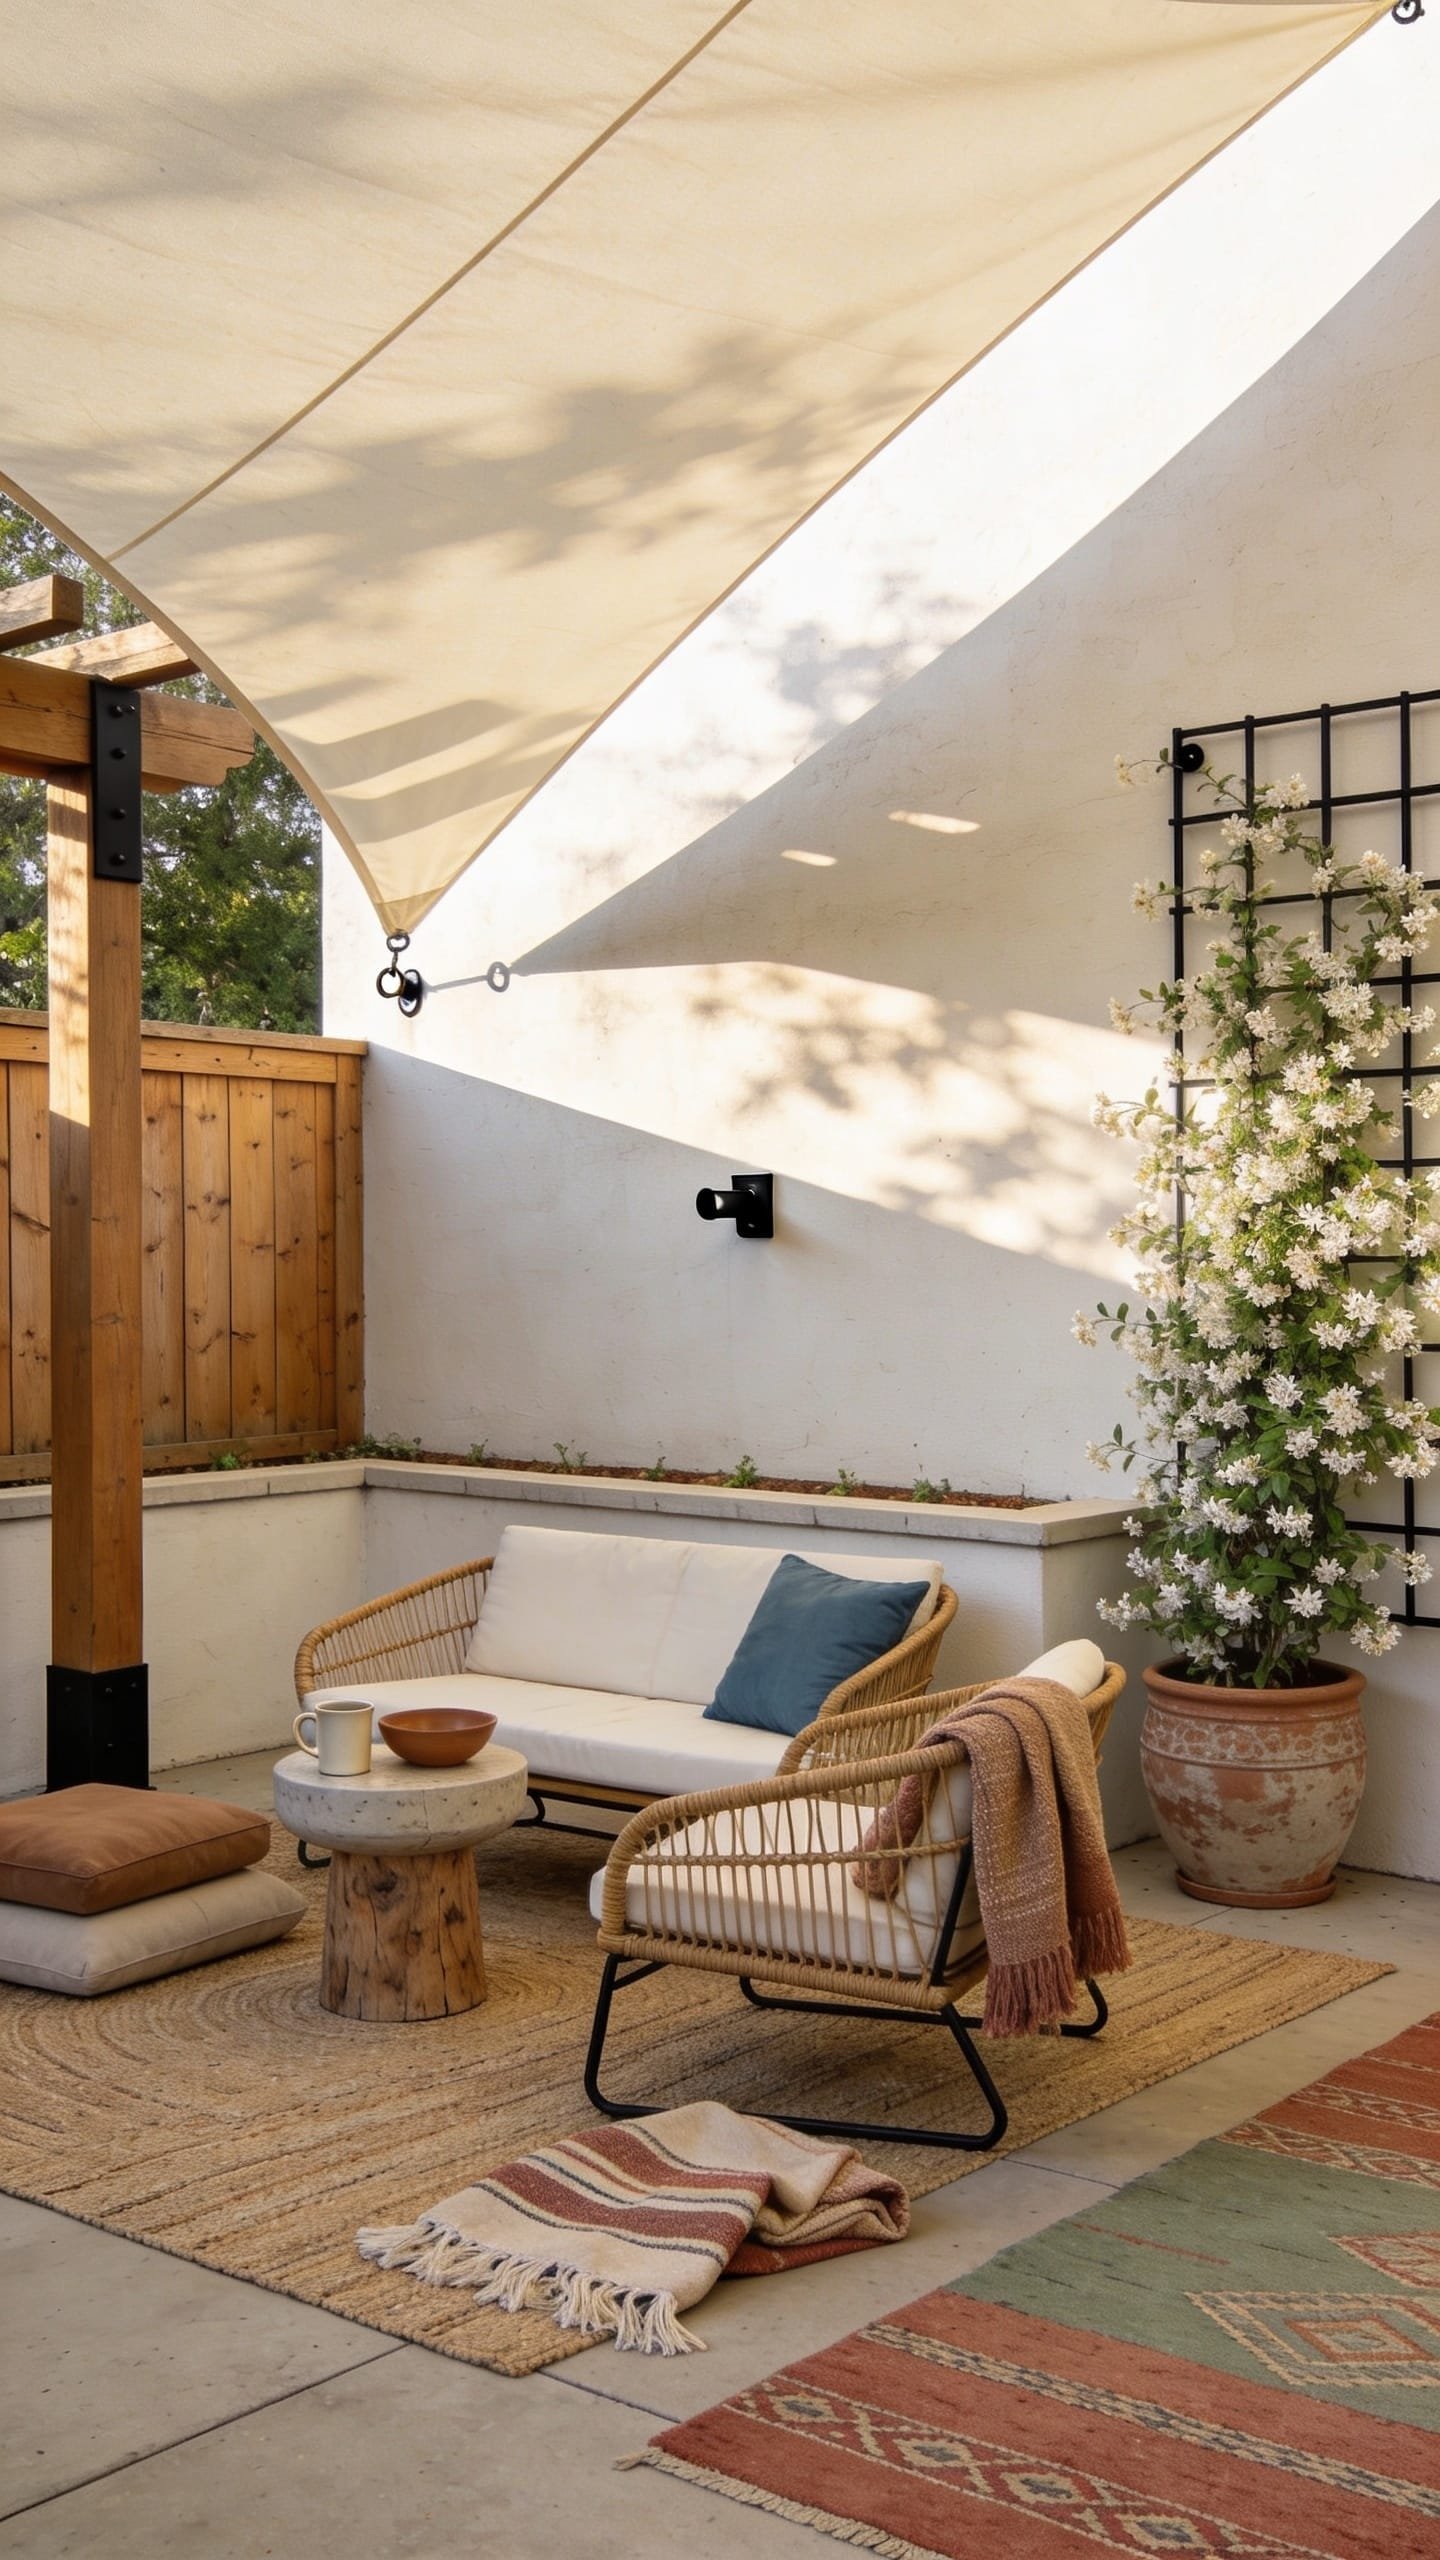
You want soft, dappled shade and cozy seating, but umbrellas never sit right in small patios—they wobble, they hog floor space, and the pole ends up perfectly in your sightline. The Boho Shade Sail Nook is the antidote: a simple triangular sail, a pair of low chairs or a loveseat, a layered textile palette, and a climbing vine that draws the eye up. The vibe is retreat-meets-bungalow terrace—breezy, warm, and just a little wild in the best way.
This works beautifully in rentals too because you can mount a sail to existing structures with adjustable hardware or use removable posts set in weighted planters. Lighting is sun-driven during the day; at night, lean into candles in tall glass hurricanes and a couple of string lights anchored along the sail’s edge. Materials bring soul: cotton-linen throws, woven seats, a jute or polypropylene rug, and a clay pot ready for a star climber—jasmine if you have sun, ivy or pothos if your area is shaded and warm. Photographs well? Absolutely. The sail creates sculptural lines and soft shadows, while the layered textiles add tactile depth.
Budget-friendly version uses a painter’s drop cloth treated with fabric waterproofing as your sail and secondhand chairs with new cushion covers. For tiny balconies, skip the rug and use a textured runner; add a slim loveseat to save space. A darker option works with espresso-toned wood, indigo textiles, and bronze lanterns. Renter-friendly adjustments: use tension rods between two sturdy verticals to clip the sail without drilling.
Budget Breakdown:
- Shade sail or treated canvas: $30–$150
- Mounting hardware or weighted posts: $40–$160
- Outdoor rug or runner: $40–$180
- Low chairs or loveseat: $140–$500
- Lanterns and candles/string lights: $25–$90
- Large clay pot and climbing plant: $35–$120
Total Estimated Cost: $310 – $1,200
Best For: Sun-hit corners that overheat at midday, renters who need a flexible solution, and anyone who craves a softer, fabric-forward patio garden.
Key Design Elements:
- Main materials: Canvas sail, woven seating, jute/poly rug, clay pot
- Color palette: Warm neutrals, sun-faded terracotta, leafy green, touches of black
- Lighting strategy: Edge-lit sail with string lights, plus hurricane candles at eye level
- Furniture silhouettes: Low-slung sling chairs, compact loveseat
- Texture layers: Woven rug, linen throws, climbing vines, clay
- Accent details: Tassel pillows, hammered metal tray, vintage-look watering can
How To Recreate This Look:
- Start by identifying three anchor points for your sail (two walls and a post, or two posts and a wall).
- Add mounting hardware or set posts in weighted planters; tension the sail so it slopes slightly for water runoff.
- Layer a rug, then place two chairs or a loveseat underneath, angled toward each other.
- Install string lights along the sail edge and set hurricane lanterns near the seating zone.
- Style with a clay pot and a trellis for your climber, plus a stack of textured pillows and a soft throw.
Why This Looks Intentional: The sail traces a graphic triangle overhead, which unifies the furniture and plants beneath. It tells your eye, “This is a room,” even outdoors.
Don’t Do This: Don’t hang the sail too low. It needs head clearance and space to breathe; otherwise it looks like laundry day, not a design moment.
Pro Styling Tip: For photos, place your boldest pillow or throw opposite the light source so the texture pops; then clip the sail to add a tiny twist that creates a graceful curve.
Real talk: I once tried to DIY a shade sail on a windy rooftop without proper tensioning. It slapped like a flag all night. Learn from me—use quality hardware and pull it taut. Good tension equals good sleep.
5. Modular Bench Planter With Built-In Storage and Tea Corner
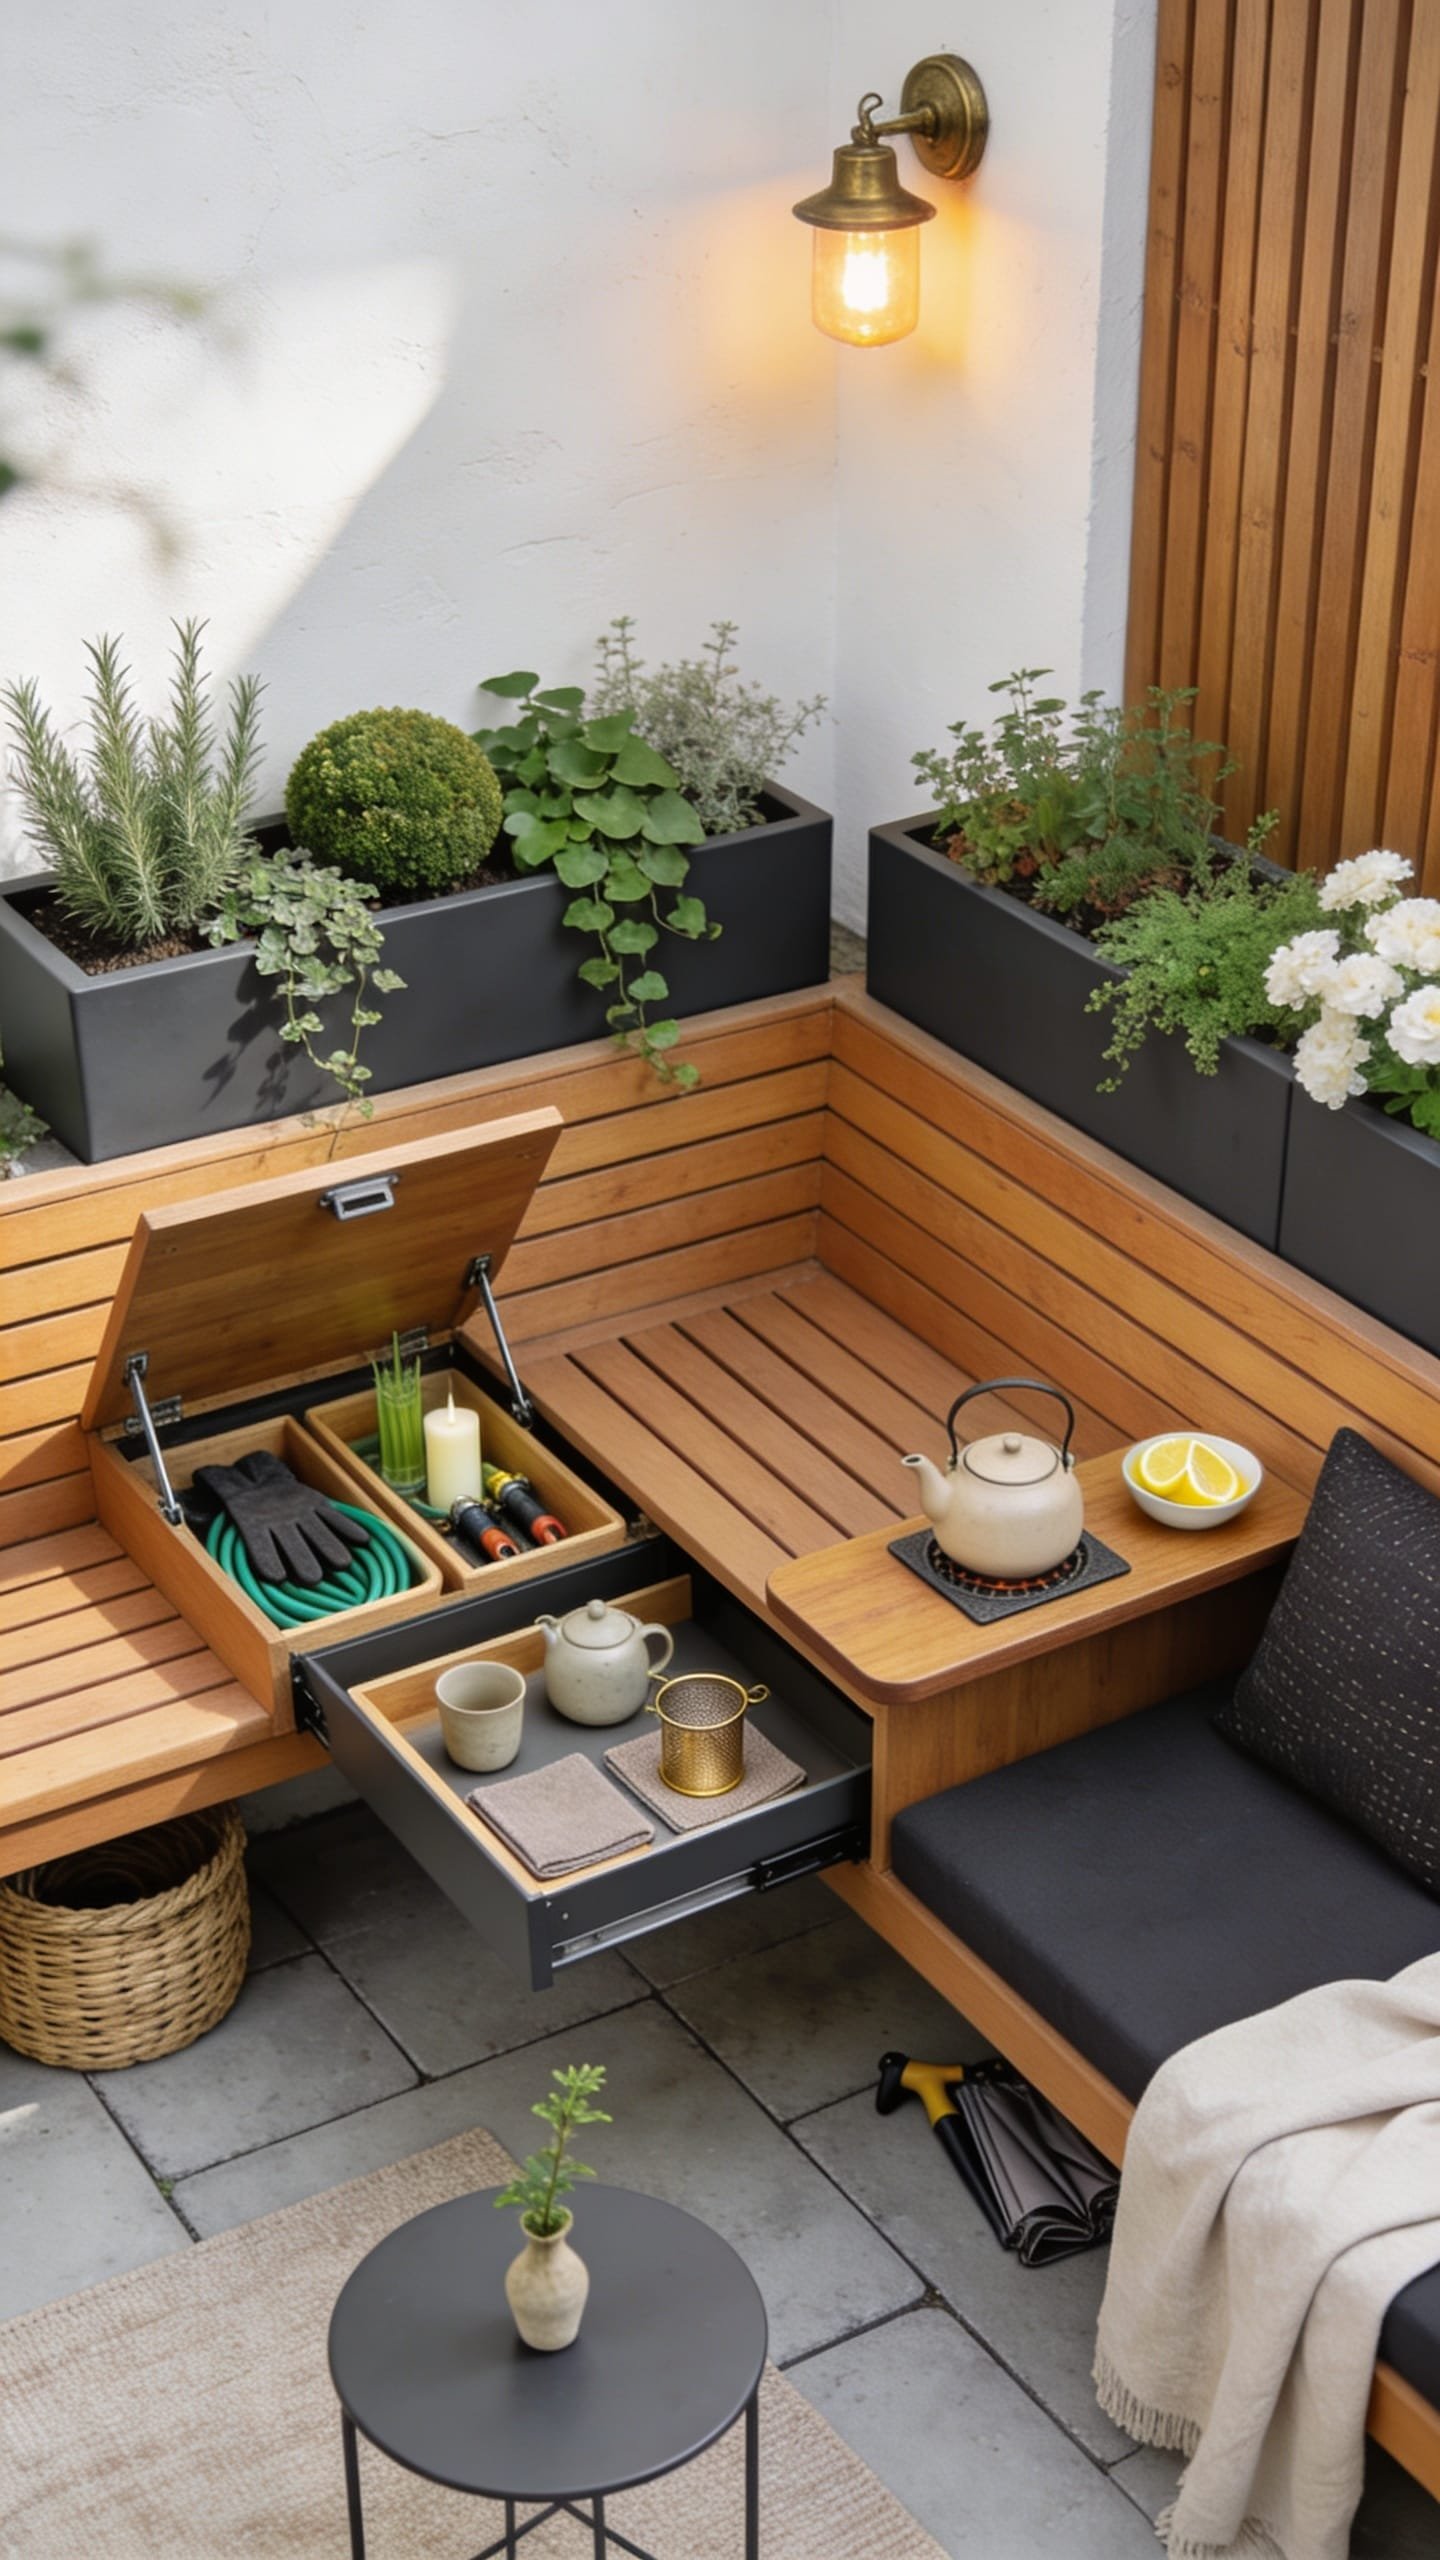
You crave a patio garden that actually helps your life, not just decor for decor’s sake. But clutter creeps in—garden gloves, citronella candles, hose attachments—and suddenly your “zen corner” looks like a utility shelf. The Modular Bench Planter solves the mess and the mood by combining seating, storage, and greenery in one cohesive build. The look: refined and modern with warm wood tones, matte planter boxes, and a hidden spot for your tea set or evening spritz supplies. It’s equal parts pretty and practical, which, IMO, wins every time.
Why it works: a low L-shaped bench defines a corner, with one or two integrated planters that bring height and softness. Storage hides under hinged seats for cushions, throws, or that stack of mismatched saucers you swear you’ll use. Lighting here is strategic—two warm step lights under the bench lip give a subtle glow and make feet feel safe. Photographs sing because the planter bench creates layers and levels, placing foliage right at backrest height for that lush, enveloping look. Think slatted fronts, smooth-painted planters, and a quiet palette of putty, warm oak tone, and deep green.
Variations: Budget build uses pine with an exterior stain and premade plastic planters dropped into a wood frame. Small-space version trims the L to a single straight bench with one end planter. A moodier style goes walnut-stain with charcoal planters and burgundy-toned foliage like heuchera or purple basil. Renter-friendly option: two storage benches set at right angles with freestanding planters in between—you get the look without drilling.
Budget Breakdown:
- Lumber (cedar/pine) and exterior screws: $120–$350
- Exterior stain and sealant: $25–$70
- Planter inserts (metal or composite): $50–$180
- Hinges and gas struts for lids: $30–$90
- Under-bench step lights (low-voltage or battery): $25–$120
- Seat cushions and pillows: $80–$240
- Small side table or tray: $25–$90
Total Estimated Cost: $355 – $1,140
Best For: Patios that double as working spaces or family hangouts. Perfect for tea lovers, evening readers, and anyone who wants a neat, intentional patio garden every day.
Key Design Elements:
- Main materials: Cedar/pine, composite planters, exterior fabric, matte hardware
- Color palette: Warm wood, putty/stone, deep leafy greens, matte black accents
- Lighting strategy: Low, under-bench glow and one focused reading light
- Furniture silhouettes: Clean-lined bench, low side table, rectilinear planters
- Texture layers: Slatted wood, smooth planters, linen cushions, leafy plants
- Accent details: Brass pulls, ceramic tea set, compact watering can
How To Recreate This Look:
- Start by measuring your corner and sketching an L-shaped bench with one planter box end.
- Add a simple frame with 2×2 or 2×4 lumber; include a hinged lid over a storage bay.
- Layer slats for the seat and face, leaving small gaps for drainage.
- Install a planter insert at bench height so greenery rises just behind your shoulder.
- Style with firm outdoor cushions, a soft throw, a tray for tea, and warm under-bench lights.
Why This Looks Expensive: Integrated seating always reads custom. Matching planter height to the bench back creates a built-in look that furniture-alone setups can’t match.
Watch Out: Don’t forget ventilation for the storage cavity. A couple of discreet holes at the back keep mildew from sneaking in and ruining your cushions.
Pro Styling Tip: For photos, crack the bench lid open an inch with a folded throw peeking out—inviting, not staged, and full of texture.
Small confession: I once spent weeks agonizing over outdoor fabric swatches for a client’s patio. The real fix? We swapped their bluish LED bulbs for warm white and suddenly every fabric looked luxe. Lighting first; swatches second. Trust me.
Feeling a little fired up? Good. The last idea is a small but mighty mood shift that a lot of people overlook: scent, sound, and ritual—wrapped into one flexible corner that seasons with your life.
Quick Checklist
- Decide on one mood and color palette before buying plants
- Use at least one large-scale planter for visual anchor
- Add warm lighting (2700K) for night comfort
- Create a defined ground plane (rug, gravel, or platform)
- Repeat materials and colors for cohesion
- Top-dress pots with pea gravel or lava rock
- Vary heights: floor, seat, and eye level
- Include one flexible element (cart, folding chairs)
- Layer textiles with structure (piped cushions, firm throws)
- Edit decor—leave negative space for the eye to rest
Frequently Asked Questions
How much should I budget for a relaxing outdoor corner if I’m starting from scratch?
Plan on $300–$800 for a solid setup: one or two key planters, seating, a small table, and lighting. If you want built-in elements or a fire feature, $800–$1,400 feels realistic. Start with the anchor pieces and layer over time.
My patio is tiny. Which idea works best in under 50 square feet?
Go for the Aromatic Tea Garden Cart and a single folding chair or the Mini Shade Sail Nook with just a runner rug. Define a corner and scale everything down: one big planter, one chair, one light.
I’m a renter and can’t drill into walls. Can I still do the shade or slat ideas?
Yes. Use weighted planters as anchors for posts, tension rods where safe, or freestanding slat panels attached to planter boxes. Clip-on lights and rechargeable lanterns avoid wiring entirely.
How do I keep patio textiles from looking dingy after a month?
Choose performance fabrics in warm neutrals, add zip-off covers, and store extras in a bench or bin when not in use. Quick fix: a fabric shaver for pilling and a gentle scrub with diluted dish soap every few weeks.
What’s the biggest design mistake people make in small patio gardens?
Too many small planters and no focal point. Choose one or two larger pieces, define the floor with a rug or gravel, and keep your palette tight. Your photos—and your brain—will thank you.
Closing Notes
Pick one idea and start this weekend. A single potted olive with uplighting or a tight tea cart with herbs can change how you use your patio immediately. From there, add the next layer: a bench, a sail, a gravel pad. Keep it simple, choose a clear palette, and let the textures do the heavy lifting.
The secret to a relaxing outdoor corner isn’t buying more stuff—it’s shaping light, choosing a couple of materials you love, and editing with restraint. Your patio garden should feel like an exhale the moment you step outside. With these DIY ideas, it will.
You’ve got this. Roll out the rug, water the mint, and claim your little slice of calm—one cup of tea, one sunset, one soft evening at a time.

About the Author

Krisztina P.Rendes, Founder of Home Style Vibes
Founder of Home Style Vibes
Krisztina Puskásné Rendes created Home Style Vibes as a cozy-modern lifestyle space where homemaking meets inspiration. Her goal is to help women create beautiful, organized, and peaceful homes they truly love — without overwhelm. You’ll find here heart-driven content on home decor, cleaning tips, easy family recipes, organization and decluttering, DIY home projects, plants, and seasonal ideas — all designed to bring more calm, comfort, and style into everyday life.