4 Fall Centerpiece And Vase Arrangement Ideas That Are Easy And Stunning
You want that cozy, golden-hour fall feeling—the candlelit warmth, the layered plaid, the pumpkin-lined mantel—without spending every weekend futzing with branches that won’t stand up straight or a centerpiece that looks flat in photos. You love the idea of simple, stunning arrangements. You hate when they read skimpy, chaotic, or like a random grocery-store bouquet plopped in a vase. Here’s the truth: a few focused choices and the right ratios can make your fall centerpiece and vase arrangements feel rich, not fussy, and wildly photogenic.
These four fall decor ideas solve the biggest pain points—awkward scale, weird color combos, and not enough glow—so your home looks ready for crisp mornings, mulled cider nights, and big-family Sunday dinners. We’re talking affordable materials, 60-90 minutes per setup, and a seasonal look that flips the “I tried, but it’s not quite right” feeling into a warm, lived-in vibe that’s easy to maintain through Thanksgiving. Expect saturated russets and burgundies, layered textures like chunky knits and wheat, plus the kind of golden light that makes every snapshot Pinterest-worthy. If you love cozy abundance that still feels realistic in a real home with pets, kids, and weeknight pasta, this is your sweet spot.
1. Pumpkin-Lined Mantel With Amber Candle Glow and Leaf Garland
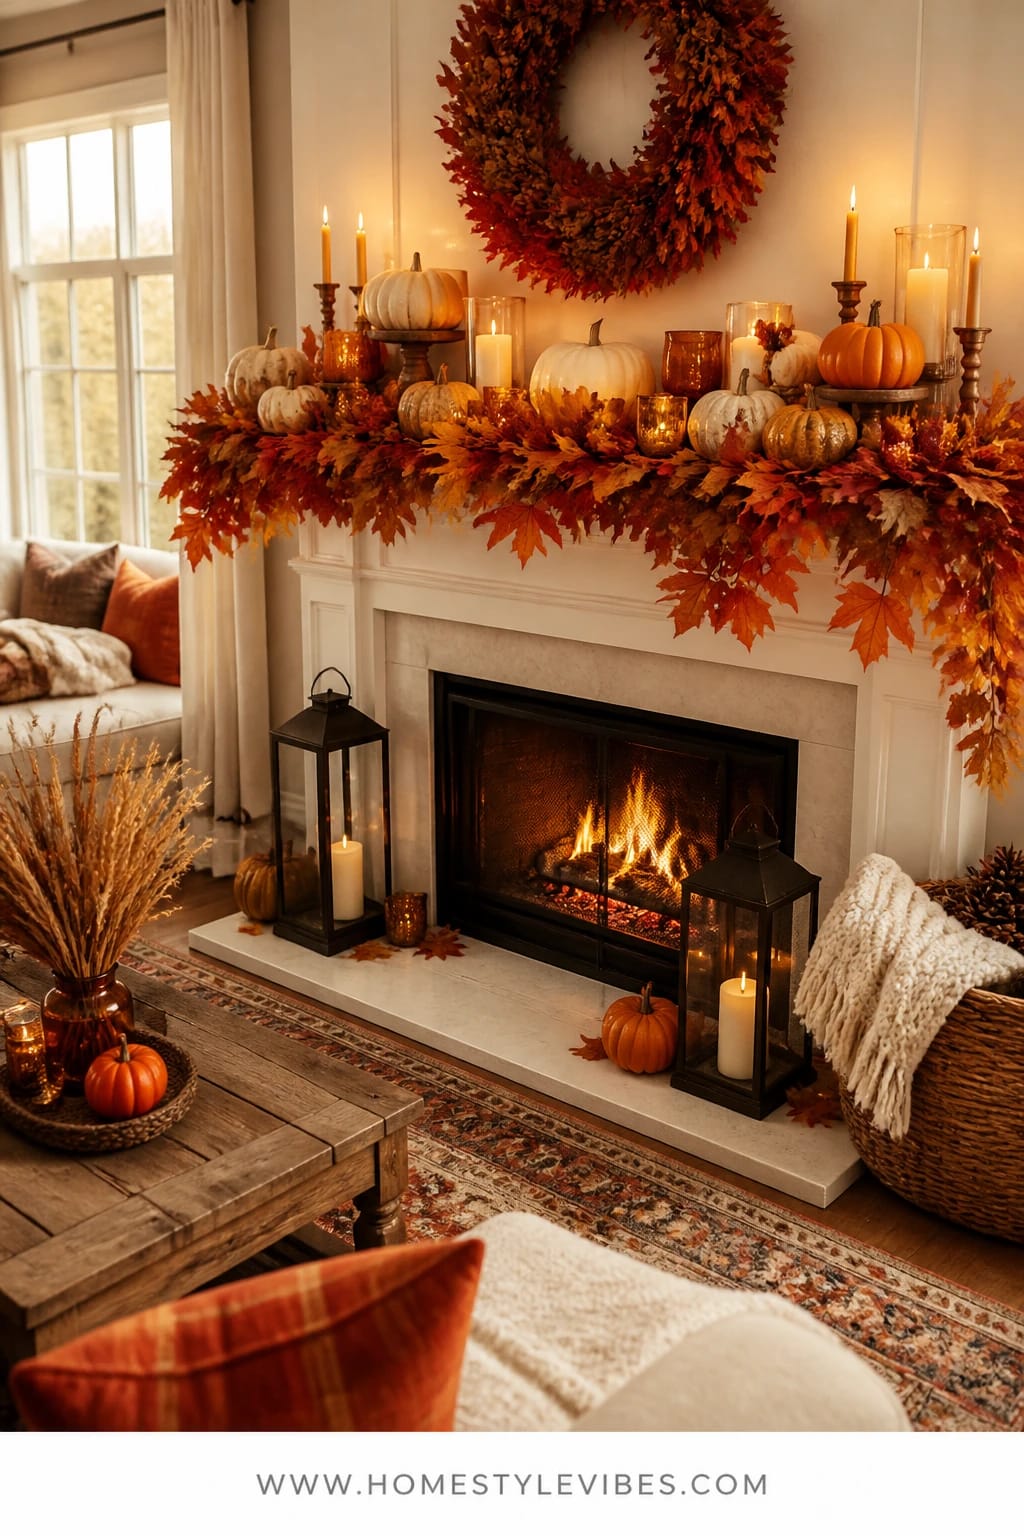
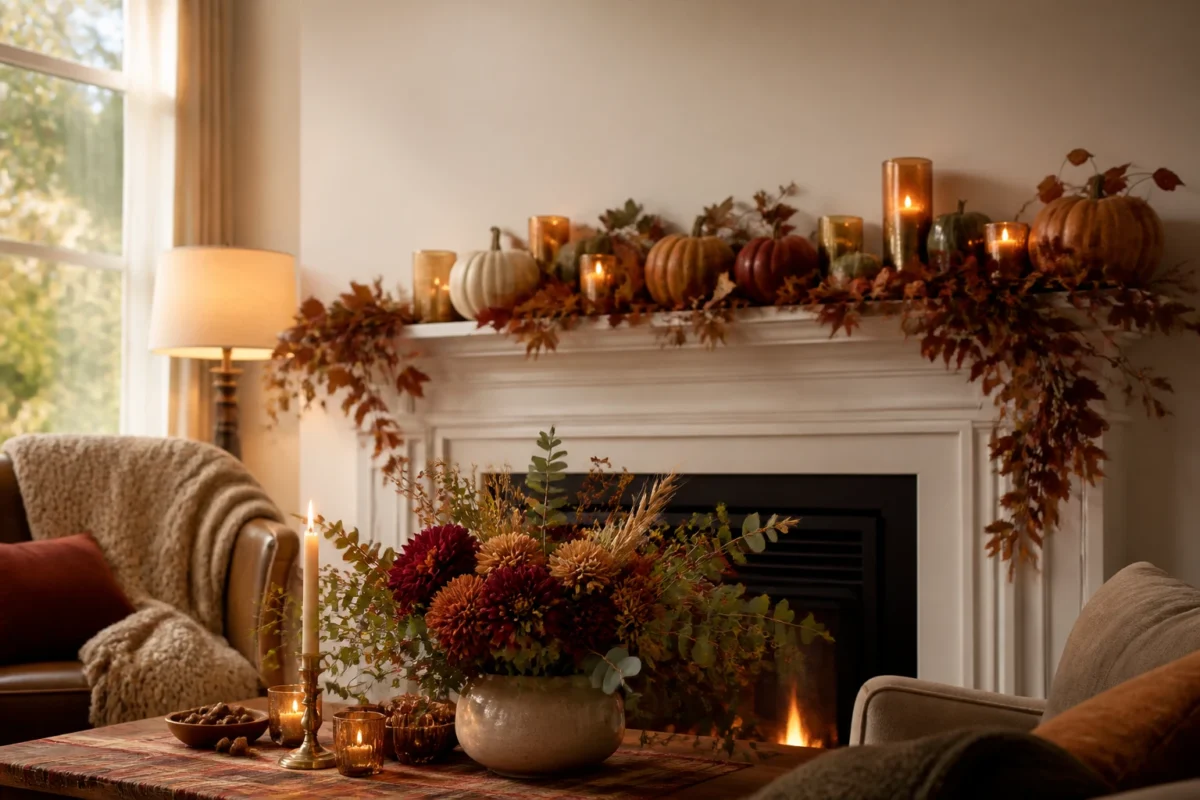
We’ve all been there: your mantel should be the star of fall, but something about it always looks skimpy or off-balance. You try a garland, maybe a couple pumpkins, and then boom—flat line. No movement, no warmth, and you can’t figure out how to make it read full and layered without blocking the TV or looking like a craft store exploded. This pumpkin-lined mantel concept solves that by focusing on three things: a lush leaf garland as your base, a repeat of petite pumpkins for rhythm, and pools of amber candle glow to create that deep, cinematic warmth.
The mood it creates is golden-hour comfort with a tiny hint of woodland magic. Think: papery rustle of faux leaves, little flames that crackle softly, and warm amber tones bouncing off the wall. It works in real homes because you can scale it up or down: a small mantel gets a half-garland and five pumpkins, while a long mantel welcomes an asymmetrical swoop and a dozen minis. It’s family-friendly when you use LED tapers and tea lights, and the whole thing stores easily—garland coils, pumpkins nest, candles tuck into a basket. Lighting is the secret here. Amber glass votives and a couple of LED tapers at different heights create depth and movement that make your mantel photograph like a magazine spread instead of a straight line of stuff.
To help it look gorgeous in photos, you want visual “peaks and valleys.” The garland dips, the pumpkins perch, the candles rise—your eye moves. Saturated fall color carries the shot (russet, burnt orange, fig-leaf brown), while a few soft neutrals break it up. Two variations I love: a budget-friendly version using a plain faux eucalyptus garland tucked with clipped branches from your yard, or a muted version with white baby boos, sepia-toned leaf garland, and linen-colored candle tapers. If you’re renting or have a no-flame rule, swap to LED pillars and string micro-lights under the garland for the same cozy effect.
Budget Breakdown:
- Faux leaf garland (1–2 strands): $18–$60
- Mini pumpkins/gourds (8–14 pieces, real or faux): $12–$40
- Amber glass votives + LED or real tea lights (6–10): $15–$35
- LED taper candles with holders (2–4): $18–$45
- Optional micro string lights (1 strand): $6–$12
- Command hooks or clear tape for anchoring garland: $6–$12
Total Estimated Cost: $57 – $194
Best For: Mantels in living rooms or dens that feel underdressed; great from early October through Thanksgiving; perfect if you want cozy at night and a tidy look by day.
Key Design Elements:
- Main seasonal props: Leaf garland, mini pumpkins, amber glass votives
- Color palette: Burnt orange, rust, umber, soft cream for balance
- Lighting strategy: Layer votives low, tapers mid-height, optional micro-lights tucked into leaves
- Textile layers: A folded plaid throw on a nearby chair to echo colors
- Natural elements: Real mini pumpkins or dried pods mixed in for texture
- Accent details: Brass or matte-black candleholders, a single copper piece for gleam
How To Recreate This Look:
- Start with your garland, draping it across the mantel with a gentle dip. Secure lightly with Command hooks or clear tape so it won’t shift.
- Add a handful of small pumpkins in a repeated rhythm—cluster three on one side, then two farther down, then singles to fill gaps.
- Layer in amber votives low and toward the front edge. Light (or switch on) and check for shadows and hotspots.
- Place 2–4 tapers in holders, staggering heights. Keep at least one taper near the shortest pumpkin cluster to prevent a “bald spot.”
- Style with one hero object off to the side: a framed fall print, a simple vintage mirror, or a stack of small books to ground the scene.
Why This Looks Expensive: The repeated elements (pumpkins and votives) create intentional rhythm, while mixed metals (brass with amber glass) add depth. The asymmetrical garland swoop reads custom, not cookie-cutter, and candlelight softens everything, which always scans high-end in photos.
Watch Out: Don’t overcrowd the center. Leave negative space so the eye can rest, especially if your TV sits above. And skip too many color families—keep it to 3–4 hues max so it reads cohesive, not chaotic.
Pro Styling Tip: Photograph at dusk with just the mantel lights on, then tap your phone screen to lower exposure slightly—the warm glow saturates and the garland texture pops.
Ready for a centerpiece with drama you can still eat dinner around? Keep scrolling.
2. Golden Farmhouse Tablescape With Dried Florals and Burgundy Accents
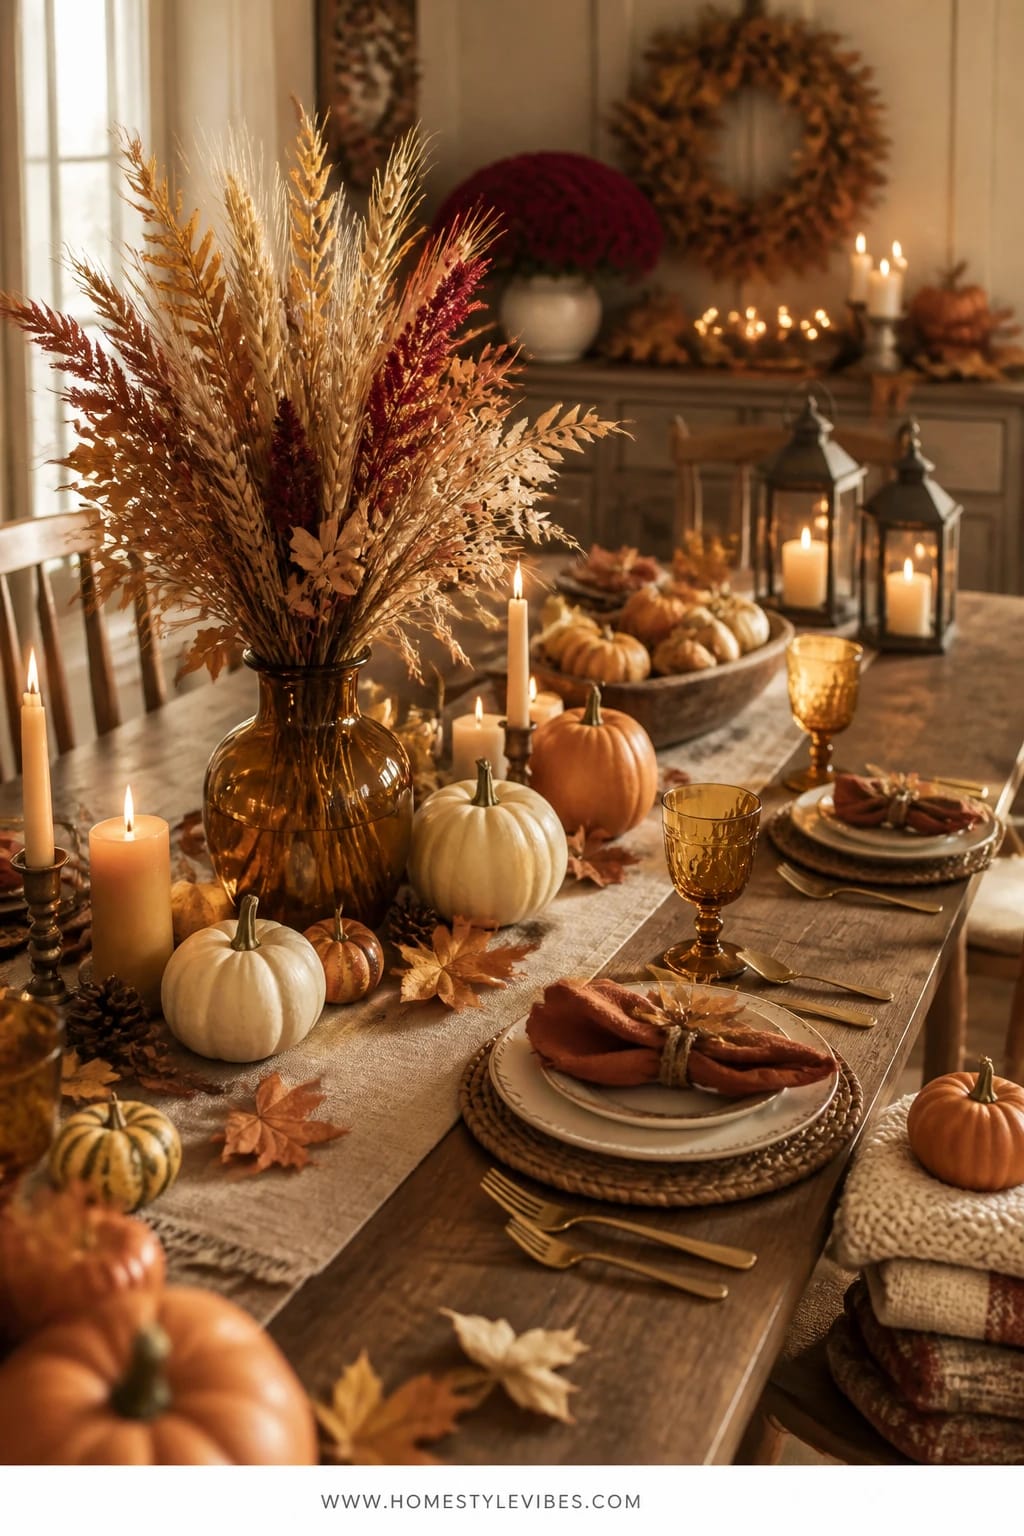
It’s that one table that always feels…awkward. You set a vase down and suddenly everyone’s peering around it like a corn maze. Or the stems splay and flop, turning your “effortless” centerpiece into a lopsided tumbleweed by dessert. This golden farmhouse arrangement gives you height without blocking sight lines and texture without mess, thanks to dried florals that stay exactly where you put them and a tight color story—golden wheat, blush ochre, and one bold hit of burgundy.
The mood here leans harvest-table abundance: think clink of cutlery, the papery whisper of dried grasses, a slow curl of steam off cinnamon tea. It shines in real homes because dried stems are low maintenance, easy to trim, and last the whole season. Lighting rides sidecar with clusters of candlelit warmth: short, squat vessels with low votives and one or two small oil lamps or LED pillars to keep the sightline clear. I tried this on my own farmhouse table last October and honestly couldn’t believe the difference—my fidgety, top-heavy bouquet finally behaved. The secret isn’t more flowers—it’s fewer varieties with better structure.
Photographs love this setup because of all the layered neutrals and one saturated accent. Golden wheat catches light like spun thread, and burgundy stems anchor the shot so it doesn’t wash out. Try a budget version with grocery-store eucalyptus mixed with foraged branches (clip responsibly), or go neutral with taupe pampas, cream bunny tails, and a single mauve hydrangea. Small space? Scale to a footed bowl with three clusters of dried stems and two squat candles—it still reads generous.
Key Design Elements:
- Main seasonal props: Dried wheat, seed pods, eucalyptus, burgundy faux peonies or mums
- Color palette: Golden, cream, soft sage, anchored by deep burgundy
- Lighting strategy: Low candlelight in short vessels; avoid tall tapers in the center
- Textile layers: Linen runner in oatmeal or thin plaid runner in rust and cream
- Natural elements: Foraged branches, acorns in a shallow bowl, a few pinecones for weight
- Accent details: A footed vintage compote, matte-ceramic bud vases, aged brass salt cellars
Budget Breakdown:
- Dried florals bundle (wheat, pampas, pods): $20–$45
- Faux burgundy stems (2–4): $12–$36
- Linen or cotton runner: $15–$40
- Low glass votives or ceramic cups (6–8): $12–$28
- Center vessel (footed bowl or compote): $18–$60
- Optional bud vases (2–3): $10–$24
Total Estimated Cost: $87 – $233
Best For: A farmhouse table or dining nook used for weeknight meals and weekend hosting; perfect from mid-September through Thanksgiving because dried stems stay pretty and fuss-free.
How To Recreate This Look:
- Start with an oatmeal linen runner to ground the scene; let it hang 6–8 inches off each end.
- Add your footed bowl or compote at center, then insert wheat and pampas first to set height (no higher than shoulder-level when seated).
- Layer in eucalyptus and seed pods to fill gaps; keep the shape oval, not round, to follow the table.
- Place 2–4 burgundy stems asymmetrically; think one small cluster on the left third, one on the right edge.
- Style with low votives in pairs, alternating sides down the runner. If you have room, add two little bud vases off-center.
Why This Feels Designer: Limiting the palette and variety creates calm, and the asymmetric burgundy placement feels intentional without shouting. The footed vessel adds vertical lift so your stems don’t fight the tabletop, and the low candle strategy says “we thought about conversation.”
One Thing To Avoid: Skipping the runner or base layer. A bare tabletop under dried florals can look stark and unfinished. Give your stems a soft landing so they look like part of the room, not an afterthought.
Pro Styling Tip: Nudge one or two stems to barely kiss the edge of your frame in photos—foreground blur adds depth and makes the centerpiece look lush.
Take a breath. You don’t need every idea in this article to feel cozy. Remember, this isn’t about recreating a showroom. It’s about building spaces that work with your life and still make you smile when the sun hits at 4:30 and everything goes honey-gold for five minutes.
3. Rust Plaid Entryway Console With Candles and Pinecones
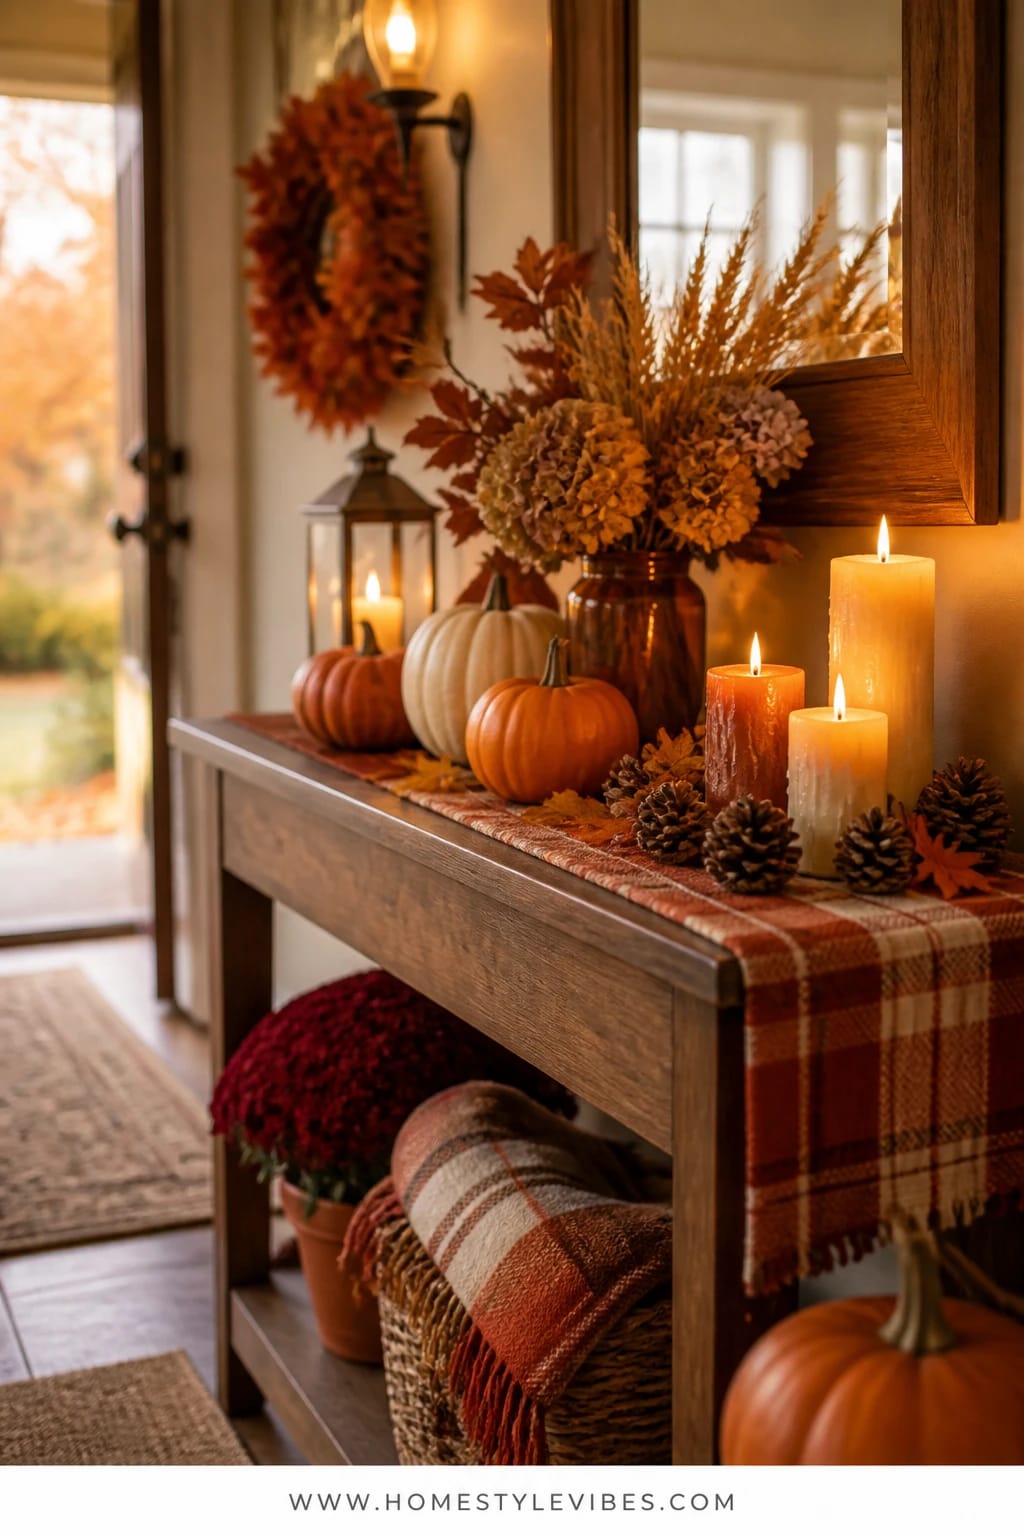
You’ve tried bowls, trays, and a lonely vase, but your entry table still feels like a drop zone for keys and mail, not a welcome moment. It either turns cluttered fast or reads too minimal and cold. This console design leans into texture—plaid, wood grain, rugged pinecones—and simple candlelit warmth that’s safe, easy, and quick to reset after a busy morning.
The vibe is cozy cabin meets pulled-together foyer: a soft plaid runner that catches every warm tone in your home, mixed candlesticks at different heights, and a low vase of dried greenery. It works because everything has a “home”: keys in a lidded dish, mail in a woven basket, matches or an LED remote in a drawer. Lighting here does double duty—short pillars for nightly glow and one taller taper for height. If you have pets or kids, switch to LED pillars with a realistic flicker; honestly, the newer ones with a soft resin “melt” edge look great. The best part? This reads beautifully in photos because textures take center stage: nubby runner, matte ceramic, the woody scales of pinecones, and that deep rust stripe holding it all together.
For variations, try a budget-friendly version with a thrifted plaid scarf as your runner and grocery-store mums in a cut-down amber bottle. Small entry? Scale to a half-runner folded under a tray and use one pillar plus a tea light. Minimalist household? Go neutral: cream-and-tan plaid, bleached pinecones, and one architectural branch. Storage down the line is easy—pinecones in a cloth bag, runner folds flat, candles live with your winter stash. I have a friend who bought three different garlands for her console before realizing the real problem was her lighting—she swapped in amber glass and an LED taper and boom, cozy finally stuck.
Budget Breakdown:
- Plaid runner or scarf: $12–$32
- Mixed candles (2 LED pillars + 1 taper set): $22–$55
- Vase (amber glass or matte stoneware): $14–$38
- Dried greenery or faux stems (eucalyptus, olive): $10–$28
- Pinecones (bag): $6–$14
- Small tray or lidded dish: $10–$24
Total Estimated Cost: $74 – $191
Best For: Entryway consoles or bookshelf tops that need warmth and order; ideal from September through late November and super renter-friendly.
Key Design Elements:
- Main seasonal props: Pinecones, plaid runner, amber or cream candles
- Color palette: Rust, cream, espresso wood, soft mossy green
- Lighting strategy: One tall taper for height, two low pillars for daily glow
- Textile layers: Plaid runner or scarf with visible weave
- Natural elements: Pinecones, a branch clipping, dried olive or eucalyptus
- Accent details: Woven catch-all basket, small brass tray, ceramic lidded dish
Why This Reads High-End: Textures do the heavy lifting. Mixing matte ceramics, woven fibers, and natural pine brings a curated feel. The rust plaid runner ties every piece together like a color “subtitle,” so nothing looks random.
How To Recreate This Look:
- Start with your runner or scarf, smoothing it with a few deliberate soft waves so it doesn’t read stiff.
- Add a tray or lidded dish on one side for keys and mail—function keeps the surface calm.
- Place two LED pillars toward the center-back and one taper toward the opposite side to create a triangle of light.
- Set a low vase with dried stems near the taper; keep stems at or below eye level for pass-by views.
- Scatter 5–7 pinecones in visual “constellations,” not lines. Tuck 1–2 near the tray to connect function with style.
The Most Common Mistake: Lining everything up along the back. Pull pieces forward in staggered depths. That front-edge candle or pinecone cluster is what makes the whole thing feel alive.
Pro Styling Tip: For photos, tilt the runner slightly diagonal to the console and shoot from the corner—those angles add movement and show off the plaid.
If one idea resonates more than the others, that’s your starting point. You don’t need all of them. Choose the scene you’ll see most—mantel, table, entry—and give it 45 minutes of focused love. The rest can come later.
4. Lantern-Lit Porch Steps With Burnt Orange Mums and a Cozy Wreath
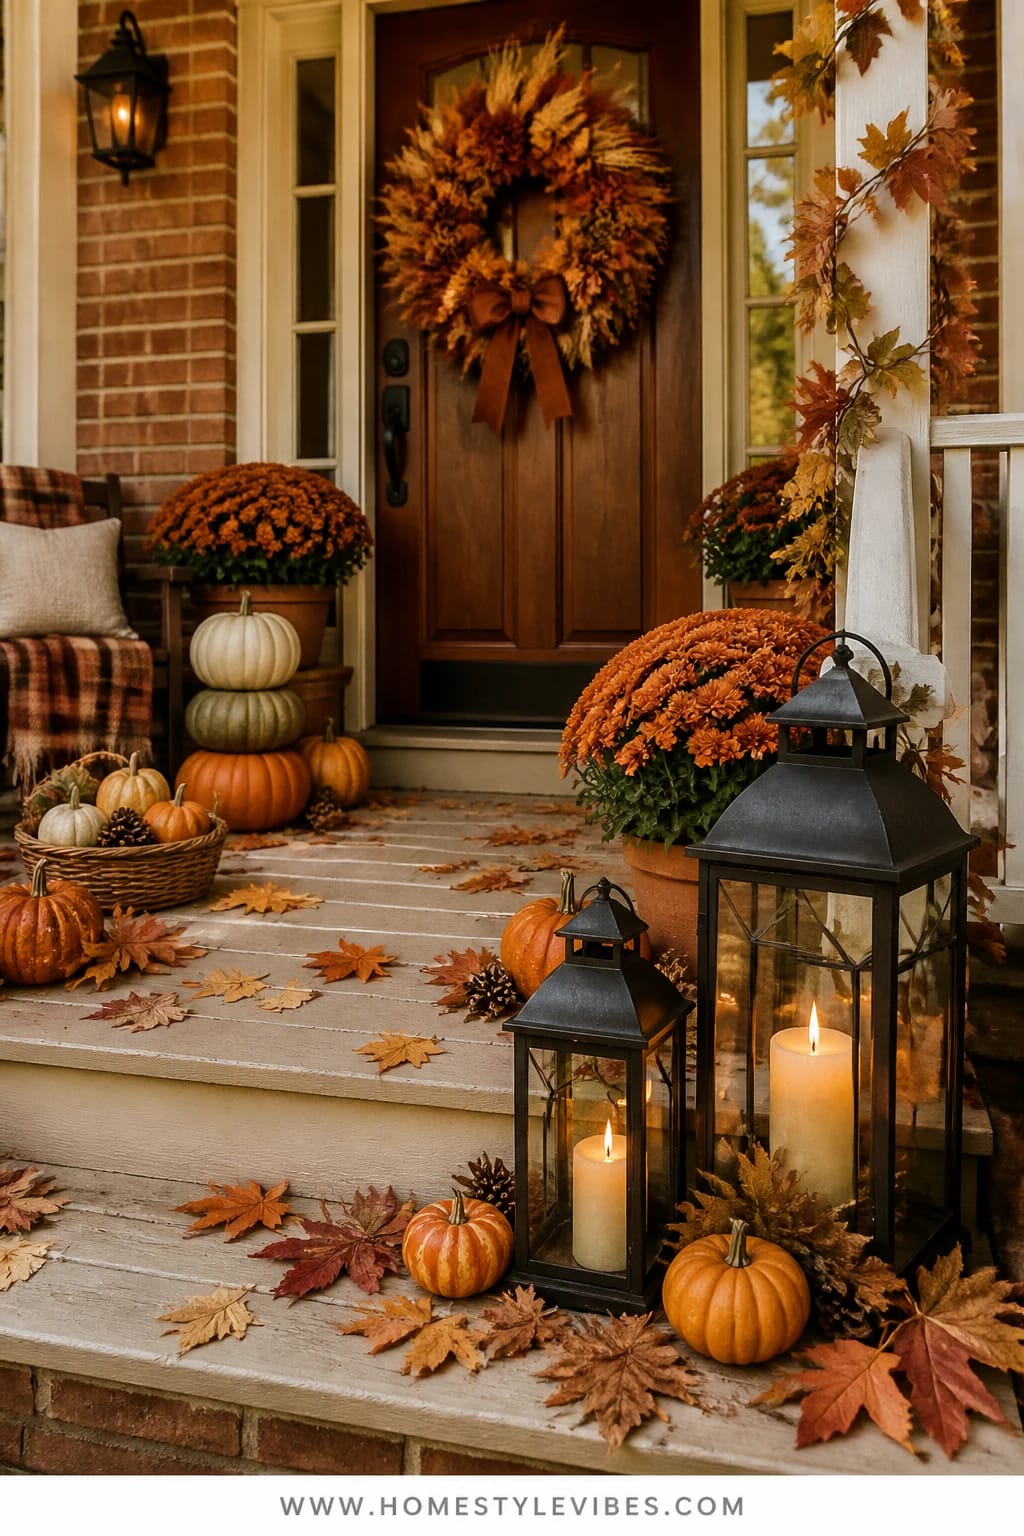
Here’s the honest truth: outdoor fall decor often looks amazing for three days and then drifts into “half-deflated pumpkin village.” You set out a few mums, a lantern, and a wreath, and suddenly the scale is off, the colors fight the brick, and by week two the front step vibe is more “yard sale aftermath” than “harvest welcome.” This porch steps concept solves that with three anchors: an oversized wreath that reads from the street, generous mums in burnt orange for a big swath of color, and 2–3 lanterns to build that candlelit pathway feel at dusk.
The mood serves festive energy—like you’re about to pour cider into paper cups for the neighbors. Practically, it works because you’re thinking in clusters, not singles. Two mum pots flanking the bottom step, one on the middle, and a pair of lanterns staggered away from foot traffic. If you’re worried about flame outdoors, go for timer-enabled LED candles—set them once and enjoy every evening glow. If your climate runs hot-cold-hot, choose hardy mums and water from the base. And yes, IMO, real pumpkins win every time—but elevate them slightly on wood slices to avoid the sad squish from wet concrete.
Photos love this setup because of the layered heights: wreath high, mums mid, lanterns low, and pumpkins tucked in like punctuation. The burnt orange reads saturated and cozy against most house colors, and the warm candle flicker at twilight sells the whole show. Variations? Budget-friendly: two big mums, one large lantern, two pumpkins, and a simple grapevine wreath with a ribbon. Neutral lovers: cream mums, pale pumpkins, natural linen bow on the wreath. Small stoop? One lantern, one mum, one pumpkin, plus a mini wreath or swaged garland—symmetry not required. Renter note: use removable hooks for the wreath and bring plants in at night if you’re contending with curious raccoons. Ask me how I know.
Key Design Elements:
- Main seasonal props: Oversized wreath, lanterns, mums, and pumpkins
- Color palette: Burnt orange, warm brass, natural jute, deep green foliage
- Lighting strategy: Lanterns with LED pillars on timers; optional micro-lights tucked in the wreath
- Textile layers: Coir doormat with a rust-striped outdoor rug underneath for pattern
- Natural elements: Real pumpkins, wood slices, dried corn stalk bundle near the door
- Accent details: Ribbon on wreath (velvet or linen), house numbers backlit if possible
Budget Breakdown:
- Oversized fall wreath: $35–$120
- Mums (3–5 pots): $18–$60
- Lanterns (2–3, metal or wood): $30–$120
- LED outdoor candles (2–4, timer-enabled): $18–$48
- Pumpkins (3–6, mixed sizes): $12–$40
- Outdoor rug + coir mat layering: $30–$80
- Wood slices or risers (optional): $12–$24
Total Estimated Cost: $155 – $492
Best For: Porch steps or stoops that need curb appeal with minimal daily effort; great for early October through Thanksgiving, with easy swaps after Halloween.
Why This Looks Intentional: Triangulation and repeats. You repeat mums and lanterns in a loose triangle, which tells the eye, “Yes, we did this on purpose.” The wreath creates a vertical focal point and anchors all the color choices below.
How To Recreate This Look:
- Start by hanging your wreath at eye level using a removable hook; angle a ribbon tail so it swoops with the door swing.
- Add your largest mum pots at the bottom step corners; place one medium on the next step for height variation.
- Set two lanterns: one by the top step rail or edge, one offset on the opposite side lower down; add LED candles and set timers.
- Layer in pumpkins near mums and lanterns, mixing sizes. Use wood slices to lift one or two so everything doesn’t sit at the same plane.
- Style with a layered doormat: striped outdoor rug on the bottom, coir mat on top. If you have room, prop a small bundle of corn stalks by the doorframe for height and texture.
Don’t Do This: A straight line of identical mums. You’ll get a row that looks polite and forgettable. Stagger those pots so the steps feel generous and welcoming.
Pro Styling Tip: Shoot porch photos five minutes after sunset; the sky turns deep blue, and your lantern glow warms up beautifully without blowing out highlights.
Quick mindset reset: If your porch or mantel gets heavy use, keep a small “reset kit” in a basket—extra batteries, floral wire, sticky tabs, and one spare mini pumpkin. Two minutes of touch-ups after a windy day saves you from the creeping “everything’s messy” spiral.
Quick Checklist
- Faux or real leaf garland for mantel layering
- Mini pumpkins and gourds in one cohesive palette
- Amber glass votives and LED tapers for warm glow
- Linen or plaid table runner in rust or oatmeal
- Dried wheat, pampas, and seed pods for structure
- Burgundy accent stems for depth
- Footed bowl or compote to lift arrangements
- Plaid runner or scarf for the entryway console
- Mixed-height candles for dimensional lighting
- Pinecones and a small tray for functional styling
- Oversized fall wreath with velvet or linen ribbon
- Lanterns with timer-enabled LED pillars
- Burnt orange mums in 3–5 generous pots
- Layered doormat setup: outdoor rug + coir mat
- Wood slices or risers to vary pumpkin height
Frequently Asked Questions
I’m on a tight budget. Which pieces give me the biggest visual impact for the least spend?
Prioritize lighting and one anchor. For the mantel, get amber votives and an affordable faux garland, then add a few real mini pumpkins. For the porch, choose a single oversized mum color and one lantern with an LED candle. Light plus one bold repeat reads fuller than lots of tiny decor buys.
Should I use real or faux pumpkins and florals for these fall centerpiece ideas?
Mix them. Use real mini pumpkins where you’ll see and touch them up close (mantel edges, table bowls), and faux stems for height and stability in vases. Dried florals are ideal on the table because they hold shape and last weeks. Outdoors, real pumpkins look amazing, but elevate them off damp surfaces.
My space is small. How do I adapt these arrangements without cluttering?
Scale by count, not by type. Keep all the elements, but reduce quantities: one garland and five minis on the mantel, a compact footed bowl with three clusters on the table, a half-runner and two candles on the console, and a single lantern + mum + pumpkin on the porch. Maintain height variation so it still feels styled.
What about storage after the season? I’m already short on closet space.
Choose collapsible or stackable pieces: coil garlands flat in a labeled zip bag; stack votive holders inside each other; store pinecones in a drawstring cloth bag; nest lanterns if possible. Keep a shallow under-bed bin for faux stems and candles. I label by zone—Mantel, Table, Entry—so next year’s setup is fast.
Are candles safe with kids and pets? I love the glow but worry about fire hazards.
Use LED tapers and pillars in heavy bases, especially on the entry console and porch. On the mantel and table, position candles away from edges and trailing textiles. The newest LED tapers look surprisingly realistic, and timer features remove daily fiddling. If you burn real candles, never leave them unattended, and use draft guards.
When should I start decorating for fall to get the most mileage?
Begin with neutrals and dried florals in early September, add pumpkins and richer rust tones in late September, then layer in mums and outdoor lanterns by early October. This slow build keeps everything fresh and lets you adjust based on weather and gatherings.
Conclusion
Pick one idea and begin. Start with the spot you see most: the mantel you stare at every night, the entry that greets you after work, or the porch that makes the neighbors smile. Give it 60 minutes, a few layered textures, and warm light you can feel across the room. You’ll be shocked how finished your whole home feels once one zone sings.
The secret isn’t buying more stuff—it’s repeating a color, stacking warm light at different heights, and leaning into generous fall textures. Candles for glow. Plaid and wheat for softness. Pumpkins and pinecones for that honest, seasonal weight. These four fall centerpiece and vase arrangement ideas are easy, stunning, and wildly photogenic because they respect how real life moves through a space.
Trust yourself. Grab the garland, fluff the stems, light the glow. You’ve got this—and your home is about to feel like October wrapped in a blanket, all the way to Thanksgiving.
About the Author

Krisztina P.Rendes, Founder of Home Style Vibes
Founder of Home Style Vibes
Krisztina Puskásné Rendes created Home Style Vibes as a cozy-modern lifestyle space where homemaking meets inspiration. Her goal is to help women create beautiful, organized, and peaceful homes they truly love — without overwhelm. You’ll find here heart-driven content on home decor, cleaning tips, easy family recipes, organization and decluttering, DIY home projects, plants, and seasonal ideas — all designed to bring more calm, comfort, and style into everyday life.