6 Balcony Vegetable Garden Ideas For Growing Food In Tiny Spaces
You want crisp basil on hand, little cherry tomatoes that taste like sunshine, and a tiny green world that makes your coffee taste better just by being near it. But your balcony is the size of a yoga mat, the wind gets bossy, and the HOA rules are very… involved. This guide is your quiet rebellion. We’re going to build six photogenic, hardworking balcony vegetable garden setups that solve small-space headaches fast, look Pinterest-ready, and cap out within realistic budgets and timelines so you can plant on a Saturday and harvest within weeks, not seasons.
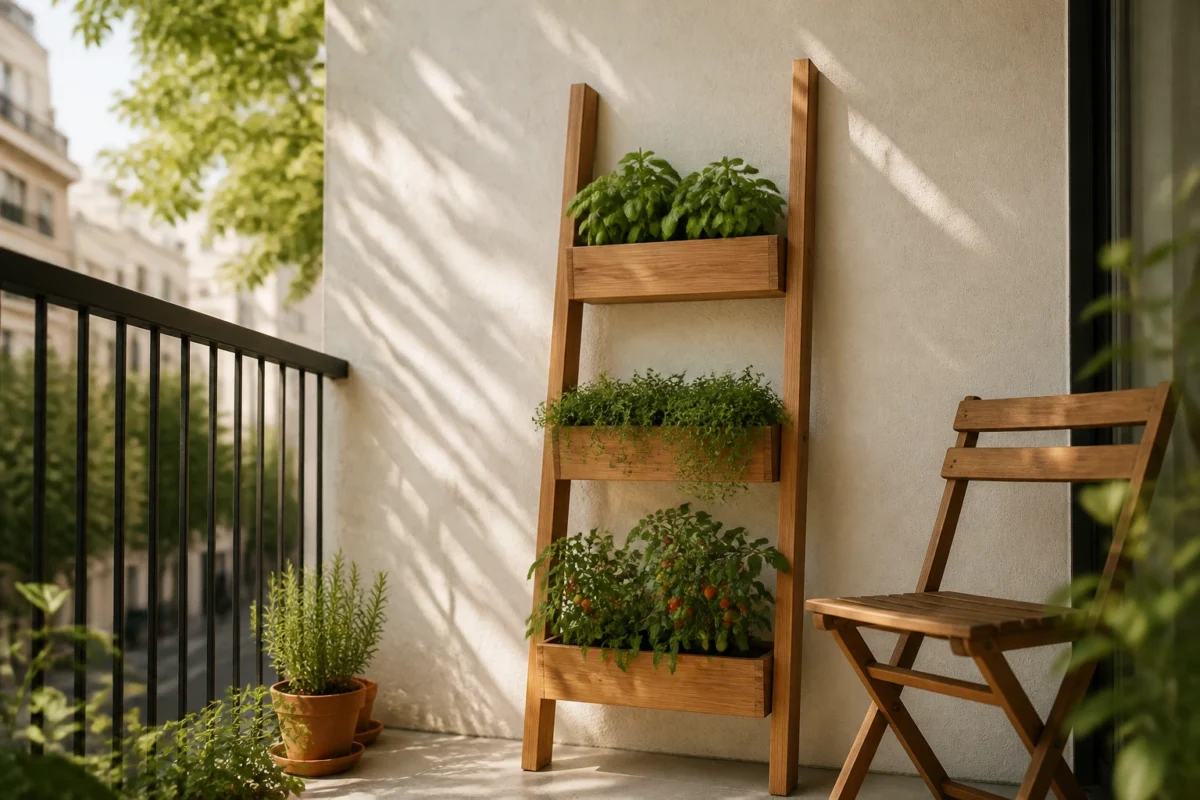
Expect tactile textures: warm wood slats, glossy leaves, chalky terracotta, matte black rails. Expect light that feels like a hug—soft, dappled, and flattering to every sprig. And expect to feel different on your balcony by the end: calm, useful, and proud. These tiny-space garden ideas are for cooks, snackers, serial plant-buyers, and anyone who wants their balcony to earn its keep without giving off dorm-room vibes.
1. Slim Cedar Ladder Garden With Morning Light And Narrow Self-Watering Troughs
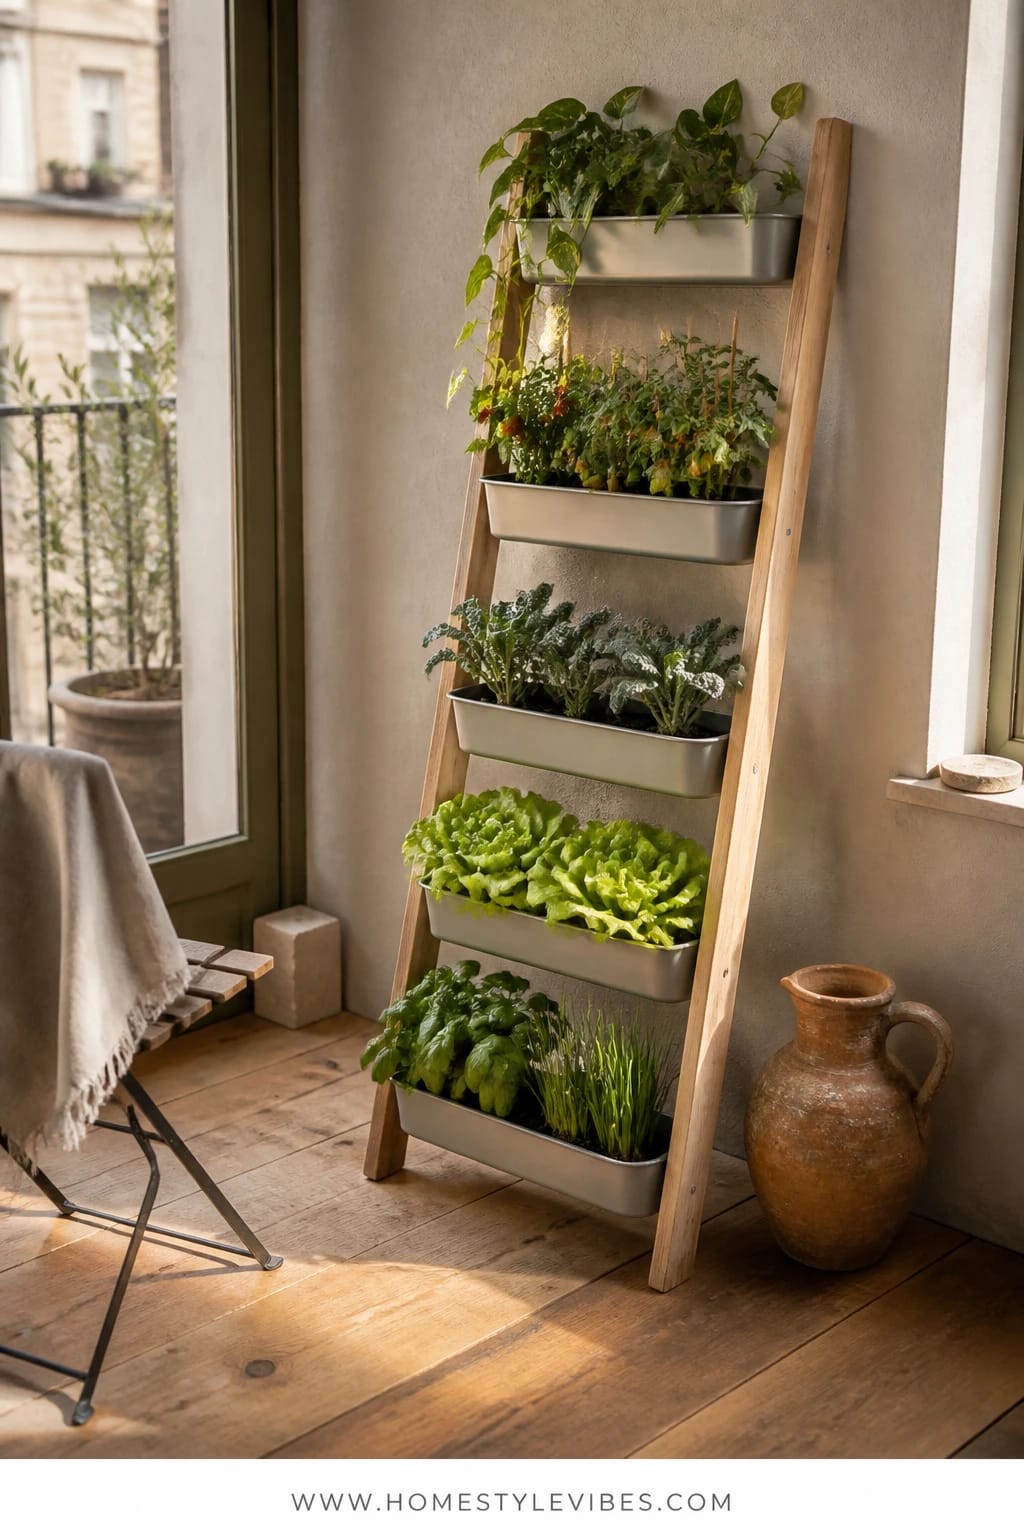
We’ve all been there: a balcony rail, a bistro chair, and nowhere to set a single pot except the floor where it trips you every time you bring out laundry. This slim cedar ladder garden is the vertical vegetable hero your balcony has been begging for. It brings a cozy, Scandinavian-leaning mood—soft grains, pale tones, and that gentle morning light that smooths everything out. It works in real homes because it claims wall height you’re not using, keeps leaves off the ground, and uses self-watering troughs so you don’t spend your lunch break rescuing droopy kale.
Cedar dominates as the main material—light, warm, and naturally rot-resistant. The light quality is key: set it along the wall that gets 2–5 hours of morning sun. Lettuce, herbs, strawberries, and dwarf tomatoes love that gentler exposure. Narrow, matte-black self-watering troughs act like the statement “furniture” here; they’re architectural, they read modern, and they create clean, graphic lines that photograph beautifully. The contrast of powdery cedar and inky planters gives depth, while the leaf gloss adds that little sparkle. You can go budget with pine sealed in outdoor poly or go premium with pre-oiled cedar slats that glow like honey.
Variations? Easy. For a renter-friendly version, use a freestanding leaning ladder shelf with adjustable feet pads—no drilling, no drama. For darker balconies, switch to reflective white troughs and choose shade-tolerant greens like arugula and mint. Small-space twist: choose 24-inch troughs instead of 36-inch; stagger heights so the top shelf sits above eye level for more visual height and fewer splashes on your floor tiles.
Budget Breakdown:
- Cedar or pine ladder shelf: $70–$180
- Self-watering trough planters (2–3 tiers): $60–$150
- Potting mix and compost: $25–$45
- Seeds or starter plants (herbs/greens/dwarf tomato): $15–$40
- Outdoor-grade brackets or anti-tip kit: $10–$25
Total Estimated Cost: $180 – $440
Best For: Narrow balconies under 4 feet deep; morning-sun spaces; renters who want a clean, modern vibe with easy maintenance.
Key Design Elements:
- Main materials: cedar slats, powder-coated steel troughs
- Color palette: warm honey wood, matte black, soft green foliage
- Lighting strategy: morning sun placement, indirect afternoon shade
- Furniture silhouettes: slim ladder profile, linear planters
- Texture layers: smooth grain, matte troughs, glossy leaves
- Accent details: slim watering can, black metal plant labels, micro-pruners
How To Recreate This Look:
- Start with a slim ladder shelf that leans safely; secure with an anti-tip kit if needed.
- Add narrow self-watering troughs to the lower two tiers; leave the top tier for lighter herb pots.
- Layer a high-quality potting mix with compost; avoid garden soil—it compacts in containers.
- Install a simple timer-based drip line or rely on the trough reservoirs; check moisture weekly.
- Style with matte-black labels and a compact watering can; tuck in a trailing thyme for visual softness.
Why This Looks Expensive: The strict color palette (wood, black, green) and consistent planter shape create a tailored, built-in feeling. No visual noise, just crisp lines and intentional layering.
Watch Out: Don’t overfill the top tier with heavy planters. Keep the heaviest troughs at knee height to avoid tipping and to spare your back when you harvest.
Pro Styling Tip: Photograph in the first hour of sun—cedar warms up, leaves glow, and shadows ladder down the wall for depth that reads editorial.
Keep scrolling—next up solves the “no floor space” problem even harder, especially if your balcony rail is your only real estate.
2. Powder-Coated Rail Planters With High Noon Light And A Compact Fold-Down Potting Shelf
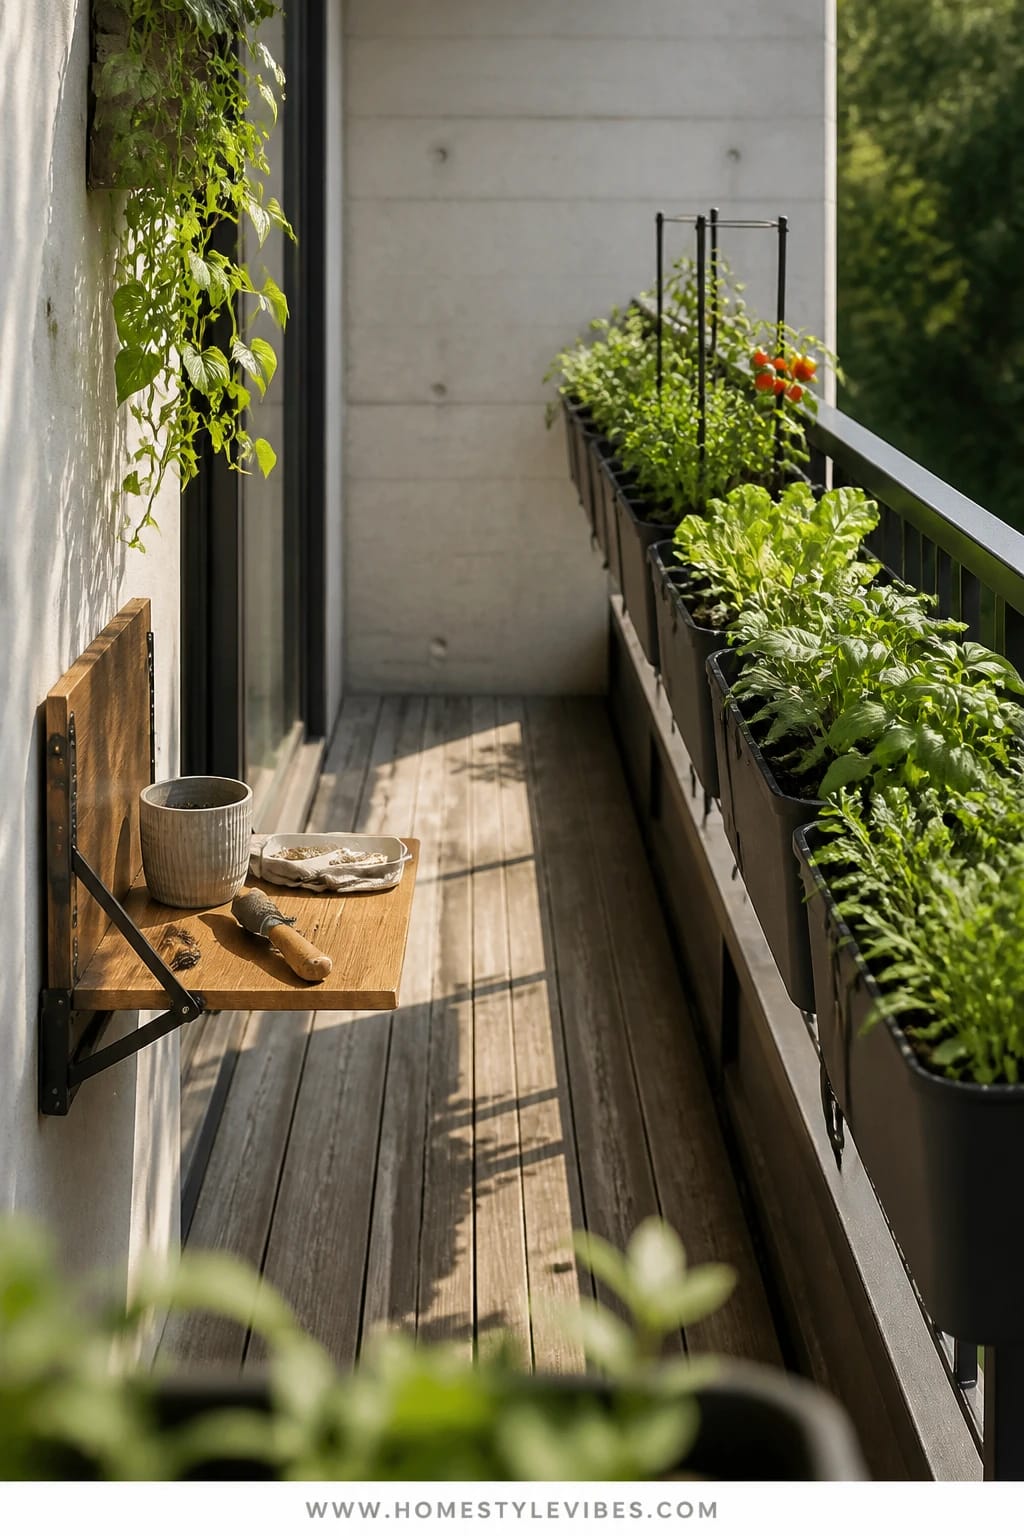
It’s that one balcony that feels like a hallway: long, narrow, and all railing. You’ve tried squeezing pots along the edge, but they wobble and look cluttered. This design turns the railing into prime vegetable real estate using matching powder-coated planters and adds a fold-down potting shelf as the statement piece. The mood leans modern bistro—crisp, purposeful, a tiny outdoor bar that also grows you arugula.
Why it works in real homes: rail planters claim the gap you can’t walk on anyway. Matching finishes keep the line consistent so your eye reads calm, not chaos. In high noon light, vegetables like peppers, bush beans, and basil thrive, especially if your building faces south or west. The fold-down shelf becomes your mini potting bench and summer salad bar; when not in use, it tucks flat to keep everything sleek. Photographing this setup is easy: strong horizontals, rhythmic repetition of planter boxes, and bold leaf shapes against the skyline.
Variations include a budget version with plastic clip-on planters (choose matte finishes and uniform color to keep it chic), a small-space version that uses staggered double-tier rail baskets, and a renter-friendly swap where the fold-down shelf is suction-cup mounted under a window rail (only if your glass is rated safe—otherwise, stick to mechanical mounts on the railing).
Budget Breakdown:
- Powder-coated rail planters (3–5 pieces): $90–$250
- Fold-down wall/rail shelf: $60–$160
- Drip saucers or coco liners: $15–$35
- Vegetable starts and mix: $35–$70
- UV-stable zip ties/rail straps: $8–$15
Total Estimated Cost: $208 – $530
Best For: West- or south-facing balconies; long rail spans; hosts who want a serving ledge that doubles as a planting station.
How To Recreate This Look:
- Measure rail depth and select planters that clamp or strap securely; confirm weight limits in your HOA guide.
- Install a centered fold-down shelf; align with one planter bay to create a natural “work zone.”
- Add a high-quality lightweight mix and slow-release organic fertilizer.
- Plant heat lovers in the outer planters and quick-cut greens closer to the shelf for easy access.
- Style with one sculptural herb (like purple basil) per planter row for rhythm and color pop.
Key Design Elements:
- Main materials: powder-coated steel, marine-grade straps
- Color palette: matte charcoal, deep green, pops of herb flowers
- Lighting strategy: full sun tolerance; midday shade cloth in heat waves
- Furniture silhouettes: slim rectangles, fold-down rectangle shelf
- Texture layers: matte metal, airy foliage, smooth rail
- Accent details: minimal black hooks for scissors, magnetic strip for plant tags
Why This Feels Designer: Continuous lines and repeated forms trick the eye into reading the balcony as larger and more intentional. The fold-down shelf acts like a custom built-in, even if it cost under a hundred bucks.
One Thing To Avoid: Mixing planter styles or colors. Three different shapes will make your small balcony feel chaotic and smaller.
Pro Styling Tip: For photos, close the shelf, set a single wooden board on top with a bowl of cherry tomatoes—clean, graphic, and delicious-looking.
Pause a second. If one idea so far is sparking something, that’s your starting point. You don’t need all six. Choose the setup that solves your one most annoying balcony issue and let that win first.
3. Terracotta Column Stack With Golden Hour Glow And A Round Bistro Table Planter
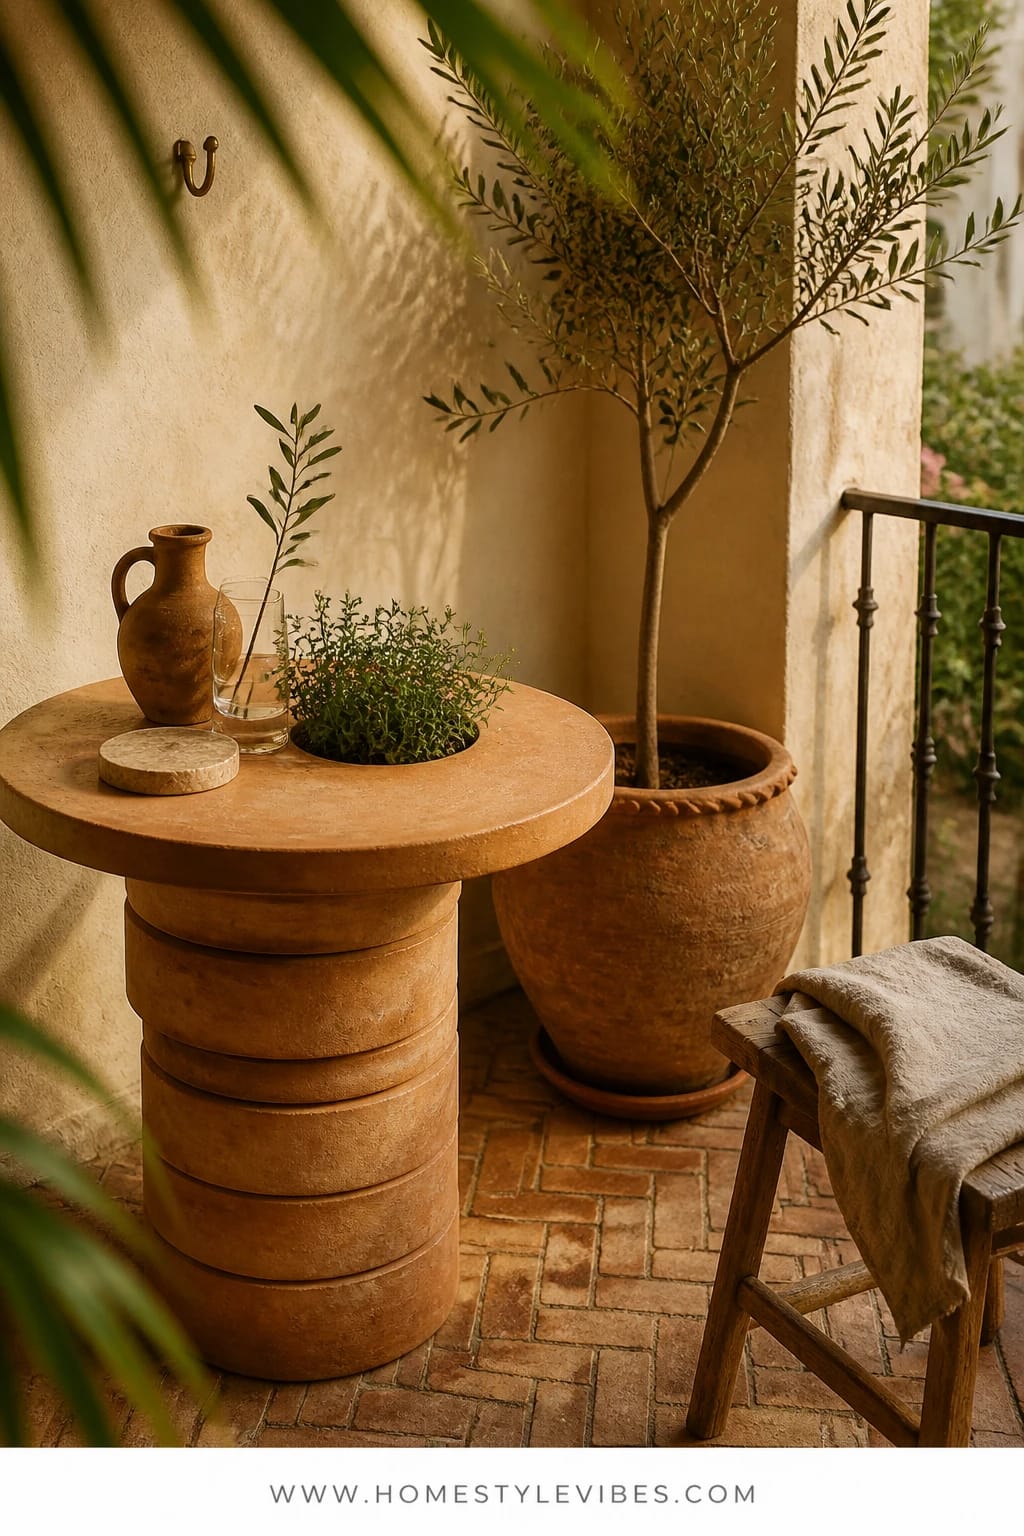
You love that old-world market vibe—warm clay, soft edges, a bit of patina. You hate the reality of twelve mismatched pots hogging your floor and drying out at different rates. Enter the terracotta column stack: nesting terracotta cylinders with a shared central reservoir, crowned by a round bistro-table planter that doubles as your evening wine perch. The mood? Mediterranean micro-courtyard. It looks like you smuggled a little Italian piazza up your stairs.
In real homes, this wins because it centralizes watering and gives vertical lift without industrial vibes. Terracotta breathes; roots stay healthier; herbs and compact veggies like dwarf eggplant, oregano, and cherry tomatoes behave. Golden hour light turns terracotta from orange to rose and makes a wildly photogenic stage for glossy basil and silvery thyme. The round table planter acts as your statement piece—functional furniture that reads sculptural. Depth comes from staggered heights; shadows kiss those curved edges for magazine-ready contrast.
Try a budget route with lightweight faux-terracotta resin planters (go for matte finishes). For small balconies, reduce to a single column plus a 24-inch round table with a deep bowl planter insert. Renter-friendly note: use furniture sliders under the column base to avoid scraping tile. Maintenance hack: mulch with shredded straw or cocoa hulls to slow evaporation and keep the terracotta from developing splash marks.
Budget Breakdown:
- Terracotta stackable planters (3–4 pieces): $80–$220
- Round bistro table planter or bowl insert: $60–$180
- Drip tray and riser feet: $15–$35
- Soil, compost, mulch: $35–$60
- Herbs and compact veg: $25–$60
Total Estimated Cost: $215 – $555
Best For: East or west balconies that catch golden hour; anyone who wants a timeless, romantic look and a surface for snacks.
Key Design Elements:
- Main materials: terracotta, iron or aluminum table base
- Color palette: warm clay, sage green, soft charcoal accents
- Lighting strategy: protect from harsh midday; let golden hour do the magic
- Furniture silhouettes: cylinders and a single, generous round
- Texture layers: porous clay, glossy basil leaves, matte metal frame
- Accent details: linen napkin, small copper watering can, lemon in a bowl
Why This Reads High-End: The material honesty of terracotta plus a single sculptural round reads collected, not cluttered. Curves soften the geometry of balcony railings and give a boutique-hotel feel.
How To Recreate This Look:
- Place a rubber mat or sliders, then set your largest terracotta base; build upward with decreasing diameters.
- Fill each layer two-thirds with mix, tuck in herbs around the edges for a cascading effect.
- Top the round table with a bowl planter; anchor with a dwarf tomato or chili and edge with thyme.
- Mulch every surface; water deeply and let the clay wick moisture evenly.
- Style with a pale linen and one citrus—simple, sunny, done.
The Most Common Mistake: Skipping saucers. Terracotta sweats; without trays or risers, you’ll stain your concrete or tile fast.
Pro Styling Tip: Shoot from slightly above to show the circular rhythm and layered foliage—it reads like edible sculpture.
4. Galvanized Stock Tank Planter Under Soft String Lights With A Narrow Bench Edge
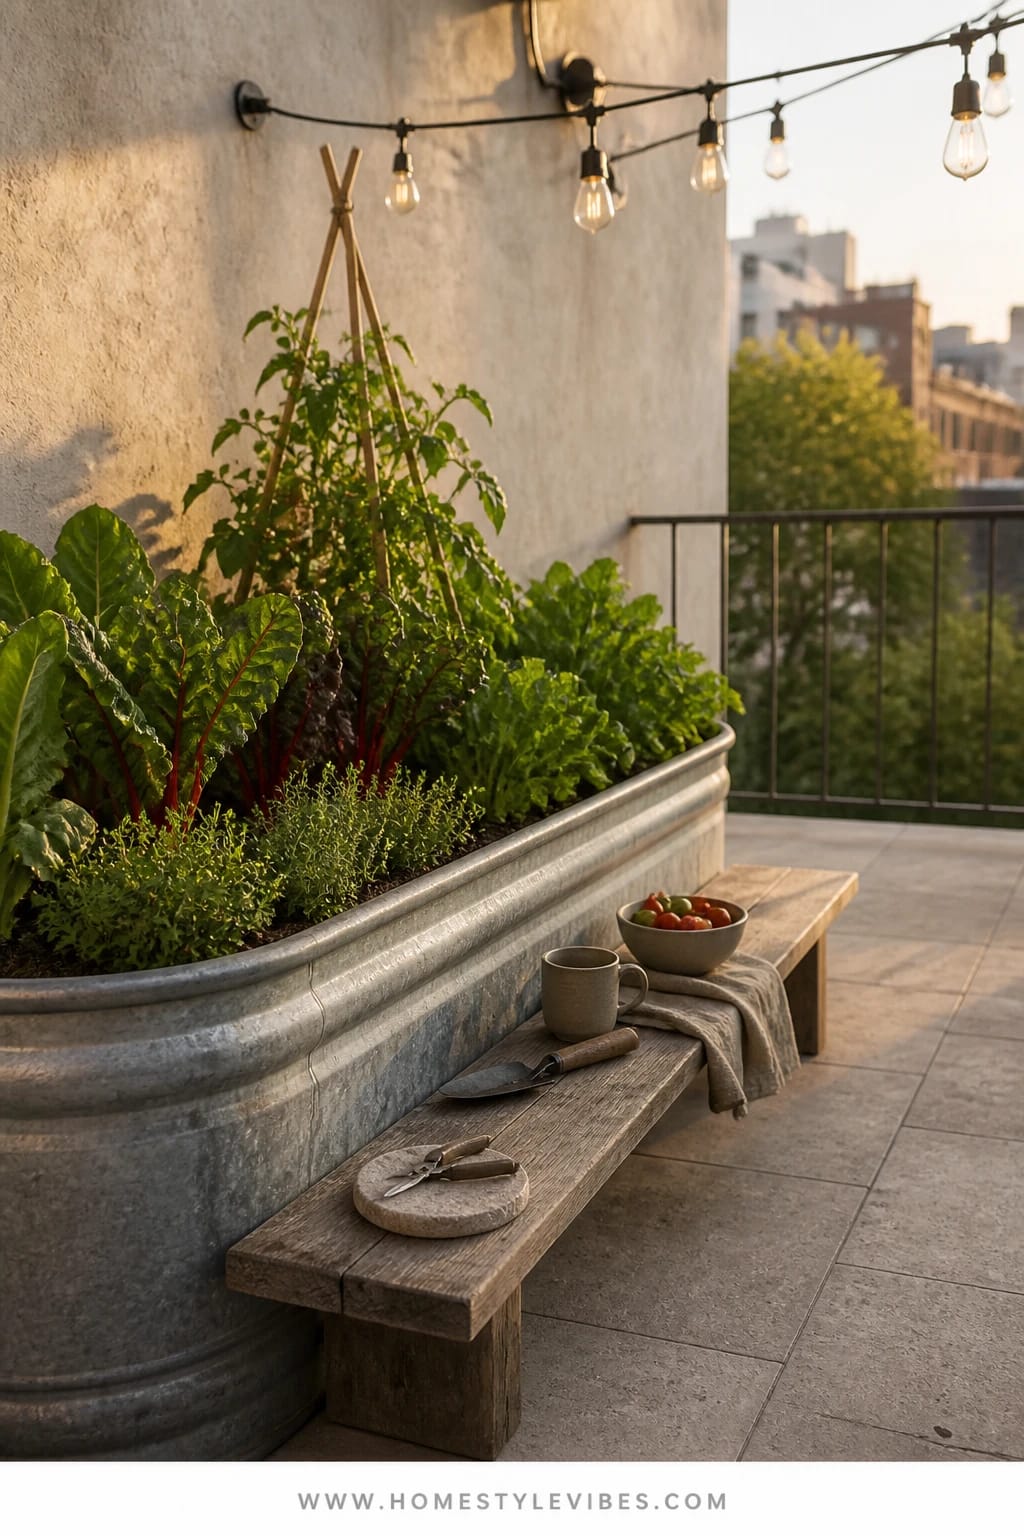
You want a big-kid vegetable bed—the kind you can actually lose your hand in while cutting chard. But your lease, your neighbors, and your floor space all say “lol, no.” This is the compromise that doesn’t feel like one: a low galvanized stock tank planter (the statement piece), tucked against the wall, with a skinny bench built along one side and soft string lights overhead. The mood is urban farmhouse meets city rooftop: easy, unfussy, and quietly hardworking.
Here’s why it works: a stock tank holds a stable volume of soil, which means less watering stress and bigger yields, even in a balcony vegetable garden. Galvanized metal loves twilight—it softens to pewter under string lights, bouncing a gentle glow onto leaves. The narrow bench edge doubles as seating and as a staging area for harvest bowls. It photographs like a lifestyle spread because of the layered lines: horizontal bench, oval tank curve, and a canopy of micro-lights that create bokeh behind your tomatoes. Maintenance is simple: drill a few drainage holes, line the base with lightweight filler (upturned nursery pots or pumice), and use a rich mix.
Variation for tight spaces: choose a half-length tank or a vertical oval planter with the same finish. Budget route: use a galvanized trough planter on casters instead of a full stock tank. Renter-friendly swap: add furniture sliders under the tank feet to protect decking and make seasonal repositioning sane.
Budget Breakdown:
- Galvanized stock tank or trough: $120–$260
- Custom narrow bench or premade bench: $70–$220
- Outdoor string lights and hooks: $30–$80
- Soil, compost, filler: $40–$90
- Veg starts (kale, peppers, cherry tomatoes, basil): $25–$60
Total Estimated Cost: $285 – $710
Best For: Balconies with at least 5–6 feet of straight wall; evening entertainers; growers who want bigger yields with fewer containers.
Key Design Elements:
- Main materials: galvanized steel, sealed wood bench slats
- Color palette: cool pewter, charcoal, emerald greens
- Lighting strategy: soft string lights for night gardening and ambiance
- Furniture silhouettes: low oval/rectangle tank, skinny bench
- Texture layers: brushed metal, ribbed leaves, smooth sealed wood
- Accent details: jute twine, plant clips, a single vintage-style harvest basket
How To Recreate This Look:
- Position the tank near a wall; drill several 1/2-inch drainage holes underneath.
- Layer lightweight filler in the bottom, then add soil/compost mix to 10–12 inches depth.
- Build or place a 10–12-inch-deep bench along one side; seal it against moisture.
- Install string lights in a gentle swag; avoid harsh, bright bulbs that flatten foliage.
- Plant taller veg to the back, cascading herbs to the front; keep your snips on a wall hook.
Why This Looks Intentional: The bench and lights give context. Instead of “giant tub on a balcony,” it reads as a micro-room with zones—grow here, sit here, glow above.
Don’t Do This: Overplant the center. Give each main crop 12–18 inches. Crowding makes it look messy and invites mildew in humid weather.
Pro Styling Tip: Turn on lights at dusk and shoot with a shallow depth of field so the bulbs blur; your greens will look cinematic.
Quick mindset reset: this isn’t about perfection. My first stock tank overflowed because I forgot to punch enough drainage holes—cue a tiny balcony flood and very polite neighbor texts. You learn, you adjust, you enjoy your salad anyway.
5. Bamboo Trellis Grid With Cool Shade Light And A Hanging Foldable Hammock Chair
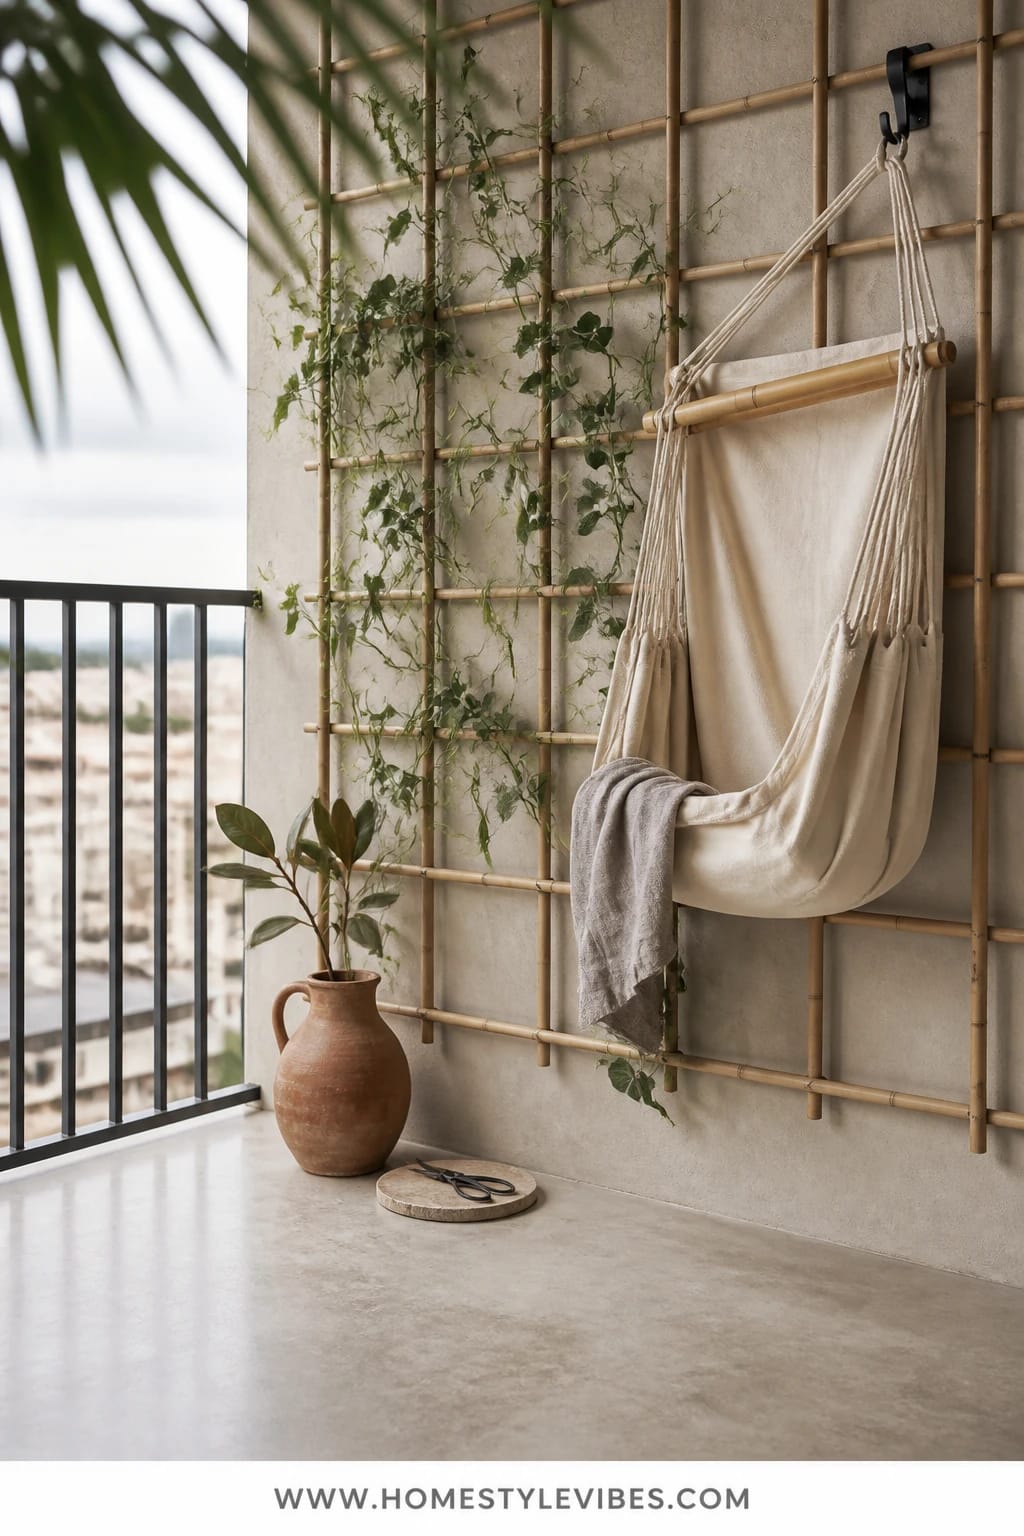
Some balconies feel like wind tunnels or hide under deep overhangs. The sun teases, then disappears. You’ve tried sun-loving tomatoes that sulked all summer. This bamboo trellis grid is your elegant workaround. It frames the space with vertical lines for peas, beans, and cucumbers that don’t demand brutal sun, and the hero piece is a foldable hammock chair that clips up when not in use. The mood is soft, Japandi-adjacent calm—simple lines, pale bamboo, and leaves drawing quiet patterns across the wall.
Why it wins at home: bamboo is lightweight, renewable, and gentle on rental walls when mounted with removable adhesive hooks and nylon cord. In cool, indirect light, greens, peas, and herbs thrive without bitterness. The grid gives depth for photos—shadows through the trellis create a woven light effect. Styling stays flexible: swap plant types seasonally, change out the chair textile for a color moment, or clip a small canvas pouch to hold twine and snips. It’s low-drama, high-soothing, and it finally makes a low-light balcony feel considered.
Variations include a budget-friendly DIY grid with garden stakes and twine, a darker version with matte-black bamboo poles (stain them) and deep green cushions, and a renter-friendly no-drill mount using tension rods at floor and ceiling to anchor the grid safely.
Budget Breakdown:
- Bamboo trellis panels or poles: $40–$120
- Removable hooks/tension rods/nylon cord: $20–$50
- Foldable hammock chair with hardware: $60–$180
- Shade-tolerant seedlings and mix: $25–$50
- Planters (rectangular or trough): $30–$90
Total Estimated Cost: $175 – $490
Best For: North or deeply shaded balconies; renters; anyone who values calm over color and wants edible vines to create a leafy privacy screen.
Key Design Elements:
- Main materials: bamboo, cotton/poly hammock fabric
- Color palette: pale wood, soft greens, off-white textiles
- Lighting strategy: indirect, dappled shade; avoid midday scorch
- Furniture silhouettes: linear grid, soft sling chair
- Texture layers: smooth poles, woven shadows, matte leaves
- Accent details: linen cushion, small ceramic side table, twine and clips
How To Recreate This Look:
- Mount bamboo as a grid along one wall using removable hooks or a tension frame.
- Place narrow trough planters at the base; fill with rich, moisture-retentive mix.
- Plant peas, pole beans, or cucumbers; train gently with soft ties.
- Hang a foldable hammock chair from a rated anchor or stand; confirm weight limits.
- Style with a single pale cushion and a compact side table—keep it hushed and calm.
Why This Looks Expensive: The repeated verticals and restrained palette feel like spa architecture. Clean geometry plus soft textiles reads deliberate, not DIY.
Watch Out: Skip heavy fruiters in deep shade. Choose varieties bred for low light—salad greens, mint, parsley, snow peas.
Pro Styling Tip: Take photos when the trellis throws diagonal shadows—angles add sophistication your phone camera loves.
6. Black Metal Grid Wall With Warm Uplighting And A Rolling Prep Cart Planter
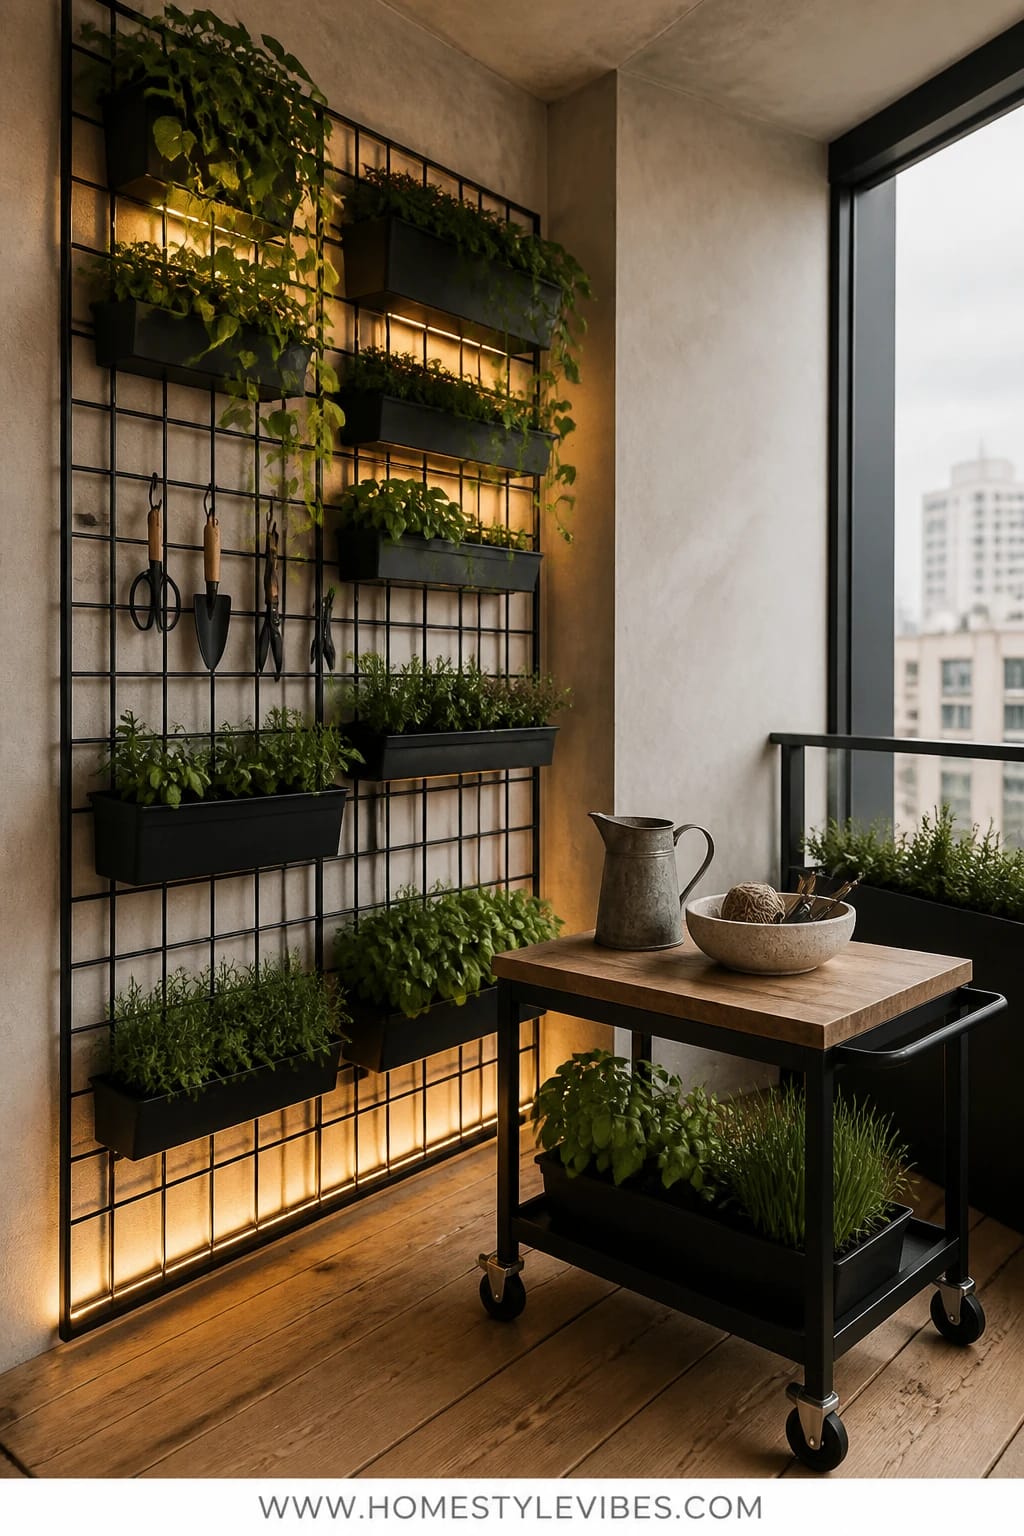
You crave order. You hate the “plant explosion” chaos where watering day turns into an obstacle course. This final setup organizes everything: a black metal grid wall that holds modular planters and tools, warm LED uplighting at the base, and a rolling prep cart that doubles as a planter on the bottom shelf. The mood reads chef’s balcony—industrial-chic with purpose. When friends come over, you look like the person who actually remembers where the shears live.
It works in real homes because the grid does what cabinets do inside—vertical storage, clear zones, no guessing. Black metal frames foliage like art, and the uplighting adds movie-night vibes and helps you spot pests before they get cute ideas. The rolling cart moves with you, staging harvest bowls and creating a mobile drinks station when the herbs are off-duty. This photographs beautifully thanks to contrast: dark frame, glowing leaves, shiny cart edges. This is also the most flexible style long-term; swap planters seasonally, hang mini shelves for microgreens, and clip notes or recipes right where you harvest.
Variations include a budget version with plastic-coated wire grids and S-hooks, a renter-friendly version hanging the grid from rail clamps, and a small-space version that uses a half-width cart and two grid panels instead of three. If your balcony gets blasting afternoon light, add a simple shade panel above the grid to soften scorch without ruining the silhouette.
Budget Breakdown:
- Black metal grid panels and anchors: $70–$180
- Modular planters and hooks: $60–$150
- Warm LED uplights or strip: $30–$90
- Rolling prep cart (metal or wood/metal): $80–$200
- Soil and plant starts: $25–$60
Total Estimated Cost: $265 – $680
Best For: South- or west-facing balconies; organized cooks; anyone who wants a tidy, high-contrast look that still grows real food.
Key Design Elements:
- Main materials: powder-coated steel, tempered shelves
- Color palette: matte black, deep greens, warm amber light
- Lighting strategy: low uplights to graze foliage; optional top shade
- Furniture silhouettes: rectangular grid, streamlined cart
- Texture layers: matte frame, glossy leaves, brushed metal accents
- Accent details: magnetic clips, misting bottle, stainless snips
How To Recreate This Look:
- Mount grid panels along one wall; keep them plumb for symmetry.
- Attach modular planters in a checkerboard pattern; leave negative space for breathing room.
- Place warm LED uplights at the base pointing up the grid; hide cords neatly along edges.
- Roll in a cart; plant soft herbs on the lower shelf in a long tray, keep prep tools on top.
- Style with labeled tins for seeds and a single citrus tree in a black pot to anchor the corner.
Why This Feels Designer: Negative space and lighting control. Half of the sophistication is what you don’t fill. The other half is light grazing leaves like sculpture.
One Thing To Avoid: Overdecorating the grid. If every square holds something, you lose the gallery effect. Aim for 60–70 percent coverage.
Pro Styling Tip: Shoot at dusk with lights on and a dark background; the plants will glow and the grid will outline like a sketch.
Perspective shift: your balcony isn’t a yard, and that’s fine. Treat it like a well-edited room with clear zones, smart light, and consistent materials. That’s how small spaces look generous.
Quick Checklist
- Measure sunlight hours at three times of day
- Pick one dominant planter color and stick to it
- Choose a single statement piece (shelf, table, tank, grid)
- Use high-quality potting mix, not garden soil
- Add slow-release organic fertilizer at planting
- Mulch container surfaces to reduce evaporation
- Install simple drip or use self-watering reservoirs
- Group plants by watering needs
- Leave negative space for air flow and photos
- Secure everything—wind-proof and neighbor-safe
- Keep a small caddy with snips, twine, and labels
- Plan for evening light—string lights or uplights
Frequently Asked Questions
How much should I realistically budget for a tiny balcony vegetable garden?
Plan on $150–$400 for a streamlined setup with quality planters, soil, and a few starts. Larger statement pieces like stock tanks or grid walls can bring it to $500–$700. Spend first on good containers and soil—you’ll taste the difference.
I’m a total beginner. Which design is the easiest to maintain?
The cedar ladder with self-watering troughs is the most forgiving. It waters evenly, keeps plants off the ground, and looks polished without much effort. Start with herbs and salad greens, then add a dwarf tomato once you’ve got a rhythm.
My balcony only gets 2–3 hours of sun. What can I grow and which setup works?
Choose the bamboo trellis grid or the cedar ladder in morning light. Grow leafy greens, peas, mint, parsley, chives, and cilantro. Use lighter planters, reflective surfaces, and avoid heat-loving crops like peppers and big tomatoes.
How do I avoid a cluttered look with so many containers?
Pick one planter finish (black, terracotta, or galvanized) and repeat it. Limit colors to wood/black/green or clay/green/charcoal. Use one statement piece to anchor the layout, then leave breathing room between clusters.
I rent and can’t drill into walls or rails. What are my options?
Leaning ladder shelves, strap-on rail planters, tension-mounted trellis frames, and freestanding carts solve it. Add felt pads and sliders under heavy pieces. Always check weight limits and keep the heaviest items closest to the wall.
Conclusion
Start with one idea that makes your shoulders drop. Maybe it’s the terracotta column that makes weeknight pasta taste like a vacation, or the black grid wall that finally tames your tools and gives your basil a spotlight. Plant three things you love to eat, set one light to glow at dusk, and give yourself a week to settle into the new routine.
The truth is, “luxury” on a small balcony isn’t marble; it’s texture plus lighting plus restraint. Repeated materials keep it calm, uplighting makes leaves look like sculpture, and empty space gives your eyes a place to rest. Do that, and even a single tomato plant can feel like a tiny triumph.
You’ve got this. Fill one trough, clip one trellis, water once, and watch your balcony vegetable garden show off. When you snip basil with your coffee in hand and the air smells like green pepper and sun, you’ll know it worked—beautifully, and on your terms.
One last micro-story before you go: a friend of mine spent weeks agonizing over which dwarf tomato to buy, then realized the real fix was swapping her mismatched rainbow pots for all-black planters. Overnight, the balcony looked intentional, and—funny twist—she started harvesting more because she actually wanted to be out there. Sometimes the classy look is the push you need to make the growing part feel easy.

About the Author

Krisztina P.Rendes, Founder of Home Style Vibes
Founder of Home Style Vibes
Krisztina Puskásné Rendes created Home Style Vibes as a cozy-modern lifestyle space where homemaking meets inspiration. Her goal is to help women create beautiful, organized, and peaceful homes they truly love — without overwhelm. You’ll find here heart-driven content on home decor, cleaning tips, easy family recipes, organization and decluttering, DIY home projects, plants, and seasonal ideas — all designed to bring more calm, comfort, and style into everyday life.