7 Best Laundry Room Ideas That Are Practical Beautiful and Pinterest-Worthy Now
You want a calm, streamlined laundry room where clothes land in the right baskets, detergents have a real home, and you don’t dread opening the door. You hate the visual clutter, the harsh overhead light, and the pile that always lives on top of the dryer. Picture soft daylight bouncing off matte tile, warm wood shelves that feel like furniture, and a counter that invites you to finally fold. These 7 laundry room ideas are practical, beautiful, and absolutely Pinterest-worthy—designed to fix real frustrations with solutions you can pull off in under six weeks and (when noted) under a $2,500 cap for materials.
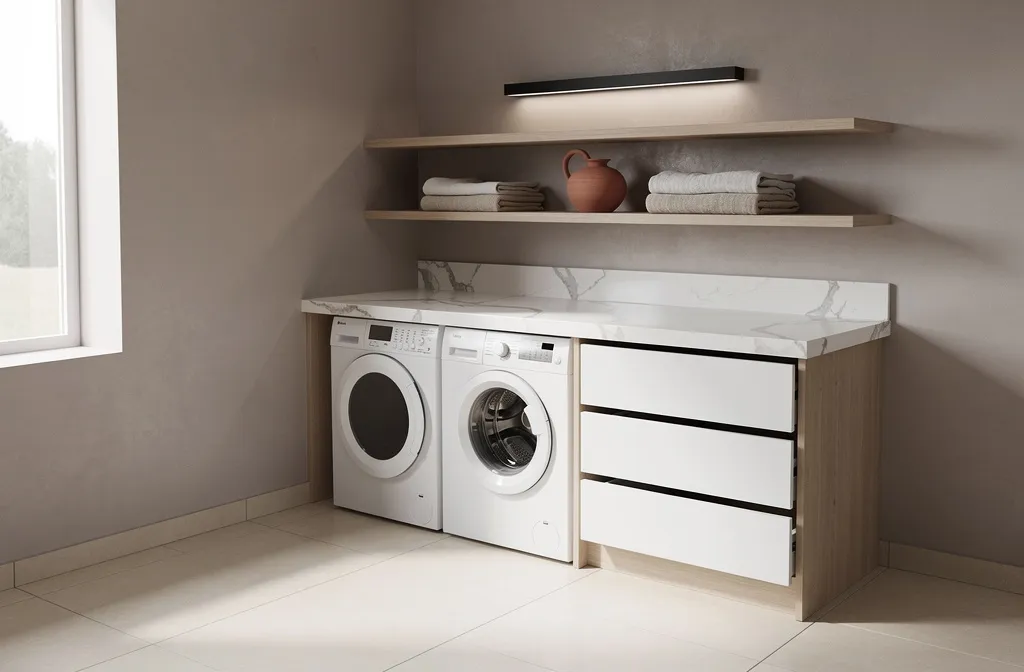
We’ll talk finishes, storage that actually gets used, and lighting that flatters both whites and blacks. Expect smart color moves, hardworking textures, and a few styling secrets that make the room look magazine-level in photos. If you love rooms that feel calm and look intentional, you’ll love what’s ahead. Minimalists, busy families, renters, and house-proud hosts—there’s a layout here with your name on it.
1. Sunlit Scandinavian Workbench With Hidden Sorting Drawers
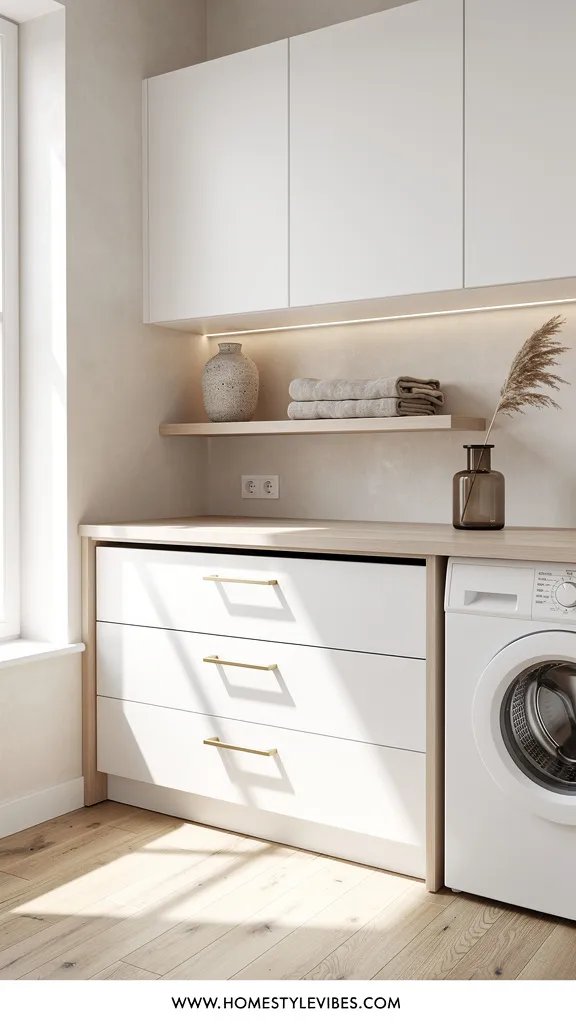
We’ve all been there: you line up three laundry baskets and swear this is the week you’ll sort as you go. Two days later, the baskets are full of rogue socks and the detergent jug sits on top like a wobbly monument. This Scandinavian-inspired setup solves the chaos by turning the sorting system into the furniture—literally.
Think pale oak, matte white cabinetry, and a long, inviting workbench in solid birch or white oak with a satin finish. The mood reads warm-minimal and easy-breathing, almost like a quiet studio. Soft, diffuse lighting matters here: a frosted glass pendant and an LED strip under the upper shelves create glow without glare, so whites don’t look harsh and colors stay true. The star? Three or four deep drawers disguised as a seamless base cabinet, each with a breathable mesh insert and a front label rail—darks, lights, delicates, towels—so you sort on autopilot. This works in real homes because it handles mess invisibly and keeps the counter clear for folding, steaming, and those five-minute life triages between loads.
Materials lean natural: lightly grained oak, matte ceramic tile in a soft putty tone, brushed stainless hardware, and a linen-blend window shade. Photos love it because of the subtle contrast between warm wood and cool whites, clean lines that let shadows pool under the overhang, and the tactile grain of the bench. For small spaces, go for a mini version with just two drawers beneath a 40-inch counter. Budget-friendly take: use birch butcher block sealed well and IKEA base cabinets with custom fronts. Darker version: swap the oak for smoked ash and add a deeper greige tile; it photographs moody and elevated. Renter-friendly swap: use a freestanding work table and rolling sorter carts tucked under a curtain panel in a textured linen for a built-in look you can take with you.
Budget Breakdown:
- Birch or oak butcher block counter: $180 – $450
- Base cabinets (3–4 units): $450 – $1,200
- Soft-close drawer hardware and mesh inserts: $120 – $280
- Open oak shelf with brackets: $90 – $220
- Matte ceramic wall tile (backsplash): $150 – $400
- Frosted pendant + LED strip: $120 – $300
- Brushed stainless hardware + label rails: $60 – $150
- Linen shade: $40 – $120
Total Estimated Cost: $1,210 – $3,120
Best For: Narrow laundry rooms or pass-throughs where you crave calm and hidden sorting. Perfect for households that love a tidy counter and value materials that patina gracefully.
Key Design Elements:
- Main materials: white oak/birch, matte ceramic tile, linen, brushed stainless
- Color palette: warm white, oat, pale greige, soft black accents
- Lighting strategy: frosted pendant + under-shelf LED for a diffused studio glow
- Furniture silhouettes: simple slab fronts, long uninterrupted counter
- Texture layers: wood grain, linen shade, matte tile, powder-coated brackets
- Accent details: label rails, small pottery vessel for pegs, a single trailing plant
How To Recreate This Look:
- Start with a warm white paint and a pale, matte tile for the backsplash at least 18 inches high.
- Add base cabinets with soft-close drawers; retrofit mesh inserts and label rails for hidden sorting.
- Layer a butcher block counter; sand, oil, and seal it for laundry-friendly durability.
- Install a single oak shelf with discreet brackets; run an LED strip beneath for shadow-kissed folding light.
- Style with one ceramic bowl for misc. buttons, a linen shade, and a small framed print leaning casually.
Why This Looks Expensive: The uninterrupted counter line and slab cabinet fronts read custom, while the restrained palette keeps the eye calm. Hidden sorting equals visual discipline—nothing screams budget more than visible plastic chaos.
Watch Out: Don’t skip sealing the wood properly; raw tops stain fast with detergent drips. And keep the LED strip warm (2700–3000K) so whites don’t go blue.
Pro Styling Tip: For photos, place a folded stack of white towels on the warm wood to capture high-contrast edges and show off grain without clutter.
2. Moody Utility Nook With Vertical Shiplap and Library Sconce
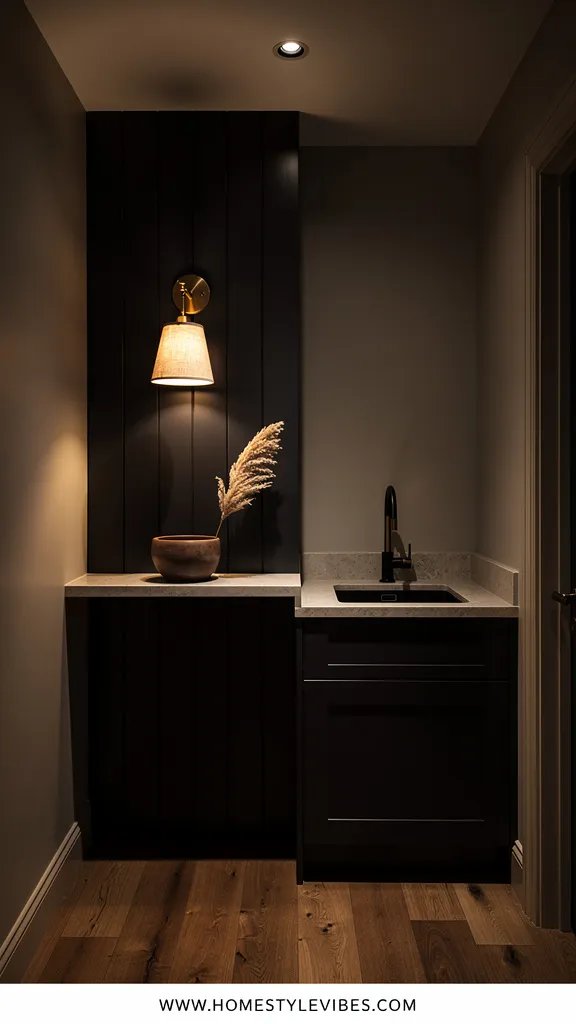
It’s that one corner that always feels off—too narrow, too utilitarian, and always gloomy. You’ve tried painting it white, but it still looks like a basement utility closet. Embrace the mood instead. This design leans into depth with vertical shiplap painted deep charcoal, a warm library sconce, and a petite stone ledge for a tiny moment of “ooh.”
The vibe is modern cottage meets boutique hotel hallway: cozy, handsome, and flattering. Why this works in real homes: vertical lines stretch short walls and disguise awkward bulkheads. A small-scale sconce sends light sideways and up, carving gentle shadows on the paneling that read intentionally dramatic in photos. Materials dominate with honest character—painted wood, honed soapstone or dark quartz for a ledge, unlacquered brass hardware that softens over time. It photographs beautifully because of light play on texture and the contrast between warm brass and cool dark walls.
Variations: Budget-friendly version uses MDF panels with a painted finish and a plug-in sconce with a cord cover painted to match. Small-space fix: keep the ledge shallow (3–4 inches) and mount baskets on hooks below. Darker version: go almost-black green and add a linen shade sconce for a softer edge. Renter version: peel-and-stick beadboard wallpaper vertically and a battery-operated picture light.
Key Design Elements:
- Main materials: vertical shiplap/MDF, honed stone ledge, brass
- Color palette: charcoals, inky greens, warm brass, off-white textiles
- Lighting strategy: library sconce + dimmer for shadowy drama
- Furniture silhouettes: slim profile hooks, narrow ledge, tall hamper basket
- Texture layers: painted wood grain, rough stone edge, woven baskets
- Accent details: art print, leather-wrapped hooks, striped clothespin bag
Budget Breakdown:
- MDF paneling or shiplap: $150 – $400
- Paint + primer: $60 – $120
- Honed stone/quartz remnant for ledge: $100 – $350
- Library sconce (hardwired or plug-in): $80 – $240
- Brass hooks and small art: $60 – $180
Total Estimated Cost: $450 – $1,290
Best For: Awkward nooks, under-stair laundry closets, or any room that needs personality fast. Ideal if you prefer moodiness to bright white.
How To Recreate This Look:
- Start by measuring the wall and installing vertical shiplap or MDF strips every 4–6 inches.
- Add a honed stone or quartz ledge at 42–48 inches high with strong brackets.
- Layer on deep charcoal or inky green paint; go satin for soft sheen.
- Install a library sconce with a dimmer and a 2700K bulb.
- Style the ledge with one art print, a ceramic catchall, and a woven basket on a hook below.
Why This Feels Designer: Embracing darkness with texture signals confidence. The ledge and sconce combo mimics a gallery wall, reframing a utility area as a styled vignette.
One Thing To Avoid: Don’t overfill the hooks. Two items per hook max or it reads like a coat check instead of a curated station.
Pro Styling Tip: For photos, dim the sconce slightly and let the shiplap catch light in soft bands—then place a creamy towel for contrast.
Craving something airier next? Keep scrolling—our next idea pairs crisp tile with curves and a shelf that acts like a stage.
Remember, this isn’t about recreating a showroom. It’s about building a room that greets you with calm and helps laundry happen faster. If one idea clicks, that’s your path—start small and keep the wins coming.
3. Arched Shelf Gallery With Zellige Backsplash and Laundry Sink
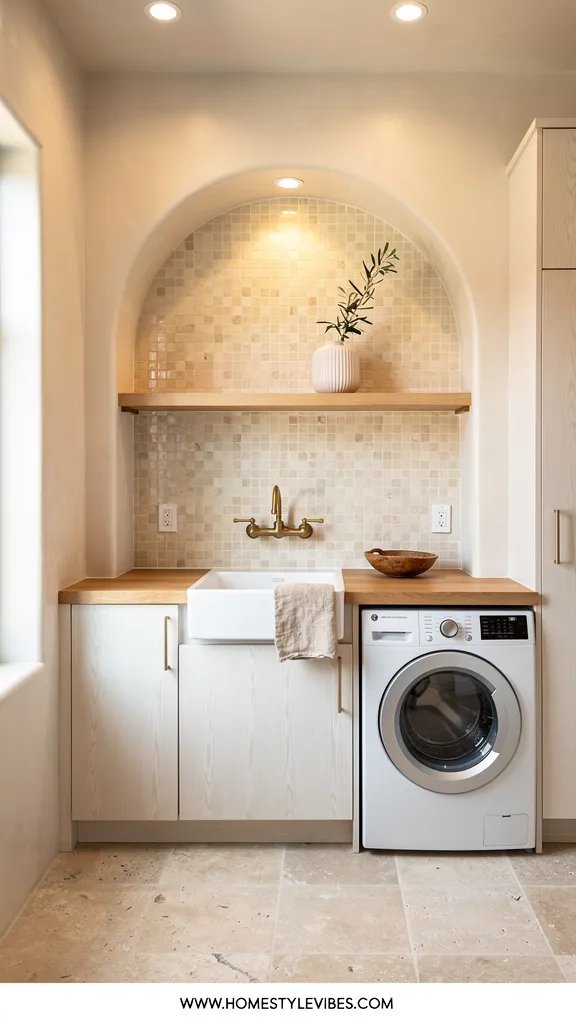
You’ve tried the standard shelf-above-sink setup, but it still looks flat and utility-focused. An arch introduces softness and focus, creating a mini “stage” for the practical things you use every day. Pair it with hand-cut-look zellige tile that shimmers just enough to feel special, and suddenly washing delicates feels like a ritual instead of a chore.
The mood is Mediterranean-laundry-meets-stylish-but-useful: inviting, artisanal, and light-catching. Real homes benefit because the arch frames the sink zone, corrals visual clutter, and gives you a defined spot for your go-tos—stain sticks, brush, a pretty dish for rings. Lighting matters: a single spot or small track aimed at the arch highlights the tile’s variation so photos capture that subtle glisten. Materials dominate with character—zellige (or lookalike) tile, limewash paint on the arch wall, a fireclay or composite sink, and tumbled brass or blackened hardware.
Variations: Budget-friendly version uses square ceramic with a hand-pressed look and a painted drywall arch template. Small-space version narrows the arch and uses a petite bar faucet. Darker take: deep teal or oxblood tile with an off-black faucet—moody but lively. Renter-friendly swap: peel-and-stick tile behind a removable MDF arch face, stuck with command strips; use a portable washtub on a cart.
Budget Breakdown:
- Zellige or handmade-look ceramic tile: $250 – $800
- Sink (fireclay/composite) + faucet: $280 – $900
- Arch materials (drywall, MDF, or prefab arch kit): $80 – $250
- Limewash or mineral paint: $60 – $120
- Directional light (mini track/spot): $80 – $200
- Hardware + soap tray + hooks: $60 – $180
Total Estimated Cost: $810 – $2,450
Best For: Any laundry room with a sink that feels bland. Great for those who love travel-inspired details and tactile tile.
Key Design Elements:
- Main materials: zellige/handmade-look tile, limewash, fireclay/composite sink
- Color palette: warm whites, muted clay, soft brass or matte black
- Lighting strategy: aimable spot to rake across tile for sparkle
- Furniture silhouettes: curved arch meets square sink for balance
- Texture layers: glossy irregular tile, velvety limewash, woven towels
- Accent details: olive-wood brush, striped linen towel, petite potted herb
Why This Reads High-End: The arch introduces custom millwork energy without a full reno, and the tile variation suggests craftsmanship. Together, they signal intention instead of utility-by-default.
How To Recreate This Look:
- Start by mapping the arch width centered over the sink; build with MDF or use a prefab kit.
- Add a backsplash in a handmade-look tile up to inside the arch height.
- Layer limewash in two thin coats on the arch face for dimension.
- Install a sink and faucet with a small sprayer; place a ledge or narrow shelf within the arch.
- Style with a single framed postcard, glass jar for clothespins, and one plant for movement.
The Most Common Mistake: Don’t overfill the shelf inside the arch. Leave breathing room so the curve reads; two to three objects max.
Pro Styling Tip: Angle your task light to graze the tile at 30–45 degrees—fewer hotspots, more gentle sparkle in photos.
Need storage that actually eats clutter? Wait for the next one—it’s all about utility that feels like furniture.
Small win mindset: you don’t need every finish perfect to feel proud. Pick one focal feature—a shelf, an arch, a tile—then keep everything else quieter and supportive.
4. Built-In Locker Wall with Vented Hampers and a Folding Station
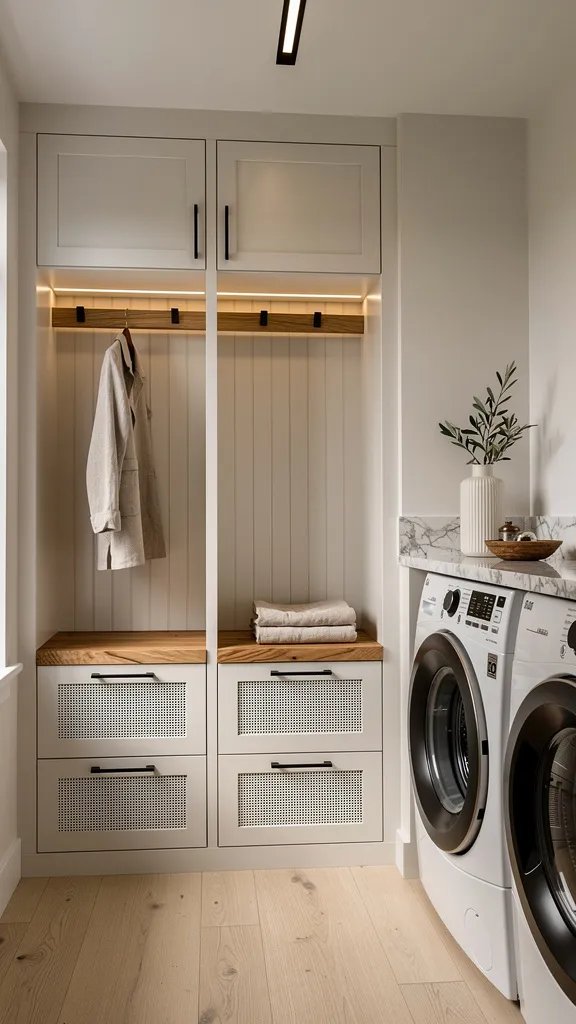
You want a place where muddy soccer socks don’t meet crisp work shirts. You’ve tried hooks and baskets, but the mess migrates. This design treats your laundry wall like an entry locker system, complete with individual cubbies, vented hamper drawers, and a landing strip for folding right where you unload the dryer. It’s family-friendly but crisp enough for resale photos.
The mood is clean utility with a preppy twist—think shaker doors, beadboard backs, and simple black pulls. Why it works: everyone gets a bin, air can circulate through mesh or cane-front drawers, and the fold-down surface flips into service only when you need it. Lighting is practical: two flushmounts with milk-glass diffusers eliminate shadows so you don’t miss that sock balled in the corner. Materials favor durability—painted MDF or plywood, powder-coated wire, and a quartz or laminate folding counter that shrugs off bleach drops. Photographs love the strong lines of repeating doors and drawers, plus warm texture from cane or mesh that keeps the wall from looking too flat.
Variations: Budget-friendly version uses ready-to-assemble cabinets and retrofits cane or perforated metal into the drawer fronts. Small-space take: shrink to two lockers and keep the folding station as a pullout shelf. Darker version: navy cabinetry with polished nickel bin pulls. Renter-friendly swap: line up three tall, narrow cabinets from a big-box store with a continuous wall shelf over them, then add freestanding hampers underneath.
Budget Breakdown:
- Cabinet boxes (4 lockers): $700 – $1,800
- Doors + hardware: $220 – $700
- Vented drawer fronts (cane/perf metal): $120 – $350
- Quartz/laminate counter: $250 – $800
- Flushmount lights: $120 – $300
- Paint + primer: $80 – $140
Total Estimated Cost: $1,490 – $4,090
Best For: Busy households, pet owners, or shared homes. Ideal for long walls and for anyone who loves a place-for-everything system.
Key Design Elements:
- Main materials: painted MDF/ply, quartz/laminate, cane or perforated metal
- Color palette: soft white, navy, or putty; black or polished nickel accents
- Lighting strategy: bright, even general light with 3000K LEDs
- Furniture silhouettes: locker-style towers, fold-down or pullout counter
- Texture layers: beadboard, woven cane, chunky canvas bins
- Accent details: number plaques, leather pulls on family bins, washable labels
How To Recreate This Look:
- Start with tall cabinets and add internal shelves/hooks to create “lockers.”
- Add vented hamper drawers at the base; line with mesh bags that lift out.
- Layer a quartz or laminate counter across the run for folding or drop-offs.
- Install two flushmount milk-glass fixtures for even light without glare.
- Style with labeled bins and a simple runner that hides lint between vacuums.
Why This Looks Intentional: Repetition is powerful. Four matching doors with consistent hardware spacing read like custom millwork and make the functional bits feel calm.
Don’t Do This: Don’t mix too many hamper types. Keep one design repeated for a clean visual rhythm.
Pro Styling Tip: Photograph head-on with doors closed, then one with a single door open showing crisp folded stacks—it tells a tidy story.
5. Japandi Stone Ledge Laundry: Fluted Panels and Pocket Drying Rod
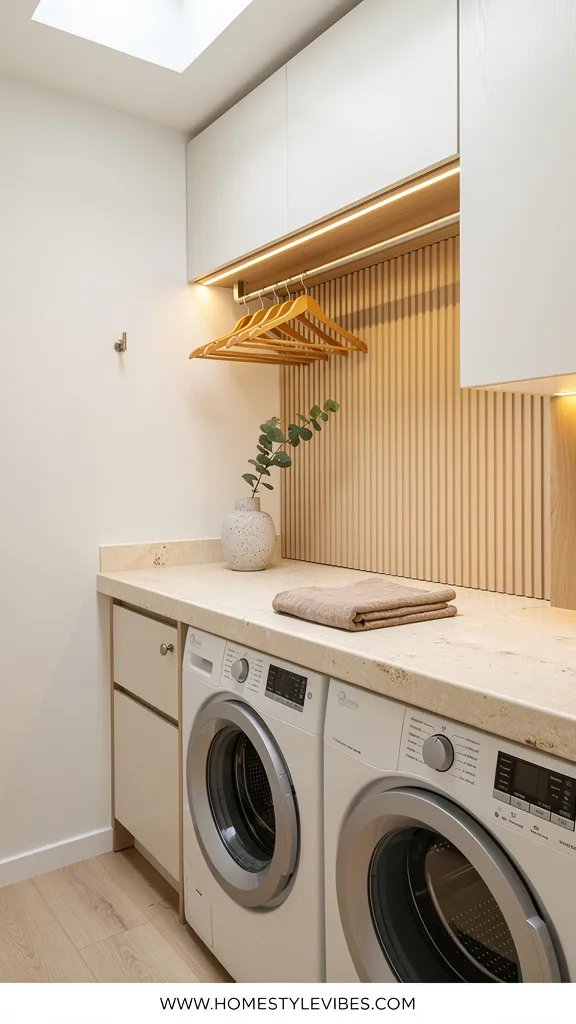
You love the idea of a serene spa vibe, but you also need somewhere to hang sweaters flat and drip-dry delicates. Typical drying racks feel like folding chairs crashed the party. This design hides a pull-out drying rod in a slim valance above the counter and rests everything visually on a substantial stone ledge. It’s peaceful, practical, and—trust me—ridiculously photogenic.
The mood reads Japandi: warm wood, crisp stone, and quiet lines. Why it works: a fluted wood panel behind the counter creates soft texture that disguises splashes and lint; the stone ledge doubles as a backstop for folding so stacks don’t topple. Under-cabinet lighting washes the fluted surface, emphasizing vertical rhythm that looks designer in every photo. Materials: light oak fluted panels, honed quartzite or quartz, matte black or bronze hardware, and neutral textiles like nubby cotton towels.
Variations: Budget-friendly version swaps real fluting for MDF half-rounds or reeded wallpaper. Small-space take: single 36-inch zone with one cabinet and a mini pull-out rod. Darker mood: smoked oak flutes with a pale limestone top for contrast. Renter-friendly swap: a freestanding garment rack and a narrow faux-stone shelf with removable mounting strips; use a portable steamer as your “spa moment.”
Budget Breakdown:
- Fluted wall treatment (wood/MDF/wallpaper): $180 – $650
- Honed quartz/quartzite ledge and counter: $400 – $1,200
- Pull-out drying rod/hardware: $60 – $180
- Under-cabinet LED with diffuser: $80 – $200
- Matte hardware + hooks: $50 – $150
- Neutral runner rug: $40 – $120
Total Estimated Cost: $810 – $2,500
Best For: Anyone who line-dries often or loves a calm, spa-like workspace. Works well in condo laundry closets or compact rooms.
Key Design Elements:
- Main materials: fluted wood/MDF, honed stone, matte black or bronze metal
- Color palette: soft oak, stone beige/gray, mushroom, charcoal accents
- Lighting strategy: warm under-cabinet wash plus one overhead flushmount
- Furniture silhouettes: slab-front base cabinets, thin valance for hidden rod
- Texture layers: ribbed panels, velvety stone, looped cotton textiles
- Accent details: ceramic canisters, black tray, eucalyptus sprig
How To Recreate This Look:
- Start with a simple run of base cabinets topped with honed stone; keep edges rounded for softness.
- Add fluted panels from counter to underside of uppers or to a valance.
- Layer a pull-out drying rod concealed inside the valance; ensure solid blocking.
- Install under-cabinet LED with a diffuser; warm temperature only.
- Style with a single tray holding your stain kit and a neutral runner to ground the zone.
Why This Looks Expensive: The fluted texture plus stone reads custom millwork. Consistency in warm tones and minimal hardware keeps everything cohesive and calm.
The Most Common Mistake: Don’t choose a glossy stone. High gloss shows every water spot and photographs harshly. Honed finishes stay forgiving.
Pro Styling Tip: Hang three items on the rod at staggered heights to create gentle verticals that echo the flutes in photos.
Still with me? Next we’re going vertical with pegboards that actually look chic—no garage vibes allowed.
Honest moment: I once spent weeks choosing the “perfect” warm white, only to realize the room needed different bulbs, not different paint. If things still feel off, try swapping bulbs before repainting. It’s faster, cheaper, and changes the whole mood.
6. Renter’s Remix: Freestanding Cart, Fabric Skirt, and Peel-and-Stick Checkerboard
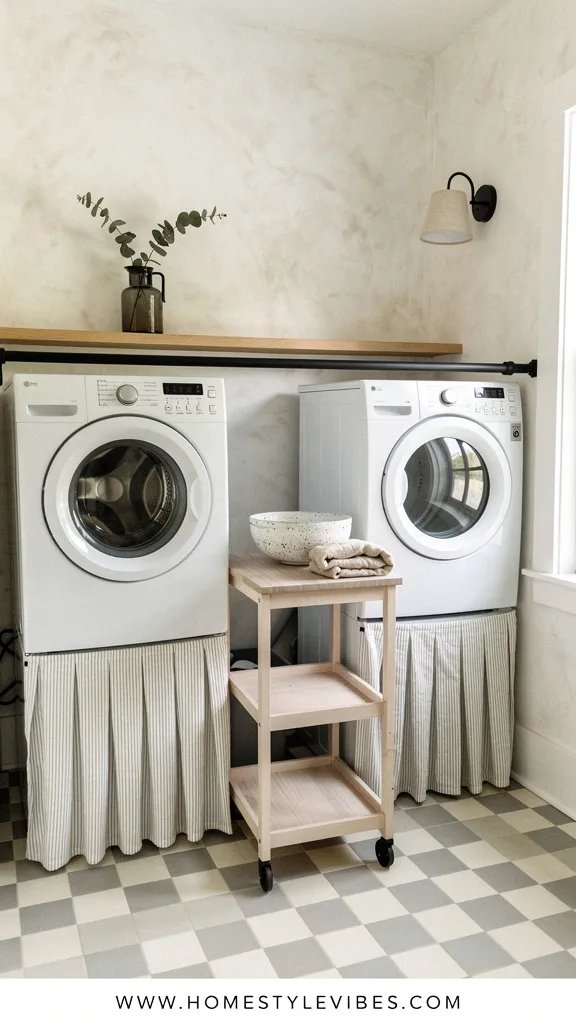
You’re renting, your machines are fixed in place, and the hookups sit like an eyesore in plain view. You’ve tried a flimsy tension rod curtain that fell down the first week. Here’s the fix: a tailored fabric skirt on a clean rail, a savvy rolling cart that fits between or beside the machines, and a peel-and-stick checkerboard floor that brings instant personality.
The vibe is Parisian utility meets DIY chic: breezy, charming, and easy to reverse. Why it works in real homes: the skirt hides hoses and outlets, the cart holds everything you actually reach for, and the bold floor pattern turns “rental beige” into a moment. Lighting stays simple—swap the builder bulb for a fabric drum shade or a pretty flushmount that casts even, flattering light. Materials include cotton-linen for the skirt, metal-and-wood for the cart, and matte vinyl tiles for the floor.
Variations: Budget-friendly version uses a tension rod with clip rings and a premade curtain panel hemmed to size. Small-space take: narrow bar cart with baskets. Darker version: charcoal and putty checkerboard with a natural linen skirt. For a micro-bath-laundry combo, choose a mini-check (8-inch tiles) so the pattern doesn’t overwhelm.
Budget Breakdown:
- Peel-and-stick vinyl tiles (checkerboard): $120 – $280
- Fabric skirt + rail/rod: $60 – $180
- Freestanding rolling cart: $70 – $250
- Drum shade flushmount: $60 – $150
- Storage baskets + labels: $30 – $80
Total Estimated Cost: $340 – $940
Best For: Renters or short-term spaces where reversibility matters. Great for tiny laundry closets that need personality and order.
Key Design Elements:
- Main materials: cotton-linen, matte vinyl tiles, powder-coated metal
- Color palette: white + warm gray or black + cream check, natural linen, brass/black accents
- Lighting strategy: soft, even flushmount with a fabric diffuser
- Furniture silhouettes: slim rolling cart, tailored skirt, simple wall shelf
- Texture layers: woven linen, matte vinyl, braided seagrass baskets
- Accent details: café stripe towel, framed recipe card, little vase for a stem
How To Recreate This Look:
- Start by laying peel-and-stick tiles in a corner-to-corner diagonal; roll firmly for adhesion.
- Add a rail across the machine fronts and hang a hemmed skirt with Velcro or clip rings.
- Layer in a rolling cart for detergents and tools; top with a small tray.
- Install a drum shade flushmount; choose warm bulbs.
- Style with two baskets on the shelf and a small framed print for charm.
Why This Feels Designer: High-contrast pattern on the floor plus a tailored textile instantly looks intentional. It’s the rental version of a built-in moment.
Watch Out: Don’t pick glossy peel-and-stick tiles; they scuff and glare. Matte tiles hide everything and photograph beautifully.
Pro Styling Tip: For photos, pull the cart out 3 inches to reveal the wheel profile—it adds depth and a little Parisian market energy.
7. Country House Table Island With Ceiling Air-Dry Grid
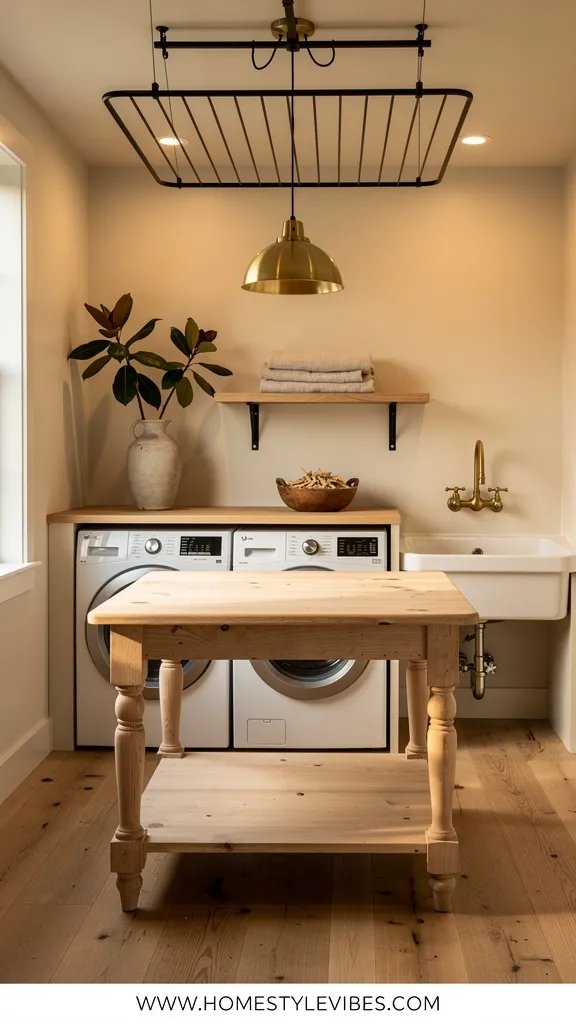
Folding on top of the dryer works until it doesn’t—too hot, too small, and ergonomically annoying. You’ve considered built-ins, but something about a real table in the laundry feels more human. This design centers the room with a rustic-meets-refined worktable and a discreet ceiling-mounted drying grid that looks like part of the architecture.
The mood blends English country with modern utility: think scrubbed pine table, milk paint walls, and black iron brackets. Why it works: a table gives you 360-degree access for folding and sorting, while the ceiling grid handles hang-dry items without stealing floor space. Add a lantern-style pendant for ambient glow and task lamps on a shelf for close work. Materials skew honest—pine or oak for the table, powder-coated steel for the grid, stone or linoleum floor underfoot. Photos love the way light filters through hanging garments, casting soft shadows on the table top.
Variations: Budget-friendly version uses a secondhand farmhouse table refinished with a matte topcoat. Small-room take: a narrow console table on locking casters becomes a moveable island. Darker version: walnut-stained table with a warm clay wall color and antique brass lantern. Renter-friendly swap: tension-mounted ceiling rack with removable pads, plus a folding drop-leaf table.
Budget Breakdown:
- Worktable or island: $200 – $1,200
- Ceiling drying grid or rack: $120 – $450
- Lantern pendant + dimmer: $120 – $380
- Wall shelf with task lamps: $100 – $300
- Rug runner: $40 – $120
- Refinishing supplies (if vintage): $40 – $120
Total Estimated Cost: $620 – $2,570
Best For: Medium to large rooms that double as mudrooms or craft zones. Great for people who like spreading out and need hang-dry space out of the walkway.
Key Design Elements:
- Main materials: pine/oak, powder-coated steel, iron brackets
- Color palette: chalky whites, earthy neutrals, blackened metal
- Lighting strategy: central lantern pendant + targeted task lamps
- Furniture silhouettes: farmhouse table, simple shelf, classic brackets
- Texture layers: scrubbed wood, woven runners, enamelware bins
- Accent details: herb jar, ticking stripe towels, a vintage chair pulled up
How To Recreate This Look:
- Start by centering a sturdy table with a matte, stain-resistant finish.
- Add a ceiling-mounted drying grid aligned over one half of the table so drips land on easy-wipe surface.
- Layer a lantern pendant on a dimmer; add two clamp-on task lamps if needed.
- Install a simple wall shelf for baskets and an enamel bin for clothespins.
- Style with a washable runner, a small stool tucked under, and a jar of clothespins for old-world charm.
Why This Looks Expensive: A standalone table screams furniture-first, not utility room afterthought. The ceiling grid reads custom when painted to match the ceiling and aligned cleanly with the table.
One Thing To Avoid: Don’t let the island overwhelm circulation. Leave at least 36 inches around all sides so laundry baskets and bodies can pass easily.
Pro Styling Tip: Hang two airy shirts on the grid and place a folded quilt on the table for a soft-meets-structure photo moment.
Micro-story time: A friend of mine agonized for weeks over the “perfect” cabinet color, then admitted the real stressor was nowhere to fold. We rolled in a vintage worktable and added a pendant. She texted me the next day: “I folded right after the dry cycle for the first time in months.” Sometimes the fix isn’t color—it’s flow.
Quick Checklist
- Choose a lighting temperature (2700–3000K) and stick to it
- Decide on one focal material: wood, stone, or tile
- Hide sorting inside drawers or behind tailored textiles
- Use at least one closed storage element to kill visual noise
- Pick matte finishes for forgiving, photo-friendly surfaces
- Add a dedicated folding surface at least 36 inches wide
- Install dimmers to manage glare and evening tasks
- Repeat one hardware finish consistently
- Label discreetly: inside edges, back of handles, under lids
- Plan ventilation for hampers (cane, mesh, or perforated fronts)
- Keep patterns to one high-impact zone (floor or backsplash)
- Style with restraint: two to three decor items per surface max
Frequently Asked Questions
How much should I budget for a laundry room refresh that actually fixes clutter?
For a targeted refresh—lighting, one storage solution, and surface updates—plan for $600 to $1,800. If you’re doing built-ins or tile, $1,800 to $4,000 covers most mid-range materials. Start with lighting and sorting; they deliver the biggest visible and functional shift.
My laundry room is tiny. Which idea works best without cramping the space?
Go for the Sunlit Scandinavian Workbench (Section 1) in its small-space variation or the Renter’s Remix (Section 6). A long, shallow counter with hidden sorting or a rolling cart plus fabric skirt maximizes function without eating square footage.
I’m worried about maintenance. Which materials are easiest to live with?
Honed quartz or durable laminate for counters, matte ceramic tile, and painted MDF with a good primer hold up well. Avoid glossy stone and high-shine tiles—they show spots and lint. Choose warm LEDs to make everything look softer and more forgiving.
As a renter, what can I do that still looks high-end but comes off clean?
Use peel-and-stick tile for a checkerboard floor, a tailored fabric skirt on a removable rail, a freestanding rolling cart, and a plug-in sconce with a painted cord cover. These pieces read custom in photos and lift out in an hour on move-out day.
What’s the most common design mistake in laundry rooms?
Relying on a single overhead light and expecting it to flatter everything. Add task or under-cabinet light where you fold and sort. The second mistake: too many visible containers—hide them in drawers or behind doors for visual calm.
The Gentle Finish
Pick one idea from these 7 best laundry room ideas and start there. Maybe it’s the hidden sorting drawers, maybe it’s a fluted panel with a soft underlight, or maybe it’s a humble skirt that finally hides the tangle of hoses. One focused change can shift the room from utility to daily ritual within a weekend.
The truth is, rooms look luxurious when you combine texture, lighting, and restraint. A warm LED strip, a matte surface that loves shadows, and a single strong material choice will do more than a cart full of mismatched containers. I want you to feel proud every time you open that door, even on towel day.
You’re closer than you think. Start with the thing that bugs you most, fix it beautifully, and let the rest follow. Seriously—you’ve got this, and your laundry is about to feel a lot lighter.

About the Author

Krisztina P.Rendes, Founder of Home Style Vibes
Founder of Home Style Vibes
Krisztina Puskásné Rendes created Home Style Vibes as a cozy-modern lifestyle space where homemaking meets inspiration. Her goal is to help women create beautiful, organized, and peaceful homes they truly love — without overwhelm. You’ll find here heart-driven content on home decor, cleaning tips, easy family recipes, organization and decluttering, DIY home projects, plants, and seasonal ideas — all designed to bring more calm, comfort, and style into everyday life.