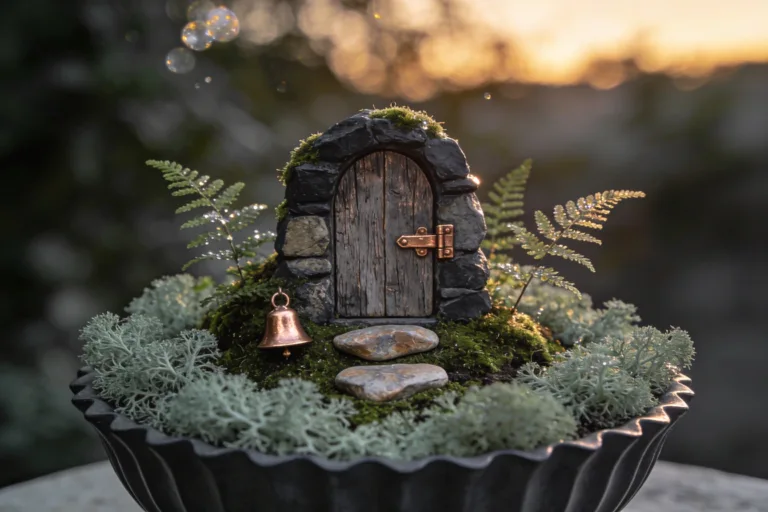
6 Fairy Garden Wedding Ideas That Look Straight Out of a Fairytale Now
You want a wedding that feels like twilight in an enchanted forest—glowing moss underfoot, candlelit whispers in the trees, a soft breeze that smells like jasmine and a hint of magic. But here’s the pain point: every “fairy garden wedding” you save looks either too DIY-crafty or too theme-park literal. You want ethereal, not Etsy explosion. These 6 fairy garden wedding ideas fix that exact frustration with layered textures, romantic lighting, and upscale details that photograph like a Vogue editorial—while staying practical for real venues and real budgets.
Expect dew-kissed color palettes, stone and wood undercurrents, shimmering glass, and florals that look foraged, not forced. Each idea elevates your event—whether you’re transforming a backyard, upgrading a barn, or turning a standard ballroom into a mossy dreamscape. They’re highly photogenic, intentionally restrained, and perfect for couples who love nature, romance, and a just-right dose of whimsy.
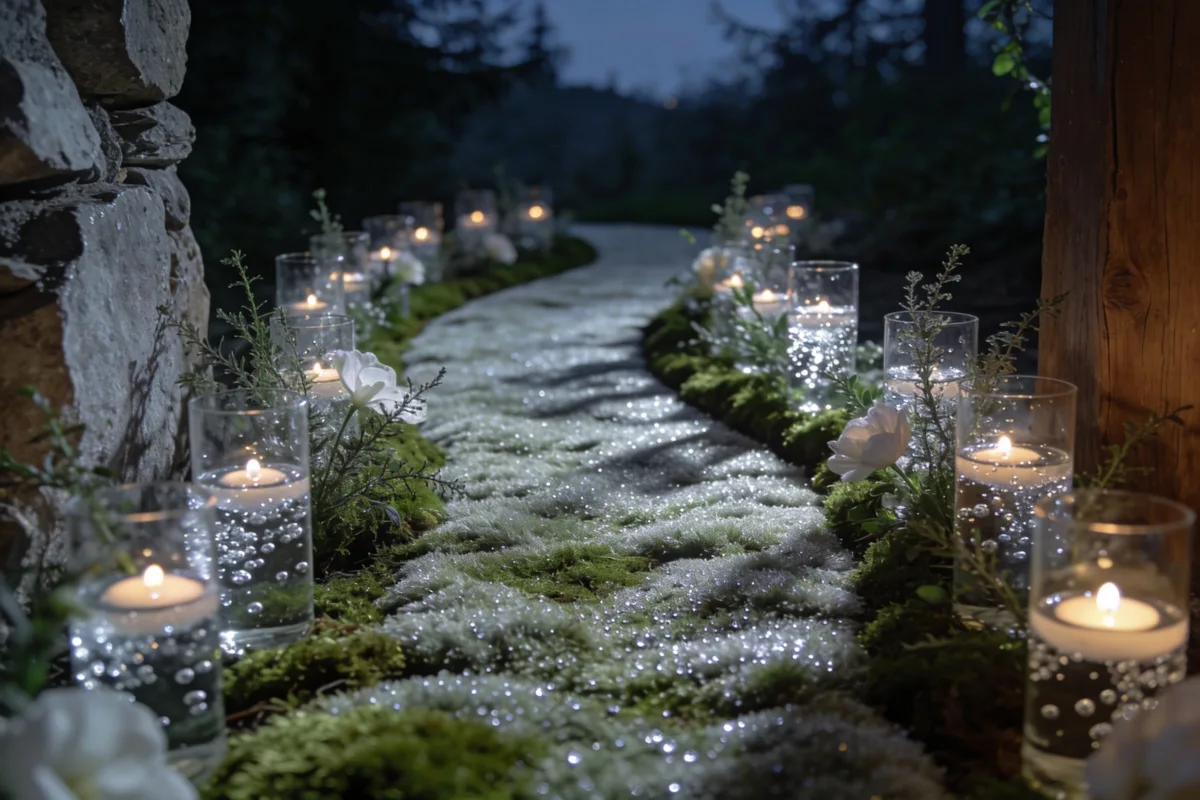
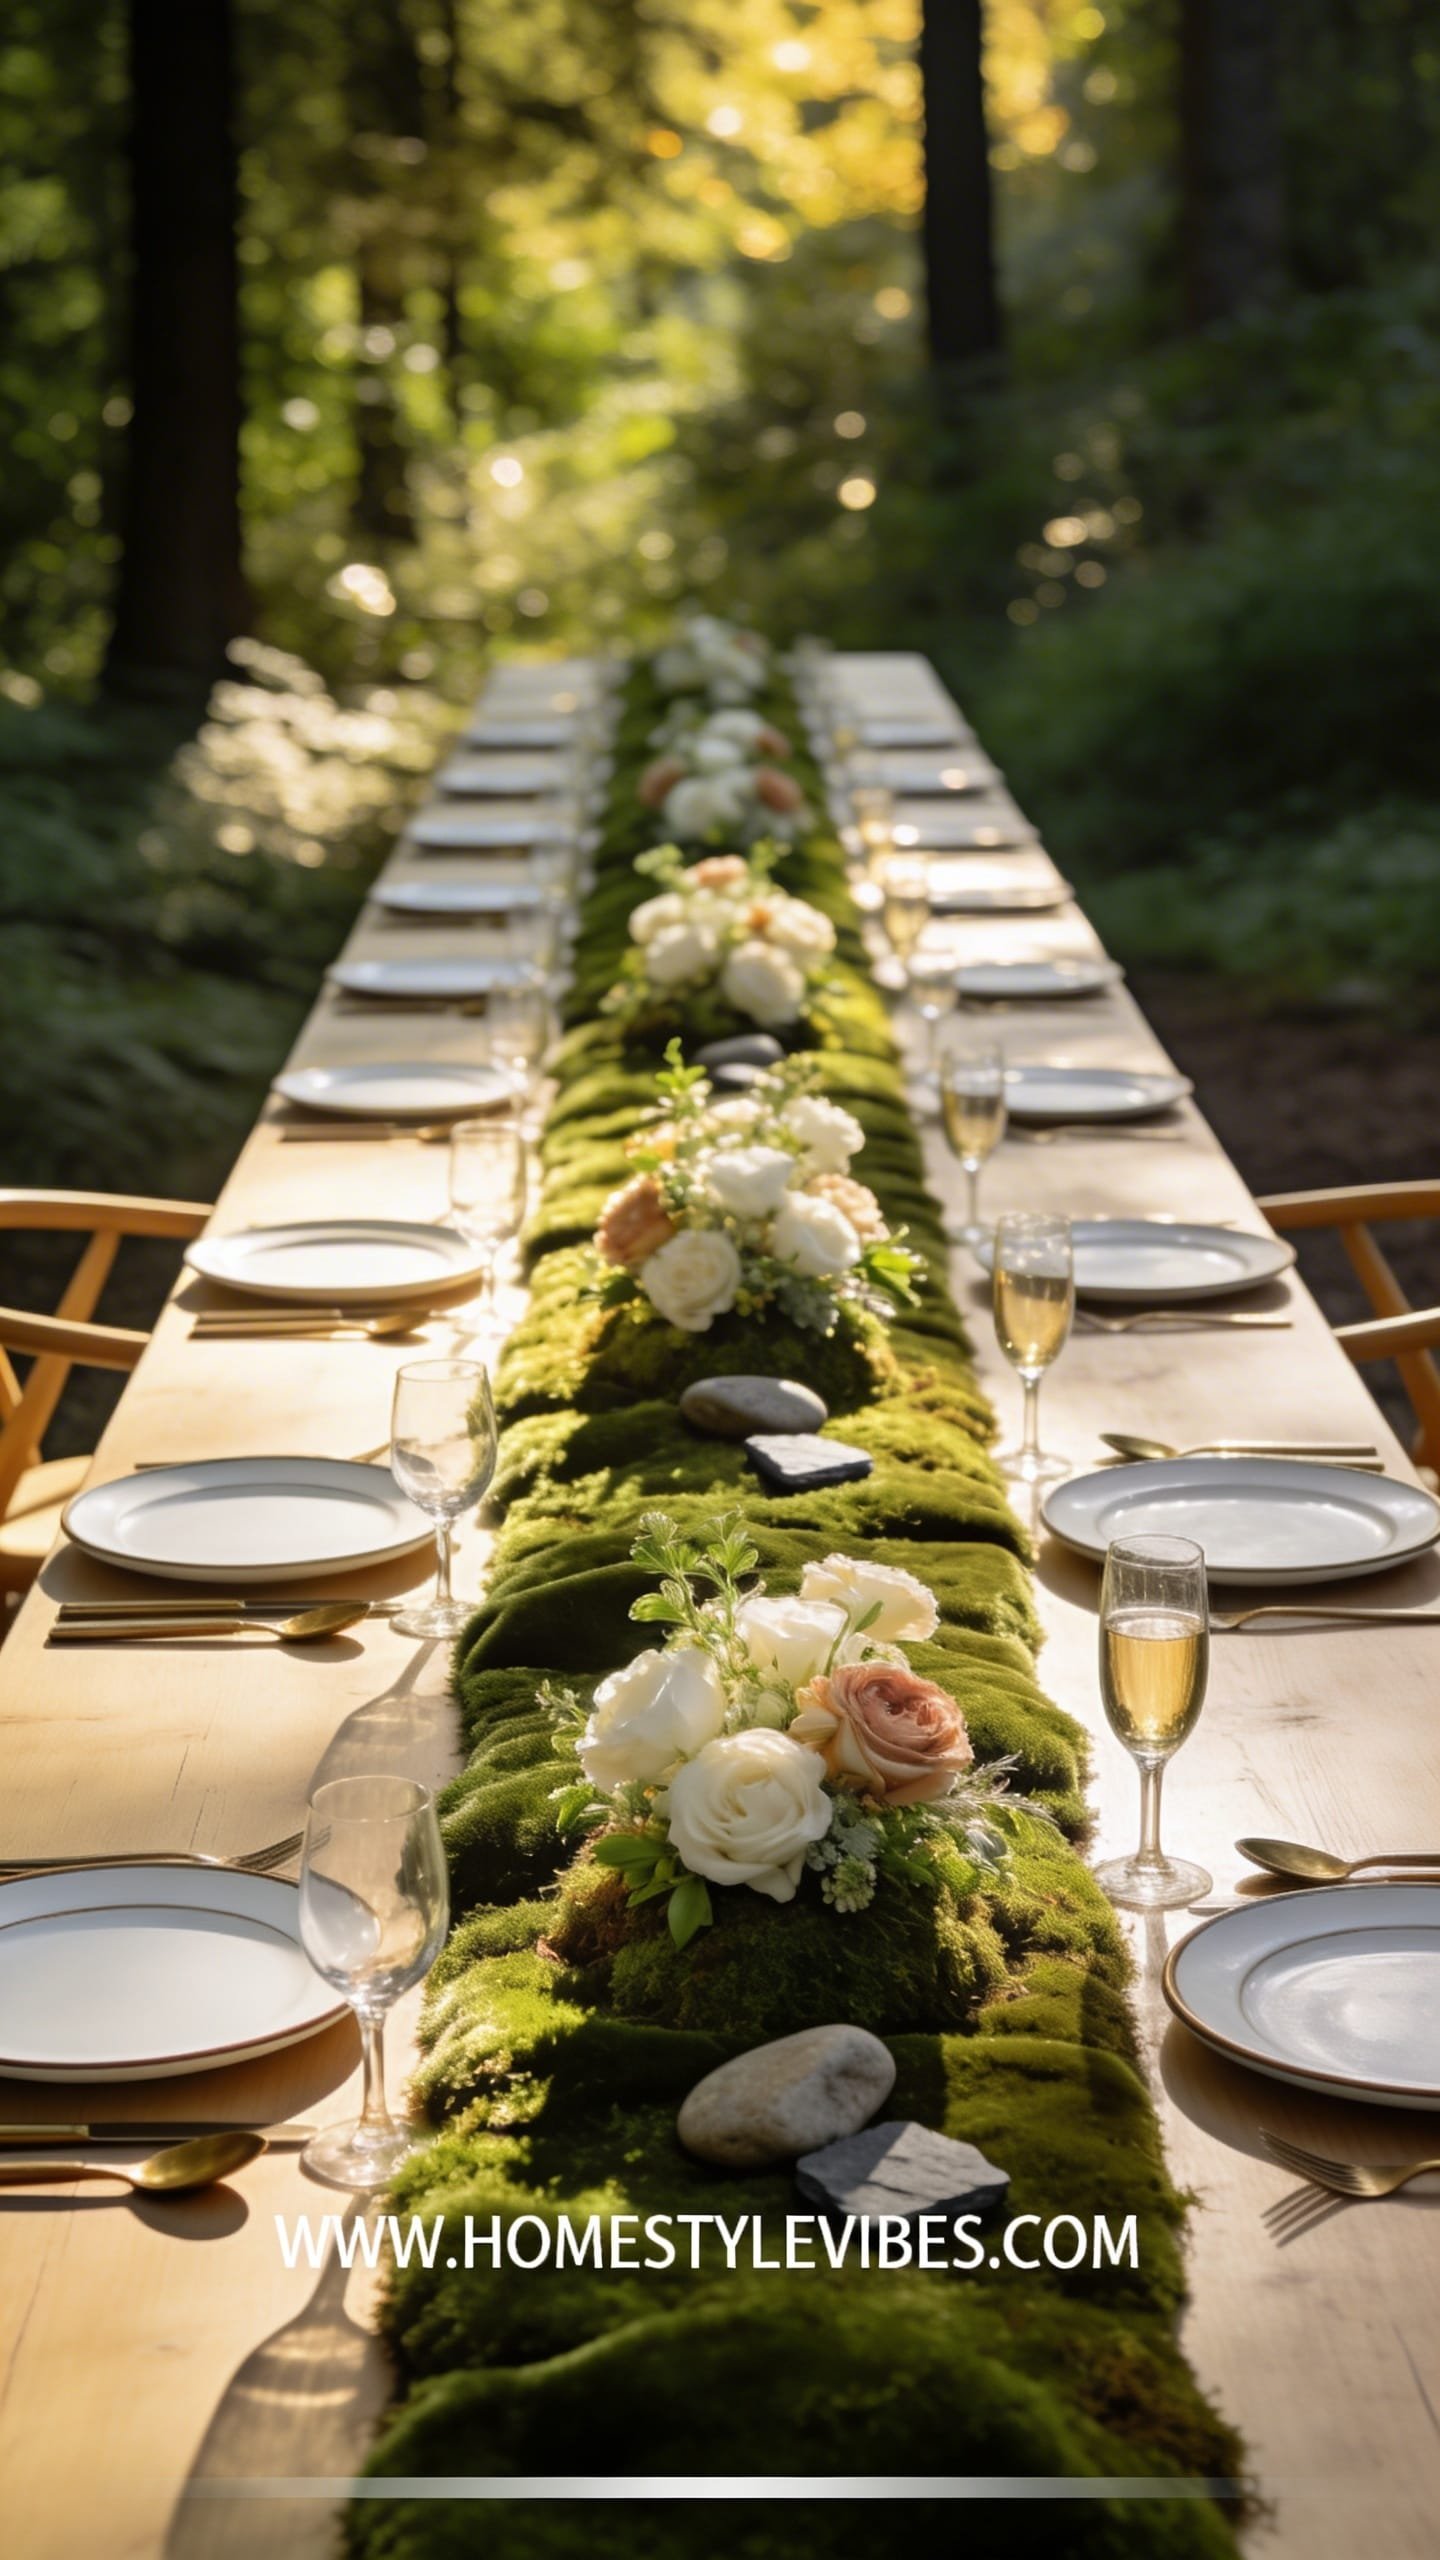
1. Moonlit Moss Aisle With Dewdrop Candles
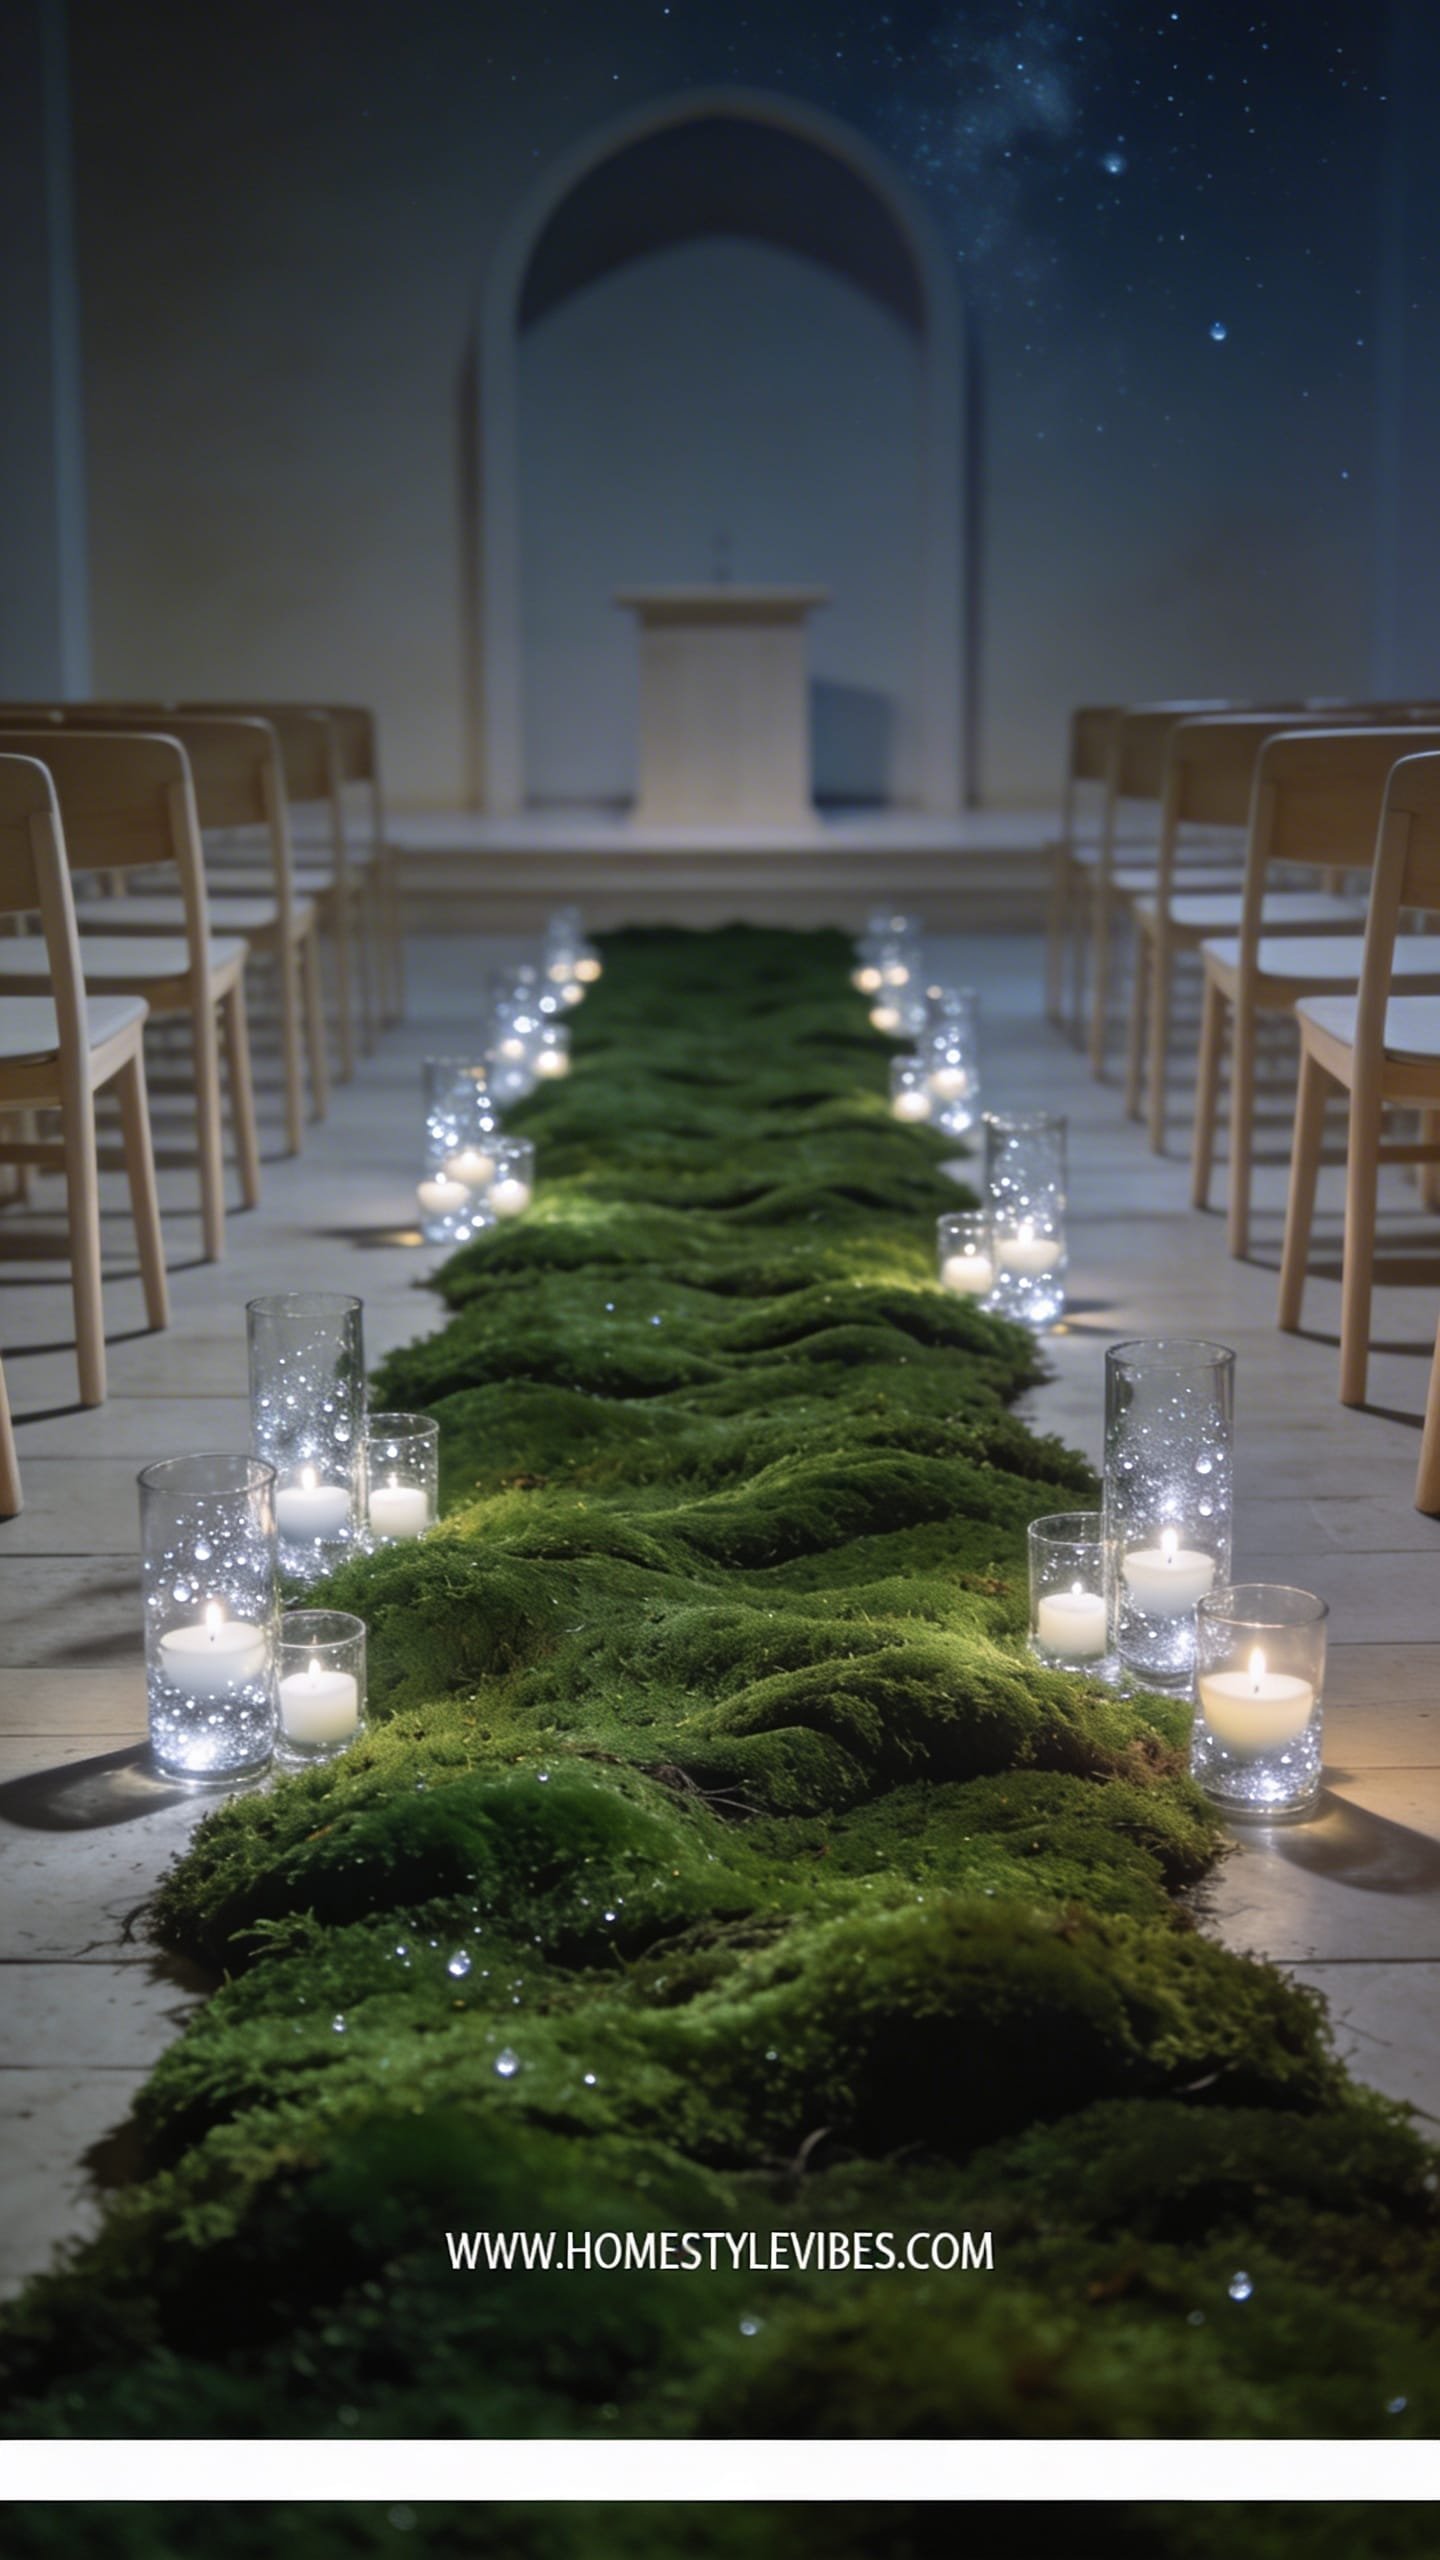
We’ve all been there: the ceremony aisle looks like an afterthought, with chair sashes doing way too much and petals doing far too little. You’ve tried simple lanterns, but it still reads “cute” not “enchanted.” The Moonlit Moss Aisle creates a lush, grounded mood—think twilight forest floor, silvery glimmers, and velvet depth underfoot. It works for outdoor lawns, woodland clearings, and even standard venues with neutral floors. Strategic lighting makes the aisle glow like it’s kissed by moonlight, while the layered greenery softens every hard edge.
Why it works in real weddings: moss runner panels feel luxe, yet you can build them modularly for easy transport. For family-friendly flow, wide paths keep hems safe. Soft, low lighting flatters everyone and is easy to maintain—LED “dew drop” fairy lights won’t blow out in wind and won’t smoke like candles. If your venue restricts open flames, you can still achieve the glimmer with micro LEDs and glass cylinders. The overall mood: cinematic, quiet, and wildly romantic.
Why It Looks Expensive: this idea bridges DIY and high-end by controlling scale and texture. Instead of a narrow petal sprinkle, you’ll layer thick moss pads, trailing ferns, and glass with a high-low dimension. The repetition of elements (moss, glass, glimmer) creates cohesion that reads designer. Use fewer types of decor, repeated confidently, and it instantly looks curated—not cluttered.
Materials dominate: preserved moss panels, velvet-soft ferns, wispy asparagus fern, clear glass cylinders, hand-blown bud vases, and thin copper fairy lights. A softened, moonlit palette—sage, silver, smoke, and creamy whites—plays beautifully with shadow. Photography loves the contrast: deep greens against pale blooms, reflective glass alongside matte moss, and low light creating depth around every candle halo.
Variations: On a budget, alternate sections of moss with textured jute runners and clusters of LED votives. For small spaces, run a half-width moss strip with asymmetric candle groupings. Darker version? Swap white florals for moody hellebores and chocolate cosmos with warm amber lights. Renter-friendly swap: roll-out faux moss rugs and battery-operated tea lights.
Key Design Elements:
- Main materials: Preserved moss panels, faux moss rugs, glass cylinders, LED fairy lights, asparagus fern
- Color palette: Sage, pale eucalyptus, creamy ivory, silver, smoke
- Lighting strategy: Low-to-ground glow with micro LEDs and staggered candle heights
- Furniture silhouettes: Slimline ceremony chairs in natural wood or ghost acrylic
- Texture layers: Soft moss base, feathery greens, smooth glass, delicate blooms
- Accent details (hardware, decor pieces, plants): Thin copper wire lights, hand-blown bud vases, dew-like water droplets on petals
How To Recreate This Look:
- Start with modular moss: Lay preserved moss panels or faux moss rug strips to define the aisle width.
- Add ferns and trailing greens: Tuck asparagus fern along the edges to soften the transition from floor to chair legs.
- Layer glass: Place clusters of glass cylinders and bud vases at alternating intervals for rhythm.
- Install micro lighting: Weave copper fairy lights through the moss edges and hide battery packs under greenery.
- Style with blooms: Add small, intentional floral touches—think hellebores, ranunculus, or spray roses—for a dew-kissed finish.
Why This Looks Expensive: The aisle reads like a continuous installation with consistent height variation—low moss, mid-height glass, and flickers of light. Restraint elevates the mood. No clutter, just rhythm.
Common Mistakes To Avoid: Don’t crowd the aisle; leave generous walking room. Avoid too many flower types—stick to 2–3 varieties so the moss remains the star. Skip exposed wires—conceal everything.
Pro Styling Tip: Shoot from low angles to capture the glimmering runway effect; side lighting makes the moss look plush and dimensional.
Keep scrolling—because the right entry moment sets the tone, but the reception magic seals the dream.
2. Enchanted Canopy Reception With Floating Lantern Blooms
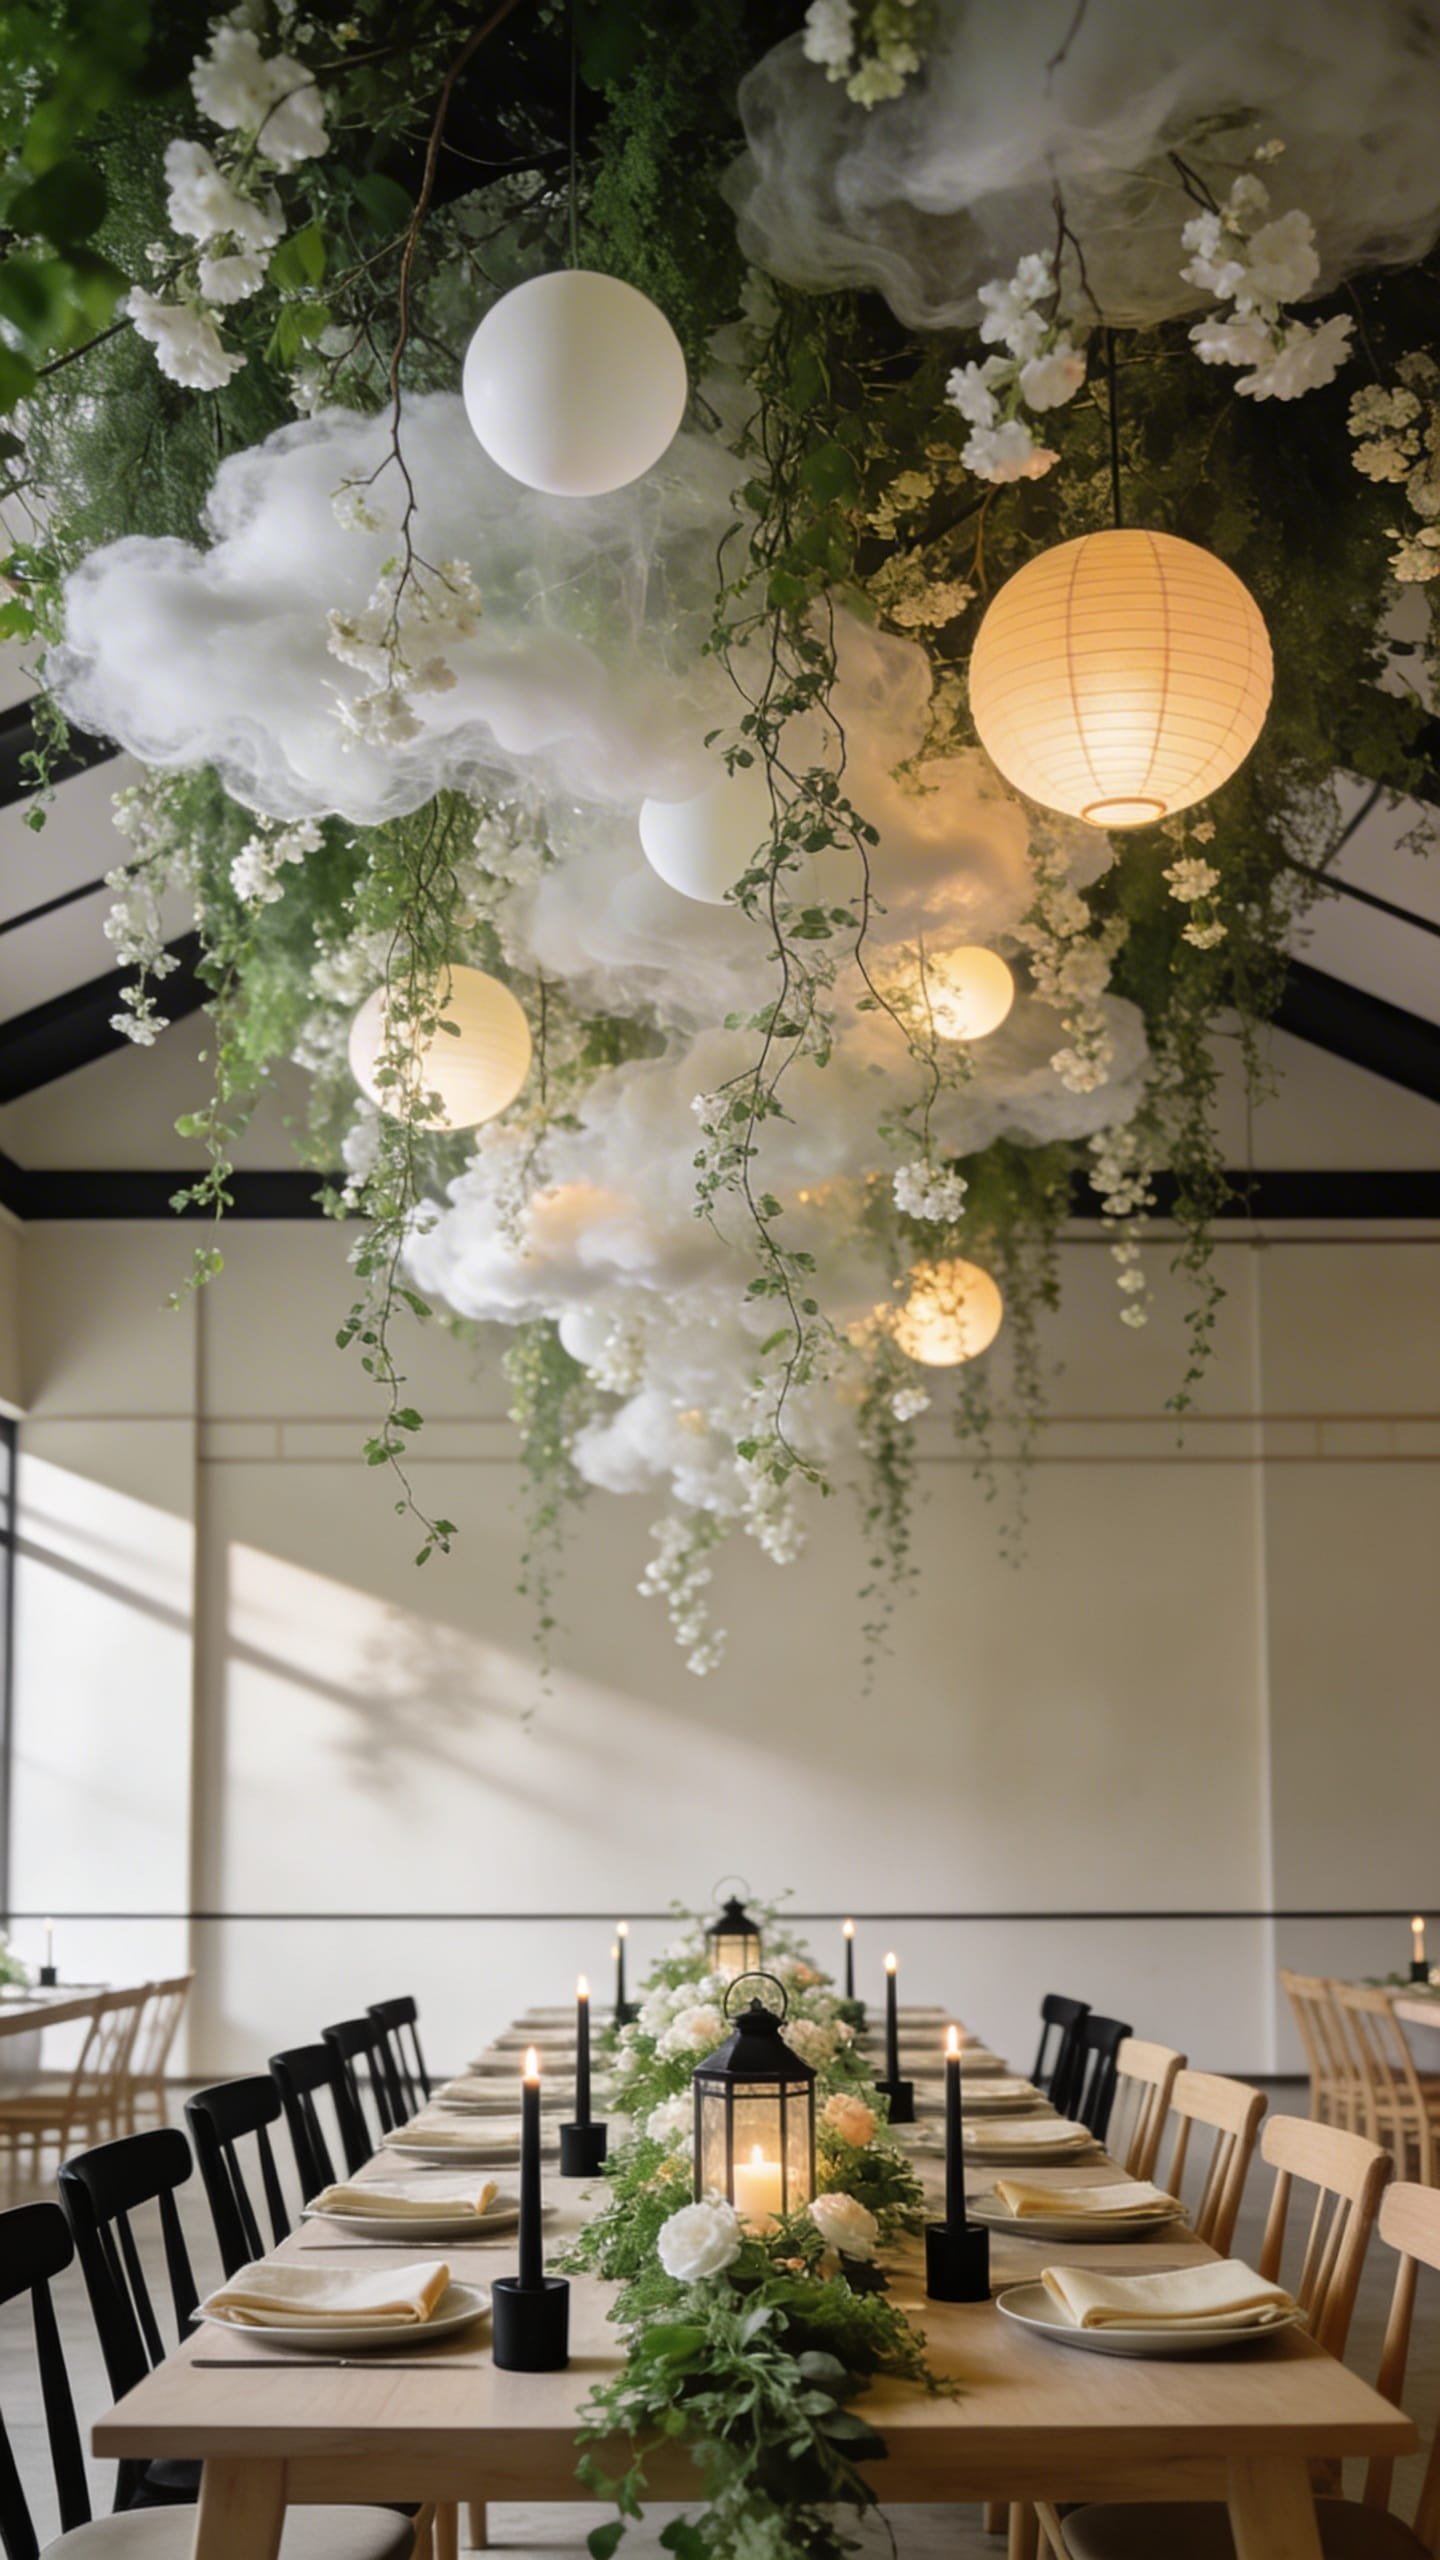
It’s that one ceiling that always feels off—too high, too sterile, or just painfully “venue.” You’ve tried paper lanterns, but it still looks like a dorm party. The Enchanted Canopy centers your reception with cascading greenery, floral “clouds,” and softly glowing lanterns that feel like they’re drifting. The vibe skews romantic garden-meets-Japandi: airy, organic, and beautifully edited. It’s family-friendly (nothing fragile down low) and useful for large spaces that need intimacy.
Why it works in real weddings: bringing the eye level down creates a cocoon, which instantly makes round tables feel connected. Even banquet halls look softer under leafy canopies. Lighting is everything here—warm, diffused, and filmic. Use pendant-style lanterns with warm LED bulbs (2200–2700K) dimmed to define the dinner mood. You can build canopy rigs with lightweight grid truss or fishing line for low-profile installs.
Why It Looks Expensive: it reads custom because it floats. When florals aren’t tied to table centerpieces alone, everything feels curated. You’ll mix scale—large floral clouds, mid-size lanterns, and small trailing vines—so it never feels flat. Strategic repetition and negative space (don’t overfill every square inch) create that carefully edited, editorial look.
Materials dominate: ruscus, smilax, eucalyptus, cloud-like hydrangea, ranunculus, linen lanterns, and frosted glass or rice paper pendants. Colors stay restrained—creamy whites, soft blush, eucalypt greens with a hint of smoky taupe—so the whole room glows like it’s lit from within. Photographs love the gentle translucency of lanterns against layered greens.
Variations: Budget-friendly? Concentrate canopy décor over the dance floor only, then echo with small hanging vines over a few key tables. Small-space version: a single suspended floral cloud above the sweetheart table. Darker version: switch to mahogany tables, blackberry tones in florals, and amber bulbs. Renter-friendly swap: adhesive hooks (check weight ratings) and ultra-light paper lanterns with battery puck lights.
Key Design Elements:
- Main materials: Smilax, Italian ruscus, hydrangea, linen/paper lanterns, fishing line, lightweight truss
- Color palette: Cream, blush, eucalypt, smoky taupe, warm ivory
- Lighting strategy: Dimmable pendants and lanterns, warm 2200–2700K LEDs, focused over tables
- Furniture silhouettes: Slim-profile banquet tables or raw-edge wood with neutral linen
- Texture layers: Airy fronds, cloud florals, linen lanterns, matte ceramics at table level
- Accent details: Silk ribbons, tiny bell charms, clear acrylic name cards that disappear into the glow
How To Recreate This Look:
- Start with rigging: Secure a lightweight grid across the ceiling (consult venues for approved methods).
- Add greenery base: Drape smilax/rosemary to create organic movement; anchor points with floral wire.
- Layer floral clouds: Build mini clusters with hydrangea and spray roses using foam-free cages.
- Install lanterns: Vary heights and sizes; add warm LEDs and dimmers for control.
- Style tables: Keep centerpieces low and soft—ceramic bowls with moss and single-stem blooms.
Why This Looks Expensive: Suspended installations feel custom, and cohesive lantern shapes reinforce the curated palette. Under-lighting at table level adds dimension without clutter.
Common Mistakes To Avoid: Don’t overpack the canopy; allow negative space or it can feel heavy. Skip mixed bulb temperatures—keep all lights warm for consistency.
Pro Styling Tip: Photograph through hanging vines to create natural frames and dreamy foreground bokeh.
Ready for the kind of entrance that makes your guests literally gasp? Let’s talk portals and pathways.
3. The Wishing-Arch Entry: Twinkling Portals With Foraged Texture

You’ve tried a standard floral arch but it still looks like, well, every other arch on Instagram. It’s that first photo moment that needs to feel like stepping into a storybook. The Wishing-Arch Entry leans into mixed natural textures—branchy movement, sculptural vines, and glints of light—so your entrance becomes a portal. The mood balances woodland mystique with modern elegance. It works beautifully outdoors or freestanding inside a venue with weighted bases.
Lighting plays a sly supporting role here: small pin lights hidden within the arch create a twinkle that reveals itself only as guests approach. Think of it like a constellation woven into bark. This makes it wildly photogenic—front-lit for clarity, but with tiny backlit surprises that feel secret and intimate.
Why It Looks Expensive: it blends organic structure (branch scaffolding) with selective blooms, not a uniform flower wall. Negative space shows off form, which screams designer. The mix of matte (branches, moss) and gloss (glass drops, metallic leaf) creates depth that feels refined and cinematic.
Materials dominate: curly willow, birch poles, grapevine, preserved moss, single-stem florals in clusters (foxglove, delphinium), glass teardrop orbs, and micro LEDs. Color palette skews natural—bark brown, velvety green, cream with faint blush, plus one accent metallic (antique gold or soft copper). The result photographs like a woodland halo with a modern edit.
Variations: Budget-friendly? Use more vine/branch structure and fewer blooms. Small-space version: a half-arch off to one side with a trailing vine “tail.” Dark, moody version: add burgundy scabiosa and black taper candles on pedestals nearby. Renter-friendly swap: portable weighted bases and no drilling; use clear zip ties for fast breakdown.
Key Design Elements:
- Main materials: Curly willow, birch, grapevine, preserved moss, pin lights, glass orbs
- Color palette: Bark, deep green, cream, soft blush, antique metallics
- Lighting strategy: Hidden pin lights and micro LEDs woven into the structure
- Furniture silhouettes: Minimal—flank with slim pedestals for balance
- Texture layers: Rough bark, soft moss, delicate florals, clear glass, subtle metallic glint
- Accent details: Hanging wish tags or velvet ribbons that flutter gently
How To Recreate This Look:
- Start with structure: Build an arch frame using birch poles or premade metal; wrap with grapevine for organic lines.
- Add moss: Tuck preserved moss at joints and base for softness.
- Layer branches: Use curly willow for upward, whimsical movement.
- Install lights: Weave micro LEDs and hide battery packs behind moss; tuck a few pin lights facing outward.
- Style blooms and accents: Cluster foxglove/delphinium asymmetrically; hang glass orbs and wish ribbons.
Why This Looks Expensive: Sparse, deliberate blooms and visible branch architecture give it a sculptural, editorial vibe. The lighting gleam feels like stardust rather than party lights.
Common Mistakes To Avoid: Avoid symmetrical overload; keep one side lighter for a modern silhouette. Don’t use mixed metallics—pick one antique finish for sophistication.
Pro Styling Tip: Shoot from just inside the arch looking outward to frame guests in natural bokeh and capture the twinkle.
Next, let’s bring the fairy-tale to the table—literally—without the cluttered centerpiece chaos.
4. Woodland Banquet Tables With Velvet Moss Runners
You’ve tried tall centerpieces that block eye contact and low ones that disappear. It still feels sparse in photos. Woodland Banquet Tables fix that with long, continuous tablescapes: velvet-like moss runners, low sculptural florals, and stone accents. The vibe blends modern rustic with quiet luxury—the kind of table that invites deep conversation and lingers in memory. It’s renter-friendly and scales easily for any guest count.
Why it works in real weddings: you’ll create intimacy through length and repetition. Long tables naturally photograph beautifully because they showcase rhythm—repeating candles, stone, and blooms—that draws the eye. Lighting stays warm at table height with dimmers; a soft glow hits cheeks and glassware, while the moss absorbs glare for natural depth.
Why It Looks Expensive: the runner reads custom because you’re texturing—not lining up random bits. You’ll mix materials that feel like they belong outdoors: river stones, raw-edge wood chargers, ceramic bud vases. Balanced spacing and consistent heights scream pro. Proportions are queen here.
Materials dominate: preserved moss sheets, small river stones, ceramic bud vases, taper candles in aged brass or matte black, low floral sprigs (ranunculus, butterfly ranunculus, hellebores), and linen napkins with silk ribbons. The palette leans forest-calm: moss green, stone gray, cream, and subtle blush—with the candlelight giving it life. Photographers love the interplay of matte moss and glossy glassware—zero glare, all glow.
Variations: Budget-friendly? Swap real moss for high-quality faux and focus on candles + stones. Small-space version: half-width runner with negative space on wood tables. Darker version: add aubergine tulips and deep plum candles. Renter-friendly swap: adhesive runner grips to keep everything from shifting.
Key Design Elements:
- Main materials: Preserved/faux moss, river stones, ceramic vases, taper holders, raw-edge wood chargers
- Color palette: Forest greens, stone gray, cream, blush, warm brass or matte black
- Lighting strategy: Dimmable tapers and low votives for face-flattering warmth
- Furniture silhouettes: Long wood tables or linen-draped with floor-length fabric
- Texture layers: Plush moss, cool stone, matte ceramic, soft linen, glossy glassware
- Accent details: Silk napkin ties, pressed fern place cards, tiny mushroom accents (tasteful!)
How To Recreate This Look:
- Start with the base: Roll out moss runners; trim to create soft, organic edges.
- Add stone rhythm: Place river stones in measured clusters every 12–18 inches.
- Layer candle heights: Mix tapered candles with low votives; keep line-of-sight clear.
- Install floral sprigs: Tuck stems into ceramic bud vases; keep colors restrained.
- Style place settings: Use raw-edge chargers, linen napkins with silk ribbon, and fern-pressed cards.
Why This Looks Expensive: Repetition and restraint. You’ll echo the same materials down the table with micro-variations for character. Consistency reads luxury every time.
Common Mistakes To Avoid: Don’t overload with too many flower types. Skip scented candles that compete with dinner. Keep tapers secure—use sticky wax to prevent wobble.
Pro Styling Tip: Ask your photographer for overhead table shots; the repeating runner patterns and candlelight create editorial-worthy geometry.
Okay, ready to add a little ethereal sparkle without cheesy twinkle overload? Let’s play with reflective magic.
5. Water-Glint Dance Floor With Mirror-Pooled Florals
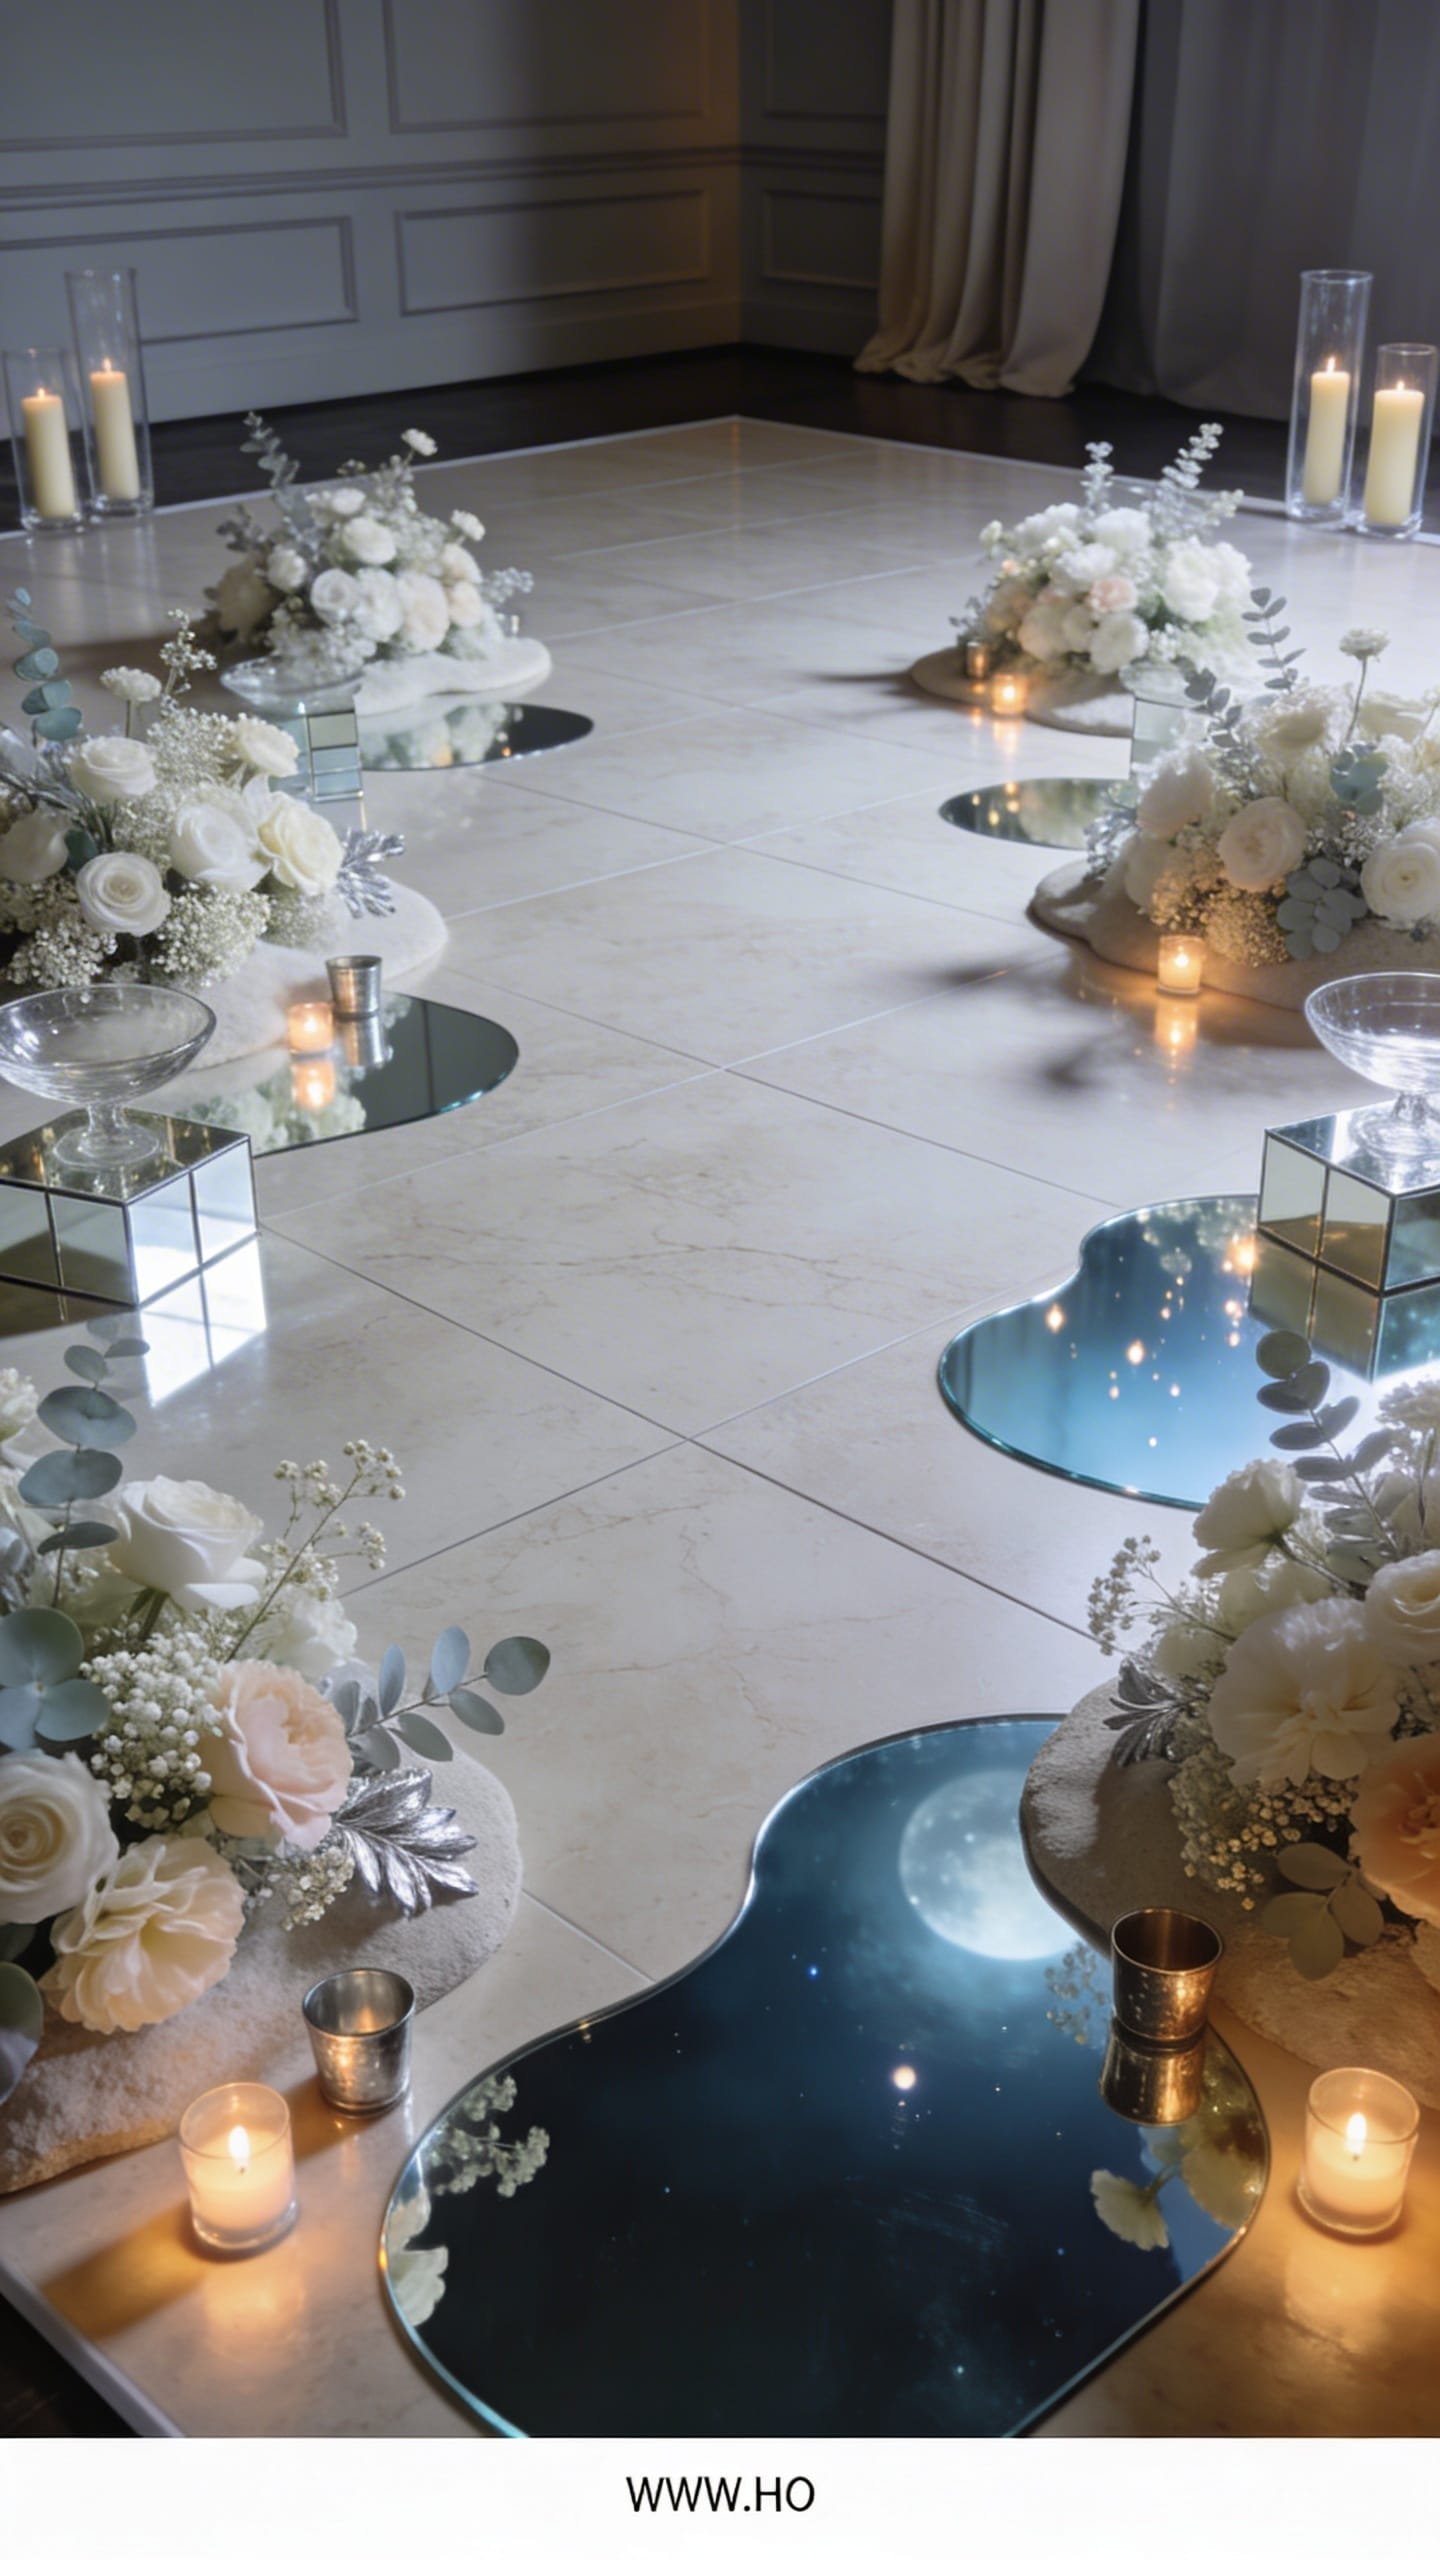
You’ve seen dance floors that read like a gymnasium—flat, bright, echo-y. You’ve tried string lights, but it still feels sparse and practical. The Water-Glint Dance Floor concept creates a liquid, moonlit vibe by introducing mirror “pools,” reflective accents, and low floral islands around the dance perimeter. The mood: ethereal, glamorous, and dreamy—without going full disco. It turns your first dance into a cinematic event.
Why it works in real weddings: reflective pieces bounce candlelight and make the room feel alive as guests move. You get sparkle without sequins—subtle, grown-up shimmer. It’s easy to maintain because most elements sit at the edges; the main floor stays open for dancing. Lighting stays directional—soft wash from the sides and low spotlights that skim across mirrors for a gentle ripple effect.
Why It Looks Expensive: mixing translucent and reflective elements (mirror tiles, acrylic risers, glass bowls) reads custom. Avoiding obvious party effects makes it sophisticated. Soft silhouettes around the perimeter feel designed, not like a rental drop-off. It’s that editorial nuance you feel but can’t always name.
Materials dominate: modular mirror tiles or a glossy white dance floor overlay, acrylic plinths, glass bowls with floating blooms, water, and candles, plus hand-cut mirror “shards” placed under florals (safely sanded edges only). Color palette stays watery—pearl whites, pale silver, clear glass, soft greenery, and one accent hue (ice blue or blush). Cameras love the reflections; it amplifies candlelight and makes the couple’s movement trail with glints.
Variations: Budget-friendly? Use fewer mirrors and focus on glass bowls with floating candles. Small-space version: a single mirrored island at one corner. Darker version: deep navy floor wrap with silver accents and smoky glass. Renter-friendly swap: removable vinyl mirror decals along the perimeter and acrylic, not glass, for safety.
Key Design Elements:
- Main materials: Mirror tiles/overlays, acrylic plinths, glass or acrylic bowls, floating candles, vinyl decals
- Color palette: Pearl, silver, clear, soft green, optional ice blue or blush
- Lighting strategy: Side wash lighting, low spot highlights, no overhead glare
- Furniture silhouettes: Minimal—focus on clean edges and clear acrylic to let light play
- Texture layers: Reflective mirror, translucent glass, glossy floor, soft petals
- Accent details: Tiny glass orbs, light-catching beaded trims on arrangements
How To Recreate This Look:
- Start with the floor: Use a gloss overlay or vinyl wrap to create a smooth, reflective base.
- Add perimeter “pools”: Set acrylic plinths with glass bowls of water, floating blooms, and candles.
- Layer mirror accents: Slide mirror tiles or decals beneath florals to bounce light upward.
- Install lighting: Keep overhead subtle; use side lights and soft spots to skim across reflective surfaces.
- Style details: Choose one accent color for petals; keep it restrained for a calm, water-like feel.
Why This Looks Expensive: The reflection trick doubles your decor visually—instant abundance. Controlled lighting over shiny surfaces adds that editorial glow without club vibes.
Common Mistakes To Avoid: Don’t mix too many metallic finishes. Avoid bright white uplights; they kill the mood. Check slip risk—keep water contained and edges clean.
Pro Styling Tip: Ask for slow-shutter shots of your first dance; the light trails across mirrors look like liquid stardust.
Finally, let guests touch the magic—without sticky glitter or complicated favors.
6. Secret Garden Lounge Nooks With Glow-Foraged Bars
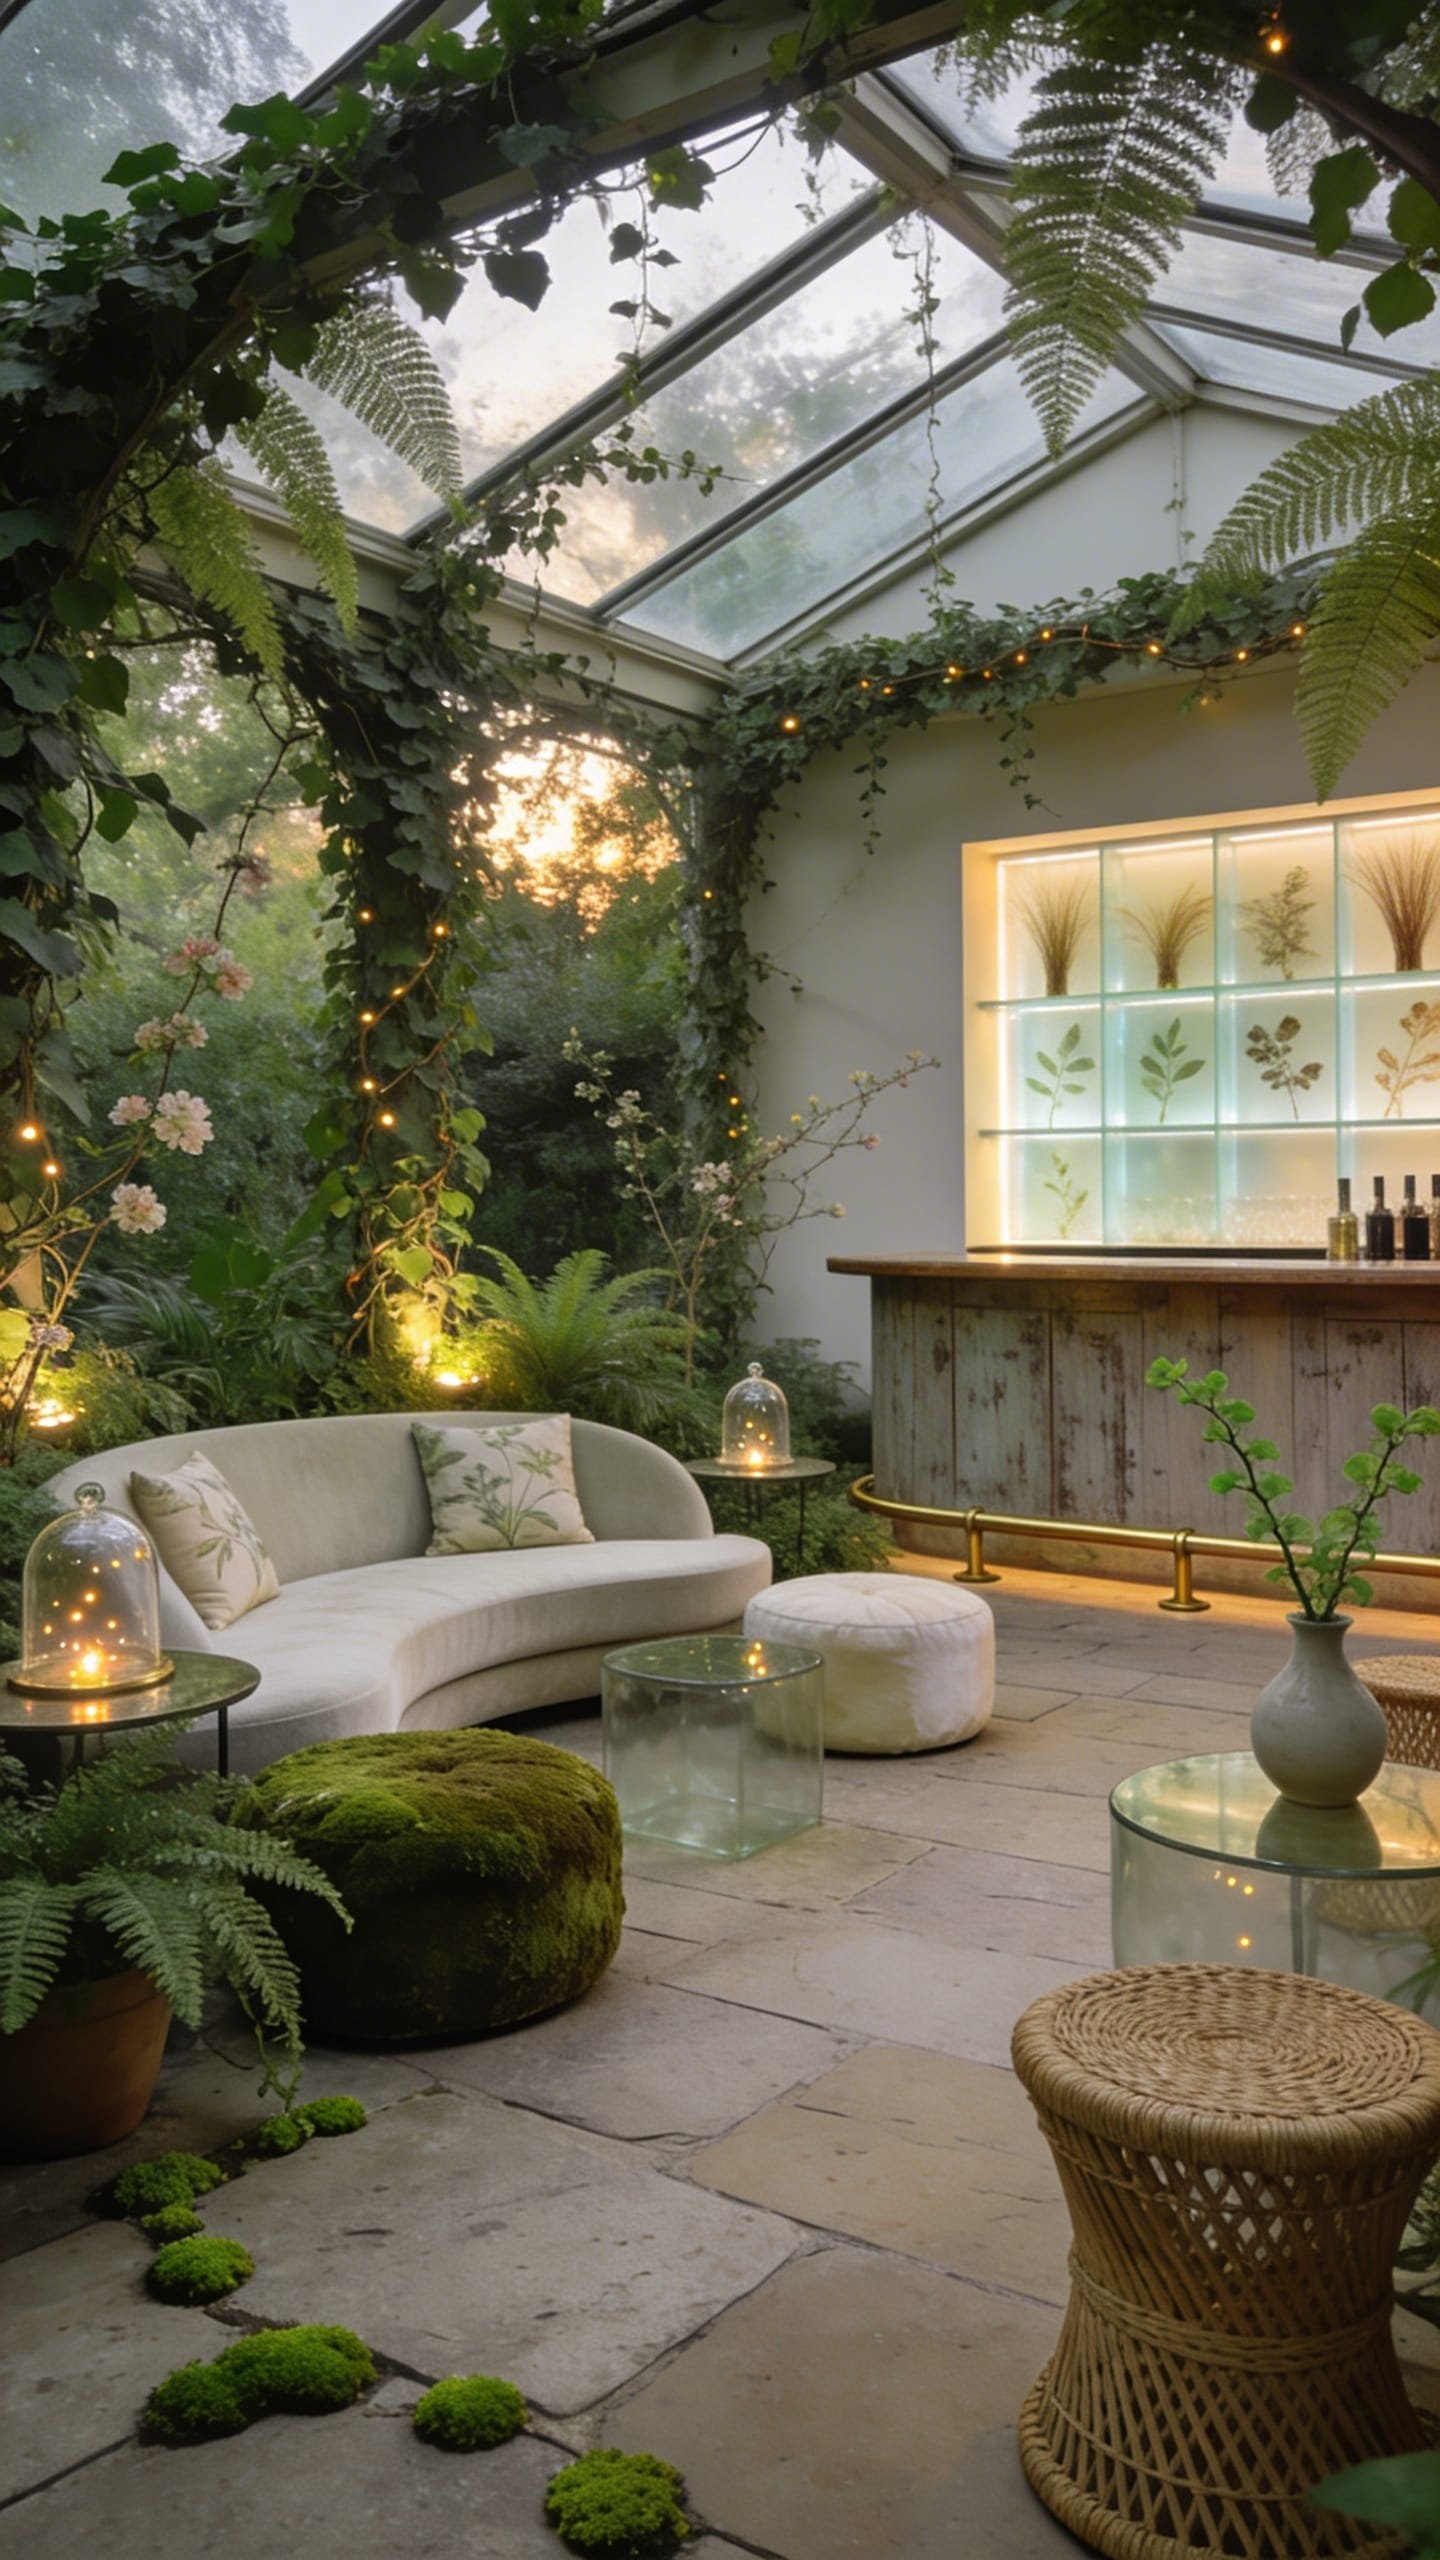
You’ve tried generic lounge rentals that look like any corporate event. You’ve added throw pillows, but it still feels disconnected from your fairy garden vision. Secret Garden Lounge Nooks turn downtime moments—cocktail hour and late-night chats—into vignettes that keep the enchantment going. Picture low seating wrapped in greenery, a “foraged” bar with backlit botanicals, and pockets of intimacy that invite guests to linger. The mood is cozy-bohemian meets refined conservatory.
Why it works in real weddings: guests need small escapes from the dance floor. Nooks control traffic flow, give grandparents a comfortable perch, and photograph like lifestyle editorials. Lighting stays glowy—table lamps with fabric shades, battery lanterns hidden in planters, and one hero element: a backlit bar with pressed botanicals set in acrylic panels that glow like captured daylight.
Why It Looks Expensive: instead of random lounge furniture, you’ll curate shapes and materials that echo your ceremony aesthetic—curves, soft textiles, natural wood, aged metal. The bar becomes an art piece with embedded ferns and tiny blooms, lit from behind with warm LEDs. It reads custom and considered.
Materials dominate: rattan and cane chairs, velvet or linen sofas, raw wood side tables, potted ferns, olive trees, philodendron—plus the acrylic bar front with pressed botanicals. Palettes lean earthy: olive, moss, cream, warm wood, and antique brass. Photographs love the translucency of the bar panels and the shadow play from layered plants.
Variations: Budget-friendly? Skip the acrylic bar and use a linen-draped bar with a greenery garland and table lamps. Small-space version: a single loveseat with flanking planters and a petite side table. Darker version: deep emerald velvet sofas, smoked glass lamps, and moody maroon florals. Renter-friendly swap: freestanding planters and wireless lamps—no wiring, no drilling.
Key Design Elements:
- Main materials: Rattan, linen, velvet, raw wood, potted ferns and trees, acrylic panels with pressed botanicals
- Color palette: Olive, moss, cream, warm wood, antique brass
- Lighting strategy: Warm table lamps, hidden lanterns in planters, backlit bar panels
- Furniture silhouettes: Curved sofas, cane-back chairs, low drum tables
- Texture layers: Nubby linen, velvety cushions, leafy greenery, ribbed glass, woven cane
- Accent details: Botanical coasters, herb-infused cocktails, linen throws for chilly evenings
How To Recreate This Look:
- Start with layout: Design small clusters of seating that allow conversation without bottlenecking paths.
- Add plant architecture: Place tall planters behind sofas to create privacy walls; layer ferns at the base.
- Layer textiles: Mix linen and velvet pillows; add a few patterned botanical prints for interest.
- Install glow elements: Set table lamps with warm bulbs; add battery lanterns hidden in foliage.
- Style the bar: If using acrylic, press ferns and blooms between layers; backlight with LED strips at 2700K.
Why This Looks Expensive: Cohesive furniture shapes with intentionally layered plants feel like a curated conservatory, not a rental set. The glowing bar front anchors the space like a sculpture.
Common Mistakes To Avoid: Don’t overcrowd with furniture—leave space for dresses to pass. Avoid mismatched bulb temps between bar and lamps. Keep plant heights varied; avoid a uniform hedge look.
Pro Styling Tip: Frame candid lounge shots through plant leaves to add depth and a soft, voyeuristic romance to the photos.
Before you finalize your plan, think through how these ideas play together. A Moonlit Moss Aisle leads naturally to an Enchanted Canopy Reception. A Wishing-Arch Entry sets the tone for Woodland Banquet Tables. And that Water-Glint Dance Floor? It shines brightest near Secret Garden Lounge Nooks and a glow-foraged bar. Each element tells part of the same story—yours.
Bringing It All Together
Here’s the empowering part: you don’t need all six fairy garden wedding ideas. Pick one hero concept and let it guide your palette, textures, and lighting across the rest of the day. If you adore the mossy aisle, echo that plush green with linen napkins and fern-pressed place cards. If the floating lantern canopy stole your heart, keep table decor low and calm so the ceiling can sing. Luxury comes from restraint—choose a few materials and repeat them like a chorus.
When in doubt, return to the trio that always wins: texture, lighting, and breathing room. Texture makes it feel tangible (moss, linen, raw wood). Lighting makes it feel alive (warm, layered, dimmable). Breathing room—aka negative space—makes it feel expensive. You’re building an experience that engages every sense: the quiet flicker of candlelight, the velvet-y look of green against stone, the soft brush of a silk ribbon in your hand. That’s the fairytale, FYI. Not more stuff—just the right stuff, layered with intention.
So choose your portal—moss underfoot, stars overhead, water-glint at your feet—and step into it. Curate with confidence. Smile when your guests whisper, “It looks like a real-life fairytale,” because you earned that magic with thoughtful choices and a beautifully edited eye. And when the photos arrive? You’ll see what we see already: an enchanted world that looks like you, only dreamier. Seriously, this is your moment—let it glow.