6 Dollar Tree Christmas Decor DIYs That Look Surprisingly High-End
You want that crisp red-and-white Christmas look that feels cozy, polished, and photo-ready. You hate when it turns into a cluttered mismatch of cheap plastic and tangled string lights. This guide is your secret playbook: six Dollar Tree Christmas decor DIYs that look surprisingly high-end — designed to give you that candy-apple red, crisp white, fresh green vibe in real rooms, on a real budget. Each project lives indoors, leans classic holiday with red-and-white accents, and can be made in an evening with a cup of cocoa and a good playlist.
We’re talking glossy red ribbon, ceramic-style white finishes, evergreen touches, and clean lighting that reads warm and inviting at golden hour. Expect total costs under $25 per project, smart tricks that store easily, and styling cues that photograph beautifully for Pinterest or the family group chat. If your style loves classic holiday cheer and you want fast wins before guests arrive (or before the kids lose interest), this is for you.
1) Red Velvet Bows And White Ceramic-Style Houses On A Mantel Shelf
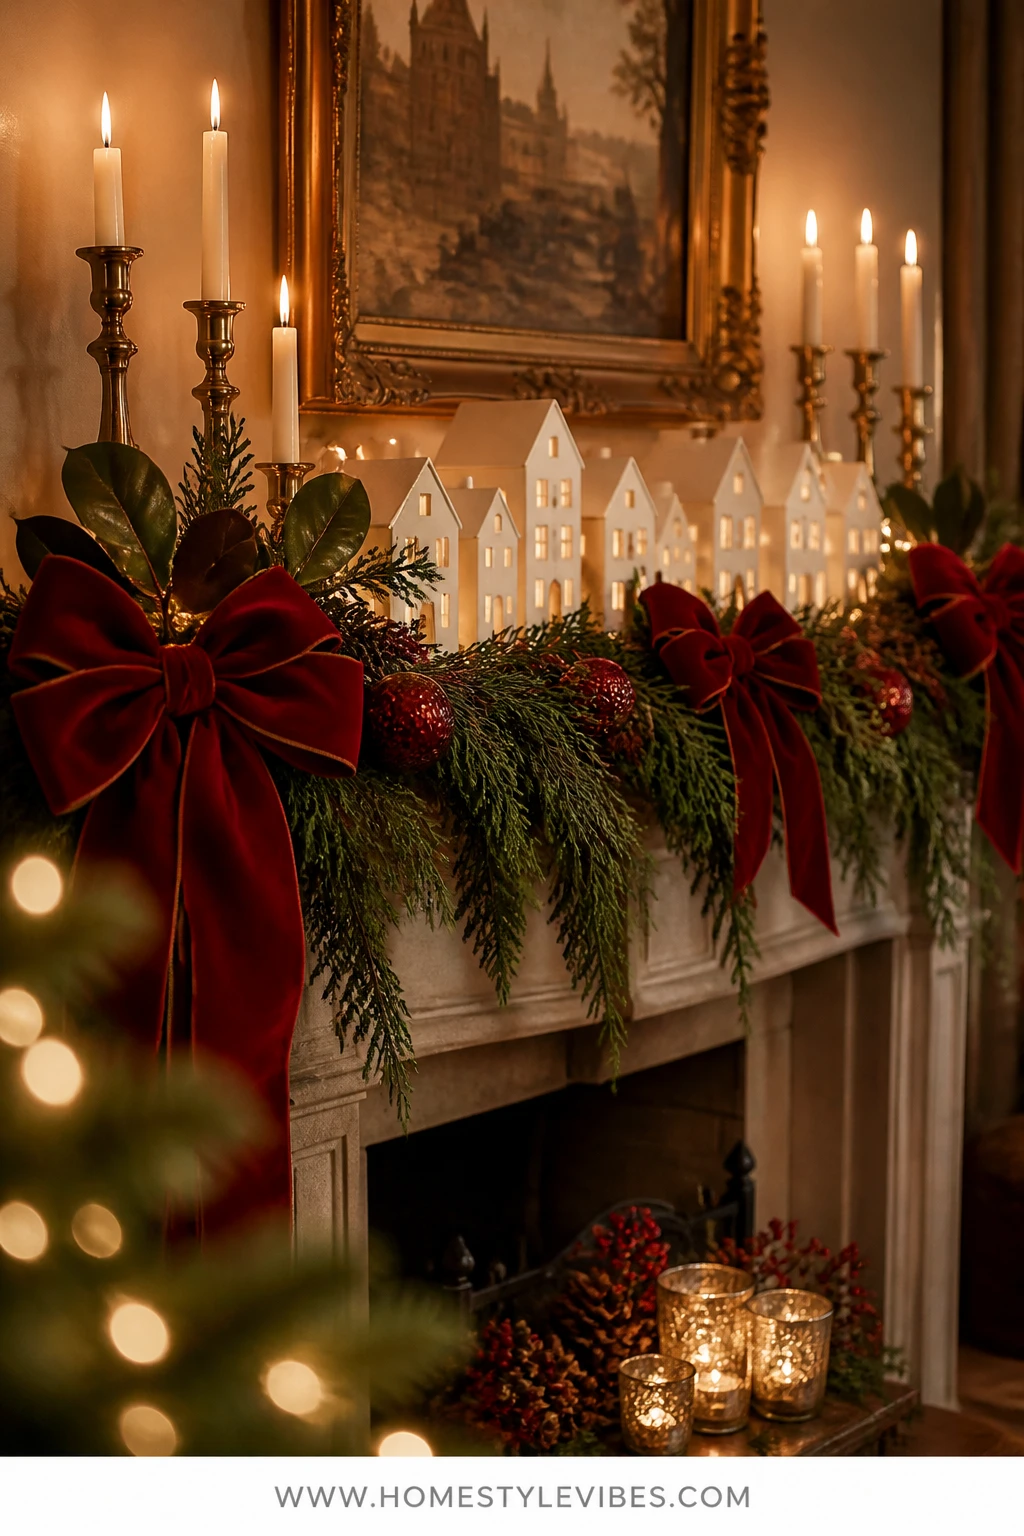
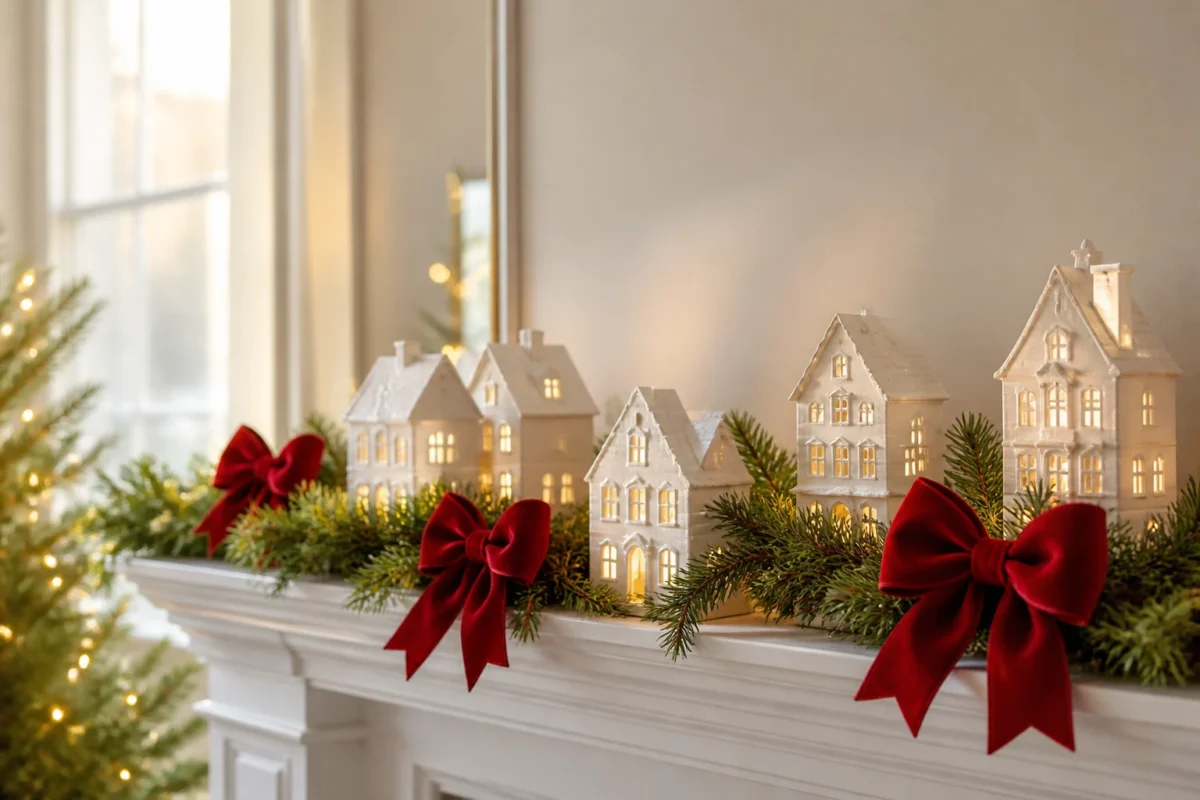
We’ve all been there: the mantel looks like a jumble of stuff — a garland here, a knickknack there — but it never feels finished. This classic red-and-white mantel DIY leans into crisp white “ceramic” village houses (made from Dollar Tree wood houses) with red velvet bows and warm white fairy lights. The result is a clean, cranberry-and-ivory glow with little twinkle windows that feel like miniature storybook streets.
It works because you’re simplifying your palette to candy red, crisp white, and fresh green, then adding a warm glow. The wood houses get a high-end ceramic look with white gloss spray paint; tiny battery tea lights inside give that soft clink-and-glow moment at dusk. It’s easy to put up, safe around pets if you stick to flameless lights, and it stores flat in a shoebox. The glow photographs beautifully — the fairy lights create bokeh on camera while the matte velvet ribbon keeps it from reading shiny or cheap.
Lighting note: keep it all warm white. Anything blue-toned will kill the cozy and clash with the red. Place additional fairy lights along the back edge of the mantel to halo the “village” and pull the scene together.
Variations: For a softer look, swap the velvet bows for red-and-white ticking stripe ribbon. In small spaces, make a mini version on a bookshelf or TV console ledge. Leave the houses up into January by removing the red bows and tucking in plain cedar sprigs for a winter village vibe.
Supplies and Cost:
- Unfinished wood house cutouts or birdhouses (Dollar Tree Crafter’s Square): $1.25 each (5–7 pieces)
- Glossy white spray paint (multi-price aisle, often $3–$5) or acrylic white paint: $3–$5
- Battery tea lights or fairy lights: $1.25–$5
- Red velvet ribbon (Dollar Tree seasonal): $1.25
- Faux cedar sprigs or mini bottle-brush trees: $1.25–$3
- Clear adhesive dots or poster tack: $1.25
Total Estimated Cost: $15–$25
Time and Skill Level: 45–60 minutes active time plus paint drying · Beginner
Best For: Mantels, floating shelves, or TV consoles where you want a polished focal point from Thanksgiving weekend through New Year’s.
Key Design Elements:
- Main holiday props: “ceramic” white village houses, red velvet bows, cedar sprigs
- Color palette: candy red, crisp white, fresh evergreen
- Lighting strategy: warm white fairy lights behind the houses, tea lights inside
- Textile and ribbon layers: matte red velvet ribbon in narrow widths
- Greenery and natural elements: faux cedar pieces tucked along the base
- Accent details: white bottle-brush trees, small brass jingle bells if desired
How To Make It:
- Prime and paint the wood houses with glossy white spray paint or 2–3 coats of acrylic; let dry fully.
- Line the back of your mantel with a micro string of warm white fairy lights.
- Arrange houses in height order with small gaps between, then tuck a tea light behind or inside each if possible.
- Cut three or five lengths of velvet ribbon and tie neat, small bows; use clear adhesive dots to secure a bow at each end and one at center.
- Weave faux cedar sprigs at the base of the houses and nestle a few tiny bottle-brush trees for depth.
- Step back, dim overheads, and adjust lights until the “street” glows evenly.
Why This Looks Expensive: The glossy white finish unifies mismatched wood shapes into a “ceramic” collection, and repeating red bows adds designer-level consistency. Clusters of the same item always read elevated.
Watch Out: Don’t mix cool white and warm white lights. The temperature clash cheapens the scene instantly. Keep all bulbs warm white.
Pro Styling Tip: For photos, push the fairy lights two inches behind the houses to get that soft halo and layered depth in the background.
2) Candy-Red Stripe Ribbon And Fresh-Look Green On A Staircase Garland
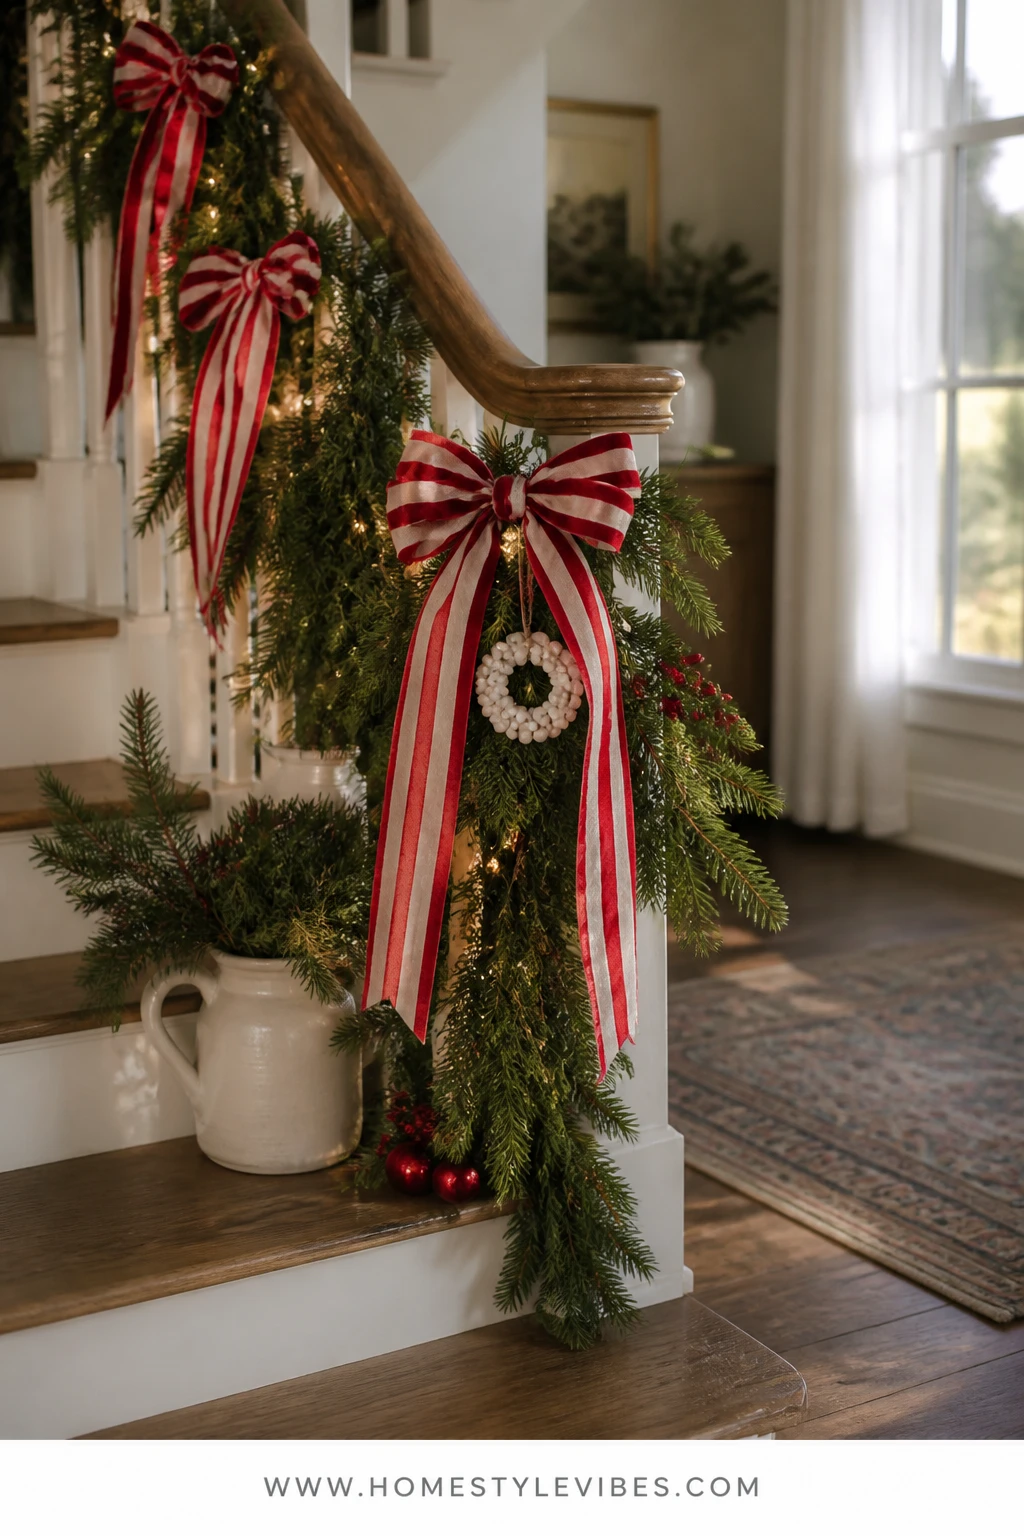
It’s that spot you see every day — the staircase — but it either turns into a tinsel avalanche or does nothing at all. This classic ribbon-and-garland treatment uses red-and-white striped ribbon, lush faux greenery, and a few crisp white accents to create a clean candy-cane moment along the banister. It feels timeless, lively, and ready for photos the moment guests walk in.
Here’s why it works in real homes: you’re keeping the stripes consistent, the greenery full, and the details restrained. Dollar Tree’s multi-price garlands get a boost when you layer two together and add sprigs. The result is generous, not skimpy. Warm micro lights thread through, and foam white berries add dimension without glitter fallout. Plus, it attaches to the outside of the banister, so the handrail stays usable and safe.
Photograph-wise, the diagonal ribbon tails create beautiful movement in pictures. Turn off overheads and let the garland lights do the work at golden hour for that soft, cinematic glow. If your family is anything like mine, this is where everyone takes the “we’re leaving for the concert” photo.
Variations: For small staircases, swag just the lower three newel segments. If you prefer a quieter look, use solid red velvet ribbon instead of stripes. Want January longevity? Pull the red ribbon after New Year’s and keep the plain greenery with white berries up through the first snow.
Key Design Elements:
- Main holiday props: faux fir garlands, striped ribbon, white berry stems
- Color palette: candy red, crisp white, deep evergreen
- Lighting strategy: warm white micro lights woven deep into greenery
- Textile and ribbon layers: bold red-and-white stripe, tied in repeated loops
- Greenery and natural elements: layered faux fir plus cedar picks for fullness
- Accent details: white plastic bells or small matte ornaments sparingly
Supplies and Cost:
- Faux garlands (two per 6–8 feet of railing): $3–$5 each
- Red-and-white striped ribbon (wired): $1.25–$3 per roll
- White berry or baby’s breath faux stems: $1.25 each
- Warm micro string lights (battery): $3–$5
- Zip ties or green pipe cleaners: $1.25
- Command hooks for newel posts: $3–$5
Total Estimated Cost: $18–$35 depending on staircase length
Time and Skill Level: 45 minutes to 1.5 hours · Easy
Best For: Interior staircases or railings visible from the entryway where you want a signature, instantly cheerful red-and-white statement.
How To Make It:
- Attach hooks to the outside of your banister, one every 3 feet; let cure per package directions.
- Double up your garlands for fullness and zip-tie them lightly to each other.
- Hook the garland to the banister in gentle swags; fluff branches outward.
- Weave micro lights deep into the greens so bulbs peek through, not sit on top.
- Cut 18–24 inch ribbon lengths; tie bows at regular intervals where the garland dips.
- Tuck white berry stems in groups of three near each bow to create rhythm.
Why This Feels Designer: Repetition and restraint — same ribbon, same spacing, same berry clusters — give a curated look. Doubling the garland density prevents that skimpy, see-through vibe.
One Thing To Avoid: Don’t place the garland on the handrail itself. It’s a safety hazard and looks messy fast. Attach to the outside of the banister.
Pro Styling Tip: Angle ribbon tails down and slightly forward; they’ll catch the light and create motion in photos without blocking the stairs.
If one idea resonates more than the others, that’s your starting point. You don’t need all six to have a home that feels festive. Pick a zone you actually see every day, and let that be your hero moment.
3) Gloss-White Ornaments With Red Satin Tails On A Slim Entryway Tree
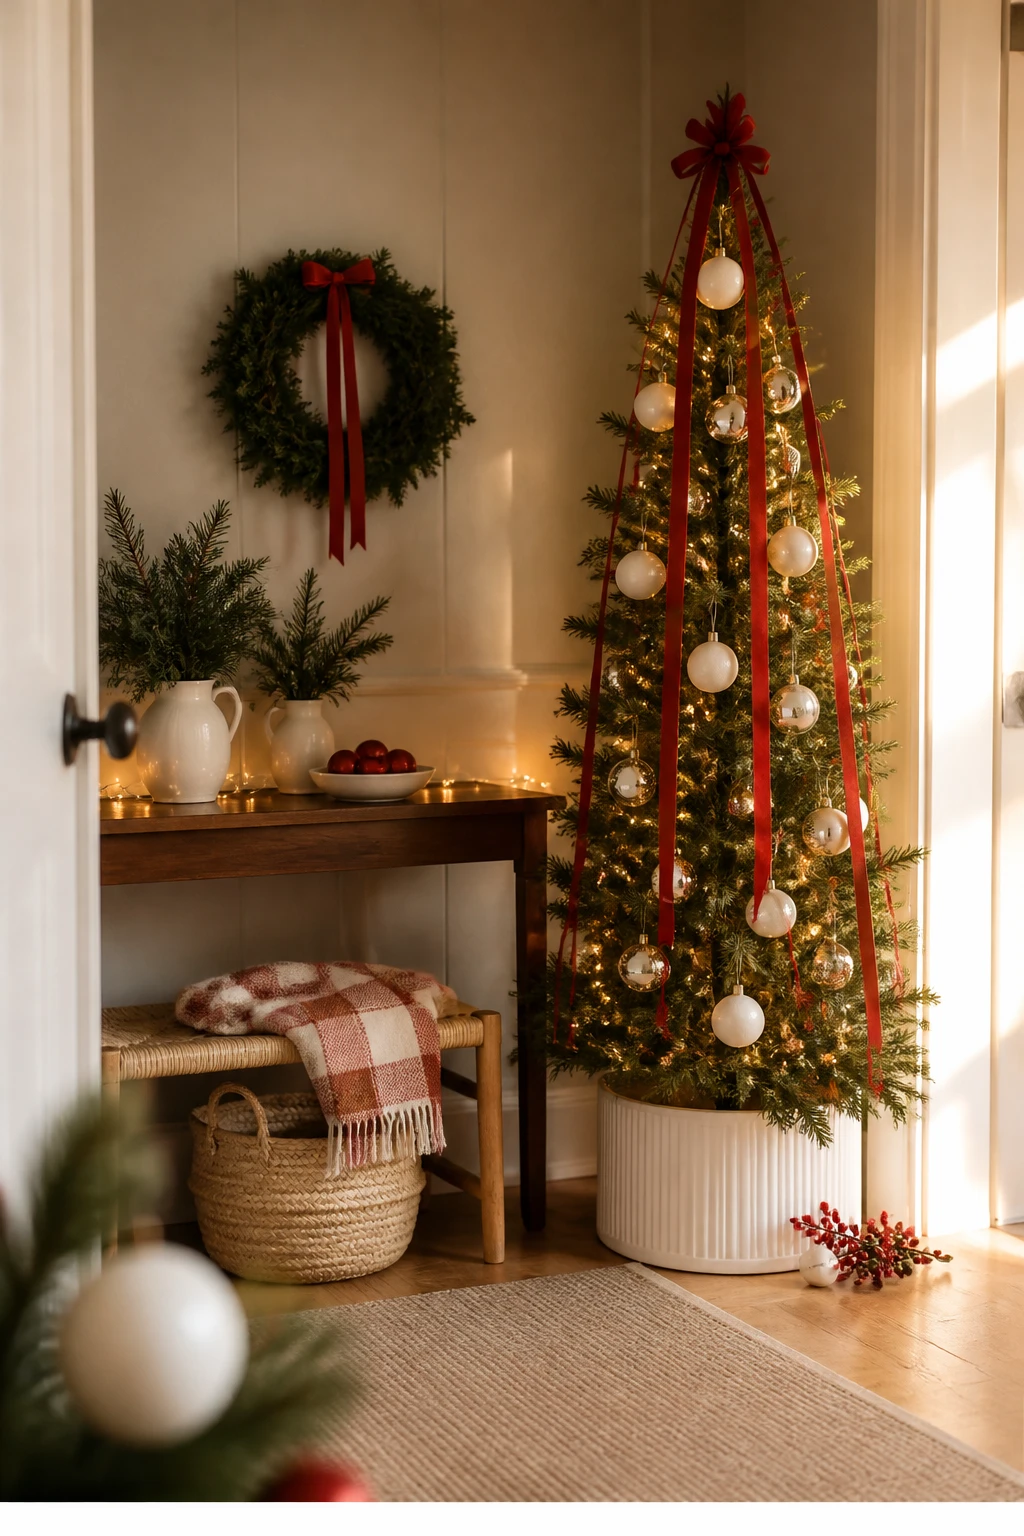
It’s that one corner that always looks bare — the entryway. You’ve tried a wall sign or a wreath hook, but it still reads unfinished. A slim tree with a strict red-and-white palette fixes that. Think glossy white ornaments, matte red satin ribbon tails, and a handful of fresh-look sprigs. A narrow silhouette fits by a console or bench without clogging foot traffic.
Why it works: a skinny tree with consistent ornament color looks sculptural, not busy. White ornaments create a snowy base; red ribbon becomes the “confetti” that pulls in the classic theme from the wreath and stockings. Use warm white lights built into the tree, then add one micro strand for extra glow toward the trunk — the interior glow reads luxe in photos.
It’s pet- and kid-friendly if you use shatterproof balls and avoid glass near the bottom third. Bonus: you can keep the white ornaments on through January by pulling the red ribbon and adding a few pinecones for a winter transition.
Variations: For extra sparkle, add a few silver bells near the top half only. For a super minimal approach, skip the topper and let a single long red ribbon cascade. If your entry is tiny, do a 3–4’ tabletop tree on the console with the same approach.
Supplies and Cost:
- Slim faux tree (multi-price aisle, 4–6’): $10–$25
- Shatterproof white ornaments (2–3 tubes): $1.25–$3 each
- Red satin ribbon (not wired), 1–1.5” wide: $1.25–$3
- Warm micro lights (optional extra): $3–$5
- Faux cedar or eucalyptus picks: $1.25 each
- Small white tree skirt or fabric remnant: $1.25–$3
Total Estimated Cost: $20–$40
Time and Skill Level: 40–60 minutes · Easy
Best For: Entryway corners, beside a console, or next to a mirror where wall reflections double the glow.
Key Design Elements:
- Main holiday props: shatterproof white ornaments, red ribbon tails
- Color palette: candy red, crisp white, fresh evergreen
- Lighting strategy: built-in warm lights plus one inner micro strand
- Textile and ribbon layers: soft red satin tails, pooled simply
- Greenery and natural elements: subtle cedar or eucalyptus picks
- Accent details: small white skirt, a few silver bells up high
How To Make It:
- Assemble and fluff the slim tree, sweeping branches upward to look fuller.
- Wrap a micro light strand tightly near the trunk for inner glow.
- Hang white ornaments first, evenly spacing from top to bottom.
- Cut 14–18” ribbon tails; fold the top inch and hook onto branches like a “U.”
- Tuck in a few picks for texture, concentrating at the midline for balance.
- Smooth a white tree skirt or fabric remnant at the base to hide the stand.
Why This Reads High-End: The disciplined palette — all white ornaments, only red in the ribbon — reads intentional and boutique. The inner-lit trunk glow is the subtle flex that makes photos sing.
Don’t Do This: Avoid mixing too many ribbon types on one small tree. Keep one ribbon texture so the scale doesn’t feel chaotic.
Pro Styling Tip: Angle a mirror behind or beside the tree to double the light and make the entry feel bigger in photos.
4) Red Berry And White Bead Garland Across A Kitchen Window
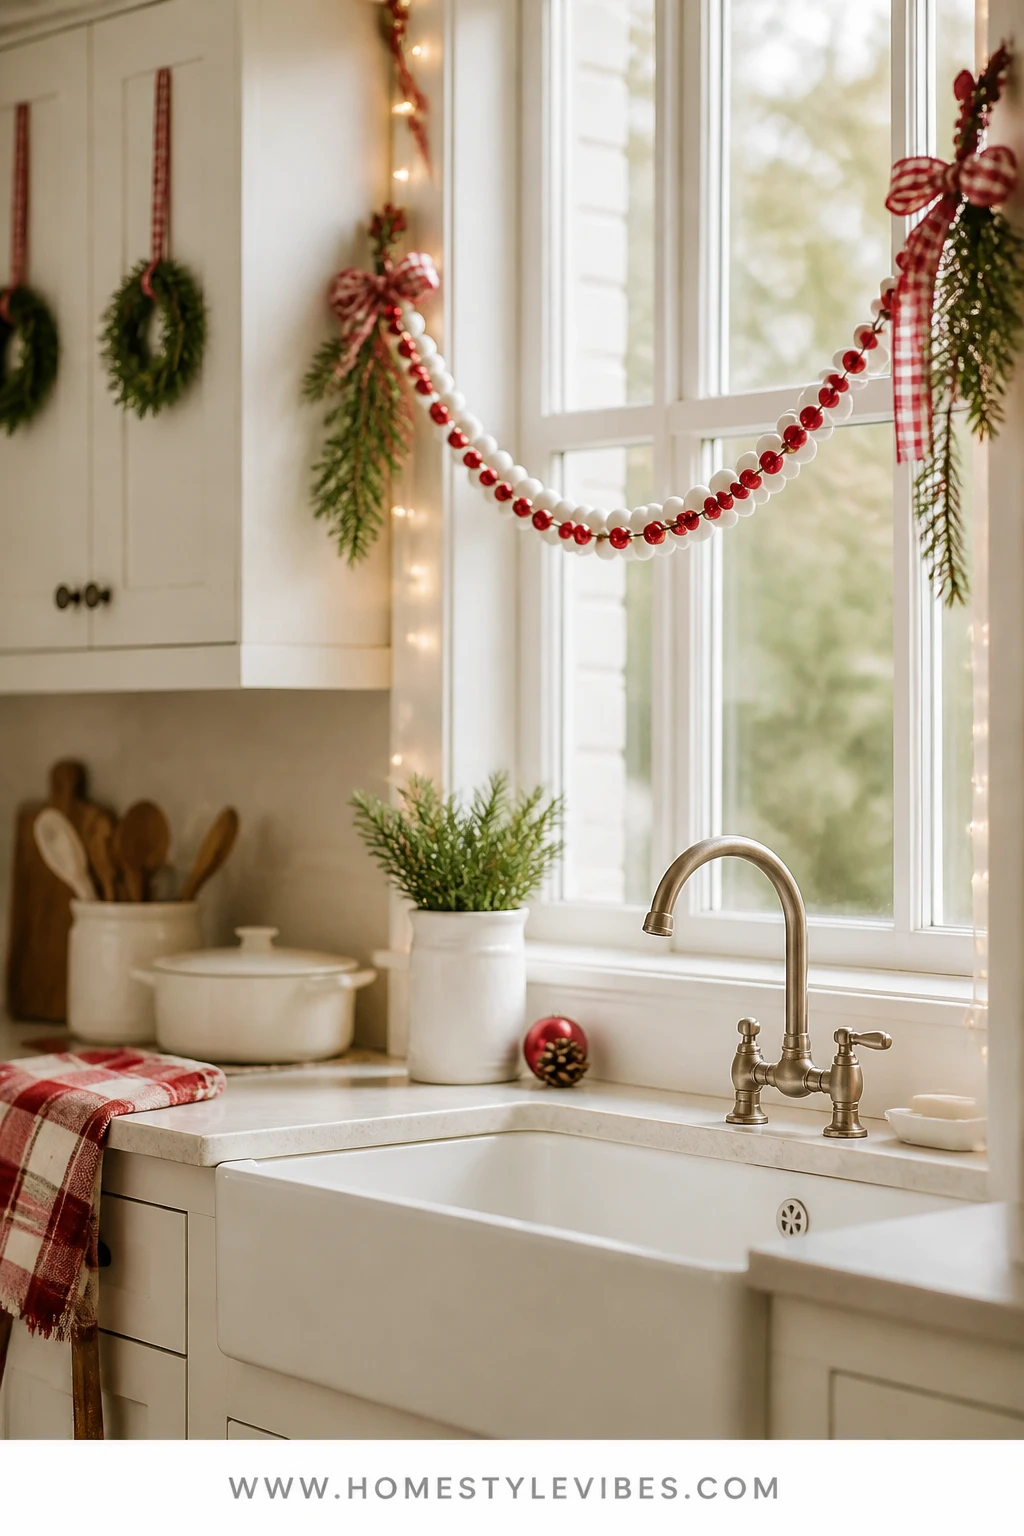
You want cozy kitchen cheer, but the counters get overwhelmed fast with mugs, canisters, and the air fryer you swore you’d put away. This DIY keeps the surfaces clear: a red-berry-and-white-bead garland that floats across your kitchen window. It frames the sink area in classic color, catches morning light, and gives you that festive hello while you rinse apples or sneak a gingerbread cookie.
It’s practical because it uses vertical space and stores in a single zip bag. Dollar Tree wooden beads take paint beautifully; paired with faux red berry sprigs, you get that candy red and crisp white combo without crowding your workspace. Add a slim fairy light strand for evening rinse time — the glow against glass is quietly stunning.
I tried this last December above my sink and honestly couldn’t believe the difference. The window suddenly looked styled, and I didn’t have to move a single thing on the counters. Even better, when the sun hits those red berries, they look like little stained-glass dots. Instant cheer.
Variations: Make a mini version for a cabinet front using removable hooks. For a neutral January look, keep the white bead garland and swap red berries for eucalyptus sprigs. Kid-friendly twist: add a few felt snowflakes between beads.
Key Design Elements:
- Main holiday props: white wooden bead garland, faux red berry sprigs
- Color palette: candy red, crisp white, a whisper of green
- Lighting strategy: warm white micro lights draped lightly across the top
- Textile and ribbon layers: narrow red grosgrain ties at ends
- Greenery and natural elements: small cedar snippets at corners
- Accent details: suction cup hooks or clear Command hooks for glass
Supplies and Cost:
- Wood beads (various sizes): $1.25 per pack (3–5 packs)
- White acrylic paint: $1.25
- Twine or thin cord: $1.25
- Faux red berry stems: $1.25 each (2–3 stems)
- Micro lights (optional): $3–$5
- Clear hooks or suction cups: $1.25–$3
Total Estimated Cost: $10–$18
Time and Skill Level: 45 minutes (paint drying included) · Beginner
Best For: Kitchen windows, above-the-sink views, or open-shelf edges where counters must stay clutter-free.
How To Make It:
- String beads on skewers, paint white, and let dry fully.
- Thread beads onto twine, alternating sizes for interest.
- Cut small berry clusters and twist onto the garland every 6–8 inches.
- Attach hooks to the window frame or tile; let adhesive cure per instructions.
- Hang the garland with a gentle dip; tie narrow red ribbon at ends.
- Weave a micro light strand along the top if you want evening sparkle.
Why This Looks Intentional: The controlled palette across a single bold line at eye level looks curated. The window glass adds natural reflection that multiplies the lights at night.
The Most Common Mistake: Overloading with berries. You want pops, not a full hedge. Leave white bead space so it reads clean.
Pro Styling Tip: Photograph at twilight with the kitchen lights dimmed — you’ll catch that pretty window reflection and warm sparkle.
Remember, this isn’t about recreating a showroom. It’s about building a home that actually feels like yours when the lights are low and the cocoa’s hot. Simple can be stunning when the color story stays tight.
5) Cranberry Velvet And White Stockings On A Slim Console Mantel
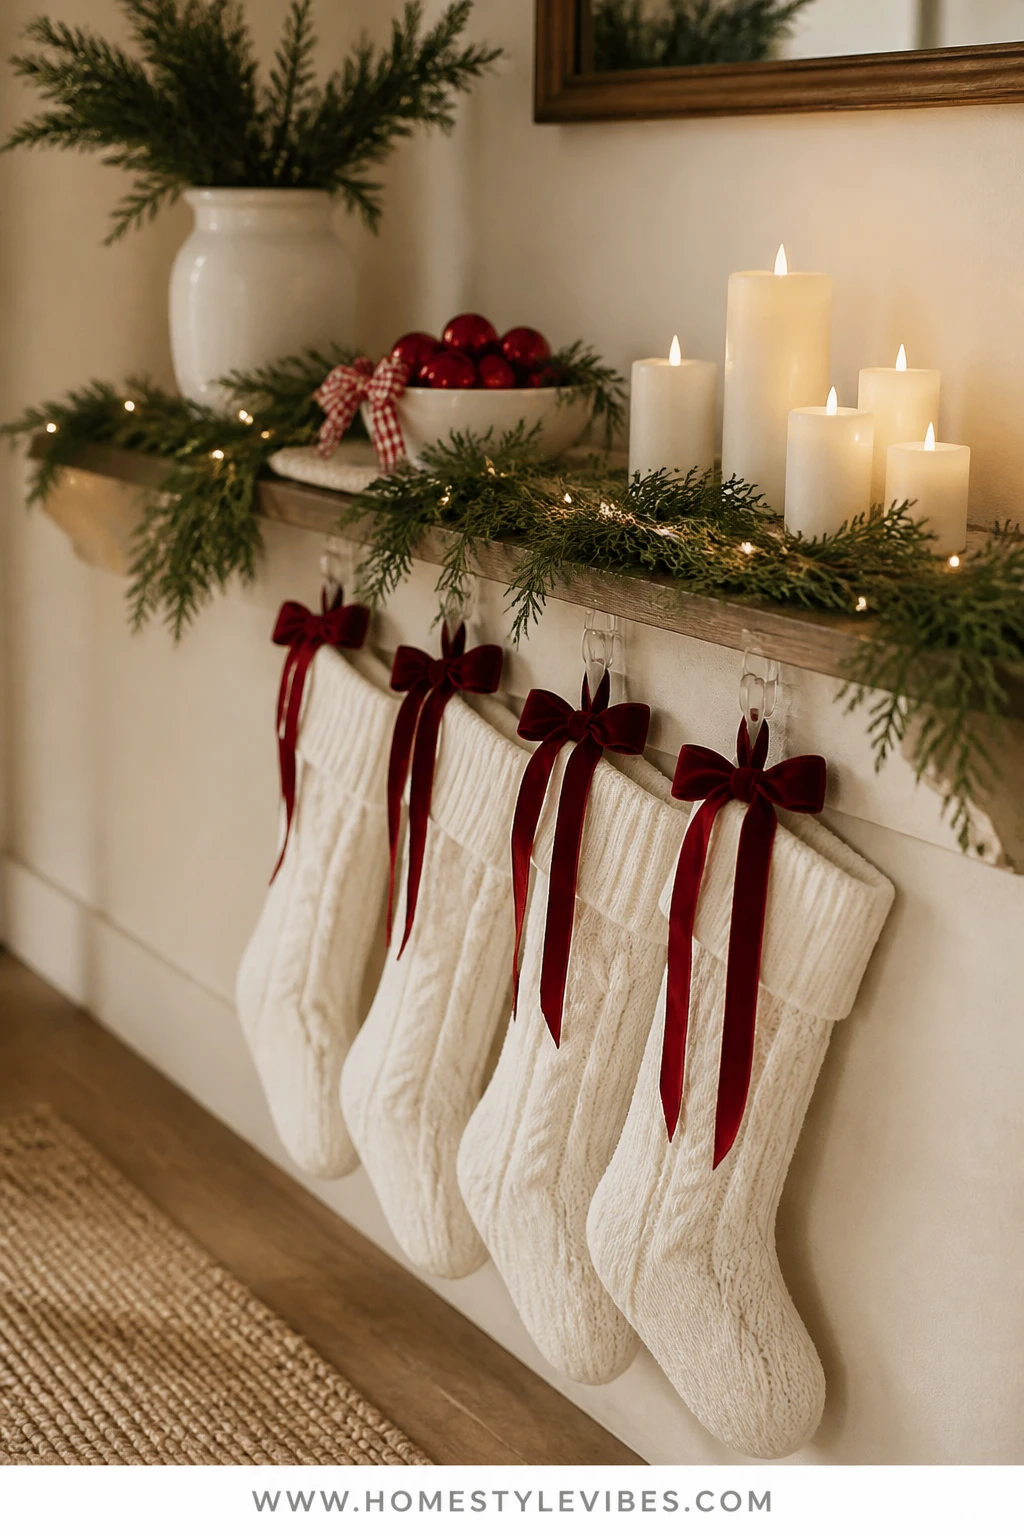
No fireplace? No problem. Your entry or living room console can play “mantel” with classic red-and-white style. This project creates a faux-mantel moment using cranberry velvet ribbon, clean white stockings, and a line of flameless pillar candles in mixed heights. Add a strand of faux cedar across the top and a few red ornaments corralled in a white bowl. The effect? Pure cranberry-and-ivory glow with greenery that looks fresh, not fussy.
Real-home practicality: stockings hang from adhesive hooks under the console lip, so they don’t slip when little hands tug. Flameless candles give safe warmth — no open flames near greenery. If your console sits by a mirror, you’ll get twice the ambiance without twice the spend. When New Year’s hits, pack the red ornaments and leave the greenery and candles for a soft winter look.
Personal confession: I used to put random decor on a console and hope for the best. It always looked like a yard sale. This stocking setup finally made the area feel finished — like it had a purpose in the holiday rhythm of the home.
Key Design Elements:
- Main holiday props: white knit stockings, cranberry velvet ribbon, flameless candles
- Color palette: deep cranberry, crisp white, evergreen
- Lighting strategy: staggered flameless pillars with subtle flicker
- Textile and ribbon layers: plush stockings, velvet bows on stocking loops
- Greenery and natural elements: faux cedar laid loosely across the console top
- Accent details: white ceramic bowl filled with red ornaments
Supplies and Cost:
- White stockings (felt or knit): $1.25–$3 each
- Velvet ribbon (cranberry/red): $1.25–$3
- Flameless pillar candles (assorted heights): $3–$5 each
- Faux cedar garland or picks: $1.25–$5
- White bowl or platter: $1.25
- Adhesive hooks (under console): $3–$5
Total Estimated Cost: $18–$35
Time and Skill Level: 30–45 minutes · Easy
Best For: Entry consoles, living room sideboards, or TV stands that need a clear visual focal point.
How To Make It:
- Place flameless pillars in a loose line on the console; vary heights for rhythm.
- Drape a faux cedar strand across, letting a few sprigs overhang.
- Fill a white bowl with red ornaments and set it slightly off-center.
- Attach adhesive hooks under the console lip; allow to set per directions.
- Hang white stockings evenly; tie a short velvet bow at each loop.
- Dim overhead lights and enjoy the glow reflecting off nearby surfaces.
Why This Looks Expensive: Monochrome stockings plus velvet ribbon reads custom. The repeated candle glow adds hotel-lobby warmth — all while using safe, budget pieces.
Watch Out: Avoid mixing too many finishes on the console (like mirrored trays with chrome and copper). Stick to white and a hint of brass at most.
Pro Styling Tip: For photos, slide one candle two inches behind the greenery to backlight the cedar and create dimension.
6) Red-And-White Striped Peppermint Centerpiece For The Dining Table
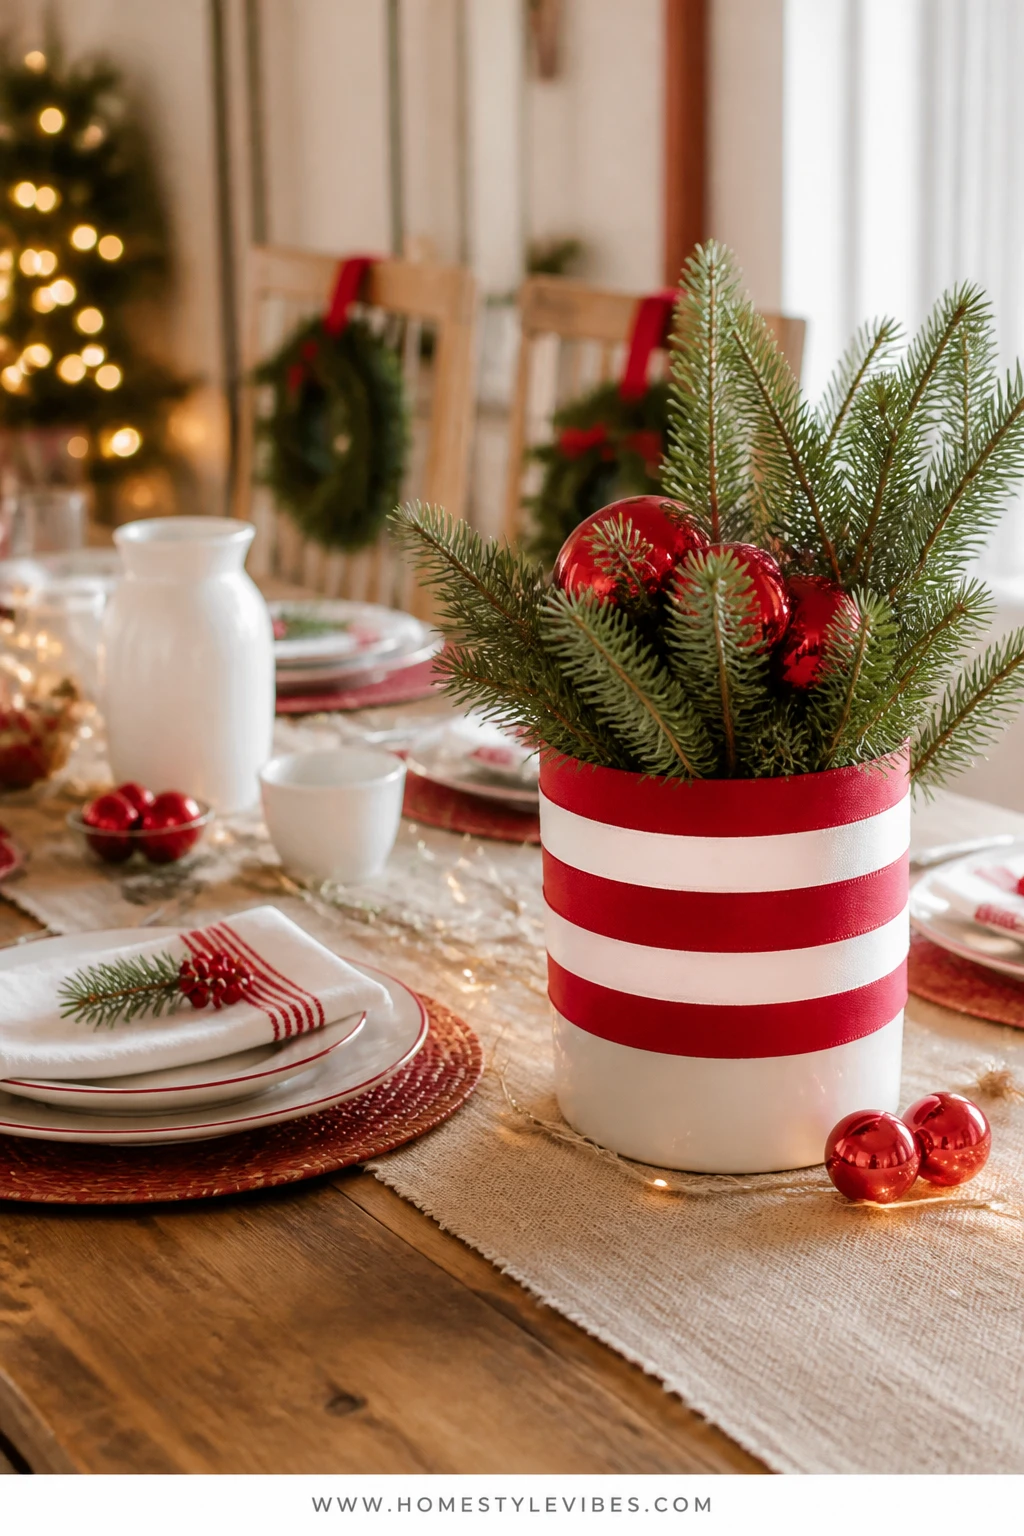
You set the table and it still feels flat. A centerpiece that’s too small disappears; too big and you can’t pass the rolls. This striped “peppermint” arrangement nails the sweet spot: a banded red-and-white vase look using Dollar Tree cylinder vases wrapped with striped ribbon, filled with evergreen sprigs and a few glossy red ornaments. It’s cheerful, symmetrical, and low enough for conversation — no peeking around a topiary tower.
Here’s why it works: the strong red-and-white stripes draw the eye, then the greenery softens it. The clear glass cylinders get an instant high-end upgrade when the ribbon wraps in clean, perfectly spaced bands. Grouping three vases (one taller, two shorter) looks intentional, not random. Warm white tea lights in tiny holders add a gentle twinkle down the runner without competing.
Variation options: Go all-white ribbon for a quieter January transition and swap red ornaments for pinecones. Small table? Use one medium vase centered on a narrow runner with two mini bud vases of cedar. Kid-friendly? Add a few paper snowflakes on the runner — simple, sweet, and recyclable.
Supplies and Cost:
- Glass cylinder vases (various heights): $1.25 each (3–5 pieces)
- Red-and-white striped ribbon (wired or satin): $1.25–$3
- Double-sided tape or glue dots: $1.25
- Faux evergreen picks: $1.25 each
- Red shatterproof ornaments: $1.25–$3 per tube
- Flameless tea lights and holders: $1.25–$3
- Simple white runner or cotton towel as runner: $1.25–$5
Total Estimated Cost: $12–$22
Time and Skill Level: 25–40 minutes · Beginner
Best For: Dining tables, kitchen islands, or sideboards where you want a bold focal line that stays out of the way during meals.
Key Design Elements:
- Main holiday props: glass cylinders, striped ribbon bands, evergreen sprigs
- Color palette: candy red, crisp white, evergreen accents
- Lighting strategy: a dotted line of flameless tea lights for diffuse glow
- Textile and ribbon layers: simple white runner, tight ribbon bands
- Greenery and natural elements: faux cedar or fir mixed with a sprig of eucalyptus
- Accent details: glossy red ornaments nestled at the base of vases
How To Make It:
- Lay a white runner down the center of the table to define the zone.
- Wrap each cylinder with striped ribbon bands, evenly spaced, securing with double-sided tape at the back seam.
- Fill cylinders with faux greenery; keep stems low and slightly fanned out.
- Cluster vases in a 1-2-1 pattern or a simple trio, leaving elbow room.
- Scatter a handful of red ornaments along the runner around the base.
- Place flameless tea lights in small holders between vases for an even glow line.
Why This Looks Expensive: Clean bands, precise spacing, and repetition read like a styled editorial. The glossy red against white creates a strong graphic moment that cameras love.
One Thing To Avoid: Don’t overfill vases. Keep greenery low and airy so guests can see across the table and the look stays modern.
Pro Styling Tip: Shoot from chair height; the ribbon bands will stack into a bold stripe pattern that looks custom and magazine-worthy.
If you’re feeling the pressure to do everything, pause. One strong idea in a key spot beats five half-finished corners. Take the win where it matters — and let the lights do the heavy lifting at night.
Quick Checklist
- Warm white lights only — keep temperatures consistent
- Repeat a single ribbon style per zone for a cohesive look
- Cluster multiples of the same item (houses, candles, vases) for unity
- Double up garlands for fullness on staircases or mantels
- Shatterproof ornaments for kid- and pet-friendly zones
- Use adhesive hooks and let them cure before hanging weight
- Place micro lights inside or behind decor for inner glow
- Keep the palette tight: candy red, crisp white, fresh green
- Photograph at golden hour or twilight for soft glow
- Store flat: label bags by zone (mantel, stairs, table) for quick setup next year
Frequently Asked Questions
How do I keep Dollar Tree garlands from looking skimpy?
Layer two garlands together and add a few faux cedar or fir picks for texture. Fluff every branch and tuck warm micro lights deep inside so the greenery looks fuller and the lights feel natural.
Can I mix real and faux greenery in these DIYs?
Absolutely. IMO, fresh cedar wins on scent but sheds faster. Use faux for the base, then add a few fresh sprigs where they won’t be handled much. Keep real greenery away from open flames and use flameless candles near any greens.
When is the best time to put these up?
Start the weekend after Thanksgiving for the full season, or earlier if it makes you happy. If you want longevity, choose pieces that can go “winter” by removing the red accents after New Year’s and keeping white, greenery, and candles.
Are these safe with kids and pets around?
Yes, if you pick shatterproof ornaments, secure garlands to the outside of the banister, and use flameless candles. Avoid small loose bells within reach of mouthing-age toddlers and anchor trees to the wall if curious climbers live with you.
How should I store everything so it doesn’t get tangled?
Coil lights around cardboard pieces, bag ribbons by zone, and stack painted houses between sheets of tissue in a shoebox. Label each bag “Mantel,” “Stairs,” “Table” so next year you can set up zones in under an hour.
Your Cozy Finish Line
Pick one of these Dollar Tree Christmas decor DIYs that look surprisingly high-end and claim a single spot in your home — the mantel, the staircase, the table. Start there. Keep the palette tight to candy red, crisp white, and fresh green, and let warm white lighting turn everything golden when the sun dips. That’s the secret to a classic holiday home that feels complete without feeling crowded.
The truth is, you don’t need designer price tags to get a designer vibe. You need repetition, restraint, and a little glow where it counts. From glossy “ceramic” village houses to peppermint-striped centerpieces, these projects give you that cheerful, classic look that photographs beautifully and lives easily with kids, pets, and real life.
So brew something warm, put on the playlist, and make one small corner sing. You’ve got this — and your December photos are about to be very, very good.

About the Author

Krisztina P.Rendes, Founder of Home Style Vibes
Founder of Home Style Vibes
Krisztina Puskásné Rendes created Home Style Vibes as a cozy-modern lifestyle space where homemaking meets inspiration. Her goal is to help women create beautiful, organized, and peaceful homes they truly love — without overwhelm. You’ll find here heart-driven content on home decor, cleaning tips, easy family recipes, organization and decluttering, DIY home projects, plants, and seasonal ideas — all designed to bring more calm, comfort, and style into everyday life.