6 Vintage Home Bar Ideas That Bring Retro Glamour Into Any Room
You want the kind of vintage home bar that glows like a late-night piano lounge and photographs like a magazine spread. You hate that every attempt so far looks more like a cluttered coffee station or a liquor store shelf. Picture this: warm brass catching candlelight, walnut that feels like an old library, a gentle bloom of ambient light that flatters every glass—six ideas that actually solve the “pretty-but-practical” problem and make the room feel finished. Each concept here translates to real homes, with realistic budgets and quick wins that look Pinterest-ready in under a weekend.
These vintage home bar ideas dial up texture, shadow, and that confident retro glamour you’ve been craving. Expect moody color anchors, honest materials, and clever storage that tucks away the mess. Pick the mood that fits your life—cocktails for two, kids in bed by eight, spontaneous neighbors at the door—and let the glow do the rest.
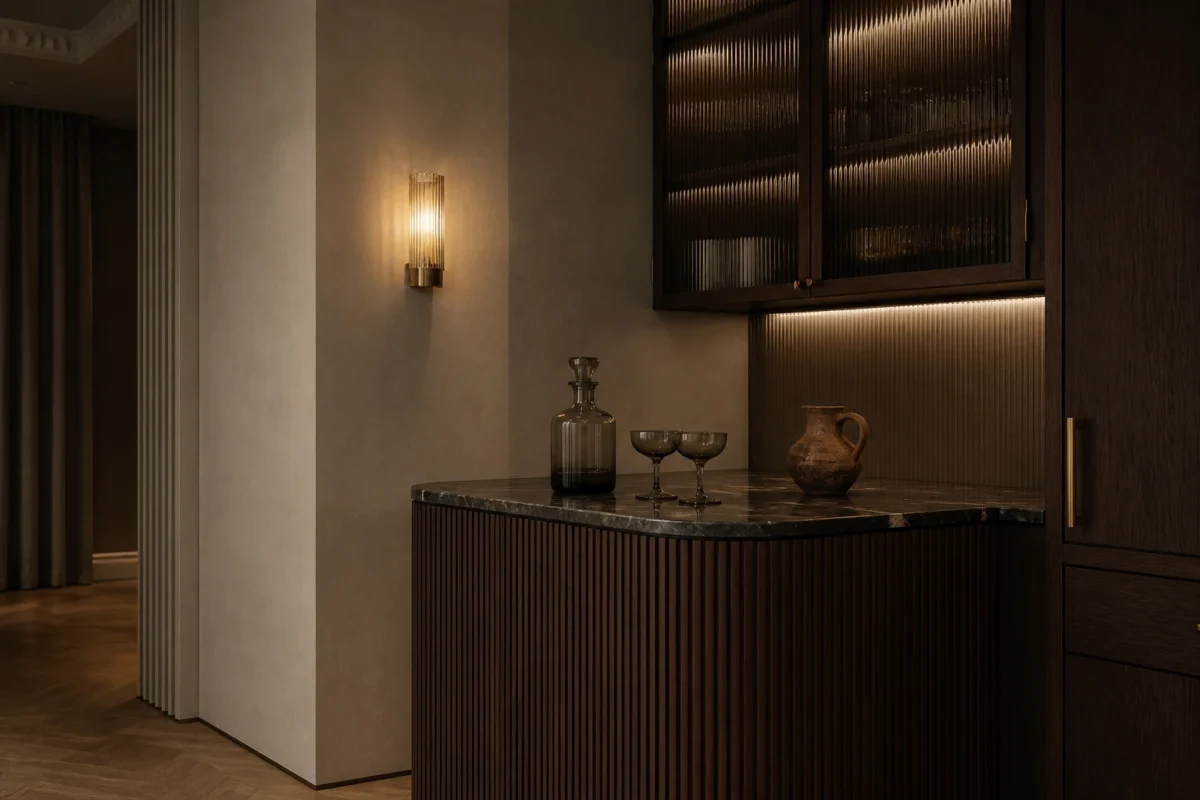
1. Fluted Walnut, Low-Lit Amber, and a Curved Waterfall Counter
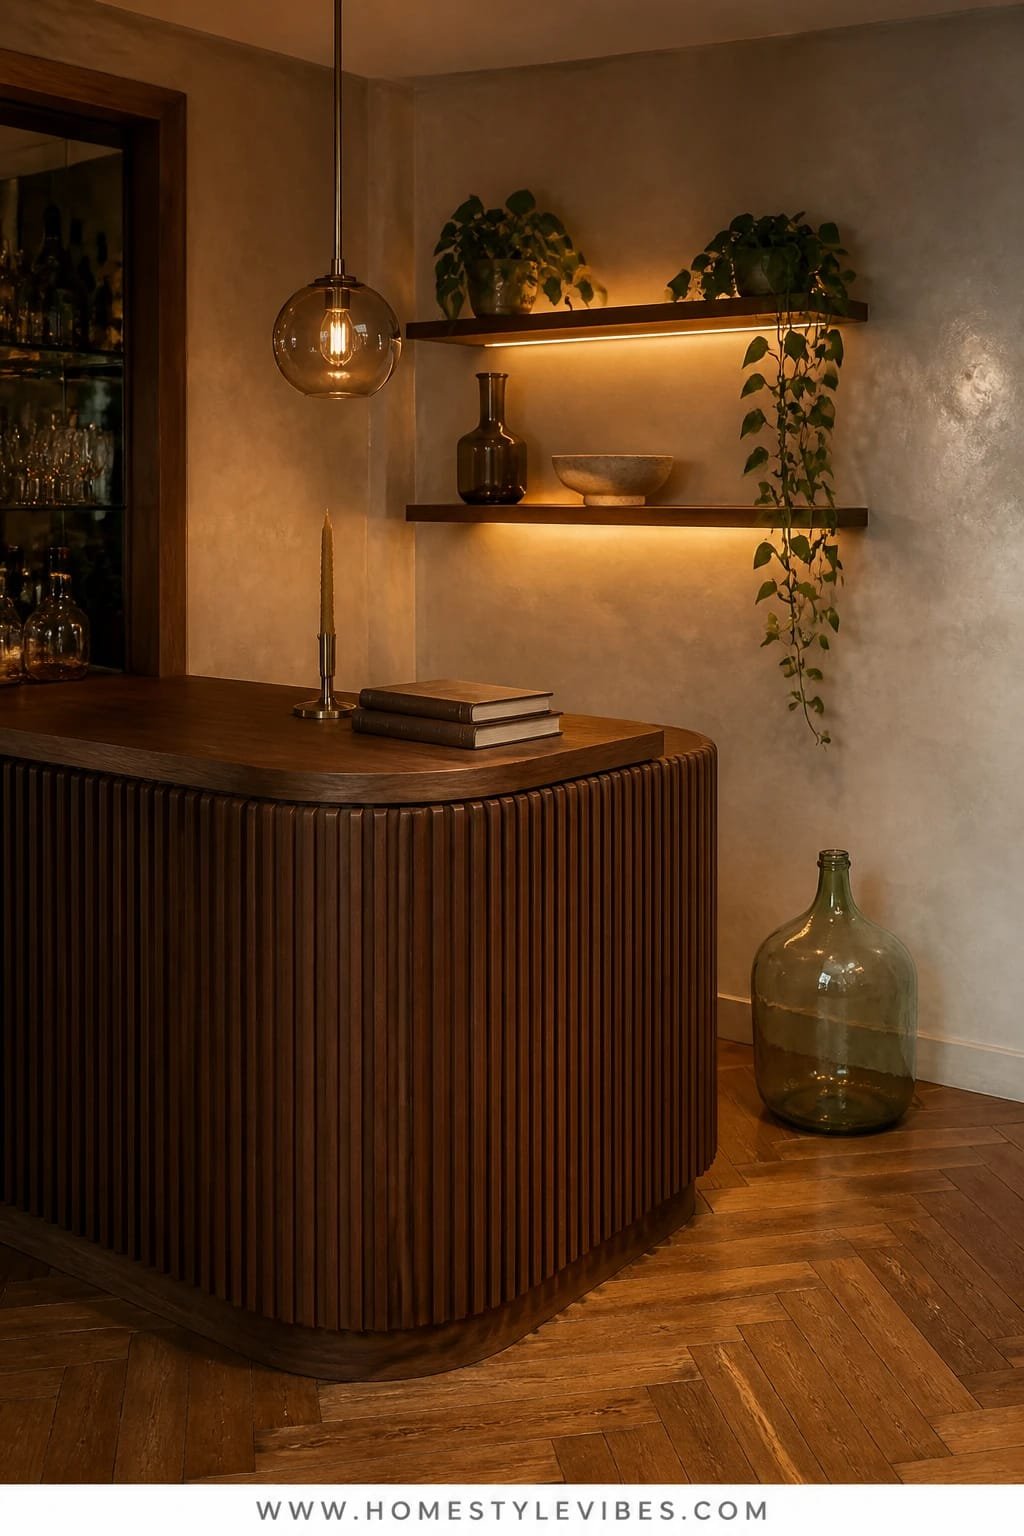
We’ve all been there: you love the idea of a statement bar, but the corner you chose feels flat, awkward, and a little too “utility closet.” This design solves that by leaning into sculptural softness—rounded corners, a gentle waterfall edge, and fluted walnut that catches low-lit amber like theater curtains. The mood is warm speakeasy meets mid-century living room, perfect for smaller spaces that need presence without harsh edges.
It works because curves visually compress depth; they guide the eye in a smooth loop and photograph beautifully. Fluted walnut delivers rhythm and shadow, giving even a narrow wall serious character. Amber lighting—think tinted LED strips under the counter lip—creates contour and flatters skin tones. You’ll get that cinematic glow that makes even seltzer in a coupe look fancy.
Variations: On a budget, use fluted MDF panels stained walnut; swap the waterfall slab for post-formed laminate with a woodgrain. Small-space version: 48-inch wide cabinet, half-depth fridge drawer, and a narrow curved shelf overhead. Renter-friendly? Do a rolling bar cart with a curved tray top and a fluted sleeve wrap secured with removable strips.
Budget Breakdown:
- Fluted walnut or MDF panels: $180 – $700
- Curved countertop (quartz or laminate): $350 – $1,500
- LED strip lights, amber-tunable: $45 – $180
- Under-counter fridge (optional): $400 – $1,200
- Brushed brass hardware and foot rail: $80 – $350
- Bar stools with rounded backs: $160 – $600 per pair
Total Estimated Cost: $915 – $4,530
Best For: Narrow living rooms or dining nooks that need a focal point; mid-century, contemporary, or transitional homes. Great for evening hosts who want soft, flattering light.
Key Design Elements:
- Main materials: Fluted walnut, brushed brass, amber-tinted acrylic or glass
- Color palette: Tobacco brown, caramel, ivory, and smoky bronze
- Lighting strategy: Dimmable amber LEDs under counter lip and behind fluting
- Furniture silhouettes: Rounded corners, curved stools, minimal bases
- Texture layers: Ribbed wood, smooth stone, soft linen napkins
- Accent details: Slim brass rail, low ceramic bowl for citrus, ribbed coupes
How To Recreate This Look:
- Start with a simple cabinet base and apply fluted panels to the face.
- Add a curved waterfall counter—template the curve with kraft paper first.
- Layer amber LED strips under the counter lip and along the kick area.
- Install a slim brass foot rail and matching hardware for cohesion.
- Style with ribbed glassware, a linen runner, and a single sculptural lamp.
Why This Looks Expensive: The curve does the heavy lifting. It suggests custom millwork and softens every edge, while the fluted rhythm creates delicious shadows that read “architect-designed.”
Watch Out: Don’t over-brighten. Too much white light kills the mood and makes the walnut look orange. Keep LEDs dimmable and warm, ideally 2200–2700K.
Pro Styling Tip: Place a matte black bottle or two among clear glass—high contrast next to the amber glow adds depth on camera and in person.
2. Honed Marble, Cool Moonlight, and a Brass Goose-Neck Sconce
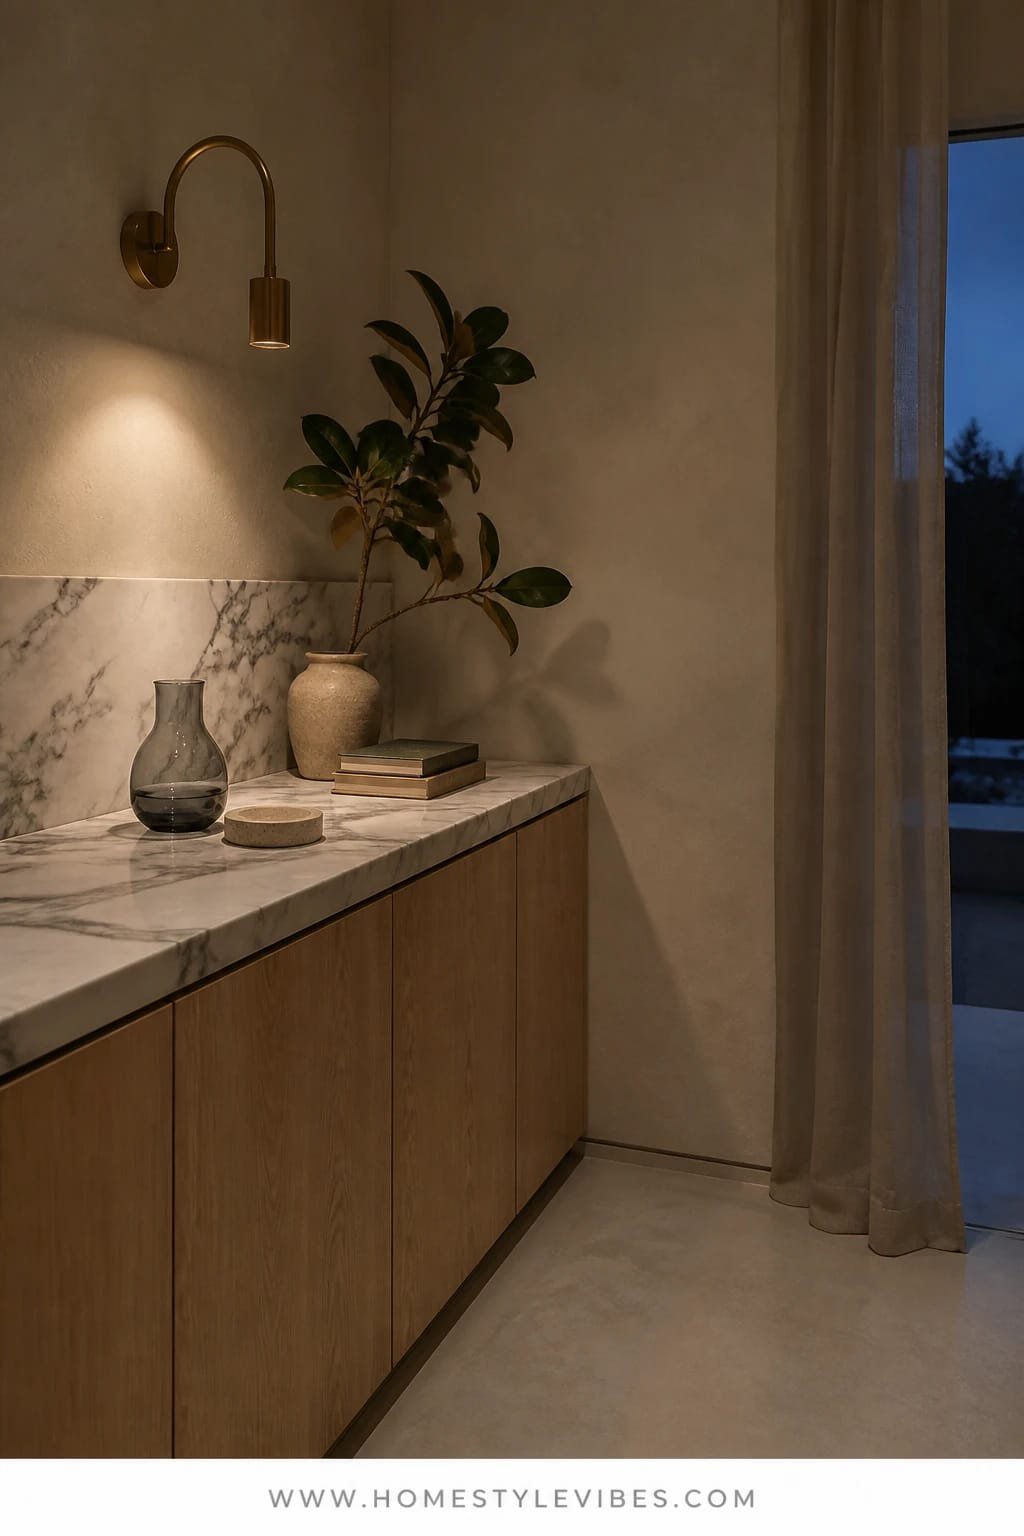
It’s that one corner that always feels too “daytime kitchen” when you want cocktail hour elegance. You’ve tried a tray, a pretty decanter, maybe a stemware rack—still reads coffee station. Enter honed marble with soft veining, a cool moonlit wash across the surface, and one dramatic brass gooseneck sconce that puts the spotlight exactly where it should be.
This setup feels like boutique hotel lounge meets editor’s apartment. Honed marble gives a velvety matte you can’t stop touching, while the cool light temperature (3000K) draws out the veining and turns glassware into jewelry. It’s perfect for tight wall niches or galley kitchens where a small sliver of stone and a single sculptural fixture carry the mood.
Variations: Budget swap to honed porcelain slab or a marble-look laminate. For darker rooms, try a deep charcoal paint on the back wall to dramatize the veining. Renter version: A marble-look console with peel-and-stick marble film and a plug-in brass sconce—no electrician required.
Key Design Elements:
- Main materials: Honed marble, unlacquered brass, smoked glass
- Color palette: Soft gray, cream, pale brass, inky charcoal
- Lighting strategy: One focused gooseneck sconce at 3000K + hidden puck light
- Furniture silhouettes: Narrow console, slim shelf, arched sconce
- Texture layers: Velvety stone, brushed metal, rippled glass
- Accent details: Marble coasters, smoked decanter, tiny silver tray for spoons
Budget Breakdown:
- Honed marble remnant or porcelain slab: $200 – $1,200
- Brass gooseneck sconce (hardwired or plug-in): $120 – $450
- Paint or peel-and-stick backdrop: $30 – $120
- Smoked glassware set: $50 – $160
- Slim console or wall cabinet: $160 – $800
Total Estimated Cost: $560 – $2,730
Best For: Apartments, galley kitchens, and hallway niches. Crisp, modern spaces that want a little old-world drama without the visual bulk.
How To Recreate This Look:
- Start with a narrow console or small cabinet and top it with honed stone.
- Add a single brass gooseneck sconce centered over the work zone.
- Layer a moody paint behind (charcoal or deep gray-green).
- Install a hidden puck light under a slim shelf for a halo effect.
- Style with a smoked decanter, a small silver tray, and two liqueur bottles tops-only.
Why This Feels Designer: The restraint sells it. One gorgeous stone, one glamorous light, and negative space around them. Your eye lands, breathes, and appreciates the materials.
One Thing To Avoid: Don’t crowd the counter with ten bottles. Curate to four or fewer and stash the rest below. Clutter kills the boutique-hotel vibe instantly.
Pro Styling Tip: Angle the sconce head so light rakes across the stone—not straight down—so the veining casts a faint shadow line on camera.
Remember, this isn’t about recreating a showroom. It’s about building a corner that earns its keep and belongs to your rituals. If one idea resonates more than the others, that’s your starting point. You don’t need all of them.
3. Aged Mirror, Candlelit Warmth, and a Slim Steel Apothecary Cabinet
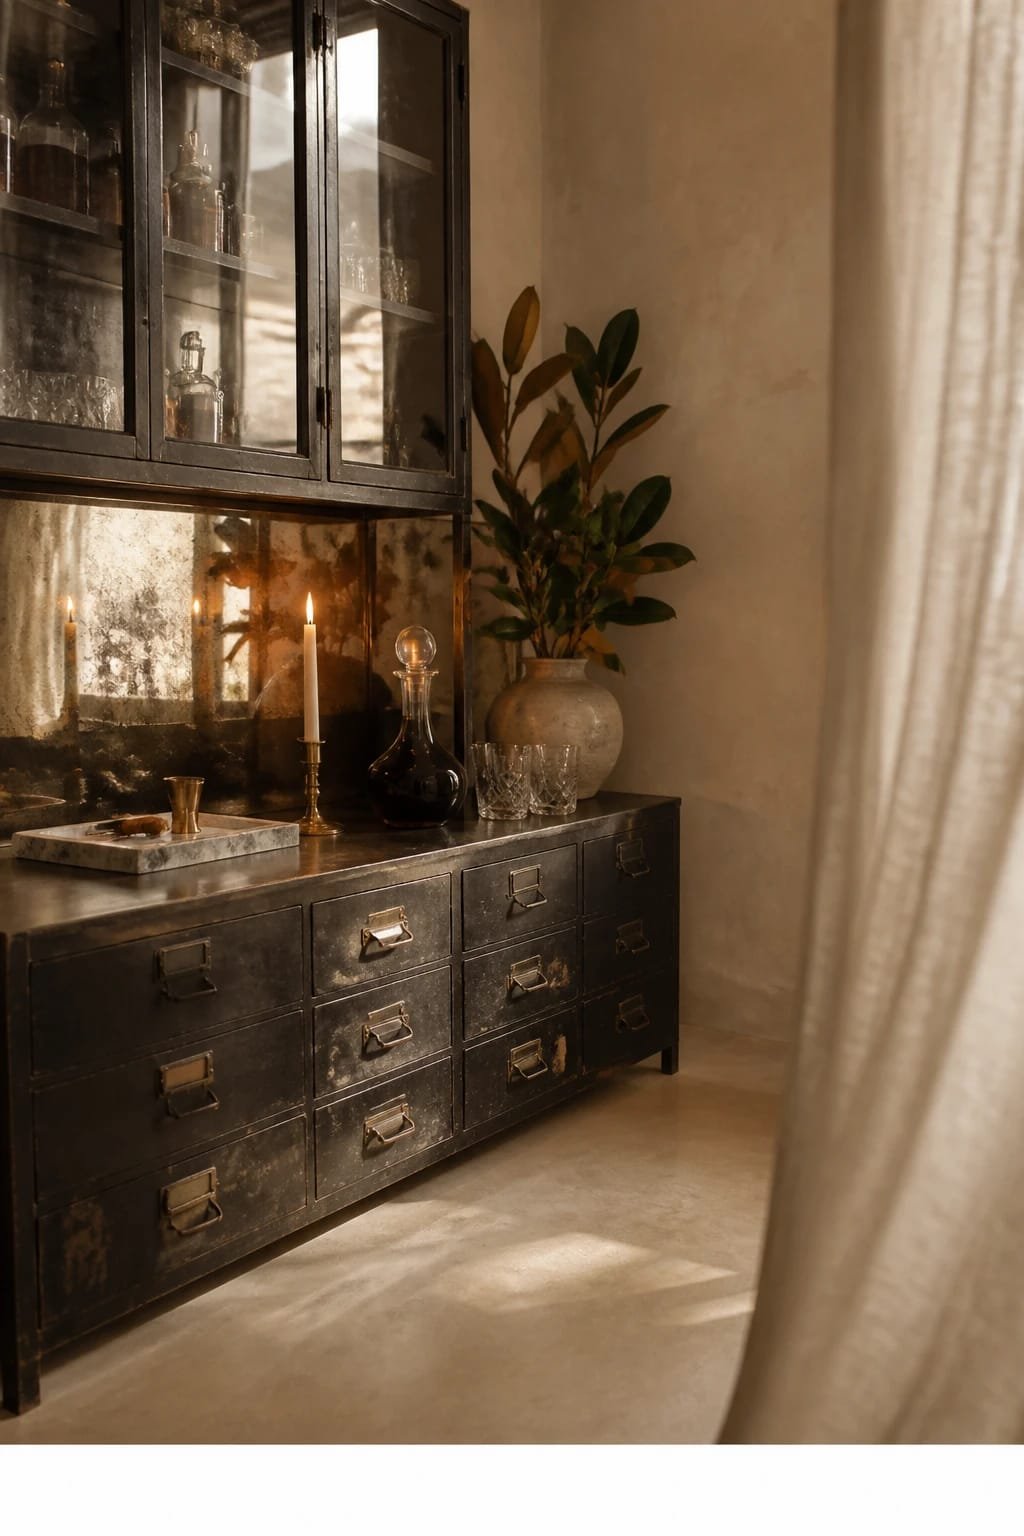
You want a vintage home bar that looks collected, not contrived. But every time you add “patina,” it swings messy or theme-y. The fix: a restrained palette with one theatrical move—aged mirror as the backsplash—paired with candlelit warmth and a slim, blackened steel cabinet that reads apothecary-not-industrial.
The mood lands in Paris apartment territory: a little smoke, a little sparkle, zero fuss. Aged mirror multiplies candlelight and throws gentle blurs across your bottles, which is wildly photogenic. The steel cabinet adds precision and keeps the whole look grounded. It’s fantastic for narrow walls because the mirror adds visual depth without color chaos.
Variations: Faux aged mirror film over basic mirror tiles for a budget take. For renters, use a freestanding vitrine and place a faux-aged mirror panel behind it with removable hooks. Prefer darker? Paint the adjacent walls deep plum or near-black to intensify the candle glow.
Budget Breakdown:
- Aged mirror panels or film: $90 – $650
- Slim blackened steel cabinet or vitrine: $300 – $1,400
- Brass or black candleholders + dripless tapers: $25 – $110
- Leather or suede bar mat: $35 – $120
- Vintage-style labels and apothecary jars: $30 – $150
Total Estimated Cost: $480 – $2,430
Best For: Tall, narrow nooks in living rooms and halls; lovers of moody, European vibes and quiet evenings with dim light and vinyl.
Key Design Elements:
- Main materials: Aged mirror, blackened steel, leather
- Color palette: Ink black, antique silver, warm candle gold
- Lighting strategy: Candle clusters + a low-watt sconce or dimmable picture light
- Furniture silhouettes: Tall, slim, framed doors with glass
- Texture layers: Cloudy mirror, smooth steel, soft leather, flickering light
- Accent details: Match striker, cut crystal cordial glasses, small marble catchall
Why This Reads High-End: Real patina feels lived-in and layered; when paired with precise, almost clinical storage, it says “collected over time,” not “Instagram order.”
How To Recreate This Look:
- Start by mounting aged mirror panels or applying film to standard mirror tiles.
- Place a slim steel cabinet in front, leaving a slight gap for depth.
- Layer candlelight—three heights, same color tapers—for glow and rhythm.
- Install a small picture light above to graze the mirror on low dim.
- Style with a tight edit: two favorite bottles, one crystal decanter, apothecary jars for bitters.
The Most Common Mistake: Over-aging. If the mirror looks like a haunted house, scale back. You want wisps and blooms, not full corrosion.
Pro Styling Tip: Stagger candle heights in a triangle and leave four inches of negative space on either side—balance translates directly to better photos.
4. Terra-Cotta Tile, Sun-Washed Glow, and a Rattan Drum Pendant
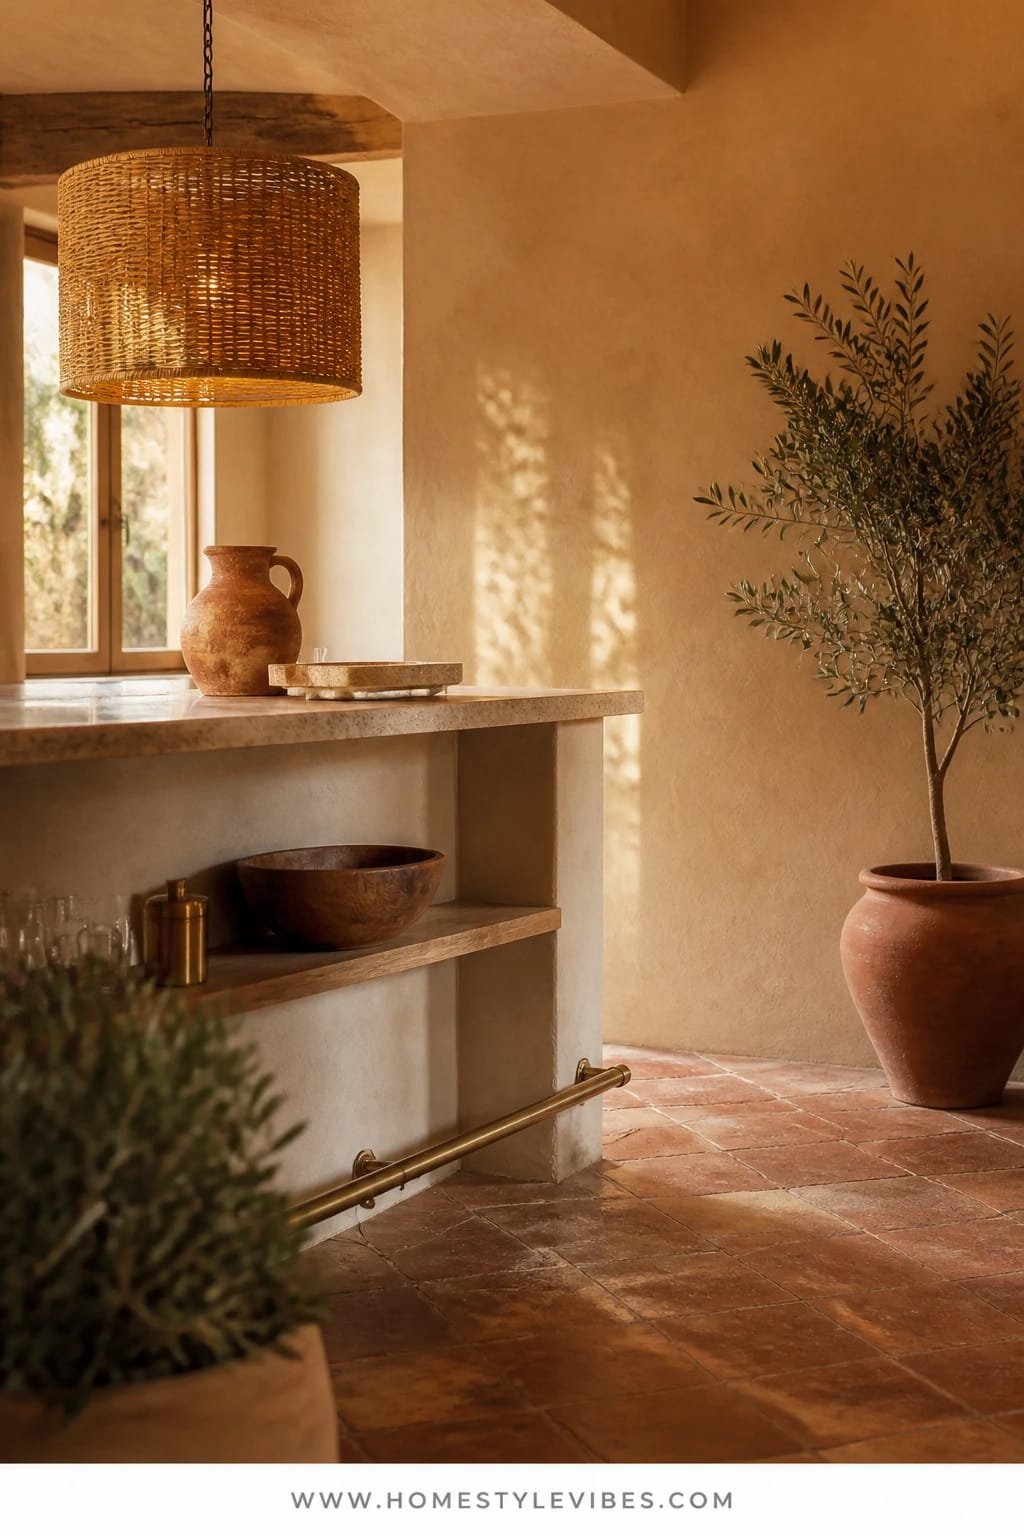
You’ve tried to make your bar feel relaxed and social, but everything lands too formal. Coasters get fussy, glass shelves feel pretentious, and nobody wants to linger. Terra-cotta tile with sun-washed glow changes the energy instantly—Mediterranean casual, barefoot-friendly, still chic. Add a rattan drum pendant for scale and softness, and suddenly your bar becomes the hangout zone.
This one thrives in multipurpose rooms. Terra-cotta brings earthy warmth and built-in variation so spills and scuffs read like character, not disaster. The sun-washed lighting (warm 2700K paired with a light linen shade liner) flatters everything, including messy herb sprigs in your G&T. Rattan filters light into a soft halo that photographs beautifully without harsh hot spots.
Variations: Budget-friendly? Use terra-cotta-look porcelain squares and thrift a rattan shade. Small space? Do a tiled wall niche and a shallow console with woven baskets below. Renter swap: Peel-and-stick terra-cotta vinyl tiles and a plug-in pendant kit with a rattan shade.
Key Design Elements:
- Main materials: Terra-cotta tile, rattan, warm brass
- Color palette: Clay, sand, olive, creamy white
- Lighting strategy: One large rattan pendant on dimmer + candles
- Furniture silhouettes: Chunky console, open shelves, woven fronts
- Texture layers: Matte tile, nubby linen, woven cane, brushed brass
- Accent details: Olive tree in a terracotta pot, herb jars, ceramic pitcher
Budget Breakdown:
- Terra-cotta or porcelain look tile: $120 – $650
- Rattan drum pendant with plug-in or hardwire kit: $80 – $420
- Open console with woven doors/baskets: $180 – $900
- Brass rail or hooks for bar tools: $25 – $120
- Linen runner, herb jars, ceramic serveware: $60 – $220
Total Estimated Cost: $465 – $2,310
Best For: Family rooms and sunrooms; people who want casual hosting with Aperol spritz energy and easy cleanup.
How To Recreate This Look:
- Start by tiling a small backsplash or applying peel-and-stick terra-cotta-look tile.
- Add a chunky console with either woven doors or baskets for texture.
- Layer a rattan drum pendant and put it on a dimmer for late afternoons.
- Install a small brass rail for bar tools and a narrow shelf for glassware.
- Style with a linen runner, a bowl of citrus, and a clay pot with rosemary.
Why This Looks Intentional: The repeating natural textures—tile, rattan, linen—create a coherent story. The large pendant scales up the zone so it doesn’t feel like an afterthought.
Don’t Do This: Avoid shiny chrome here. It fights the earthy palette and looks like a rental kitchen upgrade. Stick to warm brass or matte black.
Pro Styling Tip: For photos, mist the terra-cotta lightly—just once—to deepen the color and make the tile joints read richer on camera.
Small reminder: you’re not chasing perfection. You’re building a ritual corner that earns its spot at home—something you’ll actually use on a random Tuesday when the pasta water boils and you pour a two-minute Negroni.
5. Smoked Oak, Midnight Blue Light, and a Built-In Record Console
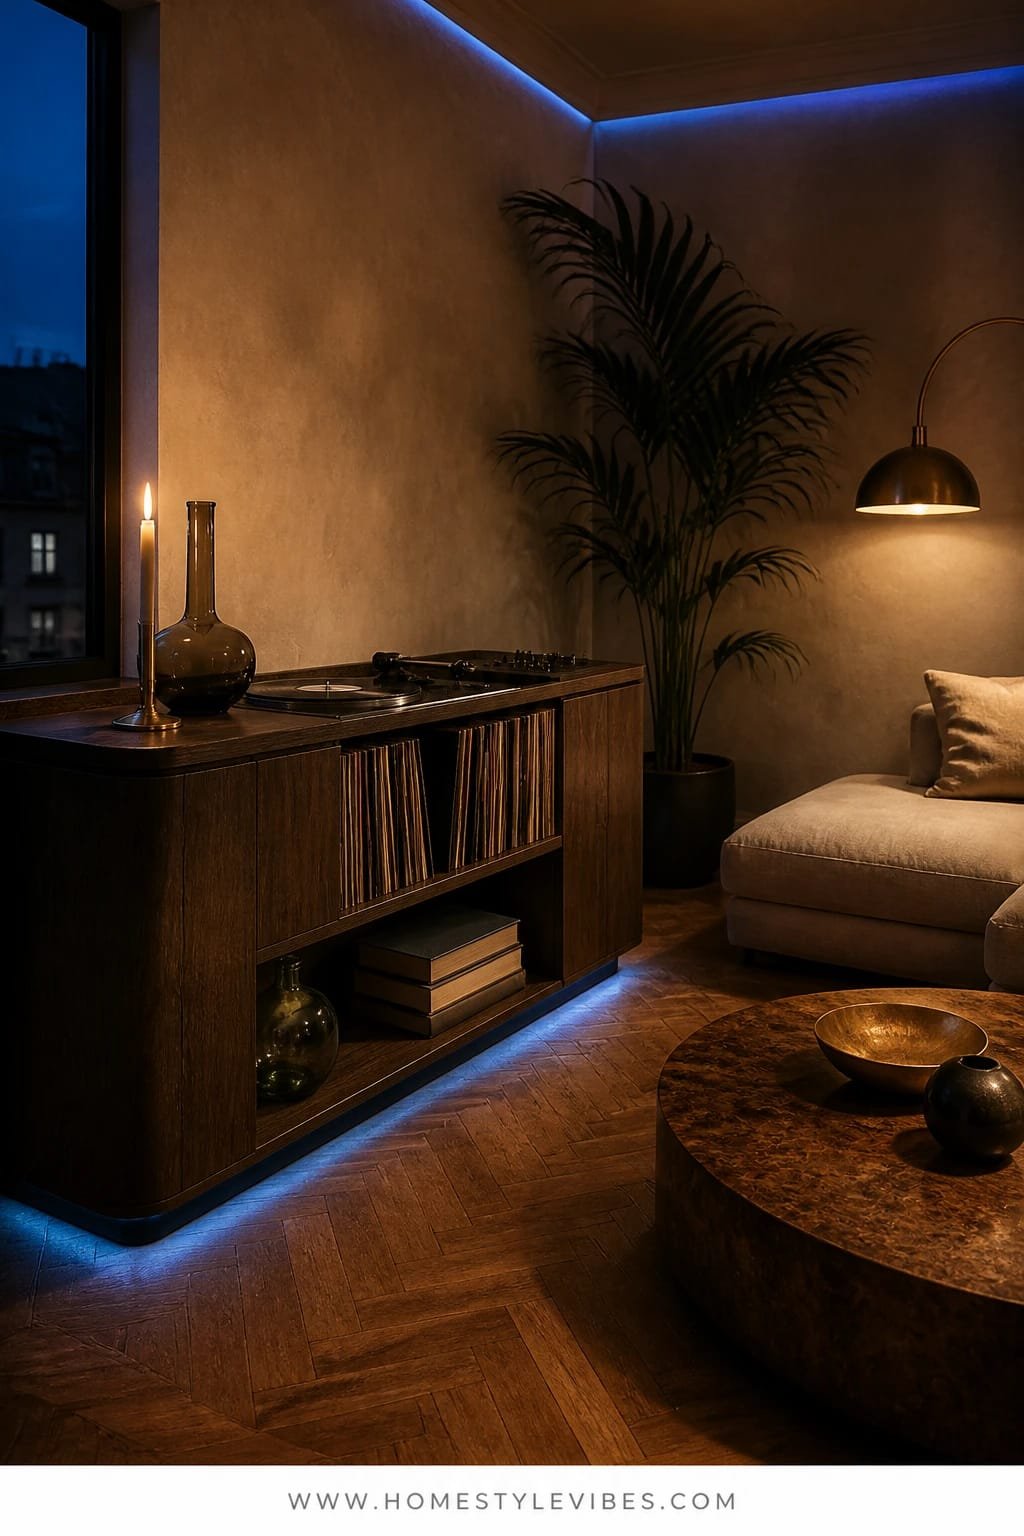
You love a vintage home bar vibe that leans moody and masculine, but your living room veers kid-friendly and bright by day. This is your night mode. Smoked oak cabinetry grounds the space, cool midnight-blue accent lighting marks the perimeter, and the showpiece is a built-in record console that turns mixing drinks into a mini ritual with a soundtrack.
The mood is city loft meets old recording studio—textural, confident, a little secretive when the house lights go low. Smoked oak photographs like a dream, especially with linear backlighting in the 3000–3500K range tweaked toward blue for a nocturnal pulse. It’s also shockingly practical: records hide visual clutter, and doors keep everything kid-safe.
Variations: Budget? Use smoked-oak stain on birch ply and a pre-loved record cabinet. Small-space hack: wall-mount a turntable shelf above a narrow cabinet and run a thin LED channel around the cabinet toe kick. Renter-friendly: freestanding cabinet + battery-powered LED bars.
Budget Breakdown:
- Smoked oak or stained ply cabinetry: $350 – $2,000
- Linear LED channels with dimmable color tuning: $80 – $320
- Turntable shelf or record console: $150 – $1,200
- Matte black hardware and bottle pullouts: $90 – $380
- Acoustic panel art (optional): $120 – $500
Total Estimated Cost: $790 – $4,400
Best For: Open-plan living rooms, lofts, and media rooms. Night owls who cue vinyl, dim the lights, and like a cocktail that matches the track.
Key Design Elements:
- Main materials: Smoked oak, matte black metal, felt or wool
- Color palette: Charcoal, indigo, tobacco, soft graphite
- Lighting strategy: Blue-leaning linear LEDs with low uplight on shelves
- Furniture silhouettes: Blocky cabinets, slim pulls, low, wide console
- Texture layers: Wire-brushed wood, wool felt, matte metal, smooth glass
- Accent details: Record dividers, graphite decanter, black coasters
How To Recreate This Look:
- Start with a low, wide cabinet; add internal dividers for records and bottles.
- Add smoked oak fronts or stain existing doors; choose matte black hardware.
- Layer linear LEDs: toe kick, underside of shelves, and inside a cubby.
- Install a wall-mounted turntable shelf and run cable management cleanly.
- Style with a graphite decanter, two lowball glasses, and a small stack of sleeves.
Why This Looks Expensive: Monochrome restraint. Similar tones across materials create that intentional shadow play designers love. The eye reads depth, not disorder.
Watch Out: Cheap blue LEDs can skew purple and make wood look weirdly cold. Invest in tunable, high-CRI strips so your smoked oak stays rich.
Pro Styling Tip: For photos, pull one record sleeve halfway out—layered diagonals give quiet movement and hint at use without clutter.
6. Glossy Lacquer, Rosy Glow, and a Swiveling Mirror-Back Bar Cart
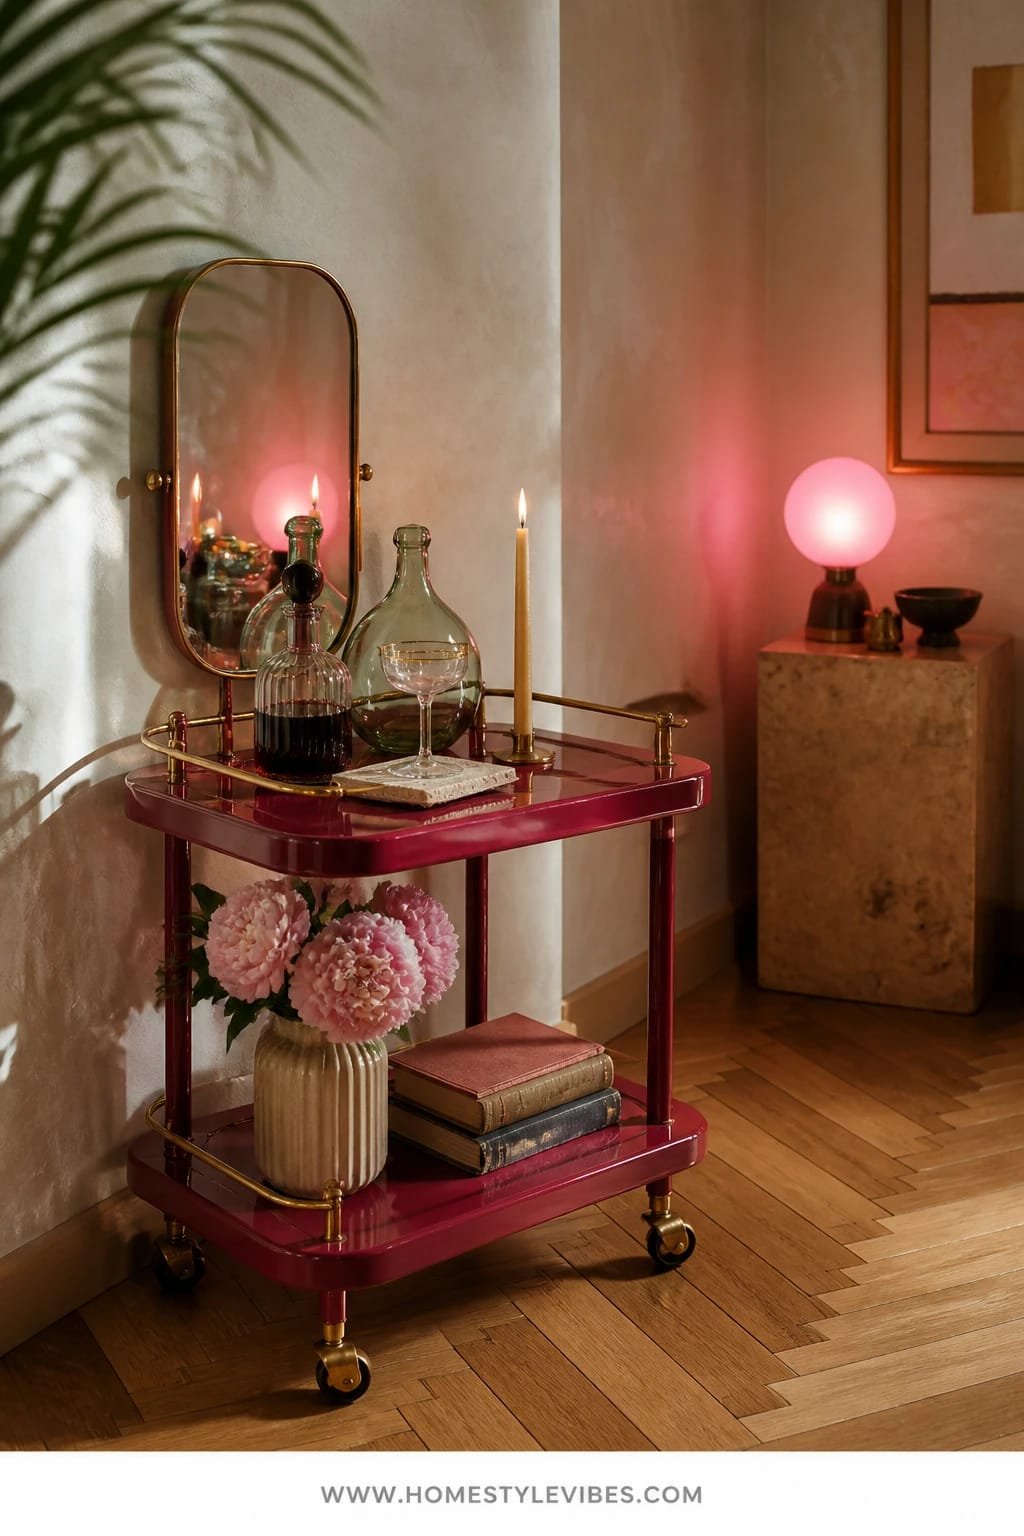
You crave vintage glam but feel stuck with a tiny footprint and a rental agreement. A glossy lacquer finish in a saturated hue turns a small cart into a star. Add rosy glow lighting—think soft-pink-tinted bulbs or a dimmable lamp—and a swiveling mirror-back attachment so you can bounce light wherever the party happens.
This reads 1960s cocktail party in the best way: playful, polished, and ready to roll. Gloss reflects just enough to feel luxe; mirror keeps the setup bright and airy, even in tight spaces. It’s wildly photogenic because the light scatters across glass and lacquer, creating little highlights that feel festive. Plus, you can move it from living room to balcony without drama.
Variations: Budget and renter-friendly by default. If you want a deeper vibe, choose oxblood or evergreen lacquer with smoked mirror; for sweet and feminine, blush or coral with clear mirror. Small-space tweak: foldable cart with removable tray tops.
Budget Breakdown:
- Bar cart (metal or wood): $90 – $600
- Lacquer paint or high-gloss enamel: $45 – $180
- Swivel mirror attachment or DIY pivot with small round mirrors: $40 – $160
- Soft-pink bulbs or dimmable table lamp: $20 – $120
- Cocktail set in brass or chrome: $35 – $150
Total Estimated Cost: $230 – $1,210
Best For: Studios, rentals, and anyone who hosts in multiple rooms. Great for holiday parties and quick pre-dinner drinks.
Key Design Elements:
- Main materials: High-gloss lacquer, mirror, polished metal
- Color palette: Blush or oxblood, rose gold, ivory, clear glass
- Lighting strategy: Rosy-tinted bulbs or lamp at eye level
- Furniture silhouettes: Slim, rounded edges, swivel elements
- Texture layers: Glossy paint, crisp linen napkins, faceted glass
- Accent details: Retro ice bucket, citrus pick set, petite vase with one rose
Why This Feels Designer: The mobile jewel-box effect. High gloss plus tiny doses of metal and mirror create sparkle zones that look intentional, not busy.
How To Recreate This Look:
- Start by lightly sanding your cart and applying two to three coats of high-gloss enamel.
- Add a small swivel mirror to the back post or mount a pivoted makeup mirror.
- Layer a soft-pink bulb in a petite lamp or use color-tuned smart bulbs.
- Install felt liners on shelves to quiet glass clinks and protect finish.
- Style with a retro ice bucket, one decanter, and color-coordinated bitters bottles.
Don’t Do This: Avoid overcrowding the top shelf. Leave negative space for a shaker and a cutting board when you’re actually mixing. You need working room.
Pro Styling Tip: Angle the mirror to catch lamp light and bounce it onto the bottle labels—the little “glint” lines read expensive in photos.
Honest moment: I once lacquered a cart at 10 p.m. and realized at midnight that my gloss looked streaky under morning sun. Solution? A final light roll with a foam roller and patience between coats. Sometimes the “wow” finish just needs an extra hour.
Perspective check: You don’t have to redo a whole room. One strong material, one flattering light, and one statement piece create 80% of the vibe. That’s the move every time.
Quick Checklist
- Choose one hero material: walnut, marble, aged mirror, terra-cotta, smoked oak, or lacquer
- Commit to a single lighting mood: amber, moonlit cool, candlelit, sun-washed, midnight blue, or rosy
- Add one statement piece: curved waterfall counter, gooseneck sconce, steel cabinet, rattan pendant, record console, or mirror-back cart
- Limit visible bottles to four; store the rest
- Use high-CRI, dimmable LEDs matched to your palette
- Introduce one soft textile: linen runner, leather mat, or wool pad
- Repeat metal finishes once for cohesion
- Leave negative space for mixing and for the eye to rest
- Test the lighting at night with glassware before finalizing
- Style one organic element: herb, olive branch, or single rose
Frequently Asked Questions
How do I create a vintage home bar look on a tight budget without it feeling cheap?
Pick one hero move and keep everything else quiet. For example, do fluted MDF and warm LEDs, or a single honed stone remnant with a great sconce. Edit bottles down, use a linen runner, and keep hardware consistent. The restraint is what feels luxe.
My apartment is tiny—where can a vintage home bar even go?
Use the end of a console, a hallway niche, or a floating shelf above a cabinet. Bar carts with plugs for lamps are golden in studios. Think vertical: one shelf, one sconce, one tray. Hide backups in a bin below.
I’m nervous about maintenance—won’t marble and terra-cotta stain?
Honed marble and terra-cotta need sealing and microfiber care. If you prefer low-maintenance, use porcelain lookalikes or laminate for counters and ceramic for backsplashes. You’ll still get the vibe without babysitting.
What lighting temperature should I use to make people look good at night?
Stick to warm-to-neutral ranges: 2200–2700K for cozy amber lounges; 3000K for cool, crisp marble and mirror. Always dimmable. Cheap LEDs skew green—choose high-CRI (90+) so skin tones and wood stay flattering.
I rent—how can I get the vintage glam look without drilling everywhere?
Use plug-in sconces, peel-and-stick tile, and freestanding cabinets or carts. Mirror film, removable hooks, and battery LED bars can create layered light without holes. Keep your best pieces mobile so you can take them with you.
Final Thoughts
Pick one idea and start. Maybe it’s a fluted panel with amber light, or a single brass sconce over a stone slab that makes your glassware sparkle. When you keep the palette tight and the lighting intentional, even a 36-inch corner can feel like a private lounge.
The truth is, luxury at home isn’t about more stuff. It’s about texture, lighting, and restraint. One hero material, one flattering glow, and a statement piece that earns attention—this is how your vintage home bar reads timeless, not trendy.
Trust yourself. Choose the corner, test the light at night, and commit. You’ll pour that first drink, catch the little glint in the glass, and think: yep, this is exactly the vibe.