6 Pergola And Shade Structure Ideas For A Cool Stylish Outdoor Space This Summer
You want a breezy, sun-drenched patio that feels like a summer escape. You hate baking under harsh midday glare, sweat trickling down your back, cushions scorching hot, and drinks melting in minutes. Imagine dappled light skimming over cool stone, canvas gently billowing, and a soft breeze running through warm wood slats. These 6 pergola and shade structure ideas solve the heat struggle and get you to a calm, camera-ready outdoor space in as little as one weekend and under a set budget per design.
If you’re done with the “we’ll just use the umbrella” plan that never quite shades where you need it, this is your sign. Expect real fixes: shade that actually moves with you, colors that don’t fade weirdly, and silhouettes that look high-end in photos. These ideas are especially good if you host, love a good alfresco dinner snap, or just want to read a paperback without squinting. Let’s build the vibe you’ve been imagining, but smarter and cooler.
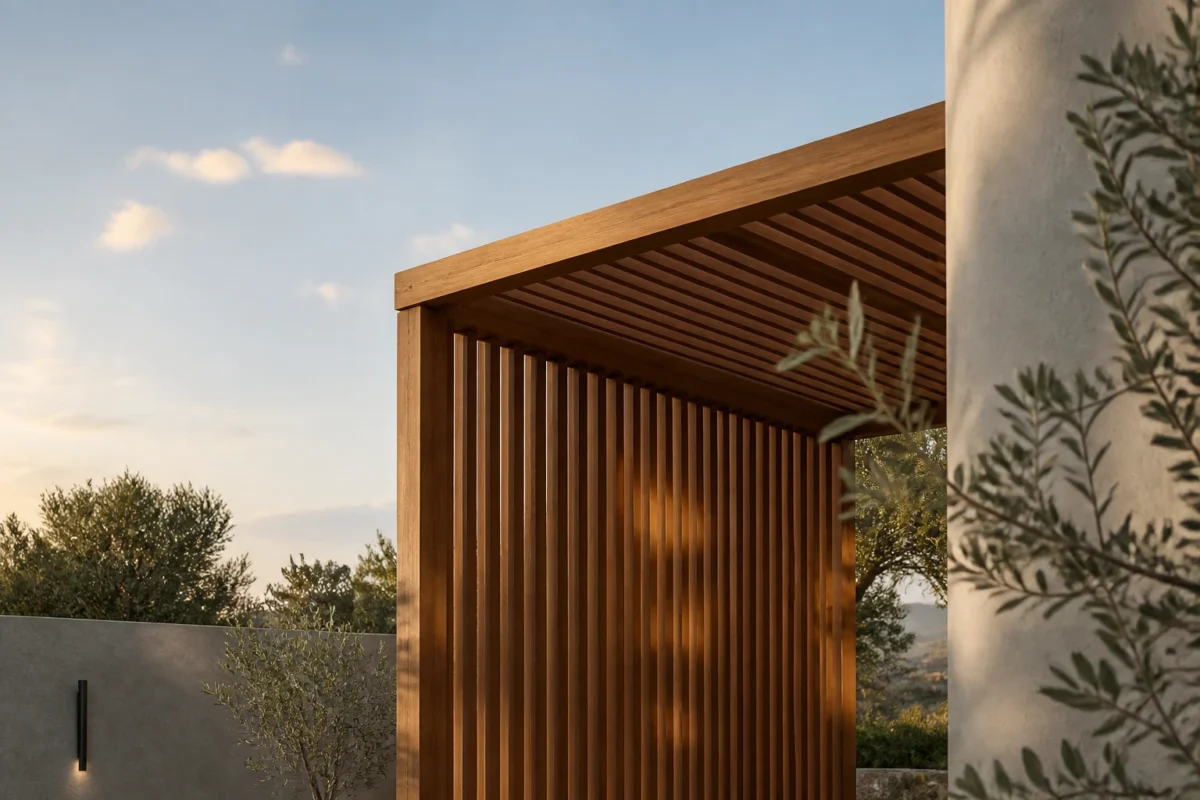
1. Warm Cedar Slatted Pergola With Dappled Afternoon Light and a Built-In Bench
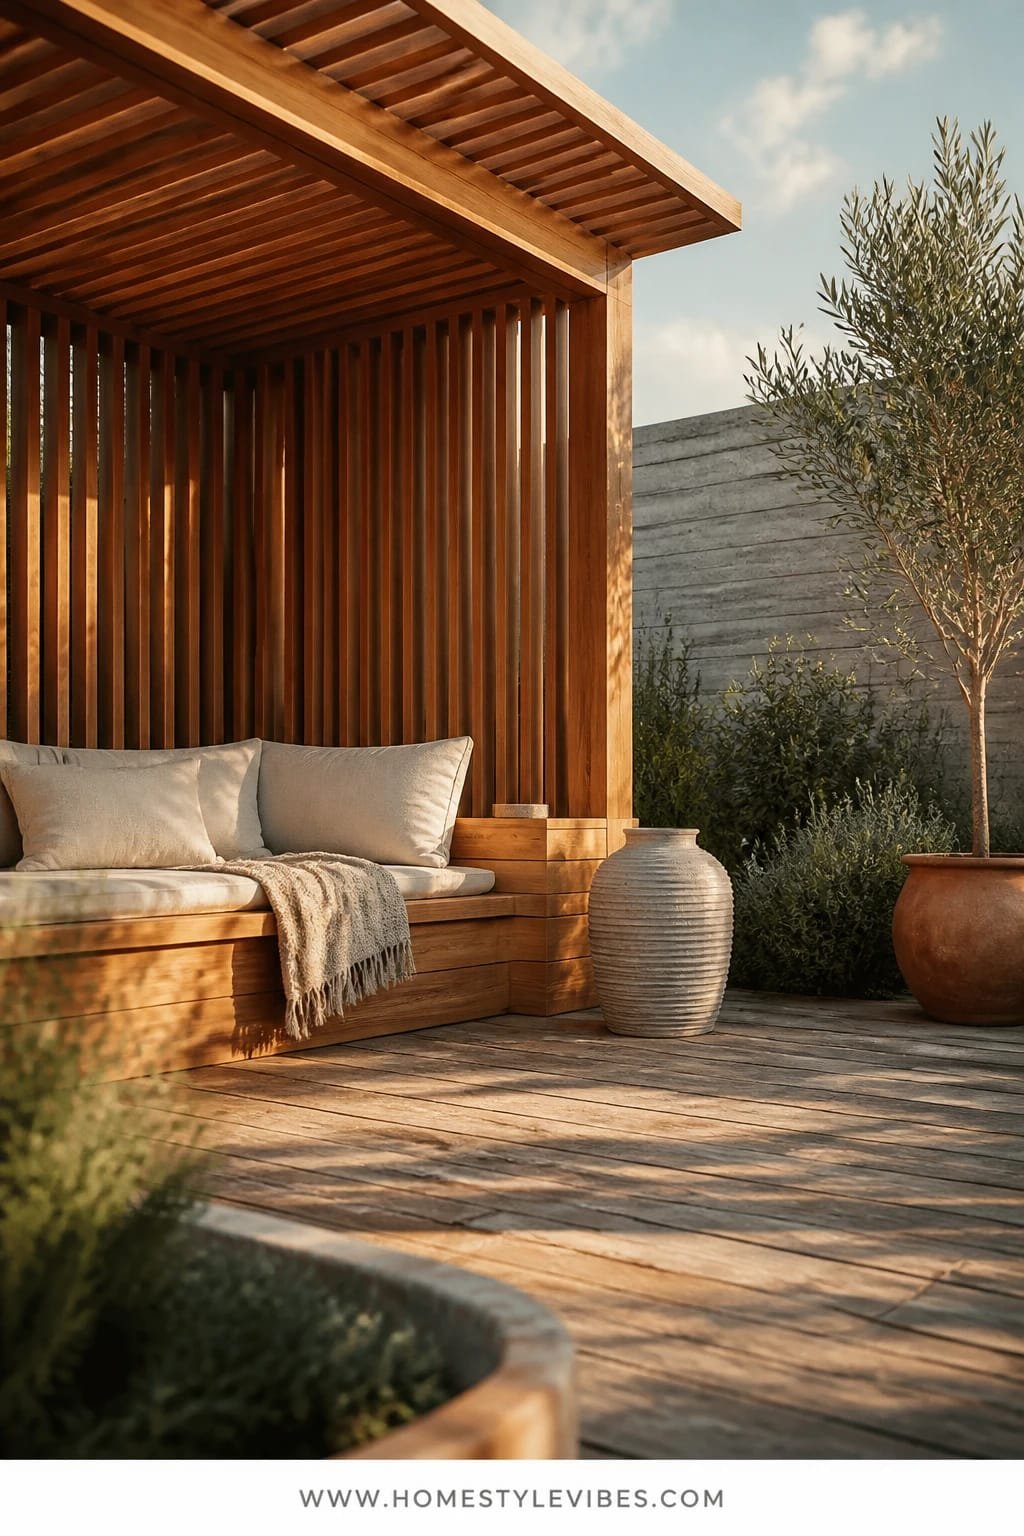
We’ve all been there: the deck is gorgeous at 9 a.m., then by 1 p.m. it’s a full-on broiler. You’ve tried tilting the umbrella every 20 minutes, but it still leaves one chair roasted and someone ends up in a baseball cap at dinner. This cedar slatted pergola anchors your whole outdoor room, scans as architectural, and solves the hot-spot issue with layered, dappled light. Mood-wise, think modern Mediterranean meets craftsman warmth: wood grain, soft shadows, and a grounded built-in bench that turns into the house favorite seat.
Why it works in real homes: cedar is naturally rot-resistant, takes stain beautifully, and ages into a silvery patina that looks expensive without fuss. The slatted roof creates moving shade that photographs like a dream—those soft stripes across a linen tablecloth? Chef’s kiss. If you’re worried about small spaces, the built-in bench hugs the perimeter so you can seat more people without cluttering the area with bulky chairs. Lighting note: run low-voltage LED strips under the bench lip to float the seat at night—warm white only for hospitality glow.
Variations: For a budget-friendly take, use pressure-treated pine stained a warm medium brown; swap the built-in bench for a long freestanding bench with concealed storage. In a renter-friendly scenario, create a freestanding pergola kit that doesn’t require ledger attachment and bring in a modular bench. For a darker, dramatic look, stain the cedar espresso and pair with bone-colored cushions and matte black planters.
Budget Breakdown:
- Cedar lumber and hardware: $900–$1,800
- Built-in bench materials and cushions: $300–$900
- Low-voltage LED strip lighting and transformer: $120–$350
- Outdoor stain/sealant and brushes: $60–$140
- Planters and greenery: $120–$300
Total Estimated Cost: $1,500 – $3,490
Best For: Small-to-medium patios needing anchored seating and soft shade. Homeowners who like warm, natural materials and a space that still feels open.
Key Design Elements:
- Main materials: Cedar, powder-coated screws/bolts, performance fabric cushions
- Color palette: Honeyed wood, off-white, olive green, matte black accents
- Lighting strategy: Under-bench LED glow + two wall sconces at warm 2700K
- Furniture silhouettes: Built-in linear bench, slim-profile dining chairs, simple bistro table
- Texture layers: Slatted shadows, nubby outdoor linen, woven jute-look rug (polyprop)
- Accent details: Climbing jasmine on one post, black steel brackets, a single sculptural lantern
How To Recreate This Look:
- Start with a simple 4-post pergola layout and confirm footings or deck anchoring.
- Add 2×2 or 2×3 cedar slats spaced 1–2 inches apart to control the dapple effect.
- Layer in a perimeter bench with hidden storage for cushions and blankets.
- Install warm LED strips under the bench lip and a dimmer for evening mood.
- Style with pale cushions, a woven rug, and one tall planter to break up the wood.
Why This Looks Expensive: Proportion and restraint. The built-in bench reads custom, the slat spacing feels intentional, and the warm light underlines the architecture without shouting.
Watch Out: Don’t space the roof slats too close. You’ll lose the shifting light (and it may trap heat). Also seal cut ends of lumber to prevent uneven aging.
Pro Styling Tip: Angle your dining table 10–15 degrees relative to the slats so the light stripes cross the tabletop—not parallel—for depth in photos.
Keep scrolling—next up is for anyone who loves breezy fabric and a beachy nap vibe.
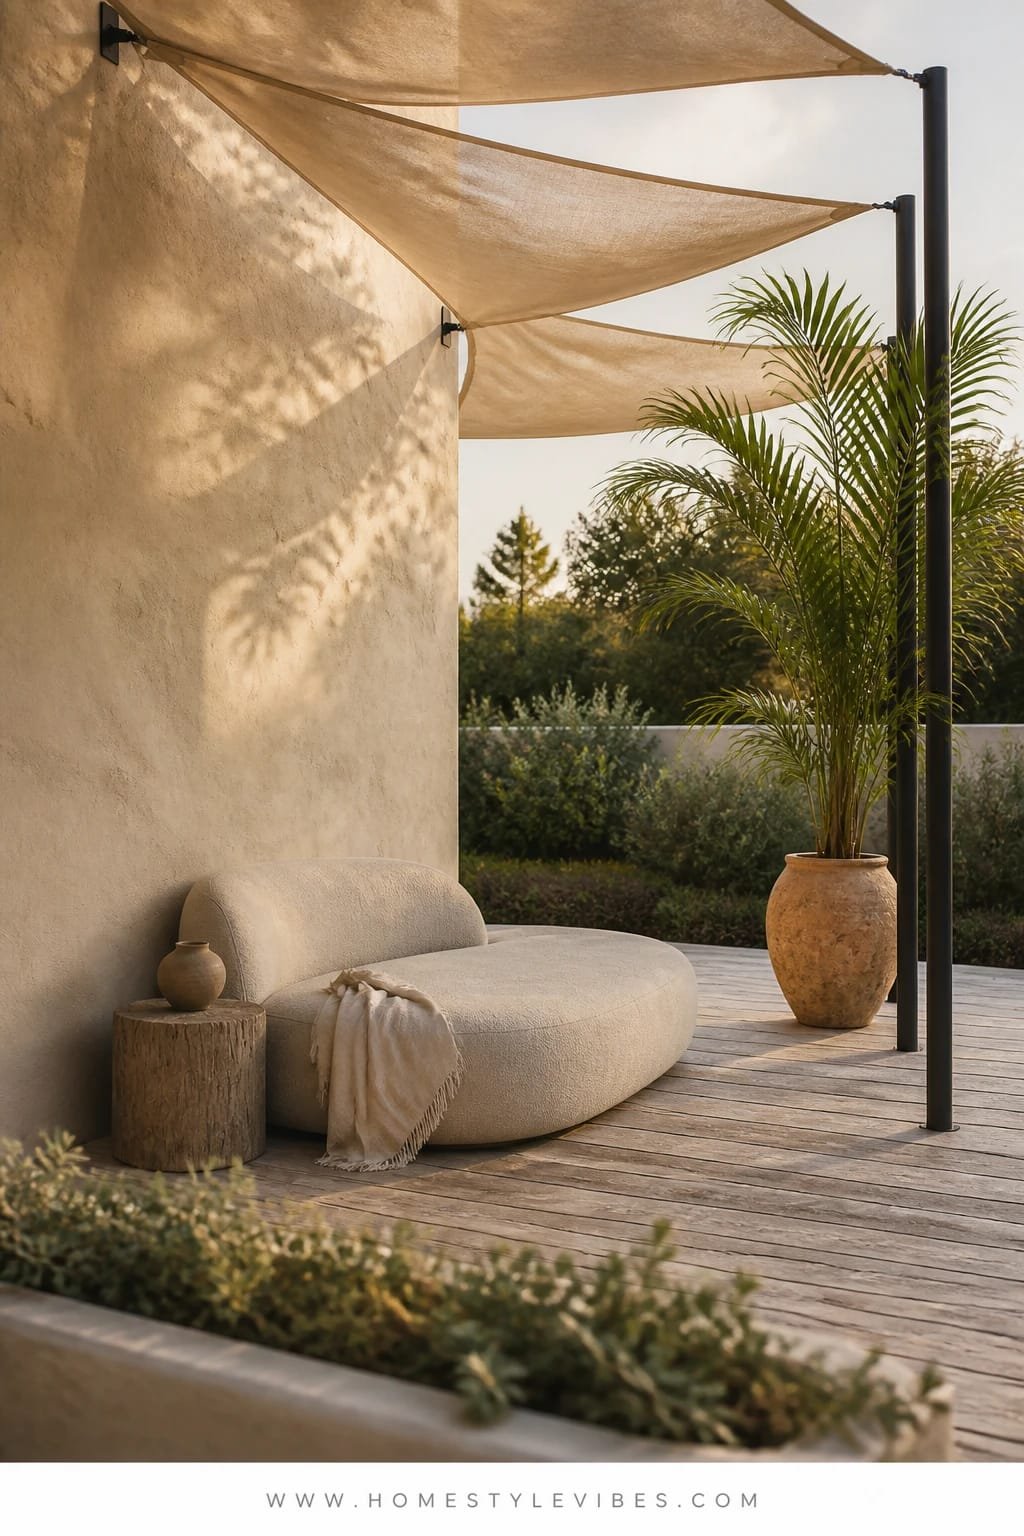
2. White Canvas Sail Shade With Cool Diffused Light and a Low Teak Lounge Set
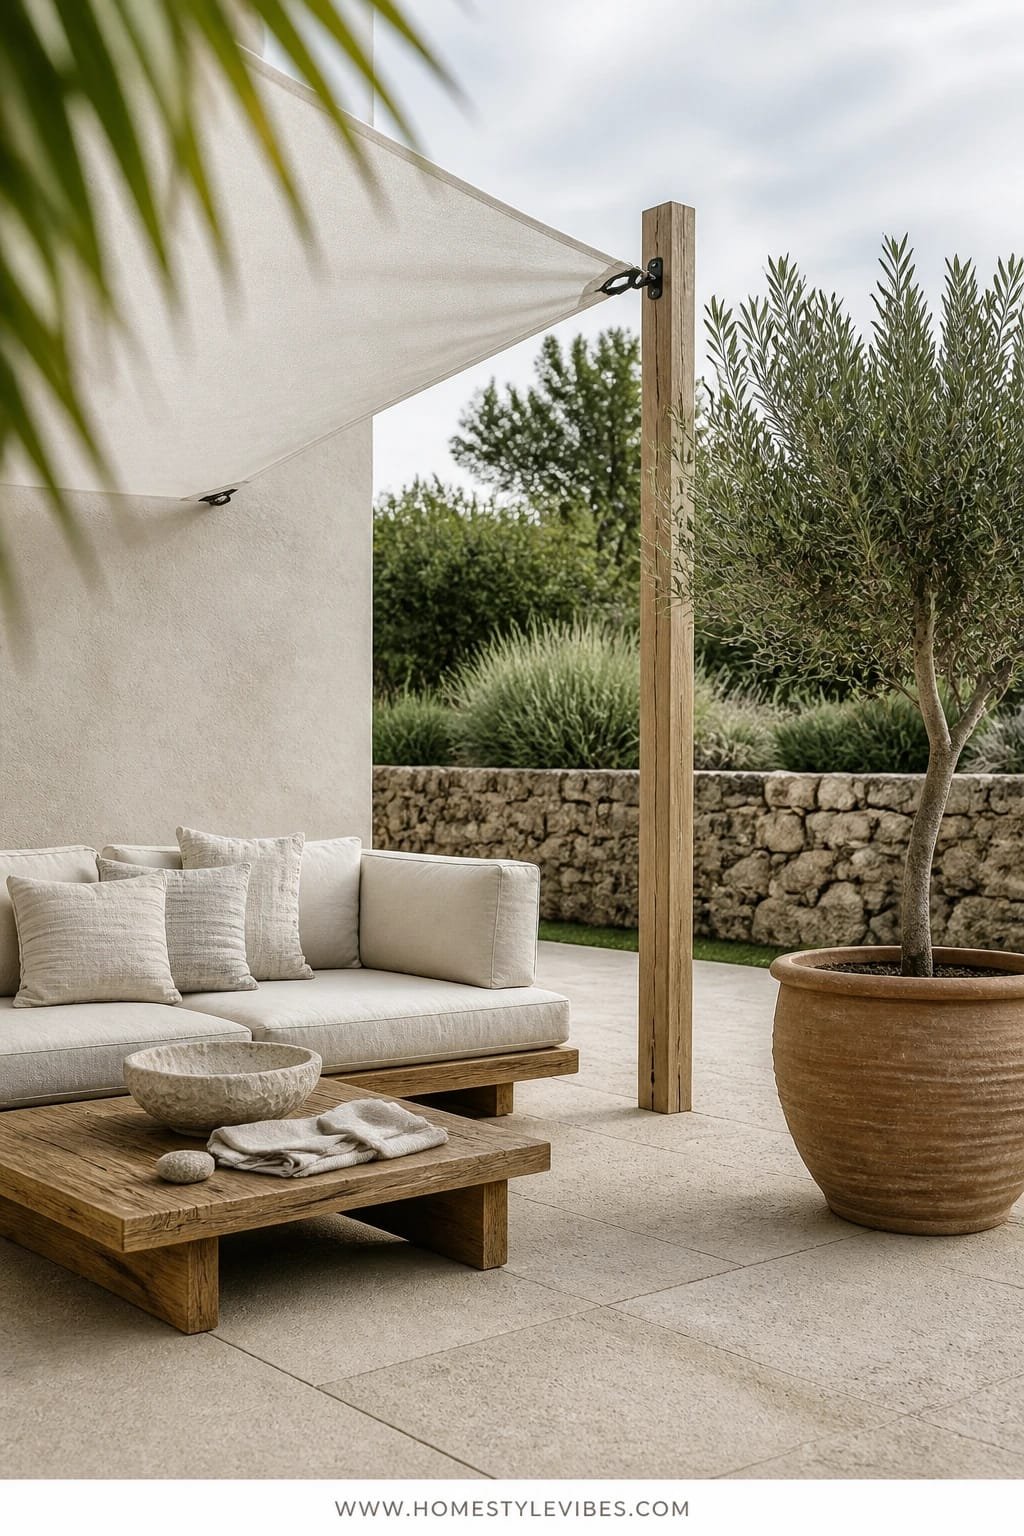
It’s that one corner that always feels off: too bright to be comfortable, too bland to be beautiful. You’ve tried a typical umbrella—clunky base, limited reach, not cute in photos. A tensioned white canvas sail pulls shade exactly where you want it and turns glare into a softbox for your patio. The vibe? Coastal-chic with a hush: crisp white, cool diffused light, and a low teak lounge that invites afternoon naps and sunset spritzes.
Here’s why it works at home: sail shades are flexible, renter-adjacent, and shapeable. You can angle them to block a neighbor’s second-story view or create a clean triangle that leads the eye toward your seating. Maintenance is simple if you choose UV-stable fabric and hose it seasonally. Teak brings the grounding warmth; white canvas balances with airiness. Photographing under a sail shade is like shooting under a giant diffuser: even skin tones, soft shadows, zero squinting. Perfect for dinner photos that don’t blow out the highlights.
Variations: For a budget-friendly version, use a high-quality polyester sail; for small spaces, choose a petite triangular sail and a two-piece loveseat set. Want moodier? Swap white for sandy khaki or soft gray and add charcoal cushions. Renter-friendly swap: use weighted planters with metal poles so you don’t drill into the house.
Budget Breakdown:
- UV-rated sail shade + stainless hardware: $120–$380
- Mounting poles or wall plates: $80–$220
- Low-profile teak lounge set: $600–$1,600
- Outdoor cushion set in performance fabric: $150–$450
- Planters and pole weights (if freestanding): $120–$300
Total Estimated Cost: $1,070 – $2,950
Best For: Courtyards, patios with tricky sun angles, and anyone prioritizing soft, photogenic light for afternoon hangs.
Key Design Elements:
- Main materials: UV-rated canvas, stainless steel tensioners, teak, performance linen-look cushions
- Color palette: White, sand, cool gray, weathered teak
- Lighting strategy: Add two solar uplights on planters for night drama; keep it minimal
- Furniture silhouettes: Low, wide lounge, armless modules, round side tables
- Texture layers: Canvas tension lines, teak grain, stone or tile underfoot
- Accent details: Striped throw, ceramic tray, a single olive tree in a tall pot
How To Recreate This Look:
- Start by mapping the sun path and choose sail anchor points that block peak glare.
- Add stainless hardware and tension until the sail is taut with a clean pitch for runoff.
- Layer a low-profile teak lounge with pale cushions for a breeze-friendly seat height.
- Install two planters with solar uplights to frame the zone at night.
- Style with a striped throw and one oversized tray for drinks and snacks.
Why This Feels Designer: The diagonals of the sail add architectural energy without bulk, the low lounge reads resort, and the calm palette says intentional restraint.
One Thing To Avoid: Don’t mount all sail points at the same height. You’ll trap heat and water. Stagger at least one high and one low corner for airflow and drainage.
Pro Styling Tip: For photos, rotate the lounge so the sail’s longest edge frames the background—triangles guide the eye and make the space feel larger.
Pause here and breathe. Remember, this isn’t about recreating a showroom. It’s about building a space that actually feels like yours. If one idea resonates more than the others, that’s your starting point. You don’t need all of them.
3. Charcoal Steel Pergola With Golden Hour String Lights and a Concrete Dining Table
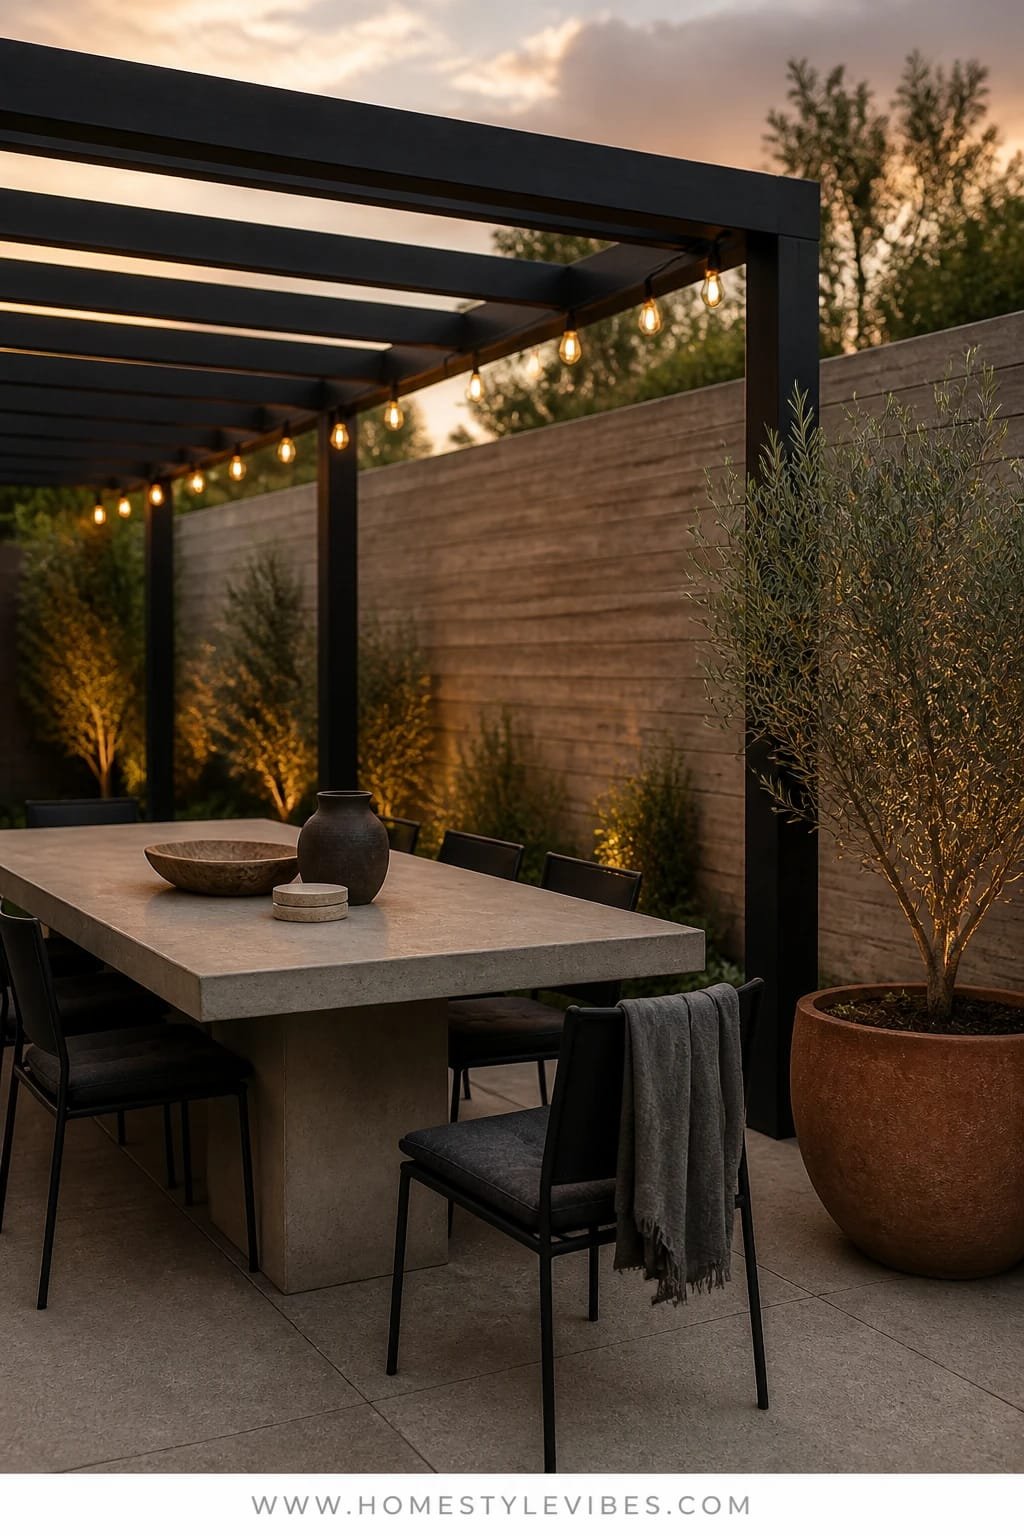
You love hosting but dread the flip from bright sun to pitch-dark backyard. One second you’re plating grilled peaches; the next, you can’t see the serving spoon. A charcoal steel pergola with a simple beam grid makes a strong architectural frame that looks good every hour of the day. Add warm string lights and a chunky concrete dining table to set a cinematic evening mood—think urban courtyard meets Tuscan supper.
Why it works: powder-coated steel handles weather and brings zero warp drama. The dark structure compresses the overhead plane slightly, which actually reads cozy, not cramped, especially paired with glow-y lighting. Concrete tables resist spills, look sculptural, and give just enough heft to balance the steel. For small patios, scale the grid—narrow your beams, keep the posts slim, and let the table be the hero. This setup photographs beautifully thanks to high-contrast edges (dark frame, pale table, warm bulbs) and the sparkle of glassware under string lights.
Variations: Budget option—galvanized metal painted charcoal and a cement-look fiberglass table. Small-space trick—use a 60-inch oval dining table to soften edges. Renter-friendly—opt for a freestanding pergola kit and clamp-on café lights.
Budget Breakdown:
- Powder-coated steel pergola or kit: $1,100–$3,800
- Outdoor-rated string lights: $60–$180
- Concrete or fiberstone dining table: $700–$2,200
- Mixed dining chairs (metal and woven): $300–$1,000
- Rug and table accessories: $120–$350
Total Estimated Cost: $2,280 – $7,530
Best For: Dedicated dining areas, townhouse yards, or anyone who entertains into the night and wants a restaurant vibe at home.
Key Design Elements:
- Main materials: Steel, concrete or fiberstone, woven resin wicker chairs
- Color palette: Charcoal, limestone gray, warm white lights, olive green foliage
- Lighting strategy: Overhead café lights + two lanterns on the table + dimmer
- Furniture silhouettes: Chunky slab table, slim-backed chairs, armless for more seats
- Texture layers: Smooth concrete, matte metal, woven chair backs
- Accent details: Herb planters, linen runner, a low terracotta bowl
Why This Reads High-End: The contrast is doing the heavy lifting. Dark frame, monolithic table, and consistent warm lighting temperatures feel curated and confident.
How To Recreate This Look:
- Start with a 10×10 or 12×12 steel pergola footprint if you can; smaller patios can scale down.
- Add string lights in neat parallel runs; clip them to the beams and keep cable slack minimal.
- Layer a concrete or fiberstone table centered under the brightest light zone.
- Install a dimmer for the lights to shift from dinner to dessert ambiance.
- Style with mixed chair textures and an herb trio for scent and color.
The Most Common Mistake: Mixing light temps. If your string lights are 2700K, match your lanterns. Mismatched color casts make everything look cheaper, especially in photos.
Pro Styling Tip: Add one glossy element on the table—a glazed pitcher or olive oil bottle—for catchlights that make images sparkle after sunset.
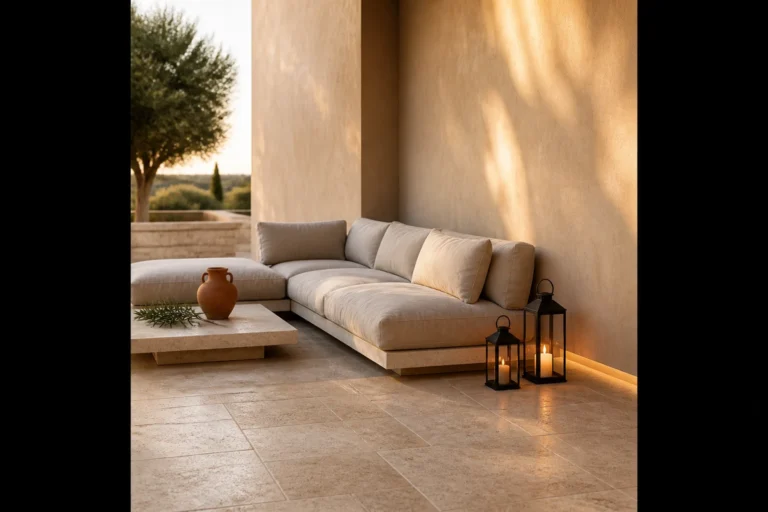
4. Limewash Plaster Canopy Wall With Soft Shade Sails and a Curved Daybed
You’ve got a plain fence line and a patch of deck that feels…flat. You’ve tried bright pillows to “add color,” but it still reads like scattered furniture, not a destination. Enter a limewash plaster canopy wall that runs along one edge, with small sail panels clipped from the wall to slim posts. The dominant material is limewash plaster—velvety, tonal, and wonderfully imperfect. Light quality stays soft and hazy, diffusing hot sun into a calm haze. Anchor the look with a curved daybed for a lounging focal point that people actually use.
In real homes, this works because that raised, textural wall gives your eye something to rest on. It’s forgiving to apply—brushed by hand, a little cloudy—and it looks editorial in every photo. Add a low curved daybed and suddenly the layout communicates purpose: this is the nap zone, the reading corner, the “I’m calling my mom” place. Maintenance is easy: limewash breathes and wears in gracefully; sail panels can be unclipped for storms.
Variations: On a budget, use masonry paint with a limewash effect roller and a faux-plaster topcoat. Small-space version: a half-height curved wall section and a single crescent lounge chair. For a richer vibe, go warm sand on the wall, ivory sails, and rust-toned pillows.
Budget Breakdown:
- Limewash plaster kit or paint + brushes: $150–$400
- Mini sail panels and clips: $80–$240
- Curved outdoor daybed: $700–$1,800
- Post kit or wall anchors: $60–$180
- Pillows and throw: $120–$280
Total Estimated Cost: $1,110 – $2,900
Best For: Side yards, narrow patios, or any area you want to transform into a soft retreat with major visual payoff.
How To Recreate This Look:
- Start by prepping your wall or fence with a smooth base coat; patch holes for a clean canvas.
- Add limewash in cloudy, overlapping strokes; focus on tonal variation, not perfection.
- Layer two small sail panels, clipped at slightly different angles to stagger shade.
- Install a curved daybed centered on the wall and orient it toward the best view.
- Style with three oversized pillows in tonal neutrals and a gauzy throw.
Key Design Elements:
- Main materials: Limewash plaster, canvas sails, aluminum clips, performance fabric
- Color palette: Bone, sand, chalk white, soft terracotta
- Lighting strategy: Wall-grazing solar sconces to highlight texture after dark
- Furniture silhouettes: Curved daybed, rounded side table, low profile
- Texture layers: Velvety wall, gauzy fabric, smooth ceramic
- Accent details: A single trailing vine, clay pot, and a soft outdoor rug
Why This Looks Intentional: The wall sets hierarchy, the sails add movement, and the curve breaks up all the straight lines. It reads like you designed the space, not just furnished it.
Don’t Do This: Don’t pick a wall color too starkly white. It’ll glare in sun and photograph harsh. Choose a warm off-white with depth.
Pro Styling Tip: For photos, spritz the limewash wall lightly with water to deepen color by half a shade—instant moody dimension.
Quick reframe: You don’t need a sprawling yard. Design clarity beats square footage every time. Choose one strong move—a wall, a canopy, a bench—and let everything else orbit around it.
5. Bamboo Reed Pergola With Cool Shade Stripes and a Tiled Bistro Nook
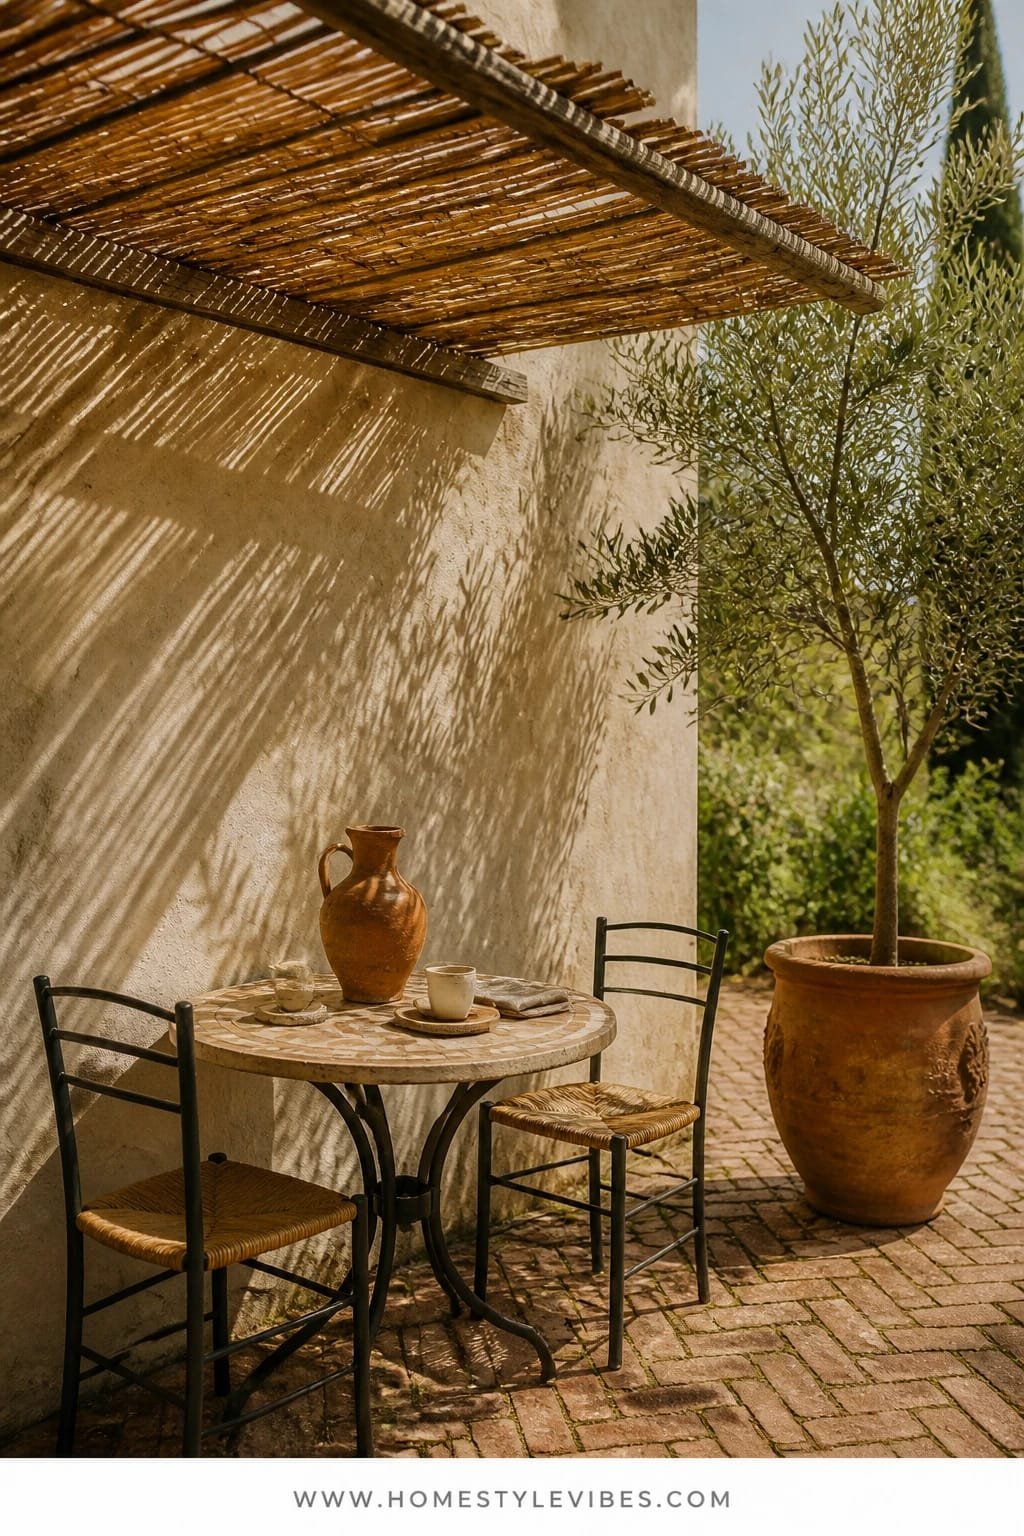
There’s always that breakfast hour when the sun slices through and blinds you right as you sip coffee. You’ve dragged the table three feet left, then right, and it still feels like a waiting room. A bamboo reed pergola filters light into delicate stripes that feel like vacation. Pair it with a small tiled bistro table—mosaic or zellige-look—for a nook that begs for croissants and weekend papers.
Real-home perks: bamboo mats or reeds are light, inexpensive, and easy to replace each season. They keep the space shaded but breezy, which you’ll appreciate when the heat builds by midmorning. The texture on texture—bamboo over patterned tile—gives you that editorial “layered” look without clutter. Photography loves a stripe, and the reed pattern throws soft, lively shadows over your tabletop.
Variations: On a tight budget, staple reed fencing panels to a simple wood frame. Small balcony? Use a narrow reed panel and a half-round wall-mount table. Darker look? Charcoal grout on the tile, black café chairs, and a charcoal cushion on the bench.
Budget Breakdown:
- Wood frame + bamboo/reed mats: $120–$350
- Bistro table (tile or mosaic top): $120–$480
- Two café chairs: $120–$360
- Outdoor cushion or bench pad: $40–$140
- Potted citrus or herbs: $40–$120
Total Estimated Cost: $440 – $1,450
Best For: Small patios, balconies, and anyone who wants instant charm with minimal tools and a weekend install.
Key Design Elements:
- Main materials: Bamboo reed, pine or cedar frame, ceramic tile
- Color palette: Warm straw, white, mint or sky blue, terracotta pots
- Lighting strategy: One petite pendant or a clamp light with warm bulb
- Furniture silhouettes: Round table, curved-back chairs, foldable options
- Texture layers: Reed stripes, glossy tile, soft cushion
- Accent details: Lemon tree in a pot, striped napkins, vintage sugar bowl
How To Recreate This Look:
- Start by installing a simple two-beam frame overhead to support reed mats.
- Add reed panels with zip ties or stainless staples, overlapping seams neatly.
- Layer a small round bistro table and two chairs to keep circulation open.
- Install a clamp light to the beam for pre-dawn coffee glow.
- Style with a citrus plant and a patterned tray—keep decor functional and cute.
Why This Looks Expensive: It’s the pattern play. Fine-grain shadows over a glossy tile top mimic boutique cafés. Plus, restraint—just three materials—keeps it chic.
Watch Out: Don’t let the reed run too close to your exterior wall lights; keep clearances for safety and replace panels if they sag after storms.
Pro Styling Tip: Shoot from a low angle so the bamboo lines converge overhead; it adds drama and makes the nook read bigger.
6. Slatted Aluminum Pergola With Adjustable Shade, Soft Neutral Light, and a Built-In Outdoor Kitchenette
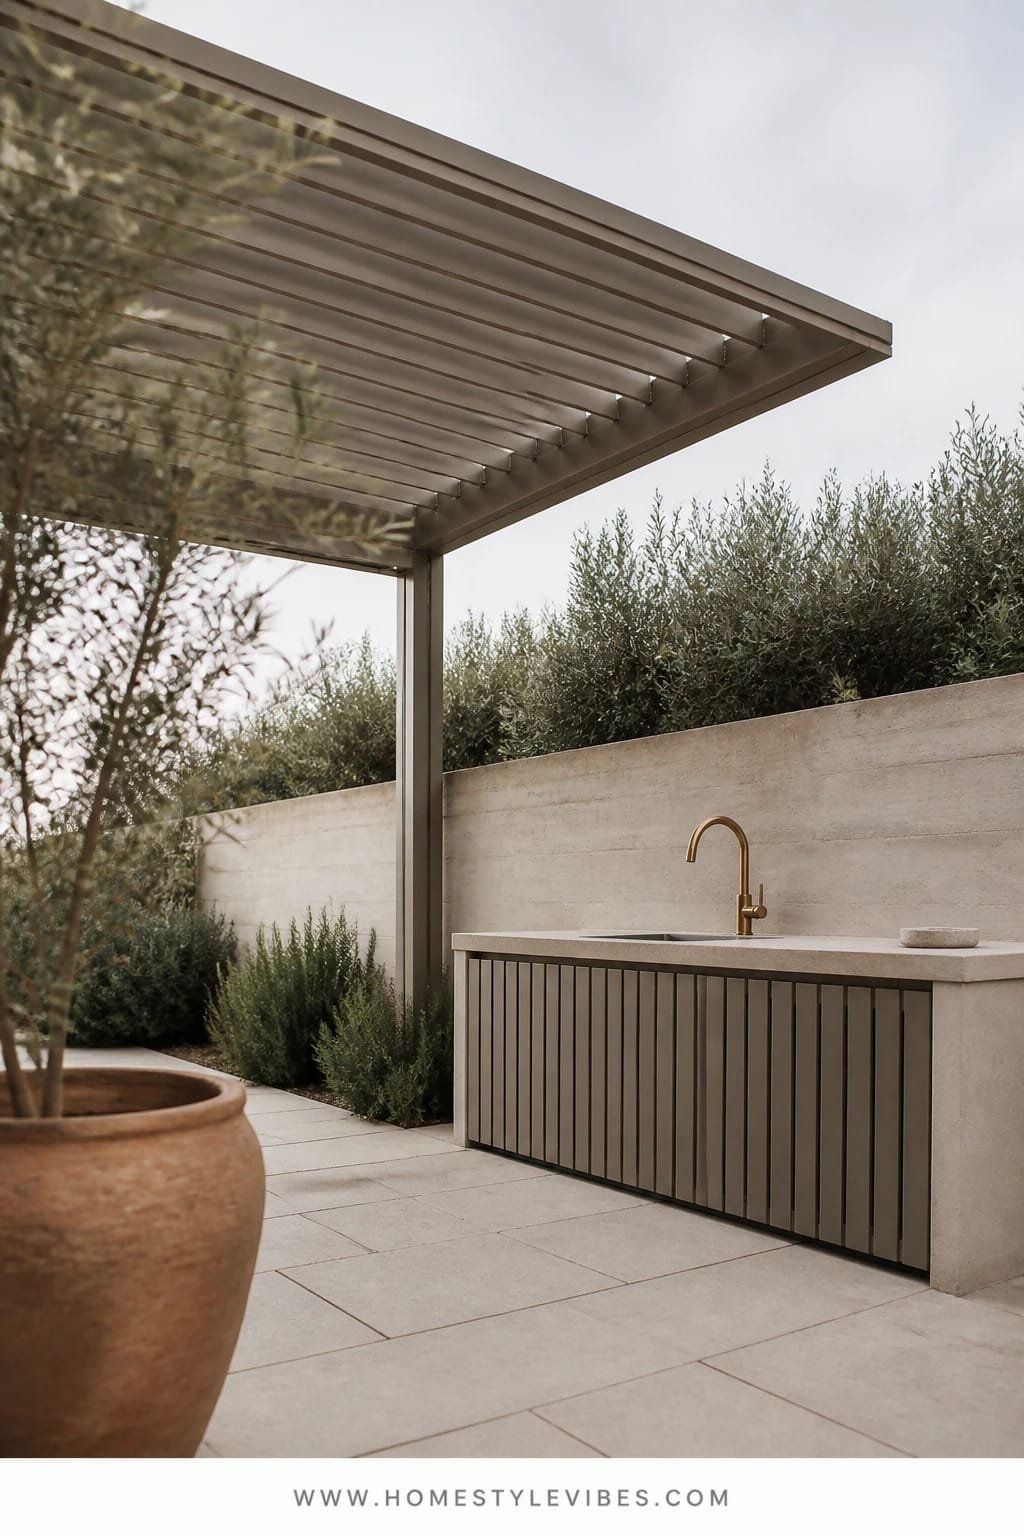
You want flexibility—the ability to host brunch in filtered light and then open up for stargazing. You’ve considered umbrellas, but they never feel integrated, and the bases trip everyone. A slatted aluminum pergola with adjustable louvers gives you fingertip control over sun and rain, and it looks architectural without heavy maintenance. Pair it with a compact outdoor kitchenette: a slim counter, a small sink, and a mini-fridge tucked behind slatted doors.
Here’s why this setup wins in real life: aluminum doesn’t warp, louvers shed rain at the right angle, and the whole thing reads like a proper room outside. Soft neutral light through slightly open slats creates those cinematic shadows on countertops (hello, cocktail hour). If resale matters, this structure adds perceived square footage. Small yard? Keep the kitchenette to a 4–6 foot run and skip upper cabinets. For renters, modular freestanding kitchens with caster wheels plus a smaller louvered pergola kit make it doable.
Variations: Budget-friendly—manual-louver kits and a butcher-block-look composite counter. Darker, moodier version—graphite pergola, taupe cushions, bronze hardware. Coastal twist—off-white frame, driftwood-tone doors, and blue-gray textiles.
Budget Breakdown:
- Adjustable aluminum pergola (manual or motorized): $2,000–$8,500
- Compact outdoor kitchenette (sink, counter, storage): $900–$3,500
- Outdoor stools or slim dining set: $300–$900
- LED strip or puck lighting under counter: $80–$220
- Weatherproof slatted doors or panels: $200–$600
Total Estimated Cost: $3,480 – $13,720
Best For: Year-round patios, serious entertainers, and homeowners who want structure plus function without constant upkeep.
Key Design Elements:
- Main materials: Powder-coated aluminum, composite counter, stainless sink
- Color palette: Greige, warm white, graphite, eucalyptus green
- Lighting strategy: Integrated LED along beams + task lighting at the counter
- Furniture silhouettes: Slim bar stools or a narrow cafe table, clean lines
- Texture layers: Slatted shadows, matte metals, stone-look counters
- Accent details: Brass or black pulls, eucalyptus branches in a pitcher, ribbed glasses
Why This Feels Designer: It’s the integration. Shade, seating, and service zone form a single, coherent story—no random pieces, no visual noise.
How To Recreate This Look:
- Start by selecting a pergola size that frames your existing patio footprint.
- Add louvers angled to your climate—slightly pitched for rain, flatter for winter sun.
- Layer a compact kitchenette against one post line; hide utilities cleanly with conduit covers.
- Install LED strips along the main beams and under the counter for task lighting.
- Style with two or three stools, a neutral outdoor rug, and one sculptural plant.
The Most Common Mistake: Overfilling the zone. If you’re adding a kitchenette, keep furniture low-profile; visual breathing room makes the structure feel custom, not crowded.
Pro Styling Tip: For photos, crack the louvers just enough to create diagonal shadows across the counter—instant depth and that “summer-at-6pm” magic.
I’ll be honest: dialing louvers to the perfect angle is a little fiddly the first week. Stick with it. Once you learn your sun patterns, it becomes second nature—like finding your favorite burner on the stove. I installed a manual-louver pergola for a friend last summer; we laughed about how he treated it like a giant camera aperture. Now he sets it by feel and his patio is always the favorite hangout.
Quick Checklist
- Cedar slats for warm dappled shade
- White sail shade for diffused light
- Charcoal steel frame for high contrast
- Limewash wall for soft, tonal texture
- Bamboo reed panels for stripe shadows
- Adjustable aluminum louvers for control
- Built-in bench to anchor seating
- Low teak lounge for resort vibes
- Concrete or fiberstone dining table
- Curved daybed as a focal piece
- Tiled bistro table for morning rituals
- Compact outdoor kitchenette for function
- Warm 2700K LEDs for evening glow
- Planters to soften structure lines
- Performance fabrics in off-whites and sands
- Dimmer switches for mood control
- Test stains and paints in direct sun
- Match light color temperatures
- Leave breathing room—avoid clutter
- Map your sun path before installing
Frequently Asked Questions
How do I choose between a pergola and a sail shade for my small patio?
Pick based on permanence and light quality. If you rent or want flexibility, go sail shade—it’s easier to mount and adjust. If you own and want an “outdoor room,” choose a pergola. For tight spaces, a light visual profile (sail or thin posts) keeps it from feeling crowded.
What’s the best way to keep fabrics and cushions from fading?
Choose solution-dyed acrylic or polyester fabrics rated for UV exposure, and store cushions when not in use. Position seating out of direct midday sun if possible. FYI, warm neutrals fade less harshly than saturated brights.
I’m on a strict budget—what gives me the biggest visual change fast?
Bamboo or reed panels over a simple frame plus a small bistro table. It’s low-cost, installs in an afternoon, and the shadow pattern is the part that makes the biggest visual difference. Add one planter for height and you’re set.
How do I avoid a cluttered look when adding shade and furniture?
Anchor with one hero move (pergola, wall, or louvered canopy). Keep furniture lines clean and low, and repeat materials to tie it together. Leave at least 30–36 inches of circulation around dining areas so the space breathes.
What are common mistakes with lighting in outdoor shade structures?
Mixing color temperatures, placing lights too high without dimming, and skipping indirect glow. Use 2700K warm light, add dimmers, and place LEDs under benches or along beams to graze surfaces instead of spotlighting faces.
Wrap-Up: Your Summer Shade, Solved
Pick one idea that fits your life and your sun pattern. Maybe it’s the cedar slats with a built-in bench that finally makes your deck the “good seat,” or the crisp sail shade that turns blinding glare into soft, flattering light. Keep the focus tight: one main material, one consistent light temperature, and furniture that supports how you actually spend time outside.
The truth is, luxury outdoors comes from texture plus lighting plus restraint. Slatted shadows, soft neutrals, and a few strong lines will always beat fifteen mismatched pieces and harsh bulbs. Start small, install thoughtfully, and let the space evolve as you live in it.
You’ve got this. Your cool, stylish outdoor space is absolutely within reach—and it’s going to feel like the summer you’ve been craving. Now grab a tape measure, map that sun path, and claim your shade.