5 Backyard Pool And Patio Ideas For The Most Stunning Summer Retreat
You want a backyard that feels like a sunlit vacation—linen cushions, cool stone underfoot, the sound of water and ice clinking in a glass. You hate that yours currently reads more “lawn chair graveyard” than “summer retreat.” Imagine soft evening glow on textured walls, breezy textiles that actually dry fast, and patio pieces that look like they belong on your favorite design feed. These five backyard pool and patio ideas tackle the exact frustrations that make outdoor spaces feel messy or unfinished and turn them into something photogenic and practical in under six weekends and often for less than $8,000. If you crave a magazine-style vibe that still works for cannonballs and sunscreen stains, this is your blueprint.
Expect high-contrast moments, layered textures, and lighting that flatters people, not just the patio. Each design fixes a real pain point—awkward furniture layouts, blinding sun, boring tile, high-maintenance wood—while giving you a backyard that actually looks good in real life. These are highly Instagrammable, family-friendly, and built for long, dreamy evenings. If you love the look of boutique hotels and quiet luxury, you’ll love these.
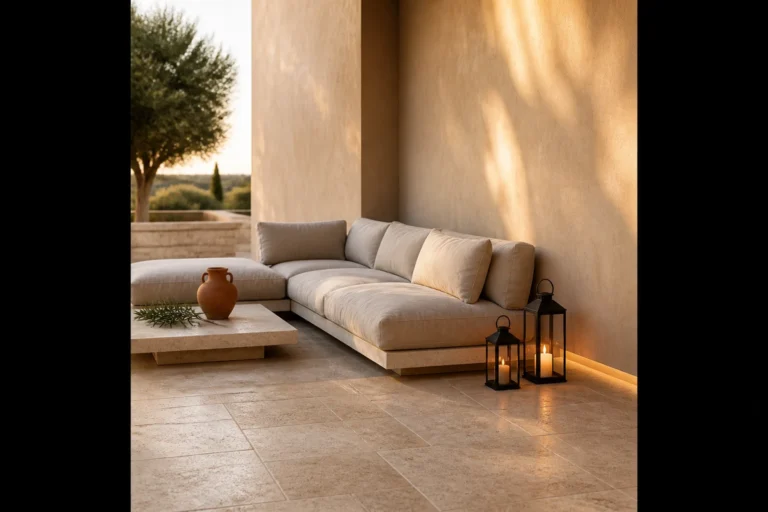
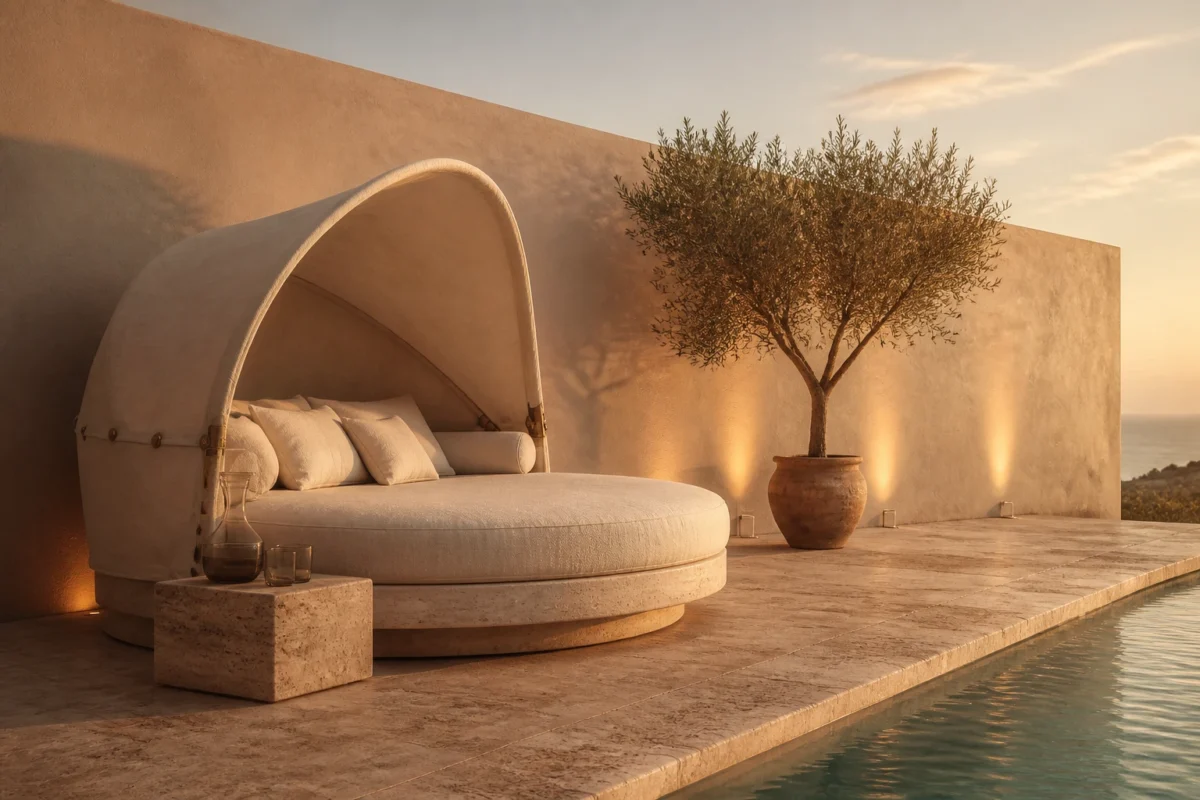
1. Travertine Terraces, Honeyed Sunset Light, and a Curved Canopy Daybed
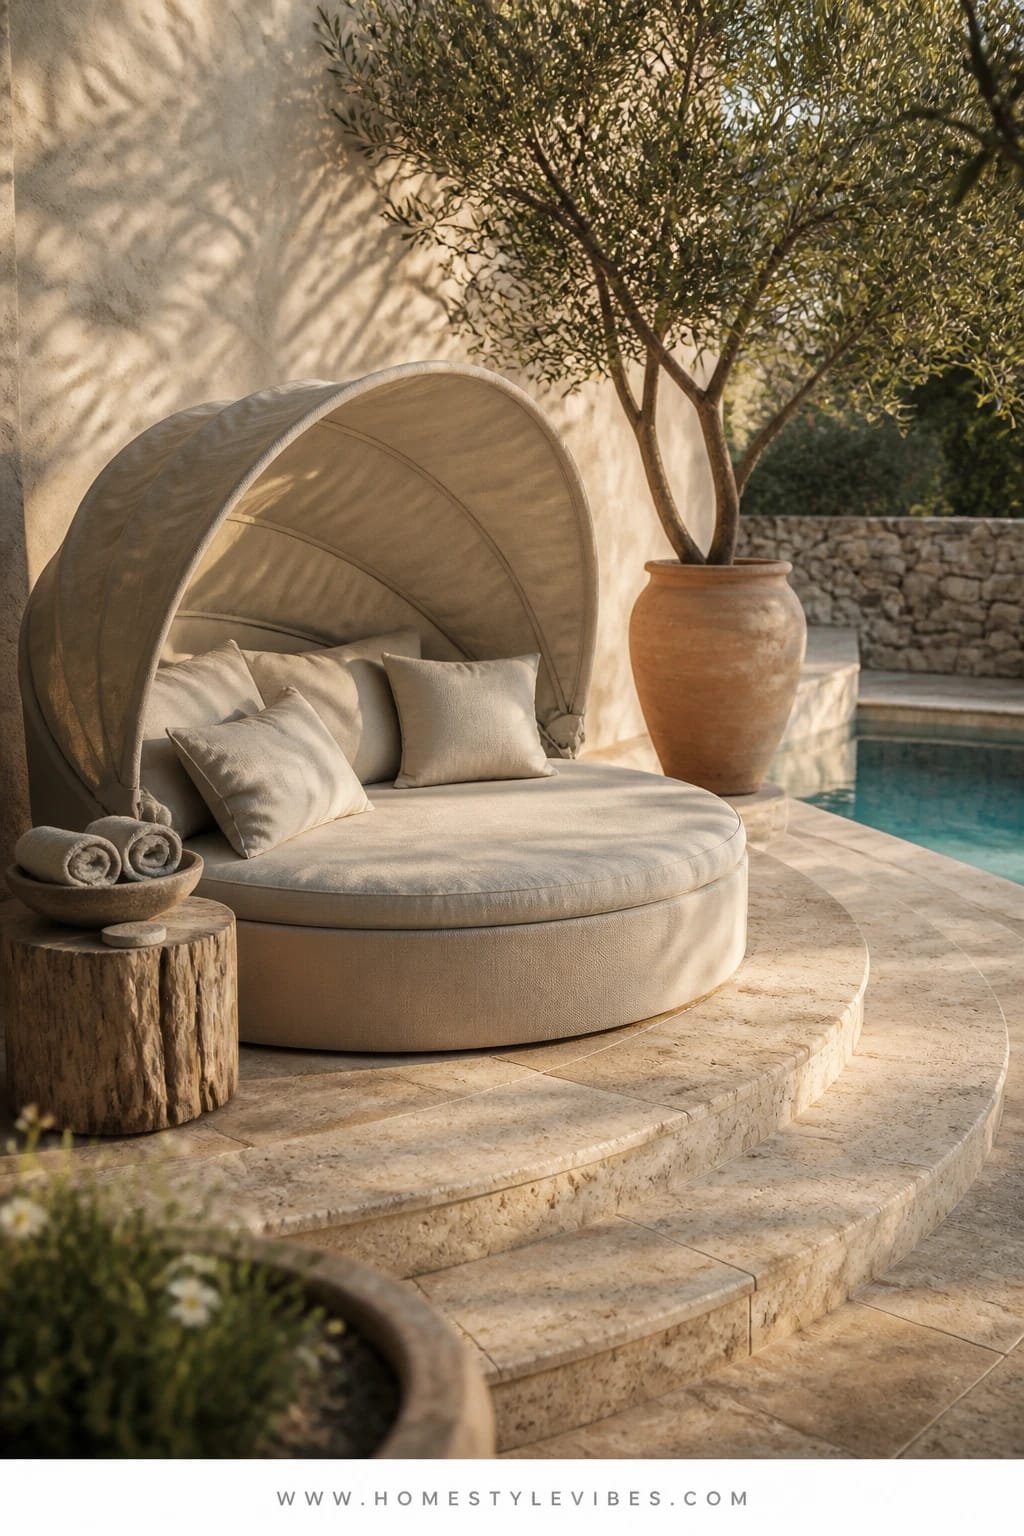
We’ve all been there: a great pool, but the surrounding patio feels like a parking lot—flat, hot, and harsh. You’ve tried throwing down a rug and some planters, but it still looks piecemeal and awkward in photos. This concept solves the “big empty slab” problem by breaking the patio into travertine terraces and soft curves, then anchoring the scene with a statement curved canopy daybed. The mood is resort-meets-Mediterranean with honeyed sunset light that makes skin look warm and the water read like glass.
Why this works in real homes: travertine is cooler underfoot than concrete, hides dust well, and gives subtle variation for depth on camera. Terracing a gentle step or two creates zones without fencing your eye in, which is key for small-ish backyards that need visual interest. Light is the hero here; you’ll lean on warm wall sconces on the fence line, plus lanterns that throw dappled shadows over stone. This photographs beautifully because of the interplay between textured stone, curved silhouettes, and low, golden light that grazes surfaces at dusk.
Variations that make it flexible: choose porcelain travertine-look pavers for a budget-friendly or low-maintenance version; swap the canopy daybed for a rounded sectional with a high back if you need more seating; in a darker palette, use charcoal planters and olive-green cushions for moodier evenings; for renters, lay interlocking deck tiles over concrete, layer outdoor rugs, and bring in a freestanding arched shade sail for the same curved canopy vibe.
Budget Breakdown:
- Travertine or porcelain pavers: $8–$18/sq ft
- Curved canopy daybed: $900–$2,500
- Outdoor sconces (4): $50–$180 each
- Lanterns and solar stake lights: $150–$400 total
- Large planters and Mediterranean plants (olive tree, rosemary): $300–$900
- Outdoor rug (9×12): $200–$600
Total Estimated Cost: $3,000 – $8,500
Best For: Medium patios that need zoning; pool areas with harsh midday sun; anyone who wants hotel-spa energy without the maintenance of a full pergola.
Key Design Elements:
- Main materials: travertine or porcelain pavers, powder-coated metal, woven canopy fabric
- Color palette: warm neutrals, soft sand, olive green, matte black accents
- Lighting strategy: fence-mounted sconces + lantern clusters + solar path lights at step edges
- Furniture silhouettes: curved, low-profile, deep-seated daybed and rounded side tables
- Texture layers: nubby cushions, gauzy canopy fabric, rough stone, smooth water
- Accent details: terracotta pots, rosemary topiaries, linen-look outdoor pillows
How To Recreate This Look:
- Start with layout: sketch two “terraces” by using a rug to define the lounge zone and pavers to create a slight level change or edge.
- Add your statement: place the curved canopy daybed to face the pool with a small side table for drinks.
- Layer your light: install fence sconces at eye height, then add lanterns near steps and corners for soft edges at night.
- Install greenery: mix one tall olive or bay laurel with three medium rosemary or lavender planters for scent and movement.
- Style with textiles: use sand-toned cushions, a striped throw, and a flatweave outdoor rug that dries quickly.
Why This Looks Expensive: The travertine texture and curved lines read custom, and the controlled palette avoids the “big box set” vibe. Warm light grazing stone at dusk feels architectural, not random.
Watch Out: Don’t scatter too many small planters. Go fewer and bigger so the scale matches your pool and the photos don’t look cluttered. Also, place solar lights so they don’t create awkward hotspots on faces.
Pro Styling Tip: At sunset, angle the lanterns to cast shadows across the terrace edges—those shadows add depth and make your pool water glow on camera.
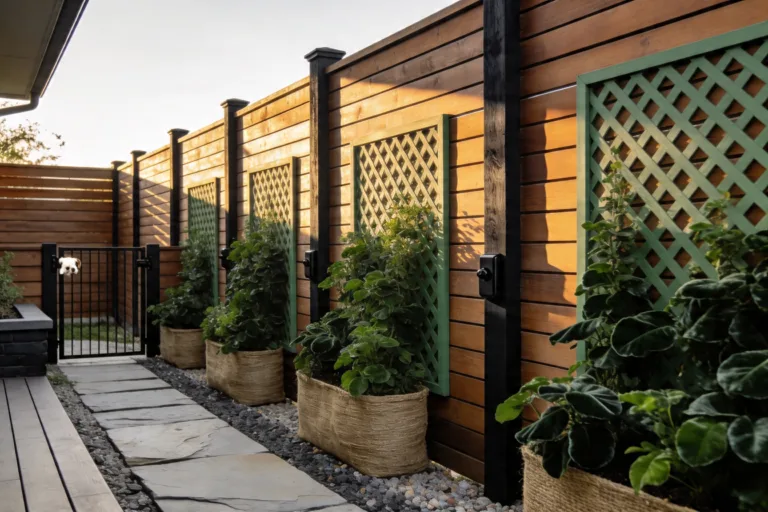
2. Charred Wood Screens, Jade-Toned Shade, and a Low-Slung Modular Sofa
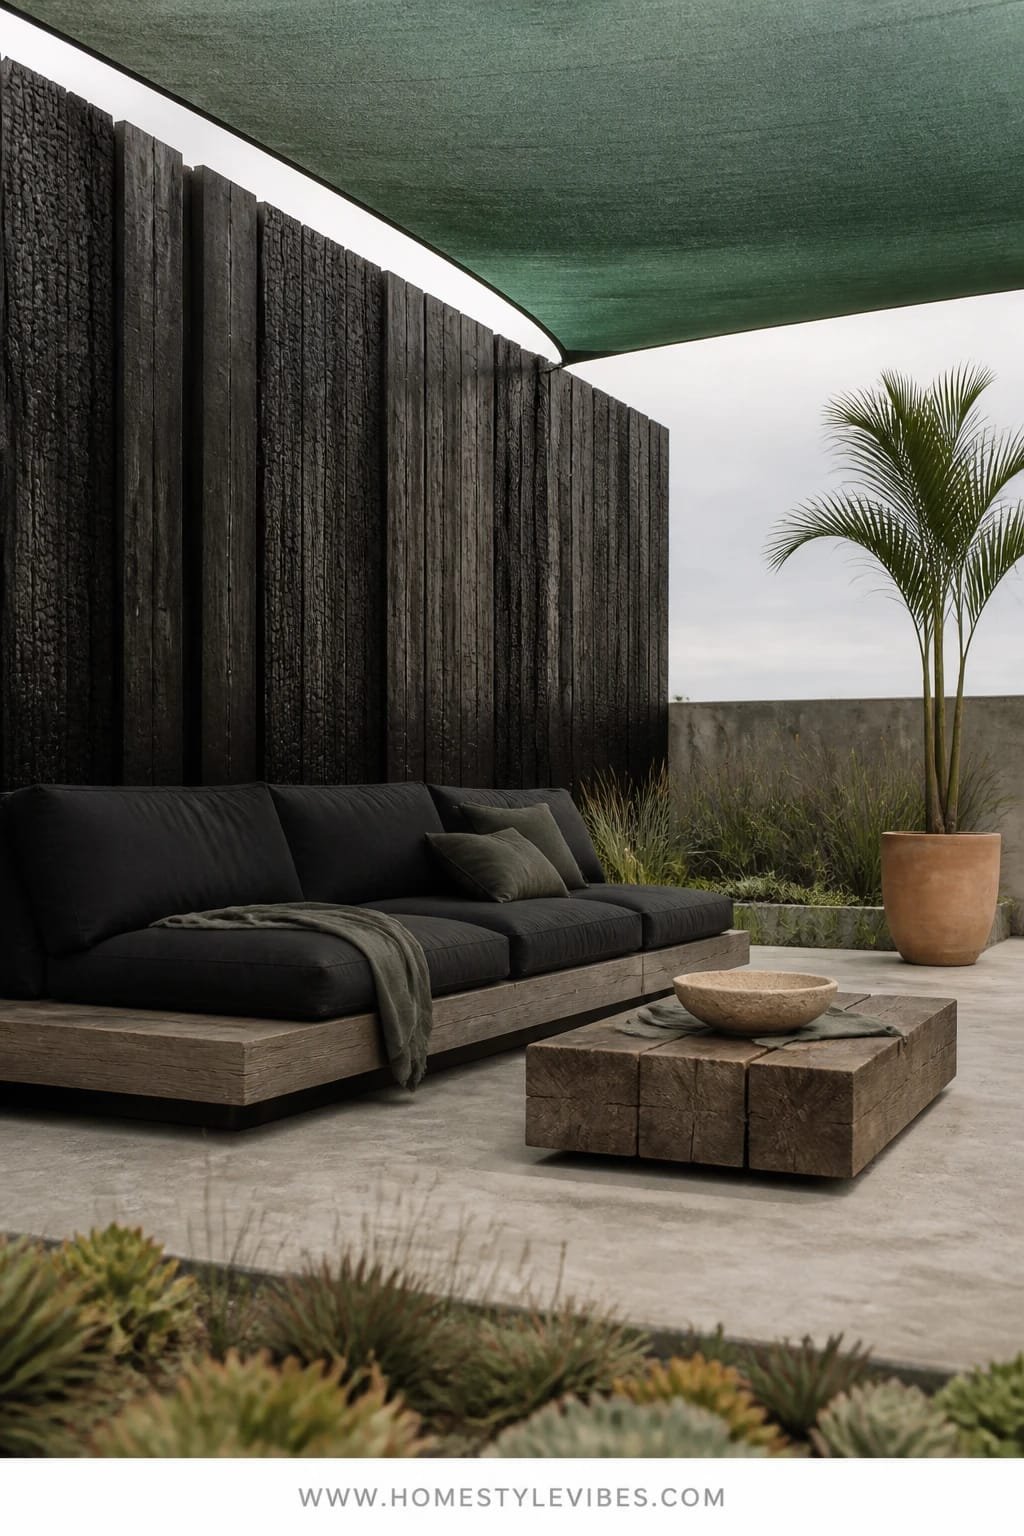
It’s that one corner that always feels exposed—neighbors peeking, wind tunneling, and your cushions end up in the pool. You’ve tried umbrellas, but they tilt and topple. Enter charred wood screens (Shou Sugi Ban style) that slice the wind, add privacy, and create a dramatic backdrop for a low-slung modular outdoor sofa. The vibe is modern Japanese courtyard meets California chill, with jade-toned shade cloth casting a cool wash over everything.
What makes it work: texture and silhouette. The dark, vertical grain of the burned wood sets a moody stage so your light cushions and concrete coffee table pop. Low seating keeps sightlines open to the pool while feeling like a protected cocoon. Photographs love contrast—matte black behind pale stone, sunlight filtering through the shade cloth creating a soft grid over the cushions.
Life happens here: kids can sprint past without knocking anything over, and the modular pieces reconfigure for parties. For small patios, a single L-shape sofa against one screen is enough. If you rent, try freestanding planters with tall bamboo to mimic a screen and use clip-on shade cloth panels you can remove without drilling. Want a darker mood? Swap to charcoal cushions with rust and ecru pillows for dimension.
Key Design Elements:
- Main materials: charred wood, powder-coated steel brackets, concrete composite, performance fabric
- Color palette: matte black, ivory, putty, rust, jade
- Lighting strategy: ground wash lights at the base of screens + a single overhead festoon line for sparkle
- Furniture silhouettes: low, boxy sofa modules; slab-style coffee table; slimline side tables
- Texture layers: burned grain, coarse weave pillows, smooth concrete, woven shade cloth
- Accent details: oversized ceramic bowl, mossy plants, slender bamboo or horsetail reeds
Budget Breakdown:
- Charred wood or pre-charred siding: $9–$16/sq ft
- Shade cloth panels and hardware: $250–$700
- Modular outdoor sofa (4–6 pieces): $1,200–$3,200
- Concrete coffee table: $350–$900
- Ground wash lights (4): $60–$140 each
- Planters and bamboo: $250–$700
Total Estimated Cost: $2,500 – $6,500
Best For: Windy yards, tight urban patios, and anyone who needs privacy without building a solid wall.
How To Recreate This Look:
- Start by mapping privacy zones: place screens where you feel most exposed, not just along the property line.
- Add the modular sofa: assemble a low L-shape with the long side against the screen to form a backdrop.
- Layer the shade: mount jade-toned shade cloth so it filters late afternoon sun without darkening the pool.
- Install low lights: aim ground washes up the screens to highlight the wood grain after dark.
- Style minimally: one large tray, one ceramic bowl, and two tall planters—stop there to keep the clean lines.
Why This Feels Designer: The high-contrast backdrop and low furniture height feel intentional, and the light filtering through shade cloth adds that “edited” look photos need.
One Thing To Avoid: Don’t choose bright white cushions if you don’t have covered storage. Go ivory or light putty; pure white sunscreens into chalky spots and shows every splash.
Pro Styling Tip: Fluff pillows vertically, then press one centered “karate chop” so light catches the crease—cheeky, yes, but it adds shadow detail on camera.
Remember, this isn’t about recreating a showroom. It’s about building a space that actually feels like yours. If one idea resonates more than the others, that’s your starting point. You don’t need all of them.
3. Tumbled Brick Herringbone, Dappled Morning Light, and a Built-In Breakfast Nook Bench
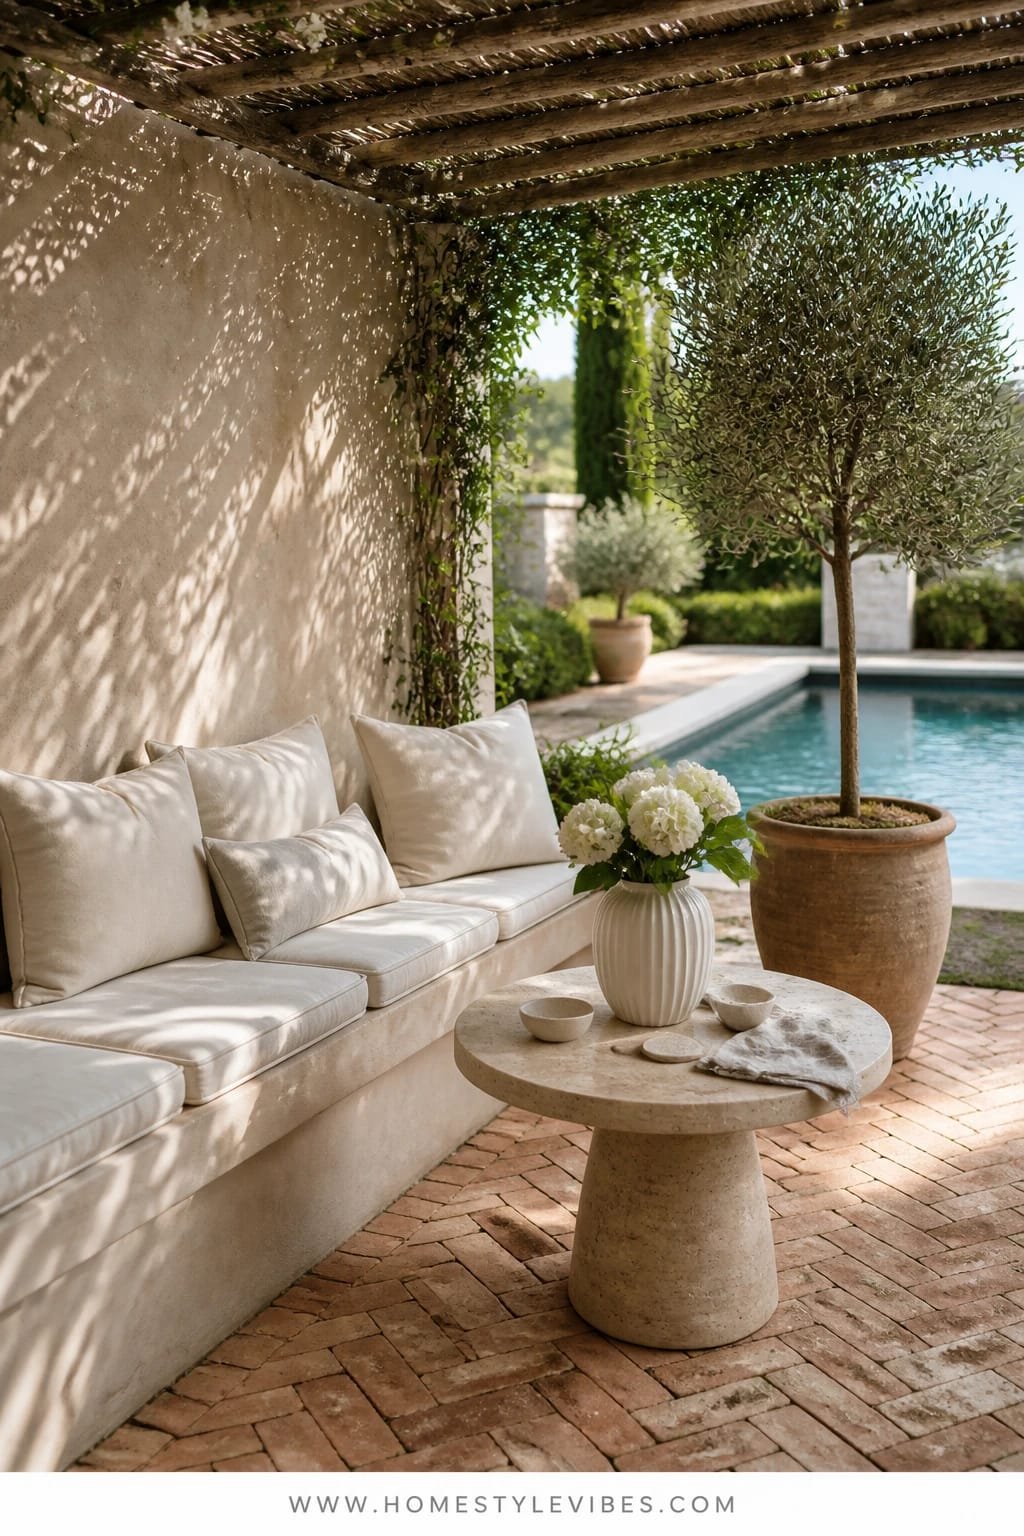
You want a charming breakfast spot by the pool but end up dragging mismatched chairs onto hot concrete. You love the idea of slow coffee and a paperback, but the area never feels inviting—or cool enough by 10 a.m. This one focuses on texture and shade: tumbled brick in herringbone for instant storybook character, a skinny pergola that throws dappled light, and a slim built-in bench with cushions that don’t absorb half the pool.
The mood is cottage-meets-European courtyard. Brick brings romance and slip-resistance with a soft matte that ages well. A thin-slat pergola creates moving shadows that photograph like lace, and the built-in bench makes even a narrow strip between house and pool feel like a scene. It’s shockingly good for resale because herringbone brick reads “custom” without the cost of a full outdoor kitchen.
Variations: in a small yard, run the herringbone on the diagonal to widen the feel. For budget, use clay pavers or porcelain brick-look tiles over an existing slab. If you prefer cooler tones, go for reclaimed gray bricks with sage-green cushions. Renter? Create a faux bench with two storage benches pushed together and a long cushion; add a freestanding pergola with weighted bases.
Budget Breakdown:
- Tumbled brick or clay pavers: $4–$10/sq ft
- Pergola kit (thin slat): $700–$2,000
- Built-in bench materials (pressure-treated frame + cedar): $300–$800
- Outdoor cushions and Sunbrella fabric: $250–$600
- Bistro table + 2–4 chairs: $250–$900
- Climbing vine starter (jasmine, star jasmine) and planters: $120–$350
Total Estimated Cost: $1,900 – $5,650
Best For: Narrow patios, side yards, and anyone who wants an early-morning coffee zone that stays cool and pretty.
Key Design Elements:
- Main materials: tumbled brick, cedar, powder-coated metal, outdoor foam
- Color palette: warm clay, soft white, sage, charcoal wrought iron
- Lighting strategy: string lights woven under the pergola slats + one vintage-look wall lantern
- Furniture silhouettes: petite bistro set, slender bench with hidden storage
- Texture layers: rough brick, linen-look cushions, climbing vines, matte metal
- Accent details: striped lumbar pillows, ceramic pitcher, woven placemats
How To Recreate This Look:
- Start with the ground: lay brick in a herringbone pattern with a soldier-course border to frame the zone.
- Add the structure: install a skinny-slat pergola parallel to the pool edge to cast rhythmic shade lines.
- Build the bench: a simple box frame with a cedar face; add a flip-top for towel storage.
- Green it up: train a vine up one post and across a wire—patience, but the payoff is romance.
- Style the table: keep a simple tray with two glasses, a bud vase, and linen coasters—done.
Why This Reads High-End: Patterned flooring plus built-in seating looks bespoke. The dappled light hides imperfections and makes the area feel dynamic in photos and IRL.
The Most Common Mistake: Skipping an edge restraint on brick. Without it, the herringbone slowly “walks” and looks messy. Use a steel or concrete edge to keep lines crisp.
Pro Styling Tip: Photograph this zone between 8–10 a.m. when the pergola shadow lines are soft and the brick color is warm—not bleached.
Small confession: I once spent weeks agonizing over cushion colors for a patio like this before realizing the real issue was glare. I added a slim pergola and everything softened—suddenly every fabric looked good. Lighting wins.
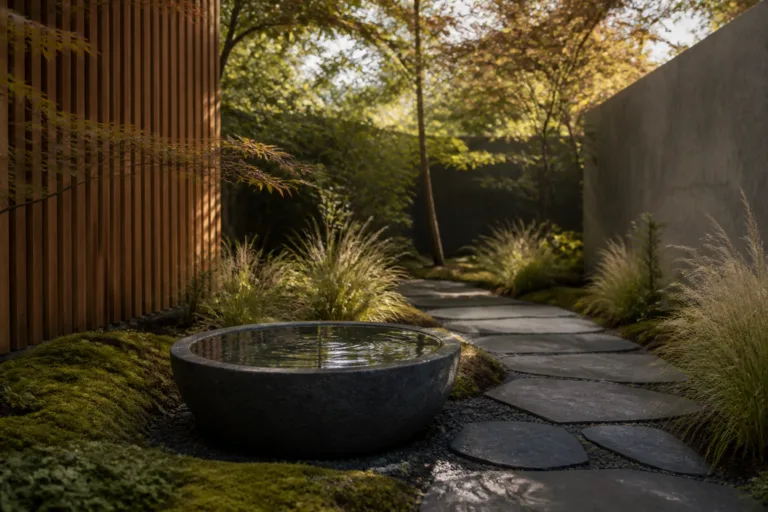
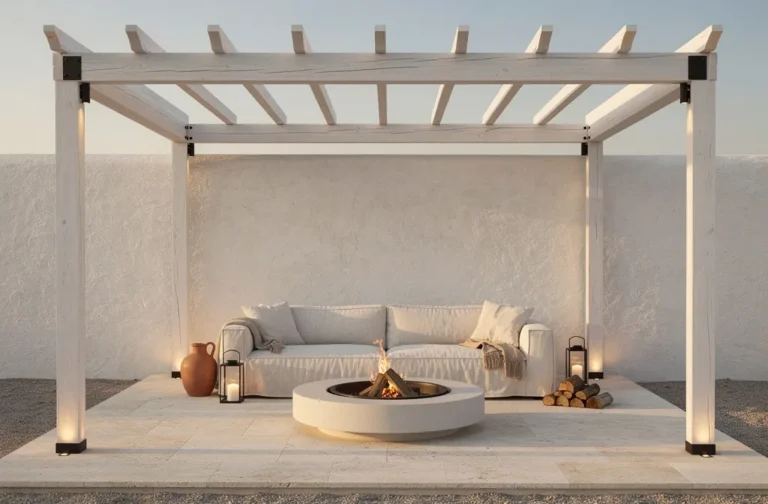
4. Limestone Coping Edges, Soft Moonlight Glow, and a Sculptural Fire Bowl Lounge
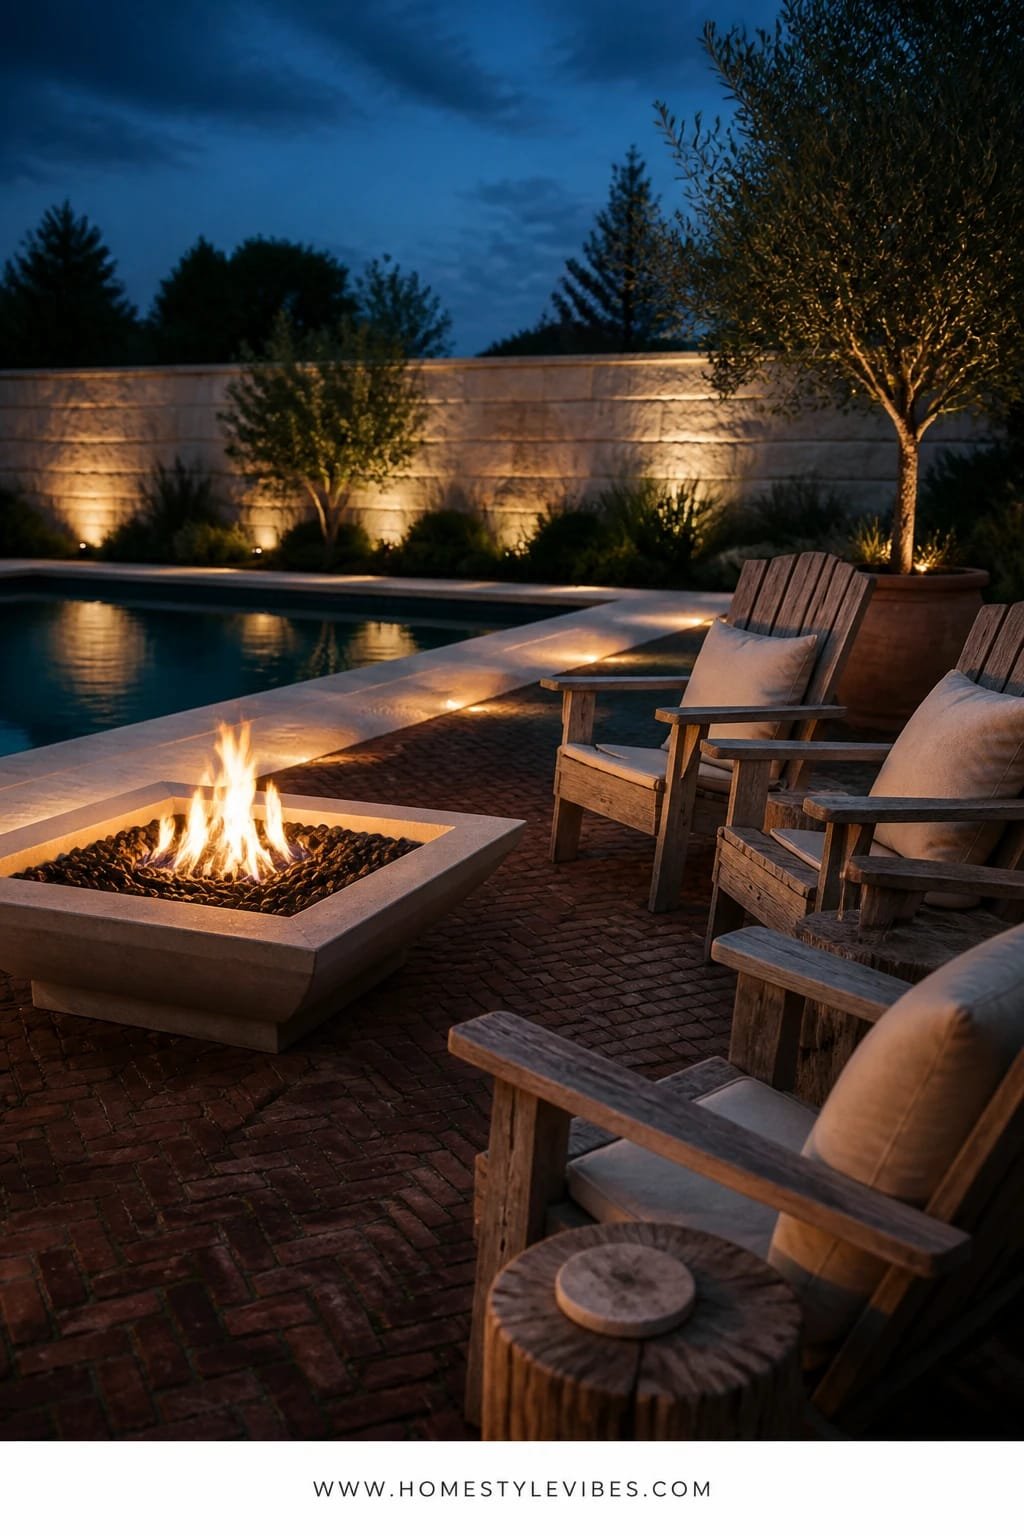
You want your pool to feel magical at night, but it currently reads as a cold blue rectangle after 6 p.m. You’ve tried string lights everywhere and it still feels flat. This design is about night theater: limestone coping that reflects soft light, a sculptural fire bowl that anchors conversations, and a thoughtful low-voltage lighting plan that creates gentle, flattering “moonlight” instead of interrogation-bright spots.
Here’s why it works at home: limestone’s pale, velvety finish bounces warm light onto faces while staying cool underfoot. The fire bowl brings movement and focus, making the space a true destination, not just a pass-through. Photographically, it’s a masterclass—tiny light points around planting beds, warm under-cap lights along steps, and just one or two tree uplights to outline shapes without killing the vibe.
Variations: a propane fire bowl for easy on/off or a bioethanol option where gas lines aren’t feasible. For a smaller yard, choose a 28–32 inch bowl and one loveseat instead of a whole lounge. Want drama? Pick a dark graphite bowl and camel cushions; for a softer palette, go limestone bowl and fog gray cushions. Renter-friendly: use a portable fire column and solar puck lights under the coping edge.
Budget Breakdown:
- Limestone coping (per linear foot): $20–$45
- Fire bowl (propane or natural gas): $600–$2,200
- Low-voltage lighting kit (8–12 fixtures + transformer): $500–$1,400
- Outdoor loveseat + two chairs: $1,000–$2,800
- Side tables and throws: $200–$500
Total Estimated Cost: $2,320 – $6,945
Best For: Evening entertainers, households that live outdoors after the sun dips; works with modern and traditional homes alike.
Key Design Elements:
- Main materials: limestone, cast concrete or metal fire bowl, performance upholstery
- Color palette: chalk, fog gray, graphite, camel, soft brass accents
- Lighting strategy: low-voltage path lights, under-cap step lights, restrained tree uplights
- Furniture silhouettes: deep lounge pieces with rounded arms and low profiles
- Texture layers: stone grain, boucle-style outdoor fabric, smooth metal, flickering flame
- Accent details: wool-look outdoor throws, leather-handled lanterns, olive or bay trees
How To Recreate This Look:
- Start by defining a fire zone: center the bowl 10–12 feet from the pool edge to avoid heat reflecting on water.
- Add limestone rhythm: if replacing coping isn’t in budget, add limestone-look porcelain tiles on a lounge pad.
- Layer lighting: install under-cap lights at any step; add 4–6 path lights; uplight only one tree for hierarchy.
- Choose seating: arrange a loveseat and two chairs to form a U facing the fire, not the house.
- Style sparingly: one low tray with matches and a ceramic candle snuffer, plus two lanterns—stop before clutter.
Why This Looks Intentional: It’s the restraint. One destination fire feature, one hero tree, and just enough glow to outline circulation. That’s what reads “considered” in photos and real life.
Don’t Do This: Avoid blue-toned LED bulbs. They wash out skin and make limestone look icy. Choose 2700K–3000K for warmth.
Pro Styling Tip: Shoot from a low angle with the fire in the foreground and the pool catching reflections—reflections double the drama without adding fixtures.
If your brain is whispering, “This is a lot,” exhale. Pick one anchor—stone, shade, or light. Nail that, and the rest will slot in. Great outdoor rooms grow in layers, not overnight.
5. Micro-Cement Pool Deck, Citrus-Toned Noon Light, and a Slatted Teak Dining Table With Pendant Cluster
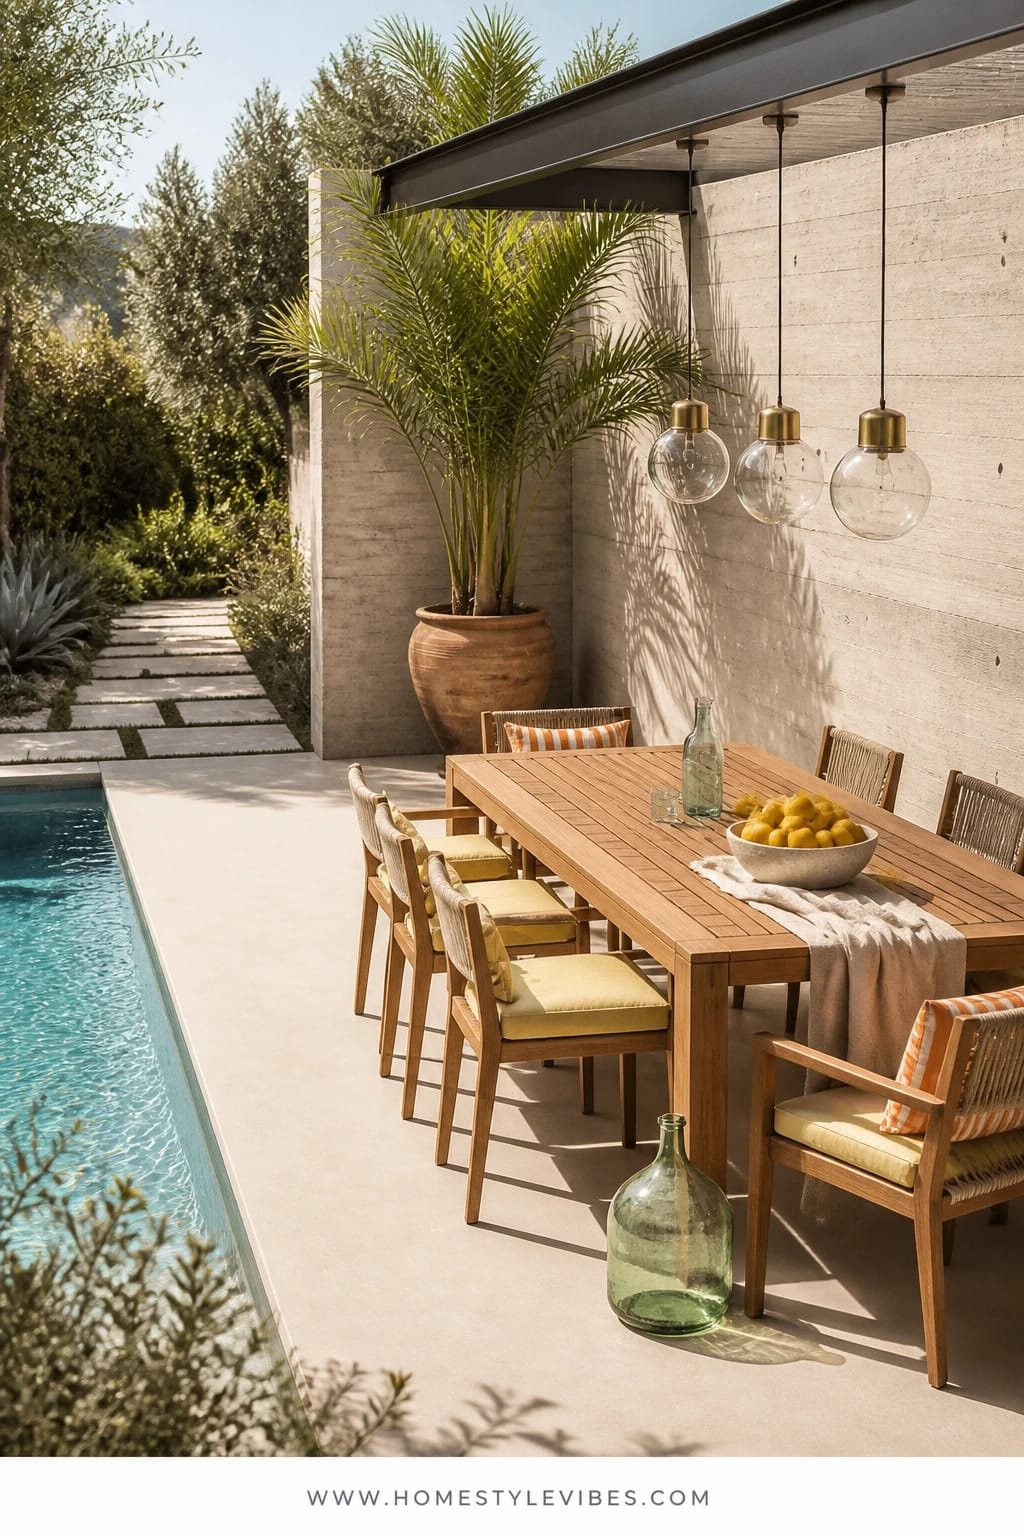
You crave a dining zone that actually looks finished, but your current setup is a folding table and chairs that wobble on the gravel. You host one BBQ and swear off entertaining because nothing sits straight and the sun blinds everyone at noon. This design leverages a micro-cement deck for a seamless, level surface, leans into citrus-toned accents that sing under bright noon light, and finishes with a slatted teak dining table under a cluster of outdoor-safe pendants.
The mood is fresh, sun-drenched, and a little Italian market. Micro-cement gives you the smooth, monolithic look of poured concrete without the expansion joints or the price of tearing everything out. The slatted teak table drains and dries quickly after pool splashes. For photography, this is high-contrast heaven: matte deck, warm teak grain, pops of lemon and basil green, and a pendant cluster that pulls the whole scene together like jewelry.
Real-life perks: easy to hose down, forgiving when someone drags a chair, and the continuous surface visually expands small spaces. If you’re renting, use interlocking deck tiles in a light gray and place a large outdoor rug to fake the monolithic look. Prefer a cooler vibe? Swap citrus accents for sky blue and eucalyptus. If you need shade, place a square cantilever umbrella with a low profile so pendants remain the focus.
Budget Breakdown:
- Micro-cement overlay (professional install): $8–$15/sq ft
- Slatted teak dining table (6–8 seats): $750–$2,200
- Outdoor dining chairs (6–8): $450–$1,600 total
- Outdoor-safe pendant cluster + junction posts/wiring: $500–$1,400
- Rug (8×10) and cushions: $300–$700
- Planter herbs and citrus trees in pots: $150–$450
Total Estimated Cost: $2,650 – $6,350
Best For: Hosts who love long lunches, smaller patios that need a continuous visual plane, bright yards where color can shine.
Key Design Elements:
- Main materials: micro-cement, teak, powder-coated aluminum, woven rattan-look cords
- Color palette: soft gray, teak honey, lemon, basil green, crisp white
- Lighting strategy: pendant cluster over the table + subtle perimeter spikes for late dinners
- Furniture silhouettes: slim, stackable chairs; long, slatted table; low-profile umbrella if needed
- Texture layers: matte deck, warm wood grain, canvas cushions, terracotta pots
- Accent details: striped table runner, glass carafe with citrus slices, woven bread basket
Why This Feels Designer: The continuous floor plane makes everything look custom-built. Then the pendant cluster becomes a focal point that says, “This is the dining zone,” no confusion.
How To Recreate This Look:
- Prep the ground: level your surface and apply a micro-cement overlay, or use interlocking tiles and a large rug.
- Center the table: align it parallel to the pool edge for clean sightlines and less visual noise.
- Hang pendants: cluster 3–5 at differing heights, keeping the lowest 30–34 inches above the tabletop.
- Add chairs: choose slender frames that tuck neatly; mix two captain chairs with arms at the heads.
- Dress the table: layer a runner, a vase of cut basil, linen napkins, and simple white dinnerware.
One Thing To Avoid: Don’t pick glossy decks. High sheen shows footprints and water marks in every photo and looks slippery in real life. Matte wins.
Pro Styling Tip: For photos, place a single bowl of lemons just off-center and angle one chair out five degrees—it adds life without shouting “staged.”
Micro-story time: I tried a pendant cluster over my own patio table last fall and couldn’t believe how much it “finished” the space. Even when the table was empty, the pendants made it feel set. Guests arrived and immediately sat down—no herding required.
Quick Checklist
- Choose one anchor: stone, wood, or a seamless floor plane
- Pick a lighting temperature: 2700K–3000K for warm, flattering evenings
- Scale up planters instead of scattering small ones
- Introduce one sculptural piece: canopy daybed, fire bowl, or pendant cluster
- Commit to a tight color palette with one accent
- Map zones: lounge, dine, fire, or breakfast—give each a boundary
- Use matte finishes outdoors for calmer photos and fewer smudges
- Add shade where the glare lives, not where it’s easy to mount
- Layer textures: rough stone, smooth metal, woven fabric, living green
- Edit twice: remove one accessory from every surface
Frequently Asked Questions
How do I prioritize if I only have $2,000 to spend on my backyard pool and patio?
Pick one zone and one anchor. For example, create the breakfast nook with a freestanding pergola and a small bistro set, or invest in modular seating plus two great lights. A single finished area beats a half-finished yard.
What if my pool deck is small and everything feels cramped?
Go low and linear. Use a slim bench against a wall or screen, a small fire bowl, and interlocking deck tiles to create one continuous plane. Keep furniture legs light and visually airy so sightlines stay open.
I rent—how can I get the look without permanent changes?
Use freestanding privacy screens or large planters with tall bamboo, interlocking tiles over concrete, and shade sails clipped to weighted posts. Portable fire columns and lanterns deliver ambience without hardwiring.
How do I maintain materials like travertine, teak, and micro-cement?
Seal stone with a breathable matte sealer once a year. Wash teak with mild soap and a soft brush, then oil if you want to preserve the honey tone. For micro-cement, use pH-neutral cleaners and avoid dragging metal edges.
What’s the most common design mistake around pools?
Scattering lots of small furniture and decor. It makes the space feel busy and cheap. Choose fewer, larger pieces and a strict palette. Also, watch bulb temperature—cool LEDs kill the mood.
Conclusion
Here’s the truth: the most stunning summer retreat doesn’t come from buying more stuff. It comes from a clear anchor, layered textures, and lighting that loves your skin. Start with one idea—maybe that curved canopy daybed or a tiny herringbone brick corner—and finish it completely. You’ll feel the shift the second you sit down.
Remember, luxury outside is restraint plus rhythm: stone that catches light, fabric that breathes, silhouettes that make sense at scale. Your backyard pool and patio can feel like a boutique escape by next month if you pick one zone and commit. You’ve got the taste; these ideas give you the bones.
When you light the lanterns and hear water lap the coping, you’ll know you built this. Not a showroom. Not a set. Your summer retreat—made for barefoot mornings and unhurried, starry nights. Go start.