8 Kids Room Decor Ideas That Make Any Bedroom Feel Magical Tonight
You want a kids’ room that feels like a storybook come alive—soft light, layered textures, color that sparks imagination. You hate the clutter, the mismatched hand-me-downs, the toys that swallow the floor. You’re dreaming of a bedroom that photographs beautifully and actually functions on a Tuesday morning when someone can’t find their left sock. These 8 kids room decor ideas will fix the chaos and create a space that feels magical on a realistic budget in a single weekend project per section—pick one idea, cap it at $800 or less, and watch the transformation unfold.
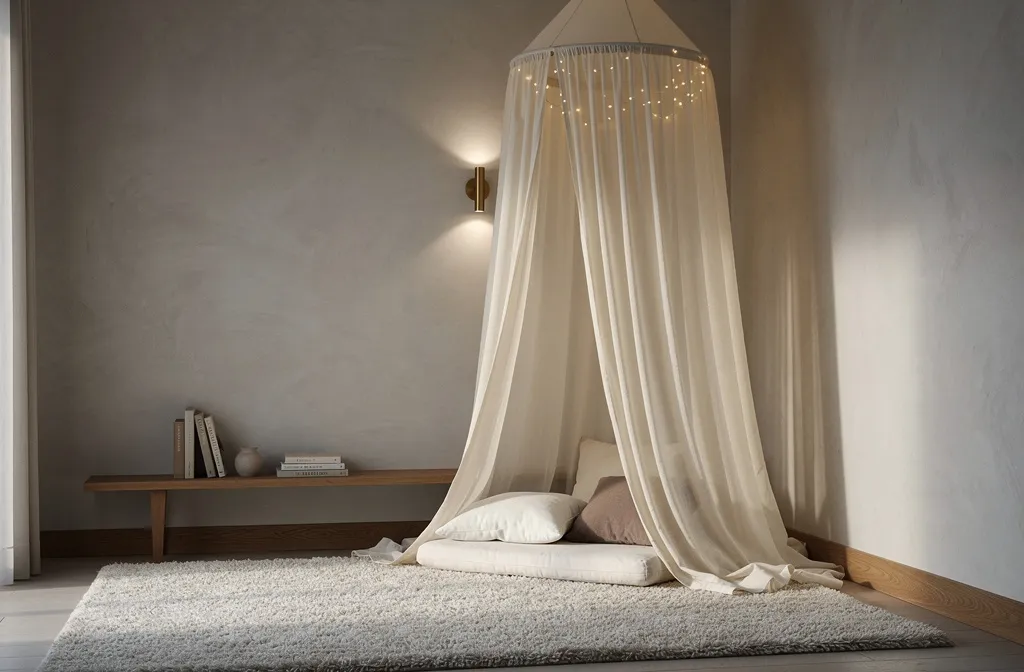
Think plush rugs that quiet the room, glow-y lamps instead of harsh overheads, and textiles that invite bedtime snuggles. Each idea hits a different pain point—storage, lighting, walls, layouts—so you can solve what’s actually not working right now. The vibe stays youthful, not kiddish, and totally Pinterest-worthy. If your kid loves stories, color, or building forts out of everything—this is your room makeover blueprint.
1. Moonlit Canopy Nook With Twinkle Threads
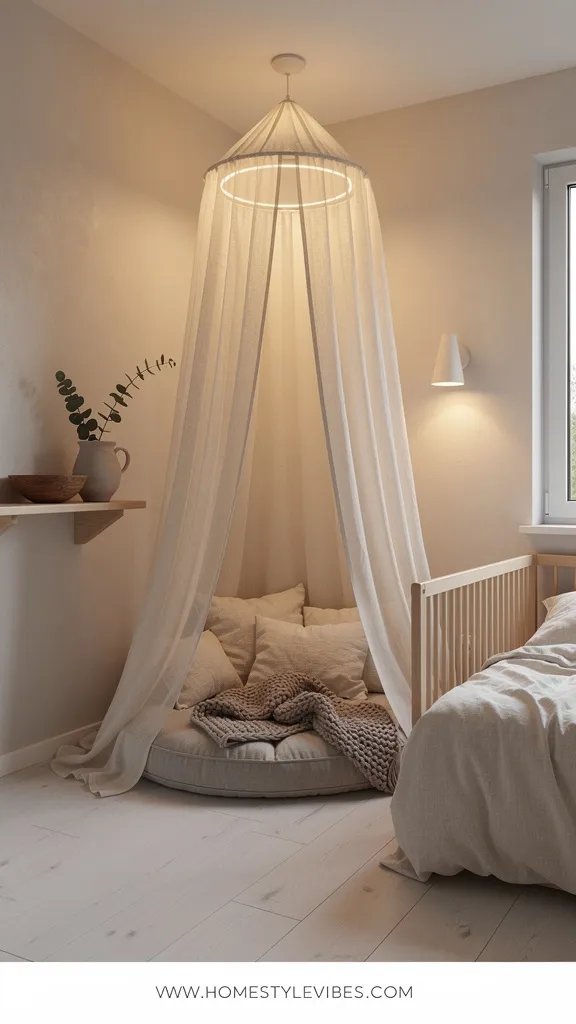
We’ve all been there: It’s that one corner that always feels off—too bare during the day, too stark at night. You’ve tried a beanbag, then a bookshelf, but it still looks like a waiting room for stuffed animals. This design creates a cozy, moonlit hideaway with a ceiling or wall-mounted fabric canopy, layered floor cushions, and a soft string-light halo. It’s equal parts reading nook and secret fort, which means it doubles as clutter camouflage during playtime.
The mood leans Scandinavian fairytale: gentle, moody lighting with warm whites and a whisper of silver. It works in real homes because the canopy defines a zone, even in tiny bedrooms, and the layered textiles swallow sound—great for siblings sharing a wall. Lighting transforms the space at night; a dimmable string wraps the canopy ring and casts delicate shadows that feel like tree branches under moonlight. Linen, cotton gauze, and a wool-blend rug ground it in tactile calm.
Photographs love this nook because of the light bounce. The gauze diffuses brightness, floor cushions add sculptural shape, and the twinkle lights create micro-highlights that make the scene sparkle. Try two variations: a budget-friendly curtain-panel canopy hung from a simple hoop, and a renter version using removable hooks and command strips. For a darker, dramatic choice, swap gauzy cream for deep indigo or charcoal and switch the lights to warm amber for a night-sky vibe.
Budget Breakdown:
- Sheer canopy fabric or pre-made canopy: $40–$120
- Embroidery hoop or metal ring: $10–$25
- Warm white string lights (plug-in with dimmer): $18–$40
- Floor cushions/poofs: $60–$200
- Low book ledge or crate: $20–$60
- Small wool-blend rug: $70–$180
Total Estimated Cost: $218 – $625
Best For: Small to medium rooms that need a defined reading zone. Great for ages 3–10 and for renters who can’t paint.
Key Design Elements:
- Main materials: cotton gauze, linen, wool-blend rug
- Color palette: warm white, pale blush or sage, moon-silver accents
- Lighting strategy: one dimmable string and a soft-glow plug-in sconce
- Furniture silhouettes: rounded cushions, low ledges, canopy ring
- Texture layers: gauzy canopy, nubby rug, velvet or boucle cushion
- Accent details: star or moon pillow, small wood stool, paper garland
How To Recreate This Look:
- Start with the corner: clear 3–4 feet of floor space and center the canopy ring 18–24 inches from the wall.
- Add a small rug first, then layer 2–3 floor cushions at different angles.
- Wrap warm string lights around the canopy ring and run the cord down the corner neatly with cord clips.
- Install a slim book ledge at kid height; face books forward for color.
- Style with a star pillow, a tiny stool for hot cocoa mugs (or crayon cups), and a plush throw.
Why This Looks Expensive: Layered textiles plus controlled, dimmable light read like boutique hotel design. The gauzy canopy adds vertical drama without heavy furniture.
Watch Out: Avoid cold white or blue-tinted lights; they make the nook feel sterile. Keep the canopy high enough to avoid tugging and leave clearance around outlets.
Pro Styling Tip: Photograph at dusk with only the string lights on and a single book face-out; the gentle glow pulls texture forward and softens shadows.
Keep scrolling—the next idea solves the toy avalanche without turning the room into a storage unit.
2. The Under-Bed Library With Hidden Wheels
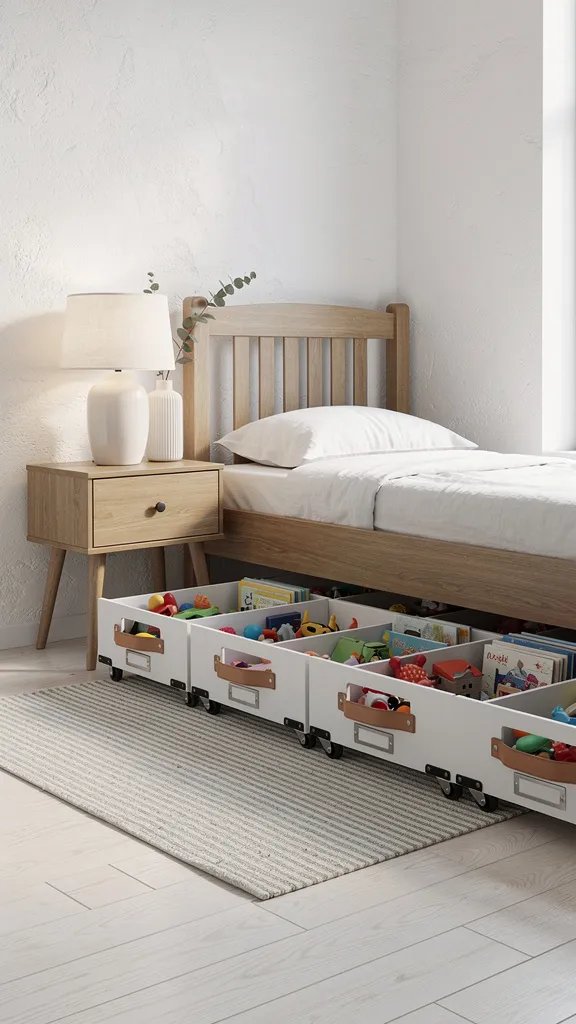
It’s the clutter creep, right? You clean the floor, blink twice, and tiny plastic pieces appear again like glitter. You’ve tried tall baskets, but toys sink to the bottom and vanish. This layout turns the dead zone under the bed into a rolling library of labeled trays and slim bins—so kids can pull out their world and slide it back with one kick.
The mood reads crisp and functional with a touch of studio charm—think white boxes with leather pulls, slim labels, and a warm wood bed frame. It thrives in small rooms where every inch matters. Lighting by the bed should be practical: a swing-arm sconce that aims down when bins roll out, then up at night for reading. Materials: birch plywood or IKEA under-bed drawers, felt pads, and sturdy casters that won’t snag rugs.
Photos love the symmetry of multiple bins perfectly aligned and the light-dark contrast of labels on muted boxes. Try the budget path using shoe organizers with stick-on handles. For renters, zero drilling needed; you can add bed risers to gain 2 extra inches of clearance. For families with darker floors, pick matte black labels and light bins—it’s the contrast that gives it that “ahhh, organized” look.
Key Design Elements:
- Main materials: birch or white MDF bins, metal casters, leather or brass pulls
- Color palette: soft white, camel leather, natural wood, black labels
- Lighting strategy: swing-arm sconce aimed downward for task lighting
- Furniture silhouettes: low-profile bed, slim bins, rounded corners
- Texture layers: matte boxes, leather tabs, woven linen label tape
- Accent details: icon labels for pre-readers, matching bed skirt to hide bins
Budget Breakdown:
- Under-bed bins (3–4): $60–$220
- Casters and felt pads: $24–$60
- Leather pulls or rope handles: $15–$40
- Label maker or printed stickers: $12–$30
- Swing-arm sconce: $45–$120
- Bed risers (optional): $12–$25
Total Estimated Cost: $168 – $495
Best For: Tiny rooms, LEGO families, renters. Also great in shared rooms where toys must tuck away fast.
How To Recreate This Look:
- Measure bed clearance; aim for at least 8 inches height for bin plus caster.
- Choose 3–4 low, wide bins to maximize surface area and minimize stacking.
- Attach smooth casters and felt pads; test on rug and hard floor.
- Sort toys by “activity” not item—building, art, pretend, bedtime books.
- Label with icons and words; tuck a thin throw as a “skirt” to soften the look.
Why This Feels Designer: Repetition creates polish. Matching bins with consistent labels mimic custom millwork at a fraction of the cost.
One Thing To Avoid: Don’t pick bins too tall to see inside; kids won’t use what they can’t see. Also skip heavy lids—sliding should be easy, not a workout.
Pro Styling Tip: Stagger two bins halfway out for photos to show function and depth; keep the bed quilt tucked smooth so the lines read clean.
Pause for a second. If one idea resonates more than the others, that’s your starting line. You don’t need all eight. Pick the one that solves your daily annoyance, then layer more when life calms down. This isn’t about recreating a showroom; it’s about building a bedroom your kid actually lives in.
3. Painted Storybook Mural With Tape-Guided Shapes
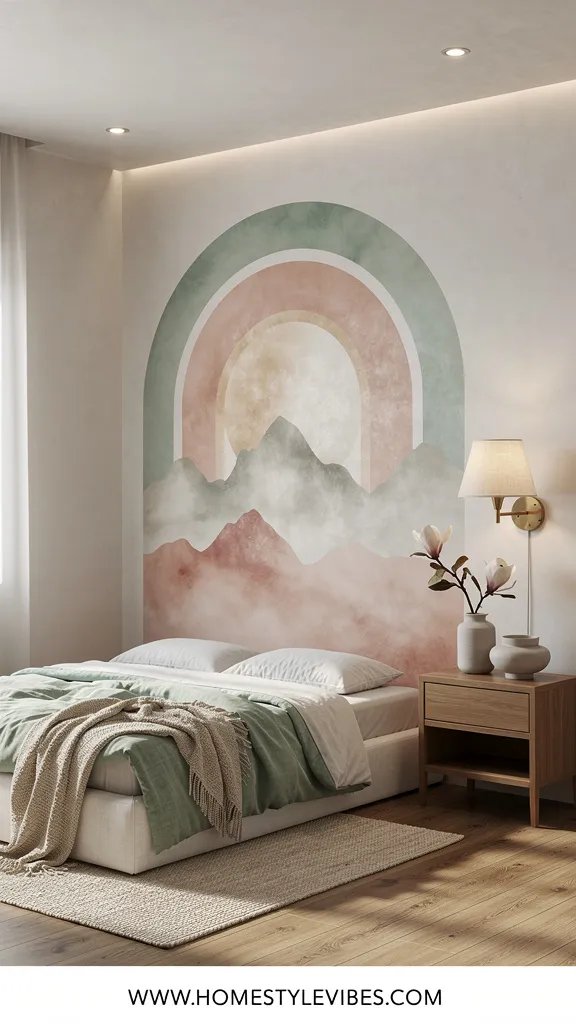
Have you ever stared at a blank wall and thought, “This needs… something,” then felt paralyzed by paint choices? You’re not alone. My friend Jo spent weeks agonizing over the perfect sage, only to realize the issue wasn’t color—it was flatness. This idea turns a plain wall into a storybook scene using easy, tape-guided mountains, arches, or waves. No art degree required.
The vibe feels modern Mediterranean meets whimsical fairytale. Soft gradients, sun-wash circles, and layered shapes bring movement without looking like a theme park. It works beautifully for resale because you can keep the palette restrained: three colors, all muted. Lighting brings the mural to life—aim a tiny spotlight or use a clip lamp to throw gentle shadows over the painted edges for dimension.
Materials are simple: matte wall paint, quality tape, a level, and a foam roller. Photos adore the soft curves and graphic lines; they add structure to the mess of real life. Variations include: a small-space version using a single off-center arch as a “headboard,” a darker option with deep teal waves and brass sconce accents, and a renter-friendly take with removable fabric decals instead of paint.
Budget Breakdown:
- Quart paints (2–3 colors): $40–$90
- Quality painter’s tape + level: $12–$25
- Rollers and brushes: $10–$20
- Clip light or mini spotlight: $18–$40
- Removable decals (renter alt): $30–$80
Total Estimated Cost: $80 – $235
Best For: Feature walls behind beds or desks; parents who want visual drama with minimal furniture.
Key Design Elements:
- Main materials: matte paint, tape, simple lighting
- Color palette: muted clay, peach, olive; or deep teal, ochre, cream
- Lighting strategy: side-grazing light to emphasize edges
- Furniture silhouettes: simple bed, low nightstand, rounded lamp
- Texture layers: nubby throw, linen drapes, natural wood frames
- Accent details: thin wood ledge for art, woven basket for softness
How To Recreate This Look:
- Pick three colors: one main, two accents. Test swatches at morning and evening.
- Map shapes with tape—arches, scallops, or mountains. Keep edges crisp.
- Roll the largest shape first; let dry fully before adding layers.
- Angle a lamp to graze across the design at night for soft shadows.
- Keep furniture low and simple to let the mural breathe.
Why This Reads High-End: Restraint. A tight palette and confident shapes look like a designer commissioned the wall, even when it’s just you, tape, and a podcast.
The Most Common Mistake: Overcomplicating the shapes. Two to three big forms beat seven small ones. Leave negative space so the eye can rest.
Pro Styling Tip: Hang a single lightweight pennant or moon mirror partially overlapping the mural edge; that overlap creates editorial depth.
Ready for texture you can actually feel? The next design turns the bed into a soft sculpture kids can’t resist.
4. Cloud-Soft Bedscape With Layered Linens and Playful Piping
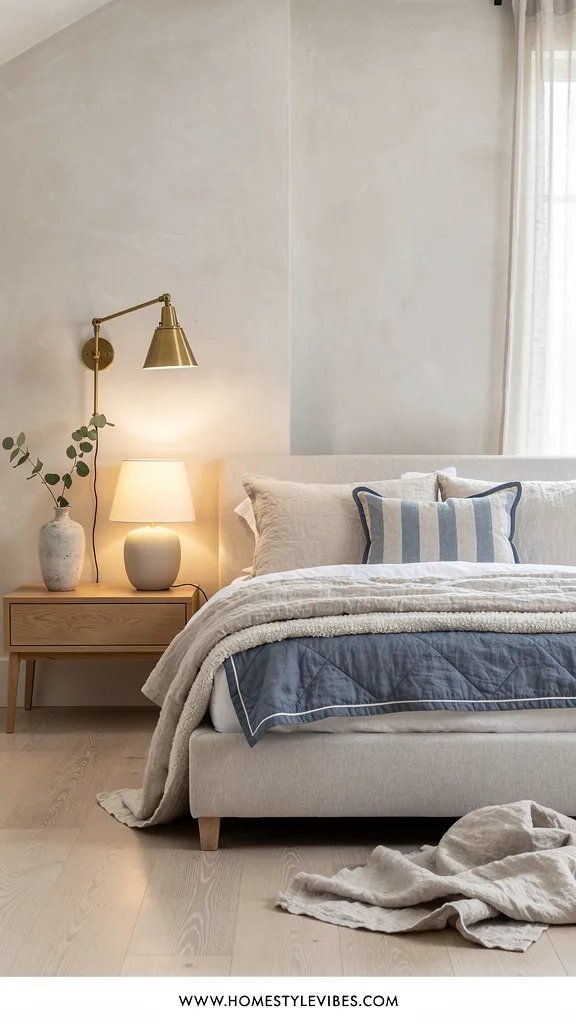
It’s bedtime and everything looks… flat. You swapped the comforter twice, but the bed still feels thin and kind of sad. This approach treats the bed like the hero of the room: layers of breathable linen, a quilt with contrasting piping, and one standout pillow with personality. It’s tactile, serene, and secretly easy to make each morning.
The mood channels boutique coastal with a playful twist. Linen and cotton keep things cool and crumple in that photogenic way—honestly, wrinkle is a feature here. It works in real life because kids run hot and linen breathes, and the quilted texture doesn’t show every crumb between washes. Lighting matters: opt for bedside lamps with linen shades that scatter light softly across the folds. Photographs lap up the diagonals created by a casually folded throw and the pop of color from piping.
Variations: a budget set using a linen-blend duvet and IKEA quilt; a small-space version with a daybed stacked with bolsters to become a mini-sofa by day; a darker look with olive or indigo base and cream piping. For renters who want polish, consider swapping the default bed legs for tapered wood legs—10-minute upgrade, huge difference.
Budget Breakdown:
- Linen-blend duvet + cover: $60–$180
- Quilt with contrast piping: $70–$160
- Two standard pillows + one shaped pillow (star, cloud): $40–$120
- Linen-shade lamp: $45–$110
- Wood bed legs (optional): $25–$60
Total Estimated Cost: $240 – $630
Best For: Any room where the bed sits in view from the door—you’ll get instant “finished” energy when you walk in.
Key Design Elements:
- Main materials: linen, cotton percale, quilted cotton
- Color palette: soft white, pebble gray, blush/terracotta piping
- Lighting strategy: diffuse lamps on both sides for symmetry
- Furniture silhouettes: simple headboard, tapered legs
- Texture layers: crinkled linen, quilt stitching, knit throw
- Accent details: piped edges, star-shaped pillow, woven basket for books
How To Recreate This Look:
- Start with a supportive base—tighten slats, add a breathable mattress topper.
- Add a duvet in a soft neutral and a mid-weight quilt with contrast piping.
- Layer two standard pillows vertically plus one playful shape in front.
- Place a knit or waffle throw on a diagonal for movement.
- Swap in linen-shade lamps to warm the scene at night.
Why This Looks Intentional: The contrast piping frames the bed like a tailored jacket. Repeated linen textures and consistent tones make the palette feel curated, not random.
Don’t Do This: Skip shiny microfiber that reflects light weirdly and highlights wrinkles. Avoid six decorative pillows—two plus one hero pillow is plenty.
Pro Styling Tip: Pinch the front edge of the duvet and fluff upward, then let it fall; that floaty ripple reads beautifully on camera.
Quick Tip: Put the curtain rod 2–4 inches from the ceiling, not just above the window frame. That tiny gap is what makes rooms look shorter and cheaper. High and wide makes everything feel taller and more generous.
5. Color-Block Closet That Actually Teaches Kids To Tidy
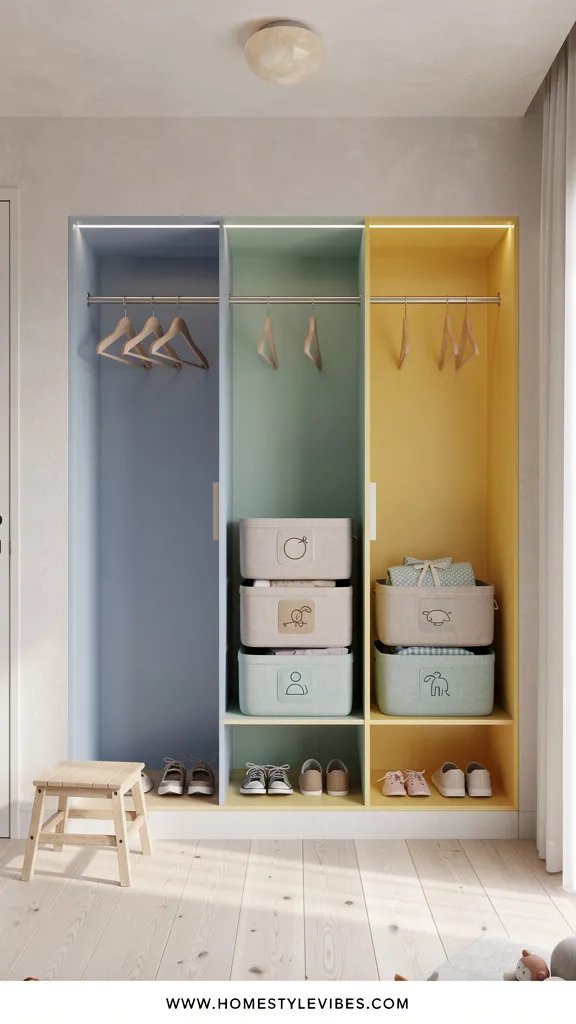
Closets swallow good intentions. You add bins, the bins fill with mystery items, and then the door becomes a shield you avoid opening. This idea uses color-block zones inside the closet—one color per category—so even non-readers know where things live. It’s behavioral design disguised as decor.
The mood is cheerful utility: pale wood hangers, soft color bins, and simple icons. It works because you remove decision fatigue. Blue = tops, green = bottoms, yellow = pajamas. Lighting fixes the black-hole effect: a motion-sensor LED strip illuminates shelves so kids can actually see what’s in the back. Materials stay kid-tough: melamine shelves, cotton bins, clear acrylic dividers.
Photos love the uniform hangers and color pops. Variations include a small-space rolling rack instead of a closet, a darker look using navy bins with white labels, and a renter-friendly setup with tension rods and peel-and-stick hooks. If you ever sell, buyers appreciate a tidy, systemized closet more than you think.
Budget Breakdown:
- Set of matching wood or velvet hangers: $30–$80
- Cotton storage bins in 3–4 colors: $40–$120
- Motion-sensor LED strip: $18–$35
- Acrylic shelf dividers: $20–$50
- Icon labels: $10–$20
Total Estimated Cost: $118 – $305
Best For: Families who crave faster school mornings; small closets that need clarity more than space.
Key Design Elements:
- Main materials: cotton bins, acrylic, melamine
- Color palette: pastel blocks or navy/white duo
- Lighting strategy: automatic LED strip inside door frame
- Furniture silhouettes: slim hangers, low baskets, shallow drawers
- Texture layers: canvas bins, smooth acrylic, woven hamper
- Accent details: icons over words, one “prize” shelf for displayed treasures
How To Recreate This Look:
- Empty the closet, measure shelves, and group by category.
- Assign each category a color; apply labels with matching icons.
- Swap to uniform hangers; hang by sleeve length for visual order.
- Install motion LED inside for full-shelf visibility.
- Reserve a single, eye-level display spot for a rotating favorite.
Why This Feels Designer: Systems beat stuff. Uniform hangers plus color logic read as custom millwork strategies, even with basic shelves.
Watch Out: Don’t overfill bins. Leave 20% breathing room so putting things away stays easy. Clutter creeps in when things have to be shoved.
Pro Styling Tip: Photograph with the closet doors half-open and the LED on; it creates a glowing frame and tidy color story.
Take a breath. You’re not behind. Spaces evolve with kids and with you. If your first try isn’t perfect, good. Perfect rooms never get played in.
6. Nature-Scout Desk Zone With Pegboard and Pressed Leaves
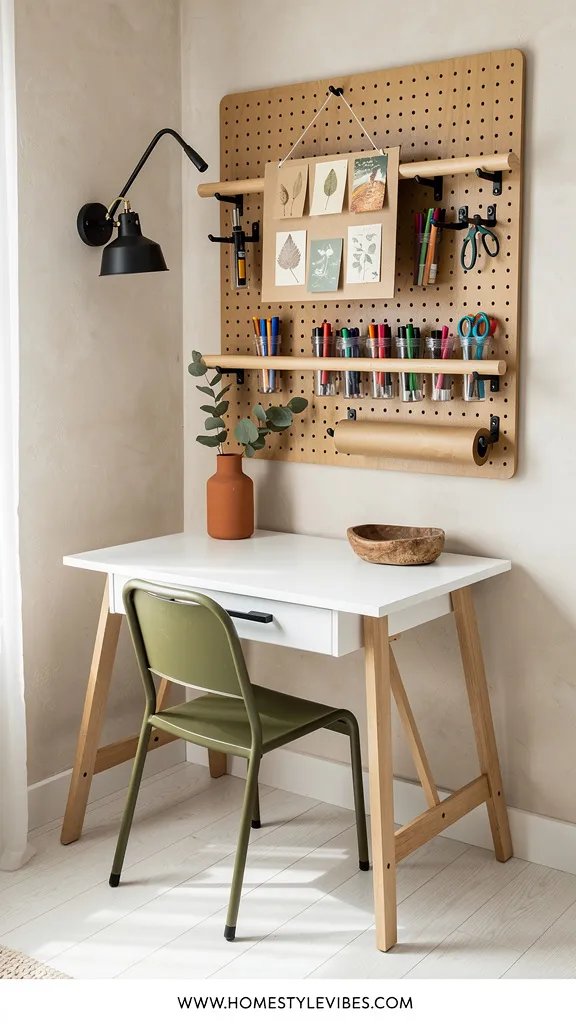
Homework station? Craft table? Science lab? You’ve tried to make one surface do everything, and it just ends up sticky and chaotic. This design carves a crisp desk zone with a wood pegboard, clip-on jars, and a rotating “field notes” display using pressed leaves or postcards. It’s functional, earthy, and surprisingly calming.
The mood feels modern rustic: pale wood, olive accents, kraft paper tones. It works in real homes because pegboards flex—today it holds scissors and markers, tomorrow headphones and a magnifying glass. Aim a warm task lamp onto the work surface and a wall washer onto the pegboard to highlight textures. Materials include birch pegboard, leather loops, glass jars with lids that actually click shut.
Photographs adore the pegboard grid contrasted with the organic shapes of leaves and twine. Try a budget version with IKEA SKADIS or a DIY plywood board. For renters, mount with removable strips and keep jars light. A darker variant uses walnut stain on the pegboard with brass hooks for a moody library look.
Budget Breakdown:
- Pegboard + hooks/jars: $45–$140
- Compact desk (or wall-mounted drop-leaf): $70–$220
- Adjustable task lamp: $25–$90
- Pressing kit or simple wax paper + heavy books: $10–$25
- Stool or kid chair: $30–$120
Total Estimated Cost: $180 – $595
Best For: Multi-use bedrooms where a tiny footprint must work hard. Ideal for kids who collect “nature treasures.”
Key Design Elements:
- Main materials: birch, leather loops, glass jars, kraft paper
- Color palette: olive, sand, honey wood, ink black accents
- Lighting strategy: task lamp for desk, ambient wash across pegboard
- Furniture silhouettes: straight-lined desk, round stool, skinny legs
- Texture layers: raw wood, twine, matte paper, smooth glass
- Accent details: magnifying glass, tiny clipboard, field guide book
How To Recreate This Look:
- Center a pegboard at kid shoulder height so they can reach everything.
- Mount jars for markers, loops for headphones, shelf for a small plant.
- Choose a compact desk with one shallow drawer for paper clutter.
- Press leaves between wax paper in a heavy book, then clip to the board.
- Angle the task lamp to avoid screen glare and shadows on homework.
Why This Looks Expensive: Material honesty. Real wood, glass, and leather age well and patina over time, which reads as quality on day one and year five.
The Most Common Mistake: Filling every peg. Leave negative space so the eye can rest and small hands can grab easily.
Pro Styling Tip: For photos, clear the desk except one open field guide and a single leaf on white paper; simplicity highlights the textures above.
Did You Know? A warm bulb (2700–3000K) makes color pencils look richer and skin tones softer. Cool bulbs can make paper and walls feel sterile and blue—no thanks for bedtime vibes.
7. Soft-Glow Adventure Ceiling: Constellations and Lanterns
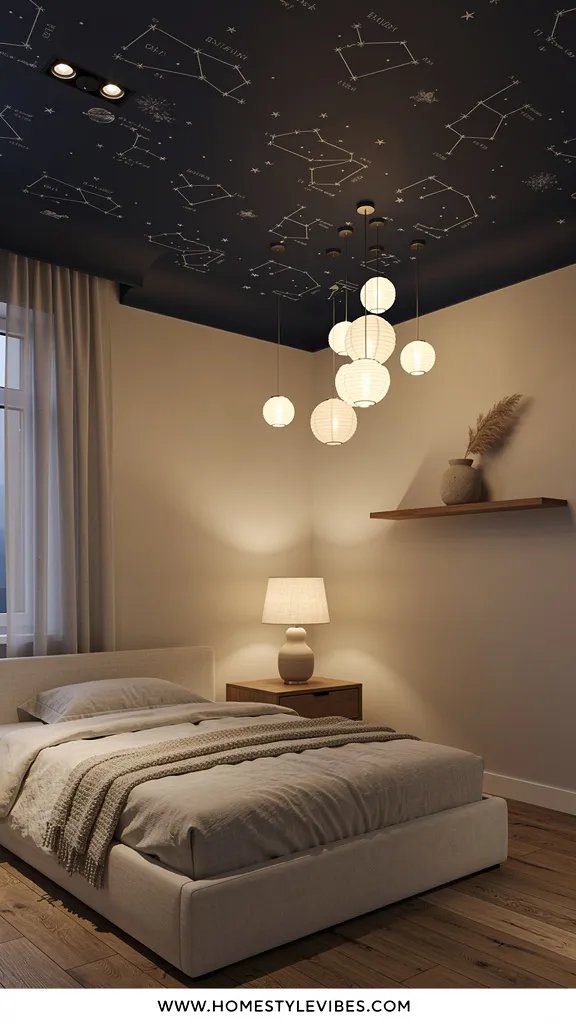
That overhead light? It’s a mood killer. Harsh, flat, and way too bright for winding down. This design turns the ceiling into a story: removable glow stars arranged as real constellations, tiny paper lanterns clustered like planets, and a dimmer switch that shifts the whole room into evening mode with one slide.
The mood blends celestial and boho—warm white lanterns, navy ceiling decals, and a soft amber wash. It works because bedtime becomes an event: a ceiling worth looking up at means kids settle more easily. Lighting is the hero here: hang three to five mini lanterns at varied heights from a canopy hook or a ceiling medallion, then add a plug-in dimmer to control brightness.
Photos love the ceiling drama and the depth from layered heights. For a small room, choose a single oversized lantern and a few constellations near the headboard. For a darker, moodier room, paint the ceiling a deep midnight blue (renter alt: peel-and-stick wallpaper overhead can work if it’s light). Pro tip from my own house: we added a tiny star near the door as a “goodnight button” to tap—completely silly, highly effective.
Budget Breakdown:
- Paper lantern set: $20–$60
- Warm white LED bulbs + dimmer: $25–$70
- Glow constellation decals: $15–$35
- Ceiling hooks/medallion: $10–$25
- Optional ceiling paint or peel-and-stick: $40–$120
Total Estimated Cost: $110 – $310
Best For: Nighttime routines, shared rooms, or any kid who loves space, stories, or gentle rituals.
Key Design Elements:
- Main materials: paper lanterns, decals, dimmable LEDs
- Color palette: warm white, navy, soft gold
- Lighting strategy: multiple low-watt bulbs, all dimmable
- Furniture silhouettes: keep low-profile to direct the eye up
- Texture layers: rice paper translucence, matte stars
- Accent details: moon nightlight, metallic sprinkle pillow
How To Recreate This Look:
- Install a plug-in dimmer for the lantern string or main lamp.
- Hang lanterns at three heights; keep at least 12 inches from the ceiling for glow.
- Map a few real constellations—Orion, Cassiopeia—around the bed area.
- Swap to warm LEDs and test brightness at bedtime level.
- Add a small moon nightlight near the outlet for layered glow.
Why This Feels Designer: Layered ambient lighting plus a statement ceiling reads like boutique hospitality. The eye travels up, making the room feel bigger and more considered.
One Thing To Avoid: Overcrowding the ceiling. Choose clusters, not a sea of lanterns, and keep cords tidy with clear clips running along the ceiling line.
Pro Styling Tip: Shoot from kid-eye height, slightly upward; lights will flare softly and the ceiling reads expansive and dreamy.
Quick Tip: When you hang art above a kid’s bed, keep the bottom edge about 6–8 inches above the headboard. Too high and it floats away in photos. Too low and it competes with pillows.
8. Mini Museum Wall With Swap-Friendly Frames and Kid Curation
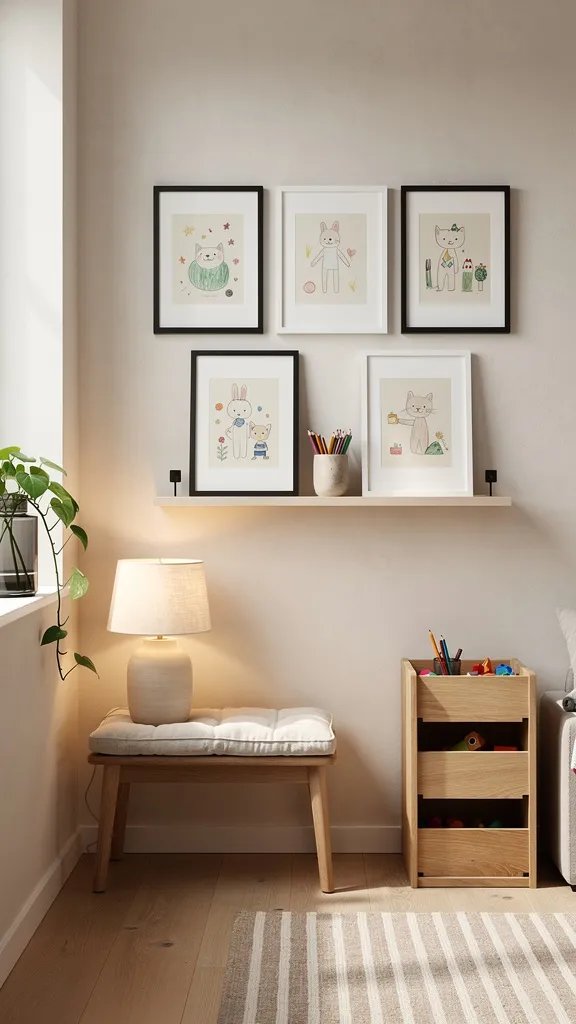
You’ve got piles of art and zero plan. Fridge doors buckle under the tape, and masterpieces slide to the floor. This mini museum installs a low gallery wall with easy-open frames and a petite picture ledge. Your child becomes the curator; you just enjoy the rotating magic.
The mood lands in clean gallery with playful notes—thin black or white frames, a wood ledge, and cream mats that make even finger paint look intentional. It works in real homes because it respects the flood of creativity without clutter. Place it low so kids can point and talk about their work. Lighting? A subtle track light or two plug-in picture lights makes the color pop and the paper texture gleam softly.
Photos adore repetition and negative space. Keep frames consistent and vary art scale inside the mats. Variations include: a budget line with clip frames and washi tape borders; a small-space vertical stack beside the closet; a darker, dramatic version with walnut frames and brass picture lights. Renter bonus: use Command picture hanging strips for everything.
Budget Breakdown:
- Set of 6–8 frames with mats: $60–$180
- Picture ledge (24–36 inches): $20–$60
- Plug-in picture lights or slim track: $45–$140
- Hanging strips and level: $12–$25
- Archival sleeves (optional): $15–$30
Total Estimated Cost: $152 – $435
Best For: Hallway bedrooms, long blank walls, kids who create weekly.
Key Design Elements:
- Main materials: metal/wood frames, mats, wood ledge
- Color palette: black/white frames, natural wood, creamy mats
- Lighting strategy: focused picture lighting, warm temperature
- Furniture silhouettes: slim ledge, narrow frames
- Texture layers: matte paper, glass reflections, wood grain
- Accent details: date stamps, tiny plaques with titles written by the artist
How To Recreate This Look:
- Measure a “kid-zone” from 24–48 inches high; place frames within this band.
- Install a slim ledge centered; use it for 3D pieces or rotating favorites.
- Mount frames in a neat grid with 2–3 inches between edges.
- Plug in picture lights; aim for soft grazing rather than hot spots.
- Label titles with painter’s tape and pen—instant museum vibes.
Why This Reads High-End: Consistency. Matching frames and mats elevate even the simplest drawing. Focused lighting adds gallery polish and takes the room from kid-chaos to curated.
Don’t Do This: Avoid mixing too many frame styles. Pick one or two at most. Also skip glossy, brightly colored frames—they reflect weird and cheapen photos.
Pro Styling Tip: For a magazine look, keep one frame intentionally empty with just the mat—it creates breathing room and teases the next masterpiece.
Mindset Reset: If one idea failed before, it likely wasn’t you—it was the sequence. Storage first, then lighting, then decor. When the order works, the room works.
Quick Checklist
- Install a gauzy canopy and dimmable string lights for a moonlit nook
- Use rolling under-bed bins with icon labels
- Paint 2–3 tape-guided shapes for a storybook mural
- Layer linen bedding with a piped quilt and a single hero pillow
- Color-code closet zones with uniform hangers
- Mount a wood pegboard above a compact desk
- Cluster paper lanterns and real constellations on the ceiling
- Create a kid-height gallery with matching frames and picture lights
- Swap harsh bulbs for 2700–3000K warm LEDs
- Hang curtains high and wide to visually raise the ceiling
Frequently Asked Questions
How do I pick just one idea if my budget is tight?
Choose the idea that fixes your daily stress first. If bedtime is chaos, start with lighting or the canopy nook. If mornings drag, do the closet color system. Cap it at $200–$300 and let that win motivate the next step.
My kid’s room is tiny. Which idea works best in a small space?
The under-bed library on wheels and the mural headboard both earn their keep without taking floor space. A pegboard above a small desk also keeps surfaces clear and tools within reach.
We rent. What can I do that won’t cost my deposit?
Use removable hooks for canopies and lanterns, command strips for frames and pegboards, and peel-and-stick decals for murals. Plug-in dimmers and picture lights create mood without wiring.
How do I keep these spaces tidy long-term?
Label everything with words and icons, and leave 20% empty space in bins. Build a 5-minute reset routine: one song, everyone slides bins in, books on ledge, lights dimmed. Systems, not willpower, keep rooms calm.
What if my kid changes interests every six months?
Design the bones neutral—linen, wood, white frames—and swap the accents: pillows, wall art, and decals. These ideas are made to flex with new obsessions without redoing the whole room.
Conclusion
Start with one idea. Seriously. Pick the nook, the lighting, or the under-bed fix and do it this weekend. You’ll feel the shift the second you walk in—less noise, more glow, and a room that finally looks as loved as it is.
The truth is, luxury in a kids’ room isn’t marble or designer wallpaper. It’s texture you can touch and lighting that hugs the room at night. Keep your palette tight, your layers soft, and your systems simple. That’s the secret sauce.
You’ve got this. One small, thoughtful change at a time and the bedroom turns magical—photogenic, practical, and perfectly yours. And when you catch them reading under the canopy lights with crumbs on the quilt? That’s the good stuff. That’s home.

About the Author

Krisztina P.Rendes, Founder of Home Style Vibes
Founder of Home Style Vibes
Krisztina Puskásné Rendes created Home Style Vibes as a cozy-modern lifestyle space where homemaking meets inspiration. Her goal is to help women create beautiful, organized, and peaceful homes they truly love — without overwhelm. You’ll find here heart-driven content on home decor, cleaning tips, easy family recipes, organization and decluttering, DIY home projects, plants, and seasonal ideas — all designed to bring more calm, comfort, and style into everyday life.