6 Diy Raised Vegetable Garden Bed Ideas for Small Spaces
You want tomatoes that taste like summer and herbs that actually smell like themselves. You hate the sad basil on your windowsill, the balcony planter that never quite produces, and the mess that sprawls everywhere. Picture soft morning light hitting clean cedar lines, deep green leaves against creamy gravel, and little pockets of edible color that feel intentional, not chaotic. These 6 DIY raised vegetable garden bed ideas for small spaces solve tight-quarters frustration with smart layouts, vertical tricks, and real-deal materials—so you can go from “I wish I had a garden” to “Want pesto?” in under a weekend, for under $300 each in most cases.
We’ll fix common pain points—drainage, soil depth, awkward corners—and create something photogenic enough for your camera roll and your friends’ inboxes. Expect textures that play beautifully in sunlight, color palettes that flatter leafy greens, and layouts that look tidy, even when life gets busy. If you’re renting, short on space, or allergic to fussy maintenance, this is your lane. The vibe: grounded, practical, and a little dreamy. Perfect for anyone who loves design and loves dinner even more.
1. Slim Cedar Ribbon Beds With Gravel Aisles
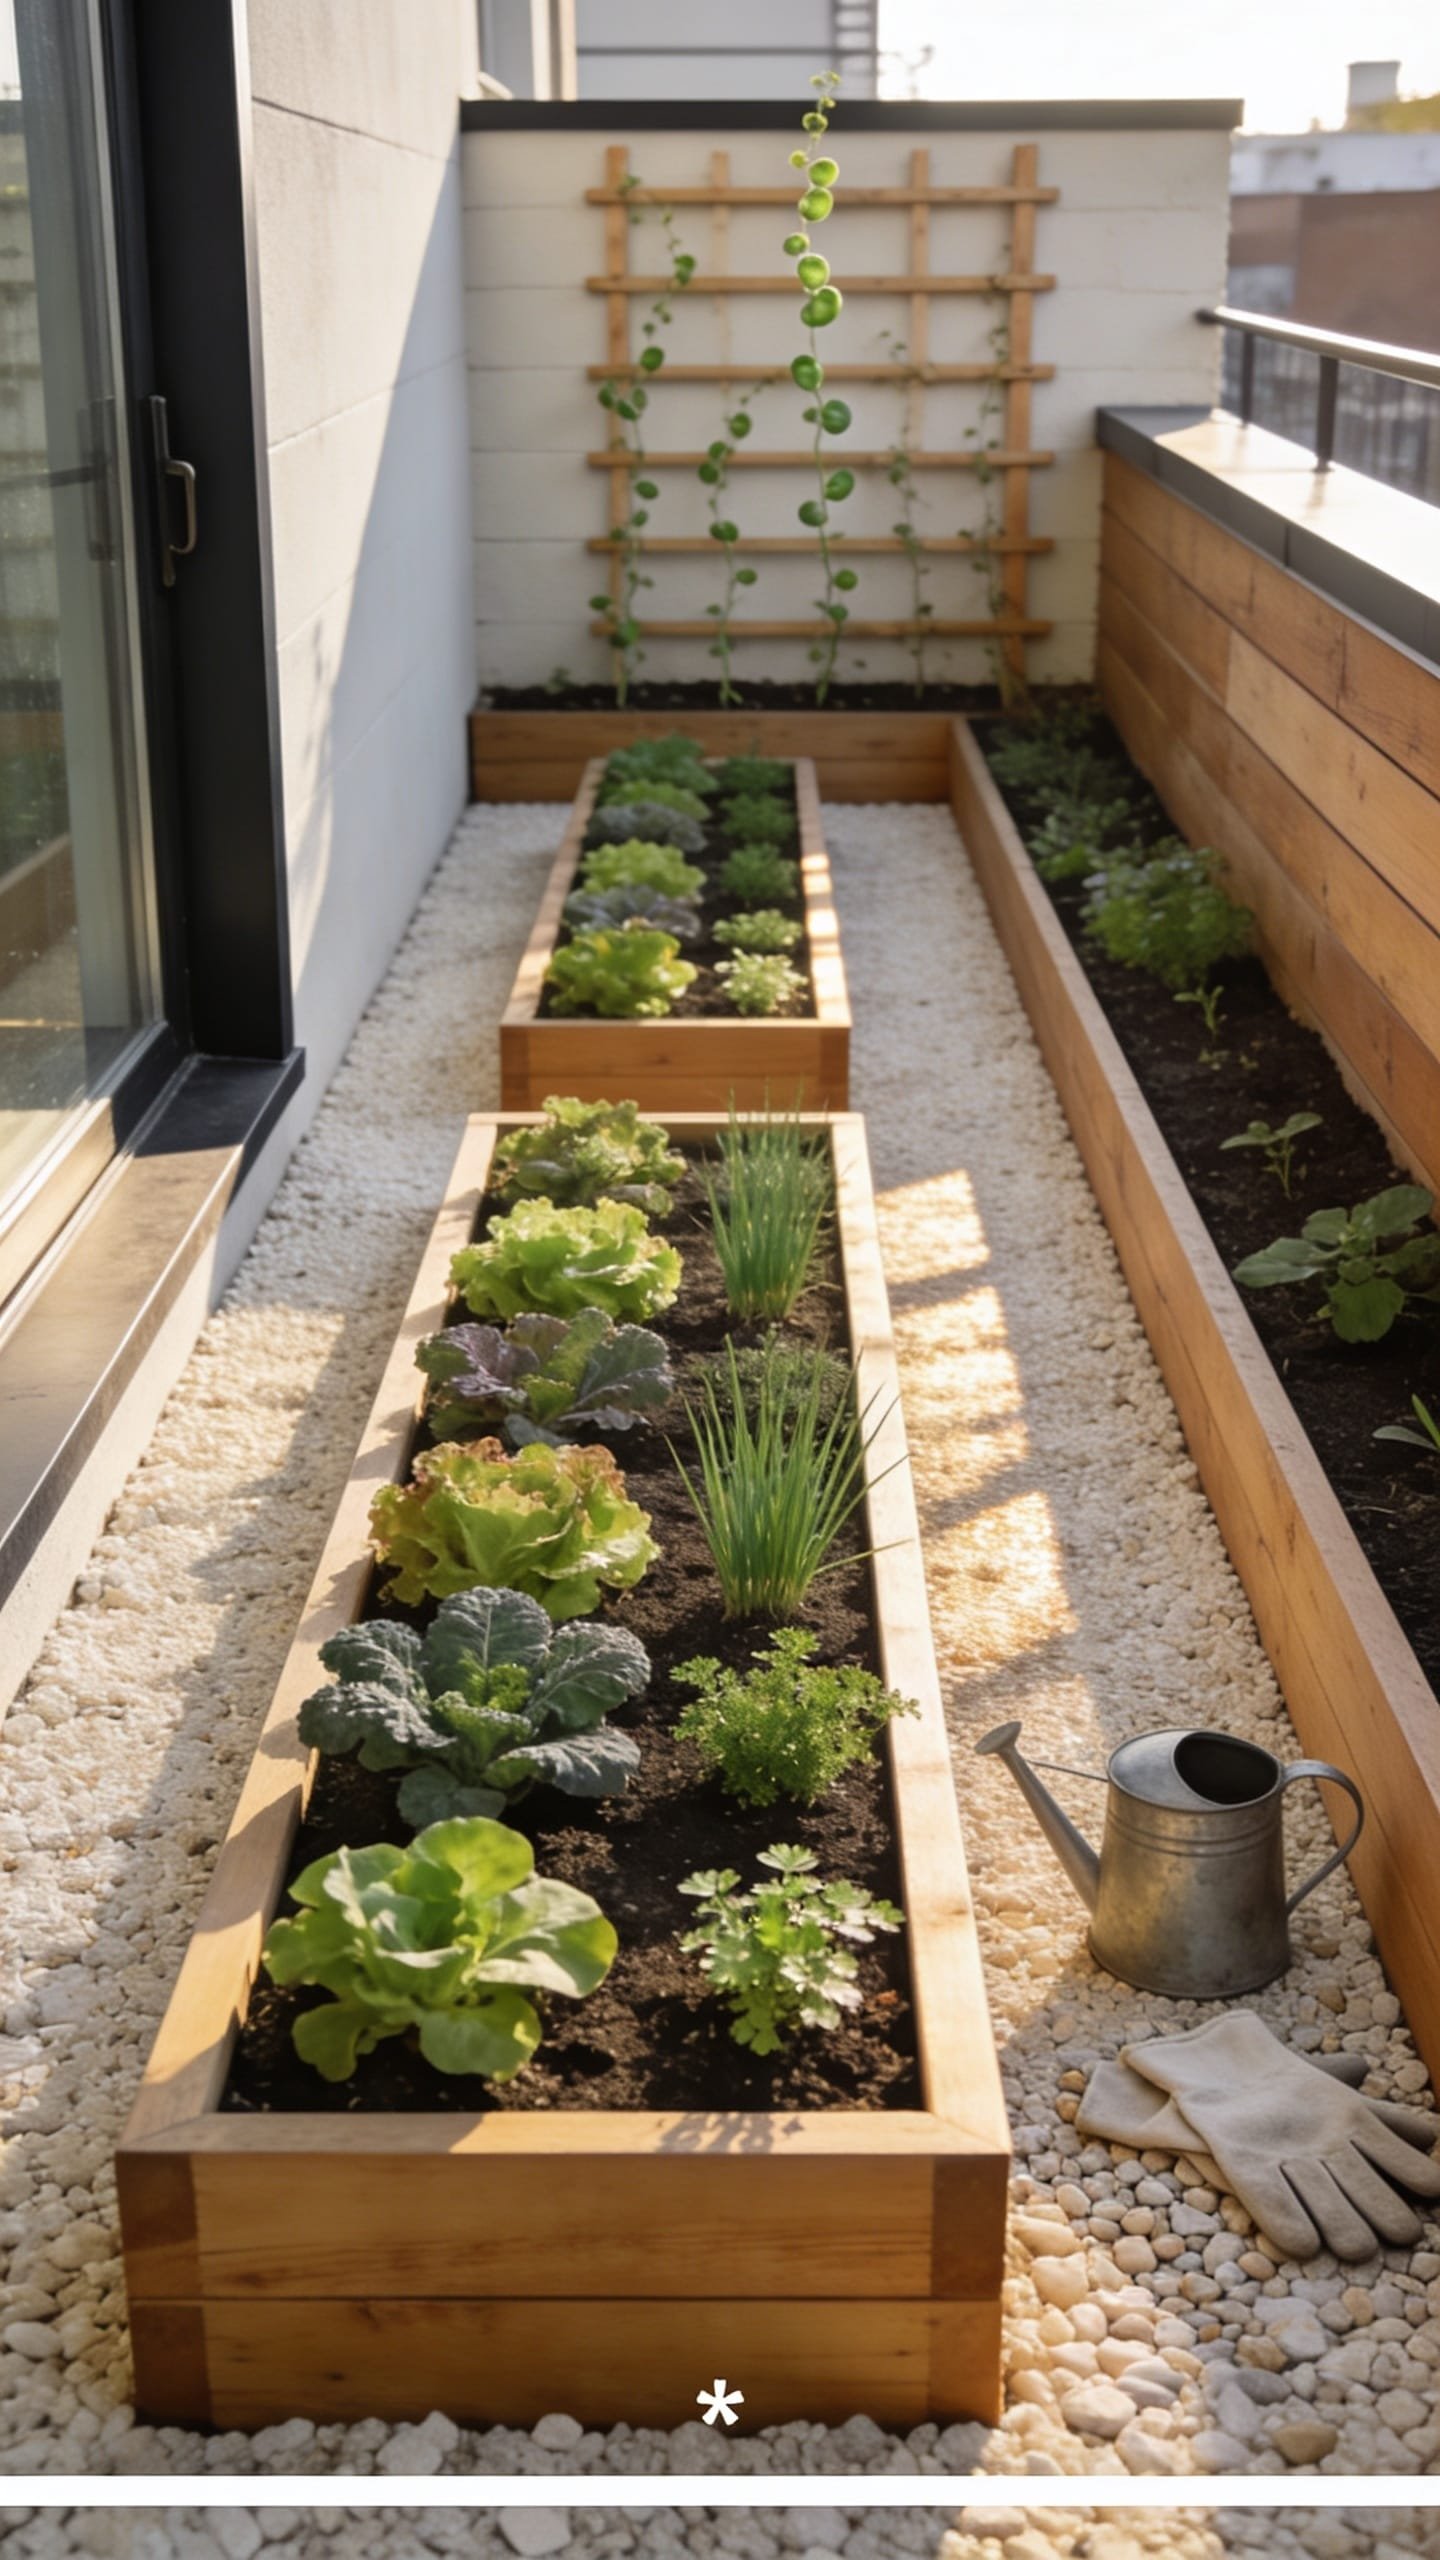
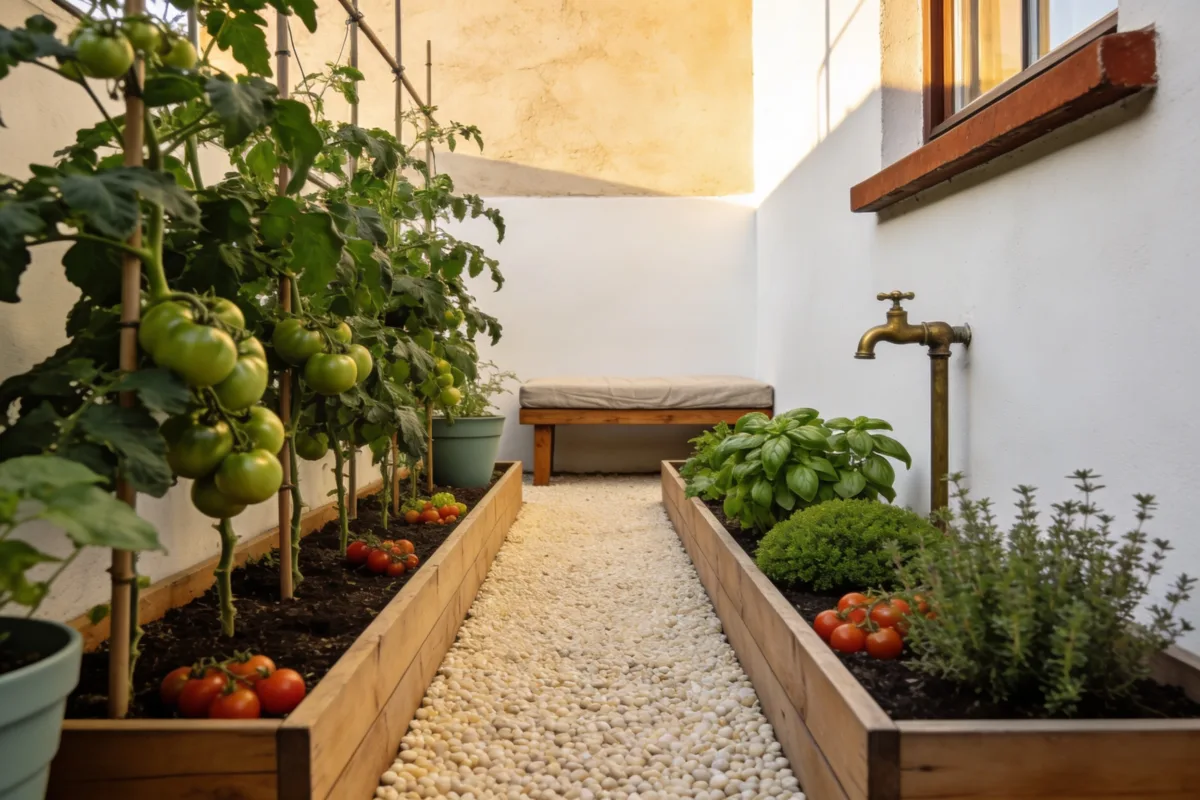
We’ve all been there: your balcony or narrow side yard feels awkward, long, and useless. You’ve tried a few random pots, but it still looks scattered and you can’t tell what’s thriving. Meet the “cedar ribbon”—slim, low raised beds that run like neat lines down a small space, anchored by pale gravel that makes greens glow. The mood is modern cottage meets urban tidy: grounded, calm, and quietly lush.
It works in real homes because narrow beds keep you from overplanting, yet still give roots the depth they need. Cedar resists rot and smells like a forest after rain. Lighting matters here—morning sun turns the gravel into a soft reflector, bouncing light under leaves so everything reads brighter and more photogenic. Materials lean natural: unfinished cedar, pea gravel, black powder-coated brackets, and matte irrigation lines that disappear visually.
Why it photographs beautifully: crisp cedar edges against a pale ground plane create contrast and depth; herbs and lettuces form a low, textured canopy. A long shot down the aisle delivers that magazine-ready perspective line. For flexibility, you can tweak the bed height and spacing. Renter-friendly? Yes—use landscape fabric over the existing surface and skip any permanent edging. For tighter spaces, do a single ribbon bed along one wall and mirror the gravel on the opposite side.
Budget Breakdown:
- Cedar boards (1×8 or 2×8): $80–$150
- Corner brackets/screws: $15–$30
- Landscape fabric: $15–$25
- Pea gravel (bags): $60–$120
- Soil and compost: $50–$100
- Drip irrigation kit (optional): $35–$75
Total Estimated Cost: $255 – $500
Best For: Long, skinny balconies or side yards. People who love crisp lines and hate visual clutter. Works in spring through fall; great if you like a low-maintenance, structured look.
Key Design Elements:
- Main materials: Untreated cedar, pea gravel, steel brackets
- Color palette: Honey cedar, cream gravel, glossy green foliage, matte black accents
- Lighting strategy: Morning sun ideal; gravel reflects soft light under plant canopies
- Furniture silhouettes: Narrow bench or foldable bistro chair at the end of the aisle
- Texture layers: Smooth boards, crunchy gravel, ruffled greens
- Accent details: Small black plant labels, a single weathered terracotta pot for warmth
How To Recreate This Look:
- Measure your space and decide on bed width (10–14 inches works for small footprints) and length.
- Assemble cedar frames using corner brackets; keep height at 8–12 inches for root depth.
- Lay landscape fabric on the ground; pin in place with landscape staples.
- Position beds, fill with a 60/40 soil-to-compost blend, and rake level.
- Pour pea gravel around the beds; keep 16–20 inches of walkway if possible.
- Install drip lines under a light mulch (shredded straw or fine bark).
- Plant rows of cut-and-come-again greens, basil, and compact tomatoes on cages.
- Style with a single black lantern or a folding bistro chair for a finishing moment.
Why This Looks Expensive: The repetition. Multiple narrow beds read custom, not “I grabbed a random planter.” The gravel aisle creates a defined stage, and the restrained palette feels intentional, like a boutique kitchen garden behind a small hotel.
Watch Out: Don’t choose white gravel; it glares and will wash out your greens in photos. Creamy pea gravel adds warmth and hides pollen and soil splatter better.
Pro Styling Tip: Shoot late afternoon when shadows stripe across the gravel—diagonal lines + cedar grain = instant depth.
Keep scrolling—our next build goes vertical and sneaks a legit harvest onto a tiny wall.
2. Ladder-Style Vertical Planter With Modular Trays
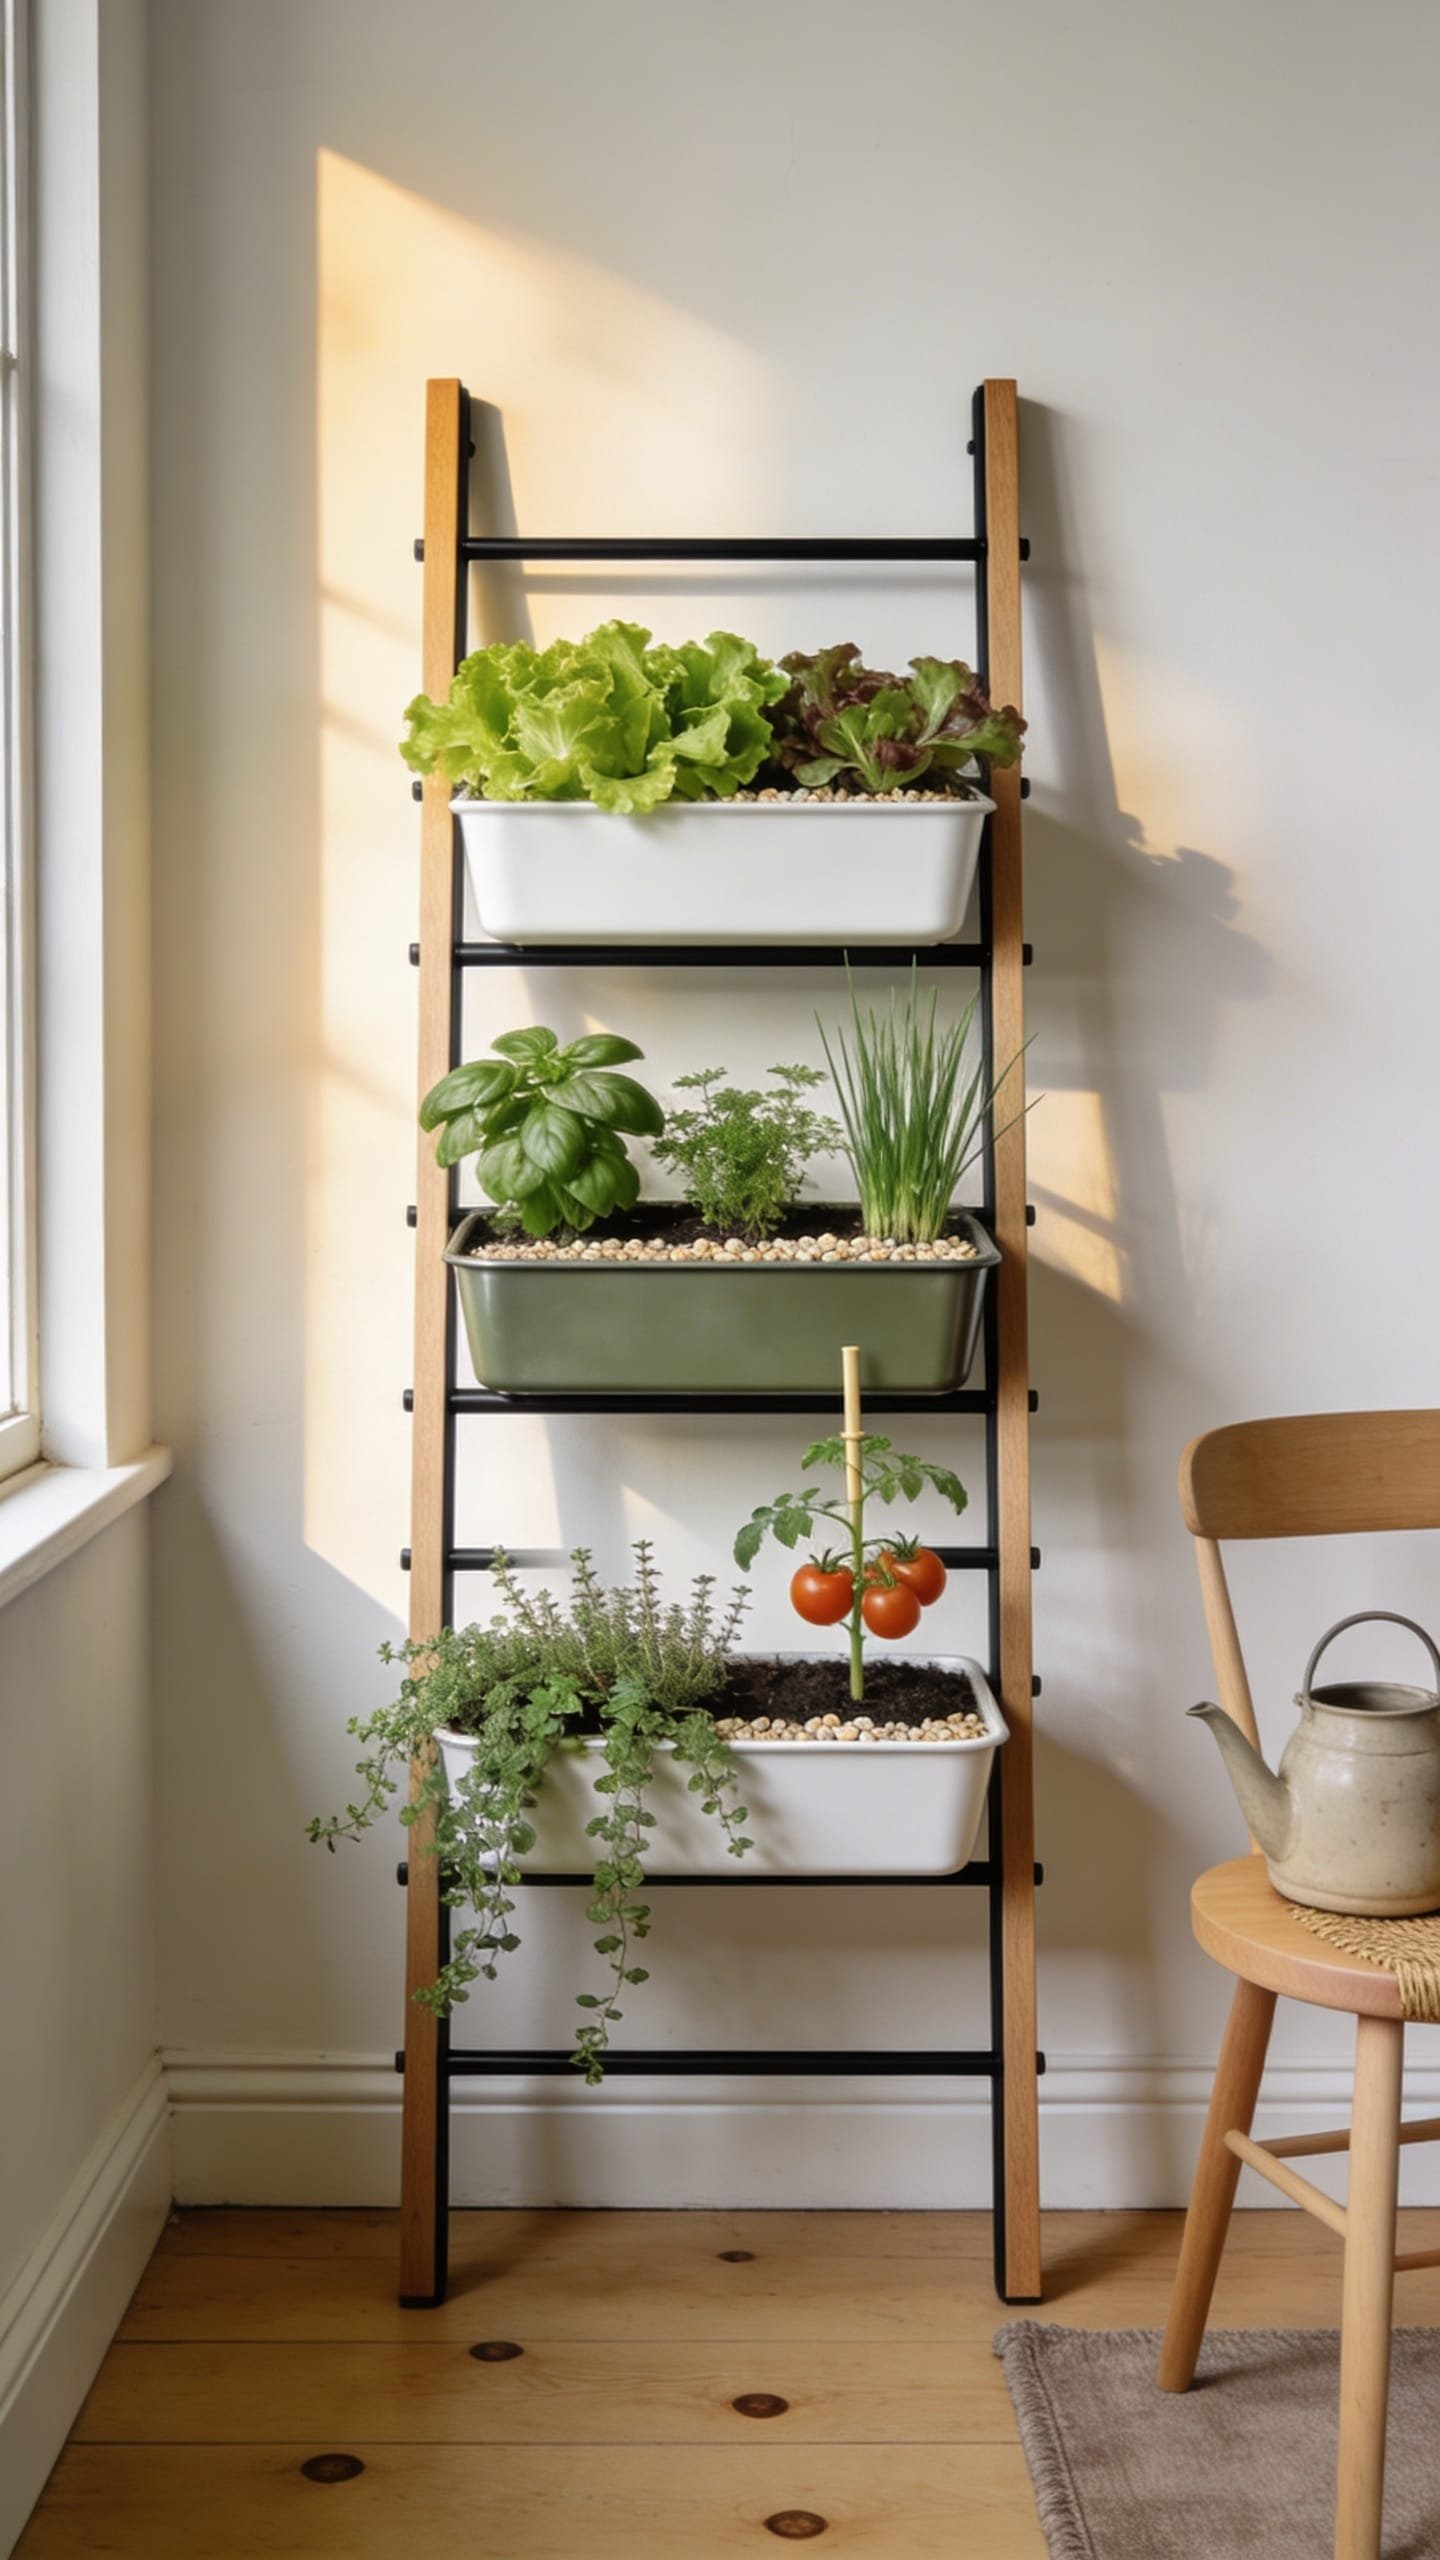
It’s that one wall that always feels off—blank, echoey, and wasted. You’ve tried a cheap shelf system, but the planters droop, watering is a mess, and nothing looks cohesive. The ladder-style vertical planter fixes the wall and your herb situation. Mood-wise, it’s Scandinavian greenhouse: light, airy, and delightfully practical.
This works in small spaces because it claims vertical real estate while keeping the floor clear. Modular trays let you rearrange crops seasonally—salad greens up top in spring, trailing strawberries on the lower rungs in summer. Lighting note: vertical gardens love even light. East-facing walls shine; harsh west sun can crisp leaves unless you add a thin shade cloth in July.
Materials skew minimal: sealed pine or cedar rails, matte-black brackets, galvanized or powder-coated steel trays. It photographs beautifully because trays create horizontal layers; plants cascade at slightly different depths and heights, which reads rich and dimensional. Renter-friendly version? Mount the ladder to a freestanding A-frame and skip wall drilling. Micro-space variation: a half-ladder with three tiers over a console-height planter base for extra soil mass.
Key Design Elements:
- Main materials: Cedar or pine rails, metal trays, matte brackets
- Color palette: Natural wood, soft gray metal, saturated greens, tiny pops of edible flowers
- Lighting strategy: Even morning light; add dappled shade cloth if afternoons scorch
- Furniture silhouettes: Slim bench or potting stool under the lowest tier
- Texture layers: Smooth metal trays, grainy wood, tufted greens, trailing vines
- Accent details: Uniform plant labels, a single copper watering can for a warm note
Budget Breakdown:
- Wood for ladder rails and rungs: $40–$80
- Metal or plastic modular trays: $60–$120
- Hardware and brackets: $20–$40
- Soil and compost: $30–$60
- Drip line or self-watering wicks (optional): $25–$50
- UV-protective stain/sealant: $20–$35
Total Estimated Cost: $195 – $385
Best For: Balcony or patio walls, renters who need non-permanent solutions, herb-heavy cooks. Ideal for quick snips near the kitchen door.
How To Recreate This Look:
- Cut two vertical rails to height (5–6 feet) and sand smooth; seal with UV-protective product.
- Attach rungs or brackets every 12–14 inches; keep the lowest rung at least 16 inches above the floor.
- Mount modular trays; ensure a slight tilt back so water drains inward, not onto the wall.
- Line trays with coir or mesh to keep soil in place; fill with light potting mix.
- Plant compact herbs up top (thyme, chives), leafy greens mid-level, strawberries or nasturtiums low and trailing.
- Add a slim drip line at the back or use self-watering wicks from a concealed reservoir.
Why This Feels Designer: Consistent tray style and spacing create a visual rhythm. It looks like a custom install instead of a haphazard stack because the negative space between tiers is deliberate.
One Thing To Avoid: Random pot shapes and colors on the same ladder. It gets chaotic fast. Keep formats uniform; let the plants provide the variety.
Pro Styling Tip: Mix leaf shapes—spiky chives next to round butter lettuce and trailing thyme—for texture contrast that reads well in photos.
Ready for something that turns a corner nobody knows what to do with into your favorite place to stand in the morning?
Remember, this isn’t about recreating a showroom. It’s about building a mini garden that fits your life and your light. If one idea lights you up, that’s your starting point—save the rest for next season.
3. Corner-Cradled L-Shaped Bed With Built-In Bench
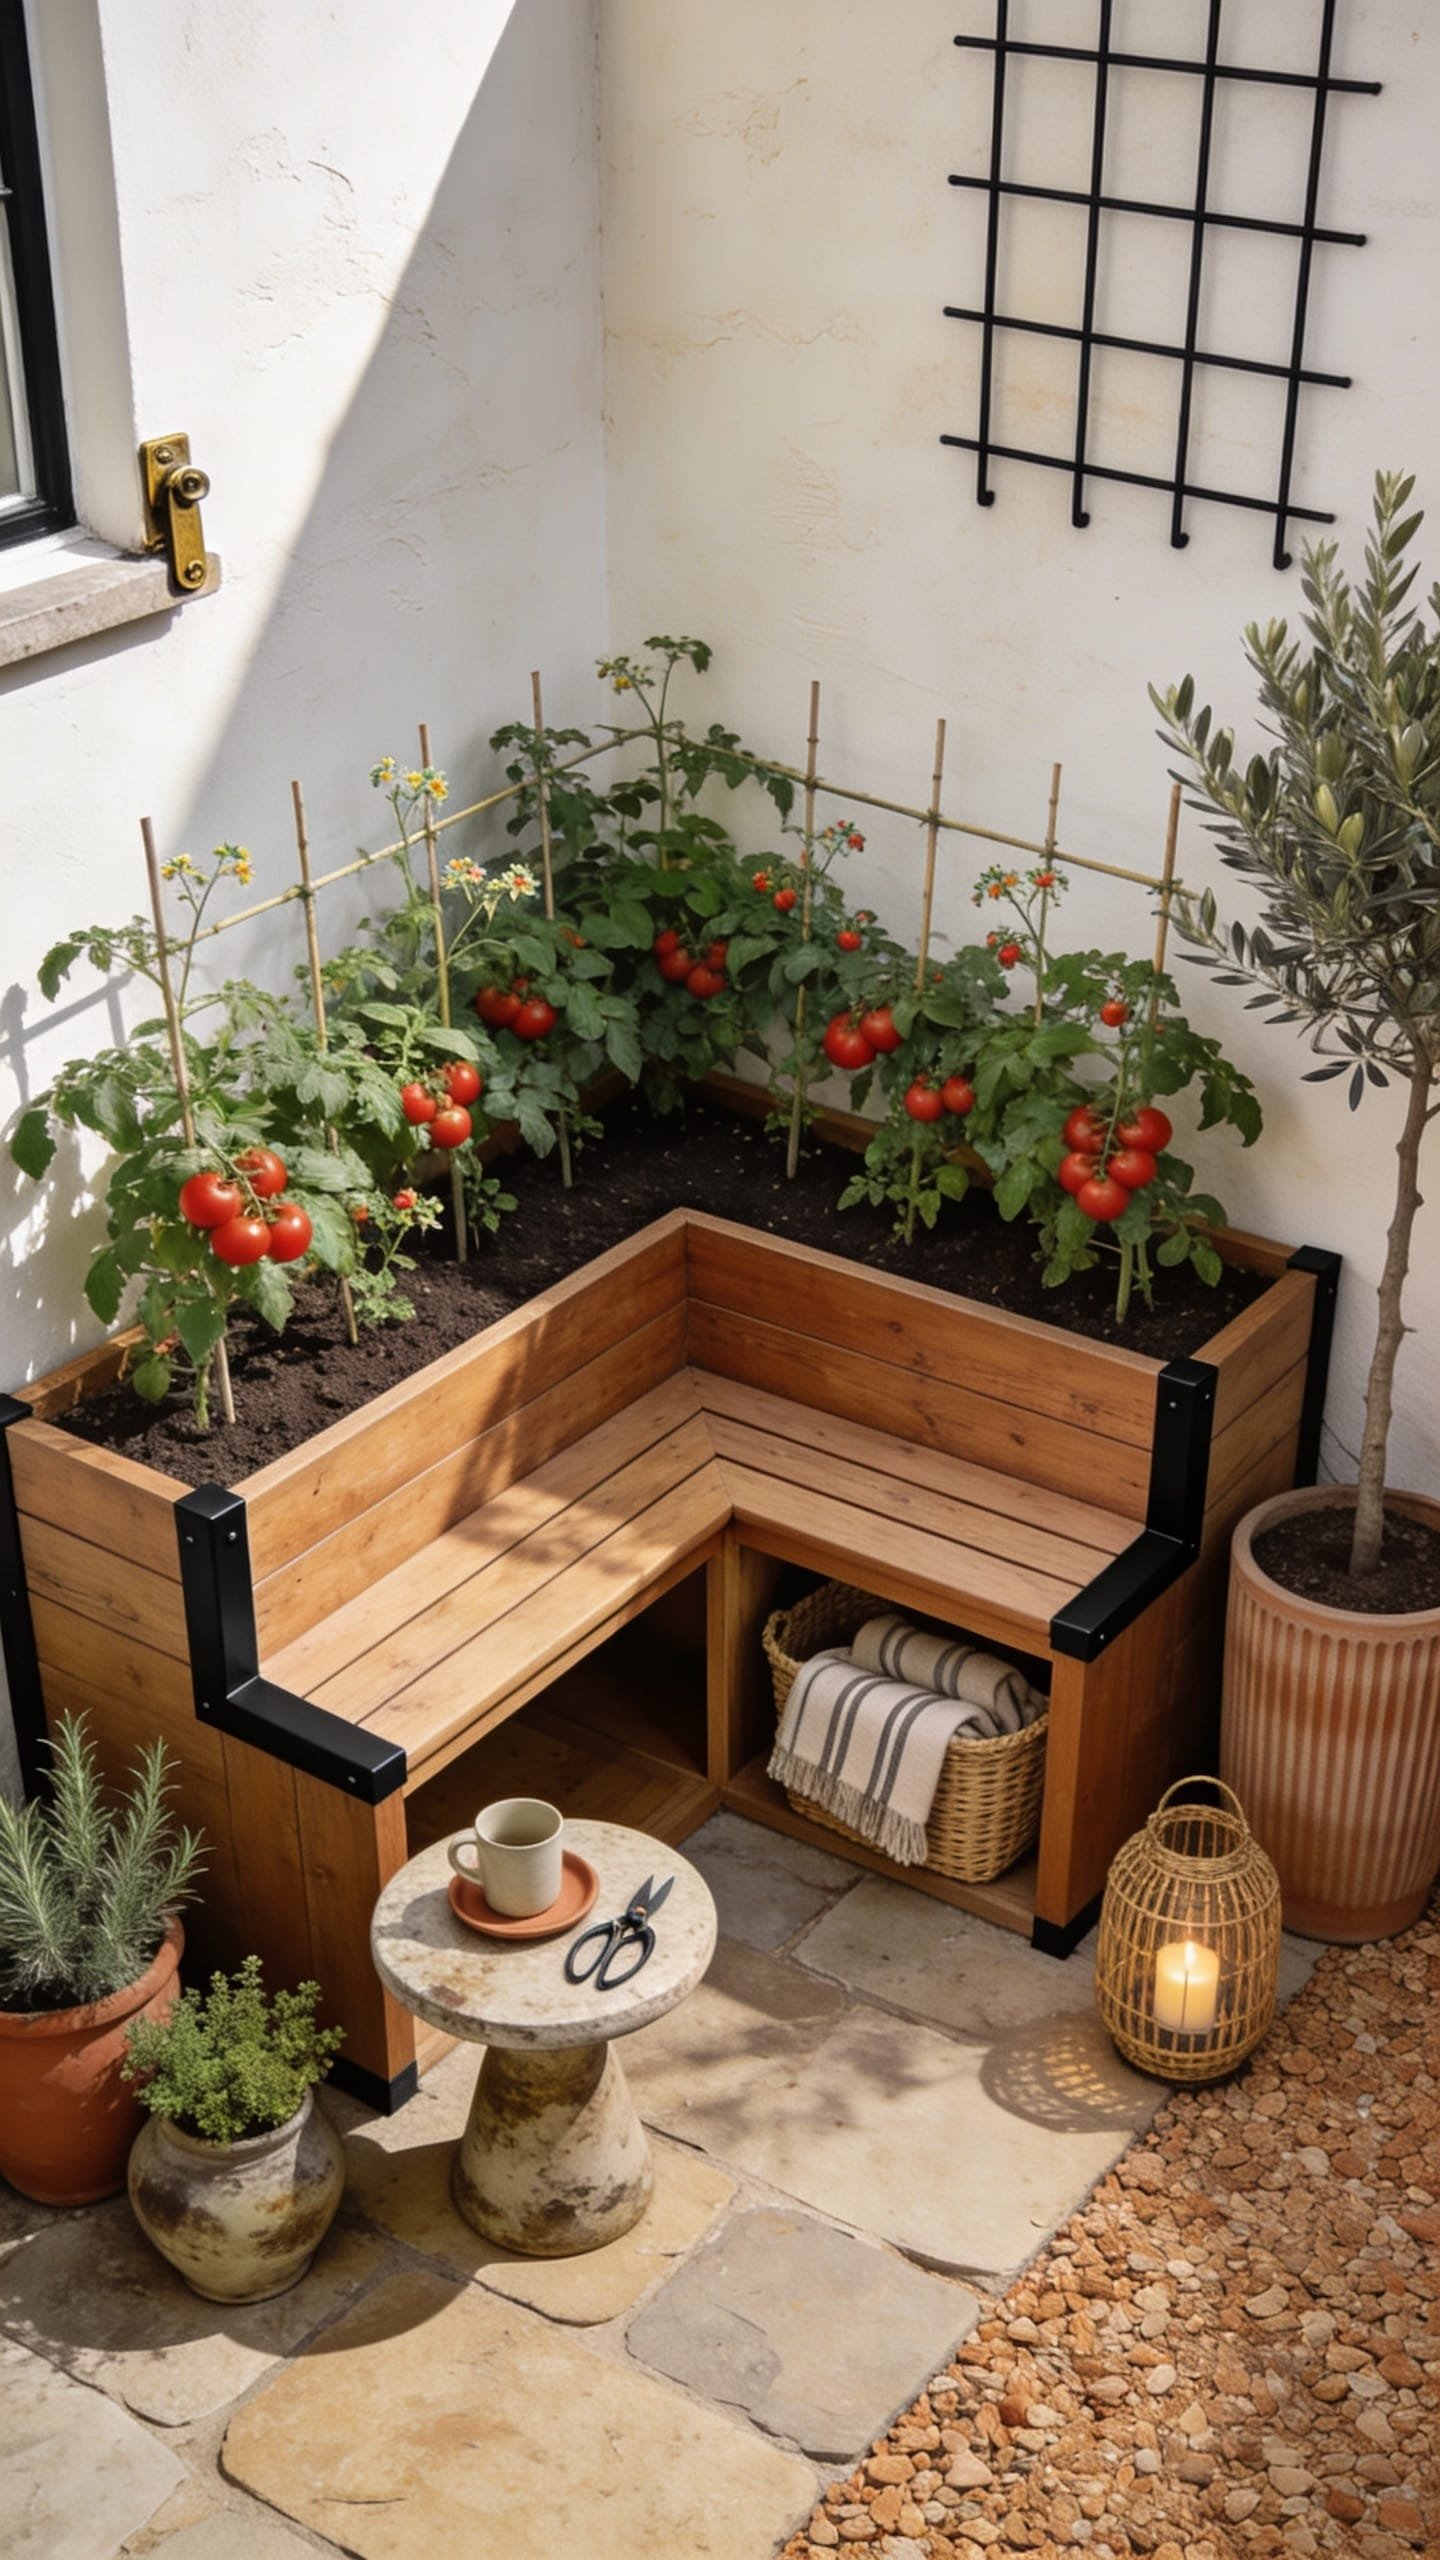
You want a place to sit with your coffee and stare at your tomatoes while pretending you’re thinking about work. But corners are tricky; they collect clutter, and square beds can feel boxy or in the way. The L-shaped bed wraps the corner and tucks in a simple bench so the whole setup feels like it was meant to be there. The mood is modern Mediterranean courtyard—warm wood, olive greens, and sun-washed stone vibes even in a small city patio.
Why it works at home: the L-shape defines the zone without eating the whole patio. A bench doubles as perch and potting station. Lighting gets interesting here; corners often have mixed light. Plant sun-lovers on the outboard arms and tuck partial-shade herbs (parsley, cilantro) closer to the interior wall. Materials bring texture contrast: cedar or cypress boards, a seat of slatted wood, and a pale paver or decomposed granite floor for that soft crunch underfoot.
It photographs beautifully because the L creates depth from any angle—you get foreground leaves, midground bench, and background wall. Even better, corner beds hide irrigation lines neatly. Variations: budget-friendly use pine coated in a non-toxic sealant and add rubber feet. Darker version stain the wood a walnut tone and use charcoal pavers for an evening-cocktail vibe. Renter-friendly? Build the L bed as two separate rectangles that butt together so you can move it later.
Key Design Elements:
- Main materials: Cedar or cypress, slatted bench seat, pale pavers or DG
- Color palette: Honey wood, soft stone, olive and emerald foliage
- Lighting strategy: Sun-lovers on the arm edges, tender herbs closer to shade
- Furniture silhouettes: Low corner bench, slim side table for a mug
- Texture layers: Smooth slats, grainy stone, velvety tomato leaves, glossy peppers
- Accent details: A single outdoor cushion in natural linen, matte black hooks for tools
Budget Breakdown:
- Wood for L-shaped bed and bench: $120–$250
- Corner brackets and exterior screws: $20–$40
- Pavers or decomposed granite: $80–$180
- Soil, compost, mulch: $60–$120
- Drip kit and timer: $45–$85
Total Estimated Cost: $325 – $675
Best For: Small patios that need a focal point. People who entertain outside and want a spot for a guest to sit and pluck mint for drinks.
How To Recreate This Look:
- Map out your L dimensions with painter’s tape; check clearances for chairs.
- Build two rectangular frames; connect with a shared corner post or leave independent.
- Set rubber pads or paver bases to keep wood off damp ground.
- Add slats on top of the inner edges to create the bench seat; leave 1/4-inch gaps for drainage.
- Fill beds with soil mix; install drip along the outer edges and a cross line in the corner.
- Plant tall tomatoes or trellised cucumbers at the back, basil in front, marigolds at corners.
- Style with a natural linen cushion and a small tray for clippers and a citrus zester.
Why This Reads High-End: The built-in bench. Integrated seating looks custom, even if it’s just a cleverly placed slat. The L-shape frames your view and whispers “designed,” not “thrown together.”
The Most Common Mistake: Overfilling the corner with too many tall plants. You’ll lose air circulation and create mildew central. Keep one tall plant per arm and let the rest stay mid-height.
Pro Styling Tip: Place a single terra-cotta pot on the bench’s corner with trailing thyme to soften the right angle in photos.
Small-space gardens thrive on clarity. Give each plant a lane, and you’ll actually harvest more—because you can see what’s ready and what needs water at a glance.
4. Stock Tank Garden With Split-Height Pairing
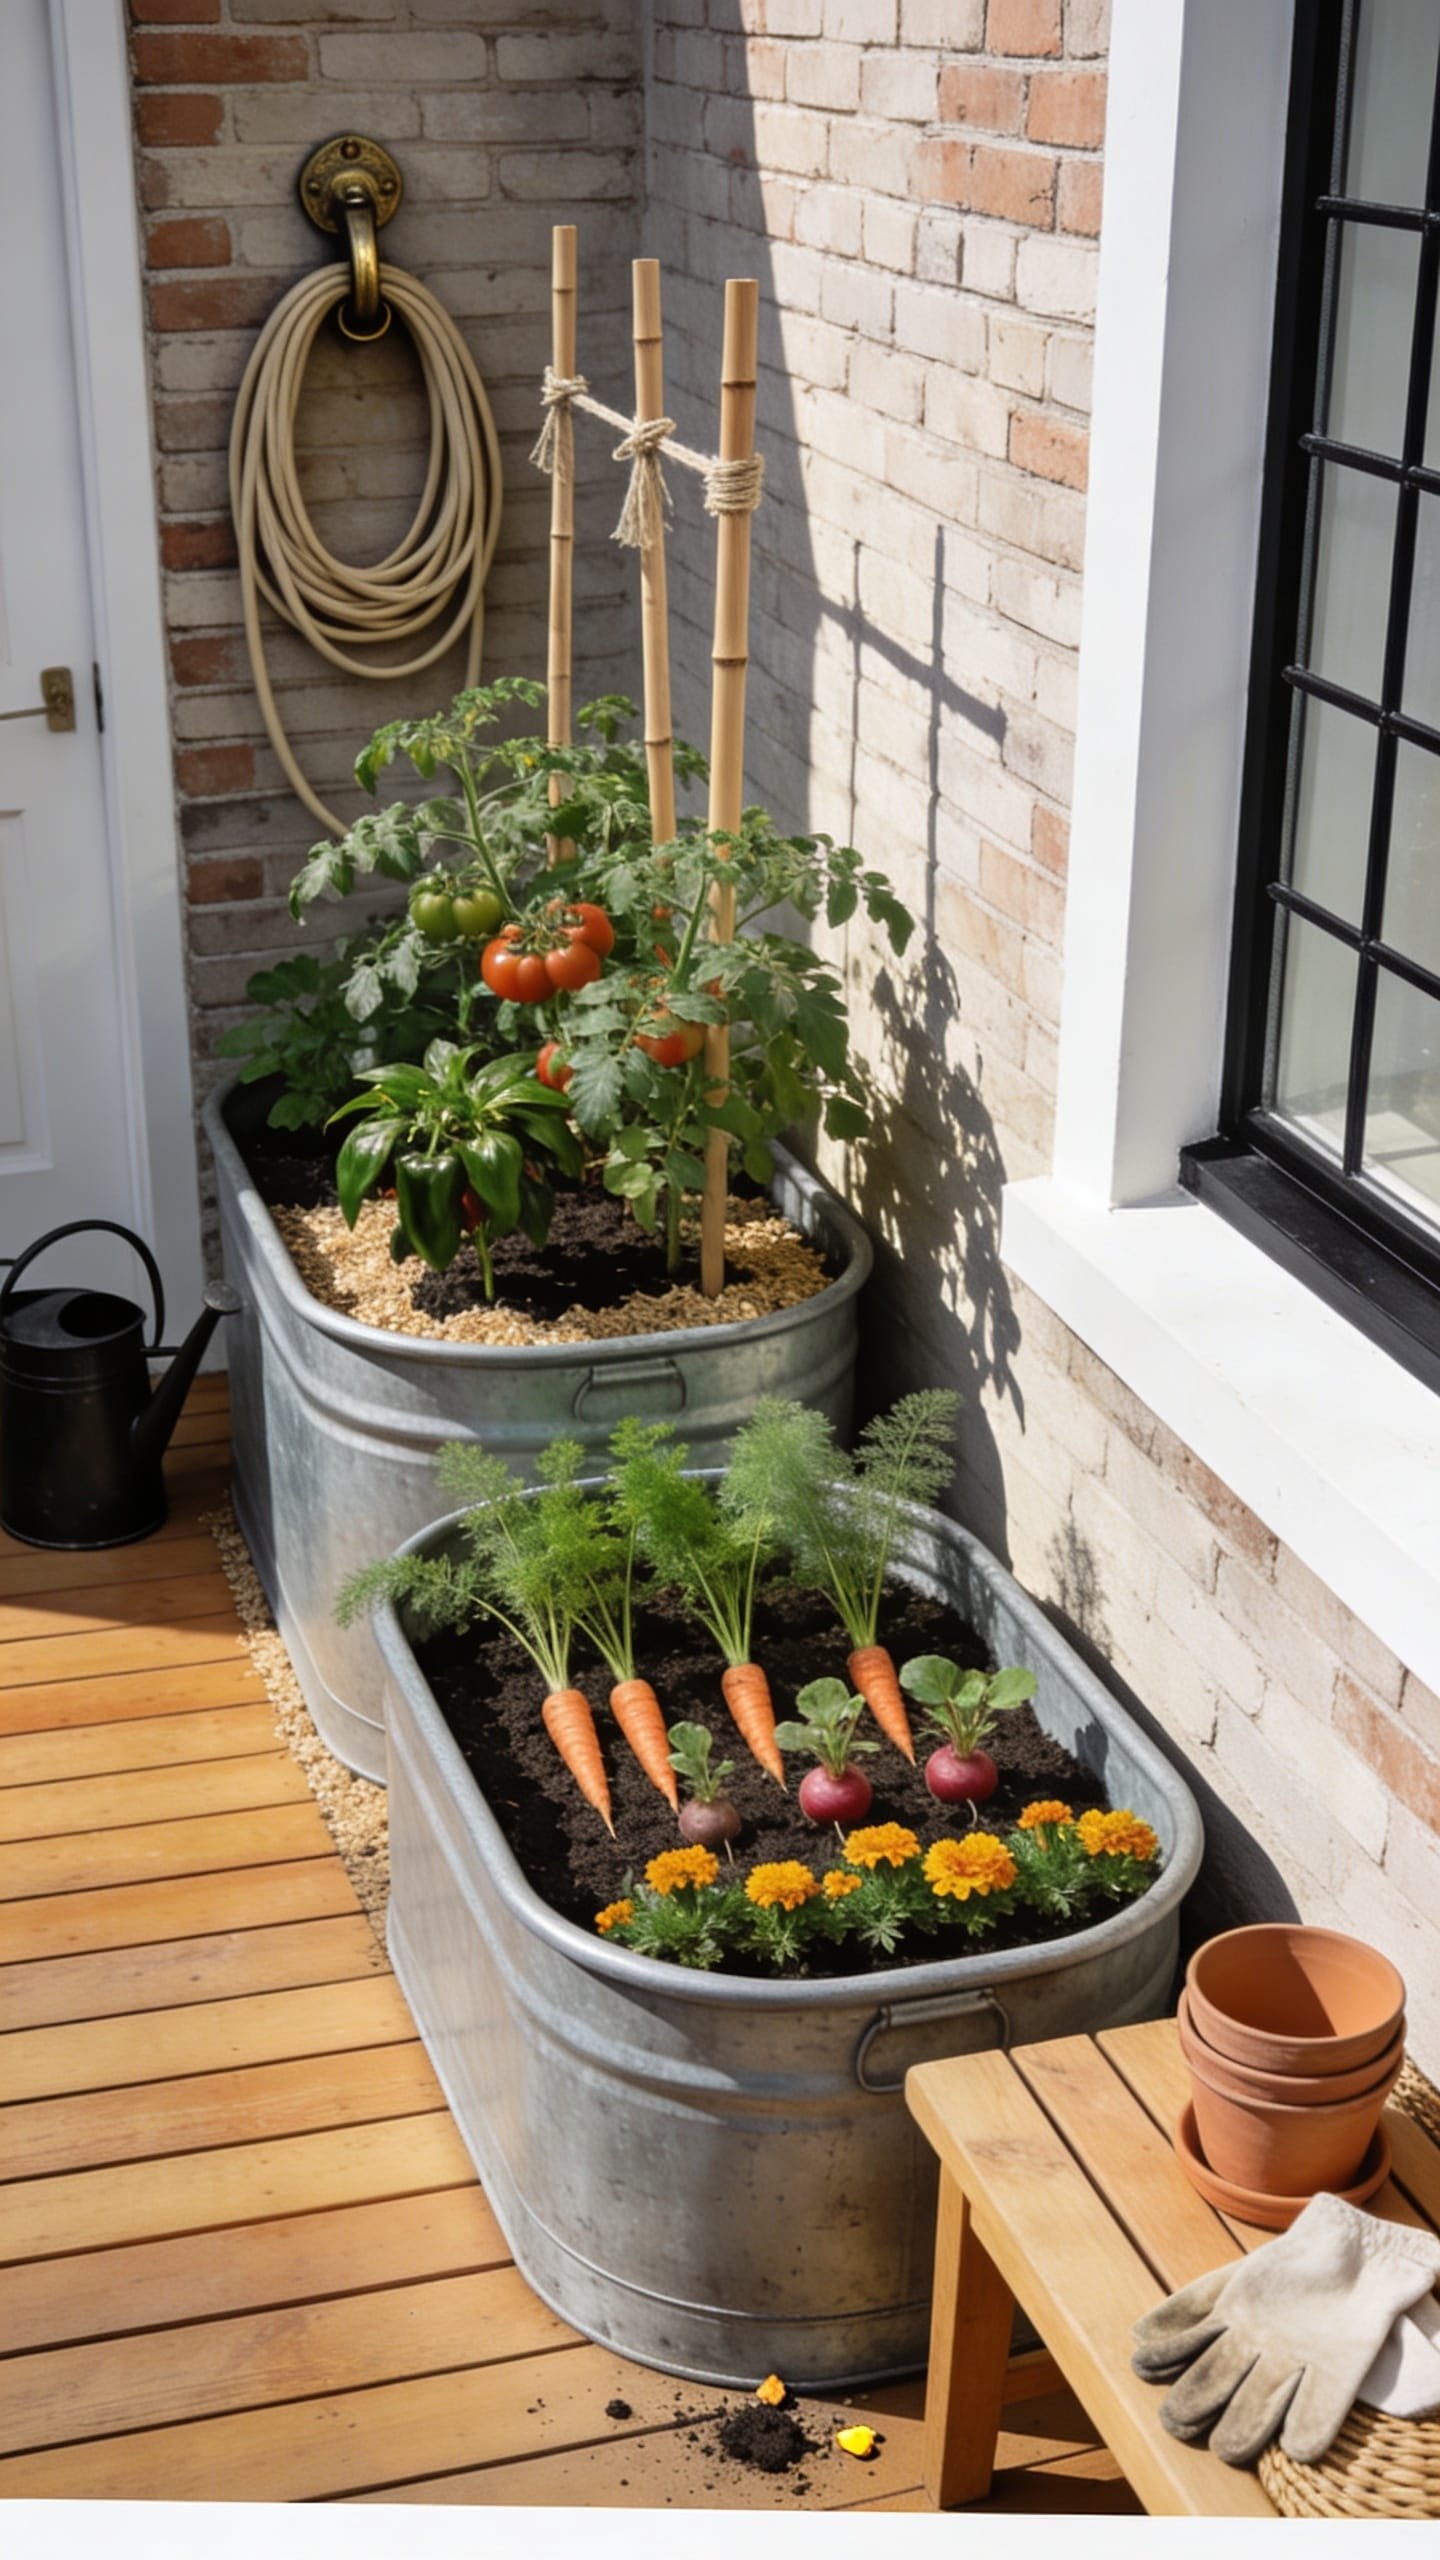
You’ve tried mismatched pots that topple in the wind, and the watering routine feels endless. A pair of galvanized stock tanks at two heights gives you generous soil volume, clean lines, and a ready-made container that looks intentional. The mood leans modern farmhouse meets city terrace—simple, sculptural, and deeply functional.
Here’s why it works: stock tanks offer real root depth and excellent stability. They’re ideal for tomatoes, peppers, and root crops that hate cramped quarters. Lighting gets a boost too; the galvanized surface reflects a soft, cool light that makes foliage look crisp on hot days. Materials stay restrained: galvanized steel, matte-black or brass hardware, and a slim cedar cap if you want to add warmth at the rim.
Photographs love them because the curved silhouette breaks up the usual rectangles of a balcony or patio. A split-height pair creates a stair-step composition that pulls the eye through the frame. Budget version: scout local farm supply stores and ask about dented tanks—they sometimes discount them. Darker, moody version: paint the exteriors with a rust-inhibiting black enamel for a design-forward statement (drill drainage first). Renter-friendly? 100%. They move with you.
Budget Breakdown:
- Galvanized stock tanks (2): $140–$320 total depending on size
- Hole saw bit and grommets: $15–$30
- Cinder blocks or low stands for height variation: $10–$30
- Soil and compost: $80–$160
- Optional cedar rim cap: $30–$70
- Drip kit and timer: $45–$85
Total Estimated Cost: $320 – $695
Best For: Windy balconies, renters, and anyone craving high-yield veggies with minimal fuss. Great in full sun.
Key Design Elements:
- Main materials: Galvanized steel, cedar cap, dark hardware
- Color palette: Silver or matte black, cedar honey, green-on-green foliage
- Lighting strategy: Full sun with reflected light; afternoon shade cloth in extreme heat
- Furniture silhouettes: Low metal side table, simple sling chair
- Texture layers: Smooth metal, ribbed tank sides, fluffy basil, leathery pepper leaves
- Accent details: Simple jute tie-ups for tomatoes, a brass hose nozzle resting on the rim
How To Recreate This Look:
- Drill 10–12 drainage holes in the tank bottoms; add grommets if sharp edges concern you.
- Raise one tank on two low cinder blocks to create height difference.
- Fill bottoms with a few inches of coarse gravel, then soil/compost blend.
- Add a cedar cap if desired: miter corners, attach from underneath with short screws.
- Install drip lines; set a battery timer if you travel.
- Plant tall crops in the back, bushy herbs and flowers in front; add a dwarf tomato cage.
Why This Looks Intentional: The pair. Two tanks at staggered heights read as a set, not an afterthought. The curved shape softens hard edges and makes even a tiny balcony feel styled.
Don’t Do This: Skip drilling drainage holes. Trapped water will sour the soil and roast roots in summer. Give it generous drainage and a thin layer of gravel at the base.
Pro Styling Tip: Tuck a single marigold or calendula cluster by the rim where it meets metal—the color pop against silver photographs beautifully.
Real talk: I once overwatered a stock tank for two weeks straight because I’d set the timer too high. The basil forgave me; the tomatoes never did. Set your timer conservatively and adjust after a week.
5. Sleeper-Style Planter Bench With Hidden Storage
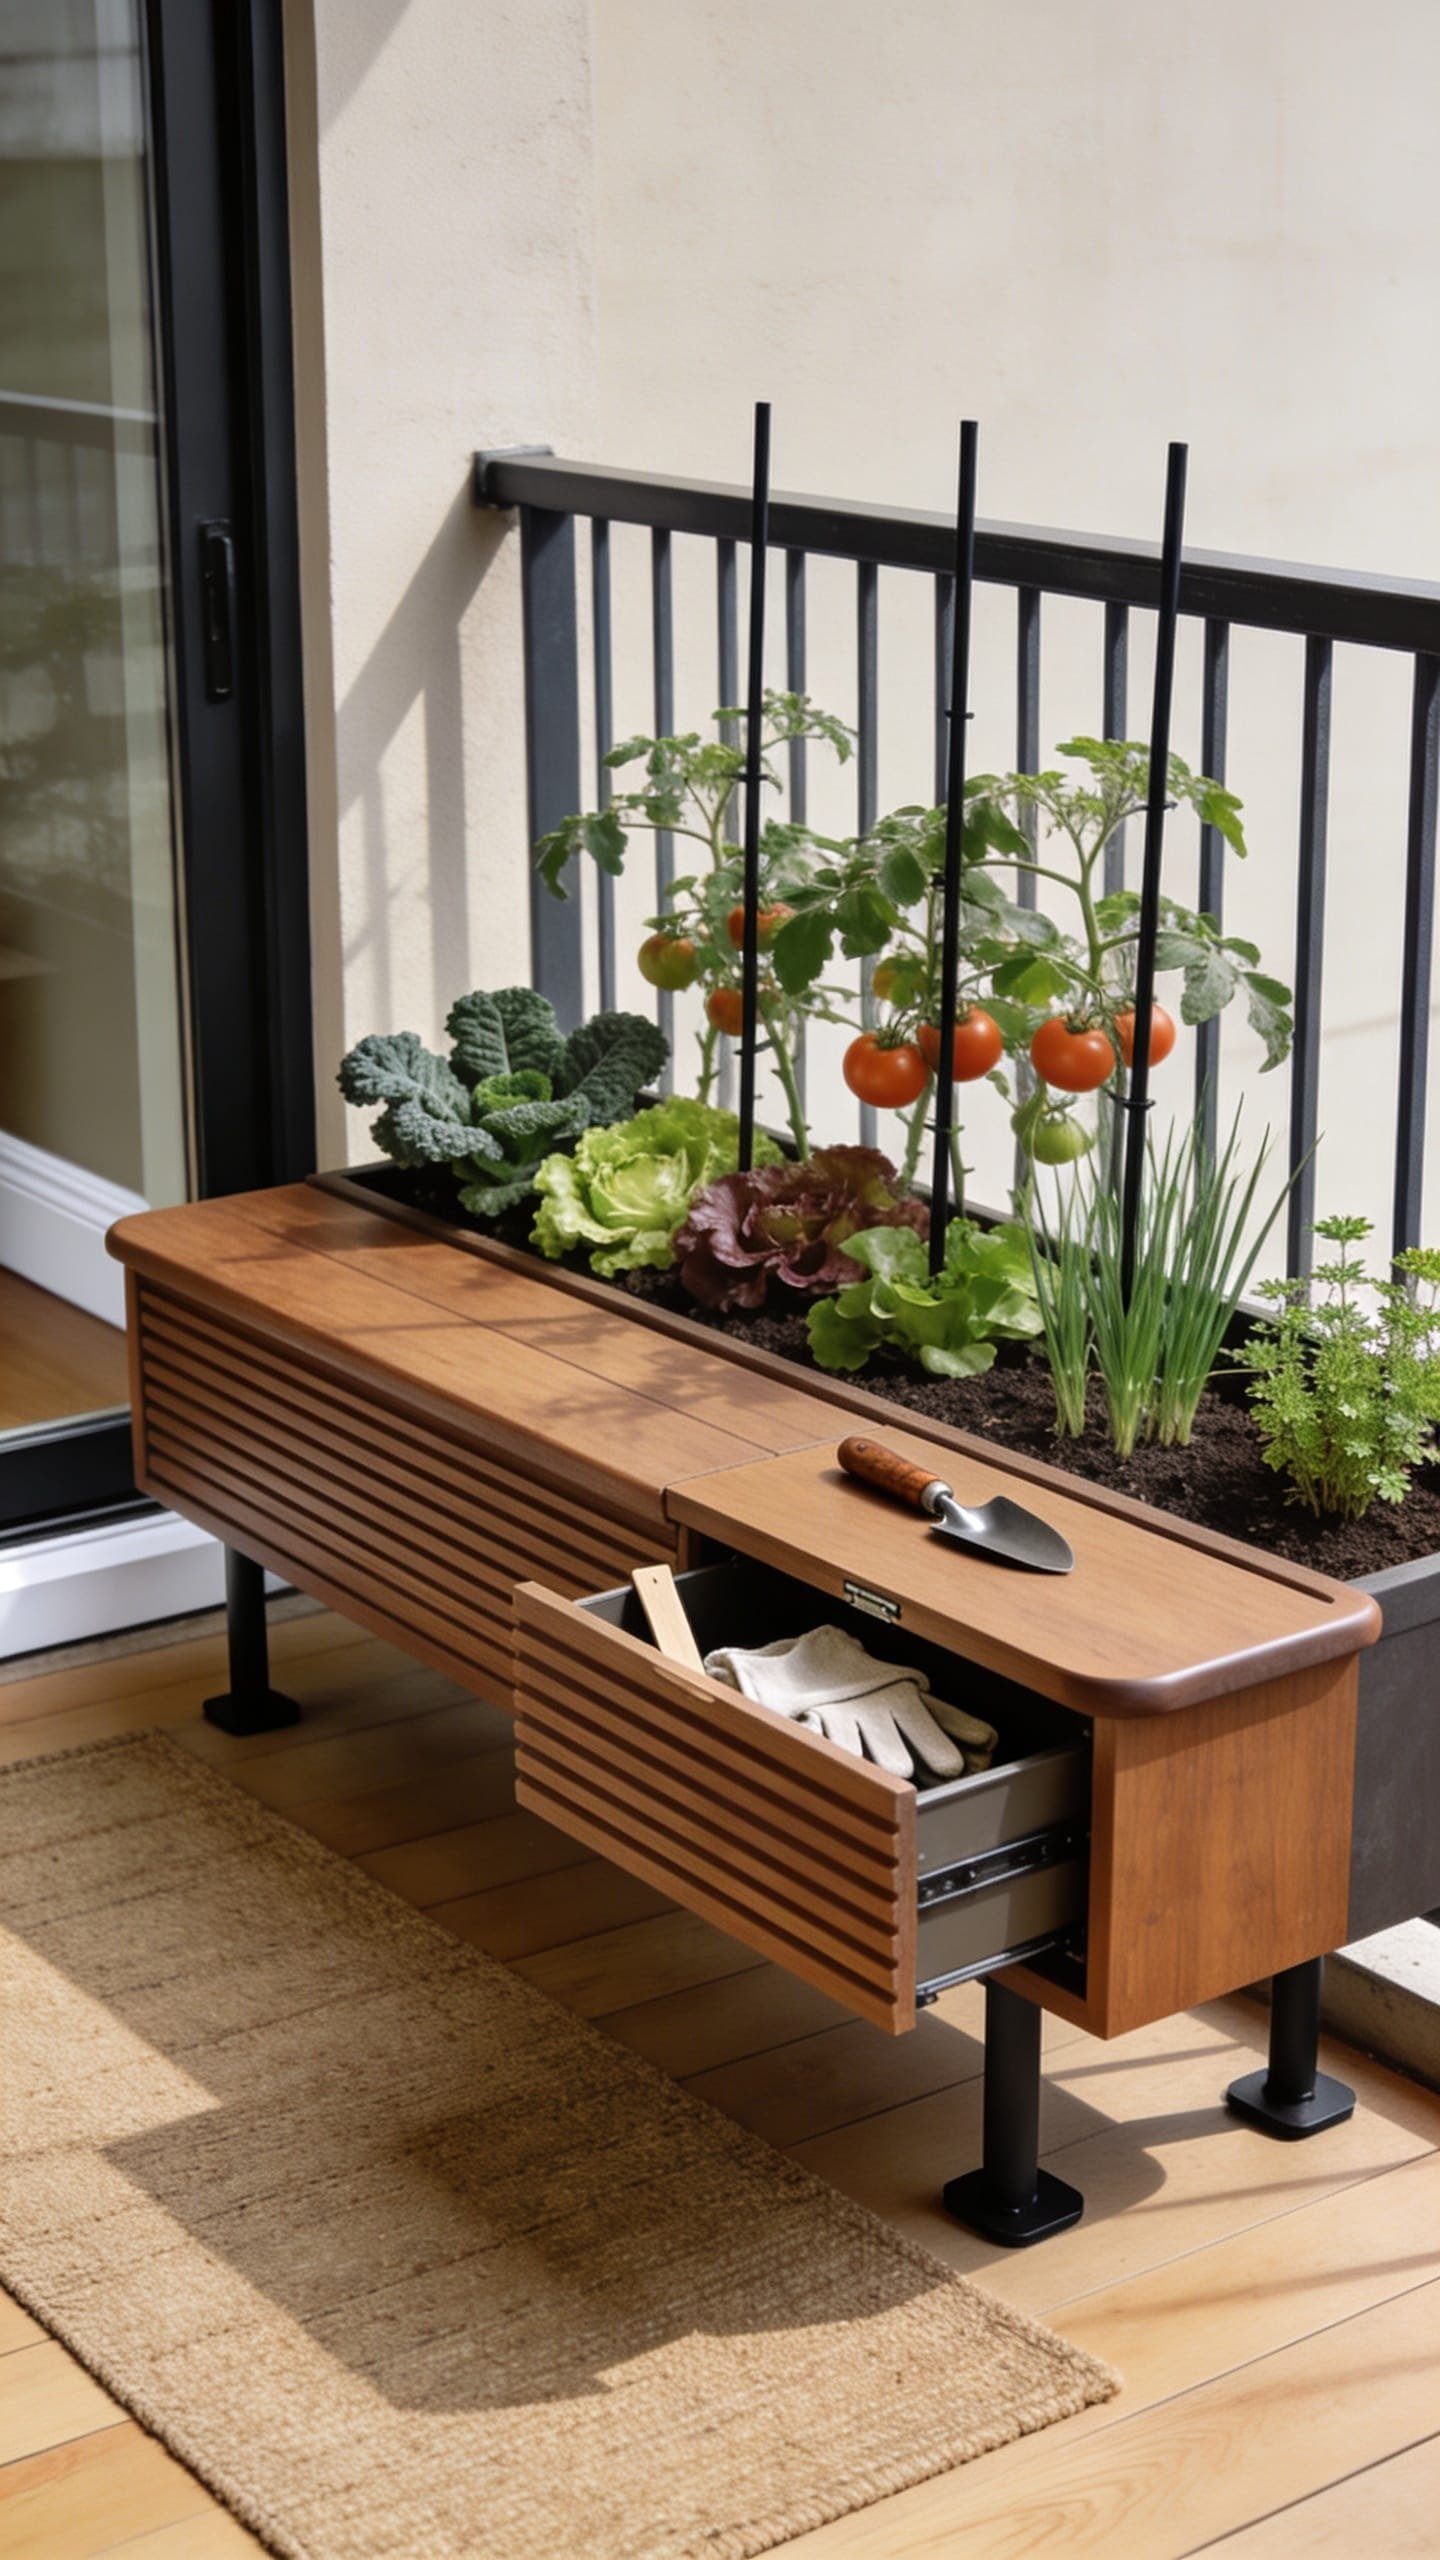
You need a spot to stash gloves, plant markers, and that hand trowel that always disappears. You also want a neat, low-profile bed that doesn’t read “I gave up and bought a plastic bin.” The sleeper-style planter bench solves both. It’s a chunky, horizontal planter that doubles as seating with a hidden storage bay, and the mood is Japandi-meets-urban loft: clean lines, warm wood, and purposeful minimalism.
This setup works brilliantly when you’re short on visual breathing room. The long, low silhouette calms a fussy patio and keeps sight lines open. Lighting plays along; because the planter height stays low, it avoids casting harsh shadows on windows, which keeps indoor spaces brighter too. Materials keep it refined: smooth cedar or thermally modified ash, black recessed pulls, and a fine pebble mulch that makes every leaf read crisp in photos.
Why it photographs beautifully: long lines + negative space. When crops stay below hip height, you get an elegant “green runner” effect across the frame. Variations include a budget-friendly plywood-and-sealant version (line it with a pond liner) and a darker-stained model for a moody, courtyard vibe. Renter-friendly swap: build as two or three shorter modules you can arrange in a row.
How To Recreate This Look:
- Plan a bench length that fits your wall; 5–7 feet looks balanced in small spaces.
- Build a rectangular planter with an interior shelf/lid that opens to a shallow storage bay.
- Line the soil chamber with pond liner or heavy-duty plastic; add drainage slits.
- Set the planter on rubber feet for airflow; make sure the lid clears for easy access.
- Fill with soil mix; add a fine pebble mulch on top for a finished surface.
- Plant a rhythm: chives, parsley, basil, and compact peppers spaced evenly.
Why This Looks Expensive: Flush surfaces, mitered corners, and concealed storage read as custom millwork. The lid gap kept tight and consistent is the tiny detail that makes people ask who built it.
Budget Breakdown:
- Cedar or thermally modified ash: $180–$360
- Heavy-duty liner: $20–$40
- Hardware and recessed pulls: $20–$50
- Soil and pebble mulch: $60–$120
- Rubber feet and exterior finish: $20–$40
Total Estimated Cost: $300 – $610
Best For: Patios where every inch has a job. Minimalist design lovers who still want fresh herbs on demand.
Key Design Elements:
- Main materials: Smooth cedar/ash, pond liner, pebble mulch
- Color palette: Warm wood, charcoal accents, varied green tones
- Lighting strategy: Works in part sun; low height avoids blocking light
- Furniture silhouettes: Backless bench lid, slim side table
- Texture layers: Tight-grain wood, tiny pebble mulch, tidy herb mounds
- Accent details: Black metal pulls, slender tool hook under the bench
One Thing To Avoid: Overstuffing the bench with tall, floppy tomatoes. The silhouette turns messy fast. Keep plants compact and clipped.
Pro Styling Tip: Leave 6–8 inches of empty mulch at the ends—clean negative space makes the middle plantings look fuller in photos.
Take a breath. You don’t need every feature and flourish. Pick the bones you love—shape, height, or material—and build around that. The rest can evolve as your plants do.
6. Crate-and-Climb Micro Orchard Wall With Integrated Trellis
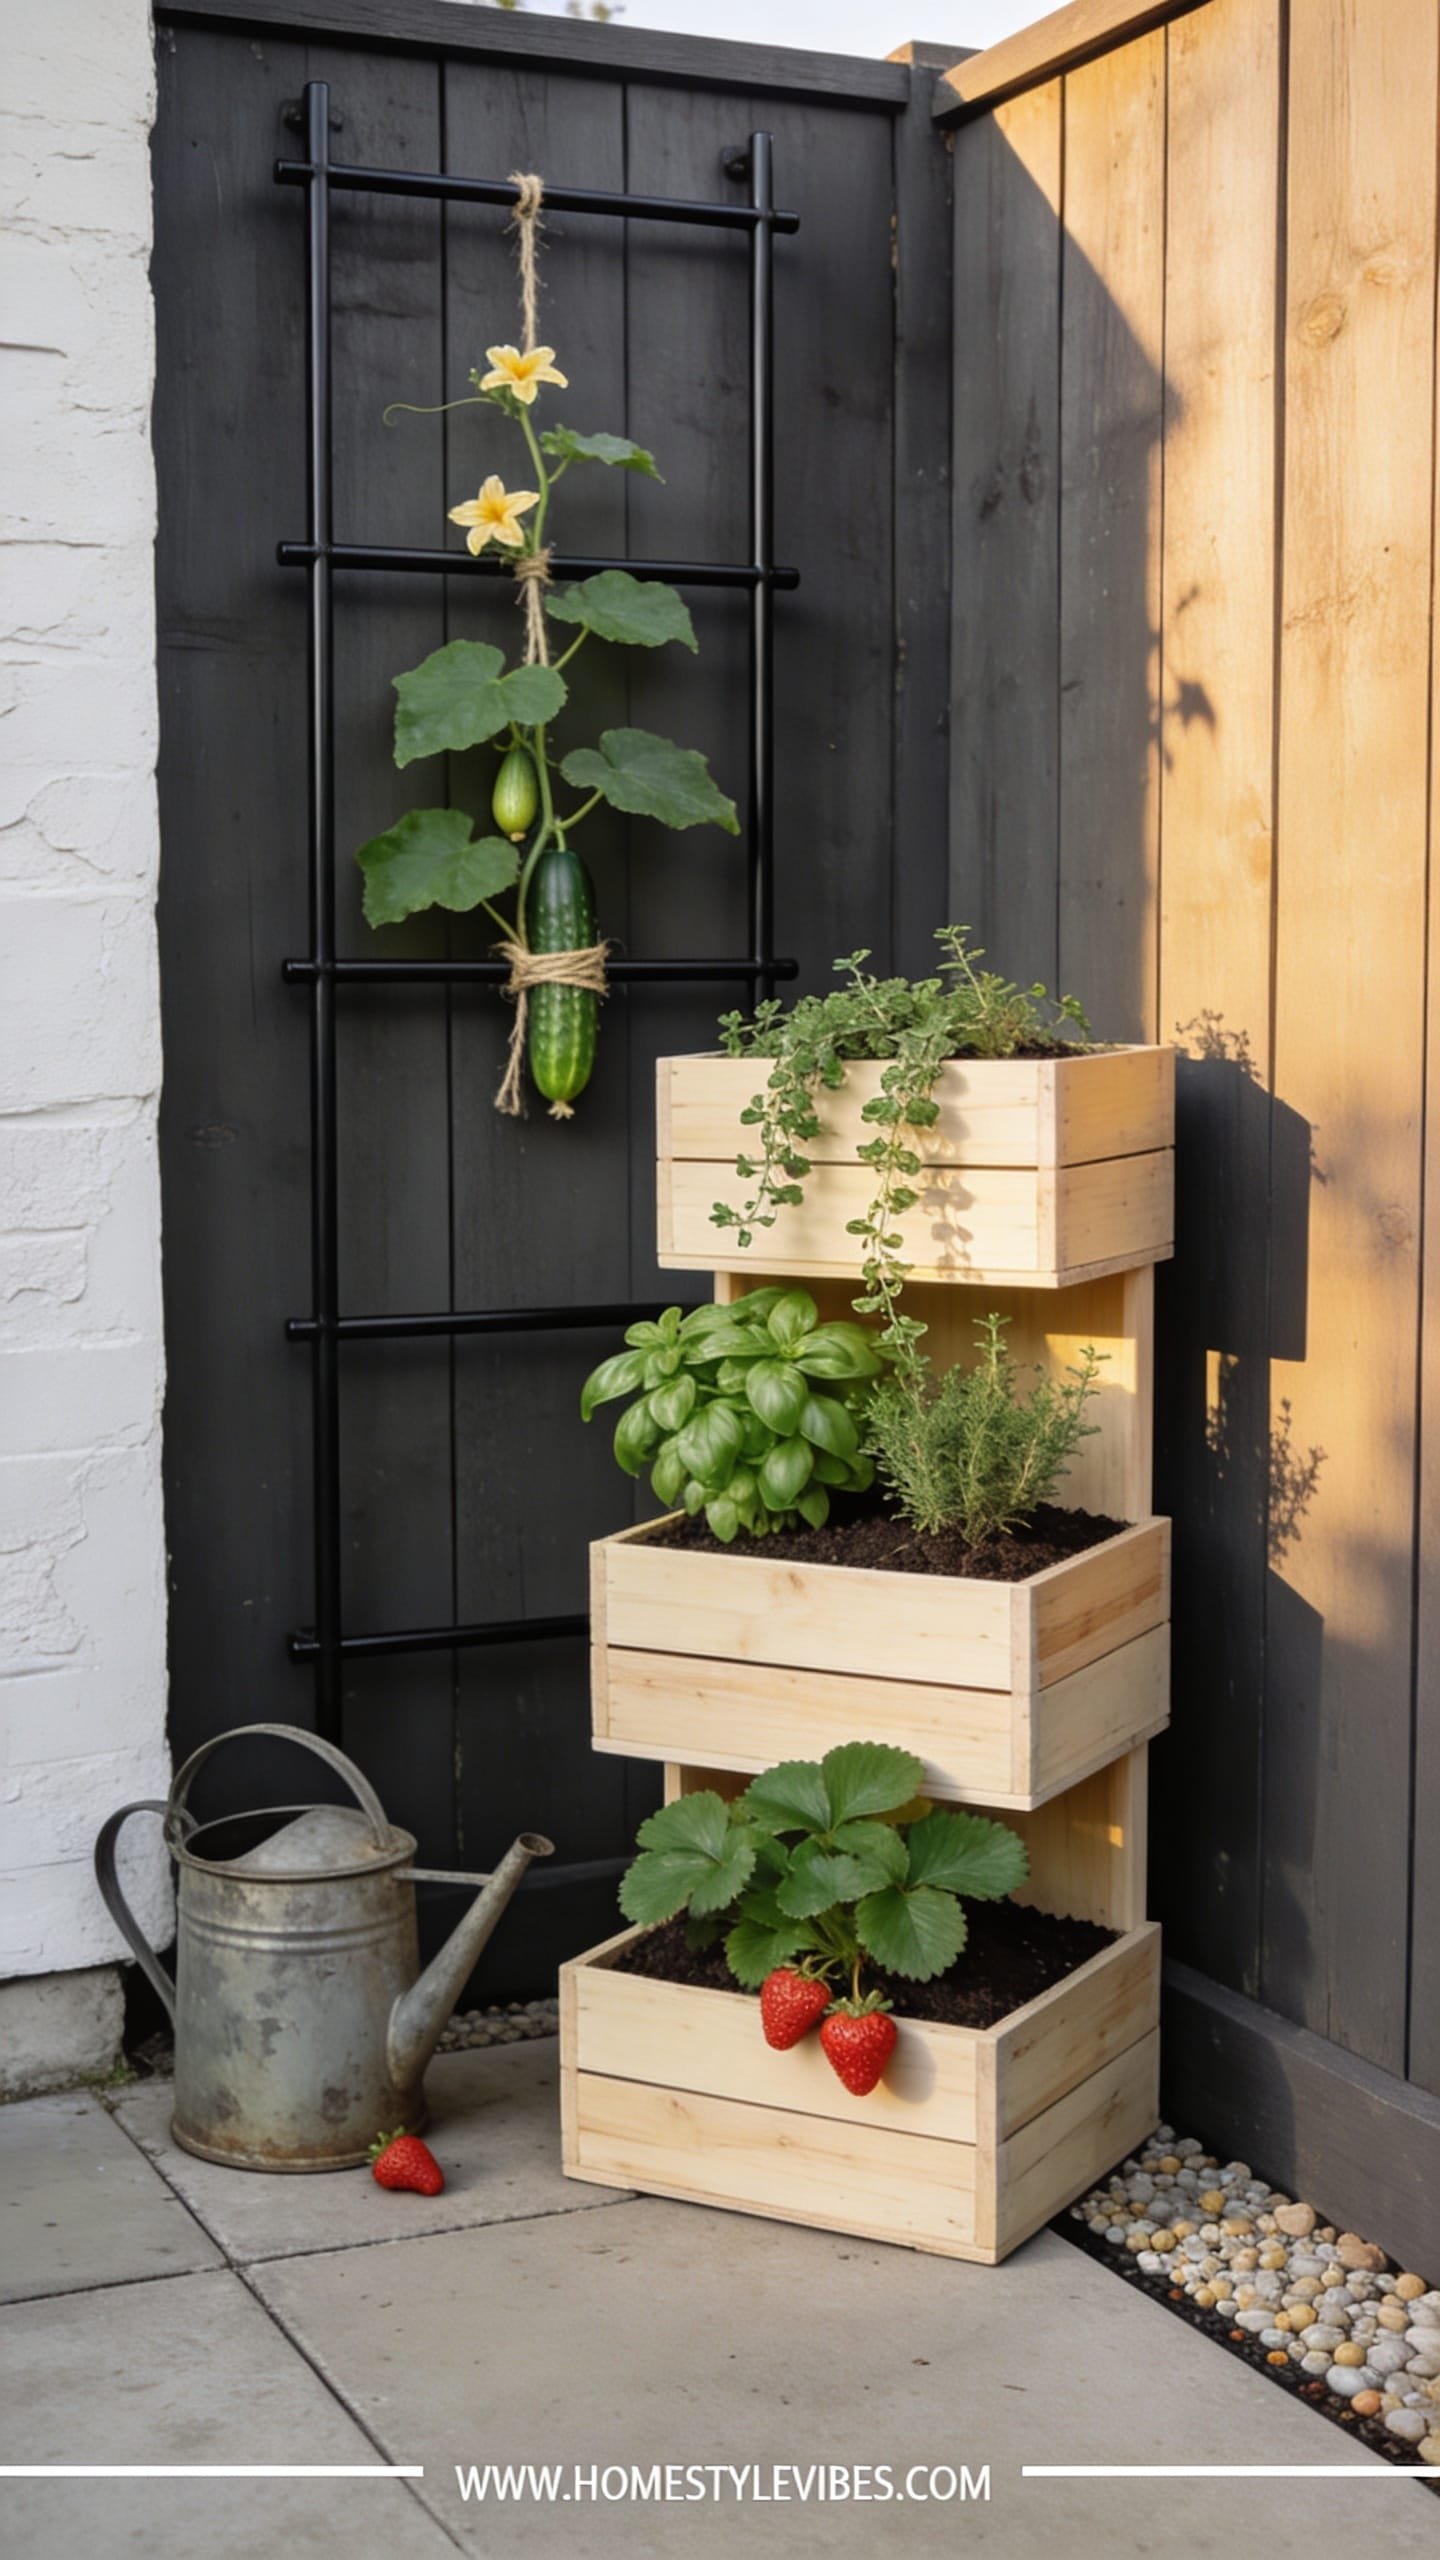
Small space, big harvest energy. You want fruit, pole beans, and cukes but you’ve only got a sliver of fence. You’ve tried random trellises and they turn into a tangly mess by July. The crate-and-climb method organizes vertical growers on a grid of stacked wooden crates and a slim steel trellis, turning chaos into a graphic, edible wall. The mood? Urban agrarian with a touch of Paris balcony charm.
It works because crates provide modular soil pockets and the trellis gives vines a designated lane. Lighting thrives on this system; vines get full sun while crates below enjoy dappled light—perfect for mint, oregano, and alpine strawberries that like a bit of shade on their roots. Materials balance rough and refined: aged wood crates, matte-black trellis, twine ties, and a single copper plant mister for warm shine.
Photos adore this because it layers foreground leaves, middle-tier fruit, and a clean trellis line behind. The grid keeps the eye from getting lost, even when the plants go wild mid-summer. Variations: budget-friendly plastic milk crates lined with landscape fabric. Darker mood: stain crates espresso and add a charcoal trellis for a wine-bar vibe. Renter-friendly: strap the trellis to freestanding planters instead of screwing into a fence.
Budget Breakdown:
- Wood crates (6–8): $60–$120
- Matte-black steel trellis panels: $70–$160
- Zip ties/twine and mounting hardware: $10–$20
- Landscape fabric liners: $10–$20
- Soil and compost: $60–$120
- Slim drip line: $25–$50
Total Estimated Cost: $235 – $490
Best For: Narrow fences or balcony rails. Growers who love vertical produce—beans, peas, cucumbers, and even espaliered dwarf apples or pears.
Key Design Elements:
- Main materials: Wood crates, steel trellis, fabric liners
- Color palette: Weathered wood, matte black, crisp green vines
- Lighting strategy: Full to partial sun; top vines soak up max light
- Furniture silhouettes: None needed; keep the floor clear for circulation
- Texture layers: Rough wood, taut metal grid, glossy cucumber leaves
- Accent details: Copper mister, uniform black plant clips, small bee-friendly flowers
How To Recreate This Look:
- Stack crates two high along your fence line; secure stacks together and to the fence.
- Line each crate with landscape fabric and fill with a light potting mix.
- Install slim trellis panels 2–3 inches off the wall for air circulation.
- Plant climbers at the back row of crates; herbs and strawberries in front.
- Train vines early using clips or twine; set a drip line across crate tops.
- Slip in a few calendula or nasturtiums at the corners for color and pollinator traffic.
Why This Feels Designer: The grid. Repeated verticals and horizontals make an honest, architectural backdrop that reads like art once the plants fill in.
Watch Out: Overcrowding crates. Roots need room, especially for cucumbers. Stick to one climber per crate and leave a “breathing space” crate every few feet for tools or a watering can perch.
Pro Styling Tip: Clip a single lemon or small harvest basket to the trellis for scale—it tells the story and adds a warm, human note in photos.
A quick honesty moment: I once zip-tied an entire trellis to a railing, stood back feeling wildly proud, and then watched a July storm flex it into a noodle. Secure your verticals top and bottom, and don’t trust one attachment point, ever.
Quick Checklist
- Measure sun hours before you build
- Choose rot-resistant wood or seal exposed surfaces
- Drill generous drainage in any closed-bottom container
- Use a 60/40 soil-to-compost blend for raised beds
- Add drip irrigation or self-watering wicks
- Keep plant heights varied for visual balance
- Repeat materials and colors for cohesion
- Leave negative space for maintenance and photos
- Label plants with uniform markers
- Mulch with straw, fine bark, or pebbles to reduce splash
- Stagger heights or go vertical to free floor space
- Secure trellises at multiple points against wind
- Plan storage for tools within arm’s reach
- Edit plant varieties to what you actually eat
- Schedule a weekly 10-minute pruning and harvest check
Frequently Asked Questions
How much should I budget for a small raised vegetable garden bed in a tiny space?
For most of these builds, plan $200–$500 depending on materials and irrigation. Cedar costs more than pine but lasts longer. Skip automation and use a watering can if funds are tight, then add drip later.
What if I only get partial sun—can I still use these small-space raised bed ideas?
Yes. Choose leafy crops and herbs: lettuce, arugula, mint, parsley, chives, and kale handle 4–5 hours of sun. Place fruiting crops like tomatoes or peppers in the brightest spot or use the stock tank setup near a reflective wall for extra light.
I rent—how can I build a raised bed without upsetting my landlord?
Focus on freestanding solutions: stock tanks, ladder planters with A-frame supports, and modular crate systems. Use landscape fabric under gravel or pavers instead of mortared or glued bases. Everything can move with you.
What’s the biggest maintenance issue with small raised beds?
Overwatering and cramped planting. Install drainage, keep consistent spacing, and set a simple schedule. A 10-minute weekly tidy—pinch basil, remove yellow leaves, check irrigation—prevents the midseason meltdown.
How do I keep my small-space garden looking tidy and photogenic through summer?
Repeat materials, stick to one or two planter colors, and mulch. Trim runners, tie vines every week, and harvest often. A single prop like a watering can or basket helps tell the story without clutter.
Your Next Move
Pick one idea that made you pause—that’s your project. A slim cedar ribbon, a pair of stock tanks, or a vertical ladder can be built in a weekend and kept under $400. Start small and build one complete moment. Half-finished everywhere never looks good; one finished zone always does.
Here’s the truth: the luxury you’re after isn’t price—it’s texture, lighting, and restraint. Cedar grain against pea gravel. Matte-black brackets disappearing into foliage. A drip line that stops the daily scramble. These small details make your raised vegetable garden bed feel composed and calm, even on busy days.
You’ve already got the vision. Now you have the blueprint. Plant the first bed, make dinner from it, and let the rest grow from there. You’ve got this—seriously.

About the Author

Krisztina P.Rendes, Founder of Home Style Vibes
Founder of Home Style Vibes
Krisztina Puskásné Rendes created Home Style Vibes as a cozy-modern lifestyle space where homemaking meets inspiration. Her goal is to help women create beautiful, organized, and peaceful homes they truly love — without overwhelm. You’ll find here heart-driven content on home decor, cleaning tips, easy family recipes, organization and decluttering, DIY home projects, plants, and seasonal ideas — all designed to bring more calm, comfort, and style into everyday life.