6 Garden Ideas Around Trees That Instantly Upgrade Your Yard
You want a yard that feels magical at dusk—softly lit, layered, and lush. You hate that right now it’s a patchy ring of dirt around a beautiful tree, plus some random edging from 2009. You crave dappled light on stone, low silhouettes of planting that look intentional, and a place you actually want to sit with a drink at 7 p.m. These 6 garden ideas around trees solve the “awkward bare zone” problem and give you photogenic, Pinterest-ready moments that work in real homes, with a clear budget range and simple steps you can do in a weekend or two. If you value texture over clutter and want your yard to finally look finished, this is your plan—no guesswork, just six complete concepts with materials, color palettes, lighting, and styling notes baked in. Perfect for design lovers who want the vibe of a boutique courtyard without the full contractor circus.
1. Moonlit Gravel Terrace With a Stone Hug
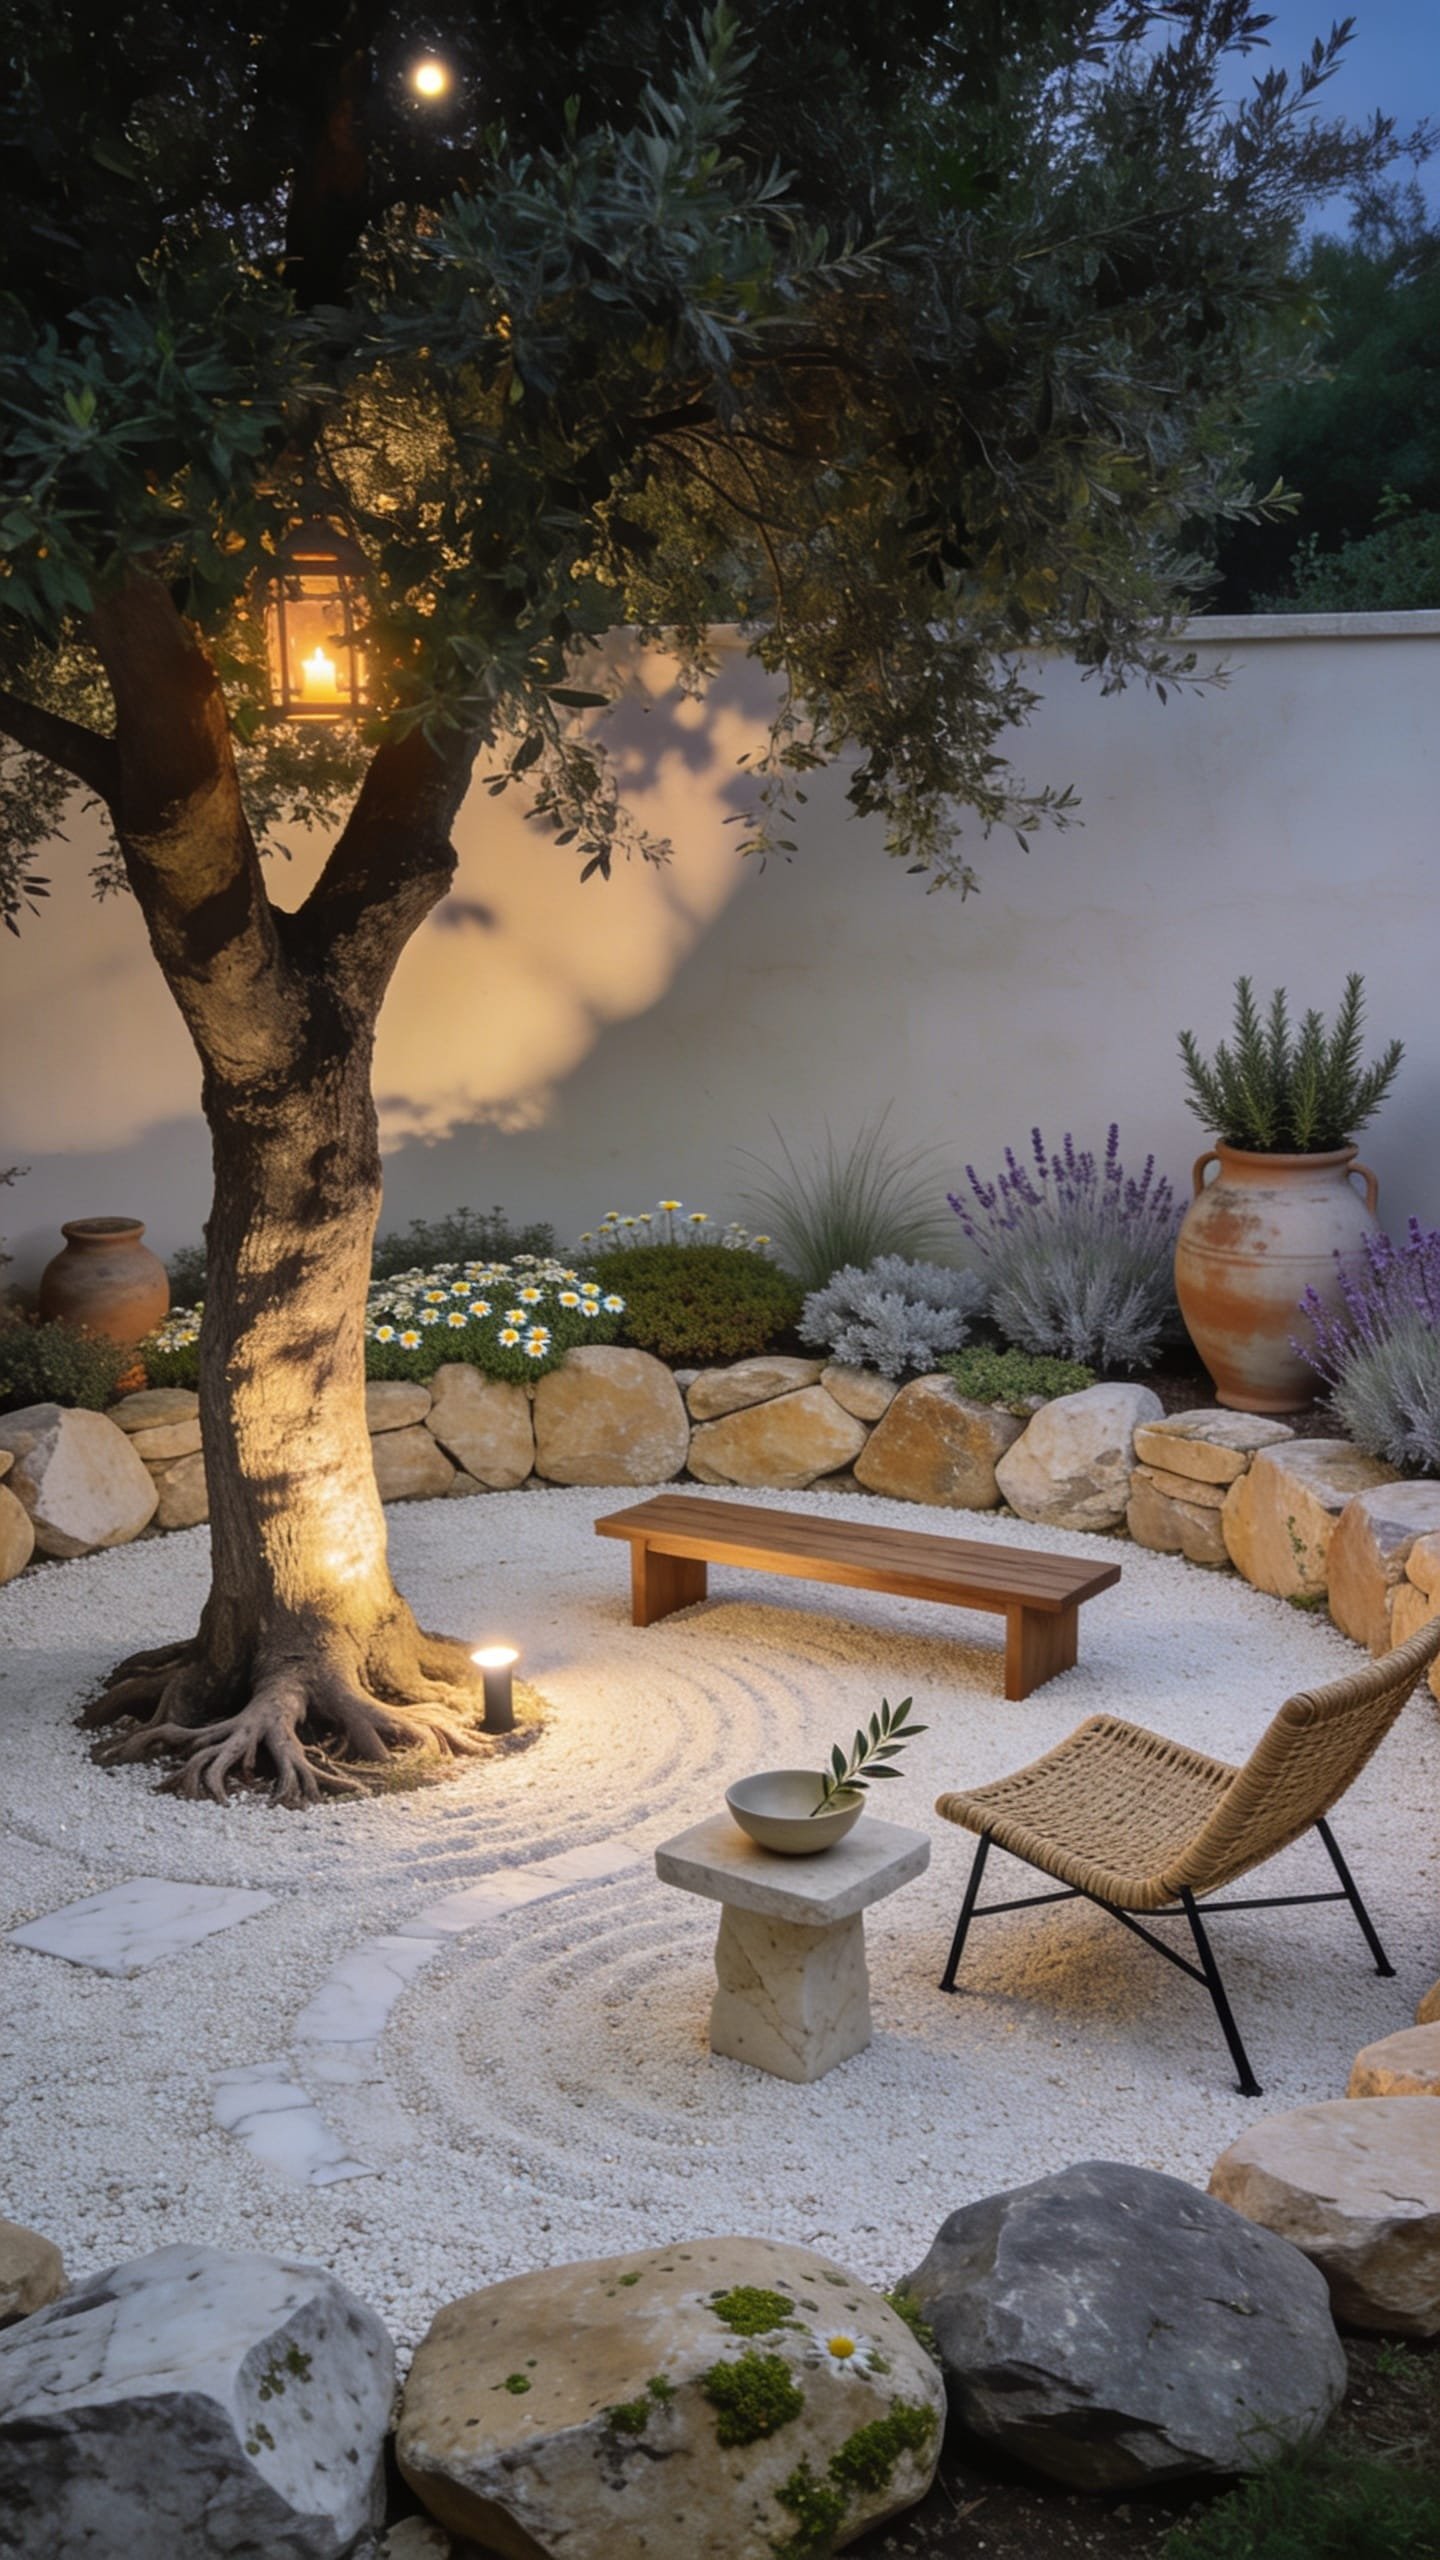
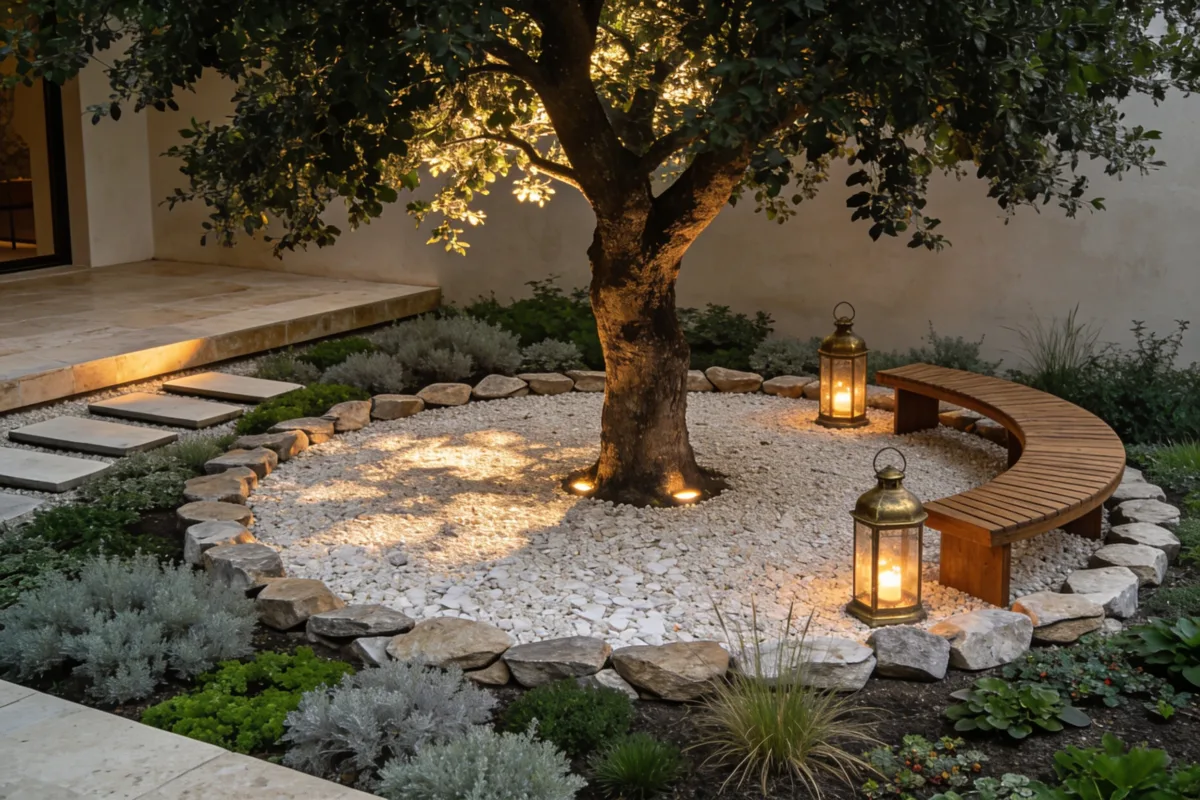
We’ve all been there: a gorgeous mature tree with that dead, compacted halo around the trunk that screams “I gave up.” You’ve tried tossing mulch, maybe a few hostas, but it still looks like an afterthought and doesn’t photograph well. This design builds a round gravel terrace encircled by an irregular stone “hug,” so the tree reads like the intentional anchor of your yard—not a landscaping accident.
Think hotel-courtyard mood: warm Mediterranean with a pinch of Japandi restraint. Crushed marble or granite gravel bounces light in the evening, while a low stone border creates subtle theater. It works in small and large yards because the circle can scale up or down; it’s budget-friendly and easy to maintain. Lighting matters a ton here—soft uplights grazing the bark make the trunk glow and shadows dance, which always reads beautifully in photos.
Materials do the heavy lifting: tumbled limestone, honey pea gravel, weathered steel edging, and simple teak or metal chairs. The reason it photographs so well is the contrast: pale gravel against dark bark, chunky stone against smooth foliage. Depth, texture, shadow—check, check, check.
Variations worth trying: For a smaller footprint, go for a half-circle terrace tucked into a fence corner. Renter-friendly? Use steel edging and a floating gravel base over landscape fabric, then reclaim the stone later. For a moodier vibe, choose dark basalt gravel and black metal furniture with olive cushions.
Budget Breakdown:
- Crushed gravel (1–2 cubic yards): $80–$180
- Irregular stone or chopped limestone (1 pallet or by the ton): $250–$700
- Steel or aluminum landscape edging: $60–$180
- Landscape fabric + pins: $30–$60
- Two lounge chairs or bistro set: $150–$700
- Two low-voltage uplights + transformer: $120–$300
Total Estimated Cost: $690 – $2,120
Best For: Medium to large trees with open branching. Great for evening hosts who want a dusk-friendly zone and families who need something low-maintenance and mud-free.
Key Design Elements:
- Main materials: pale gravel, tumbled stone, weathered steel
- Color palette: soft limestone, warm gray, olive, charcoal bark
- Lighting strategy: 2–3 ground uplights angled 30–45 degrees to graze trunk texture
- Furniture silhouettes: slim metal frames or low teak, round bistro table
- Texture layers: crunchy gravel, rough stone, smooth leaves, linen cushions
- Accent details: tiny herb planters, citronella candle in a stone bowl, linen throw
How To Recreate This Look:
- Mark a circle around your tree (8–12 feet diameter) leaving a mulch-free ring near the trunk to protect roots.
- Install edging to define the terrace and prevent gravel migration.
- Lay landscape fabric, then add 2–3 inches of crushed gravel and rake smooth.
- Set a single ring of irregular stone 12–18 inches from the gravel edge to create a soft border.
- Place furniture and add 2–3 uplights focused on the trunk and a lower branch spread.
Why This Looks Expensive: The round geometry reads “custom” and the stone edge telegraphs quality. Gravel reflects light in a creamy way at night that feels boutique-hotel, even if your chairs came from a big-box store.
Watch Out: Don’t bury the trunk flare in gravel or stone. Trees need breathing room. Leave a 6–12 inch no-fill ring around the base.
Pro Styling Tip: Shoot at golden hour; let the uplights flick on as the sky blushes. The trunk shadows on the pale gravel create gorgeous depth and editorial contrast.
Keep scrolling—next up is for anyone craving that layered, plant-lover look without turning your yard into a maintenance marathon.
2. Woodland Understory Ring With Shady Stars
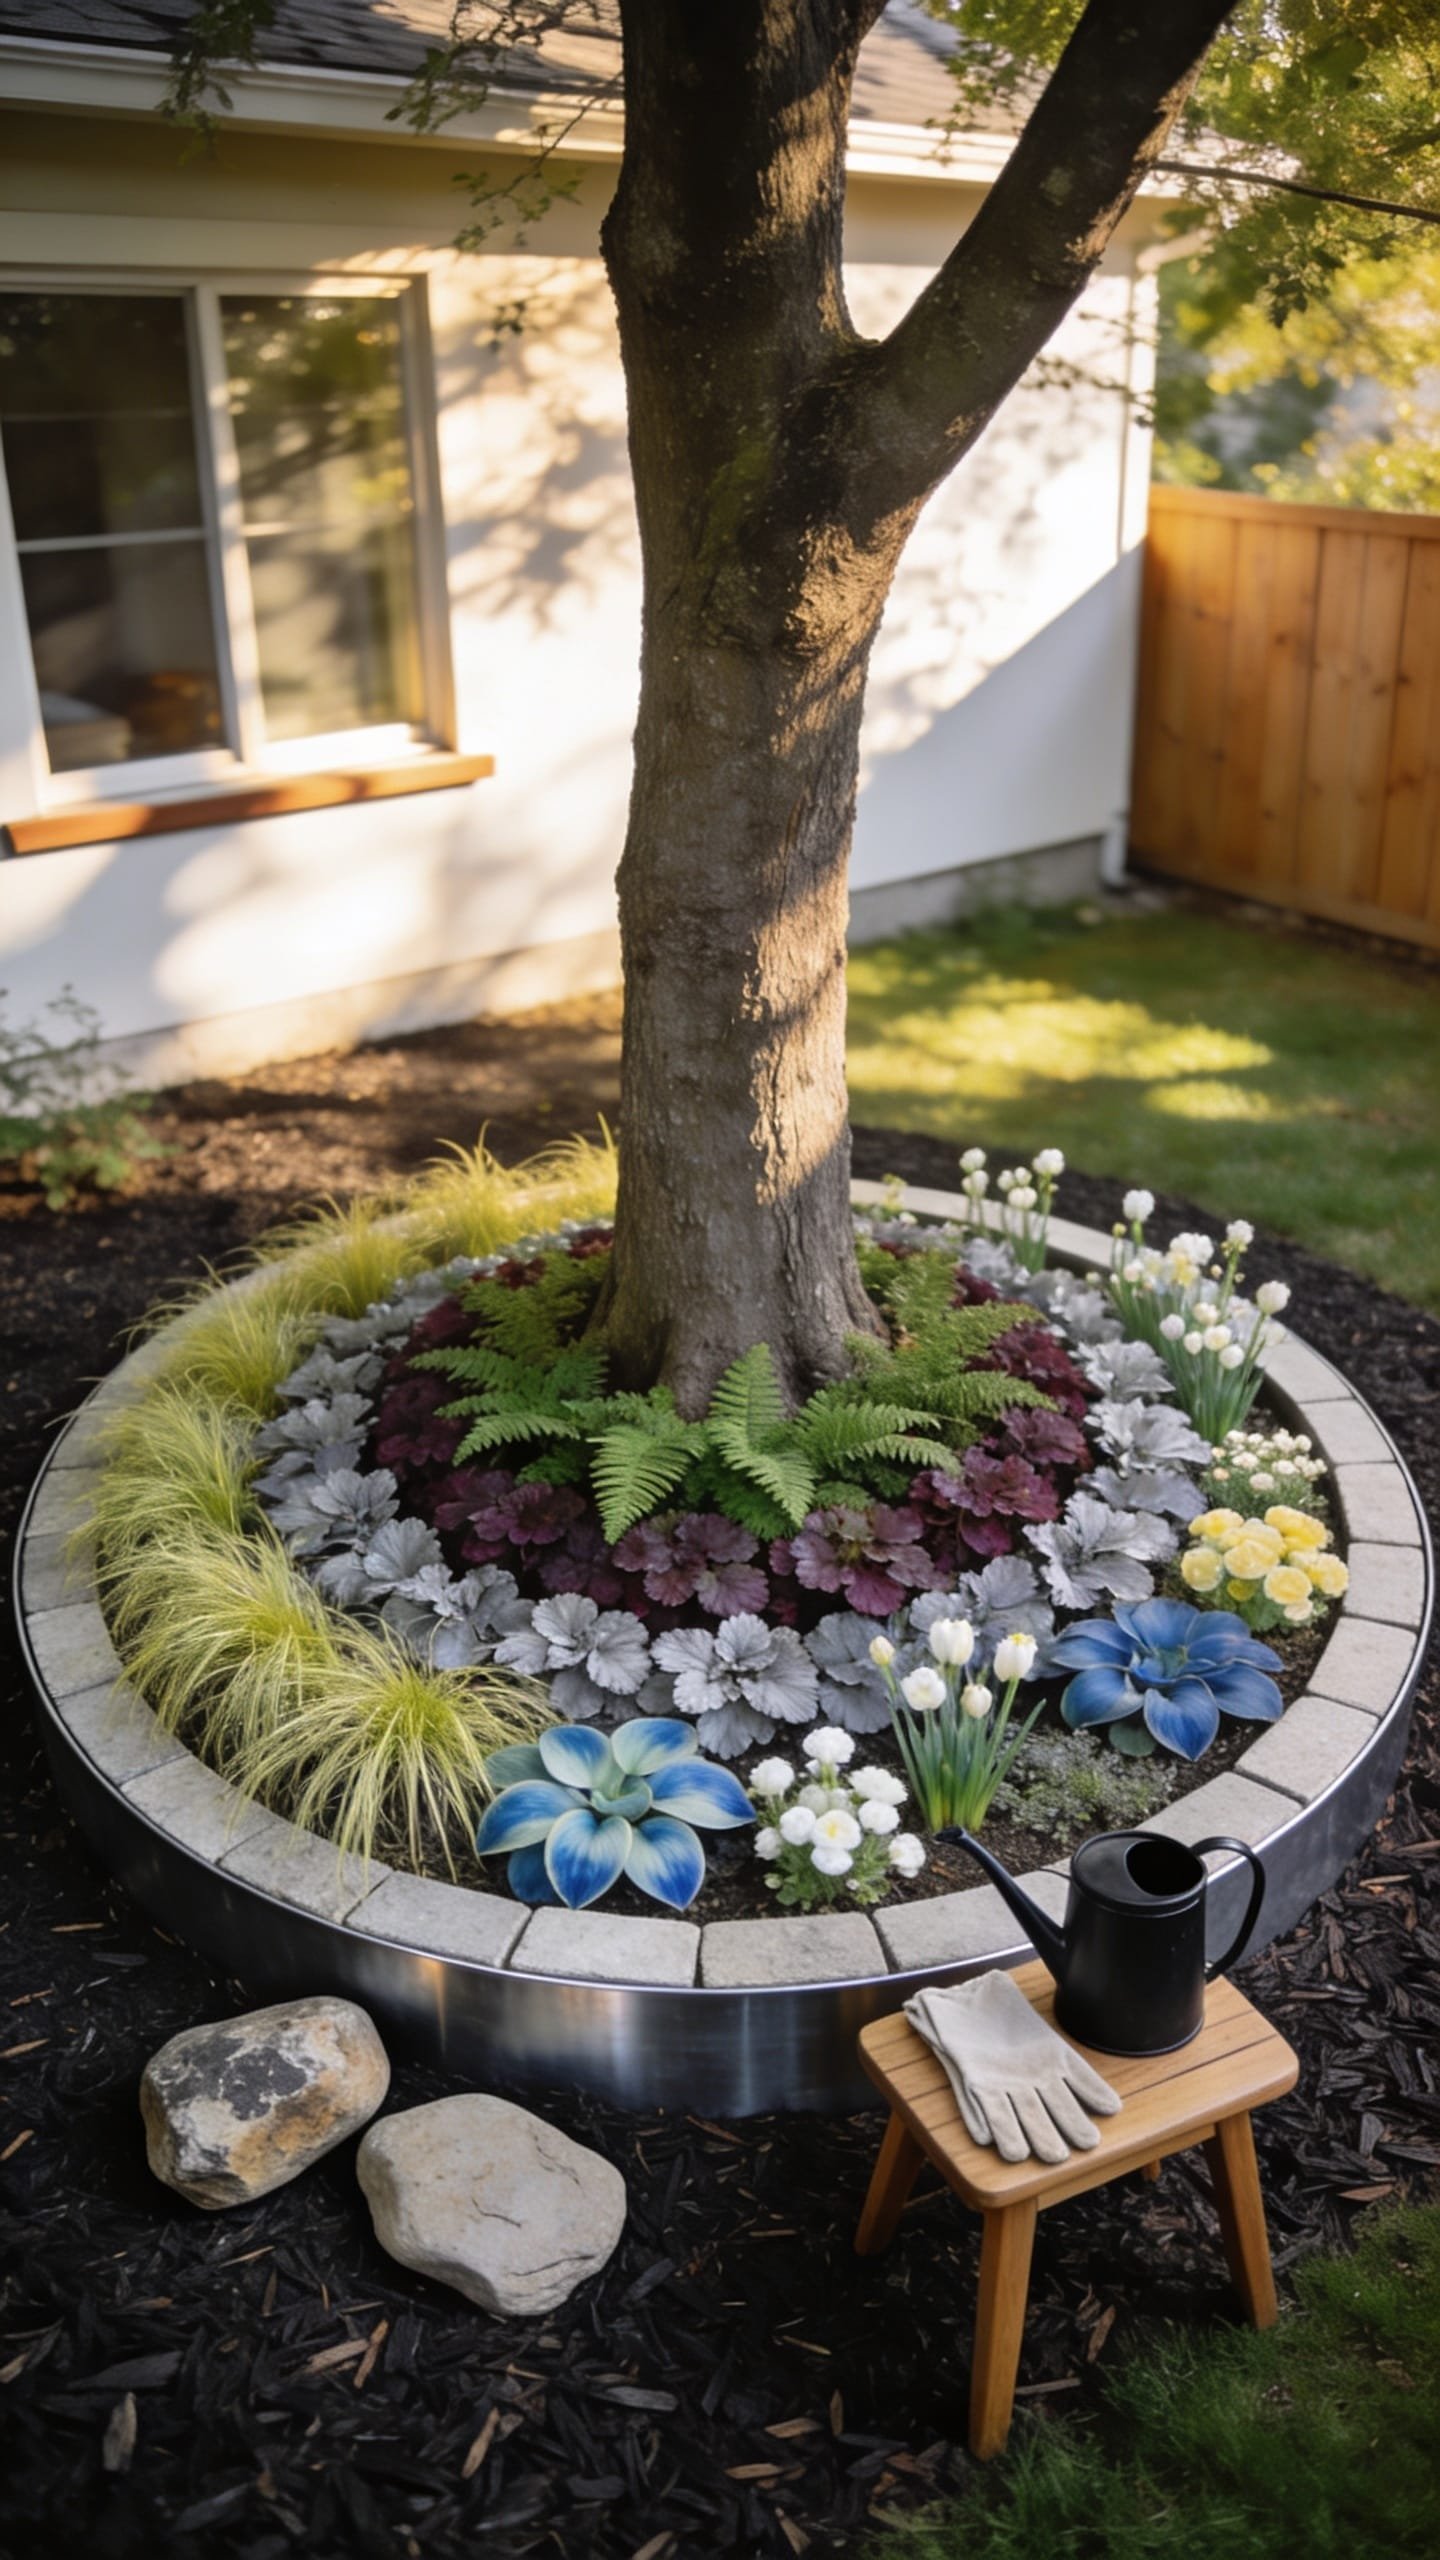
It’s that one circle that always feels bare and defeated, even after you tossed in a few “shade-loving” plants. You water them, they sulk. You walk away. The secret isn’t more plants—it’s the right layered understory and consistent edge definition that turns the base of your tree into a woodland vignette.
This idea builds a stacked ring of shade performers: think circles of ferns, heuchera, hakone grass, hosta, and a drift of spring bulbs for a moment of surprise. The mood is modern woodland meets hotel-spa—lush, low, and serene. Why it works: the staggered heights create volume, the foliage contrast carries interest, and the shape frames the tree like a necklace. Maintenance stays reasonable if you choose perennials that actually want to live in dry shade.
Lighting plays a different role here: softer, lower. Use one moonlight-style bulb higher up in the tree canopy or a single low spotlight that grazes the foliage edge. Materials? Matte black metal edging, dark compost mulch, and natural stone stepping pads if you want a pathway. It shoots beautifully because of the foliage contrast: glossy vs. matte, chartreuse next to burgundy, and that ripple of hosta that always looks good on camera.
Two versions to consider: Budget version with divided perennials from neighbors and basic cedar mulch. Small-space version: plant in a crescent shape instead of a full ring so it doesn’t overwhelm a petite yard. Renter-friendly: use large nursery pots sunk partially into the soil and ring with bark chips—then take them with you when you move.
Key Design Elements:
- Main materials: compost mulch, matte metal edging, natural stone pads
- Color palette: deep greens, chartreuse, plum, soft cream blooms
- Lighting strategy: one canopy-mounted downlight or a low, wide-beam spotlight
- Furniture silhouettes: none required, but a slim metal bench nearby looks chic
- Texture layers: feathery fern, ribbed hosta, silky hakone grass, frilly heuchera
- Accent details: spring bulbs (snowdrops, muscari) and a weathered birdbath
Budget Breakdown:
- Edging (20–30 feet): $80–$200
- Compost mulch (2–4 bags): $30–$60
- Plants (12–20 perennials): $180–$520
- Single downlight kit or spotlight: $90–$220
- Stone stepping pads (optional): $60–$150
Total Estimated Cost: $380 – $1,150
Best For: Shade-heavy yards, folks who want a soft, lush look with perennials that come back every year. Great around oaks, maples, and beeches with filtered light.
How To Recreate This Look:
- Edge the ring so your shape stays crisp; remove weeds and add compost for a healthy base.
- Place plants by height: tallest closer to the trunk (still leaving a no-plant ring at the flare), then step down in layers.
- Mix foliage textures: 1 fern, 1 broad-leaf, 1 grass in repeating groups for rhythm.
- Install one light source for subtle evening glow.
- Mulch lightly to conserve moisture and keep a tidy, editorial finish.
Why This Feels Designer: It’s the discipline. Repeating a tight plant palette in a clear shape beats a random mix every time. The restrained color story lets texture do the flexing, which reads high-end.
One Thing To Avoid: Don’t stack soil against the trunk to create height. Use plants for lift and keep the trunk base open. Too much mulch against bark invites rot.
Pro Styling Tip: Photograph after a light water so leaves look glossy and the mulch darkens—contrast jumps and the greens pop on camera.
Remember, this isn’t about recreating a showroom. It’s about building a yard that actually fits your routines. If one idea sticks, that’s your start. You don’t need all six.
3. Circular Bench Lounge With Lantern Glow
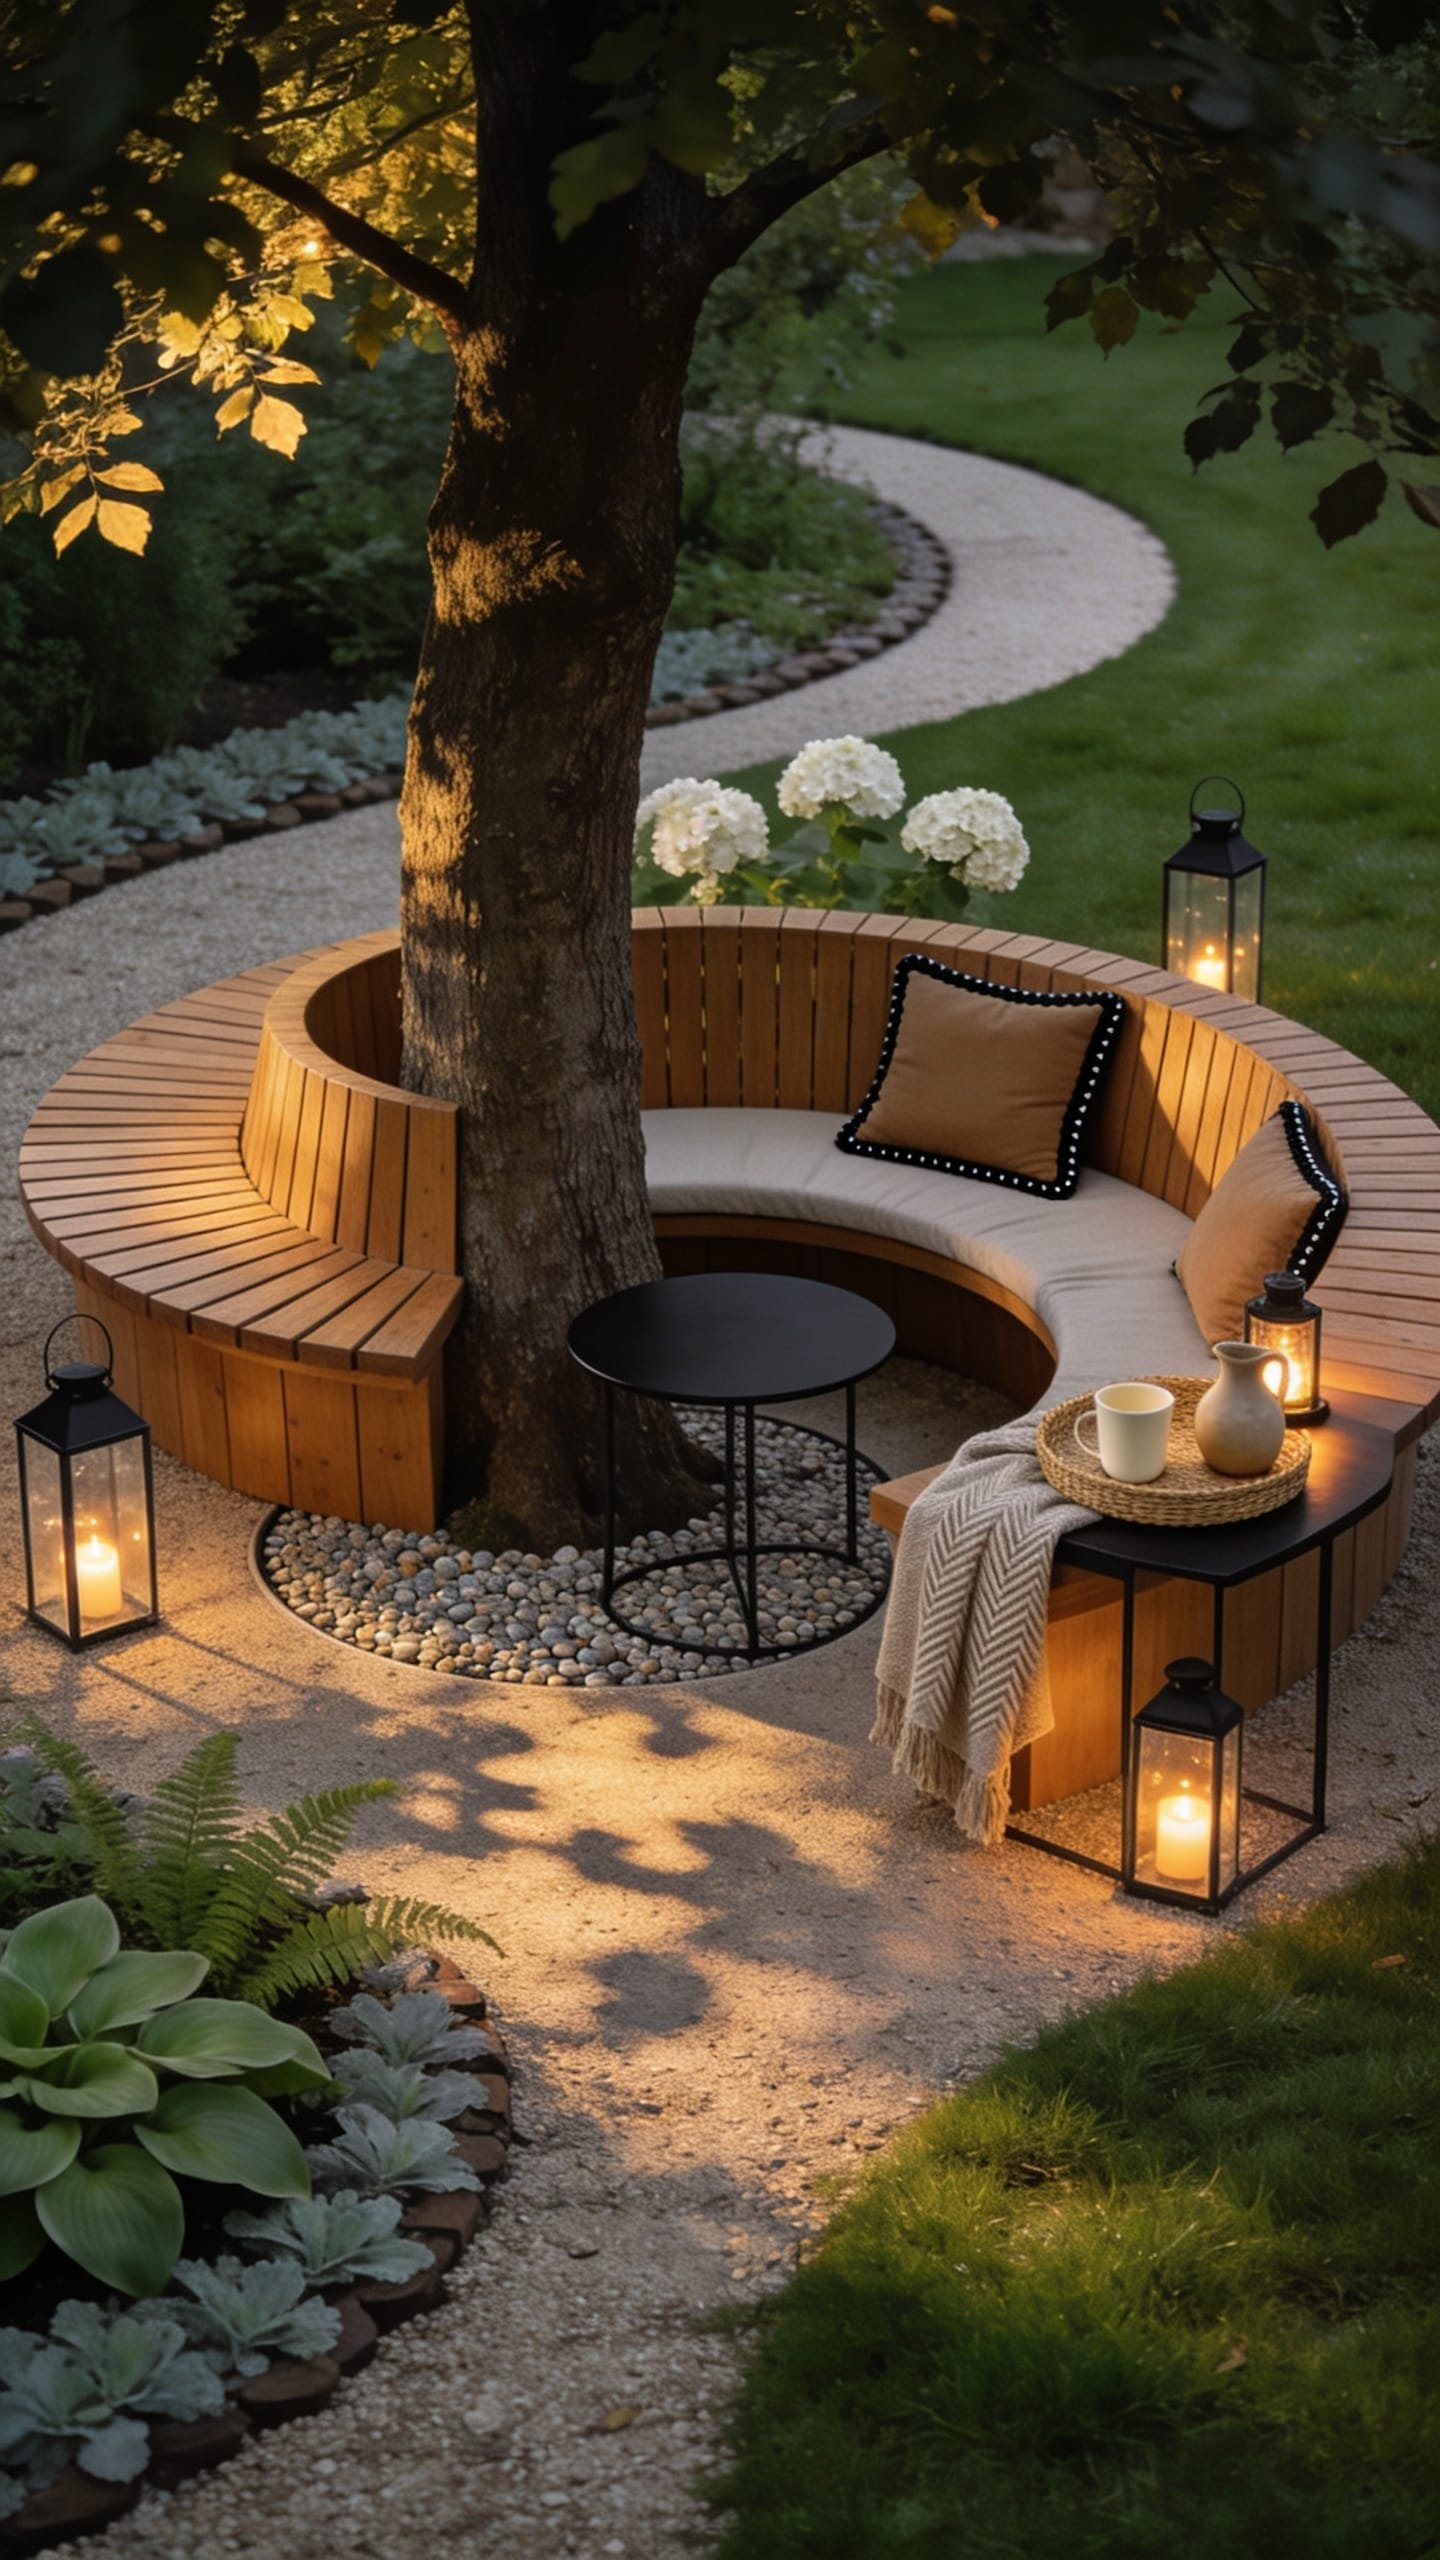
You want a place to sit under your favorite tree but every bench you’ve tried looks like a random prop. You’ve tried moving it around, you’ve tried painting it. Still reads “temporary.” The fix is a wrap-style circular bench that frames the trunk and makes seating the feature—like your tree put on a halo made of cedar.
This vibe leans modern cottage meets garden party. A curved, slatted bench paired with neutral seat pads and a small round table turns a bare base into your most-used hangout. Family-friendly, easy to sweep, and the bench footprint discourages trampling roots. Lighting strategy here: low lanterns on the bench surface and a discreet rope light under the seat to create a floating effect at night. It photographs like a magazine page because the geometry is strong and the glow lines curve around the trunk.
Material callouts: sealed cedar or thermally modified ash, black powder-coated hardware, natural canvas cushions with outdoor foam. Not a carpenter? Several modular circular benches exist; choose one with adjustable segments. For a smaller yard, build only a half-ring and nest it near a fence. For a bolder look, stain the wood a rich walnut and pair with brass-toned lanterns.
Budget Breakdown:
- Modular circular bench kit or lumber: $300–$1,200
- Outdoor cushions/pads: $80–$250
- Small café table: $80–$300
- Lanterns + outdoor LED candles: $50–$180
- Under-bench rope light (low-voltage): $60–$150
Total Estimated Cost: $570 – $2,080
Best For: Social yards, families with kids who love to gather outside. Great for mid-sized trees with enough trunk clearance for seating.
Key Design Elements:
- Main materials: cedar or modified ash, black metal hardware
- Color palette: warm honey wood, black, soft canvas, greenery
- Lighting strategy: lanterns at varying heights + discreet under-seat glow
- Furniture silhouettes: curved, slatted, low-profile
- Texture layers: smooth wood, nubby canvas, matte metal, leafy canopy
- Accent details: striped outdoor pillow, low tray, herb pot centerpiece
How To Recreate This Look:
- Measure trunk diameter and allow a 6–10 inch air gap inside the bench.
- Install adjustable bench segments, ensuring level support on pavers or compacted gravel pads.
- Add a compact round table centered on one segment.
- Place lanterns in asymmetric pairs; run a rope light under the front lip.
- Style with two pillows max to keep it calm and cohesive.
Why This Reads High-End: Curves feel custom. The circular geometry echoes the tree’s canopy, and underlighting makes the bench “float.” Designers love a lit silhouette because it’s both functional and cinematic.
The Most Common Mistake: Oversizing the seat depth. If it’s too deep, cushions slide and people perch. Aim for 16–18 inches of seat depth for comfort and control.
Pro Styling Tip: Shoot from a slightly elevated angle to catch the full ring and the glow line beneath the seat—it frames the trunk like a jewel.
Still with me? The next idea is for the minimalists who want calm, cooling stone and a whisper of green instead of a full chorus.
4. Quiet Zen Stone Basin and Moss Belt
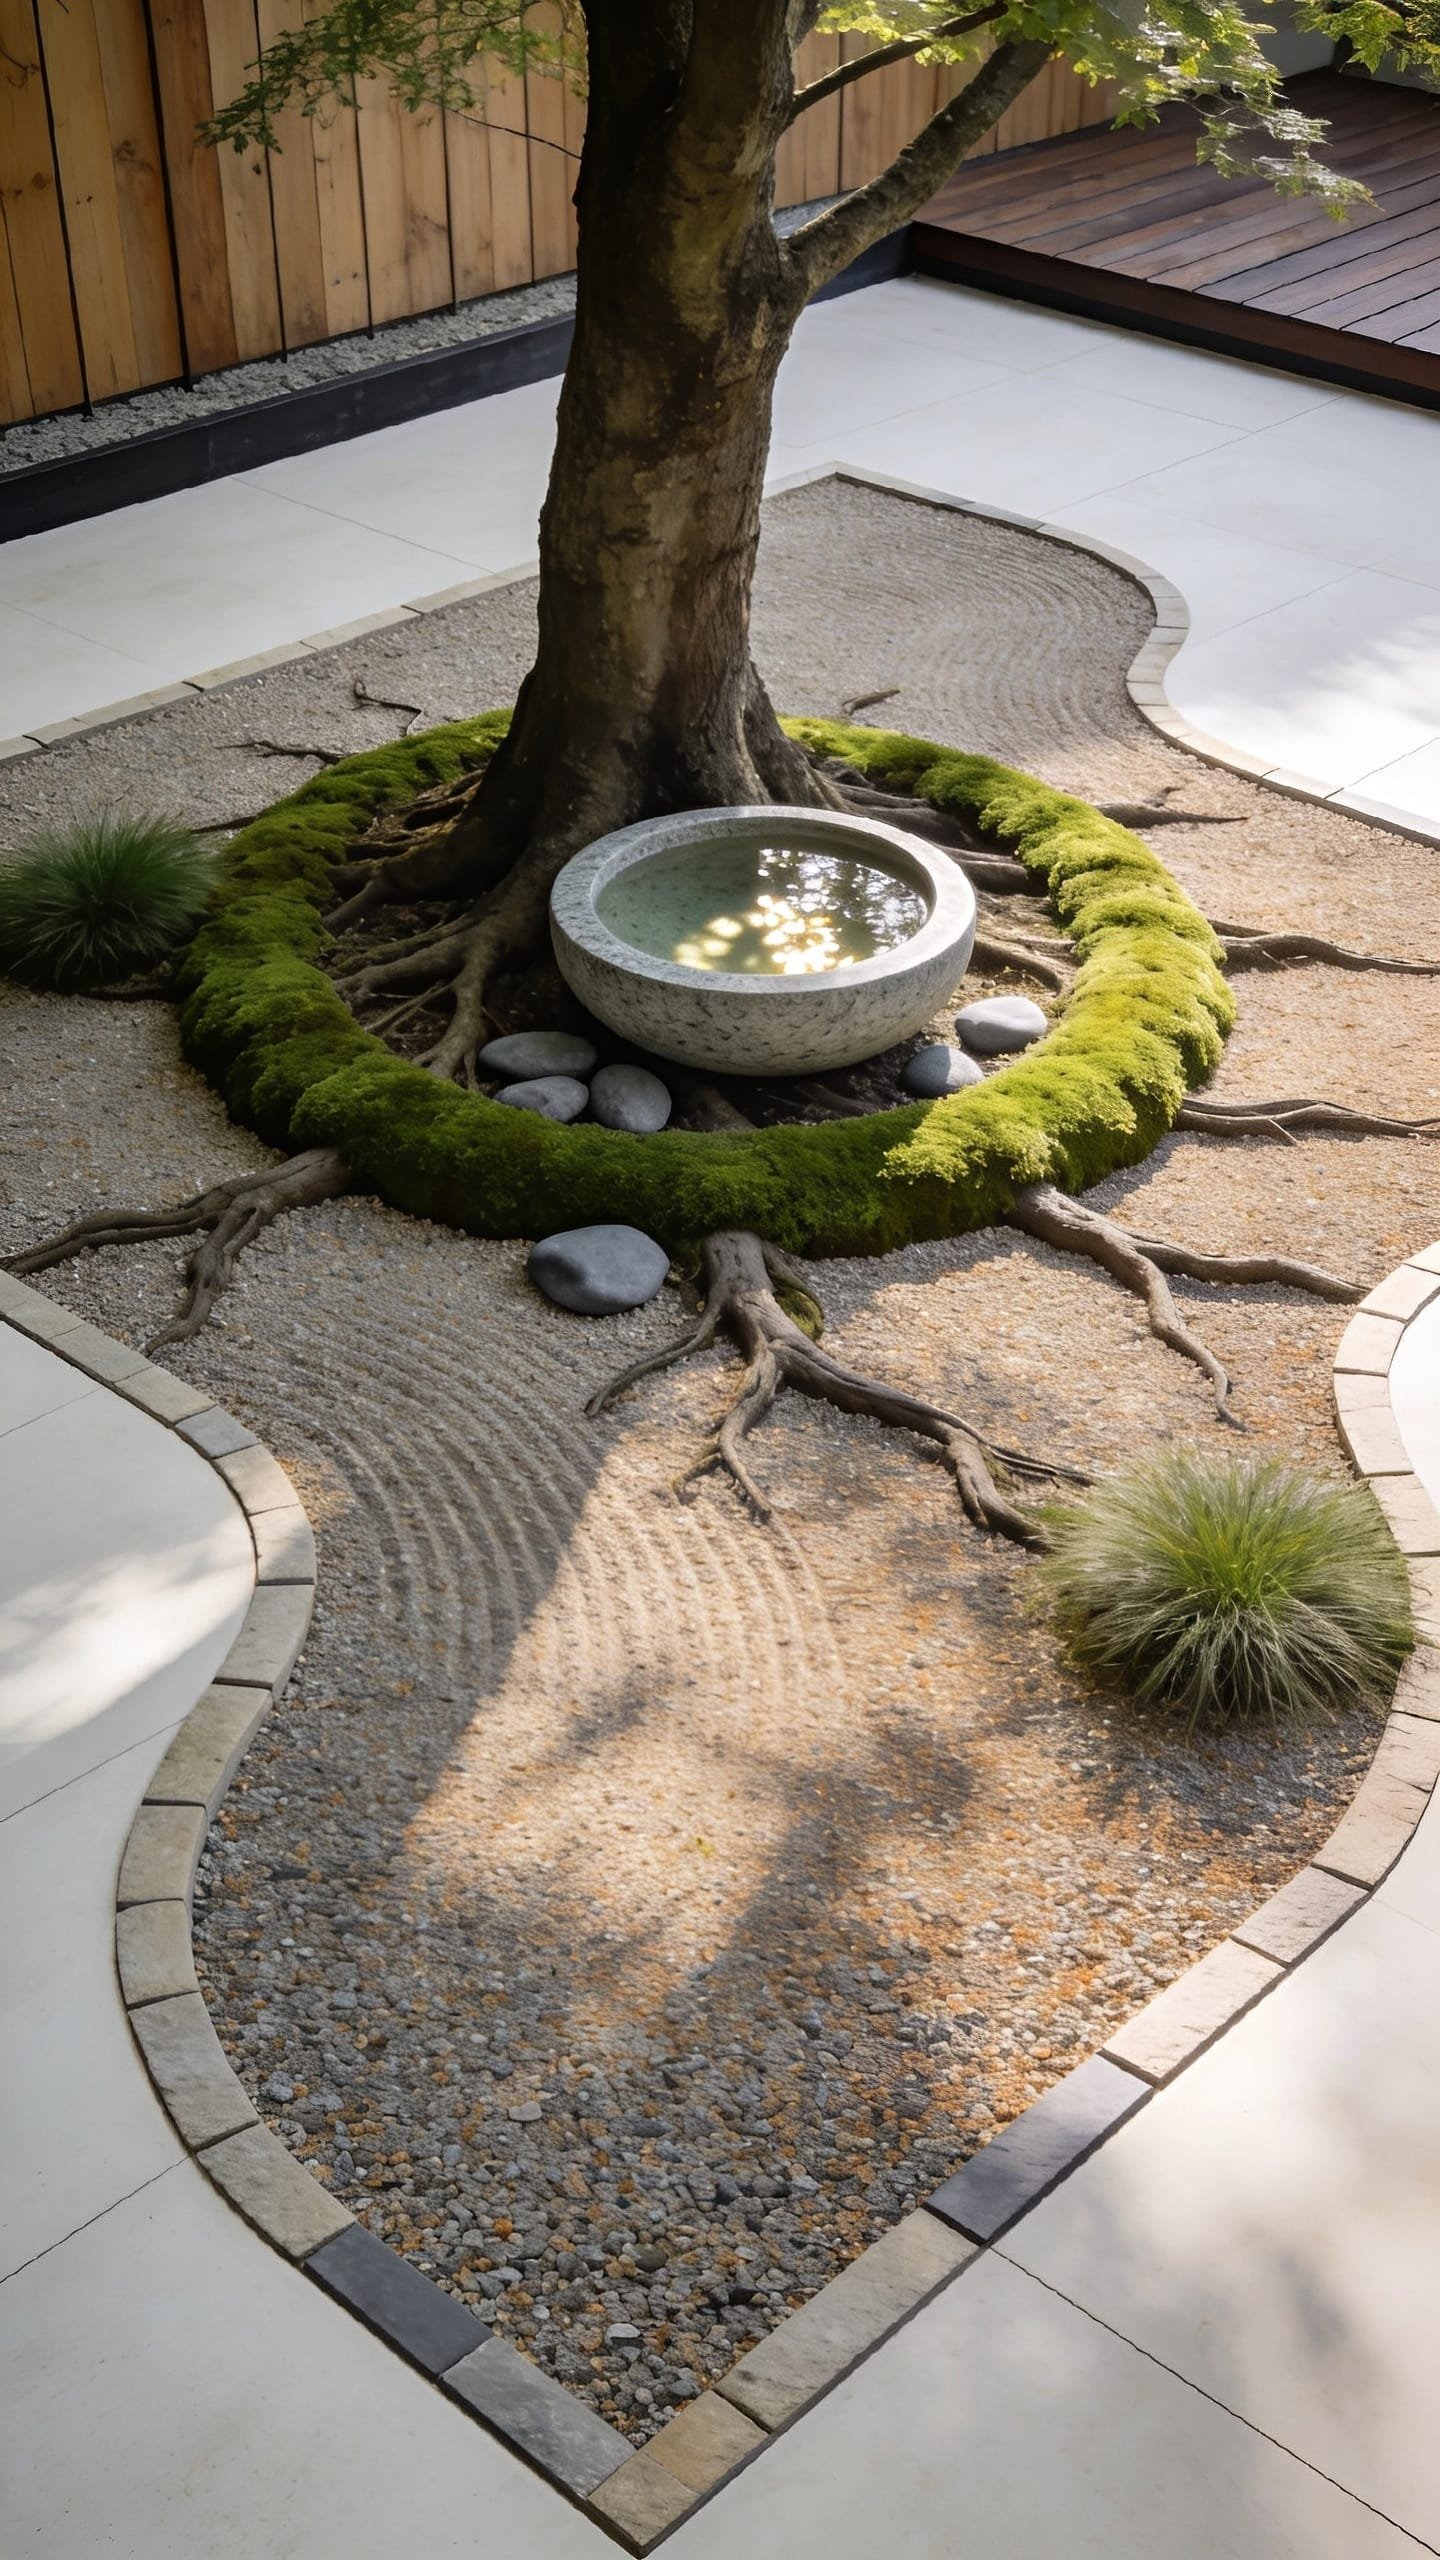
You love simplicity but your tree base currently reads chaotic: exposed roots, patchy weeds, random edging. You’ve tried mulch—too messy. You’ve tried pavers—too fussy. This setup calms the center with a low stone basin and a minimal “moss belt” so the area becomes a quiet moment rather than one more task.
Mood-wise, it’s modern Japanese courtyard meets spa: restrained, textural, and meditative. Here’s why it works in real homes: very few plants, most of the structure comes from stone and gravel, and the maintenance is about gentle tidying rather than constant pruning. Lighting is gentle and indirect: a soft wash on the basin and a single ankle-height guide light. It photographs beautifully because of the negative space—you give the eye room to rest and let tiny details (moss texture, water ripple) feel luxurious.
Materials dominate: basalt or limestone basin (doesn’t need to function as a fountain), dark river rock, fine gravel, and a narrow collar of moss or moss-like groundcover such as Sagina subulata or Irish moss in brighter zones. Variations: Budget version uses a large glazed bowl and river rock. For darker moods, choose charcoal gravel and a black ceramic vessel. For renters, keep the “moss belt” in narrow nursery trays set into gravel.
Key Design Elements:
- Main materials: stone basin or ceramic bowl, dark river rock, fine gravel
- Color palette: charcoal, soft gray, moss green, hints of silver
- Lighting strategy: one small spotlight angled to skim across the basin edge
- Furniture silhouettes: none needed; add a single low stool nearby for ceremony
- Texture layers: smooth basin, pebbled river rock, velvety moss, fine gravel
- Accent details: bamboo dipper, small stacked stone, minimal wind chime
Budget Breakdown:
- Stone or ceramic basin: $120–$600
- River rock (bags): $60–$140
- Fine gravel: $50–$120
- Moss or groundcover flats: $80–$220
- Low-voltage spotlight: $60–$150
Total Estimated Cost: $370 – $1,230
Best For: Small yards, side gardens, and anyone craving a place to breathe. Works under maples, dogwoods, or olives where dappled light plays nicely.
How To Recreate This Look:
- Define a modest ring (6–8 feet diameter); keep trunk flare open.
- Lay fine gravel 2 inches deep and tamp lightly.
- Create a subtle inner ring with river rock; set the basin off-center for tension.
- Plant a narrow moss belt between river rock and gravel edge.
- Install one small spotlight to graze the basin at dusk.
Why This Looks Intentional: Negative space is a luxury. When you resist the urge to fill, the quality of each element matters more, and the tree becomes the star instead of fighting with clutter.
Don’t Do This: Don’t crowd the basin with trinkets. One or two objects max. Excess decor reads messy and cheap in photos and in person.
Pro Styling Tip: After installation, mist the moss and stones right before photos—the sheen increases contrast and brings out subtle color shifts.
Quick breather. If your brain is spinning with options, choose the vibe that matches your actual life. Do you sit with friends? Go bench. Need a low-maintenance fix? Gravel terrace or Zen ring. Start small, win fast.
5. Storybook Boardwalk With Native Groundcover
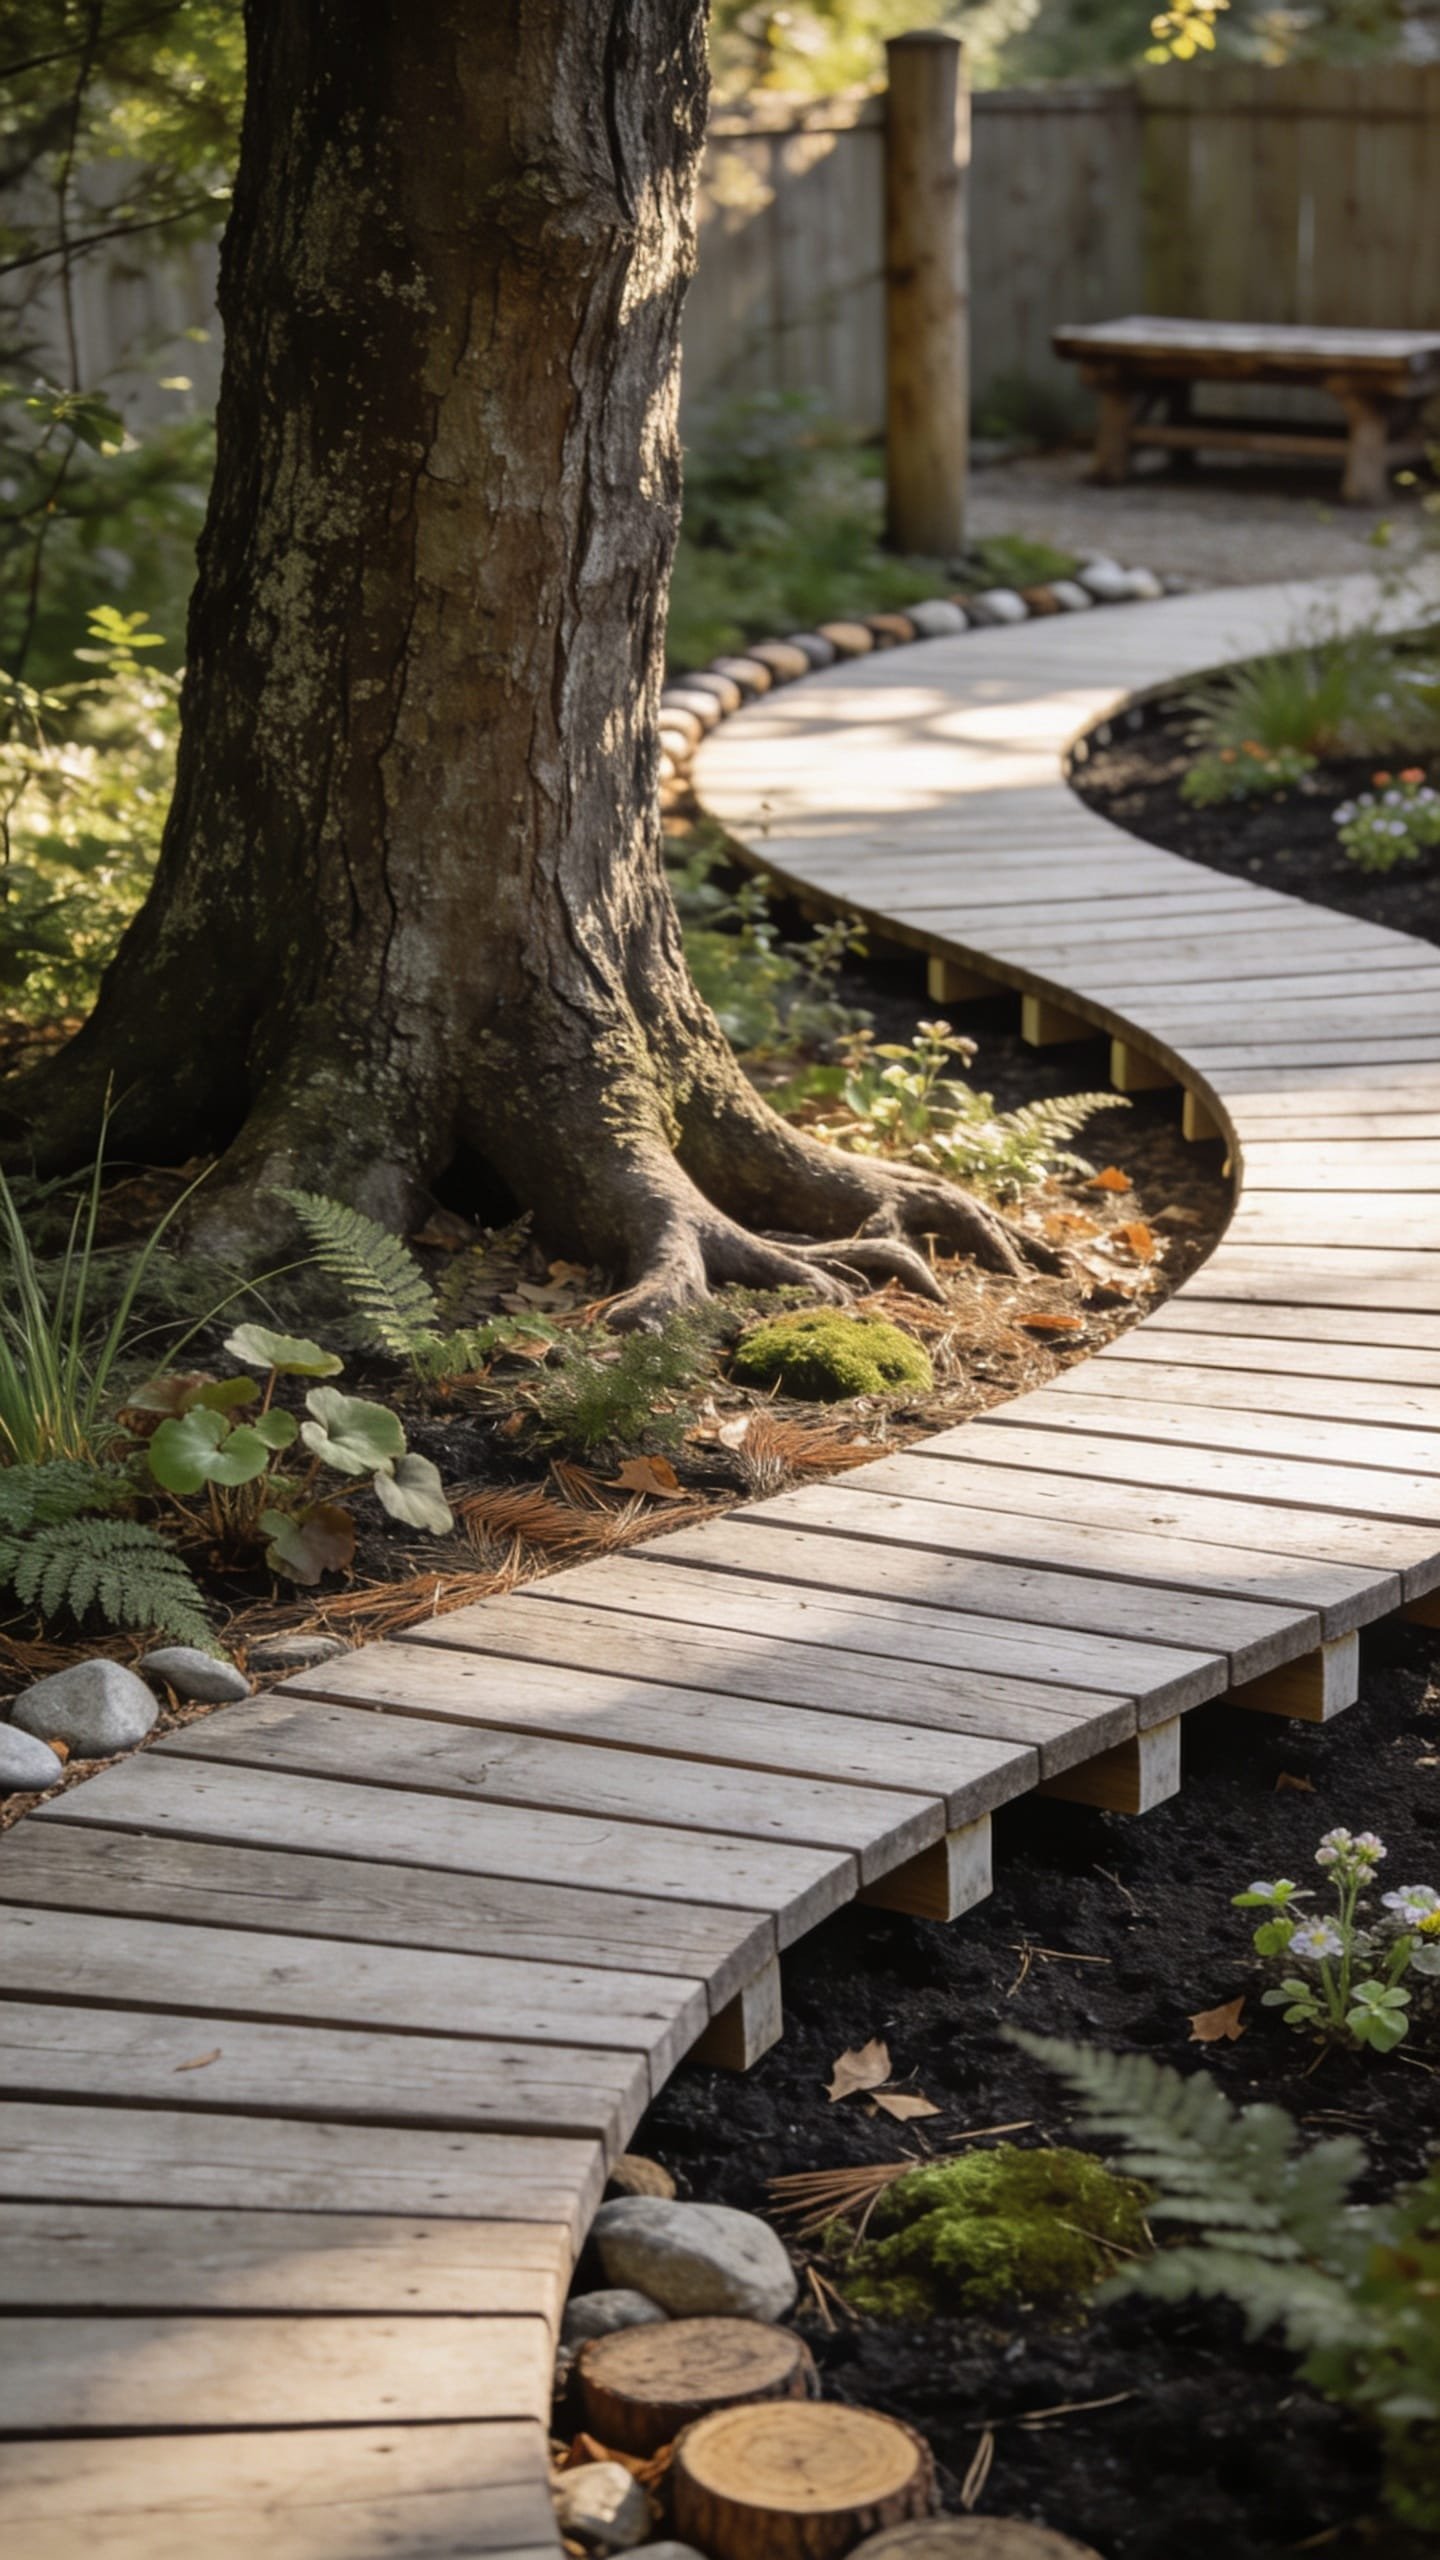
You want charm. You hate tripping over roots. Every path you’ve built shifts or gets muddy, and the tree looks annoyed. This design floats a skinny, curved boardwalk around the tree with native groundcover tucked beneath. It feels like a woodland story path—practical, photogenic, and kind to roots.
The mood sits between cottagecore and modern rustic: wood slats, soft greens, and the rhythm of dappled light on planks in late afternoon. It works in family yards because you can direct foot traffic, reduce soil compaction, and still keep the tree healthy. Light the route with low, shielded path lights to avoid glare. In photos, the sinuous line of the walkway draws the eye and frames the trunk; the contrast of warm wood and cool green reads as intentional design rather than a fix.
Materials: rot-resistant lumber (cedar, ipe, or composites), stainless screws, geotextile for weed block under the path, and low native groundcovers like Pennsylvania sedge, creeping phlox for edges, or wild ginger in deeper shade. Variations: Budget-friendly uses pressure-treated deck boards with a natural gray weathering plan. For a darker version, stain the boards espresso and pair with deep green groundcovers. Small space? Install a single “landing” platform and a short curved spur instead of a full loop.
Budget Breakdown:
- Lumber or composite boards: $350–$1,200
- Stringers and stakes: $80–$200
- Stainless screws and hardware: $40–$120
- Geotextile fabric: $30–$80
- Groundcovers (plugs or flats): $150–$450
- Low path lights (4–6 units): $140–$360
Total Estimated Cost: $790 – $2,410
Best For: Sloped yards, high-traffic routes, or families with dogs and kids. Ideal near oaks or pines where you want to protect roots but still move through the space.
Key Design Elements:
- Main materials: cedar/ipe/composite boards, stainless hardware
- Color palette: honey wood, olive, sage, gray-brown bark
- Lighting strategy: shielded path lights every 6–8 feet
- Furniture silhouettes: optional small perch or stump stool
- Texture layers: ribbed boards, soft groundcover, rough bark, matte metal light caps
- Accent details: house number plaque on a stake, subtle rope handrail on slopes
How To Recreate This Look:
- Sketch a gentle S-curve around the tree; avoid cutting into major roots.
- Lay geotextile fabric and set shallow sleepers or stringers level with the soil.
- Attach boards with consistent spacing (1/8–1/4 inch) for drainage and shadow lines.
- Plant groundcovers in clusters under and beside the boardwalk.
- Add low, warm-white path lights to graze the board edges, not blind the eye.
Why This Looks Expensive: Continuous lines and consistent board spacing read custom. The curved path implies planning and restraint—two things buyers and cameras love.
Watch Out: Don’t trench deep footings near the trunk. Surface-mount stringers and lightly pin them; the tree’s root zone needs respect.
Pro Styling Tip: Photograph from the curve’s inside edge so the path leads your viewer’s eye toward the tree—instant depth and a magazine-style composition.
True story: a friend agonized over perennial colors for weeks before I pointed out her path was the real problem. She built a slim boardwalk and, no exaggeration, everything else suddenly made sense. Sometimes layout is the answer, not more plants.
6. Wine-Nook Fire Bowl With Low Evergreen Carpeting
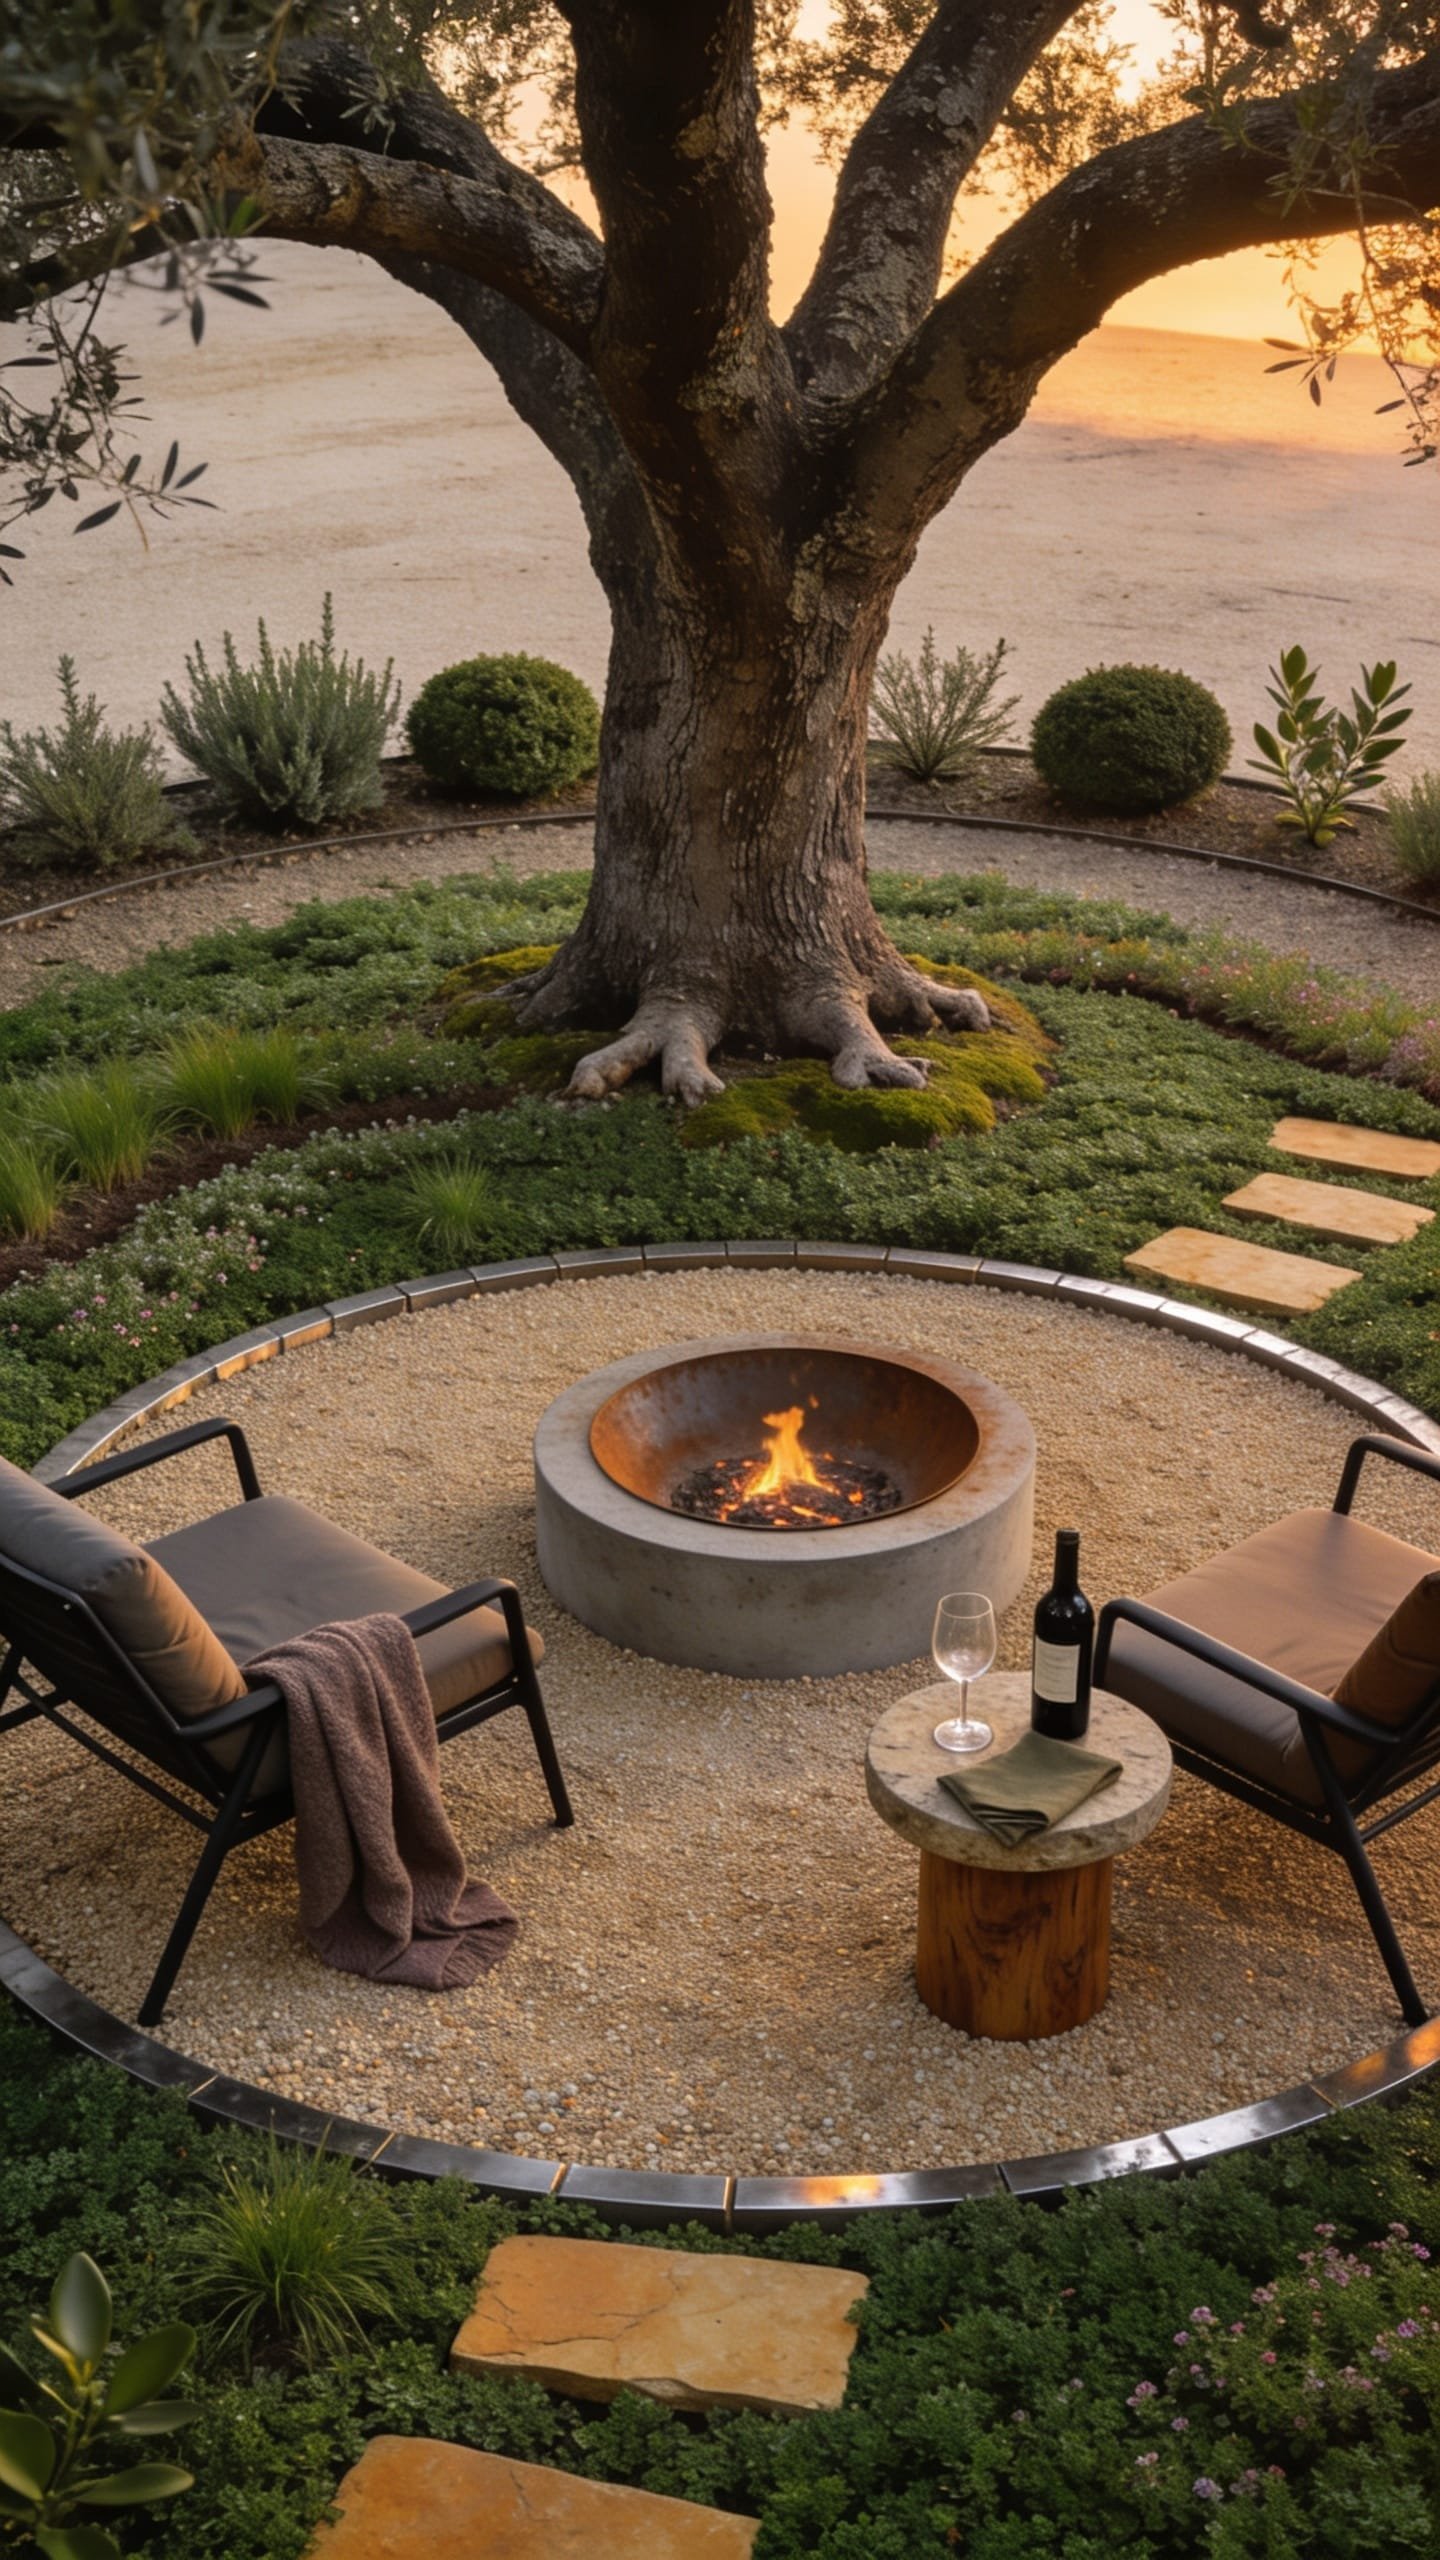
You want a place to sip and linger even in shoulder seasons, but the area around your tree feels cold and uninviting once the sun dips. You tried a cheap fire pit once and the zone still looked like a campsite. Let’s give you a compact, grown-up “wine nook”: a low, clean-lined fire bowl, slim chairs, and an evergreen carpet that keeps the scene lush year-round.
This design blends modern Mediterranean with mountain-retreat coziness. A shallow concrete or corten steel fire bowl sits on a circle of large-format pavers set within a groundcover carpet—think dwarf mondo grass, thyme in sunnier spots, or creeping jenny for a brighter chartreuse ring. Lighting? Keep it layered but calm: the fire itself, a soft tree uplight, and two tiny solar markers around the path in. It works in real life because it gives you a defined destination with low upkeep. No storing bulky furniture, no weedy ring to weed-whack.
Photographically, the interplay of flame, evergreen texture, and silhouetted branches is just…chef’s kiss. The trick is balancing scale: a modest fire bowl looks intentional; a giant one competes with the tree. Variations: For small yards, pick a 24–28 inch bowl. For a darker tone, choose black metal chairs and deep green mondo. Renter-friendly: Use a portable gas fire bowl on a paver pad you can disassemble later—zero scorch marks on lawn.
Budget Breakdown:
- Fire bowl (gas or wood): $150–$900
- Large-format pavers (6–10 pieces): $120–$300
- Groundcover flats (mondo, thyme, or creeping jenny): $120–$360
- Two lounge chairs: $200–$800
- Uplight and small solar markers: $120–$260
Total Estimated Cost: $710 – $2,620
Best For: Evenings outdoors, cooler climates, and anyone who wants a year-round “finished” look under a favorite tree. Great under oaks, birches, or olives with enough overhead clearance.
Key Design Elements:
- Main materials: concrete or corten fire bowl, large pavers, evergreen groundcover
- Color palette: charcoal, warm gray, deep green, optional brass accents
- Lighting strategy: flame as focal, subtle trunk uplight, two path markers
- Furniture silhouettes: low-slung metal or teak chairs with slim arms
- Texture layers: crisp paver edges, soft evergreen blades, smooth metal, flickering flame
- Accent details: small brass tray, wool throw, two stemless glasses (obviously)
How To Recreate This Look:
- Mark a circle sized to your bowl plus 2 feet clearance; set pavers flush with soil or gravel base.
- Plant evergreen groundcover in a donut around the pavers; keep the trunk base open.
- Position the fire bowl slightly off-center for visual tension.
- Add two chairs angled inward; leave an easy in-and-out path.
- Install the uplight and set low solar markers on the approach line.
Why This Looks Expensive: Year-round structure. When the ground stays green and the fire sits on crisp pavers, the scene feels planned even in winter. Restraint with color also reads pricier.
One Thing To Avoid: Don’t use shaggy, invasive groundcovers near fire. Keep species tidy and low, and always follow local fire safety rules. No overhanging branches right above the flame.
Pro Styling Tip: For photos, shoot as the first flames catch. The low light keeps highlights controlled, and you’ll get that subtle glow on chair arms and evergreen blades.
Real talk: I once installed a fire bowl too big for the space because I loved the catalog shot. It dominated the tree and the chairs felt like afterthoughts. We swapped for a smaller bowl and suddenly the composition clicked. Scale wins every time.
Quick Checklist
- Choose one primary geometry: circle, crescent, or curve—repeat it
- Protect the trunk flare: no soil or gravel piled against bark
- Define the edge with stone, metal, or board lines
- Pick a tight color story: 3–4 tones max
- Light the trunk with a soft graze, not a harsh spotlight
- Repeat textures intentionally: gravel + stone, wood + groundcover
- Size seating to fit scale: 16–18 inch seat depth is the sweet spot
- Use negative space to signal confidence—and quality
- Choose plants for dry shade if roots are dense
- Photograph at golden hour; mist foliage for gentle sheen
Frequently Asked Questions
How much should I budget for one of these garden ideas around trees if I’m starting from scratch?
Most projects here land between $400 and $2,500 depending on materials and lighting. Start with the shape and edge, then layer furniture or lighting later. The biggest visual leap usually comes from defining the geometry and adding texture, not from expensive decor.
I’m worried about damaging my tree’s roots. What’s the safe way to build around it?
Avoid deep digging in the root zone. Keep installations shallow: edging spikes, surface-set pavers, gravel on top of fabric, or floating boardwalks on sleepers. Most importantly, don’t pile soil or mulch against the trunk flare—leave a clear air gap.
My yard is small. Won’t a circle around my tree make it feel crowded?
Scale the circle down or switch to a half-moon or crescent. In tight yards, a clear, modest shape actually makes the space feel bigger by simplifying sightlines. Try a 6–8 foot diameter zone and keep furnishings lightweight.
Maintenance scares me. Which idea is lowest effort long-term?
The Moonlit Gravel Terrace and the Zen Stone Basin are the easiest to maintain—mostly raking, light sweeping, and occasional tidying. The Woodland Understory takes a bit more seasonal grooming but pays off with lush texture.
I rent—what’s realistic and removable?
Go for steel edging with a gravel infill (no concrete), a portable fire bowl on pavers, or potted understory plants nested into bark chips. All of these can be lifted and taken with you, leaving the lawn essentially intact.
Here’s Your Finish Line
Pick the idea that matches your life, not your neighbor’s. If you host at dusk, start with the gravel terrace or wine nook. If you crave calm, build the Zen basin. Focus on three ingredients—texture, lighting, and restraint—and your yard will finally feel complete, not busy.
The truth is, luxury outside doesn’t come from price tags. It comes from confident shapes, layered textures that invite touch, and light that flatters bark and leaf instead of blinding everyone. Start with one ring, one bench, one glow. Give yourself a weekend and a clear shape, and you’ll have a spot that looks pulled from a boutique garden—because it is, and it’s yours.
Take a breath, grab your gloves, and mark that circle. You’ve got this. And in a week, you’ll be the person sipping a drink under a tree that finally looks as good as it makes you feel—seriously.

About the Author

Krisztina P.Rendes, Founder of Home Style Vibes
Founder of Home Style Vibes
Krisztina Puskásné Rendes created Home Style Vibes as a cozy-modern lifestyle space where homemaking meets inspiration. Her goal is to help women create beautiful, organized, and peaceful homes they truly love — without overwhelm. You’ll find here heart-driven content on home decor, cleaning tips, easy family recipes, organization and decluttering, DIY home projects, plants, and seasonal ideas — all designed to bring more calm, comfort, and style into everyday life.