6 Front Yard Garden Ideas for Every Home Style (From Simple to Stunning)
You want a front yard that whispers “welcome” before anyone even knocks. You hate that your current entry feels flat, patchy, or like an afterthought the landscaper did in a rush. Picture soft morning light catching silvery grasses, a crisp path that actually leads the eye, and plants that look curated—not chaotic. These 6 front yard garden ideas fix the exact frustrations you’re feeling and help you build a magazine-worthy curb presence that photographs beautifully, holds up to weather and kids, and doesn’t require a gardener’s degree. We’ll keep costs realistic and give you a plan you can complete in 1-2 weekends per idea, with budgets you can cap under $2,500 if you stay focused. This is for anyone who wants their front yard to look intentional and Pinterest-ready, without turning into a maintenance hostage.
1. Modern Mediterranean Gravel Court with Olive Glow
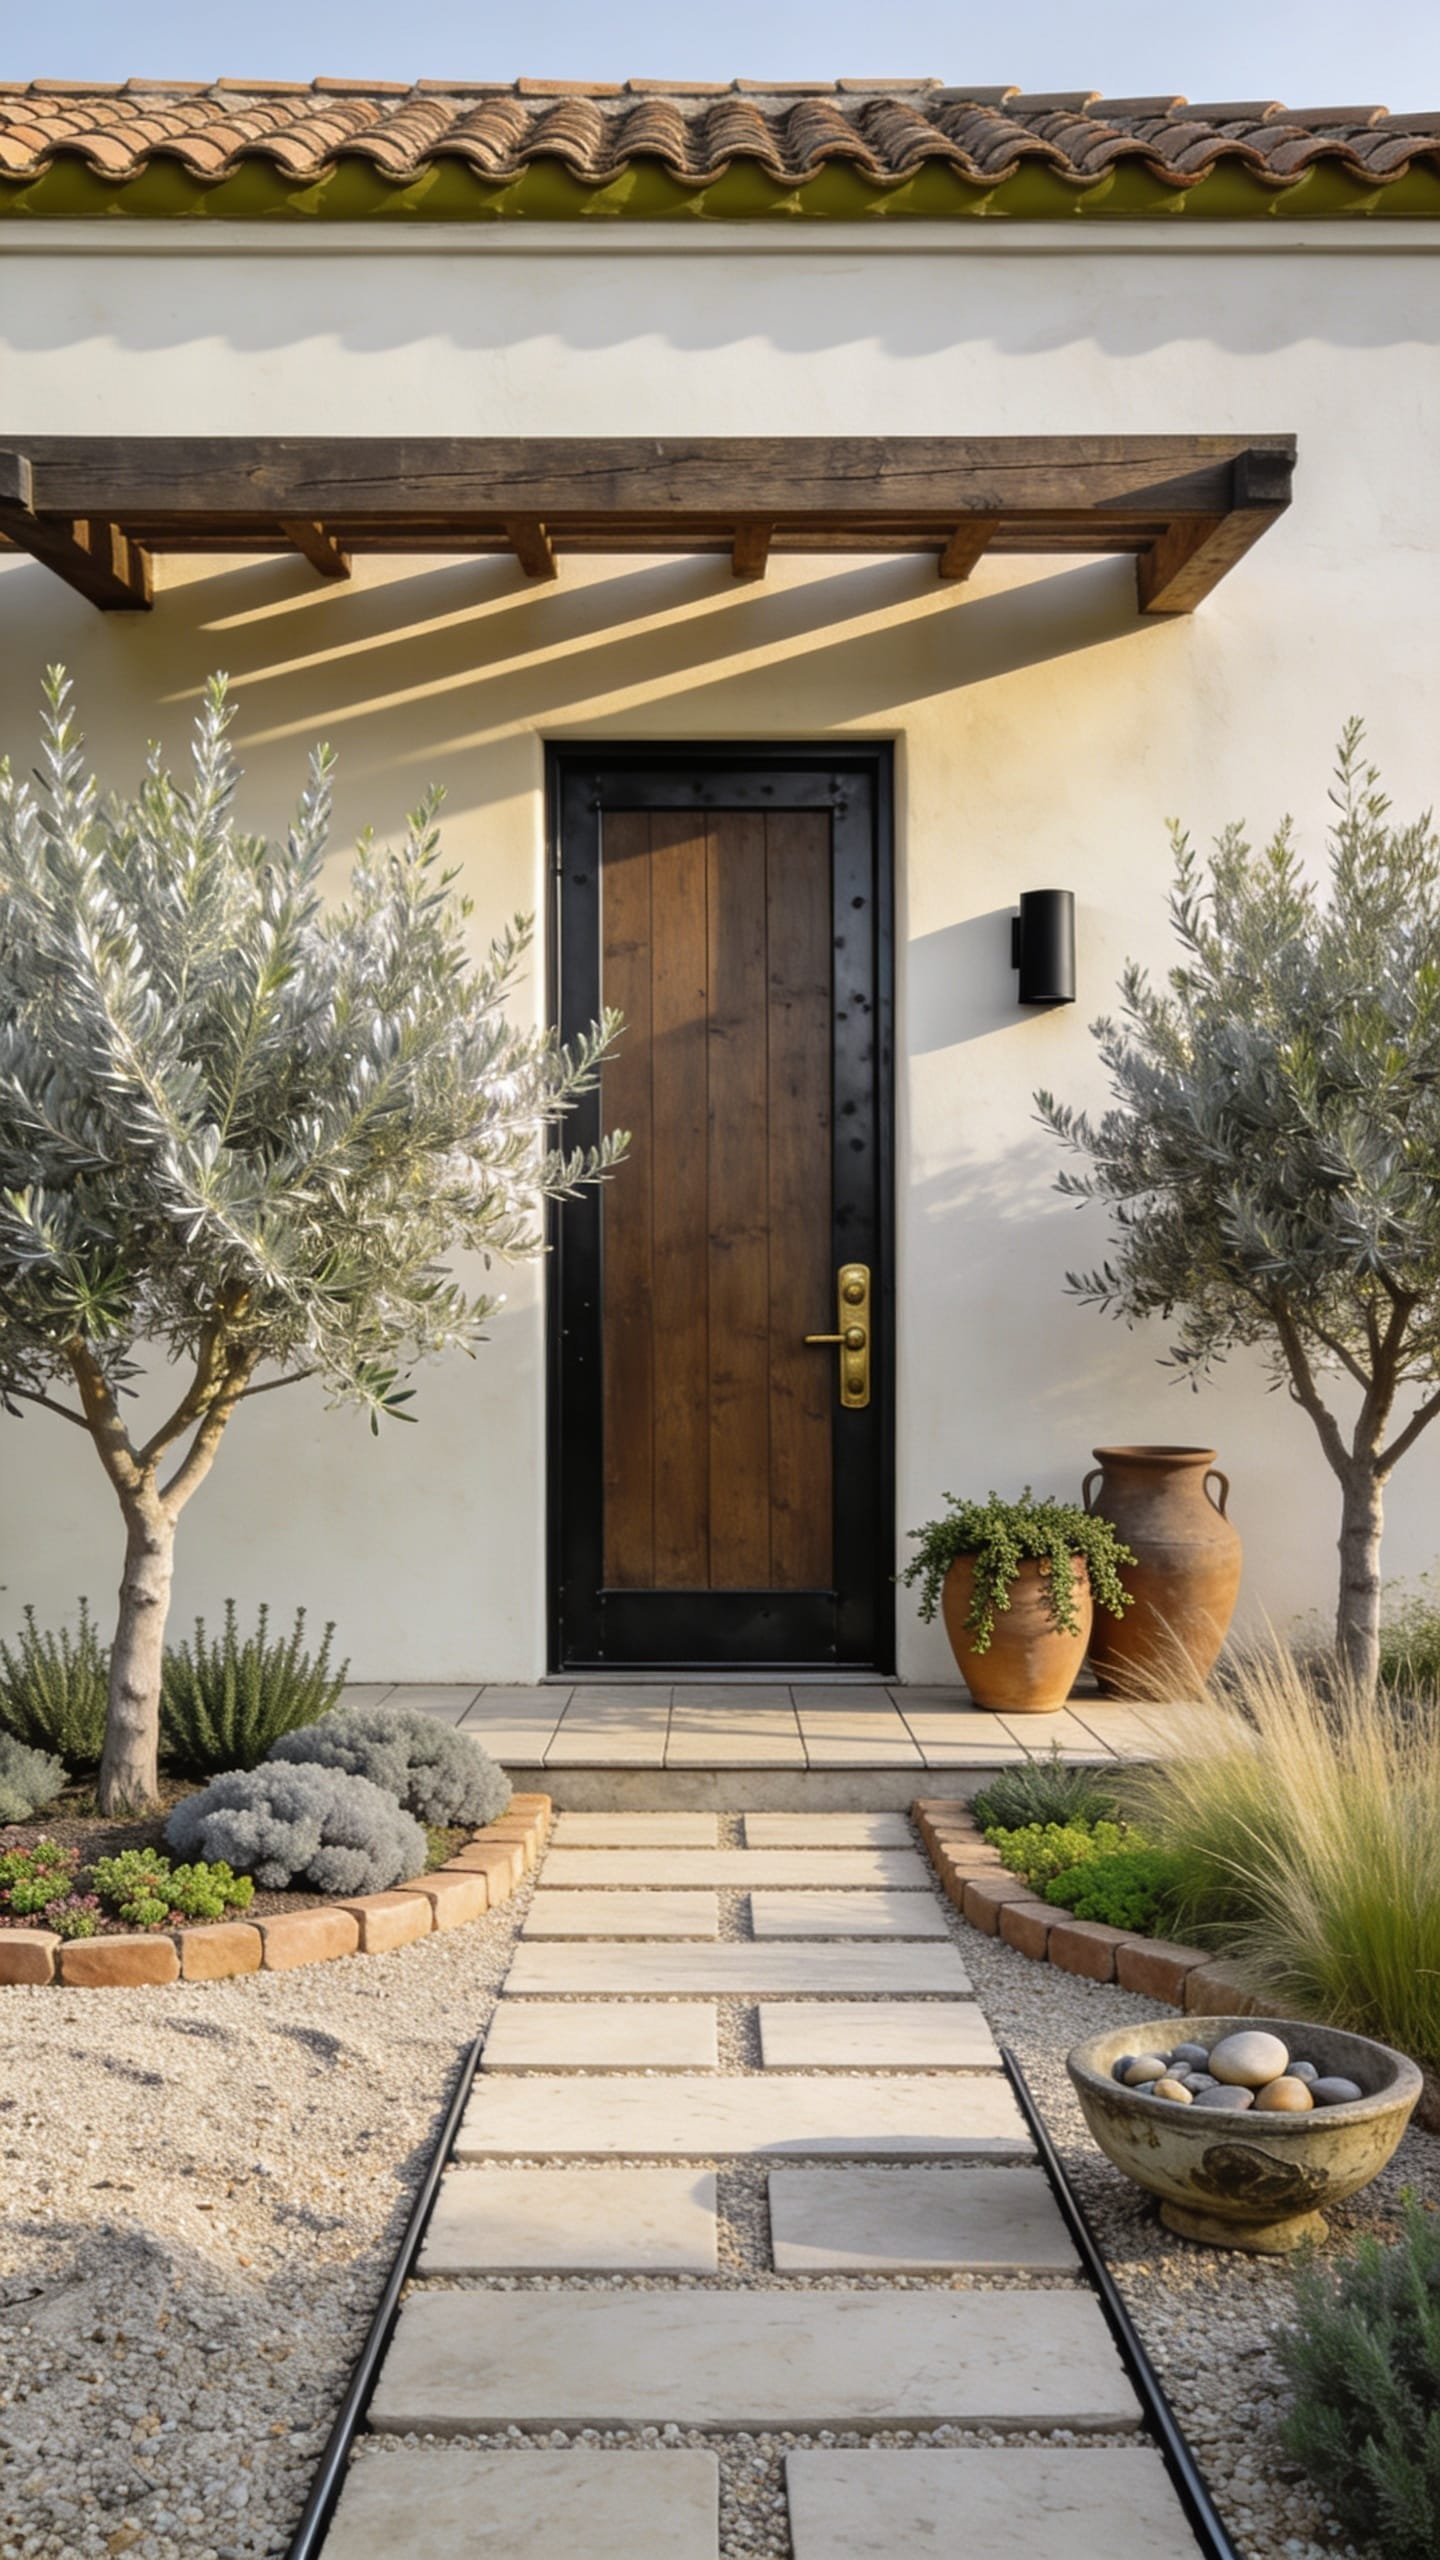
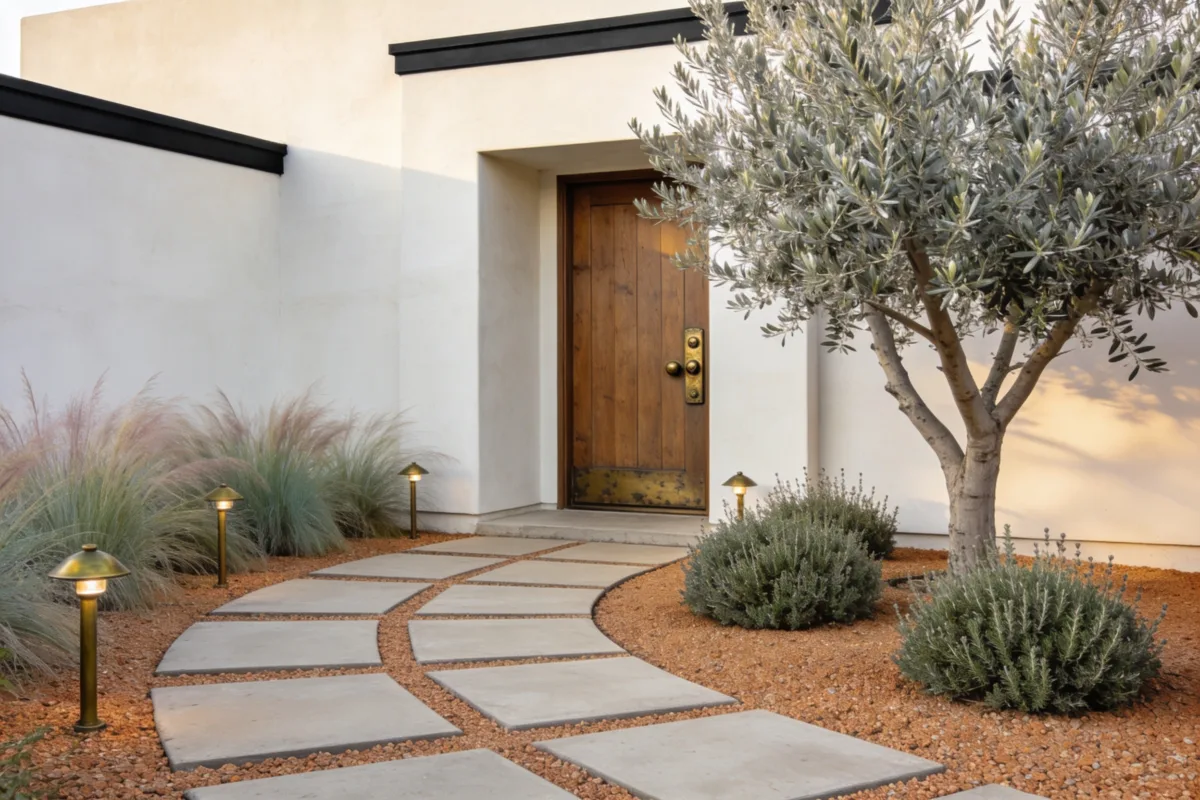
We’ve all stared at a thirsty front lawn thinking, “If I pull this out, will it just look like a parking lot?” This Modern Mediterranean concept ends the lawn guilt, keeps the look luxurious, and solves that hot, barren feeling. The mood is sun-warmed, organic, and grounded—soft gravel underfoot, silvery olive foliage, rosemary clouds, and a rhythmic grid of pavers that invite you in.
It works in real homes because it’s low-water, low-drama, and holds structure all year. Time-starved? Gravel and grid pavers install quickly and instantly feel complete. Lighting matters here: a trio of low path lights and an uplight on one hero plant (an olive or bay laurel) pull a golden glow after dusk—think vacation courtyard. Materials lead the way: crushed gravel, honed concrete or limestone-look pavers, terracotta planters, and bronze or blackened steel lighting. The camera loves this look thanks to textural contrast (gravel vs. smooth leaf), strong negative space, and sculptural silhouettes that pop, especially in early morning shadows.
Variations to fit life: choose a compact olive in a container for small spaces, swap to dwarf bay laurel where olives don’t thrive, or go budget-friendly with pea gravel and precast concrete steppers. Renter-friendly? Keep the gravel in landscape edging and cluster containers so you can take the “garden” with you later.
Budget Breakdown:
- Crushed gravel (2-3 yards): $120 – $280
- Concrete/stone pavers (10-20 pieces): $150 – $650
- Terracotta planters (2-3 large): $120 – $300
- Olive or bay laurel (5-15 gallon): $120 – $350
- Mediterranean shrubs (rosemary, lavender, westringia): $12 – $40 each
- Low-voltage path lights (3-5) + transformer: $180 – $450
- Metal edging (40-60 ft): $90 – $220
Total Estimated Cost: $800 – $2,250
Best For: Sunny front yards, stucco or modern homes, anyone tired of watering lawns. Great for mild climates and front entries that need structure without fuss.
Key Design Elements:
- Main materials: crushed gravel, grid pavers, terracotta, bronze/blackened metal
- Color palette: warm neutrals, olive green, dusty lavender-gray, soft white
- Lighting strategy: low path lights, one tree or specimen uplight for drama
- Furniture silhouettes: a bench or backless stone perch near the entry
- Texture layers: crunchy gravel, waxy olive leaves, brushed stucco or painted brick
- Accent details (hardware, decor pieces, plants): matte black house numbers, oversized terracotta urn, rosemary mounds
How To Recreate This Look:
- Start with a clear plan: outline a paver grid that leads from sidewalk to door, allowing gravel to fill the negative space.
- Add metal edging to contain gravel and carve out clean lines that read crisp in photos.
- Layer in 2-3 terracotta planters near the door with a tall specimen plant as your focal point.
- Install low-voltage path lights along the paver line and one uplight aimed at your hero tree or largest shrub.
- Style with lavender and rosemary in loose drifts, leaving open gravel pockets for breathing room.
Why This Looks Expensive: Restraint. The limited plant palette and strong geometry signal design confidence. Gravel and pavers read like a custom courtyard, while terracotta brings artisanal warmth.
Watch Out: Don’t overplant the gravel. Too much foliage ruins the calm, and you’ll lose those beautiful shadow patterns. Keep at least 30% open space.
Pro Styling Tip: Rake the gravel in one direction before photos so light catches subtle lines—instant editorial texture.
Keep scrolling—if your home leans more cottage or you need color, the next one is for the romantics.
Quick Tip: When choosing gravel, go smaller than you think. 3/8-inch sits tighter, looks neater, and is easier to walk on in dress shoes than chunky 3/4-inch.
2. Soft Cottage Border with Layered Blooms and a Storybook Path
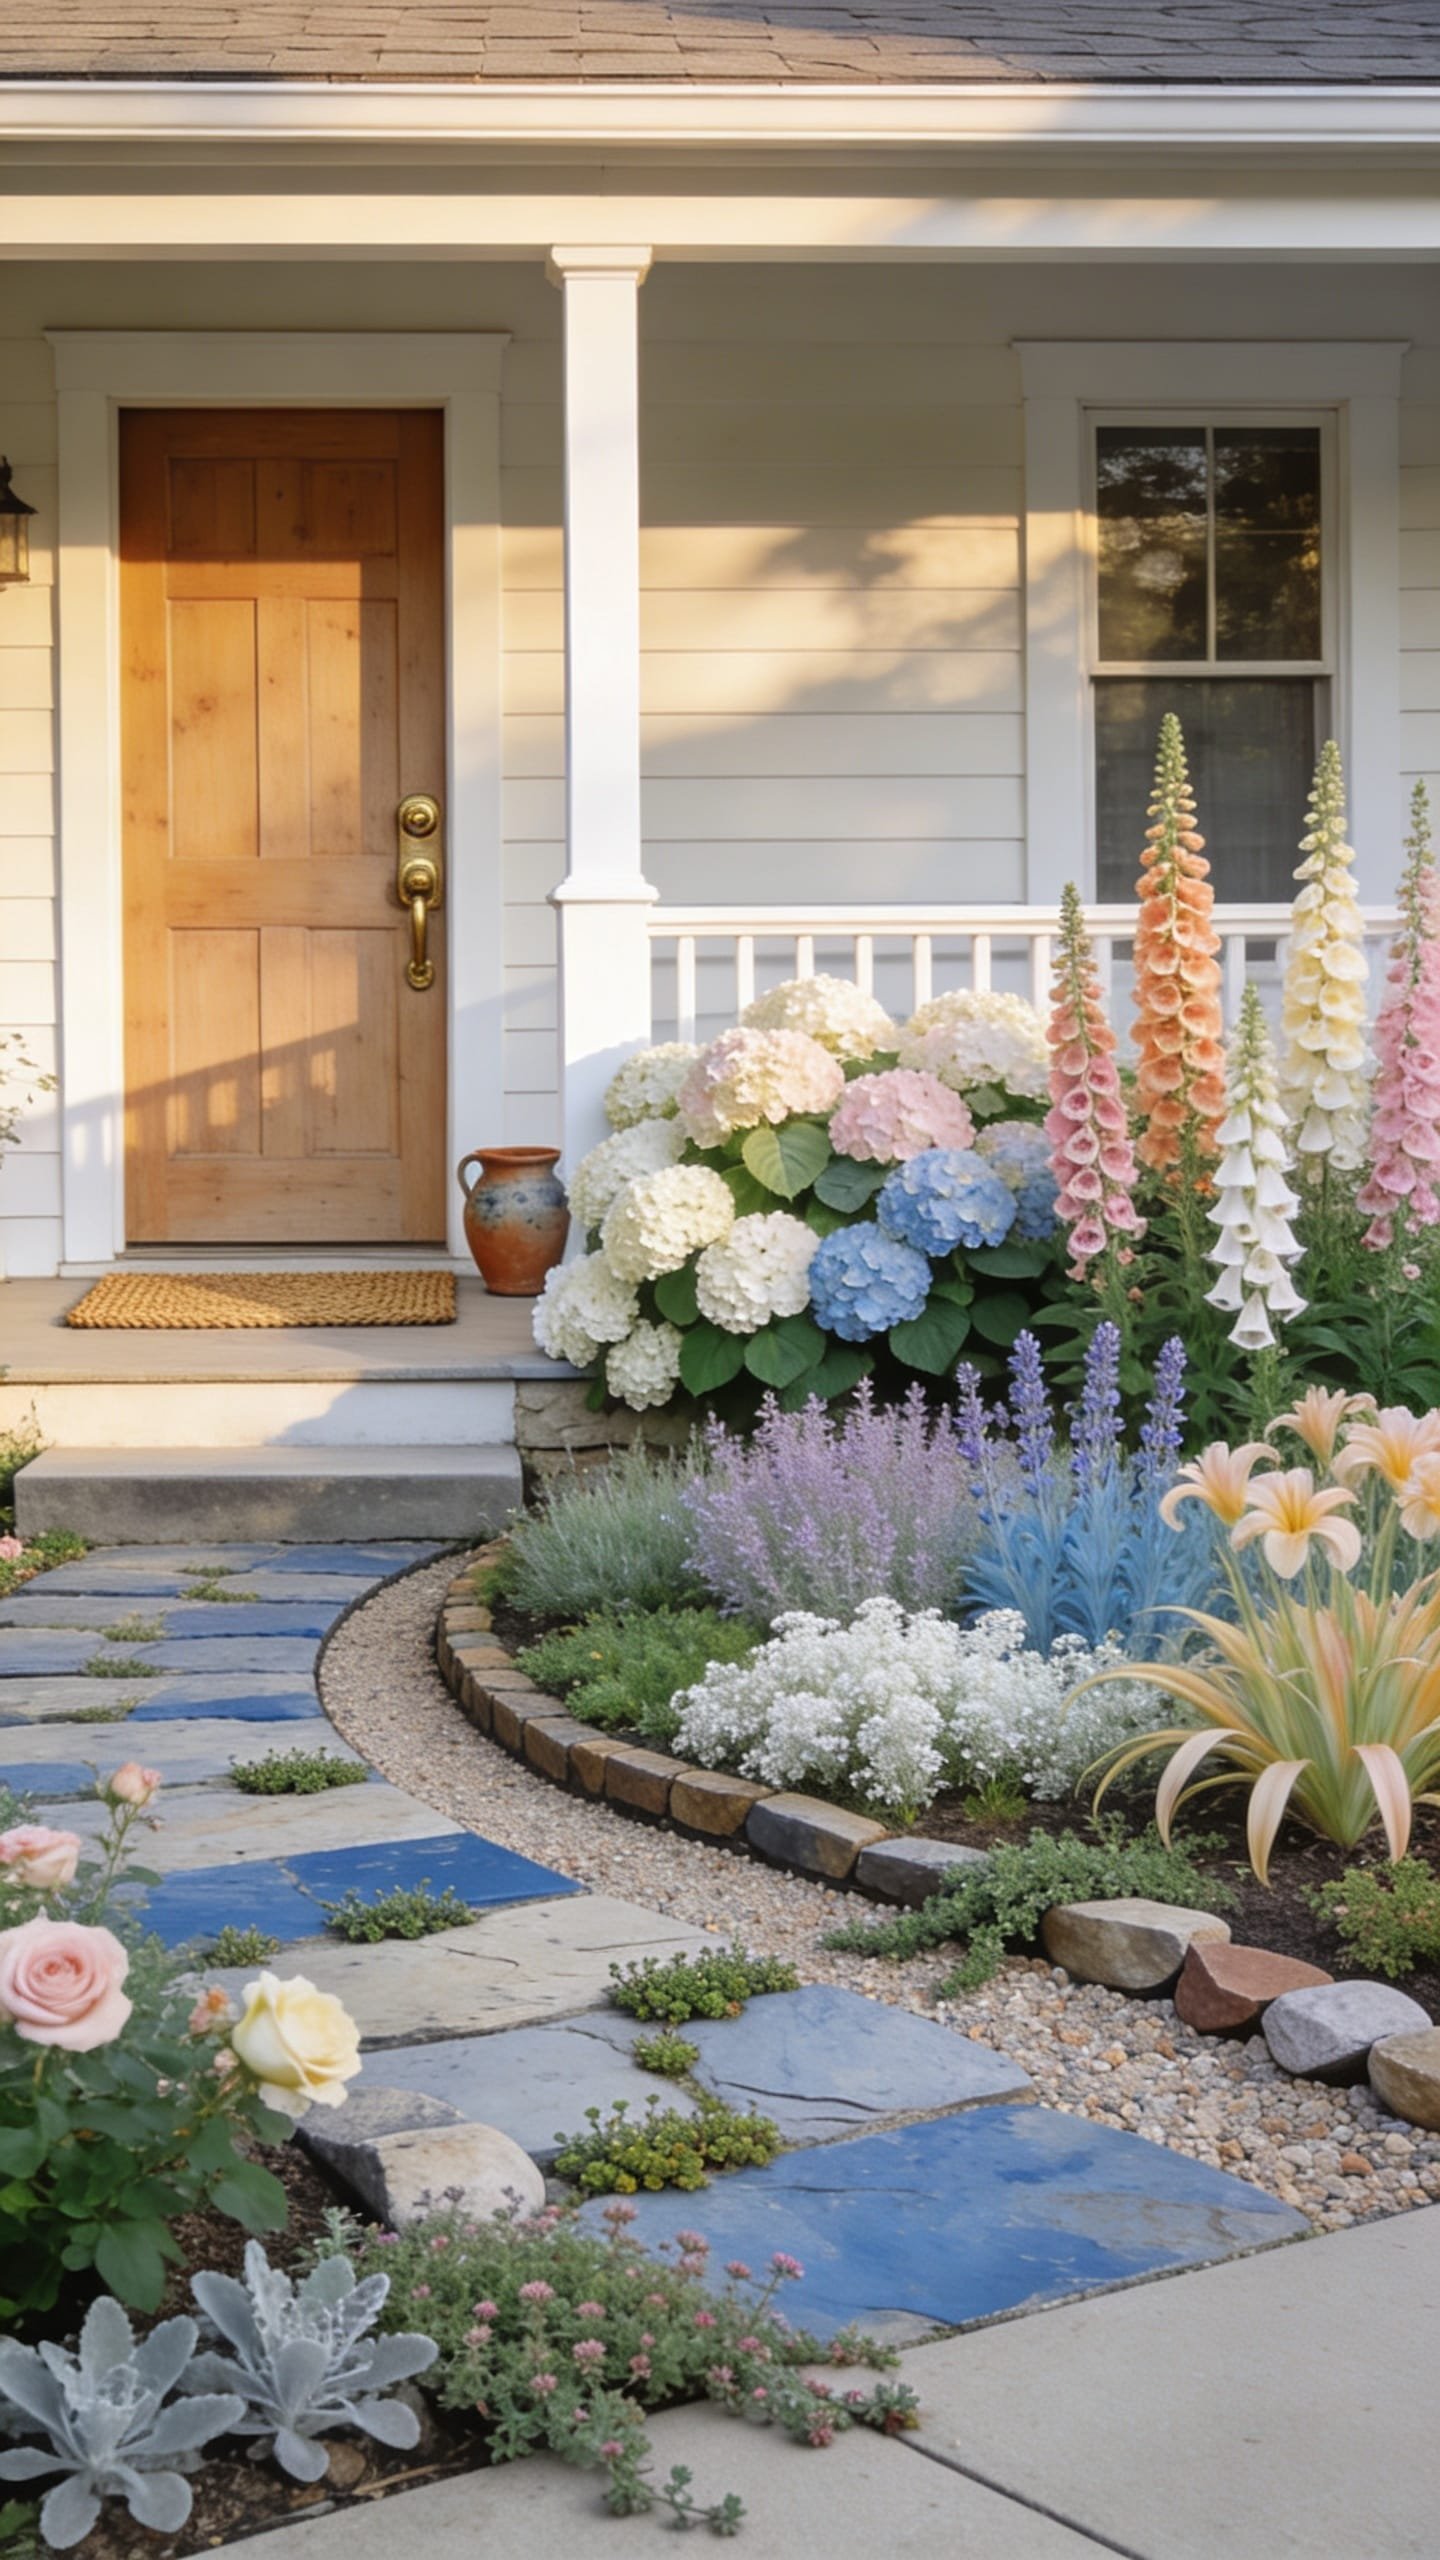
It’s that one corner that always feels off: your front bed that swings between bare stems and plant chaos. You’ve tried “a few pretty perennials,” but they bloom once then ghost you. The Soft Cottage Border solves that with layered heights, staggered bloom times, and a path that feels like a gentle hug around your porch.
This mood is bright, friendly, and a touch nostalgic—think hydrangea heads like scoop ice cream, foxglove spires, and a winding stone path with thyme peeking between joints. It works for real homes because the layout handles seasonal shifts without looking empty. Lighting is soft and scattered; warm white fairy lights woven through a trellis or two dome lights under the eaves add cozy glow for evening curb appeal. Materials skew tactile: aged brick or tumbled stone, limewashed pots, and woven willow planters. Photos love the stacked heights and color contrast—cool blues and pinks against deep green, with path shadows that add depth.
Variations: small space version uses a slim border (18-24 inches deep) with dwarf hydrangea, coreopsis, and thyme. Budget-friendly? Reuse bricks from marketplace finds and cluster fewer plant types in larger drifts so it looks intentional. A darker, moodier twist swaps pinks for burgundy heuchera and deep purple salvia.
Key Design Elements:
- Main materials: tumbled stone or used brick, limewashed pots, willow or wire trellis
- Color palette: chalky blues, soft pinks, creamy white, deep leafy greens
- Lighting strategy: string or fairy lights near the entry, two warm sconces, one subtle path light
- Furniture silhouettes: a petite vintage-style bench or iron bistro set if space allows
- Texture layers: fluffy hydrangea, wispy grasses, glossy leaves, rough stone
- Accent details: copper hose pot, vintage-style house plaque, birdbath or low bowl
Budget Breakdown:
- Reclaimed brick or tumbled stone for path: $200 – $800
- Hydrangea (2-4), foxglove (6), salvia (6-10), catmint (6): $180 – $520
- Dwarf ornamental grass (4-6): $48 – $150
- Thyme or creeping sedum for joints: $30 – $90
- Trellis or arbor: $80 – $350
- String/fairy lights + timers: $25 – $90
Total Estimated Cost: $563 – $2,000
Best For: Traditional, cottage, or farmhouse facades. Ideal for partly sunny yards and entries that need softness and charm.
How To Recreate This Look:
- Start with the path curve—keep it shallow and purposeful, guiding guests to the door without a dramatic detour.
- Add structural plants first: hydrangea at medium height, anchor shrubs at corners.
- Layer in perennials with staggered bloom times (salvia, catmint, foxglove), then tuck in thyme between stones.
- Install two warm sconces and a single low path light; avoid over-lighting which flattens the romance.
- Style with one vintage touch—a copper hose pot or a birdbath—to avoid kitsch overload.
Why This Feels Designer: The bloom sequence and repeated plant drifts create rhythm. Your eye reads harmony instead of a plant-of-the-month club.
One Thing To Avoid: Mixing too many flower colors. Cap it at three shades plus green. Otherwise the yard reads busy, not charming.
Pro Styling Tip: Water the path before photos. Damp stone deepens color and adds that “after the rain” glow cameras adore.
Little pause here: if this makes you giddy but also nervous about upkeep, you’re not wrong—Cottage looks need deadheading. Choose the Mediterranean or prairie section if you want more set-it-and-forget-it vibes.
Did You Know? Planting in odd numbers (3, 5, 7) photographs better because groupings feel organic. Our brains spot symmetry quickly, and “perfect pairs” can look staged.
3. Japandi Entry Grove with Cedar Steps and Mossy Calm
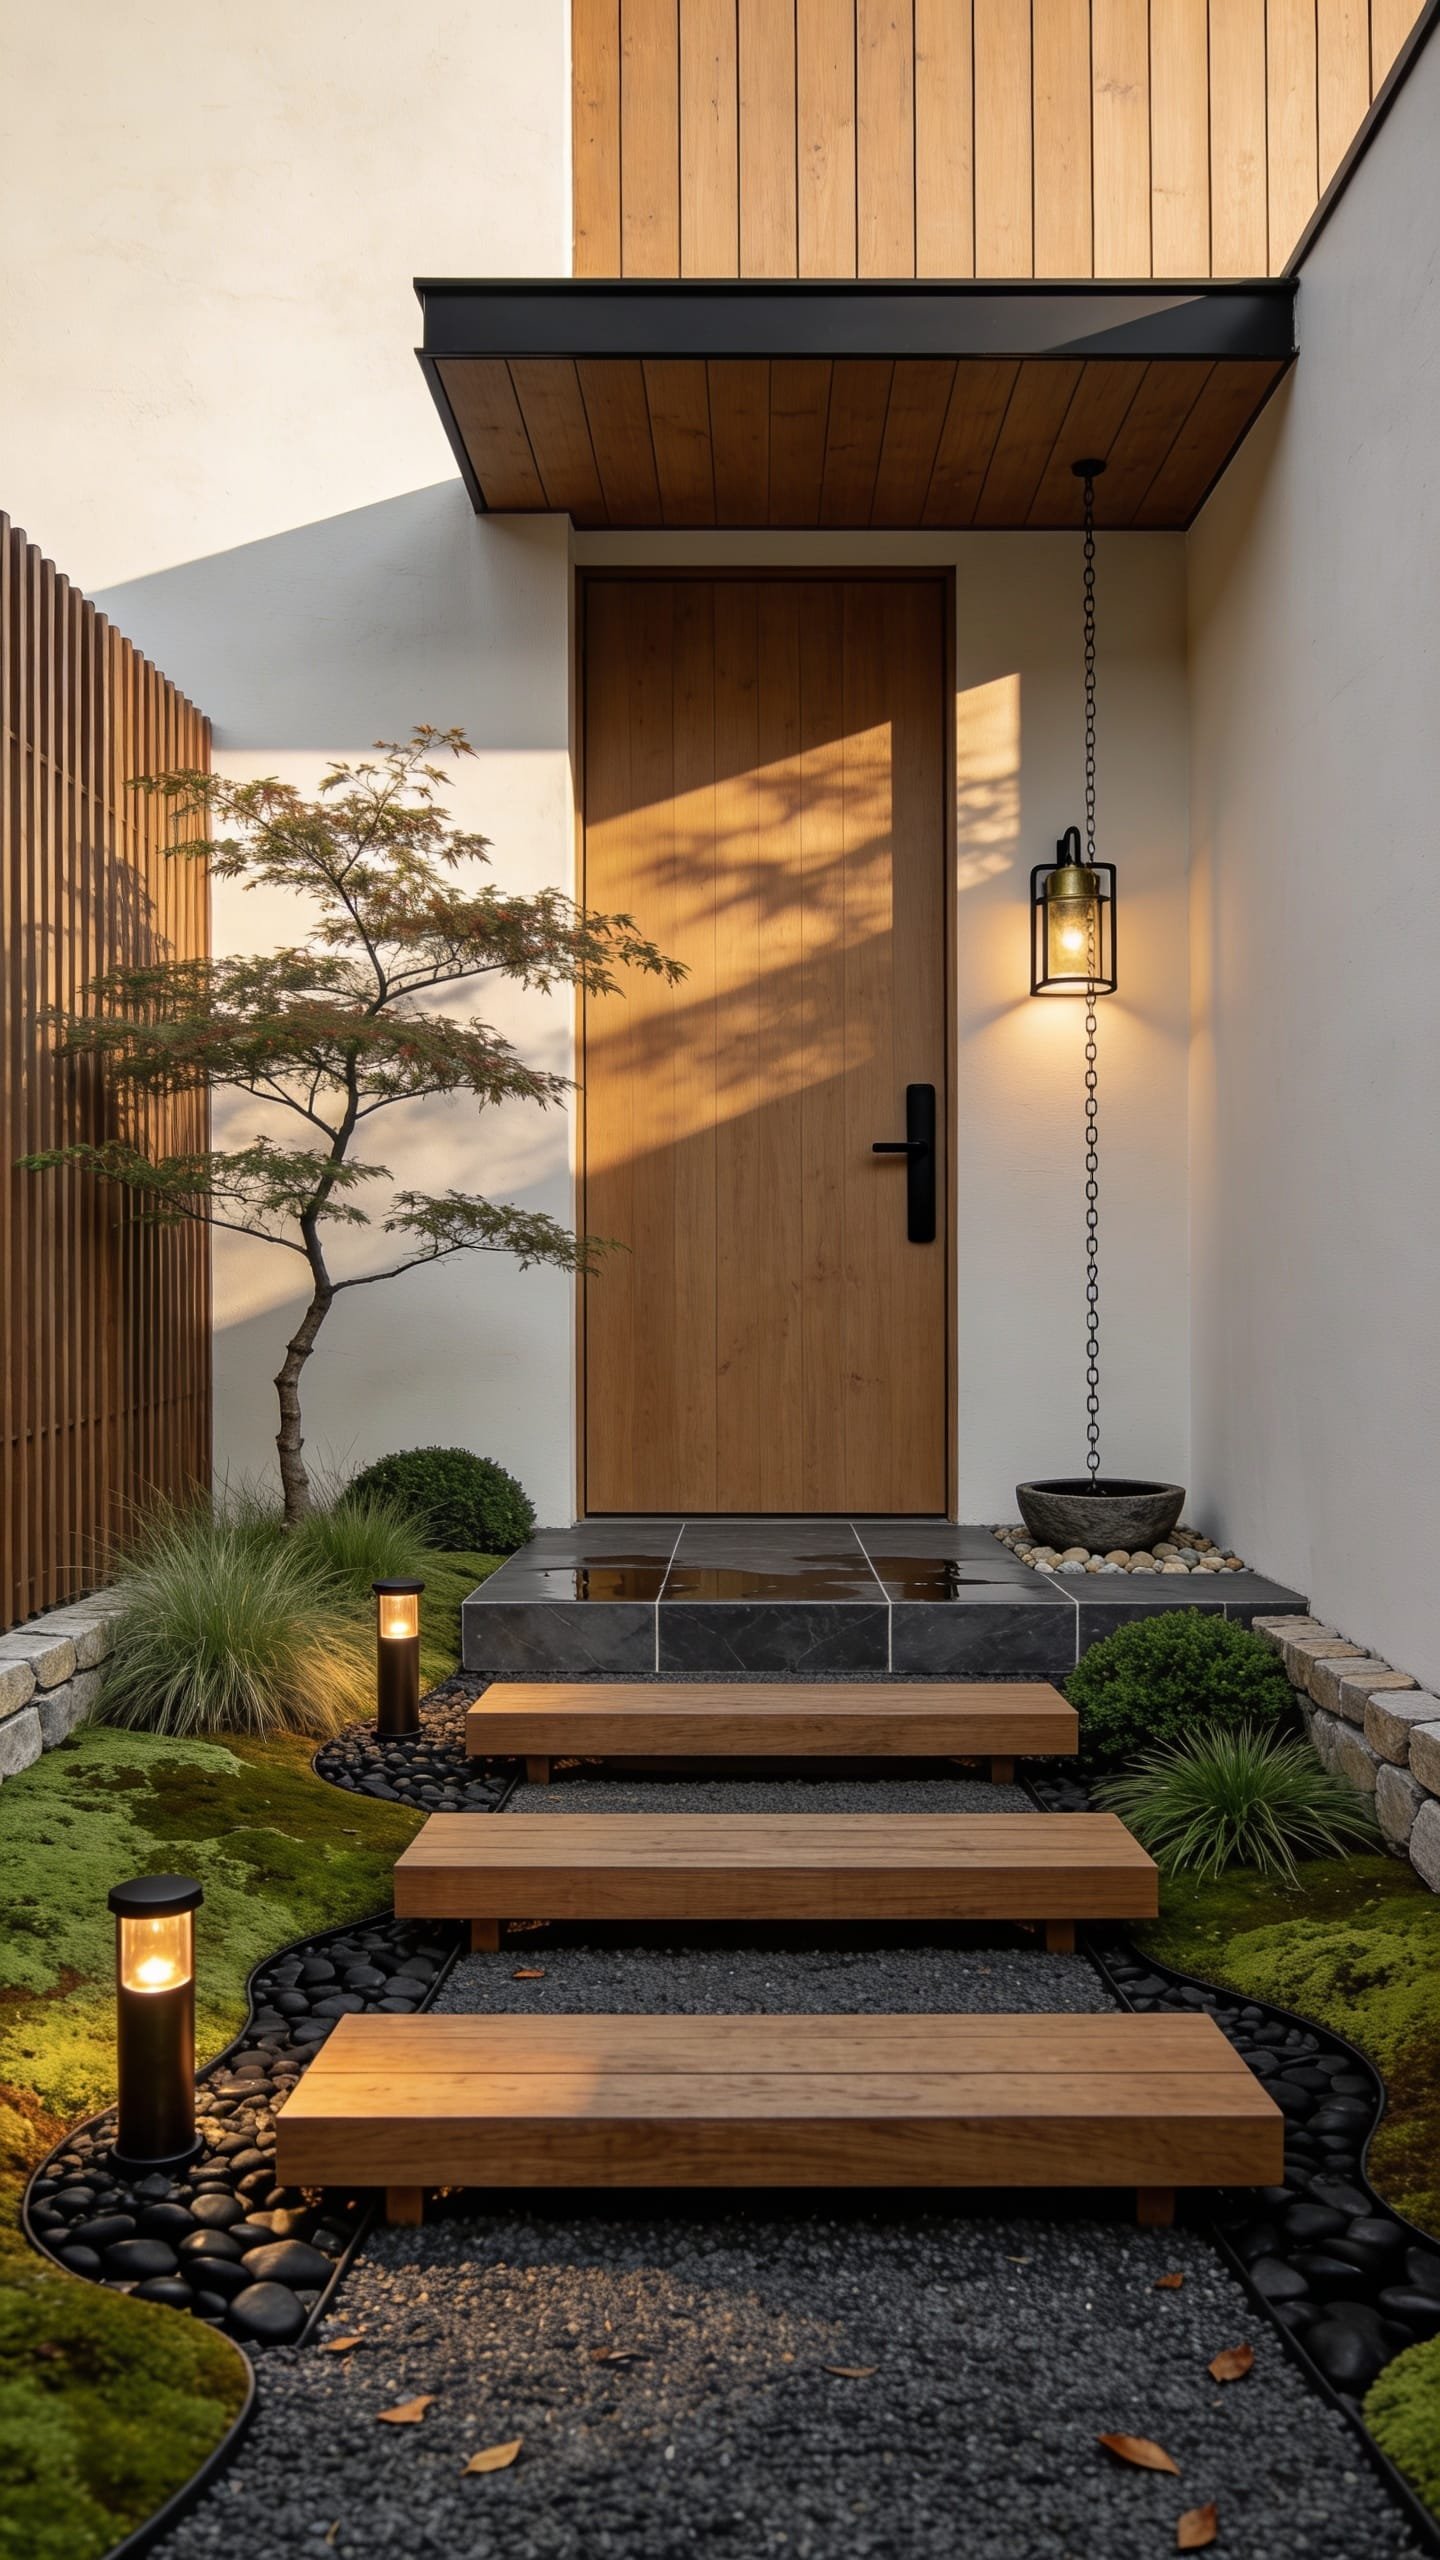
You want serenity the second you step onto your property, but your current entry screams “utility walkway.” The Japandi Entry Grove creates gentle calm with a few disciplined moves: cedar, stone, shadow, and negative space. It’s a refined aesthetic that feels like a spa greeting your day.
Why it works at home: super low maintenance and incredibly forgiving. Fewer plant species means less guesswork. Lighting stays understated—sconce glow and two low bollard lights are plenty. Materials do the talking: charred or stained cedar for steps or a porch skirt, basalt or slate pavers, river rock, and mossy groundcover in dappled light. Photography loves this look because it’s all about contrast: pale stone against inky wood, soft moss next to crisp steel edging, and moody pockets of light that sculpt the space.
Small-space version? Use three large stepping stones across a narrow bed with a single Japanese maple and a cushion of mondo grass. Budget-conscious? Swap cedar for stained pine and basalt for concrete pavers in a dark charcoal color. Renter-friendly: assemble a modular deck tile “landing” with planters to fake a built-in step moment.
Budget Breakdown:
- Cedar or pine (for steps/planter cladding): $220 – $800
- Dark pavers or stepping stones: $180 – $600
- River rock (1-2 yards): $90 – $220
- Japanese maple (5-10 gallon): $150 – $380
- Moss/groundcover or mondo grass: $60 – $200
- Low bollard lights (2-3): $160 – $420
Total Estimated Cost: $860 – $2,620
Best For: Minimalist facades, modern cabins, or any entry shaded by trees. Great if you want tranquility, not color chaos.
Key Design Elements:
- Main materials: cedar, slate/basalt, river rock, steel edging
- Color palette: charcoal, warm wood, soft green, off-white
- Lighting strategy: minimal, low glare, strategic highlights
- Furniture silhouettes: a simple wooden stool or small bench
- Texture layers: smooth stone, velvety moss, ribbed cedar grain
- Accent details: matte black mailbox, slim house numbers, shallow water bowl
How To Recreate This Look:
- Start by defining one focal tree—Japanese maple or upright yew works well.
- Add a dark paver path or three large step stones with generous spacing.
- Layer river rock around the stones, then plant low groundcover in soft drifts.
- Install two subtle bollard lights aimed downward; avoid harsh up-light here.
- Style with a wood stool near the door and a low, wide planter for moss or ferns.
Why This Reads High-End: Negative space. The restraint lets each element breathe. There’s no scramble of “filler plants,” just a calm composition that feels curated.
The Most Common Mistake: Mixing too many plant shapes. Stick to a simple trio: one focal tree, one groundcover, one accent grass or fern.
Pro Styling Tip: Wipe cedar with mineral oil before photos to bring out wood grain and deepen tone without gloss.
Quick breather: Remember, this isn’t about recreating a showroom. It’s about building a front yard that actually feels like yours. If one idea sings, start there. Permission to ignore the rest for now.
Quick Tip: For dark pavers, choose a slightly textured finish. Ultra-smooth black stone shows dust and footprints faster than you can say “who tracked mulch on this?”
4. Desert Sculptural Xeriscape with Shadow-Play Stones
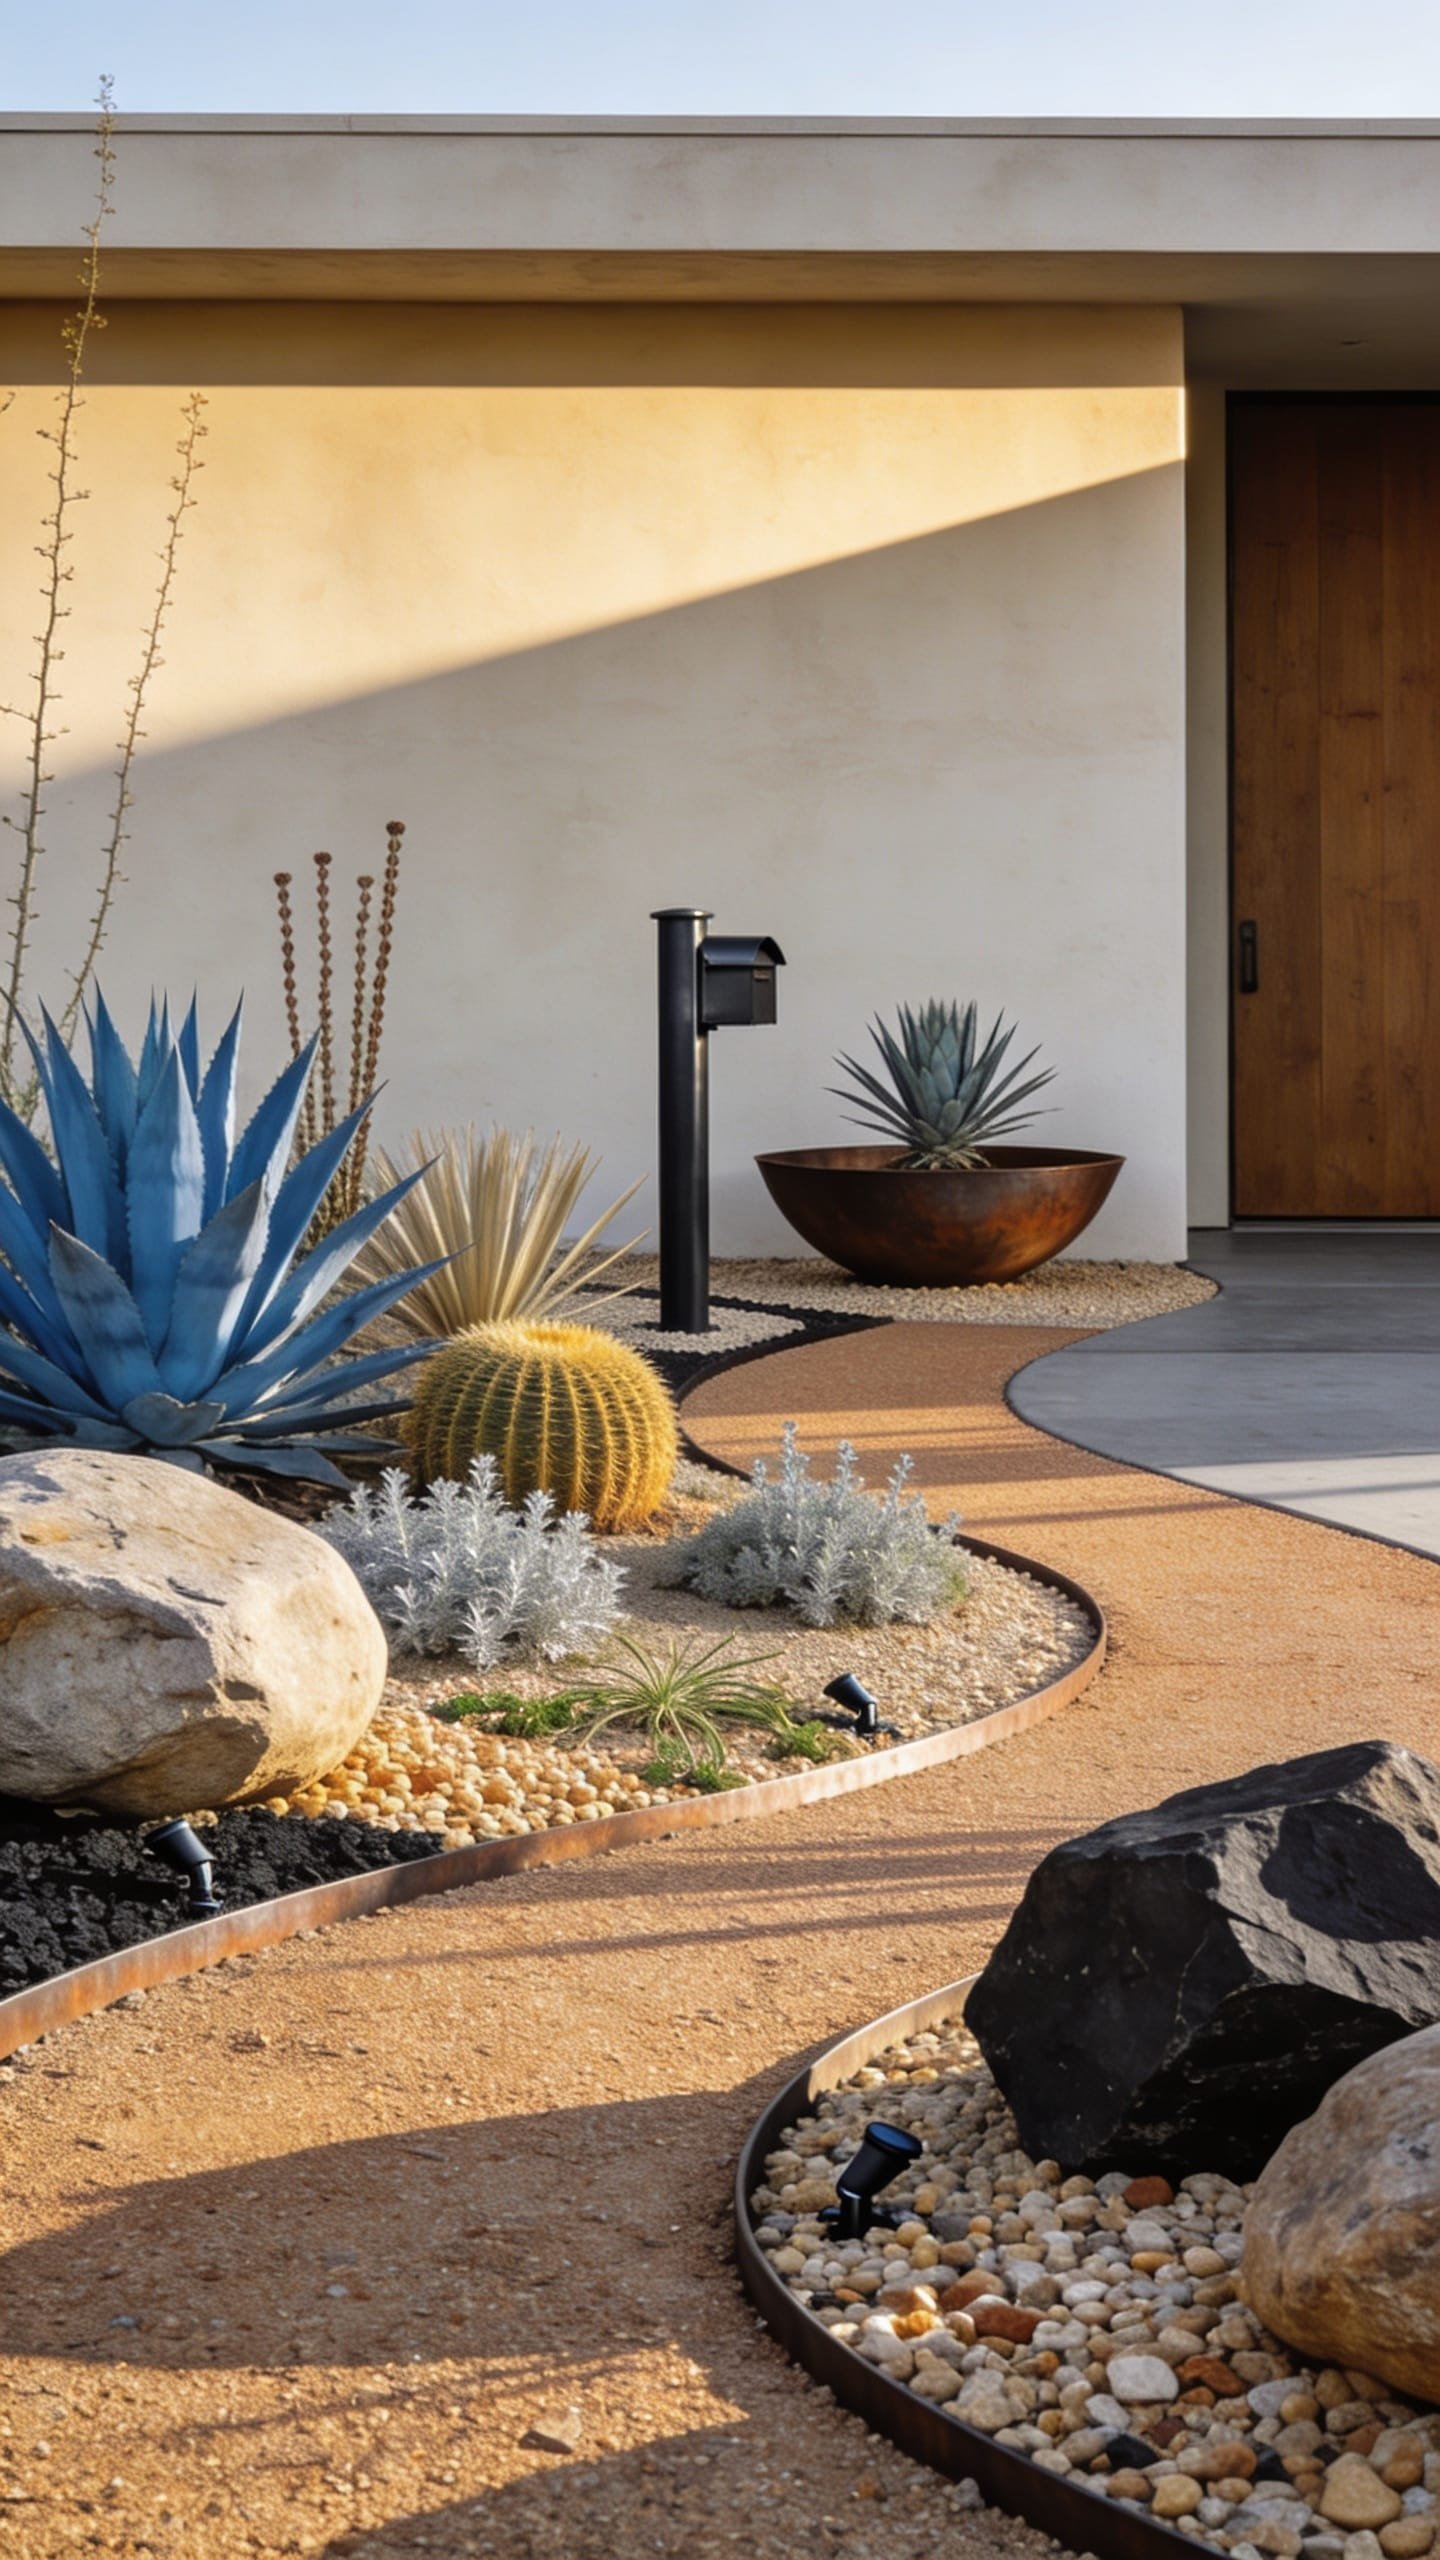
You’ve eyed the desert look, but you fear it’ll read like a rock pile with a few sad cacti. The Sculptural Xeriscape flips that script: dramatic boulders set with intention, ribboning decomposed granite, and spiky silhouettes that create a living sculpture garden. The vibe is modern Southwest meets art gallery—strong shapes, sun-kissed textures, and long shadows at golden hour.
This works because it’s drought-smart and year-round beautiful. It also handles intense sun better than most “green” yards. Lighting underscores the drama: a few pinpoint uplights at agave or yucca, with a soft wash across a boulder face. Materials dominate: large boulders, decomposed granite (DG), rusted steel edging, and tough plants like agave, yucca, desert spoon, and trailing lantana.
Variations: small yard version uses one hero boulder, two agaves, and groundcover of DG with a meandering path of steel-edged lines. Budget-friendly? Go lighter on boulder size and buy nursery agaves small; they grow quickly. Cooler climates can swap to hardy yucca, ornamental grasses, and sedum for a similar silhouette.
Key Design Elements:
- Main materials: decomposed granite, boulders, corten or rusted steel edging
- Color palette: sand, caramel, slate, deep green-blue
- Lighting strategy: crisp uplights on sculptural plants and boulder faces
- Furniture silhouettes: a low, concrete bench or simple steel chair by the entry
- Texture layers: gritty DG, smooth agave skin, rough stone, trailing greenery
- Accent details: rusted mailbox, oversized house numbers, ceramic shallow bowls
Budget Breakdown:
- Decomposed granite (3-4 yards): $150 – $360
- Boulders (by the ton or per piece): $200 – $800
- Steel edging (40-60 ft): $120 – $260
- Agave/yucca/desert spoon (4-6 plants): $160 – $540
- Lantana/sedum groundcover: $60 – $160
- Spot uplights (2-3): $120 – $300
Total Estimated Cost: $810 – $2,420
Best For: Sunny, dry climates, mid-century or modern homes, low-maintenance lovers, and anyone who wants a bold first impression.
How To Recreate This Look:
- Start by setting your largest boulder first; partially bury it for a natural look.
- Add steel edging to define a flowing DG field and a narrower planted strip.
- Layer in 2-3 sculptural plants (agave/yucca) staggered from large to small.
- Install uplights aimed slightly off-axis to avoid harsh “headlight” beams.
- Style with a low bench or a single accent pot to avoid cluttering the scene.
Why This Looks Intentional: Strong negative space and a clear focal plant read like outdoor art. The boulder placement creates story and shadow, not just “more rocks.”
Don’t Do This: Spreading different gravels everywhere. Stick to one base material (DG) and one edge finish for a clean, gallery-like view.
Pro Styling Tip: Sweep DG in graceful arcs around each plant before photos; the curved lines subtly frame the forms.
Story break: A friend of mine spent weeks agonizing over planting more species in her desert front yard, thinking variety would “fill it out.” When we removed half of them and widened the DG areas, neighbors started stopping to ask who her designer was. Less, but bigger gestures—that’s the move.
Did You Know? Burying a boulder by one-third instantly makes it look like part of the landscape, not a delivery gone wrong.
5. Classic Symmetry with Boxwood Bones and a Centerpiece Urn
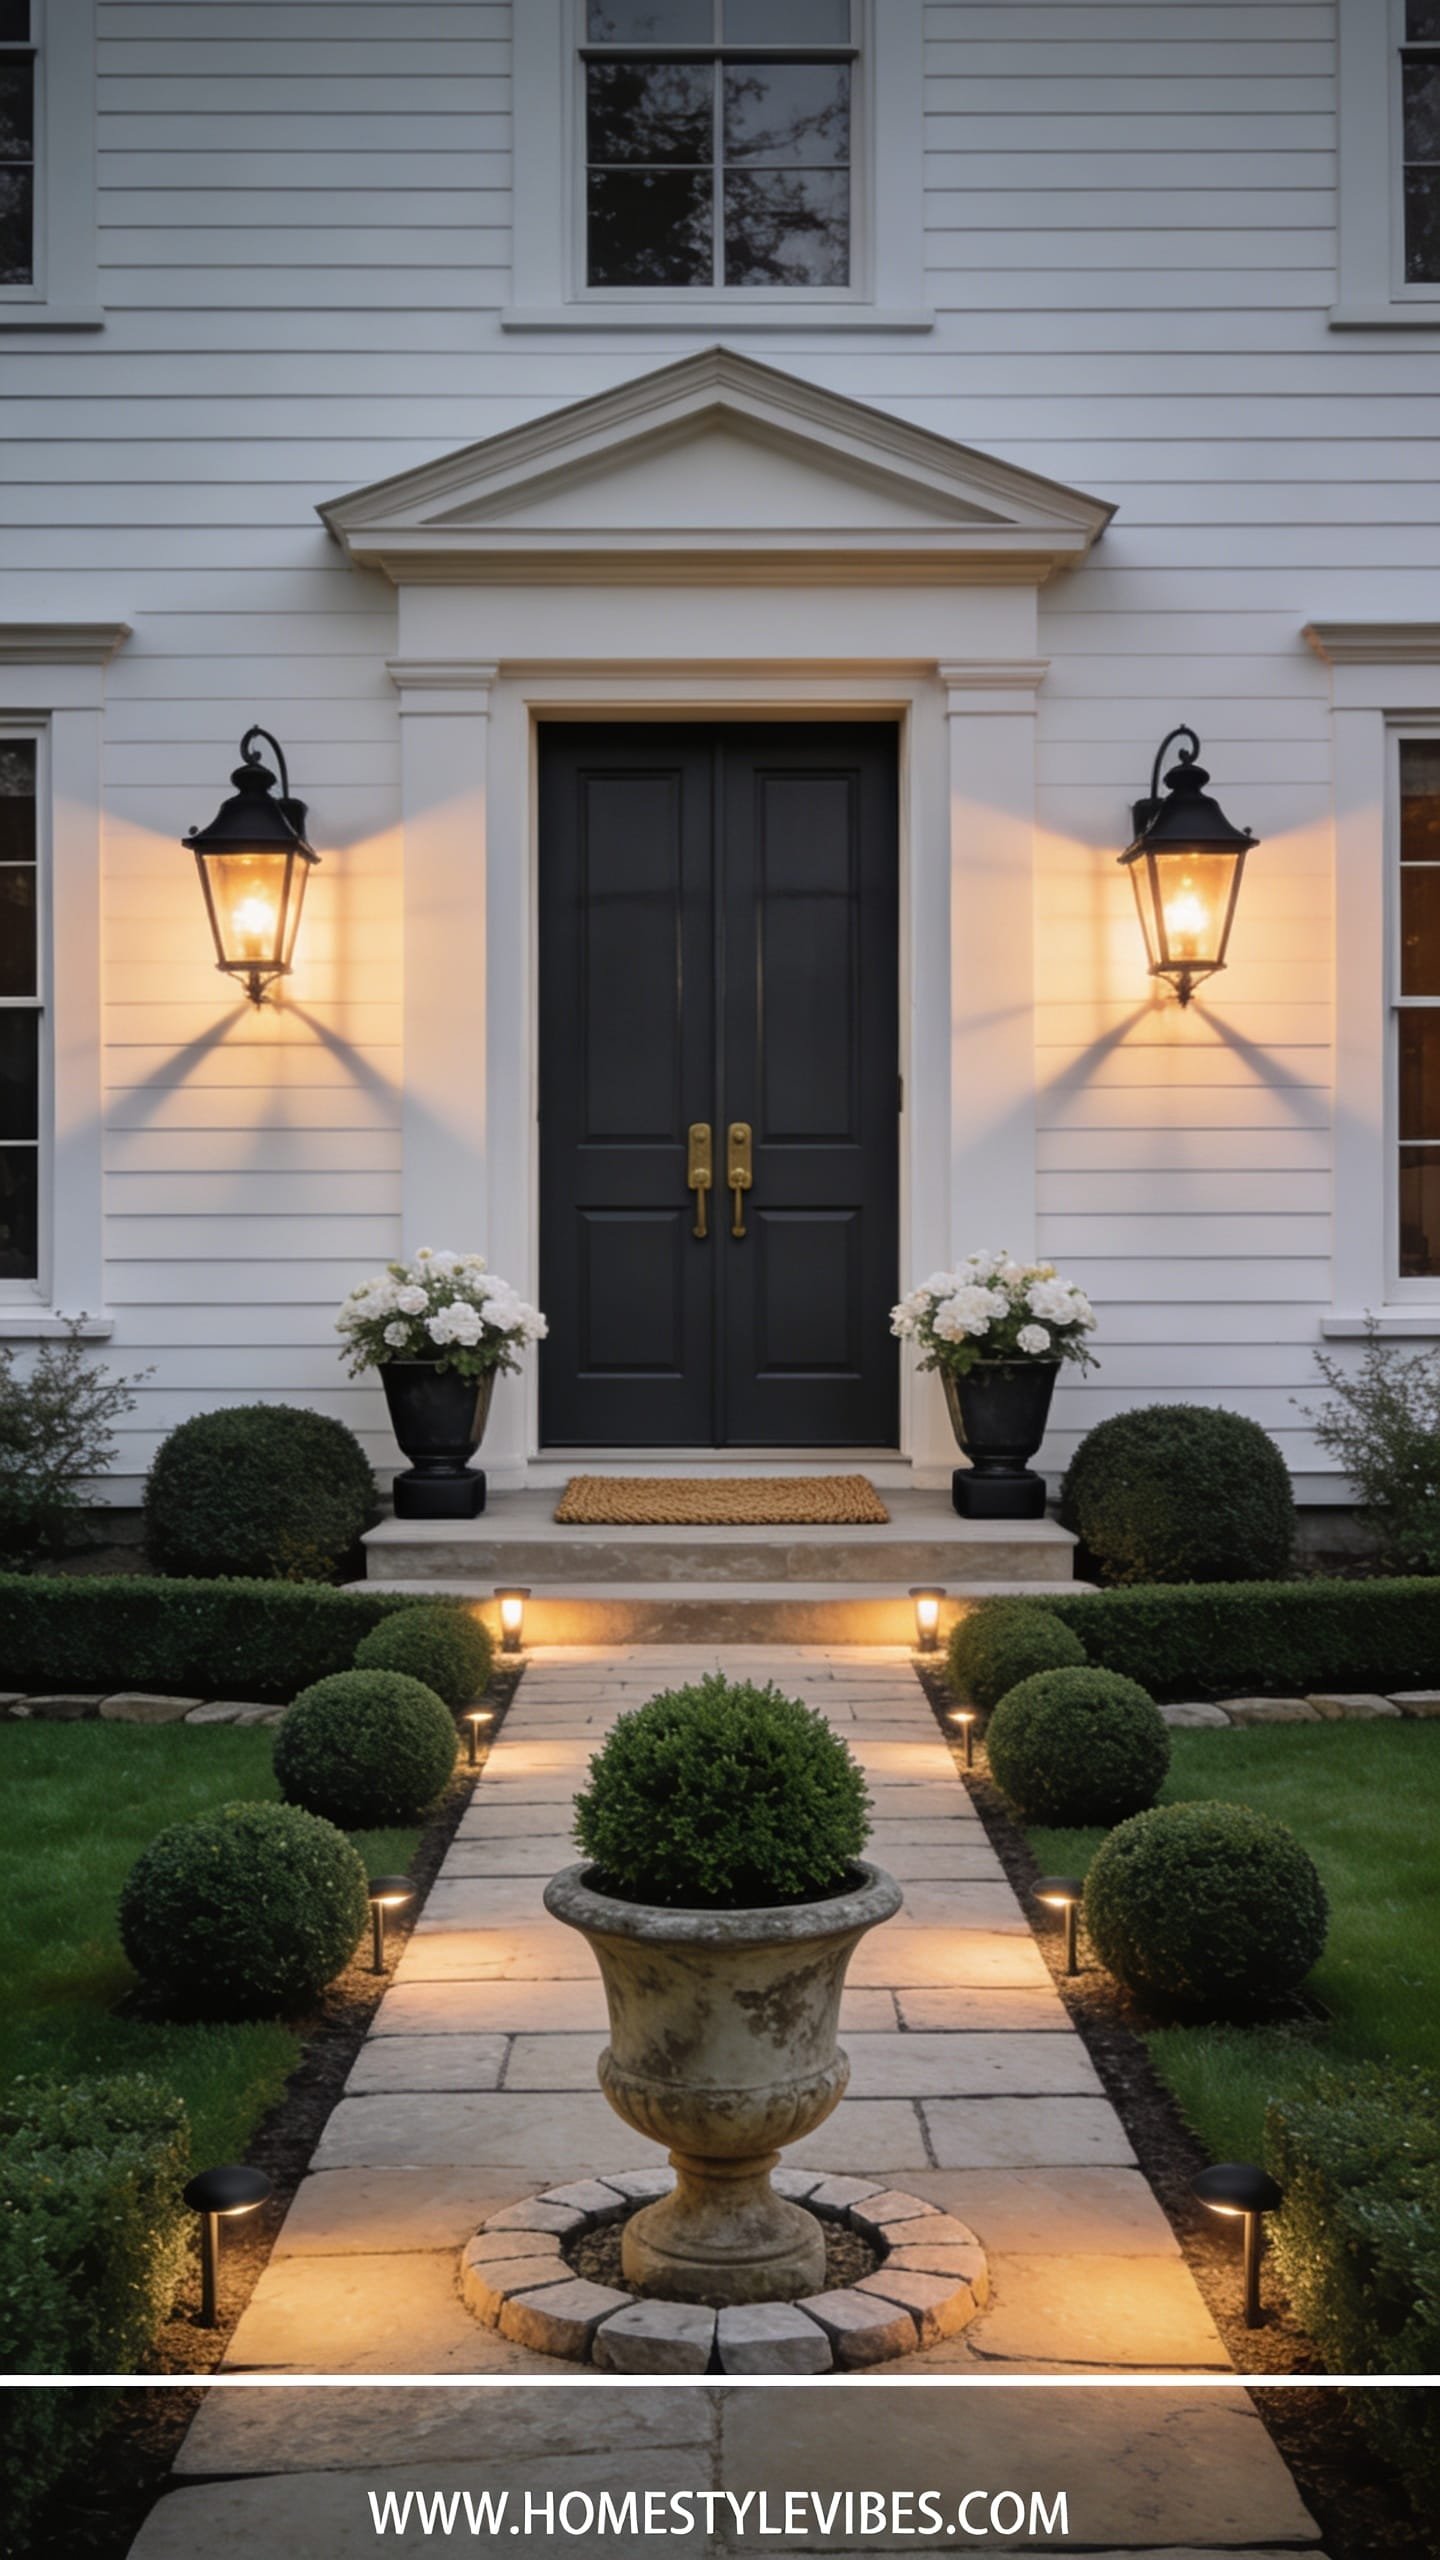
You crave polish—maybe even a touch of drama—but your current entry has no bones. Everything looks like it was placed “where there was space.” Classic Symmetry brings order: clipped hedges, a centered path, and one grand moment at the axis (hello, sculptural urn). It’s crisp, timeless, and an instant property value booster, IMO.
Why it works: symmetry quiets the visual noise. Families love it because it stands up to seasons and kids. Lighting stands formal too: twin sconces at the door, evenly spaced path lights (fewer than you think), and a soft-glow spotlight on the urn or a topiary. Materials keep the message clear: boxwood or dwarf holly, limestone-look pavers, cast stone or fiberglass urn, and polished brass or black fixtures. The camera appreciates the lines—mirrored beds, rhythmic hedging, and a centered focal point that draws your eye to the entry.
Variations: small space? Shorten the hedge and keep mini urns flanking the steps. Budget-friendly? Use plastic liners inside a lightweight fiberglass urn to swap seasonal color without replanting the whole thing. Darker vibe? Use black glossy urns with white alyssum for contrast.
Budget Breakdown:
- Boxwood or dwarf holly (12-20): $180 – $700
- Pavers or stone (for straight or gently curved path): $200 – $900
- Cast stone/fiberglass urn: $150 – $650
- Seasonal planting for urn: $20 – $80
- Path lights (4-6) + transformer: $220 – $520
- Matching door sconces (2): $160 – $420
Total Estimated Cost: $930 – $3,270
Best For: Traditional, Georgian, Colonial, or newer builds craving gravitas. Great for HOAs and resale appeal.
Key Design Elements:
- Main materials: clipped hedge shrubs, stone pavers, cast or fiberglass urn
- Color palette: glossy green, creamy stone, black or brass accents
- Lighting strategy: symmetrical sconces, evenly spaced path lighting
- Furniture silhouettes: none needed; let the urn be the hero
- Texture layers: tight hedge texture, smooth stone, seasonal flowers for soft contrast
- Accent details: classic house numbers, brass door hardware, doormat with clean border
How To Recreate This Look:
- Start by drawing a centerline from the sidewalk to your door—everything mirrors from there.
- Add a straight or gently curved path with pavers laid tight and flush.
- Layer boxwoods along the path edges, spacing consistently for a tidy hedge.
- Install the urn at the axis—centered at the stoop or in a small landing.
- Style with matched sconces and limited path lights installed at equal intervals.
Why This Looks Expensive: Precision. Perfect alignment and consistent spacing signal craftsmanship. Even if your materials are modest, the layout sells the luxury.
Watch Out: Don’t overcrowd the urn with too many colors. Monochrome plantings (all white, all green) read chic and allow the shape to shine.
Pro Styling Tip: Clip hedges the day before photos and gently rinse dust off the urn; shiny leaves and a clean focal point read crisp on camera.
Mindset moment: If perfection scares you, skip strict symmetry and try a near-symmetry instead—mirror the hedges but let the planting in the urn be slightly wild. It keeps the look friendly.
Quick Tip: Center your house numbers with the door, not the mailbox, if they’re on the facade. Misaligned numbers make even great landscaping feel off.
6. Pollinator Prairie Edge with Sinuous Drifts and a Meandering Walk
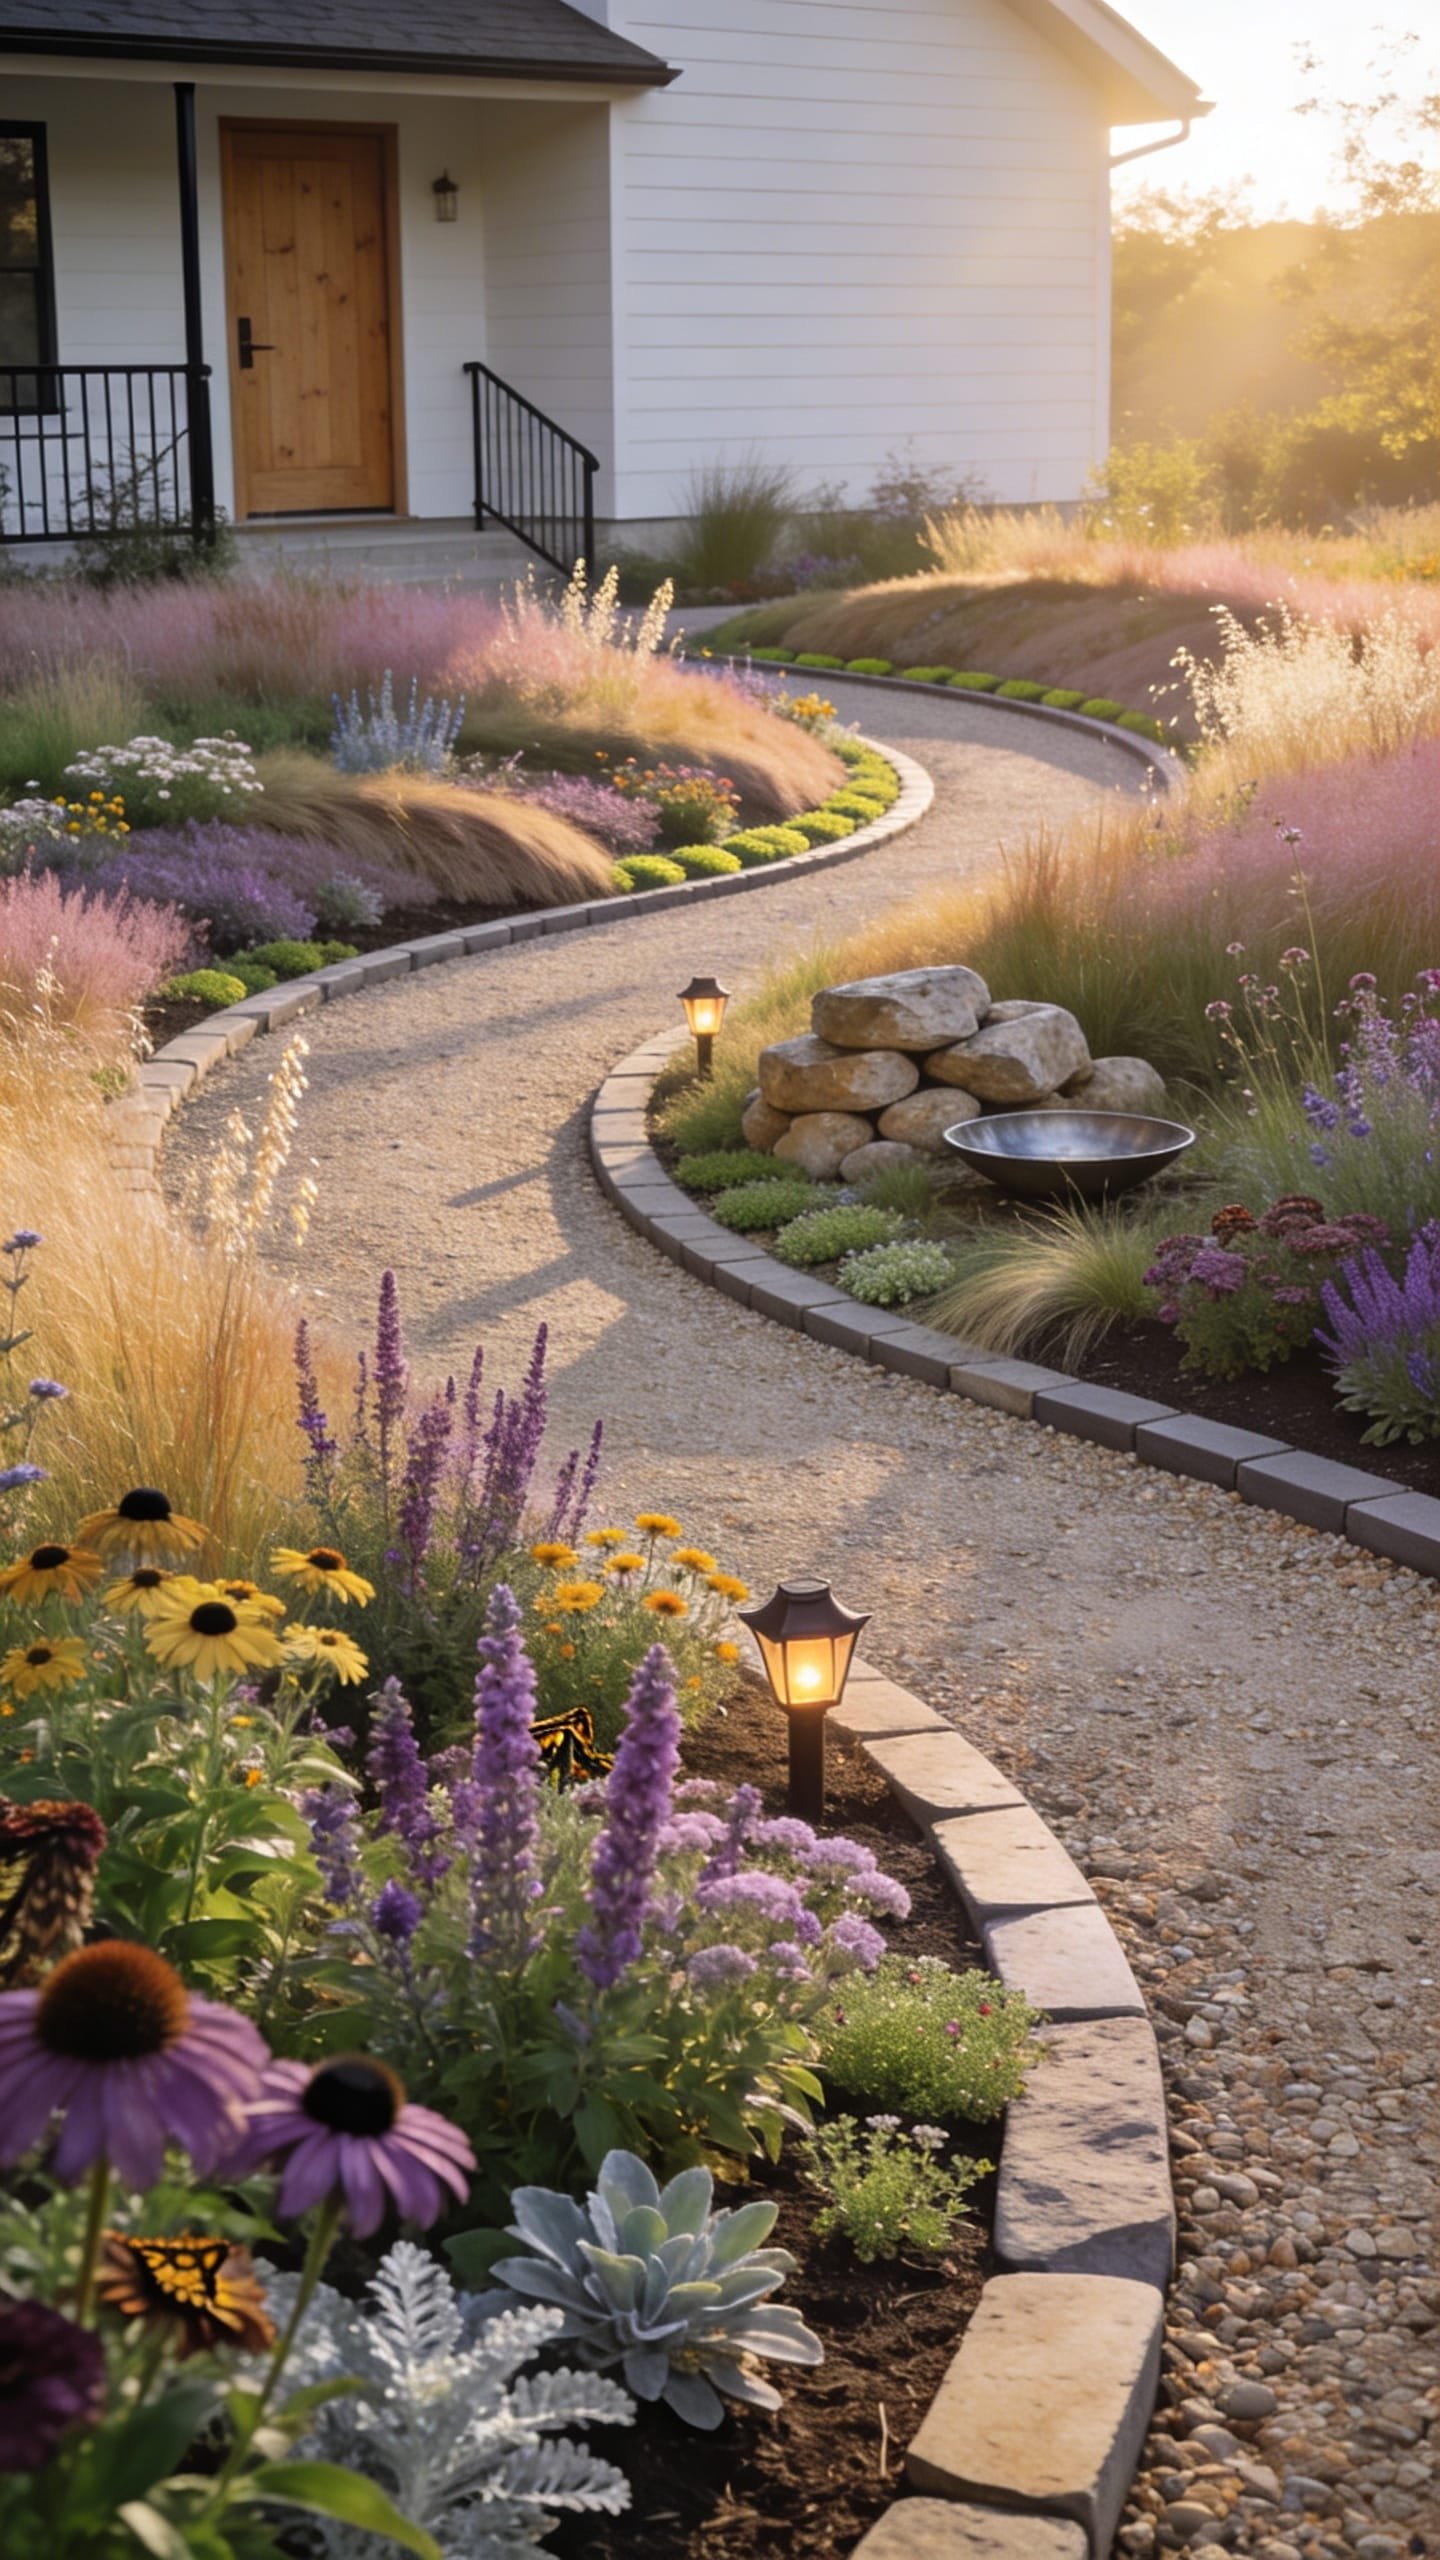
You love color and movement, but worry wild gardens look messy fast. The Pollinator Prairie Edge is your sweet spot: sweeping drifts of natives, a curving path that reads purposeful, and textures that dance in the breeze. It’s lively and modern-natural, with a painterly quality at sunrise and sunset.
This works beautifully for real homes because it thrives with less water once established and offers high ecological value—bees, butterflies, birds. Lighting should stay gentle; too many fixtures flatten the magic. Choose a couple of low, shielded path lights and a warm spotlight on a sculptural grass clump. Materials feel earthy: crushed fines or mulch paths, corten edging, and local stone accents. The camera loves the layers: seed heads, feathery grasses, bright petals, and the path cutting a clear line so the “wild” reads as curated.
Variations: small yard version keeps two broad drifts (one warm, one cool palette) with a single bend in the path. Budget-friendly? Start with plugs instead of large pots and fill gaps with annuals in year one. Darker look? Choose moody coneflowers, deep purple asters, and burgundy millet with tawny grasses.
Budget Breakdown:
- Plugs or quart-sized natives (30-80): $120 – $600
- Mulch or crushed fines for path (1-2 yards): $60 – $180
- Steel edging (40-60 ft): $120 – $260
- Feature boulder or log perch: $80 – $300
- Minimal path lighting (2-3): $120 – $300
Total Estimated Cost: $500 – $1,640
Best For: Modern or transitional homes that want softer edges; homeowners who care about habitat; medium to large front yards with part to full sun.
How To Recreate This Look:
- Start with two to three big drifts instead of many tiny clusters—think swaths of coneflower, black-eyed Susan, switchgrass.
- Add a meandering path that touches each drift so it feels intentional and walkable.
- Layer in staggered heights: tall grasses at the back, mid-height blooms in front, groundcover at the edge.
- Install minimal, warm lighting to kiss the path and highlight one standout grass.
- Style with a low, natural seating moment—a flat boulder or log—where the path pauses.
Why This Feels Designer: Repetition. Repeating plant species in broad, painterly swaths tames the wildness and looks stunning from the street and in photos.
One Thing To Avoid: A million labels. Mixing too many one-off plants creates visual noise and maintenance confusion. Keep your palette tight.
Pro Styling Tip: After planting, top-dress with a fine mulch and brush it away from stems so seed heads and stems read clean against the ground plane in photos.
Personal note: I tried a scaled-down prairie edge at my own place last fall—just two drifts, a bend in the path, and a clump of little bluestem catching the light. I honestly couldn’t believe the difference in motion and sound. The whispering grass at dusk felt like a soundtrack.
Did You Know? Planting grasses like switchgrass or little bluestem on the west side creates golden backlighting in the evening—free cinematic effects, nightly.
Before we wrap, quick mindset reset: You don’t need to overhaul the entire front yard in one weekend. Pick a path, a focal plant, and a lighting moment. When those land, everything else cooperates.
Quick Checklist
- Choose one clear garden concept before buying plants
- Define a focal point visible from the street
- Limit your palette to 3-5 plant species
- Use edging to keep lines crisp and maintainable
- Install fewer, better lights with warm color temperature
- Repeat shapes and materials for cohesion
- Leave negative space so textures read clearly
- Consider seasonal interest when selecting plants
- Scale boulders and pots to the facade (bigger than you think)
- Clean paths and pots before photos for that finished look
Frequently Asked Questions
How much should I budget for a simple front yard garden refresh?
For a focused refresh—new path, a few anchor plants, and basic lighting—plan for $800 to $2,000. Gravel courts and prairie edges usually cost less than heavy stonework. Prioritize structure (path, edging, focal plant) first, then add layered plants over time.
My front yard is tiny. Which design works best without feeling crowded?
The Japandi Entry Grove or a scaled Modern Mediterranean gravel court both shine in small footprints. Use one hero plant, three large stepping stones, and a single lighting moment. Keep at least 30% open ground so it doesn’t feel jammed.
I rent—can I do any of these without permanent changes?
Yes. Try container-based versions: terracotta clusters for Mediterranean, lightweight urns for Classic Symmetry, or planter boxes with grasses for Prairie Edge. Use roll-out path tiles or stepping stones that lift later. Low-voltage or solar lights keep wiring simple.
I’m worried about maintenance. Which idea is truly low effort?
Modern Mediterranean and Desert Xeriscape win for ease. Both rely on tough plants, gravel or DG, and simple lighting. Avoid high-deadheading cottage borders if time is tight. Choose evergreen structure and add seasonal color sparingly.
What’s the most common design mistake with front yard gardens?
Buying a cart of plants without a plan. That leads to mismatched heights, bloom conflicts, and no focal point. Draw a simple map first: path line, focal spot, repeated drifts. Then buy only what fits that plan.
Final Thoughts
Pick one of these front yard garden ideas that matches your house and your life. Start with the backbone: a clear path, a focal plant or object, and one good light. You can layer in the rest once the structure holds.
The truth is, luxury outside isn’t about rare plants. It’s texture, light, and restraint. Gravel against smooth stone, leafy gloss near matte stucco, warm pools of light instead of floodlights. When you keep those three in focus, your front yard starts feeling finished—and it welcomes you home before you even reach the door.
So choose your vibe—sunny Mediterranean, soft cottage, calm Japandi, sculptural desert, crisp classic, or lively prairie—and take the first step this weekend. You’ve got this. Seriously, your curb is about to turn heads.

About the Author

Krisztina P.Rendes, Founder of Home Style Vibes
Founder of Home Style Vibes
Krisztina Puskásné Rendes created Home Style Vibes as a cozy-modern lifestyle space where homemaking meets inspiration. Her goal is to help women create beautiful, organized, and peaceful homes they truly love — without overwhelm. You’ll find here heart-driven content on home decor, cleaning tips, easy family recipes, organization and decluttering, DIY home projects, plants, and seasonal ideas — all designed to bring more calm, comfort, and style into everyday life.