5 Funky & Quirky Home Decor Ideas That Make Your Space Unforgettable (Eclectic, Whimsical & Bold)
You want a home that feels like you—playful, a little offbeat, and totally memorable. But beige walls, matchy-matchy sets, and the fear of “doing it wrong” keep winning. This is your permission slip to go eclectic, whimsical, and bold with zero guilt and lots of color. These five ideas for funky home decor are quick to pull together, friendly on the budget, and highly photogenic—bookmark-worthy for sure.
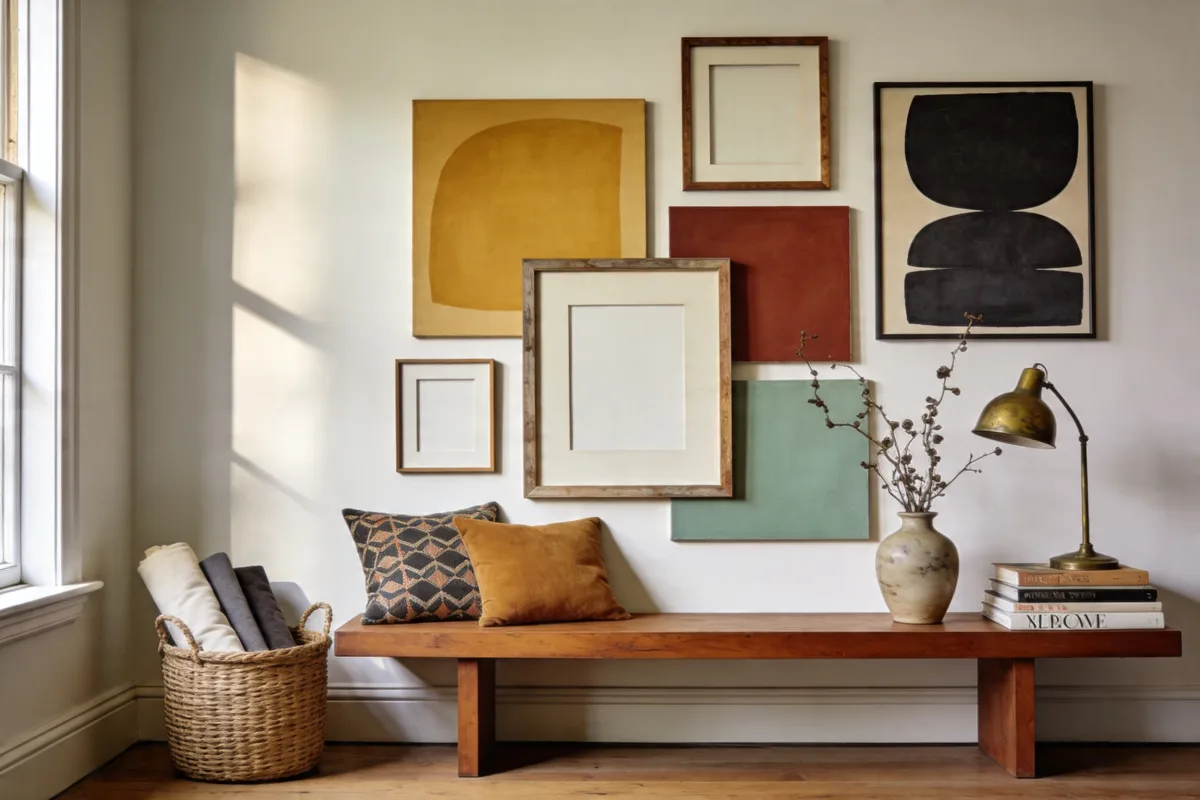
1. Maximalist Gallery Wall (Layered Frames, Bold Color, Zero Rules)

This project turns an empty wall into a layered showpiece: bold frames, striking colors, and a touch of whimsy. It’s perfect for living rooms, hallways, or that awkward dining-area wall that never feels finished. You can prep it in a single afternoon, and it fills space with visual weight—bold anchors like oversized art—that keep the eye satisfied. For busy weeks, gather art over time and lay it out on the floor first; stack the frames in a basket so the install day is grab-and-go easy. Want variations? Try a kid-friendly wall with drawings and Animal Crossing postcards, or go rental-friendly with removable adhesive strips and lightweight prints instead of heavy frames.
Planning Time: 20 minutes (layout planning)
Project Time: 60–90 minutes (hanging)
Total Time: 80–110 minutes
Covers: 1 wall (8–14 pieces)
Best For: Filling large empty walls, showcasing personality on a budget, and making a rental feel custom without paint.
What You’ll Need:
- 2–3 oversized anchor pieces (18×24 or bigger)
- 6–10 small to medium frames (mix metals, wood, white)
- 1 roll kraft paper for templates
- Painter’s tape for mock layout
- Command strips or picture hooks
- Level and pencil
- 1–2 odd objects (a straw hat, mini mirror, ceramic plate)
- Color thread: repeat 2–3 colors across art (e.g., cobalt, mustard, blush)
Steps:
- Pick a color story with 2–3 hues to repeat. Cobalt + mustard + blush creates just the right amount of visual energy.
- Lay artwork on the floor. Start with your largest pieces as anchors, then tuck smaller frames around them.
- Trace each frame on kraft paper, mark the nail spots, and tape the templates to the wall. Adjust spacing until it looks balanced—aim for 2–3 inches between pieces.
- Hang anchors first. Step back often; your eyes will catch tilt faster than any app.
- Layer in small frames, then your odd objects to break up the grid. Keep repeating your color thread so it reads as one story.
Style it: a plush bench or slim console beneath the wall grounds the arrangement and catches mail, keys, or plants.
Pro Styling Tip: Add one unexpected reflective surface (tiny convex mirror or glossy frame) to give the wall highlights that photograph beautifully.
Next up: we’re taking your light fixtures from “meh” to “you have to see this” without calling an electrician.
2. Custom Fringe Lamp Shade With Instant Personality
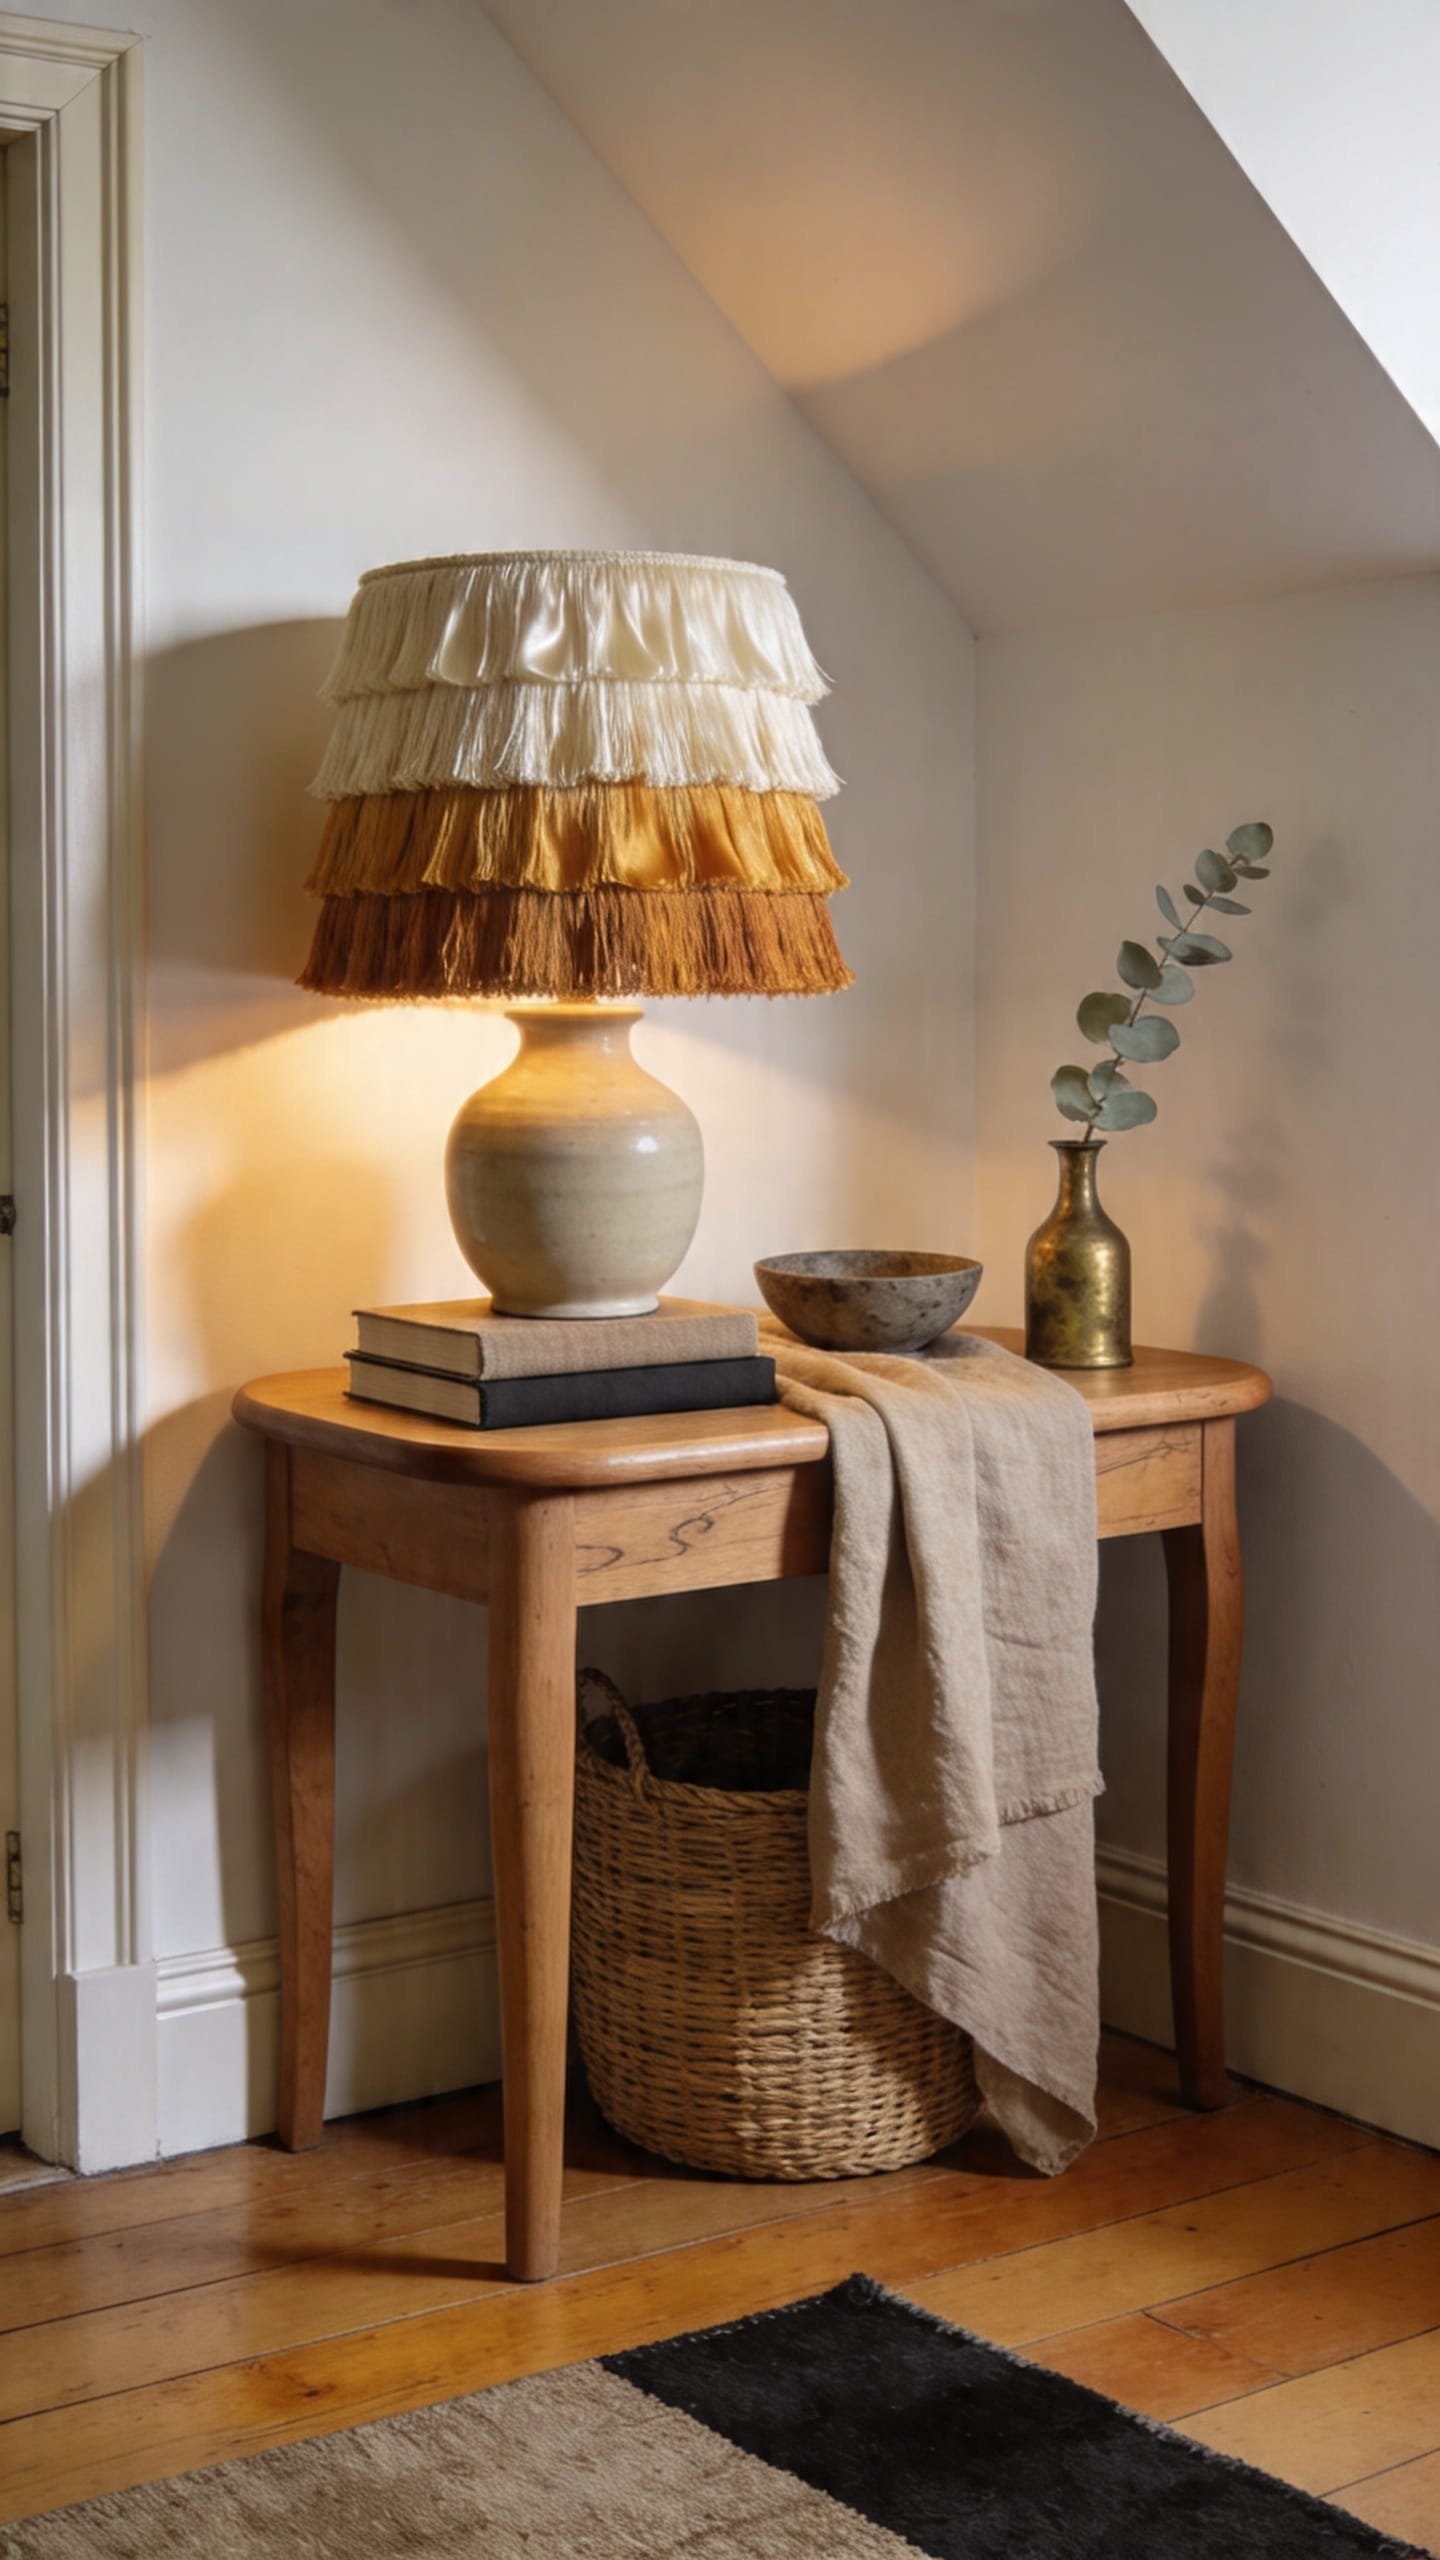
Lighting is the secret weapon. This DIY fringe lamp shade turns a plain base into a bold, whimsical statement—great for bedside tables, reading nooks, or the entry console that needs a wink. It’s quick to assemble on a Saturday afternoon, and the texture gives your space that cozy, layered feel that really sticks. For storage-savvy folks, keep your old shade tucked away; this one slides on and off so you can switch “flavors” seasonally. Try two variations: a kid-friendly rainbow fringe, or a minimalist two-tone dip that whispers instead of shouts.
What You’ll Need:
- 1 basic drum lamp shade (white or linen)
- 8–12 yards fringe trim (2–3 inches tall)
- Fabric glue or hot glue gun with sticks
- Clothespins or clips
- Measuring tape and scissors
- Optional: fabric paint for color blocking
- Optional: pom-pom trim or beaded edge for drama
Planning Time: 15 minutes
Project Time: 45 minutes
Total Time: 60 minutes
Covers: 1 lamp shade
Best For: Rentals, budget-friendly makeovers, softening harsh overhead light, and adding eclectic texture without repainting walls.
Steps:
- Measure the circumference of the shade. Cut fringe strips to wrap around once with a 1-inch overlap.
- Glue the first layer along the bottom edge. Work in 4–6-inch sections so the glue doesn’t dry before you press.
- Clip as you go. Clothespins keep the fringe aligned while glue sets.
- Stack additional layers upward, overlapping by about half the fringe height for a lush, maximal look.
- Optional: Color-block the top inch with fabric paint or add pom trim to the bottom rim.
Variation ideas: For a modern take, use a single layer of long fringe and paint a bold stripe near the top; for kid rooms, alternate two bright colors for a candy-like effect.
Pro Styling Tip: Style the finished lamp next to a matte ceramic vase and a glossy coffee table book—the contrast photographs like a dream.
I once glued fringe at midnight before guests arrived the next morning. Was it chaotic? Yes. Did everyone ask where I bought the lamp? Also yes.
Feeling brave? The next idea serves up color in the boldest way—surprising and somehow cohesive.
Mindset reset: Decorating doesn’t have to be a performance. If you finish even one corner of your home this week, that’s a win you’ll feel every time you walk past it. Keep going, not perfect.
3. Color-Blocked Door (Bold Hue, Crisp Lines, Zero Regrets)
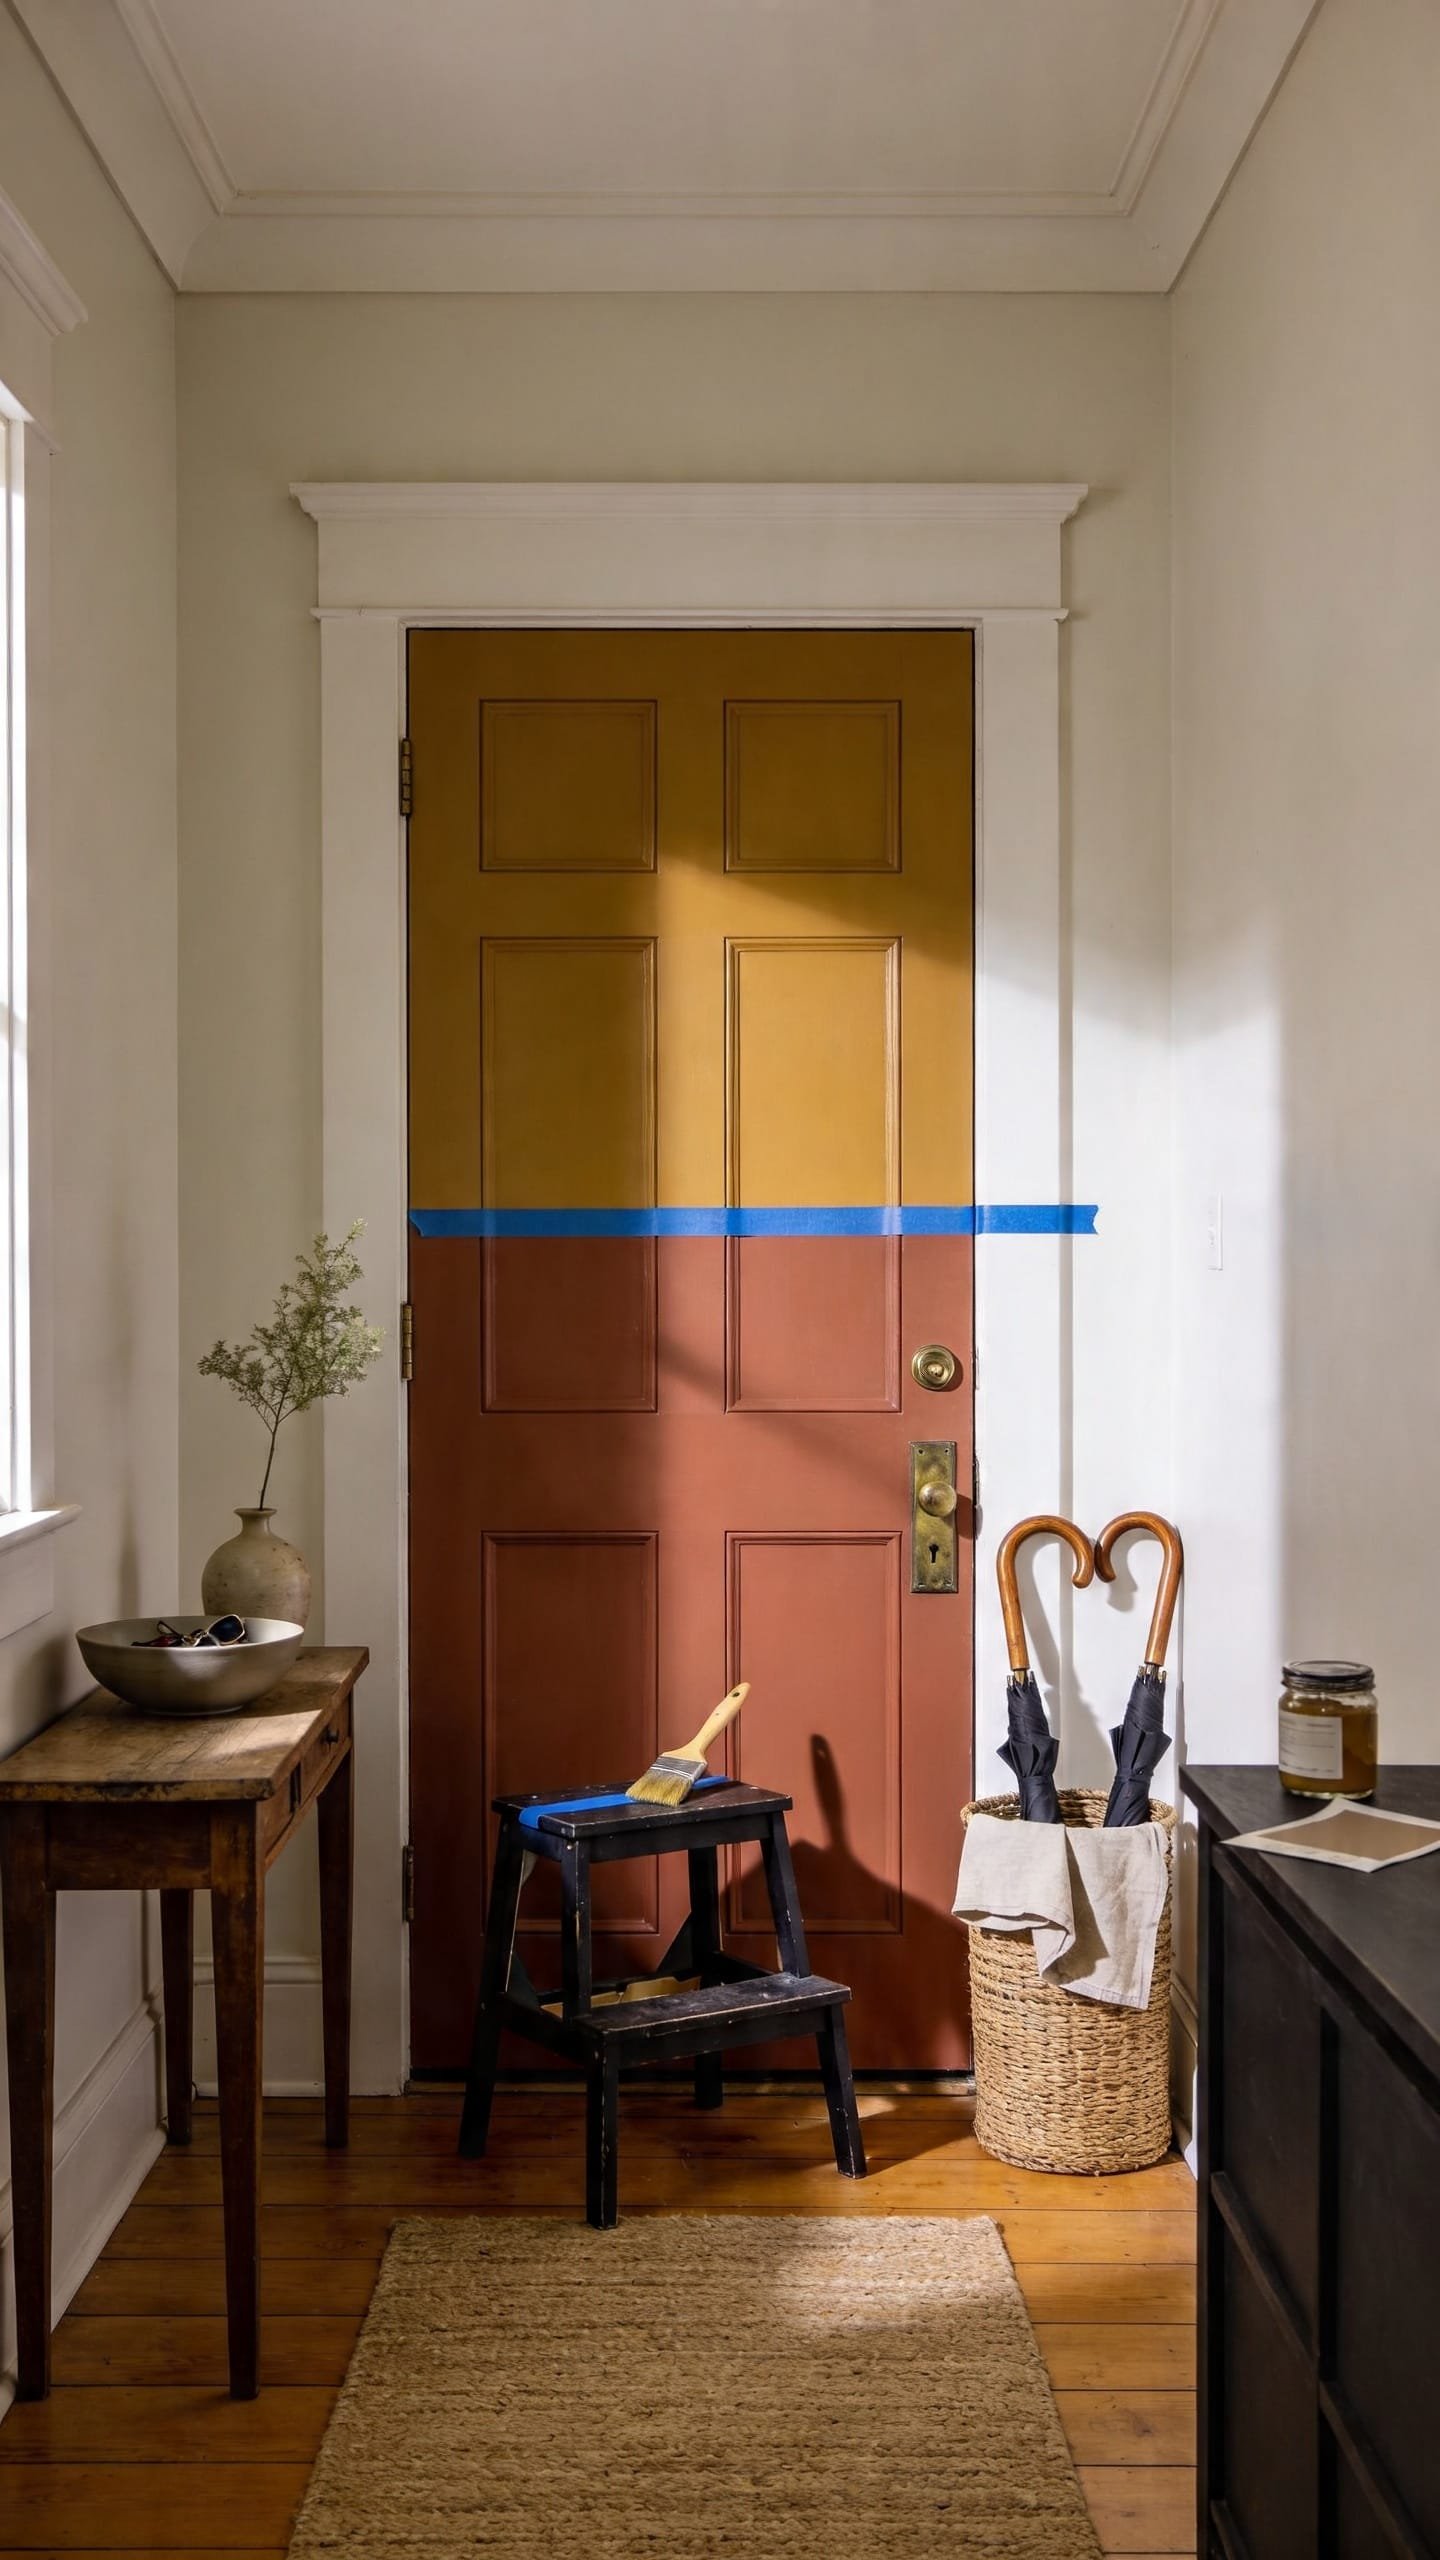
Doors are the overlooked canvas. A color-blocked door adds an eclectic, whimsical punch with minimal effort—like that one finishing touch that makes everything click. It’s perfect for entryways, bathrooms, or bedrooms that feel flat. You’ll spend more time taping than painting, but the payoff is huge, and the “fullness factor” comes from the mood shift every time you pass through it. Store extra paint in a small jar with the color swatch taped on; it’s grab-and-go for touch-ups later.
Variations to try: a kid-friendly two-tone half-dip (bottom bright, top white), or a moody jewel-toned frame with a contrasting center panel for vintage drama. If you rent, use removable peel-and-stick vinyl instead of paint—cut it with a rotary cutter for clean edges.
Planning Time: 25 minutes
Project Time: 60–90 minutes (plus drying)
Total Time: 2–4 hours including dry time
Covers: 1 interior door
Best For: Fast room refreshes, cohesive color stories, and bold statements that don’t require new furniture.
What You’ll Need:
- 1 quart interior paint (eggshell or satin)
- Painter’s tape (delicate-surface if painting over fresh coats)
- Small roller and 1–2 angled brushes
- Deglosser or light sandpaper (220 grit)
- Drop cloth and damp rags
- Optional: primer if covering dark color
Steps:
- Clean and lightly scuff the door so paint grips. Wipe dust with a damp rag.
- Map your blocks. Tape off panels or a horizontal half-dip about 60% up the door for a playful proportion.
- Brush edges first, then roll the centers. Thin coats beat gloopy ones; the second coat is where the magic shows.
- Peel tape while paint is slightly tacky for razor-sharp lines.
- Let dry fully before reinstalling hardware or hanging hooks.
Styling suggestion: Repeat the door color in two small accents nearby—a throw pillow and a vase—so the hue feels intentional, not random.
Pro Styling Tip: Photograph doors at an angle so the light skims the surface—those crisp tape lines catch a subtle highlight that reads editorial.
True story: I once chose the wrong green and the door looked like a pickle. I repainted the next day and landed the perfect olive. Not every color sings on the first try—and that’s okay.
Ready to get tactile? We’re about to plate a coffee table with layers you can actually touch and use.
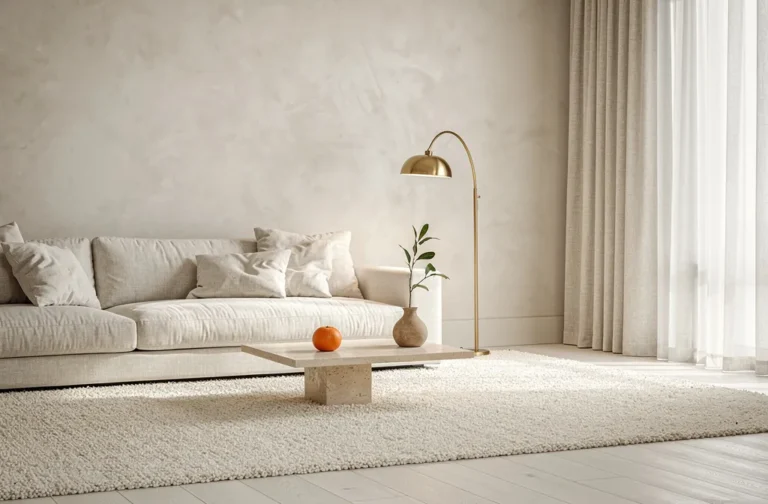
4. Coffee Table Styling: Texture, Height, and Playful Layers
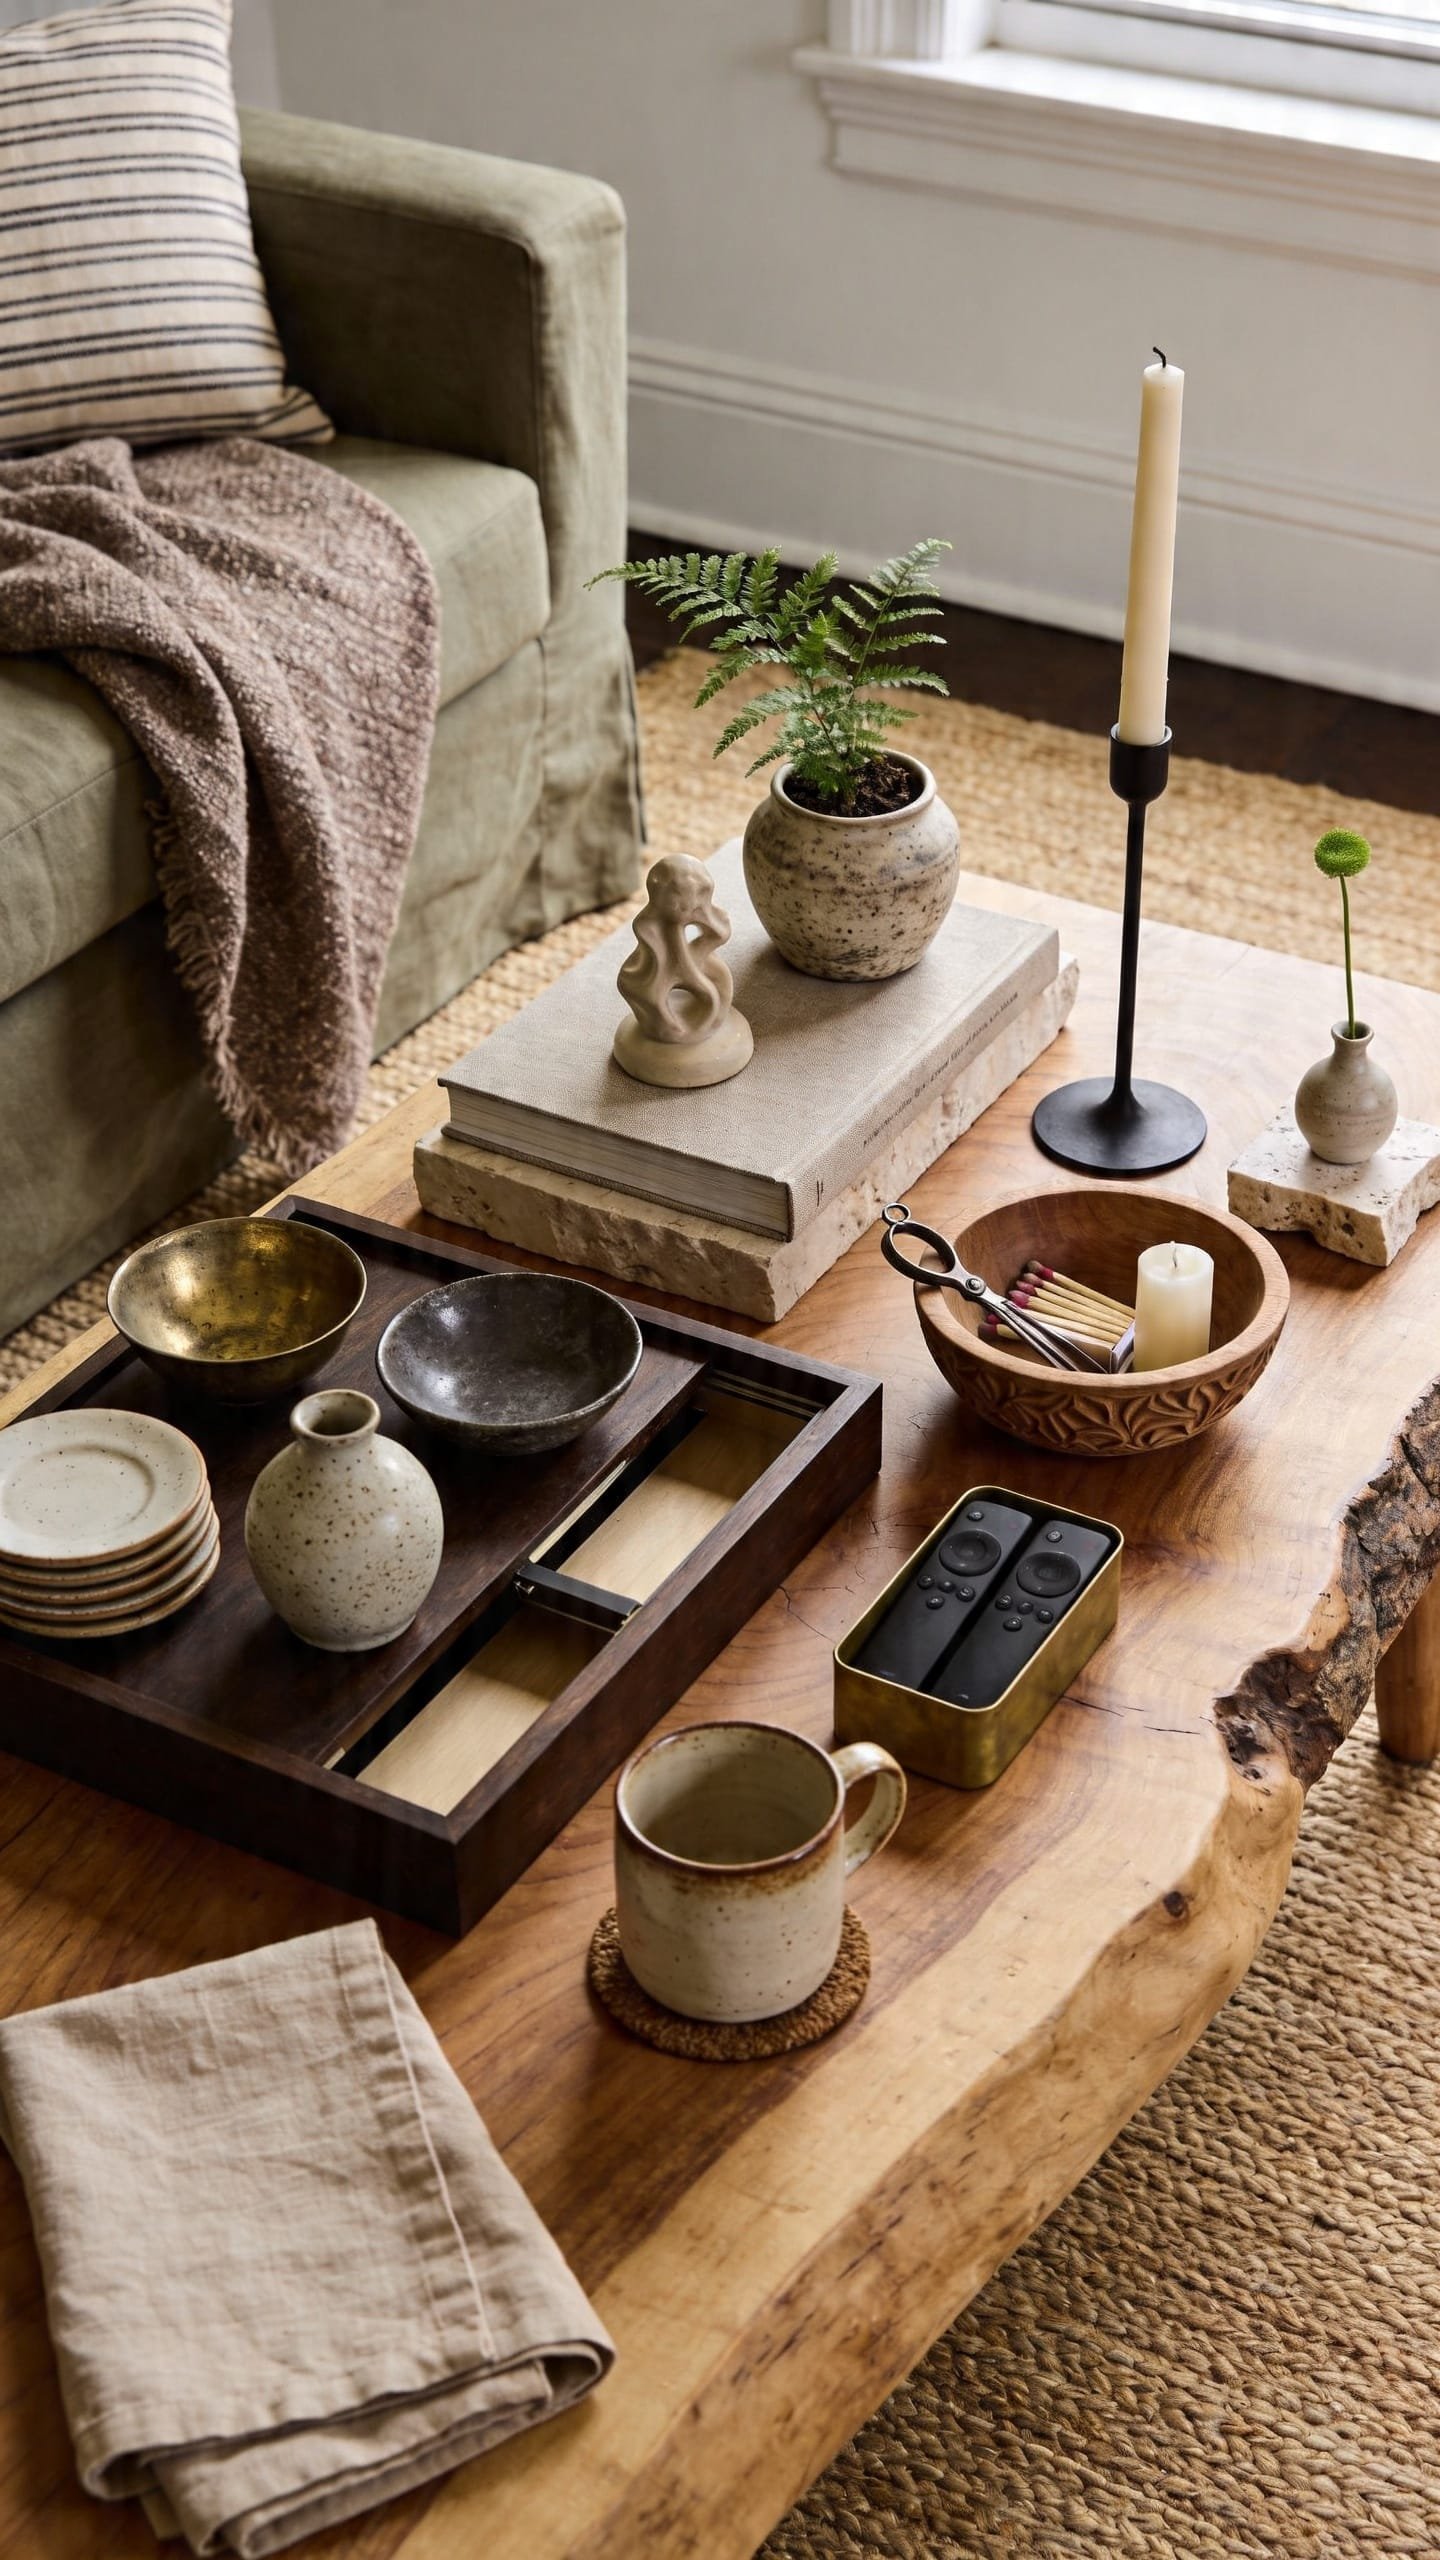
Think of your coffee table like a curated vignette—mix textures, heights, and colors, and let everyone enjoy it with their eyes. This is best for busy living rooms where function matters: remotes, mugs, and coasters still need homes. It works on weekdays because once it’s “styled,” maintaining it takes seconds—slide the tray to clear space, slide it back when you’re done. The fullness comes from varied materials—wood, metal, ceramic—that satisfy the need for contrast and visual interest.
For prep and storage, corral everything on a tray so cleaning is easy. Variation ideas: kid-friendly version with a puzzle, bright coasters, and a lidded box for crayons; or a low-profile setup for small spaces with just three objects in a tight color story.
Planning Time: 10–15 minutes
Project Time: None
Total Time: 10–15 minutes
Covers: 1 coffee table
Best For: Quick room polish, renter-safe flair, and eclectic style that won’t get in the way of movie night.
What You’ll Need:
- 1 tray (round or rectangular; 14–18 inches)
- 1–2 stacks of books (colorful spines preferred)
- 1 sculptural object (ceramic knot, brass hand, or quirky thrift find)
- 1 plant or floral stem in a vase
- 1 lidded box for remotes
- Coasters that repeat a room color
- Optional: taper candle in an unexpected holder
Steps:
- Place the tray off-center so the table doesn’t feel too formal. Odd angles bring energy.
- Stack 2–3 books with the largest on bottom. Rotate the top book slightly to break the straight lines.
- Add the sculptural object on the books for height. This is your statement piece, the fancy bit.
- Tuck the plant or vase to one side. Let leaves or stems spill over the tray edge for movement.
- Slide in the lidded box and coasters. Leave a clean zone for mugs and snacks.
Style swaps: Swap the plant for a bowl of colorful matchbooks; trade the sculptural object for a quirky teapot; switch the tray for a woven basket in summer.
Pro Styling Tip: Mix matte and glossy surfaces—think a matte stone tray with a glossy ceramic vase—so light dances across the setup in photos.
Micro-moment: It’s 8 p.m., you drop the remote in the lidded box, blow out the candle, and the room instantly looks tidy. That’s the magic of a tiny system.
We’ve layered the horizontal. Now let’s go vertical with a bookshelf that reads like a story you can’t put down.
Reality check: Eclectic doesn’t mean everything all at once. It means choosing a theme—color, shape, or era—and letting it echo. Start small, edit as you go, and keep a donate box nearby for the “almosts.”
5. Bookcase Styling: Zoning Shelves for Color and Quirk
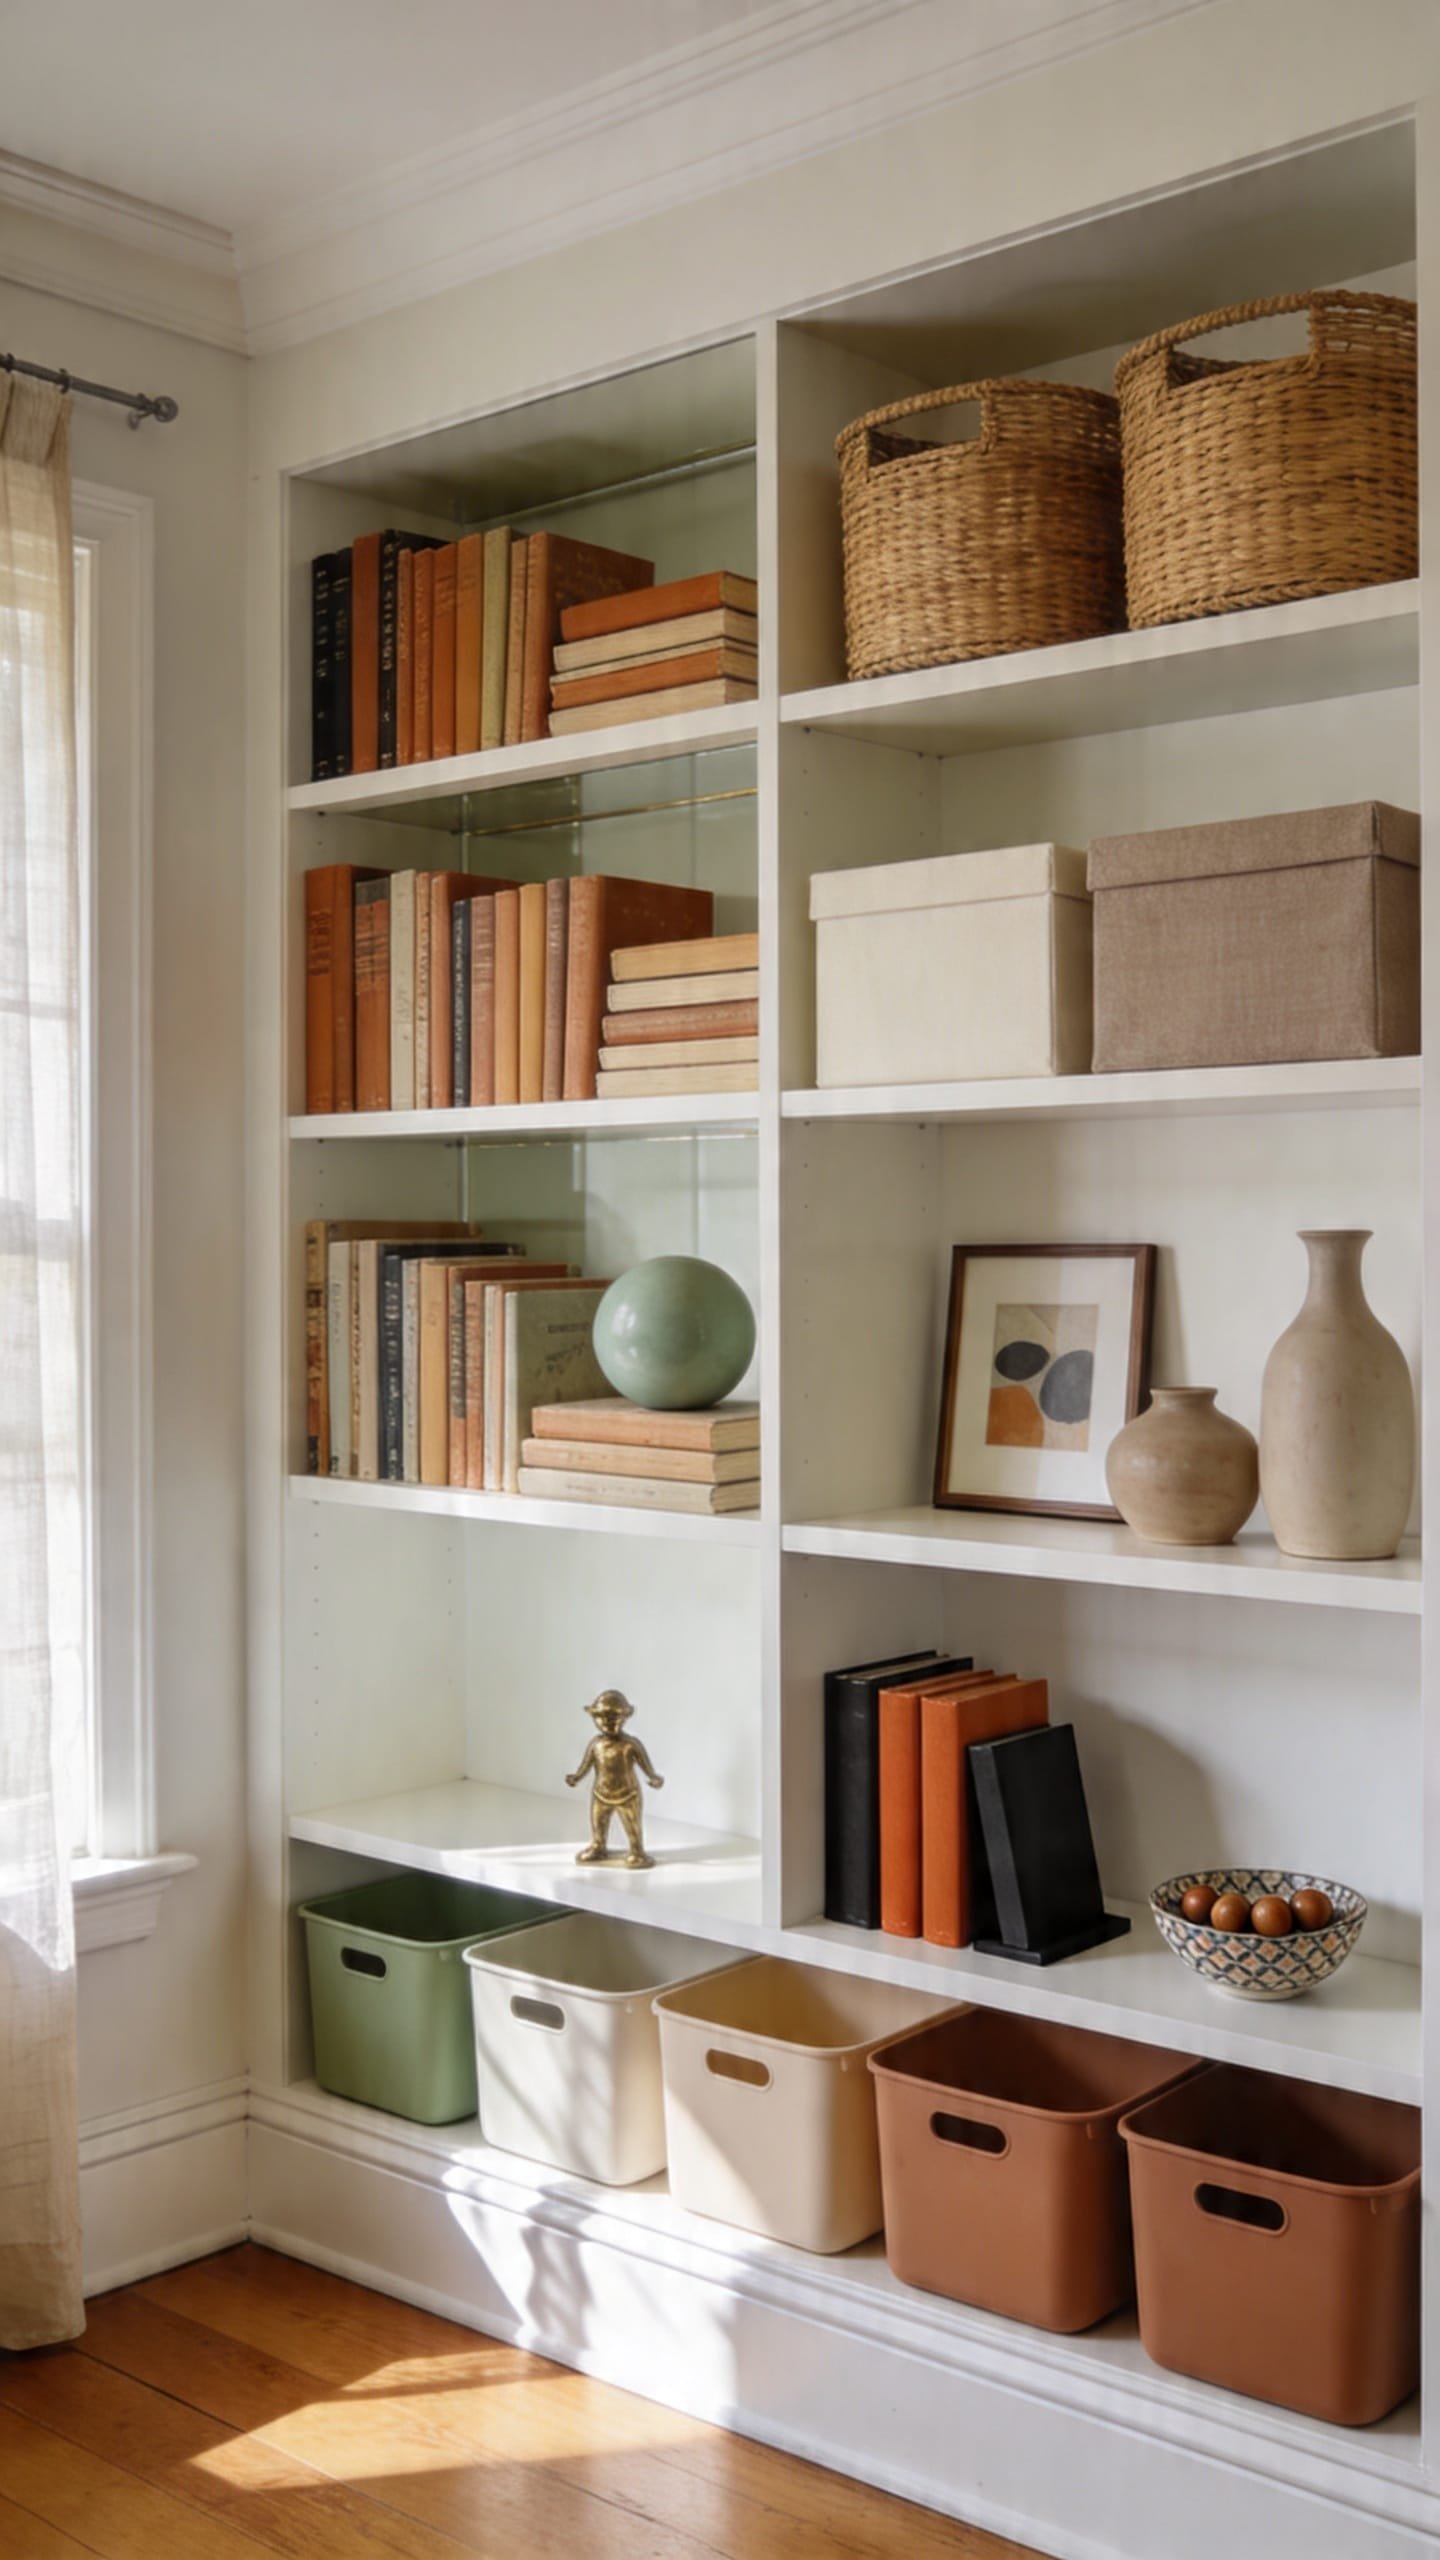
Bookshelves can slump into chaos fast. This method gives you structure without killing the fun—clear zones with a few wild, unexpected touches. It’s perfect for home offices, living rooms, or kids’ spaces. You’ll start by zoning shelves into categories: books, storage, and art. The satiety factor comes from balance—visual weight on some shelves, airy space on others—so your eye gets rest between bursts of color.
Variations: kid-friendly bins at the bottom with labels you can actually live with; a black-and-white scheme with one neon object per shelf for graphic punch; or a global-travel vibe with thrifted textiles and small framed photos.
Planning Time: 20 minutes (clear and sort)
Project Time: 45–60 minutes (style)
Total Time: 65–80 minutes
Covers: 1–2 bookcases
Best For: Organizing clutter magnet zones while making them Instagram-friendly and genuinely useful.
What You’ll Need:
- Lots of books (mix vertical and horizontal stacks)
- 2–4 closed boxes or baskets for storage
- 3–5 display objects (ceramics, small art, quirky trophies)
- 1–2 picture frames or small mirrors
- Bookends (or heavy objects that act like them)
- Optional: peel-and-stick wallpaper for the back panel
Steps:
- Empty the shelves completely. Group books by color or by subject—pick one system and commit.
- Create zones: plan one shelf for mostly books, one for mixed books and objects, and one “light” shelf with mostly art or negative space.
- Build triangular compositions. A taller item on one side, a medium item centered, something low on the other—your eye will flow naturally.
- Anchor the bottom shelf with heavier baskets. Hide cords, remotes, or kids’ stuff there so the top shelves can stay pretty.
- Add wallpaper to the back panel if you want extra whimsy. A tiny pattern can make the whole unit feel custom.
Styling ideas: Tuck a small lamp on a middle shelf for glow, or add a draped beaded strand over a stack of books for an easy “sprinkle.”
Pro Styling Tip: Photograph shelves from slightly below eye level so the vertical lines feel taller and the object layers stack cleanly in-frame.
Last month, my neighbor brought over a tiny ceramic bird for a shelf “audition.” We ended up giving it a pedestal: a stack of two vintage paperbacks. It’s the smallest thing on the bookcase and somehow the most commented-on. That’s the power of a good sprinkle.
Quick Checklist
- Pick a 2–3 color palette to repeat across rooms
- Use one oversized anchor piece in any gallery wall
- Stack textures: matte, glossy, woven, metallic
- Leave negative space so bold choices can breathe
- Style with trays for easy reset during busy weeks
- Layer lighting: a lamp plus a candle beats overhead glare
- Tape carefully for crisp lines on color-blocked doors
- Echo an accent color at least twice in a vignette
- Vary object heights to avoid flat-looking surfaces
- Keep a “donate” box for pieces that don’t sing
Frequently Asked Questions
How do I make eclectic, whimsical decor feel cohesive instead of chaotic?
Choose a tight color palette—two main hues plus one accent—and repeat it across frames, textiles, and small objects. Keep shapes varied but let color be the throughline. That’s the secret that makes bold look intentional.
Can I pull this off in a rental without painting or drilling?
Yes. Build gallery walls with Command strips, swap lamp shades, use peel-and-stick wallpaper or vinyl for door accents, and style trays and shelves. You’ll get big impact with zero landlord drama.
What if I have kids or pets—won’t all this get messy fast?
Style the “pretties” up high and go function-forward down low. Use lidded boxes on coffee tables, baskets on bottom shelves, and durable, wipeable surfaces. Your space stays whimsical and still survives snack time.
How do I pick the right bold color if I’m scared I’ll hate it?
Test large samples on poster board and move them around the room at different times of day. Look for a color that plays nice with your existing rug or sofa. If it compliments two items you already love, it’ll likely work.
Can I mix vintage and modern without it feeling random?
Absolutely. Pair opposites with a shared element: a vintage wood frame around a modern print; a sleek lamp on a distressed console. Repeat the same metal or wood tone at least twice so the mix reads as a choice.
Wrap-Up: Try One Bold Move This Week
Start with whichever idea excites you most. Maybe it’s the maximalist gallery wall you’ve been saving prints for, or the fringe lamp that promises a little mischief on your nightstand. One finished corner beats ten half-started projects—every single time.
The truth is, great decorating isn’t about perfection or massive budgets. It’s about simple systems, repeated colors, and a willingness to play. When you give yourself permission to be a little weird, your home starts to feel like your favorite person to hang out with.
So pick a color, grab the tape, lay out those frames. You’ve got this—seriously. Your space is about to be unforgettable in the best way.