6 Cute Small Garden Ideas for Backyards You’Ll Want to Copy — Gorgeous Treasure Now
Let’s be honest: your backyard might be tiny, but your dreams are not. You want morning light catching dew on herbs, a place to sip wine without staring at the trash bins, and a pocket of calm that feels like a boutique hotel courtyard, not a utility zone with grass problems. The pain point? Small yards get cluttered fast. Pots everywhere, no real layout, furniture that feels awkward, and plants that don’t do your style any favors. We’re fixing that today.
These 6 cute small garden ideas are your shortcut to “wow” without needing a landscaper on retainer. Expect layered textures (think warm cedar, soft crushed gravel, fluted planters), cinematic lighting (string lights + low glow lanterns), and plants that earn their keep in color and character. Each design transforms cramped corners into photogenic, Pinterest-ready vignettes with real-life practicality: storage, seating, shade, and smart planting.
Whether you love modern Mediterranean drama, cozy cottage warmth, Japandi calm, or romantic bistro energy, you’ll find a look that feels like you. Ready to turn that “meh” patio into a gorgeous treasure? Let’s design a backyard you’ll want to show off at golden hour every weekend.
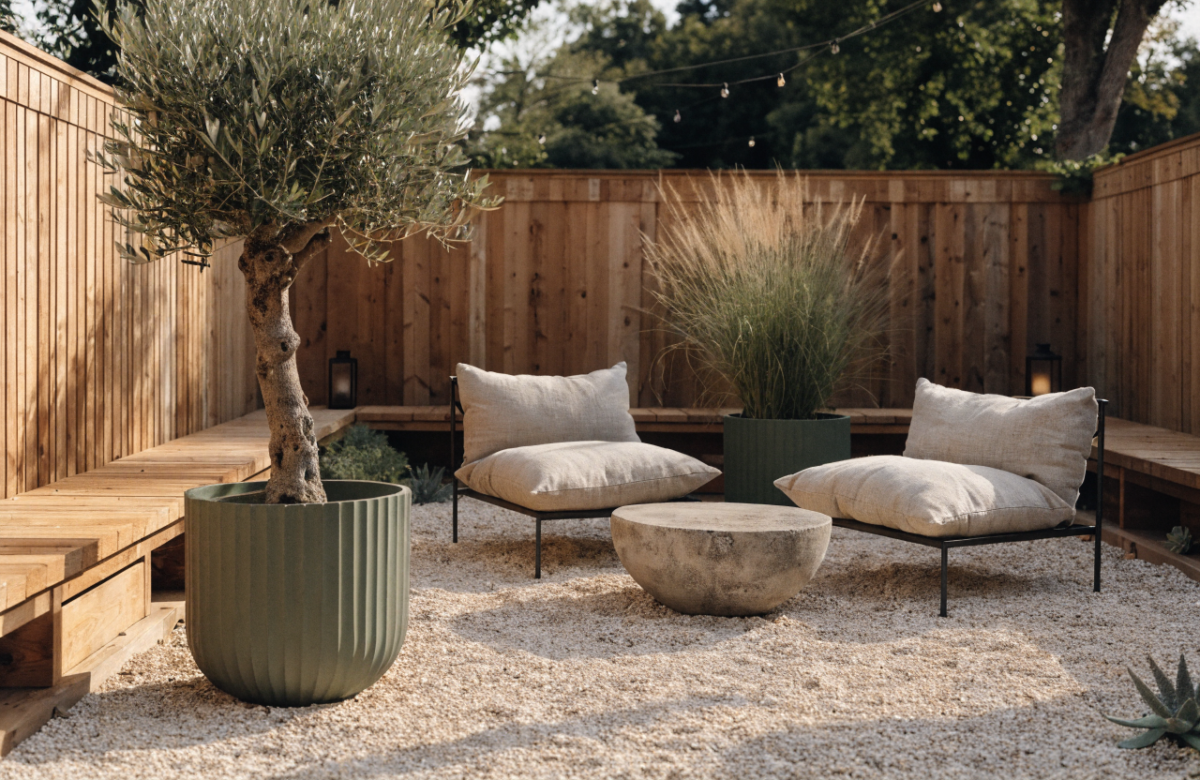
1. Layered Courtyard Nook With Gravel, Cedar, And Olive Green Accents
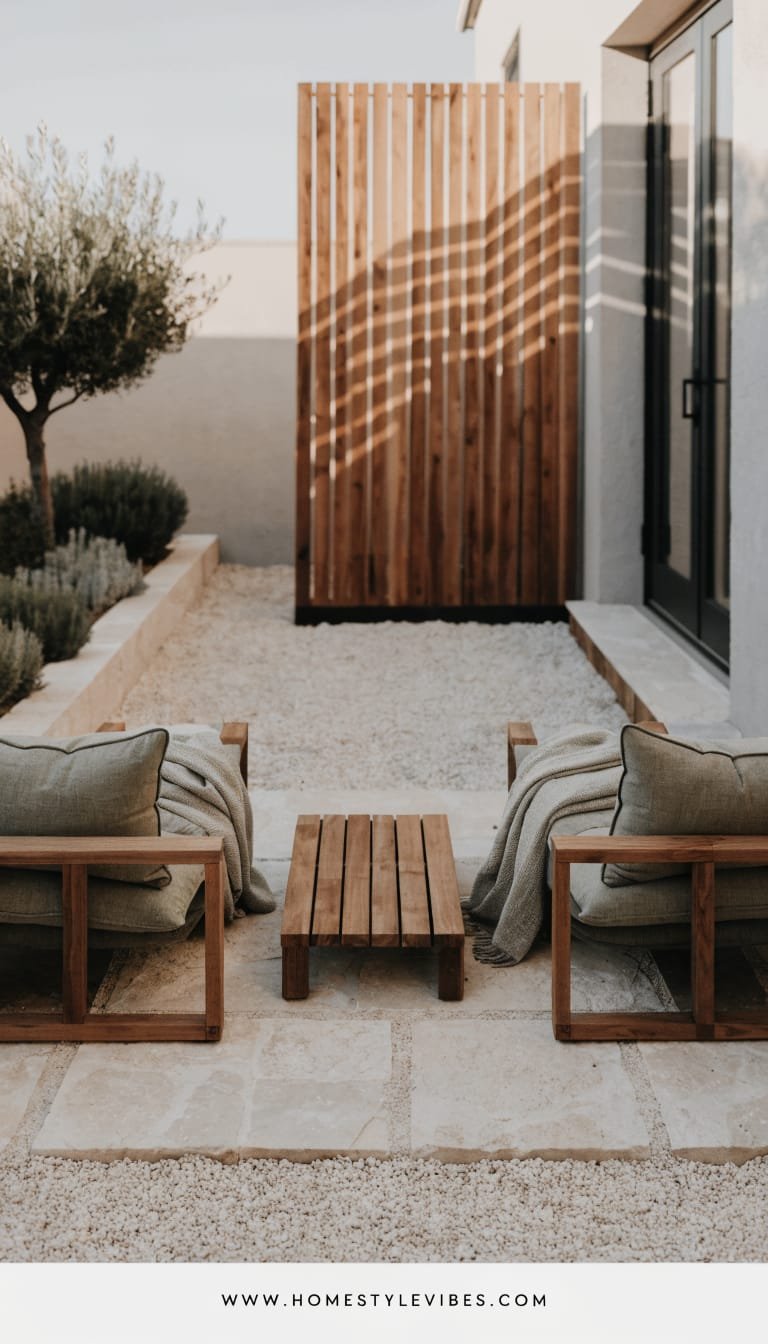
We’ve all been there: the patio chairs feel like they’re floating in space, the pavers stop abruptly, and the whole area reads “temporary.” This design locks the space down visually and emotionally by creating a layered courtyard feel—no major demo required. The mood? Modern Mediterranean with Japandi restraint. Think soft crunch of gravel underfoot, ribboned shadows from a slatted screen, pale stone, and sage-olive textiles that whisper vacation.
Why it works in real homes: small backyards often need boundaries. A perimeter of slim cedar screening creates intimacy and covers less-than-lovely fences. A defined gravel “rug” anchors furniture, drains well, and makes everything look purposefully placed. Soft uplighting on the cedar and low lanterns around the seating add depth and evening magic. This read as cozy, low-maintenance, and resale-friendly because it tidies sightlines and feels turnkey.
Why It Looks Expensive: the harmony between materials makes it feel designed, not collected. Cedar’s warmth pairs with cool limestone or concrete-look pavers. Olive green textiles echo plant foliage for a sophisticated palette you can’t easily mess up. The result? A boutique courtyard vibe that photographs like a dream: textured ground, rhythm from vertical battens, and a textural plant palette that throws gentle shadows.
Dominant materials include western red cedar slats, limestone chips or pale gravel, smooth cement pavers, and matte black metal planters. Lighting does the heavy lifting here—think hidden solar uplights for the cedar screen, and a string of warm white bulbs overhead to define the “ceiling” of your outdoor room. Variations:
- Budget-friendly: Pressure-treated lattice stained a cedar tone, pea gravel instead of limestone, IKEA-style outdoor cushions in olive covers.
- Small-space: Narrow bench against the screen instead of lounge chairs; a bistro table that tucks in.
- Darker version: Charcoal gravel, black-stained fence, terracotta cushions for moody, high contrast evenings.
- Renter-friendly: Freestanding cedar panel(s) on planter-base feet; gravel in a timber frame that sits on top of pavers.
Key Design Elements:
- Main materials: Cedar slatted screen, pale gravel, concrete-look pavers, matte black planters
- Color palette: Cedar honey, olive/sage textiles, off-white stone, matte black accents
- Lighting strategy: Low uplights on the screen, one string light canopy, table lanterns
- Furniture silhouettes: Low, boxy lounge chairs or a slim bench with clean lines
- Texture layers: Ribbed cushions, woven throw, olive tree foliage, gravel crunch
- Accent details (hardware, decor pieces, plants): Black metal lanterns, ribbed ceramic pots, olives, rosemary, and bay laurel
How To Recreate This Look:
- Start with layout: Mark a rectangular “courtyard” about 8×10 ft with landscape edging or timber to hold gravel.
- Add structure: Install a slatted cedar panel at the back (8–10 ft wide), or freestanding cedar screens.
- Layer the floor: Lay weed barrier, pour 2–3 inches of pale gravel, and set in two large concrete pavers as landing pads for chairs.
- Install lighting: Stake neat solar uplights along the screen and hang a single draped string of warm bulbs.
- Style with accents: Olive green cushions, a textured throw, a low black fire bowl, and fragranced herbs in matte planters.
Why This Looks Expensive: cohesive repetition—cedar + black metal + pale stone—mimics a pro’s palette. The screen provides a “backdrop,” just like a styled interior wall, which instantly elevates everything in front of it.
Common Mistakes To Avoid: using too many tiny planters creates visual noise. Scale up to a few larger vessels. Don’t skip weed barrier; mess equals maintenance headaches.
Pro Styling Tip: For photos, water the gravel lightly for richer color and reduce dust; layer one olive pillow and one textured neutral for subtle contrast that reads crisp on camera.
Keep scrolling—next up, we’re squeezing in storage without sacrificing style.
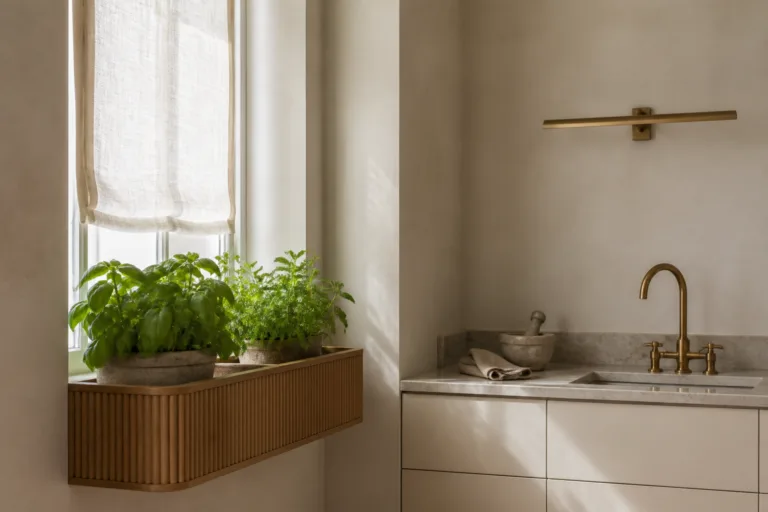
2. Slim Shed Wall With Built-In Planter Bench (Storage, Seating, Secret Garden)
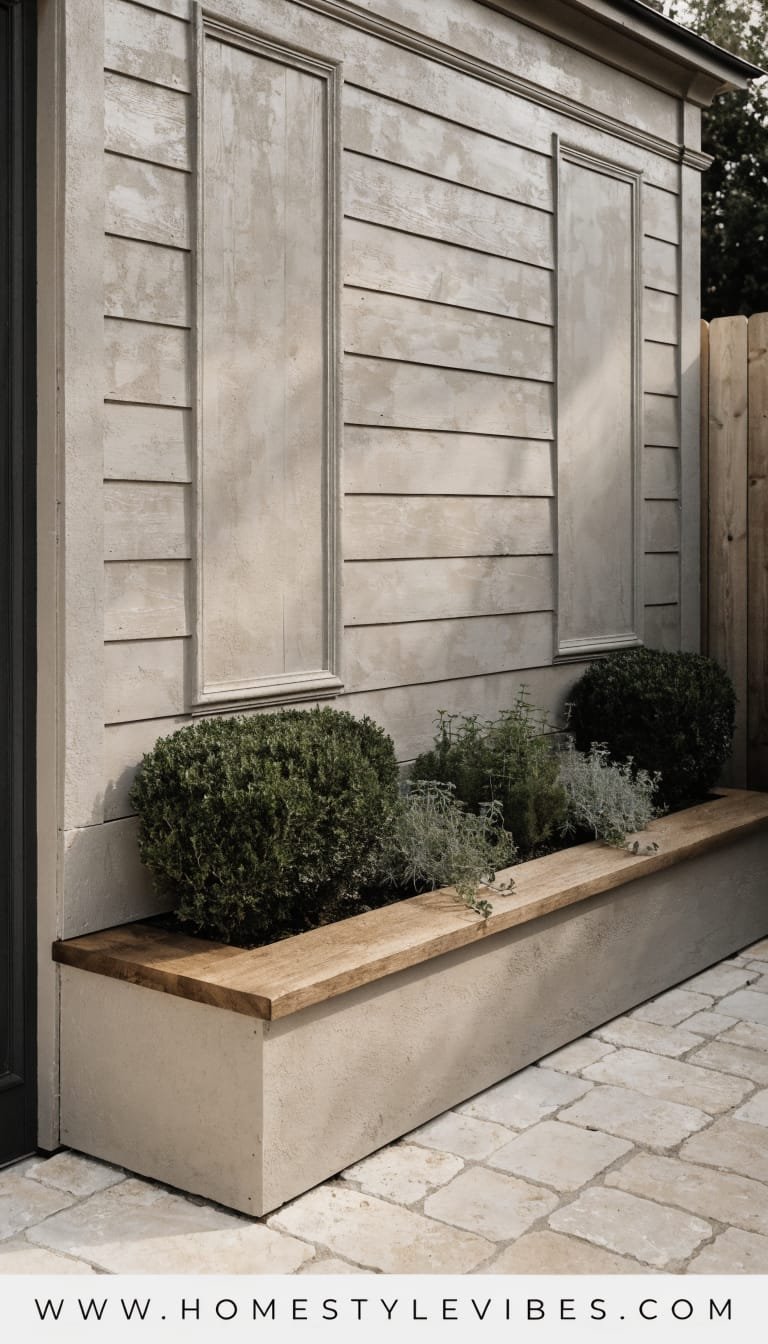
It’s that one corner that always feels off: the bin zone, the dead wall, the “now what?” space between the door and the fence. You’ve tried a vertical garden here before, but it still looked flat and… utility. This idea solves three things at once—storage, seating, and greenery—by turning a slim shed wall into a design feature with a low planter bench in front.
The mood hits “urban cottage meets modern farmhouse.” Planked siding (or shiplap-look panels) painted soft putty or clay, a bench-slash-planter box with fluted fronts, and brass or black hardware that whispers custom carpentry. Why it works in real homes: compact footprints thrive on double-duty elements. The bench gives you instant seating and hides a drip line or hose. The shed wall steals attention back from the bins while giving you a place to hang tools behind handsome doors.
Lighting matters here: a single gooseneck sconce or two petite cylinder lights frame the wall and wash it with warm light at dusk. Add push-in step lights at the base of the bench for that boutique-hotel glow. Materials lean into painted fiber cement or moisture-resistant panels, cedar or composite for the planter bench, and limewashed terracotta pots set on top for height variation.
Variations:
- Budget-friendly: Exterior-grade plywood with battens to fake a board-and-batten look, painted in satin exterior.
- Small-space: Narrow 12-inch-deep bench with a row of dwarf grasses and thyme; fold-down seat panel if needed.
- Darker version: Charcoal wall with brass sconce and deep green bench cushion—high drama, low footprint.
- Renter-friendly: Freestanding storage cabinet + movable planter bench on locking casters, matched paint color.
Key Design Elements:
- Main materials: Moisture-resistant panels, composite or cedar bench/planter, brass/black hardware
- Color palette: Putty/clay taupe, deep green foliage, warm brass or matte black accents
- Lighting strategy: One gooseneck sconce centered, step lights under bench lip, candles for evenings
- Furniture silhouettes: Long, low bench with integrated planter box and a thin cushion
- Texture layers: Fluted planter fronts, linen-look outdoor cushion, terracotta clay, trailing vines
- Accent details: Slim house numbers, a small bell or hook rail, dwarf hydrangeas or trailing jasmine
How To Recreate This Look:
- Start with the wall: Prime and paint your shed or install battens for a board-and-batten texture in a soft neutral.
- Add the bench: Build or buy a narrow planter bench; line with pond liner or plastic insert to protect wood.
- Layer plants: Use structured shrubs at the ends (boxwood balls, dwarf yew), trailing vines in the middle, and a few seasonal blooms on top.
- Install lighting: Hardwire or use solar/battery sconces; add puck or step lights under the bench lip.
- Style with finishing touches: A textured outdoor cushion, a small side table, and one sculptural terracotta urn.
Why This Looks Expensive: the “custom millwork” illusion—integrated planter fronts, consistent paint color, and real hardware—feels built-in and investment-grade.
Common Mistakes To Avoid: don’t cram too many varieties in the planter; pick 2–3 species and repeat for rhythm. Avoid loud cushions that clash with flowers—let plants star.
Pro Styling Tip: Photograph at dusk when the sconce is lit—backlight the foliage for depth and let the fluted planter catch soft shadows for that editorial look.
Ready for a tiny backyard that still throws a full-on dinner party? Let’s go bistro-chic.
3. Parisian Micro-Bistro With Checkerboard Pavers And Climbing Roses
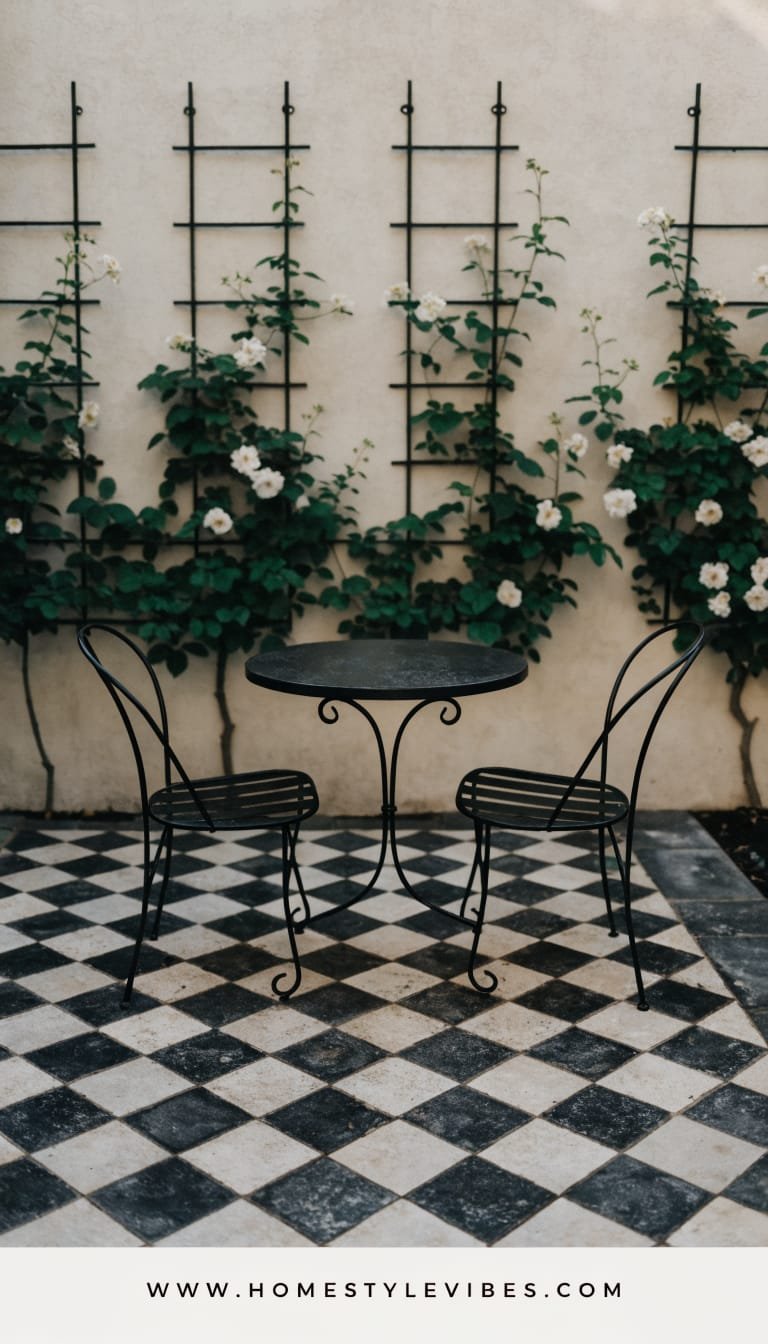
You’ve squeezed a two-seater table onto your patio before, but it still felt like a placeholder—wobbly, bare, and more “coffee pit stop” than “lingering, laughing, dessert course.” This design leans hard into romance and restraint: black-and-ivory checkerboard pavers or stenciled tiles, a slim bistro set with curved lines, and a wall of climbing roses or star jasmine wrapped around black bracket trellises.
The mood screams old-world charm meets city balcony. Why it works: small yards excel at theatrical moments. A checkerboard directs the eye and instantly zones the space, while vertical blooms draw attention upwards and away from a tight footprint. Lighting: café string lights across the seating line, plus two lanterns at floor level for the layered glow that flatters everyone’s skin tone. Easy to maintain with drought-tolerant climbers if roses feel high-touch.
Why It Looks Expensive: checkerboard is a classic, not a trend. Paired with restrained furniture and a limited color story—black, ecru, soft blush blooms—you get magazine-level chic. It photographs beautifully: geometric ground pattern, curving chair backs, glossy leaves, and petals against matte paint. Materials lean on concrete or porcelain tiles, wrought iron or powder-coated aluminum, and matte clay planters.
Variations:
- Budget-friendly: Stencil a checkerboard on existing concrete using porch paint; add metal trellis panels from the hardware store.
- Small-space: 24-inch bistro table and two foldable chairs; mount trellis directly on fence to save inches.
- Darker version: Charcoal and soft stone checkerboard with deep burgundy climbing roses for a moody palette.
- Renter-friendly: Outdoor rug with a checker print; removable adhesive trellis clips; potted climbers.
Key Design Elements:
- Main materials: Porcelain or cement-look tiles, wrought iron bistro set, metal trellis, terracotta
- Color palette: Black, cream, soft blush/white blooms, deep green foliage
- Lighting strategy: Overhead café lights, floor lanterns by chair legs, candle on table
- Furniture silhouettes: Curvy, airy chairs; petite round table with pedestal base
- Texture layers: Smooth tile, matte planters, glossy leaf shine, linen napkins
- Accent details: Brass candleholders, striped café umbrella (optional), vintage-style sign
How To Recreate This Look:
- Start with the floor: Lay checkerboard tile over a compacted base or stencil your existing slab in alternating squares.
- Add height: Install two or three vertical trellis brackets; plant climbing jasmine or roses at their base.
- Layer seating: Place a petite bistro set, leaving comfortable pull-out room for each chair.
- Install lights: Drape café lights at 8–9 ft for intimacy; add two lanterns at floor level to accent the tile pattern.
- Style with romance: Crisp linen napkins, a small bud vase, and a tray for water and glasses.
Why This Looks Expensive: symmetry and contrast—checkerboard reads classic, while the delicate bistro lines feel European. Together, they elevate even a basic fence.
Common Mistakes To Avoid: too many chair styles or random planters will break the spell. Keep metals uniform, and stick to one bloom color for cohesion.
Pro Styling Tip: For photos, lightly mist leaves for subtle gloss and place a single dessert plate on the table to suggest scale and lifestyle—it’s oddly disarming and chic.
Now, what if you want a tiny garden that changes with the seasons without replanting chaos? Enter the grid system that pros swear by.
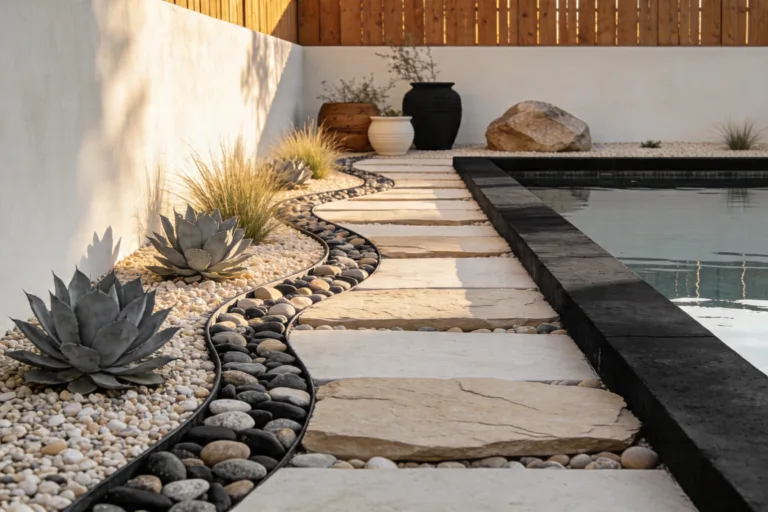
4. Modular Grid Garden With Moveable Planter Cubes And Hidden Irrigation
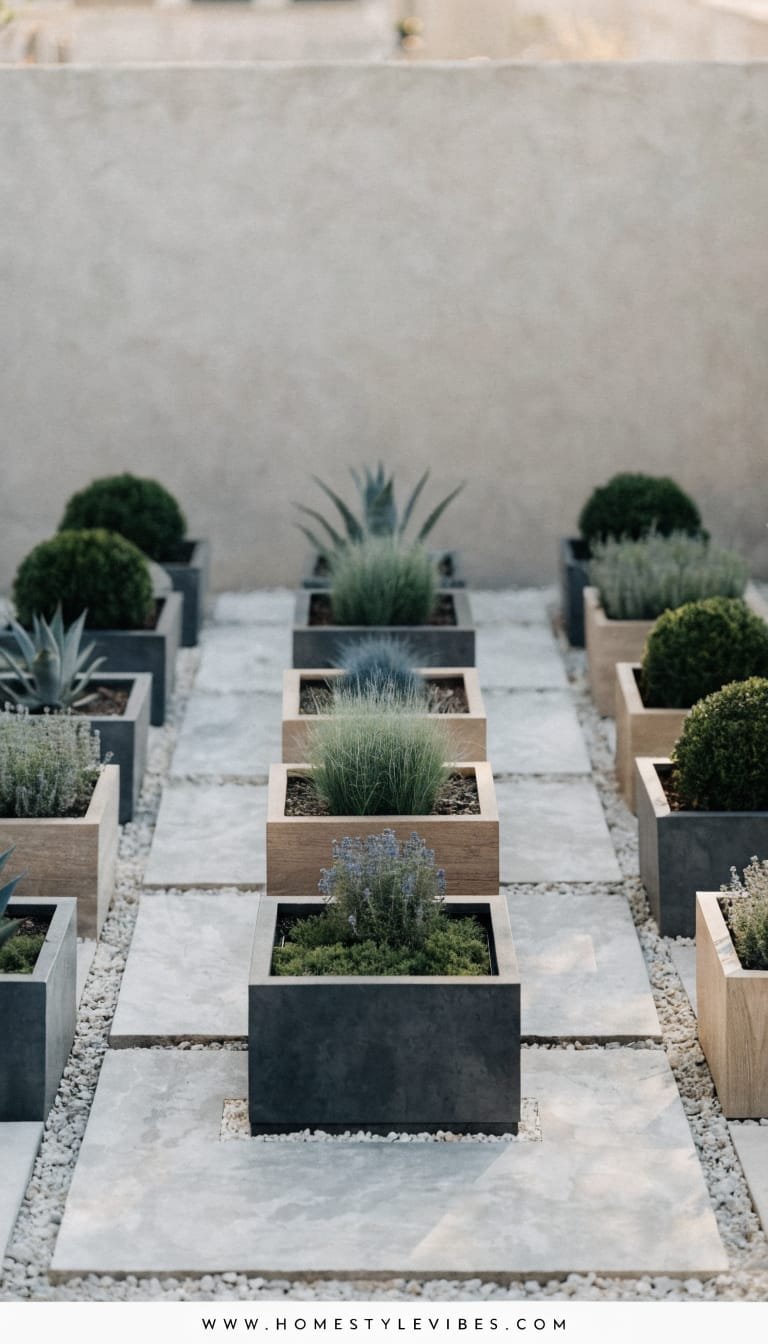
You’ve tried mixing pots “organically,” but it always looks messy by midsummer. This idea swaps chaos for a modular grid that behaves like a curated gallery. We’re talking square or rectangular planter cubes laid on a ground “grid” of stepping stones and gravel, each cube housing one plant type that can be rearranged seasonally. The mood: gallery-modern meets Scandinavian order—calm, structured, deeply soothing.
Why it works in real homes: small backyards benefit from furniture-like planting. Each cube moves when you host, when you add a grill, or when you want a new composition. A hidden drip line snakes under gravel, pops up into each cube through a grommet, and keeps maintenance low. Lighting gets clever: stake lights at the back of select cubes create depth and spotlight foliage shapes.
Why It Looks Expensive: the systemized approach feels custom. A 3×3 or 2×4 grid reads as intentional architecture, not “pot luck.” Photographically, the rhythm of repeating shapes and varied leaf textures (spiky grasses, round hostas, feathered ferns) creates a sophisticated composition with built-in shadow play.
Materials include powder-coated aluminum or composite planters, large-format pavers, pea gravel, and simple stake lights. Plant palette: mostly foliage-forward with a strict color rule—silver/green/charcoal or green/bronze/cream. Variations:
- Budget-friendly: Painted wooden cubes sealed with marine varnish; DIY drip kits with quick-connect fittings.
- Small-space: A 2×3 grid tucked against a wall; use dwarf varieties to maintain scale.
- Darker version: Black planters, charred-wood edging, burgundy heuchera and black mondo grass.
- Renter-friendly: Keep drip above gravel with quick coils; use trays under cubes to protect surfaces.
Key Design Elements:
- Main materials: Composite or metal planters, concrete pavers, pea gravel, low-voltage stake lights
- Color palette: Neutral planters (black/gray/taupe), shades of green with silver or burgundy accents
- Lighting strategy: Back-row uplights for depth, subtle glow at ground level
- Furniture silhouettes: Square cubes with identical proportions; optional low bench along one side
- Texture layers: Smooth planter faces, gritty gravel, varied foliage shapes—strappy, round, feathery
- Accent details: Minimal metal labels, a single sculptural boulder, sleek watering wand
How To Recreate This Look:
- Start with the footprint: Lay large pavers in a grid with even spacing; fill gaps with pea gravel for the “exhibit floor.”
- Add irrigation: Run a drip line under gravel with T-connectors popping up at cube locations.
- Layer planters: Place identical cubes; fill with high-quality soil and choose foliage plants with contrasting shapes.
- Install lighting: Add stake uplights behind taller forms; keep wiring hidden in gravel channels.
- Style with intention: Add one accent—a single modern birdbath or orb—to avoid visual noise.
Why This Looks Expensive: repetition and negative space—interior designers use both constantly. Your eye can rest, which screams luxury.
Common Mistakes To Avoid: mixing planter sizes within the grid will kill the graphic effect. Keep heights similar, vary only plant form.
Pro Styling Tip: Shoot overhead at an angle to catch the linear paver seams and the foliage geometry—instant magazine spread energy.
Want something softer, more romantic, but still structured? Let’s talk tiered cottage, scaled for tiny yards without the clutter.
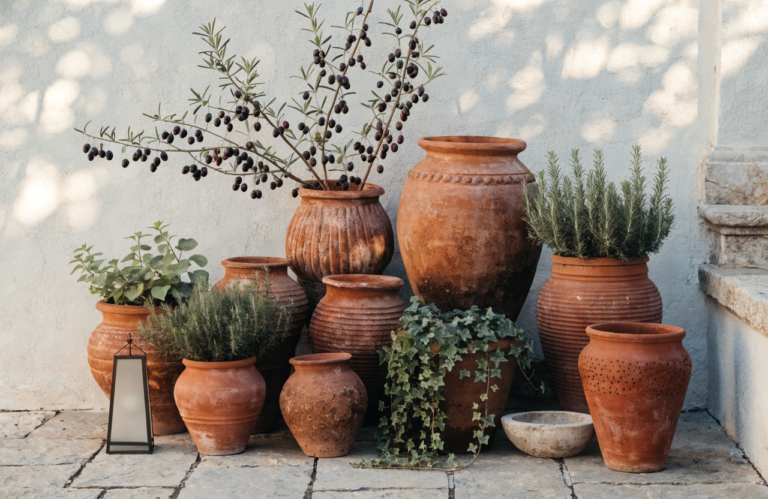
5. Tiered Cottage Terrace With Brick Edging And Lavender Drift
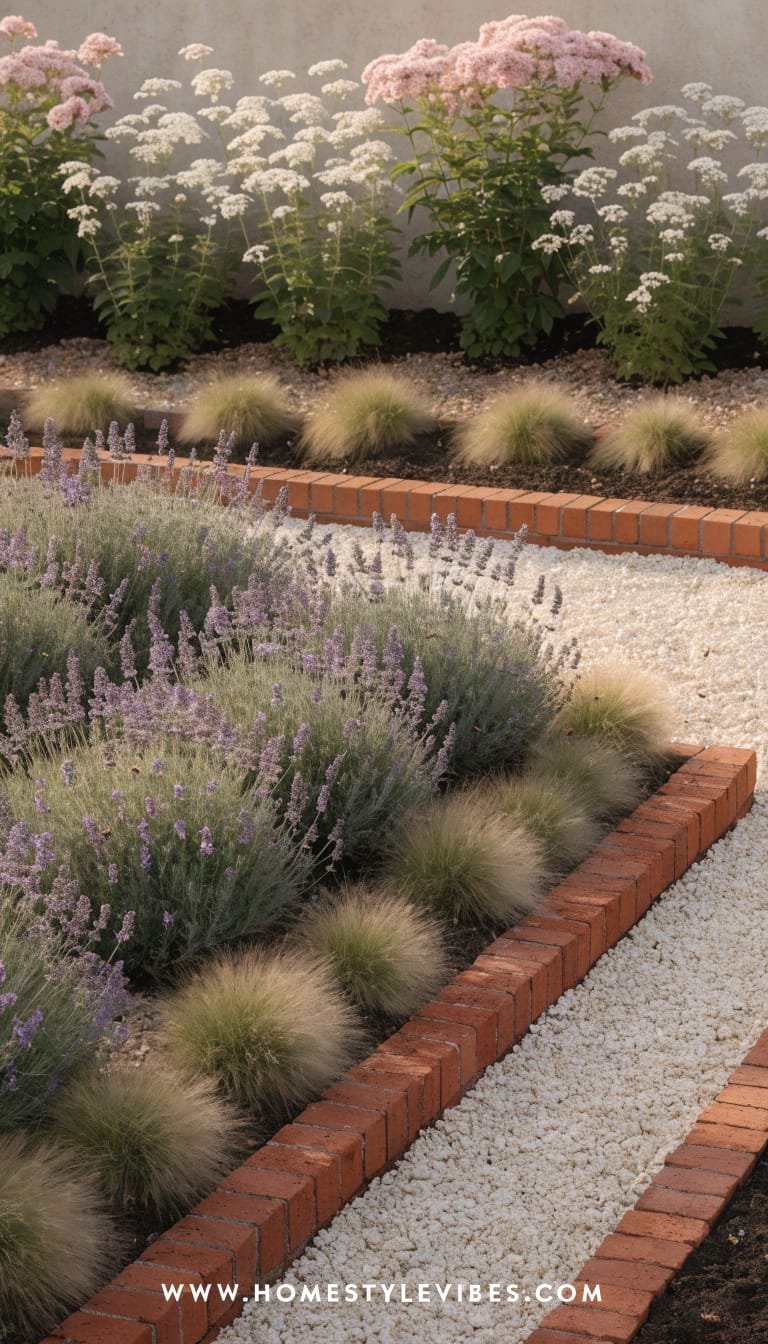
You’ve planted “a few” perennials before and ended up with a hodgepodge—different heights, random blooms, and bare patches by July. This design gives your small backyard a layered, storybook slope using low terraces (even on flat yards) with brick edging, a crushed stone path, and a romantic drift of lavender and soft grasses. The mood: modern cottage—relaxed yet orderly, scented, humming with pollinators.
Why it works in real homes: fake a terrace with two low planting beds framed by brick soldier course edging. The slightly raised beds create drama and tidy boundaries; a central path makes maintenance a breeze. Lighting: warm spike lights angled at the middle terrace to graze textures, plus a couple of lanterns on brick corners. Easy-care Mediterranean plants handle heat and drought, which keeps it sustainable and less fussy.
Why It Looks Expensive: brick edges—especially reclaimed or tumbled—give instant heritage vibes. Pair that with restrained planting: repeat lavender, nepeta, and feather grasses with a sprinkling of white roses for a tonal, elegant palette. It photographs beautifully: dusty purple against muted brick, silvery foliage catching evening light, and grainy stone path for texture-on-texture perfection.
Materials: tumbled brick, decomposed granite or crushed stone, landscape timbers or steel edging behind brick, and limewashed terracotta pots. Variations:
- Budget-friendly: Use salvaged brick and compacted crushed concrete; propagate lavender from cuttings.
- Small-space: One raised bed along a fence with a narrow path in front; keep plant selection tight and repetitive.
- Darker version: Deep wine-colored penstemon and dark-stemmed grasses with pale dusty miller for contrast.
- Renter-friendly: Brick-on-sand edging (no mortar) and movable trough planters staged as a “terrace.”
Key Design Elements:
- Main materials: Tumbled brick, decomposed granite, steel or timber edging, terracotta
- Color palette: Muted brick red, gray stone, lavender/soft purple, silvery green foliage
- Lighting strategy: Angled spike lights for graze, lanterns at corners, soft path glow
- Furniture silhouettes: A slender wood bench or wrought iron loveseat at the path’s end
- Texture layers: Brick crumb, gritty path, airy grasses, velvety lavender flower spikes
- Accent details: A vintage watering can, zinc plant labels, small birdbath
How To Recreate This Look:
- Start with edges: Set a soldier course of brick along two parallel beds; stabilize with hidden steel or mortar as needed.
- Add paths and fill: Lay landscape fabric, pour decomposed granite or crushed stone, and compact thoroughly.
- Layer plants: Back row taller (grasses), mid row lavender/nepeta, front row creeping thyme for a scented border.
- Install lighting: Place spike lights angled to skim across lavender at dusk; wire discreetly under the path gravel.
- Style the scene: Place a slender bench at path’s end, add one sculptural pot, and resist over-decorating.
Why This Looks Expensive: continuity—brick repeats, plant forms repeat, and the path ties the scene into a single vignette. It whispers curated, not chaotic.
Common Mistakes To Avoid: mixing bright reds, yellows, and purples together muddies the mood. Keep a tight color story for calm and cohesion.
Pro Styling Tip: Shoot just before sunset when the lavender turns luminous and the path reads golden; kneel to let grasses frame the foreground for depth.
Prefer crisp, contemporary lines and a built-in bench you’ll actually use? Meet the mini sunken lounge that turns tiny square footage into a sculptural moment.
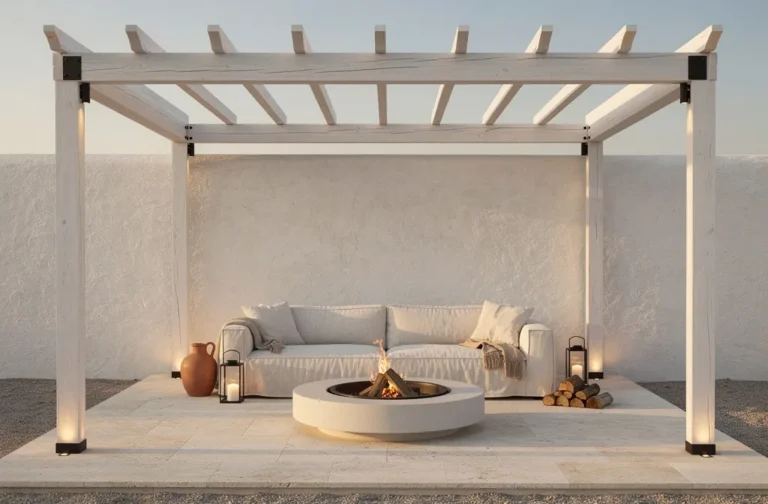
6. Mini Sunken Lounge With Corten Edge Planters And Lantern Glow
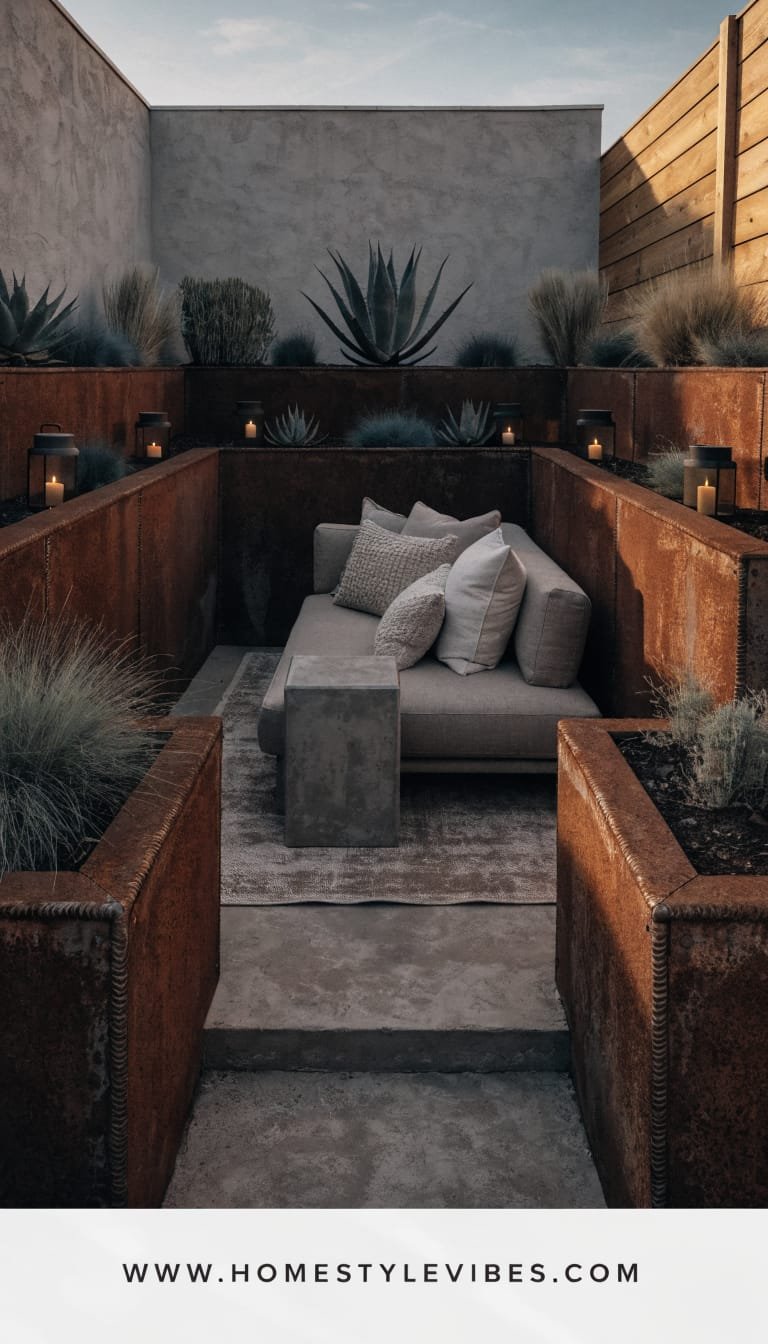
You’ve got a flat patch of pavers that never feels intimate. You’ve added a rug, maybe a lantern or two, but it still reads “leftover patio.” This concept carves out a sunken lounge feel—even if you don’t dig—by dropping the visual plane. How? A raised perimeter of corten steel edge planters surrounds a slightly lower seating pad, creating an architectural “well” of calm. The mood: modern desert-meets-urban rooftop. Cozy, sculptural, and wildly photogenic.
Why it works in real homes: small yards crave dimension. By raising the border 12–18 inches with slim corten planters and “sinking” the center with a step down or a different ground material, you gain privacy and shelter from wind without building walls. Lighting casts a sensual glow: lanterns on the planter rims, indirect strip lights under the bench lip, and a small tabletop fire bowl. Plant palette: drought-tolerant textural stars—blue fescue, sedum, aloe (or cold-hardy lookalikes), and a statement grass.
Why It Looks Expensive: corten patina plus strict geometry equals designer catnip. Add a low, built-in bench with chunky outdoor cushions in sand and ecru, plus a round coffee table in smooth concrete—instant boutique-lounge vibes. Photographs slam-dunk: warm rust tones against cool concrete, layered heights, and the glow of flames reflecting on steel edges.
Variations:
- Budget-friendly: Rust-effect paint on galvanized edging with plywood-faced planters; faux-concrete table.
- Small-space: Three planters making a U-shape around a 5×6 ft pad; lightweight modular bench.
- Darker version: Black-stained bench, charcoal cushions, midnight blue throw for moody evenings.
- Renter-friendly: Freestanding planters arranged in a U; outdoor rug to “sink” the center visually.
Key Design Elements:
- Main materials: Corten steel planters, smooth concrete or stone pavers, timber bench, performance cushions
- Color palette: Rust, sand, ecru, sage, charcoal accents
- Lighting strategy: Lanterns on rims, LED strip under bench, small fire bowl
- Furniture silhouettes: Low bench with thick cushions, round coffee table, one sculptural stool
- Texture layers: Patina steel, smooth concrete, nubby cushions, waxy succulents, feathery grasses
- Accent details: Minimalist watering can, smoked glass tumblers, stone coasters
How To Recreate This Look:
- Start with the boundary: Arrange corten planters in a U-shape around your chosen zone; ensure even spacing.
- Add the “sunken” pad: If you can’t dig, simply switch to a darker paver or outdoor rug inside the U to create contrast and a perceived drop.
- Layer seating: Build or place a low bench along the back; add dense, neutral cushions for that lounge feel.
- Install lighting: Run LED tape under the bench front; drop two lanterns on planter rims; set a small tabletop fire bowl.
- Style with restraint: A round concrete table, one throw, and a single statement pot—done.
Why This Looks Expensive: strong geometry and limited materials. Corten’s earthy glow with concrete’s coolness screams designer balance—and it ages gracefully.
Common Mistakes To Avoid: too many accessory colors weaken the palette. Keep textiles neutral and let the patina be the hero.
Pro Styling Tip: For photos, shoot from slightly above the planter rim to exaggerate the “drop” and capture the ring of rust framing your lounge.
Why This Looks Expensive (Across All 6 Concepts)
High-end gardens aren’t stuffed; they’re edited. Repeated materials, a restrained color story, and lighting that sculpts—not blasts—create that lush, boutique feeling. These 6 cute small garden ideas work because they anchor furniture, define edges, and stack textures in ways that appeal to the eye and the camera. If you repeat one takeaway, let it be this: boundaries and lighting turn a yard into a room.
Common Mistakes To Avoid (Global)
- Over-planting with too many species—choose three plant families and repeat.
- Skipping scale—tiny pots and dainty furniture look chaotic outdoors; size up for clarity.
- Random lighting—mix temperatures look cheap. Stick to warm white and layer it low to high.
- Clashing finishes—choose one metal finish to repeat across lanterns, furniture, and hardware.
Pro Styling Tips For Magazine-Ready Photos
- Water stone and gravel lightly to deepen color and suppress dust.
- Place a soft textile (throw or napkin) to introduce a tactile cue your lens can feel.
- Shoot at golden hour; turn on every light source for layered warmth.
- Create a foreground plant blur at the frame edge for depth and an editorial vibe.
Here’s your gentle nudge: you don’t need to overhaul the whole yard to feel different at home. Pick one idea that made your shoulders drop, and start there. Maybe it’s the cedar screen that turns “blah fence” into a backdrop. Maybe it’s the checkerboard that declares, “We host here now.” Maybe you crave the sunken lounge glow that practically begs for a slow Friday night. Choose one, commit to the materials, and watch the transformation happen in a single weekend or two.
Luxury outdoors doesn’t come from spending wildly; it comes from texture, lighting, and restraint. Layer a few honest materials, repeat them with confidence, and let your plants do what they do best: soften edges, cast delicate shadows, and shift with the seasons. Your small backyard holds gorgeous treasure already—it just needs a frame. When you land on that final photo, the one that catches late sun on a lavender spike or the blush of a rose against a matte trellis, you’ll feel it. That whisper of, “Yes. This is ours.” And trust me, you’ll want to copy it again in the front yard.
About the Author

Krisztina P.Rendes, Founder of Home Style Vibes
Founder of Home Style Vibes
Krisztina Puskásné Rendes created Home Style Vibes as a cozy-modern lifestyle space where homemaking meets inspiration. Her goal is to help women create beautiful, organized, and peaceful homes they truly love — without overwhelm. You’ll find here heart-driven content on home decor, cleaning tips, easy family recipes, organization and decluttering, DIY home projects, plants, and seasonal ideas — all designed to bring more calm, comfort, and style into everyday life.