5 Wildflower Garden Ideas For A Front Yard That Looks Effortlessly Beautiful
You want a front yard that looks like golden-hour magic every day—petals catching the light, butterflies flirting with your walkway, neighbors slowing their cars just to peek. You hate how manicured lawns demand weekend hostage hours and still look… flat. Imagine a wildflower garden that feels soft and free-spirited yet intentional: grasses that sway, blooms that shift through the seasons, and textures that glow under morning sun and porch lanterns. These 5 ideas fix the “chaotic mess vs. sterile landscaping” dilemma and give you a gorgeous, low-fuss front yard in 6–10 weekends, with most designs under a $2,500 cap if you DIY smart.
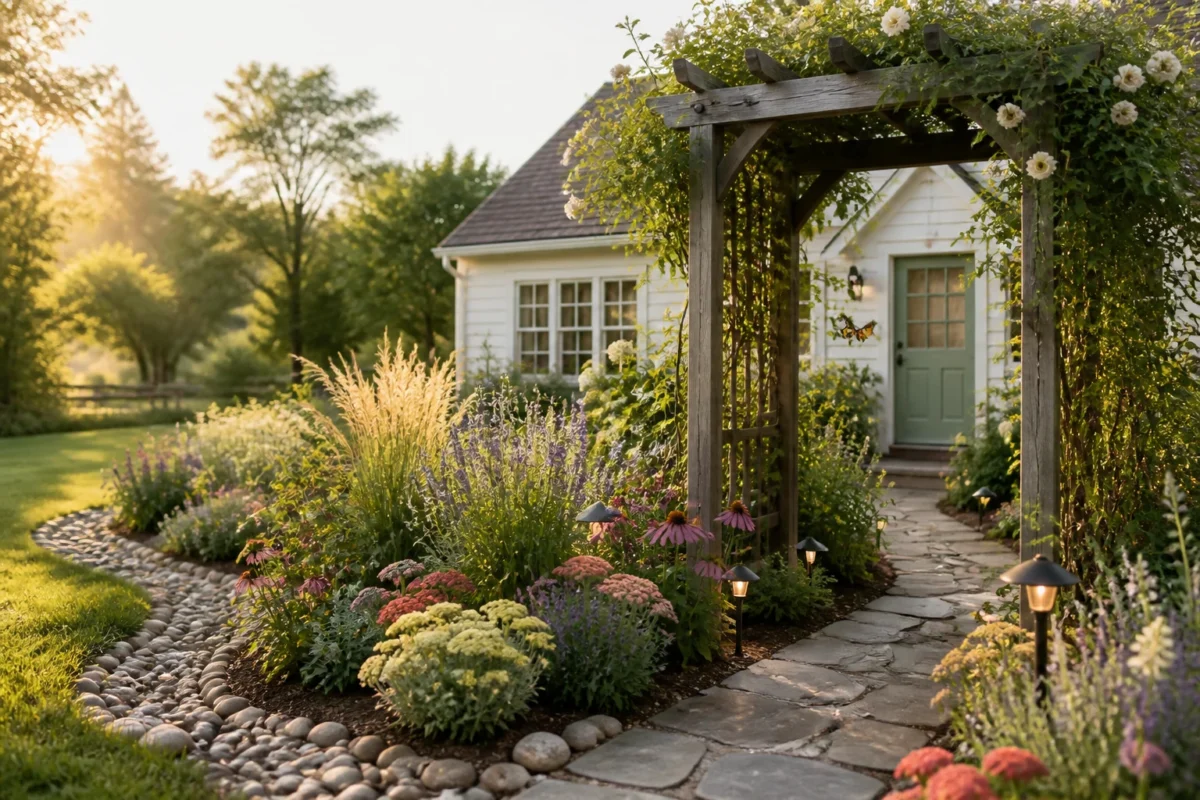
We’ll dial into color palettes, plant pairings, edges that frame the wildness, and lighting that makes your garden read like a Pinterest save instead of a roadside lot. Expect movement, layered textures, and drama that photographs beautifully. If you love natural, artsy, slightly rebellious curb appeal, these wildflower garden ideas are your love letter.
1. River-Stone Ribbon Border With Dappled Morning Light And A Weathered Cedar Arbor
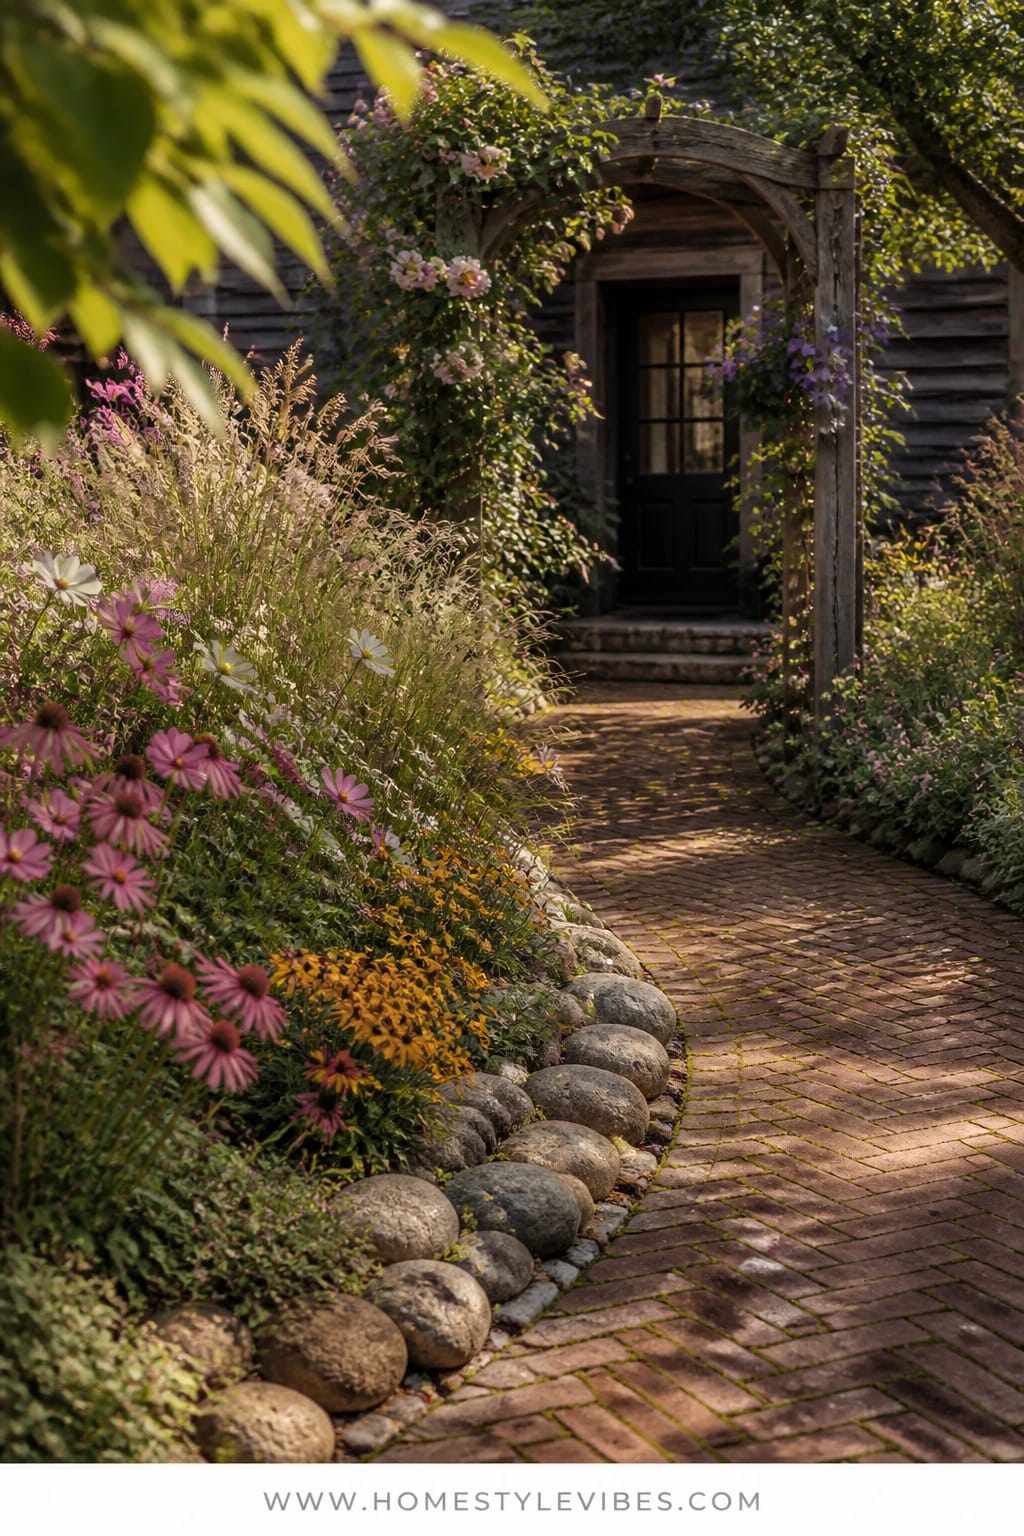
We’ve all been there: you wanted a cottagey wildflower moment, but your beds spilled over your walkway like a badly hemmed skirt. This design solves the “messy edges” problem. Think of a gentle, meandering ribbon of river stone that frames a bed of billowy wildflowers, then a weathered cedar arbor to crown your entry path. It reads like a story you can walk through—soft, romantic, and undeniably intentional. The dappled morning light filtering through your street trees turns seed heads into tiny lanterns. The arbor introduces height and ceremony; your front yard suddenly has a “front door” long before anyone reaches the actual door.
This mood leans cottage-garden meets minimalist restraint. It works in real homes because that stone ribbon is your traffic lane, your mulch catcher, your visual anchor. Maintenance gets easier since the rock border keeps stems from flopping onto the walkway. Cedar ages beautifully, taking on a silver patina that complements blues, pinks, and whites in a classic wildflower palette. Late spring to early fall, you’ll have movement from grasses, color from natives, and enough density to suppress weeds. In photos, the curving stone edge creates depth and guides the eye; the arbor adds a vertical pause so the frame never feels flat.
Variations? Budget version: skip the arbor now, install two cedar posts and a simple crossbeam; add the full arch later. Small space: tighten the curve and use 8–10 inches of stone width to keep things airy. Shadier lots: slide in woodland-friendly wildflowers like columbine, foamflower, and woodland phlox. Renter-friendly: build a freestanding arbor you can take with you, and use steel edging beneath the stone so it lifts out cleanly.
Budget Breakdown:
- River stone (1–2 tons, depending on length and width): $150–$400
- Cedar arbor kit or DIY lumber: $180–$600
- Native wildflower seed mix (front-yard blend): $35–$120
- Gravel base and landscape fabric for stone border: $60–$140
- Low-voltage path lights (4–6 fixtures): $120–$350
- Compost/topsoil to improve seed bed: $80–$200
Total Estimated Cost: $625 – $1,810
Best For: Traditional or craftsman facades that want softness without chaos. Works especially well on east-facing yards where morning light brings the sparkle.
Key Design Elements:
- Main materials: river stone, weathered cedar, compost-rich soil
- Color palette: blush pinks, cornflower blues, buttercream yellows, soft white
- Lighting strategy: warm 2700K path lights to graze the stone and kiss the arbor inside edge
- Furniture silhouettes: the arbor as architecture; optional narrow garden bench in cedar
- Texture layers: feathery yarrow, black-eyed Susan, prairie dropseed, salvias
- Accent details: iron house numbers on the arbor post; a jute door mat that echoes the stone
How To Recreate This Look:
- Start with a gentle S-curve layout for the border; mark it with a hose until it feels natural.
- Add a compacted gravel base, then lay a breathable landscape fabric just under the stone path edge to keep it tidy.
- Pour river stone to an 8–12 inch width; keep edges level and consistent for a finished line.
- Install the cedar arbor over the walkway; bury posts at proper depth with concrete for stability.
- Prepare soil with 2–3 inches of compost, rake smooth, then broadcast wildflower seed per package rate; press in, don’t bury.
- Place path lights slightly inside the stone ribbon so light grazes across the rocks and hits seed heads at an angle.
- Water gently until germination; then water deeply but less often to encourage strong roots.
Why This Looks Expensive: The stone line is clean and sinuous, reading as custom hardscaping. The arbor adds a classic “entry moment,” and the lighting feels curated, not big-boxy. Your eye catches the curve, then the height, then the dancing blooms—layered storytelling always reads high-end.
Watch Out: Don’t over-seed. Too-dense sowing leads to flopping and mildew. Also, avoid glossy white LED path lights; they flatten texture and make the stone look cheap.
Pro Styling Tip: For photos, shoot when sun is low and behind the arbor; let the stone catch side light and the blooms glow from within.
2. Corten Steel Edge Sweep With Sunset-Gold Glow And A Sculptural Birdbath
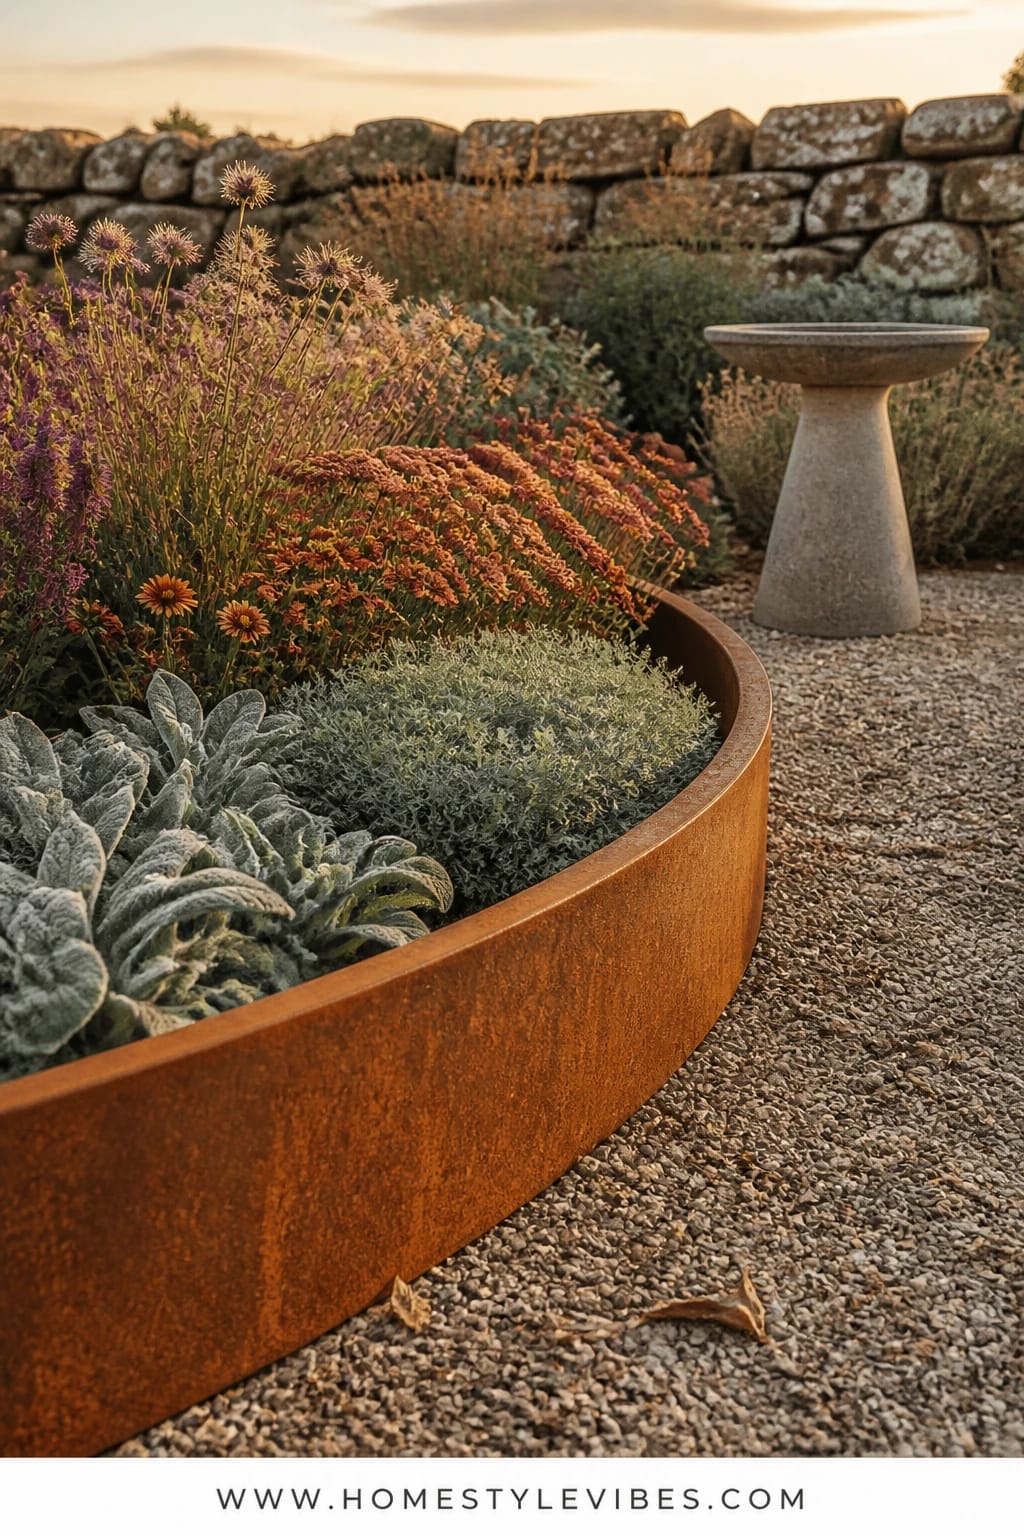
It’s that one corner that always feels off—your front bed looks like a random plant salad. You’ve tried buying another tray of blooms, but it still reads scattered. Enter a bold Corten steel edge that sweeps in one confident arc, catching the light as it develops a rich rust patina. Pair it with a sculptural birdbath in stone or cast concrete and plant in broad color drifts—think smoky mauves, terra-cotta oranges, and silvery greens. When the sun drops, the whole scene warms up like a desert painting.
This garden skews modern Mediterranean meets prairiescape—easy to maintain, friendly to pollinators, and very “architect’s front yard.” Corten edge gives discipline to the wildness; it makes photos crisp because the patina reads as a matte line with depth. Massing plants by color and height keeps the scene from going chaotic. And because you’re leaning into native and drought-tolerant mixes, summer maintenance is mostly admiring and occasional deadheading.
Small front yards benefit from the steel curve—it tricks the eye into seeing more dimension. Sloped lots? Even better; the steel holds grade while creating drama. Renter-friendly version: use thin steel planters or modular metal edging sections that lift out later; place a portable bowl birdbath instead of a heavy pedestal. Budget version: skip custom Corten for edging paint on cheaper steel; it won’t age as beautifully, but the line still reads strong.
Budget Breakdown:
- Corten steel edging (20–40 linear feet): $220–$650
- Sculptural birdbath (stone/cast concrete): $140–$480
- Wildflower plugs and grasses (mass plantings): $180–$520
- Low-voltage uplight for birdbath: $45–$120
- Mulch or fine gravel topdressing: $60–$160
Total Estimated Cost: $645 – $1,930
Best For: Contemporary and mid-century facades, hot afternoon exposures, and homeowners who want that strong “edited chaos” vibe.
Key Design Elements:
- Main materials: Corten steel, cast stone, fine gravel
- Color palette: terracotta, copper, dusty mauve, silvery sage, charcoal accents
- Lighting strategy: warm 2700K uplight on birdbath; subtle backlighting on grasses
- Furniture silhouettes: sculptural pedestal or wide bowl birdbath
- Texture layers: feather reed grass, Mexican feather grass, coneflower, penstemon
- Accent details: matte black house numbers, slim mailbox, gravel skirt around birdbath
How To Recreate This Look:
- Sketch one decisive arc with a garden hose from driveway to porch corner.
- Install Corten edging along that line; stake firmly and let it sit slightly proud of grade for shadow play.
- Group plants in drifts of 5–9; tallest at the back, mids to center, fillers and fine textures near the front.
- Set the birdbath at the curve’s focal point; ensure it’s level with a compacted base.
- Topdress exposed soil with fine gravel or shredded bark for a clean finish and moisture retention.
- Place an uplight angled to graze the birdbath bowl and catch nearby seed heads.
Why This Feels Designer: One sweeping move, one sculptural object, and disciplined color masses. Designers reduce visual noise; this setup does exactly that while keeping the garden alive and dynamic.
One Thing To Avoid: Don’t pepper in one-of-everything plants. Repetition is your friend. If you love a bloom, buy more of it and let the volume create rhythm.
Pro Styling Tip: Photograph at sunset from a low angle so the Corten edge throws a crisp shadow and the birdbath’s water mirrors the sky.
If one idea resonates more than the others, that’s your starting point. You don’t need to do everything today. Pick the one move that solves your biggest eyesore and let the rest evolve through the seasons.
3. Limewashed Brick Edge With Soft Overcast Light And A Vintage-Style Bench
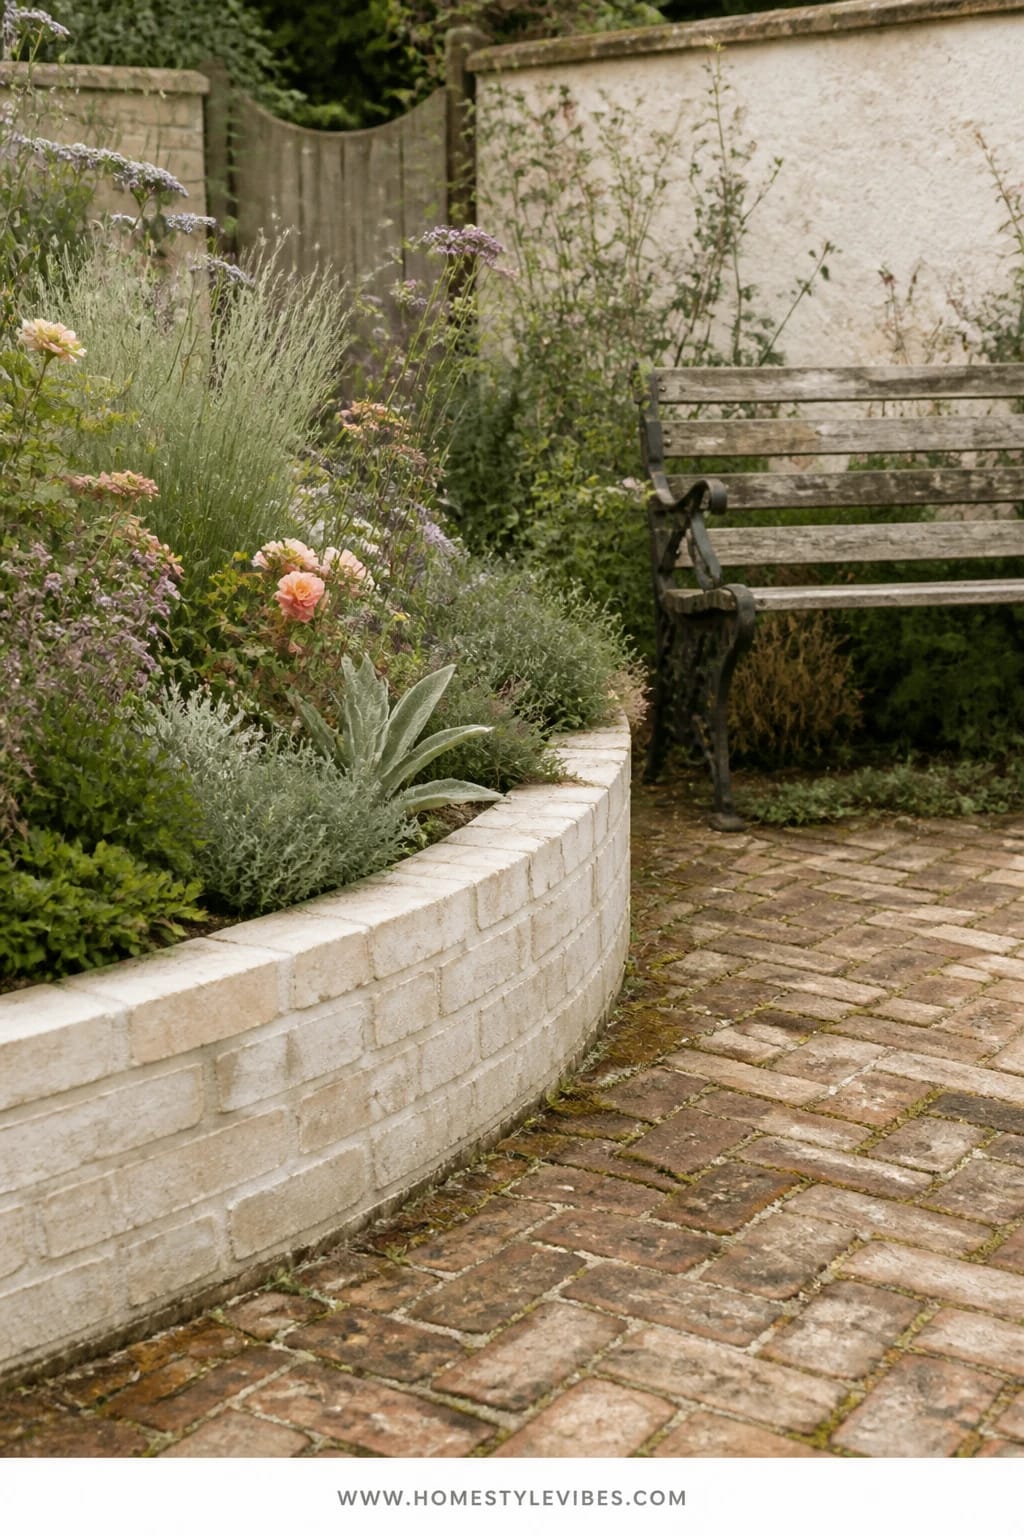
You love the romance of old English lanes, but your front yard still looks like a patchwork quilt that never quite matches. The fix: a low limewashed brick edge that whispers “heritage” without shouting. Pair it with a vintage-style metal or wood bench tucked just inside your garden curve. Overcast light makes this palette sing—muted blushes, apricot, lavender, and plenty of textured greens. The bench becomes the reason to pause; your front yard becomes a place to exist, not just pass through.
This mood is cozy European-cottage with a hint of Southern charm. It boosts resale because it looks timeless and upscale while staying low maintenance. Limewash softens new brick into a lived-in texture that photographs like a dream; even a cloudy day makes those velvety tones feel editorial. Why it works: the edge organizes the meadowy mix, the bench anchors the eye, and the color story feels calm, not chaotic.
On smaller lots, keep the bench narrow and the edge one brick tall. Renter-friendly? Use limewash on salvaged pavers in a freestanding curve you can move. Darker-house facades benefit from the pale limewash—it’s contrast in the best way. On a personal note: I tried a limewashed edge at my own last house after getting tired of mulch creeping across the sidewalk every storm. Honestly, I couldn’t believe the difference; everything looked intentional overnight, and my mail carrier stopped to compliment “the landscaping team.” It was me. In slippers.
Key Design Elements:
- Main materials: limewashed brick, decomposed granite or soil mound, perennial wildflowers
- Color palette: blush, lavender, apricot, creamy whites, sage and olive greens
- Lighting strategy: soft sconces at porch, one path light near bench foot
- Furniture silhouettes: slender slatted bench or curved-back bistro bench
- Texture layers: catmint, foxglove, cosmos, coreopsis, little bluestem
- Accent details: antique-look watering can, small terracotta cluster near bench
Budget Breakdown:
- Salvaged brick or new brick: $180–$520
- Limewash (powder or premix): $35–$90
- Bench (metal or wood): $120–$450
- Wildflower seed/plugs: $120–$380
- Minimal lighting (2–3 fixtures): $80–$220
- Soil/compost amendment: $80–$150
Total Estimated Cost: $615 – $1,810
Best For: Cottages, bungalows, and any home with a traditional or farmhouse façade; four-season climates with spring-fall bloom windows.
How To Recreate This Look:
- Dry-lay your brick edge one course high; curve gently to frame a planting bed that relates to your porch width.
- Mix limewash with water to yogurt consistency; brush onto brick and wipe irregularly for an aged patina.
- Prepare soil with compost; grade slightly higher than the walkway so blooms sit proud and visible.
- Plant in loose color bands: tall spires at back, airy fillers mid, tumbling daisies and cosmos front.
- Place bench just inside the curve with a small gravel pad to keep legs level and clean.
- Add one discreet path light to silhouette the bench at dusk.
Why This Reads High-End: The limewashed brick looks bespoke and storied, the bench signals lifestyle (not just landscaping), and the muted palette whispers sophistication. Nothing shouts, which is exactly why it looks expensive.
The Most Common Mistake: Over-limewashing. If you cover every brick perfectly, it reads “painted.” The charm comes from irregularity—let hints of brick peek through.
Pro Styling Tip: For photos, toss a neutral throw on the bench and shoot on an overcast morning; soft light equals creamy petals and zero harsh shadows.
Remember, this isn’t about recreating a showroom. It’s about shaping a front yard that reflects your pace, your climate, and your porch coffee ritual. If perfection keeps you frozen, choose one edge detail and one focal object—everything else can evolve.
4. Crushed Gravel Meander With Golden-Hour Backlight And A Black Metal Trellis
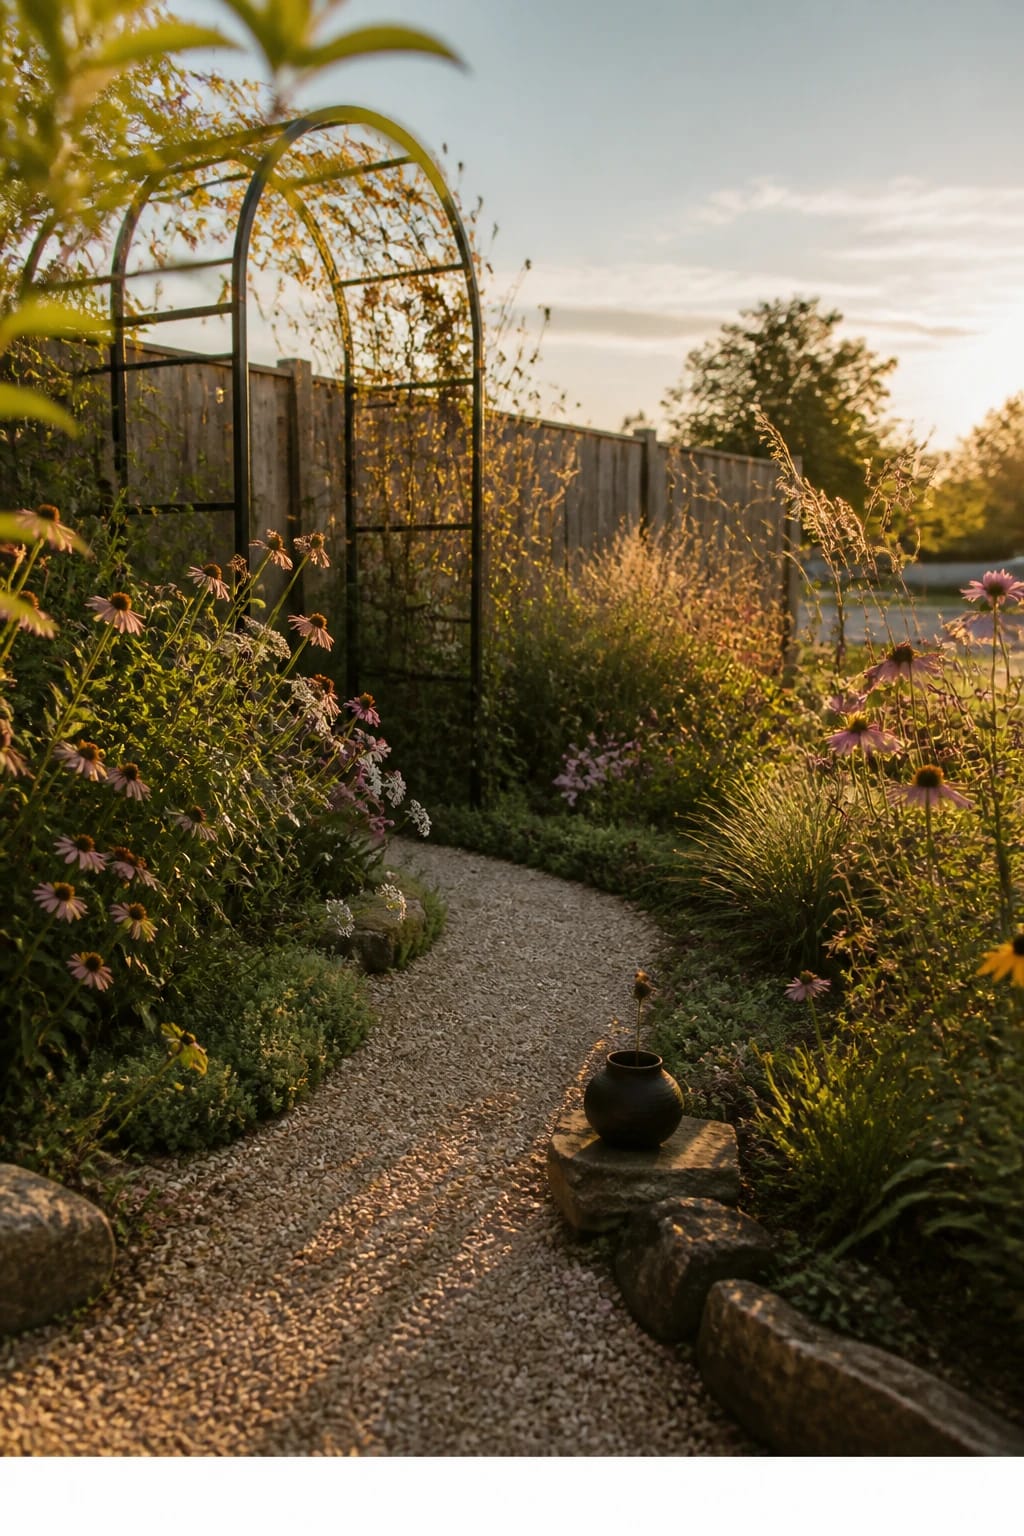
You want that effortless wildflower garden path that feels like a secret you’re letting your friends in on. But your last attempt at a walkway turned into a muddy track with weeds photobombing every shot. Let’s do it differently: a crushed gravel meander that cuts softly through a tall wildflower mix, anchored by a matte black metal trellis near the curb. When the sun sits behind the trellis, silhouettes and seed heads put on a shadow show. It’s part European courtyard, part meadow, all front-yard charisma.
This design works in real homes because gravel is forgiving, affordable, and low-maintenance when installed with the right base and edging. A black trellis reads architectural and pulls the eye up; even small façades suddenly feel grand. For small spaces, the meander can be a single gentle bend; in larger yards, two subtle curves make it feel like a destination. Maintenance stays sane: occasional raking, top-up gravel every couple of years, and simple deadheading for tidiness near the path.
Variations: Budget-friendly? Use steel landscape edging and local quarry fines for the path. Renter-friendly? Lay down woven fabric under the gravel so you can pull it up later. Shade-tolerant? Shift to woodland wildflowers and mossy edges. A darker version with wine-red echinacea and deep purple salvia adds drama against the black trellis for modern homes.
Key Design Elements:
- Main materials: crushed gravel (quarter-minus), black powder-coated trellis, steel edging
- Color palette: warm neutrals for hardscape, jewel-toned blooms—magenta, goldenrod, violet
- Lighting strategy: low path lights tucked behind grass clumps to backlight feathery textures
- Furniture silhouettes: trellis as vertical fixture; optional narrow bistro chair near porch end
- Texture layers: switchgrass, salvia, echinacea, veronicastrum, airy chamomile edges
- Accent details: a slim black mailbox or house number plaque to echo the trellis
Budget Breakdown:
- Crushed gravel and base rock: $200–$600
- Steel or aluminum edging: $90–$220
- Black metal trellis: $120–$380
- Wildflower plugs/seeds: $150–$450
- Low-voltage or solar path lights (4–6): $90–$260
Total Estimated Cost: $650 – $1,910
Best For: Bungalows, modern farmhouses, and townhomes that need drama without bulk; perfect if you host dusk hangouts on the porch.
How To Recreate This Look:
- Lay out the path with a rope; keep width at 36–42 inches for comfortable passing.
- Excavate 3–4 inches, add 2 inches of compacted base rock, then 1–2 inches of quarter-minus gravel.
- Install edging to hold the meander crisp; a clean line makes the wildflowers feel artful, not messy.
- Set the trellis at a visual pivot—near the street or at a path bend; anchor deeply for wind.
- Plant taller grasses and blooms just off the path edge to create that “brushing your hand as you walk” moment.
- Place path lights behind airy grasses so the light skims through like sparks at dusk.
Why This Looks Intentional: Contrast sells it. Fine gravel next to soft foliage, black trellis against bright petals, lit path with drifting shadows—it’s a choreography of opposites that reads designed, not accidental.
Don’t Do This: Skip pea gravel for the main path; it rolls underfoot and migrates into garden beds. Quarter-minus compacts better and stays put.
Pro Styling Tip: Sweep the path before photographing so the gravel looks crisp; then angle your shot so sunlight sits behind the trellis for that cinematic halo.
5. Split-Rail Frame With Soft Dawn Light And A Handcrafted Cedar Mailbox
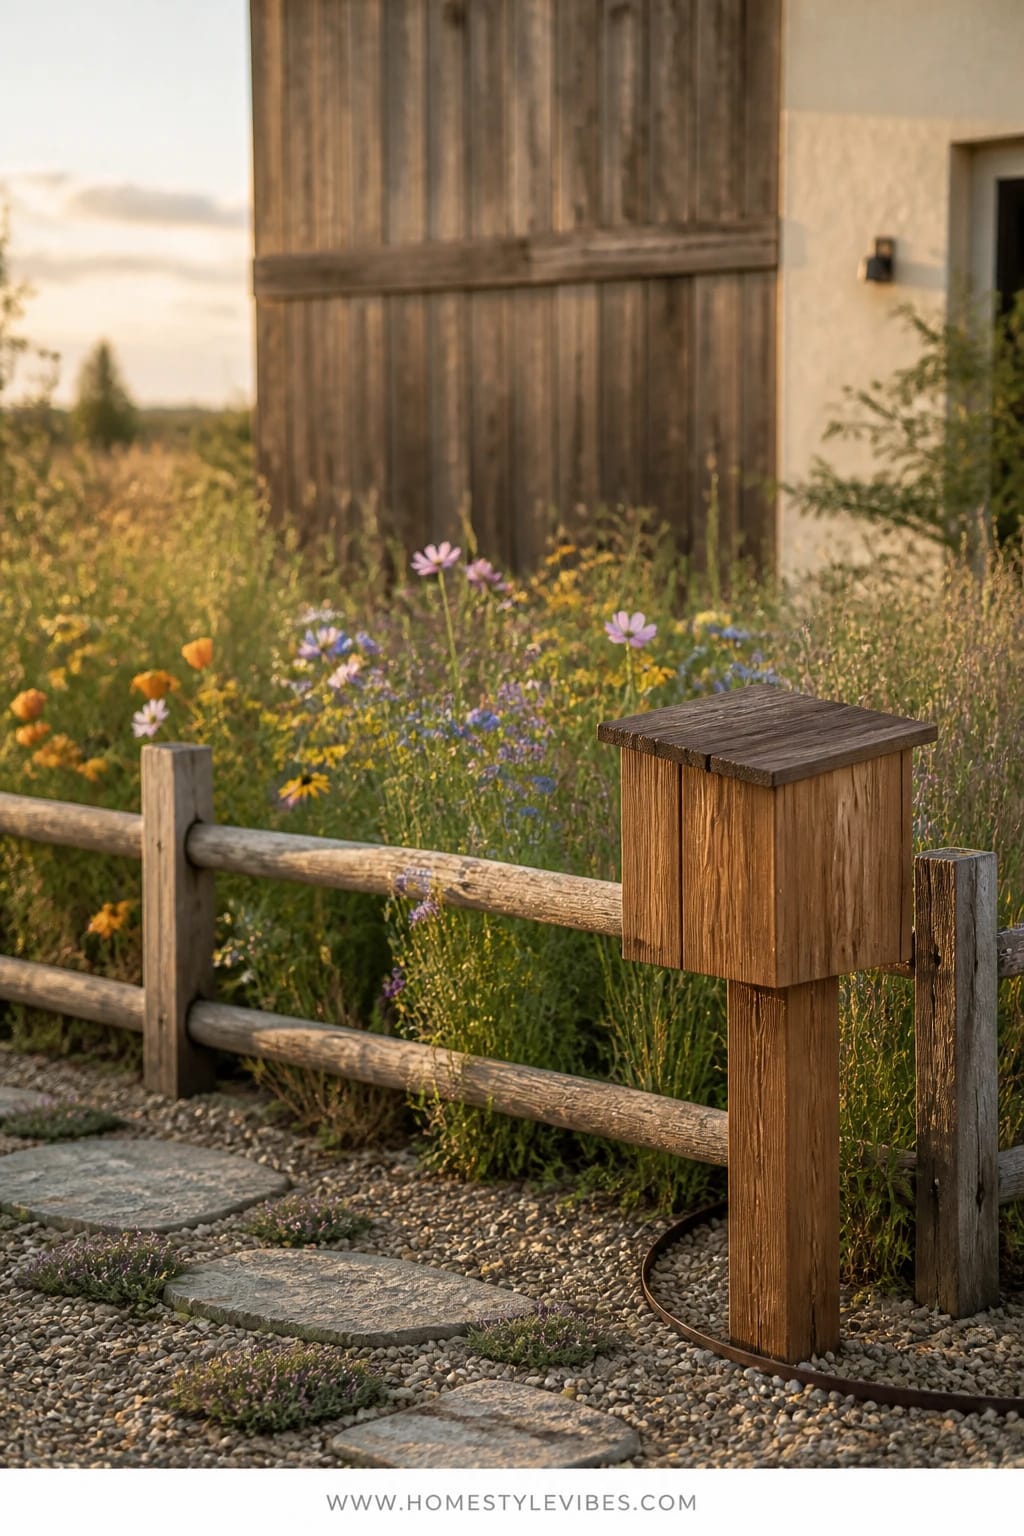
You want your front yard to whisper “country lane” but your HOA or city vibe is more “neatly clipped.” Here’s the balance: a low split-rail fence that outlines your wildflower patch and a handcrafted cedar mailbox as the hero piece by the curb. Soft dawn light slides across the rails and catches dew on petals; the fence says, “This is intentional,” and the mailbox becomes the jewelry. You get cottage energy with a clean perimeter—neighbors stay happy, pollinators stay happier.
This feels modern rustic—grounded, warm, a little nostalgic. It’s great for families because kids can follow the rails like a boundary. Resale loves it: fencing equals structure, and a beautiful mailbox reads like a considerate detail. Photographically, rails add perspective lines; they lead the eye through blooms to your house, creating depth in every shot.
Variations include a dark-stained fence for high-contrast façades or leaving the rails natural to gray out over time. Small-lot version: use a single-rail border with wire mesh inside to keep pets out of the flowers. Renter-friendly: prefabricated short sections staked rather than set in concrete, and a removable post-mount mailbox you can take when you move.
Budget Breakdown:
- Split-rail fence (30–50 linear feet): $250–$700
- Handcrafted cedar mailbox or high-quality wood/metal hybrid: $160–$520
- Wildflower seed mix (regional native blend): $80–$240
- Drip line or soaker hoses: $60–$150
- Accent boulders or stump stools at entry: $80–$240
- Warm-white spotlight on mailbox: $45–$120
Total Estimated Cost: $675 – $1,970
Best For: Ranch homes, farmhouses, or any property craving softness with clear boundaries. Ideal for morning people—dawn light makes it sparkle.
Key Design Elements:
- Main materials: cedar, rustic split-rail, native perennials
- Color palette: coral, sunny yellow, soft white, denim blue, warm woods
- Lighting strategy: one spotlight on mailbox, low grazing light along first rail
- Furniture silhouettes: mailbox as functional sculpture; optional low stump seat near entry
- Texture layers: rudbeckia, bee balm, asters, little bluestem, prairie smoke if available
- Accent details: house numbers carved or metal-clad on the mailbox; a shallow gravel pad at gate opening
How To Recreate This Look:
- Outline the bed with stakes and string; keep curves broad for a relaxed, country feel.
- Set split-rail posts at corners and every 6–8 feet; ensure top rails sit level to the street.
- Install mailbox on a cedar post with a concrete footing; angle it slightly toward the sidewalk for visibility.
- Prepare soil and sow a regional native mix; add a few larger perennials as anchors by the entry gap.
- Lay soaker hoses in a loop and cover lightly with mulch to hold moisture the first season.
- Place one warm spotlight angled to graze across the mailbox face and the first rail at dawn/dusk.
Why This Looks Expensive: Craft matters. A well-built mailbox with thoughtful lighting reads custom; the fence frames your meadow like a landscape painting. The restraint—one standout object, one tidy frame—feels curated.
Watch Out: Don’t crowd the mailbox base. Leave 12–18 inches of clean gravel or low groundcover so maintenance stays easy and the feature stays legible.
Pro Styling Tip: Photograph from slightly above eye level to let the rails draw diagonals across your frame; include a sliver of sky for scale and freshness.
Honest moment: wildflower gardens ask for patience. The first year is leafy, the second gets exciting, the third looks like you hired a landscape architect. I had a friend who spent weeks agonizing over bloom colors before realizing the real issue was edge definition—once she added a simple border, everything clicked.
Quick Checklist
- Choose one edge strategy: stone, steel, brick, gravel, or split-rail
- Pick a single focal object: arbor, birdbath, bench, trellis, or mailbox
- Commit to a tight color palette with 3–4 bloom hues
- Mass plants in drifts for rhythm and calm
- Install warm 2700K lighting to graze edges and backlight textures
- Use regional native seeds or plugs for resilience and pollinators
- Prep soil with compost; press seeds in, don’t bury
- Plan for year 1 establishment, year 2 structure, year 3 fullness
- Leave clean negative space at paths and features
- Photograph at golden hour or overcast mornings for creamy tones
Frequently Asked Questions
How much should I budget for a front-yard wildflower garden if I DIY?
Most of the designs here land between $600 and $2,000 depending on materials and size. Seeds cost far less than plugs; edges and focal pieces set the price. Start with one strong edge and a single hero object, then add plants in phases.
I’m nervous my yard will look messy. How do I keep a wildflower garden looking intentional?
Frame the chaos. Use a clear border (stone, steel, brick, or fence), repeat plants in drifts, and keep 12 inches of tidy space along paths and features. One tall focal piece—an arbor, trellis, or mailbox—adds structure and signals design, not neglect.
My front yard is tiny. Can these ideas still work?
Yes. Scale down the edge width, choose one gentle curve, and keep plant heights between 12 and 30 inches so the space feels open. Use a small but striking focal—like a slim trellis or compact bench—and repeat just two or three plant varieties for calm.
What about maintenance—will I be weeding all summer?
Not if you prep well. Improve soil, sow densely enough to cover ground by midseason, and mulch path and edge zones. Water deeply during establishment and deadhead near walkways for tidiness. Native mixes reduce fuss after the first year.
I rent my home. What can I do that’s reversible?
Use modular edging, freestanding arbors or trellises, and containerized or raised beds for your wildflowers. Lay down landscape fabric under gravel paths so you can lift materials later. Choose portable focal pieces like a birdbath or mailbox sleeve.
Conclusion
Pick one idea and move. Maybe it’s the river-stone ribbon that finally gives your blooms a frame, or the black trellis that adds a moody silhouette at dusk. Once you have a clear edge and a single focal point, everything else falls into place—seriously, this is the part that makes the biggest visual difference.
The truth is, luxury curb appeal isn’t about rare plants. It’s texture + lighting + restraint. Matte next to gloss. Soft petals against crisp edges. Warm 2700K glow skimming grasses at twilight. Edit hard, then let the garden do what it does best: move, change, and surprise you.
You don’t need a landscaping crew. You need a Saturday, a shovel, and a point of view. Start where your eye gets stuck, put a frame around it, and let the wildflower garden do the talking. You’ve got this—and your front yard is about to look effortlessly beautiful every day.

About the Author

Krisztina P.Rendes, Founder of Home Style Vibes
Founder of Home Style Vibes
Krisztina Puskásné Rendes created Home Style Vibes as a cozy-modern lifestyle space where homemaking meets inspiration. Her goal is to help women create beautiful, organized, and peaceful homes they truly love — without overwhelm. You’ll find here heart-driven content on home decor, cleaning tips, easy family recipes, organization and decluttering, DIY home projects, plants, and seasonal ideas — all designed to bring more calm, comfort, and style into everyday life.