6 Christmas Kitchen Decor Ideas for Cabinets, Counters and the Island
You want a Christmas kitchen that makes cocoa taste richer and mornings feel special. But cluttered counters, busy cabinets, and a hardworking island can make holiday decor feel chaotic instead of charming. Let’s fix that. These 6 Christmas kitchen decor ideas for cabinets, counters, and the island lean into a crisp red-and-white palette with fresh greenery and a warm, cozy glow—so your kitchen looks intentional, festive, and ridiculously photogenic without getting in the way of actual cooking. We’ll keep it simple, affordable, and real-home friendly—most of these can be styled in under an hour and stay pretty through New Year’s.
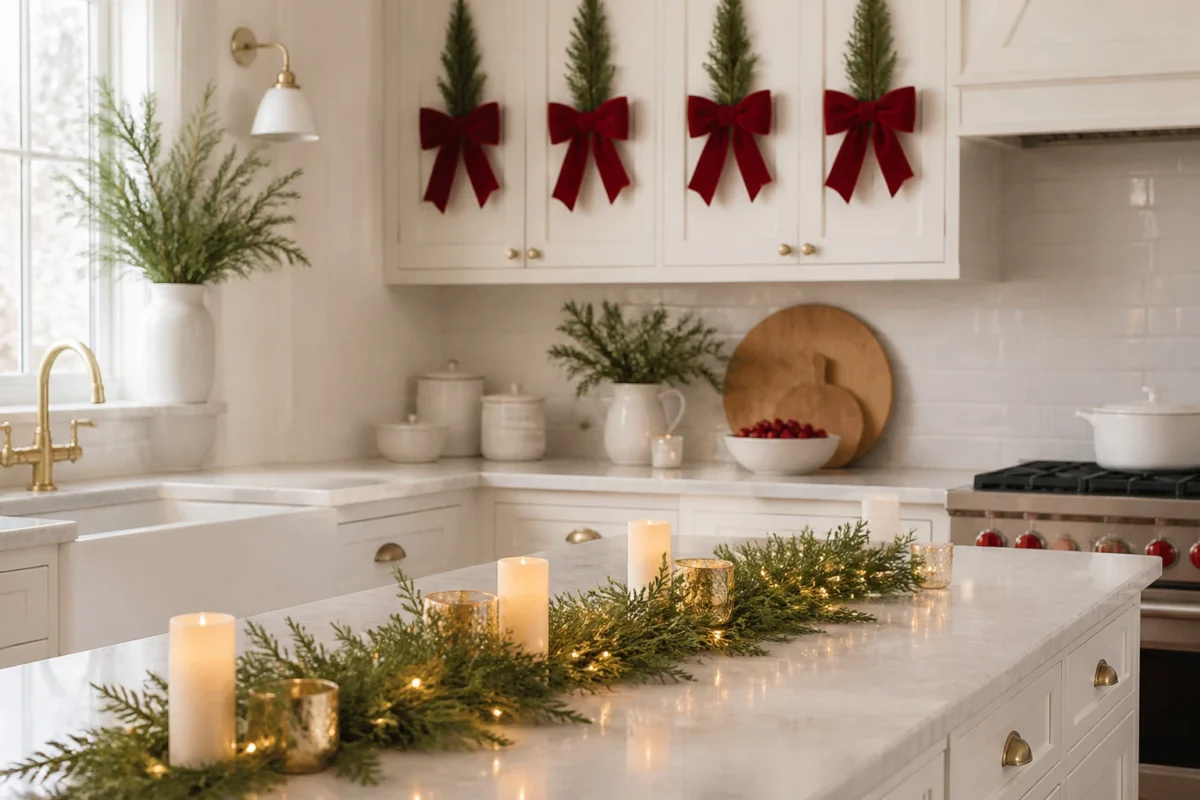
Think candy-apple red ribbon, crisp white ceramics, fresh green sprigs, warm white lights, and small details that feel classic instead of kitschy. Every idea solves a core frustration—like how to make cabinet fronts pretty without drilling, or how to style the island without eating up prep space. And yes, they’re Instagram-ready in the best way: twinkle bokeh, layered greenery, and that soft candle glow (flameless, because safety). If you love a timeless look that still feels livable, this is your kitchen’s moment. Start the weekend after Thanksgiving, enjoy it through New Year’s, and keep a few pieces into January for winter warmth.
1) Candy-Red Velvet Bows With Fresh Fir On Upper Cabinet Fronts
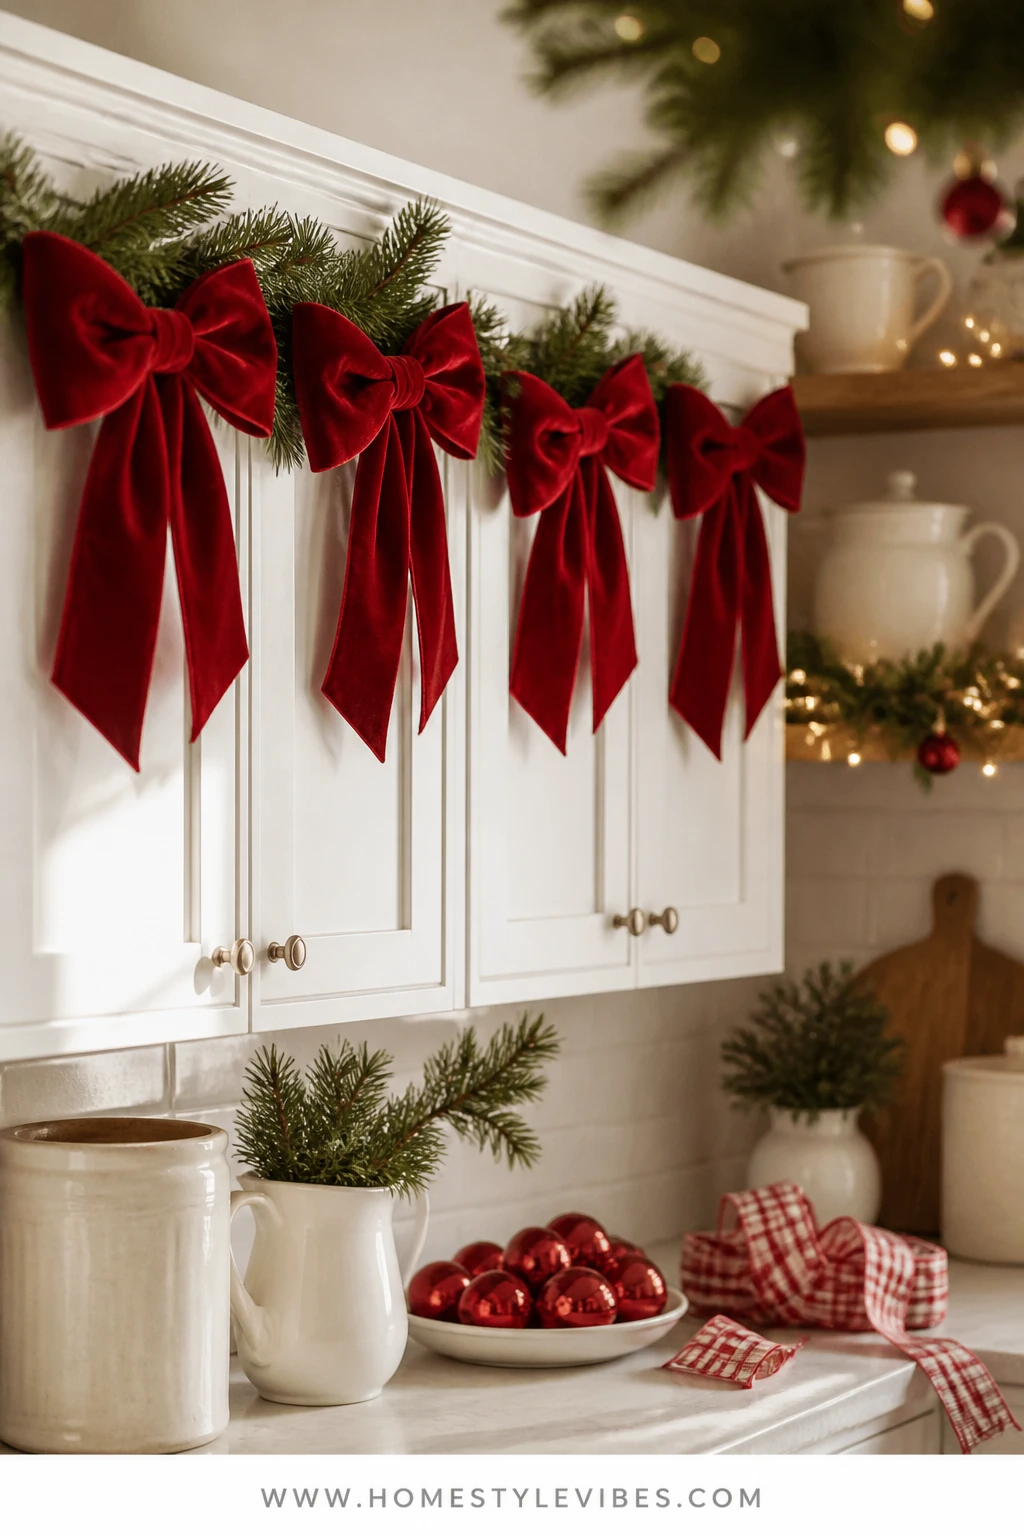
It’s that one zone that always feels off—your upper cabinets. You’ve tried wreaths and they look cluttered, or you worried about damage from hooks. We’ve all been there. Try this: ribbon-forward decor. Candy-red velvet bows anchored on clean cabinet doors with a slim line of fresh fir or cedar. The look is crisp, graphic, and classic red-and-white—instantly festive, not fussy.
This creates a tidy rhythm across your kitchen and reads beautifully in photos thanks to the color contrast against white or wood cabinetry. It’s quick to install, kid-safe, and everything stores flat. Lighting matters here: let warm white under-cabinet lights (or even a single strand tucked along the top molding) graze the greenery for a gentle glow without competing with task lighting. IMO, fresh cedar wins on scent, faux wins on staying power—choose your sanity level.
Variations? Budget-friendly: choose red grosgrain ribbon instead of velvet. Small kitchen: place bows only on the two or three most visible doors. Neutral-leaning: swap candy-red for cranberry or a red-and-white ticking stripe ribbon. Starting right after Thanksgiving makes the most of the season; swap the greenery for plain eucalyptus in January and keep the bows if you like a cheery winter nod.
Budget Breakdown:
- Velvet ribbon (2–3 spools): $12–$30
- Fresh fir/cedar bundle or faux sprigs: $10–$25
- Clear removable hooks or micro command strips: $8–$15
- Optional under-cabinet micro lights: $12–$20
Total Estimated Cost: $42 – $90
Best For: Families who want a classic Christmas kitchen look with minimal mess; works on painted, wood, or shaker cabinets where symmetry makes the bows shine.
Key Design Elements:
- Main holiday props: red velvet bows, sprigs of fir or cedar
- Color palette: candy red, crisp white, fresh green
- Lighting strategy: under-cabinet glow or a single micro light strand
- Textile and ribbon layers: velvet or grosgrain ribbon tails cut with a neat V
- Greenery and natural elements: slender, low-profile cedar for clean lines
- Accent details: tiny silver bells tied into the knot if you want a gentle jingle
How To Recreate This Look:
- Start with clean, dry cabinet doors; map out which doors will get bows to keep spacing even.
- Add a clear removable hook inside the top interior edge of each chosen door.
- Layer a 10–12 inch sprig of cedar or fir behind a pre-tied velvet bow; secure with floral wire.
- Place the ribbon over the door so the bow sits level with the top rail; hook the looped end inside.
- Style with tidy ribbon tails, trimming ends with a V to prevent fraying; add tiny bells if desired.
Why This Looks Expensive: The velvet’s matte richness, repeated across multiple doors, reads tailored and intentional, like a boutique bakery at Christmas.
Watch Out: Don’t overload each door with thick garlands; keep greenery minimal. Heavy pieces strain hooks and look bulky fast.
Pro Styling Tip: For photos, turn on only under-cabinet lights and nearby tree lights—this softens shadows and makes the red ribbon pop with creamy bokeh.
2) White Ceramic Houses And Warm Lights On The Coffee Counter
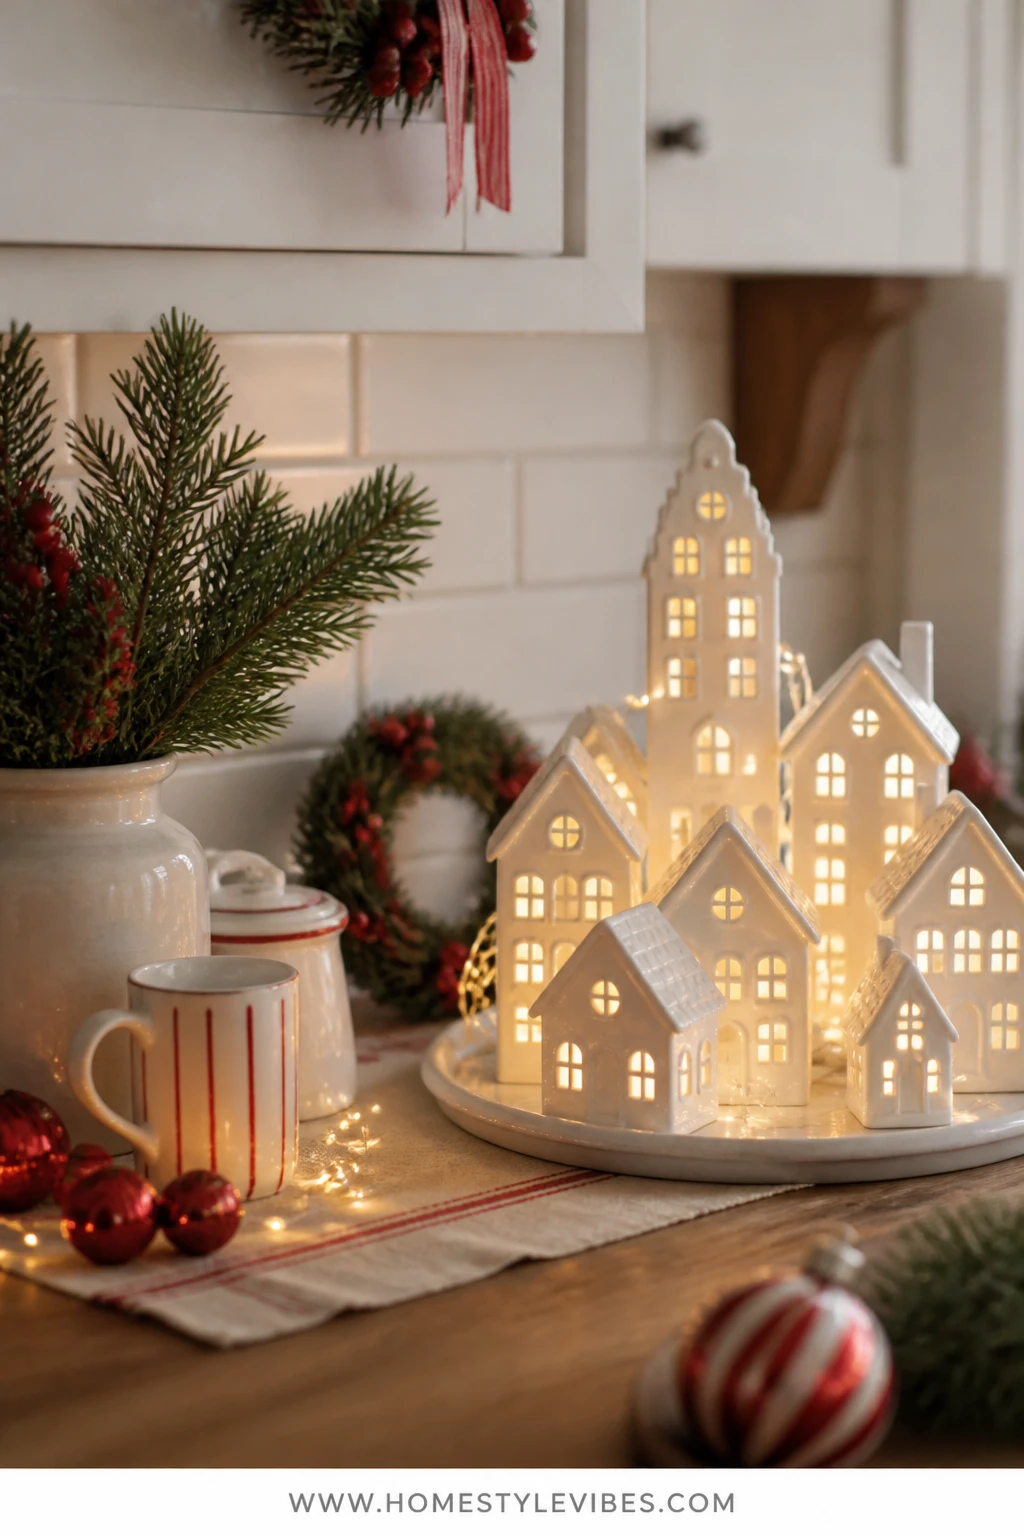
Counters can tip from festive to cluttered in two mugs. You’ve tried scattering mini trees, but it still reads messy. Anchor the look with a little white ceramic “village” on a tray at the coffee corner. In a red-and-white Christmas kitchen, these soft white shapes give breathing room while warm micro lights add that calm, cozy glow.
This setup works because it corrals decor where you naturally pause every day. It’s family-friendly, fast to move when you clean, and photogenic thanks to the warm light inside cool ceramic. Keep your palette tight: white houses, one or two red mugs, and a sprig of green—done. Good from early December through New Year’s; in January, remove the red mug and keep the houses plus greenery for winter calm.
Variations: Tiny kitchen? Use two houses on a breadboard. Bigger space? Add a slender garland running behind the village and brass teaspoons in a white cup. Kid-friendly twist: swap real lights for battery micro-lights with timers—no cords in cocoa.
Budget Breakdown:
- White ceramic houses (3–5): $24–$60
- Micro LED lights with timer: $10–$18
- Tray or breadboard: $15–$35
- Clip greenery or faux sprigs: $8–$15
Total Estimated Cost: $57 – $128
Best For: Households that love a dedicated coffee or cocoa station and want a serene, clutter-free counter that still feels festive.
Key Design Elements:
- Main holiday props: white ceramic houses, red mugs, mini bottle-brush trees in white
- Color palette: crisp white, small hits of candy red, fresh green
- Lighting strategy: warm micro LEDs tucked behind or inside houses
- Textile and ribbon layers: a red-and-white striped tea towel folded under the tray edge
- Greenery and natural elements: clipped cedar tucked at the base of the houses
- Accent details: a small lidded white jar for cocoa toppers
How To Recreate This Look:
- Start with a clear coffee counter; wipe and move appliances slightly to frame the display.
- Add a breadboard or tray to corral the scene; anchor it slightly off-center for a natural feel.
- Layer 3–5 white houses of varying heights; stagger them for depth.
- Place a micro light strand behind the houses; weave bulbs so they peek through windows.
- Style with a red mug or two, a folded striped towel, and a cedar clipping along the front edge.
Why This Feels Designer: A restrained color story plus negative space around the village keeps it airy and editorial, not chotchke-heavy.
One Thing To Avoid: Mixing too many mug colors and novelty canisters. Keep it white and red, period.
Pro Styling Tip: For photos, dim overheads and let the micro lights do the work—your camera will catch that golden window-glow inside each house.
Pause for a breath: You don’t need to decorate every inch to feel festive. In a kitchen, less volume and more intention wins every time.
3) Red Gingham Ribbon And Cedar Swags On The Range Hood
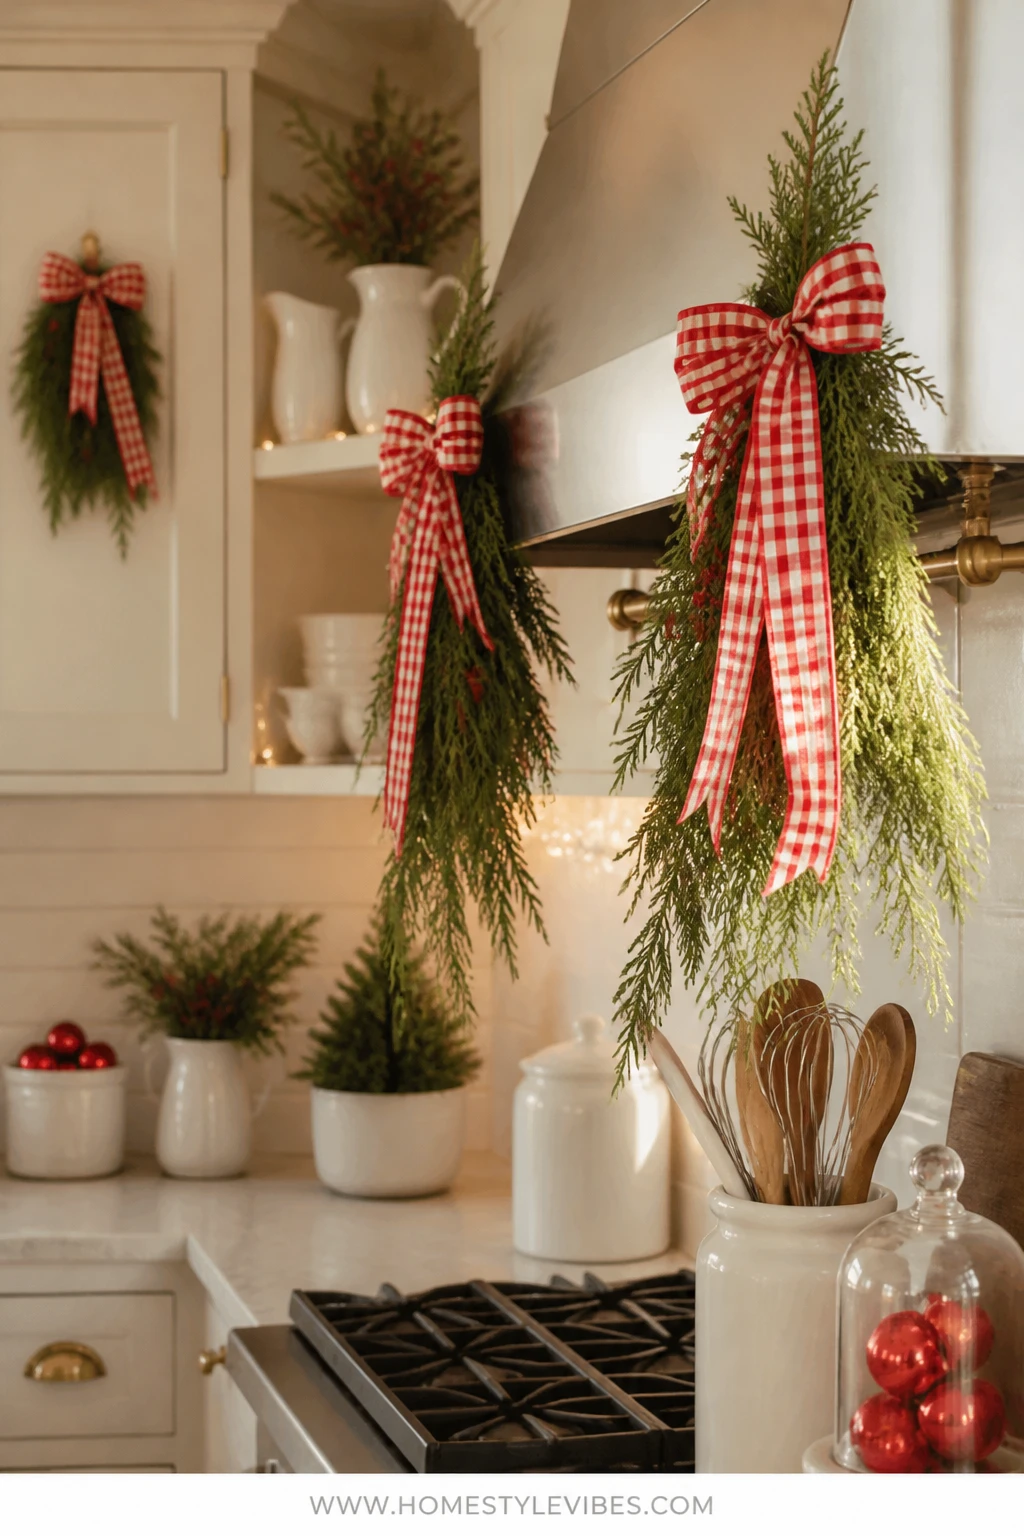
The range hood is a natural focal point, but it’s tricky—grease, heat, and steam are party crashers. You’ve tried a full garland before and it drooped by week two. Here’s a better plan: slim cedar swags tied with red gingham ribbon, secured to the outer edges of the hood, away from vent heat. It gives that classic Christmas kitchen heartbeat without inviting a pine needle avalanche onto your stovetop.
The look is old-school charming. Cedar’s feathery texture pairs with crisp checks in a way that just feels like cookies are cooling nearby. Bonus: the lighter weight means hooks stay put and cleanup stays sane. Lighting? Keep it simple with the hood light on warm; the glow grazing the cedar reads cozy. I once tested this after burning a batch of spritz cookies—still looked adorable, even if the cookies didn’t.
Variations: Neutral leaner? Use ivory check ribbon with a slim red stripe. Safety-first? Go faux cedar—less shedding over heat. Small kitchen? One swag, centered. Timing: Perfect from the first weekend of December; in January, remove the ribbon and keep a bare cedar swag for a winter note, or replace with eucalyptus.
Budget Breakdown:
- Pre-made cedar swags (2) or DIY from a bundle: $15–$35
- Red gingham ribbon (1–2 spools): $6–$16
- Removable hooks or magnetic hooks (for metal hoods): $8–$15
- Optional: a few matte white bells: $8–$12
Total Estimated Cost: $37 – $78
Best For: Families who cook a lot and need decor that won’t shed into dinner; also great for farmhouse, cottage, and classic white kitchens.
Key Design Elements:
- Main holiday props: cedar swags, gingham ribbon, matte white bells (optional)
- Color palette: candy red, white, fresh green
- Lighting strategy: hood light on warm, evening only
- Textile and ribbon layers: gingham bows with modest tails; no extra frills
- Greenery and natural elements: airy cedar for minimal drop
- Accent details: small bow at the swag’s tie-in point
How To Recreate This Look:
- Start with a degreased hood surface; let dry fully so hooks adhere.
- Add two removable hooks at the outer edges, level with the hood’s lower third.
- Layer cedar into two slim swags; tie the center with floral wire.
- Place each swag on a hook, angling slightly downward toward the corners.
- Style with gingham bows at the tie point; trim tails to the edge of the hood.
Why This Reads High-End: The scale is disciplined. Instead of one bulky garland, two tailored swags echo the hood’s lines like thoughtful millwork.
The Most Common Mistake: Hanging greenery too close to the vent or burners. Keep a safe distance and always use flameless candles nearby—no open flames near greenery, ever.
Pro Styling Tip: For pictures, turn on only the hood light and under-cabinet lights—everything else off. You’ll get a warm spotlight that outlines the cedar’s feathery texture.
4) Red-and-White Cocoa Caddy And White Florals On The Island
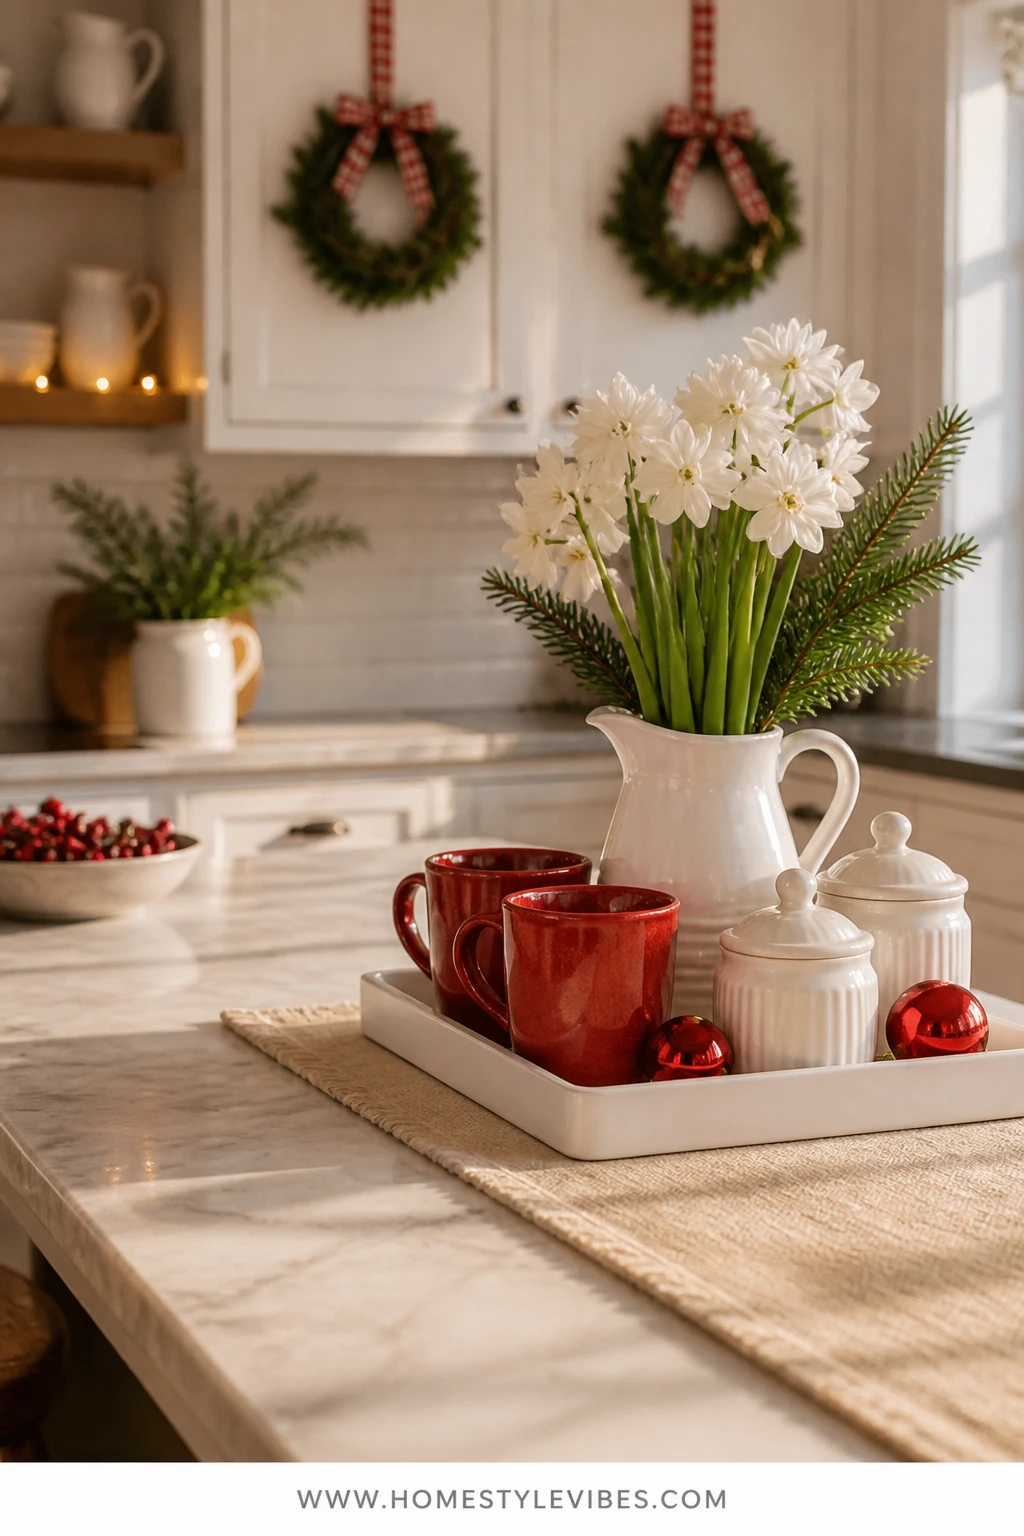
Your island works hard: chopping, homework, snack command center. A full runner plus a sprawling centerpiece gets in the way. Instead, create a compact “cocoa caddy”—a white tray with red mugs, a white pitcher of winter greens, and lidded jars—leaving 70% of the island open. It’s cheerful, contained, and wildly practical.
Mood-wise, this reads like a holiday café moment at home. White keeps it fresh; pops of candy red give the cheer. Choose a single floral/green combo—say white paperwhites or faux amaryllis with cedar to keep the palette classic. Lighting: a slim strand of warm micro lights around the pitcher base adds a gentle halo at night without cords snaking across prep space.
Variations: Small island? Use a narrow breadboard instead of a tray. Minimalist? Keep only two red mugs and a single white floral stem. Kid-forward? Use shatterproof mugs and label jars with chalk pen. Start this the first week of December; replace candy canes with cinnamon sticks in January and keep the white florals through winter for softness.
Budget Breakdown:
- White tray or breadboard: $15–$35
- Red mugs (2–4): $12–$24
- White pitcher or vase: $15–$30
- Faux or fresh white florals: $10–$25
- Mini lidded jars for cocoa toppings: $10–$20
- Micro LED strand (battery): $8–$15
Total Estimated Cost: $70 – $149
Best For: Busy families who want a festive island with zero interference during cooking and baking marathons.
Key Design Elements:
- Main holiday props: red mugs, white pitcher with white florals and cedar, candy canes
- Color palette: white base, candy red accents, fresh green
- Lighting strategy: a single micro strand circling the tray
- Textile and ribbon layers: a folded red-and-white stripe napkin tucked under the jar cluster
- Greenery and natural elements: cedar around the pitcher base for a wreath effect
- Accent details: clear jars with white lids; wood scoop for cocoa
How To Recreate This Look:
- Start with a clean island; decide on one corner or the center (but leave work space open).
- Add a white tray or breadboard as your base to contain the scene.
- Layer in a white pitcher with white florals; tuck cedar at the base like a mini wreath.
- Place 2–4 red mugs on the opposite side of the pitcher for balance.
- Style with lidded jars (marshmallows, crushed peppermint, cocoa), then wrap a micro light strand around the tray’s edge.
Why This Looks Intentional: The corralled silhouette and simple palette make it look planned, not plopped—like a café station with purpose.
Don’t Do This: Don’t scatter additional knick-knacks across the island. One contained vignette is plenty in a working kitchen.
Pro Styling Tip: Angle the pitcher slightly, not perfectly front-facing, so stems overlap for depth in photos; a tiny foreground sprig gives instant bokeh.
Remember, this isn’t about recreating a showroom. It’s about a kitchen that serves hot cocoa, family chatter, and your Tuesday pasta night while still giving you those merry moments. If one idea resonates, start there and stop. That’s enough.
5) White Canisters, Red Stripe Towels, And Evergreen On Everyday Counters
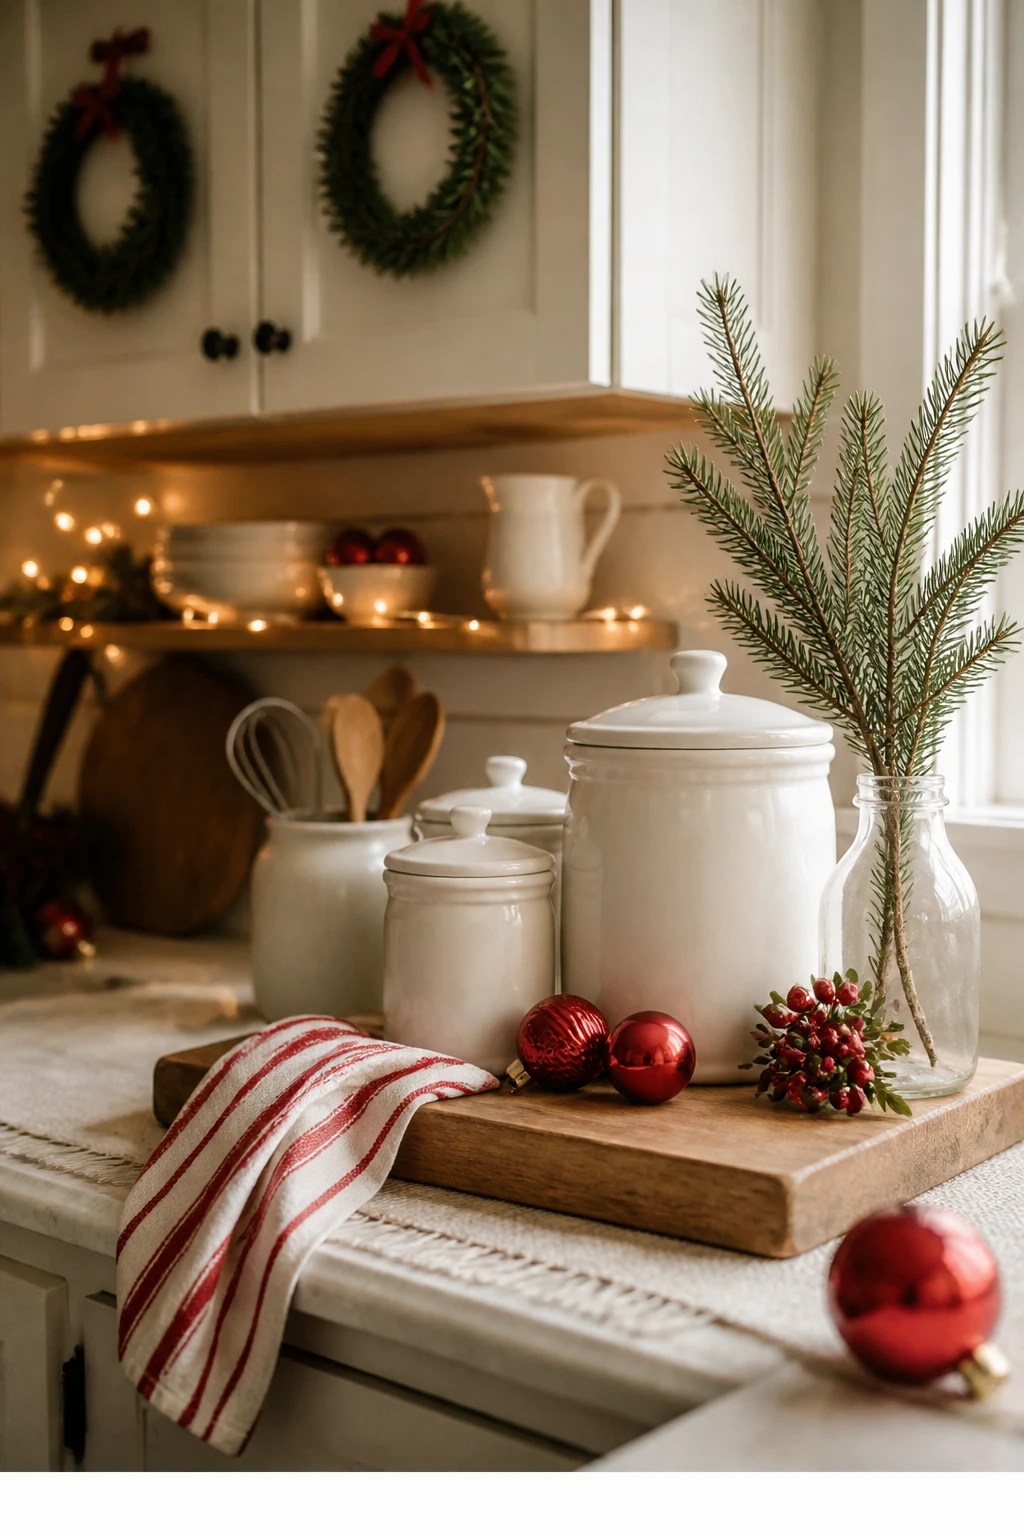
Everyday counters are where things get real. You need the olive oil and the cutting board, but you also want that Christmas kitchen feeling. Here’s the solve: swap your usual textiles and one or two utilitarian items to a red-and-white set—think white canisters, a red-striped towel draped just so, and a slim evergreen sprig propped in a milk bottle. It’s subtle yet unmistakably festive.
This strategy works in real homes because it doesn’t add clutter—it replaces it. You keep your workflow intact. Lighting stays practical: task lights on warm temperature, with just a few reflective whites and a hint of green to catch the glow. A friend of mine bought three different garlands before realizing the real problem was her lighting and countertop chaos; we did this swap-out instead, and suddenly the space felt “done.”
Variations: Tight budget? Reuse your current canisters and just add a red-striped towel pack. Modern kitchen? Pick white canisters with simple black labels and keep the sprig minimal. Post-Christmas? Remove the red towels and keep white-on-white with plain cedar for January calm.
Budget Breakdown:
- White canister set (2–3): $30–$75
- Red-and-white striped towels (set of 3): $10–$18
- Vintage-style milk bottle or small vase: $8–$15
- Cedar or fir clippings: $5–$10
Total Estimated Cost: $53 – $118
Best For: High-traffic kitchens where form must follow function; ideal for families who cook daily and don’t want to move decor to chop an onion.
Key Design Elements:
- Main holiday props: red-striped towels, evergreen sprig in a bottle, white canisters
- Color palette: white, candy red accents, fresh green
- Lighting strategy: warm task lighting bouncing off glossy white ceramics
- Textile and ribbon layers: fold towels in thirds and drape over the counter edge or bar pull
- Greenery and natural elements: one simple cedar or fir sprig, not a bunch
- Accent details: small wooden cutting board for warmth
How To Recreate This Look:
- Start by editing your counter down to essentials; stash extras in a drawer for the season.
- Add white canisters to hold what you actually reach for (sugar, flour, coffee).
- Layer a small cutting board upright to frame the grouping and provide height.
- Place a milk bottle with a single cedar sprig to the side of the canisters.
- Style with a neatly folded red-striped towel; keep it dry-only for the “pretty” zone.
Why This Looks Expensive: It’s the restraint. Matching canisters and a single stripe feel curated, like a styled pantry shot.
Watch Out: Avoid mixing three different reds (tomato, burgundy, cherry). Stick to candy red or cranberry so it doesn’t look accidental.
Pro Styling Tip: Slide your canisters two inches from the backsplash to create a shadow line—tiny depth shift, big difference on camera.
6) Red Ribbon-Tied Wreaths On Glass-Front Cabinets With White Bottle-Brush Trees Below
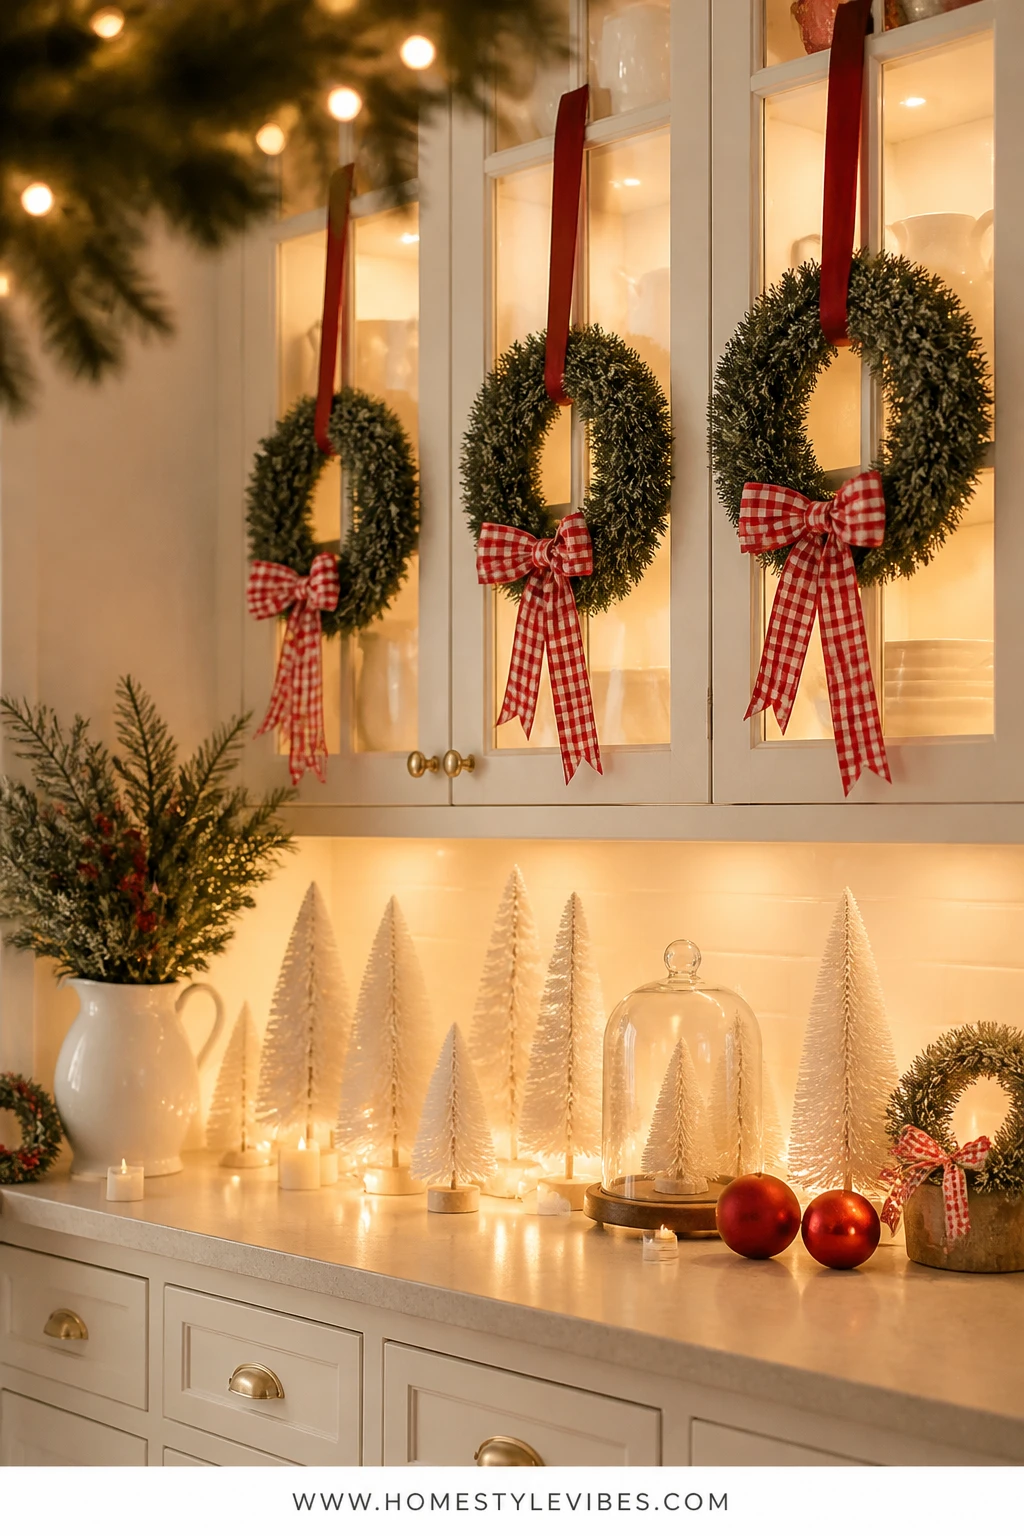
Glass-front cabinets beg for a holiday moment, but stuffing them with themed dishes gets spendy and cluttered. Instead, hang small wreaths on the glass with candy-red ribbon, and echo the circle motif below with a row of white bottle-brush trees on the counter. It’s simple geometry that reads classic and polished.
This creates a sightline that photographs beautifully: glowing glass, crisp ribbon, a neat white layer below. Keep lighting subtle—under-cabinet warm LEDs or a few tea-light style flameless candles scattered near the trees. Everything stores compactly: wreaths stack, trees box up, ribbon rolls. You can put this up the first weekend of December and, in January, replace red ribbon with ivory to keep the winter vibe without the Christmas cue.
Variations: No glass fronts? Hang the wreaths on solid doors (Section 1 style) and still do the white trees below. Modern kitchen? Choose pared-back eucalyptus wreaths and matte ribbon. Family with small kiddos? Use shatterproof trees or place them on a cake stand up and away from little hands.
Budget Breakdown:
- Mini wreaths (2–4): $16–$48
- Red satin or velvet ribbon: $6–$16
- White bottle-brush trees (4–7): $20–$40
- Flameless tea lights or micro strand: $8–$15
Total Estimated Cost: $50 – $119
Best For: Kitchens with a feature wall of uppers or glass cabinets where symmetry and repetition sing; great for entertainers who want a “wow” wall without touching the stove zone.
Key Design Elements:
- Main holiday props: mini wreaths with red ribbon, white bottle-brush trees
- Color palette: crisp white, candy red, fresh green
- Lighting strategy: under-cabinet warm light + a tiny micro strand around the trees
- Textile and ribbon layers: satin or velvet ribbon tails cut short for neatness
- Greenery and natural elements: boxwood or cedar mini wreaths
- Accent details: white cake stand or narrow riser to vary tree height
How To Recreate This Look:
- Start by measuring the center point of each cabinet door for consistent wreath placement.
- Add clear hooks at the top inside of each door; loop ribbon over the top to hang the wreath on the glass.
- Layer ribbon so bows sit at the top or bottom—choose one and repeat for cohesion.
- Place a row of white bottle-brush trees on the counter beneath; vary heights for rhythm.
- Style a micro light strand through the trees; tuck the battery pack behind a canister.
Why This Feels Designer: Repetition plus negative space. The eye catches the wreath rhythm and the clean white field below—it’s disciplined and delightful.
One Thing To Avoid: Oversized wreaths. If they bump the frame or hide too much glass, they look heavy. Err smaller.
Pro Styling Tip: Shoot from a slight angle so the reflective glass captures twinkle light bokeh from elsewhere in the kitchen—instant depth.
Quick reframe before we close: Your kitchen doesn’t need more stuff. It needs the right few pieces, repeated with intent. That’s how you get charm without chaos.
Quick Checklist
- Velvet or gingham ribbon in candy red
- Removable hooks sized for cabinet doors
- Fresh or faux cedar sprigs and slim swags
- White ceramic houses for a mini village
- Micro LED light strands with timers
- White tray or breadboard for island caddy
- Red-and-white striped kitchen towels
- White canisters and a small milk bottle
- Mini wreaths for glass-front cabinets
- White bottle-brush trees in varied heights
Frequently Asked Questions
How do I keep greenery safe near the stove and under-cabinet lights?
Keep all greenery away from direct heat and open flames. Use slim swags on the outer edges of the hood, never near burners, and stick to flameless candles. If under-cabinet lighting runs hot, leave a 2–3 inch air gap between bulbs and greenery or switch to cooler LED strips.
Real vs. faux greenery—what’s better for a busy kitchen?
Real cedar smells incredible but can dry and shed faster in warm zones. Faux holds shape, doesn’t drop, and looks great in photos. For kitchens where you cook daily, I recommend faux for the hood and real clippings in low-heat areas like the coffee corner.
When should I start decorating the kitchen for Christmas?
Thanksgiving weekend is a sweet spot. Put up the bows, village, and island caddy then. If you prefer a longer season, start with the red-and-white textiles in mid-November and add greenery in early December.
How do I keep the counters looking festive without losing prep space?
Corral decor on trays or breadboards so you can slide it aside in seconds. Prioritize one vignette per zone (coffee corner, island caddy) and let everything else be functional. Replace everyday textiles with red-and-white versions instead of adding extra items.
Are bottle-brush trees and ceramic houses safe with kids and pets?
Use shatterproof or wooden trees for lower counters and place ceramic houses on a higher shelf or tray at the back of the counter. Battery micro lights with timers keep cords away from curious hands and paws.
Final Thoughts
If your head is buzzing with ideas, start with one. Hang the candy-red bows on your upper cabinets tonight and notice how the whole room suddenly feels finished. Then, if you want, add the white village to your coffee counter this weekend. That’s it—holiday spirit, handled.
The heartbeat of a classic Christmas kitchen is simple: candy red and crisp white, a whisper of fresh green, and a soft, warm glow. Keep the palette tight, repeat the good stuff, and let your kitchen work like the everyday hub it is. You’ll make cocoa, chop onions, and wrap last-minute gifts on the island—and every moment will feel a touch more special.
You’ve got this. Pick your favorite idea, tie that ribbon, click on the lights, and enjoy your very own merry workspace that’s as practical as it is beautiful. Seriously—your coffee will taste better tomorrow.

About the Author

Krisztina P.Rendes, Founder of Home Style Vibes
Founder of Home Style Vibes
Krisztina Puskásné Rendes created Home Style Vibes as a cozy-modern lifestyle space where homemaking meets inspiration. Her goal is to help women create beautiful, organized, and peaceful homes they truly love — without overwhelm. You’ll find here heart-driven content on home decor, cleaning tips, easy family recipes, organization and decluttering, DIY home projects, plants, and seasonal ideas — all designed to bring more calm, comfort, and style into everyday life.