7 Cottage Garden Flower Bed Ideas For A Romantic English-Style Yard
You want a yard that feels like a countryside novel—wild roses brushing your ankles, bees humming, sunlight softening every edge. But you hate how stiff, flat, and patchy your current beds look, like you planted a catalog grid instead of a living story. This guide fixes that. These seven cottage garden flower bed ideas show you exactly how to build that romantic English-style yard—with texture, height shifts, and season-to-season interest—on a realistic timeline and budget. Expect layered blooms, painterly color, and highly photogenic vignettes. If you love soft romance, graceful disorder, and a touch of old-world charm, you’re in the right place.
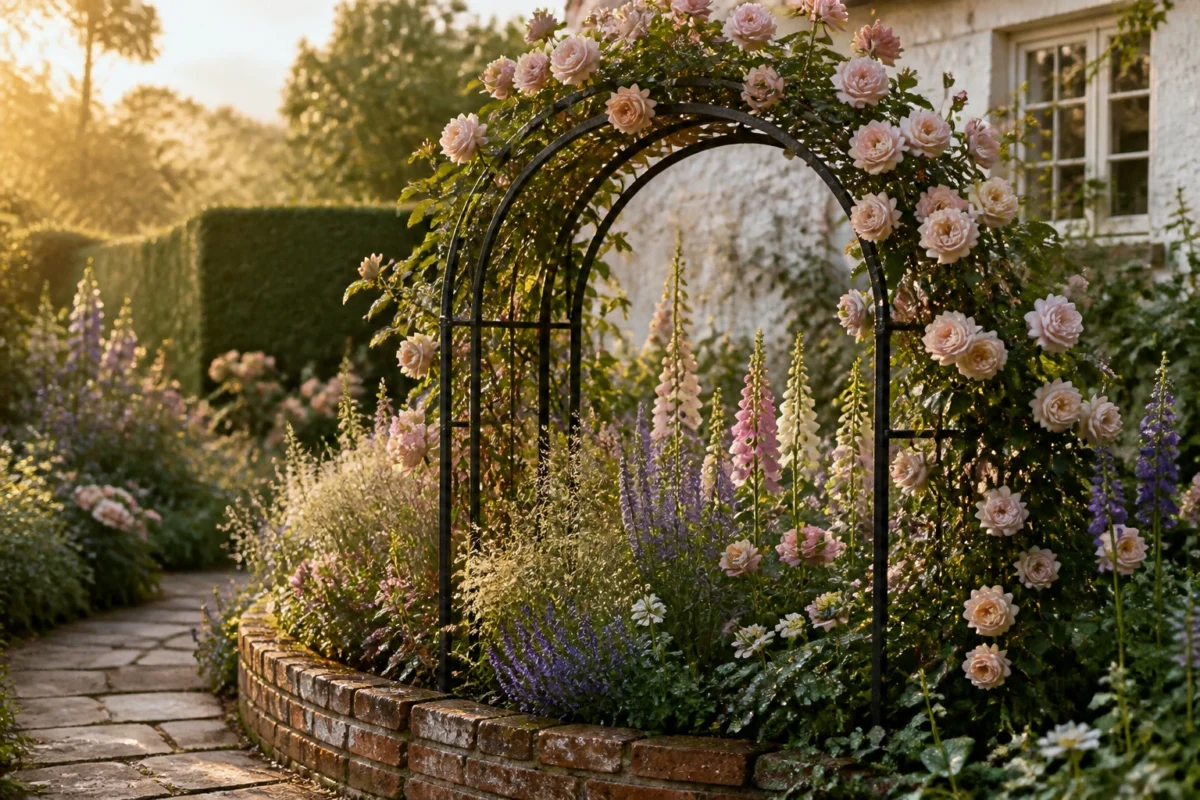
1. Weathered Brick Curve With Dawn-Gold Light And A Wrought-Iron Arbor
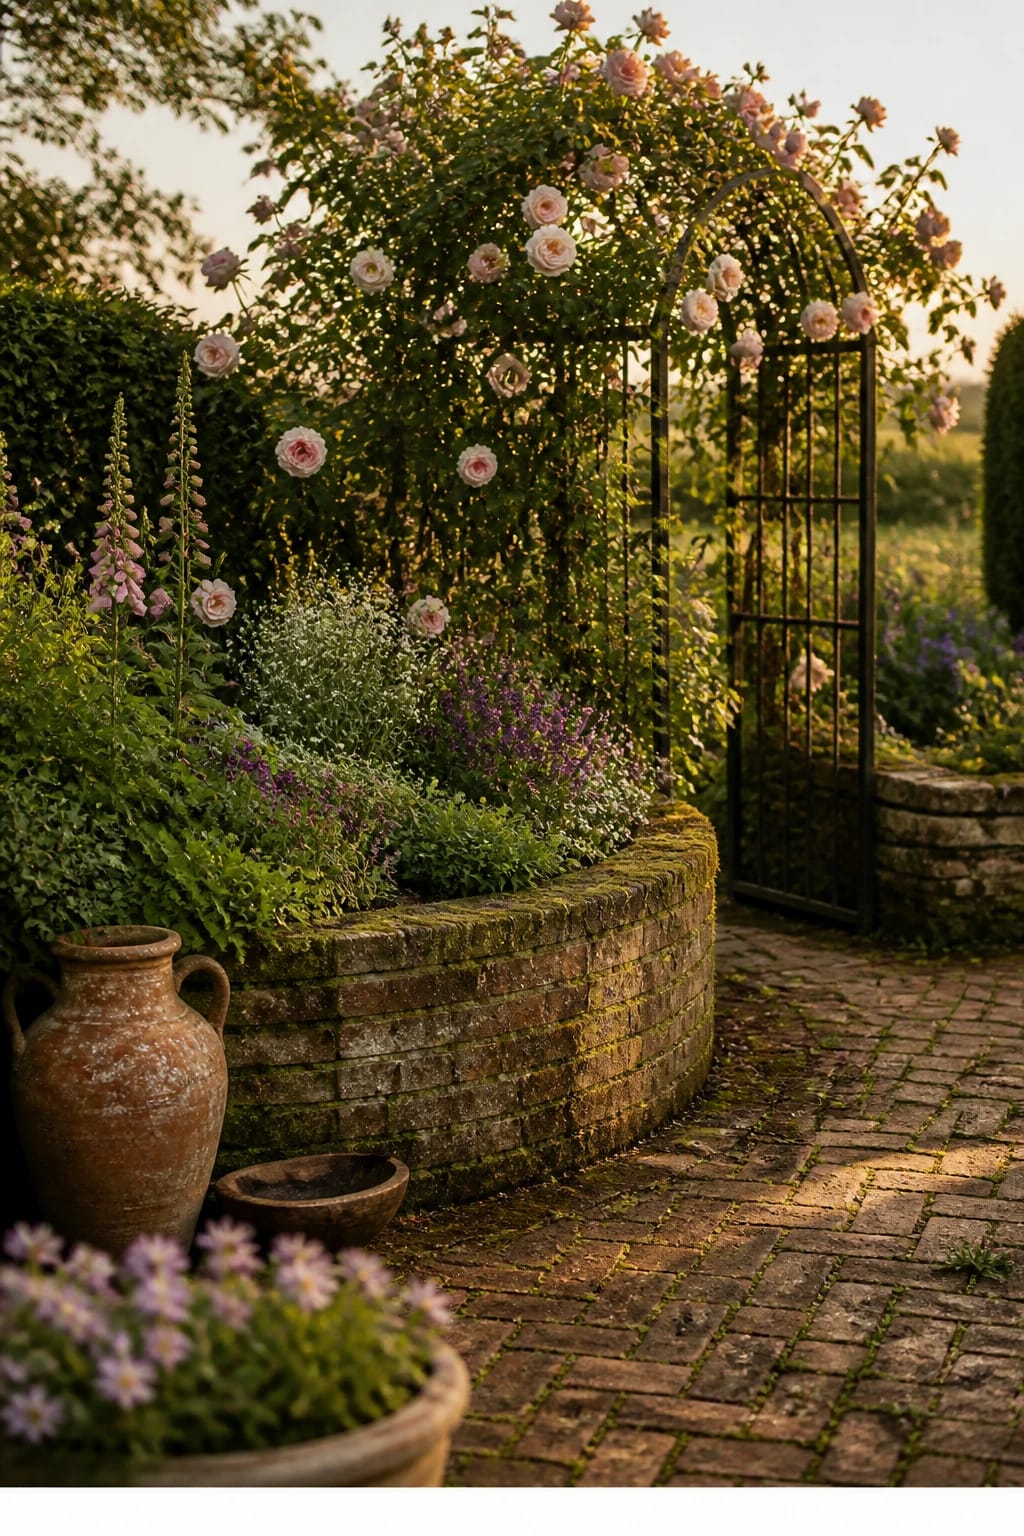
We’ve all been there: you add a few roses along the fence, and somehow it still looks… timid. No wow moment. No swoon. This design sets a stage with a curved raised bed built from weathered brick, catching that gentle dawn-gold light. The focal point? A black wrought-iron arbor with climbing roses that frames your entry like a garden portal. It feels storybook romantic—in a way that works in real neighborhoods—and offers practical structure for all-season form.
The mood is classic English cottage with a touch of formal bones. You get a sturdy outline (brick, iron) plus loose, blowzy blooms (David Austin roses, salvias, foxgloves). It’s perfect for smaller yards because the curve and height create illusion of depth. Bonus: the brick keeps soil warmer and drains well, which perennials love. Early sunlight glows against warm brick, casting gentle shadows that photograph beautifully in the morning. The result? Rich texture, great contrast, and a “built-in” frame for your floral moments.
Variations help this design meet your life: on a budget, swap reclaimed pavers for full brick and choose a metal arch kit instead of a custom arbor. For renters, build a low, curved bed with stacked stones that can be reconfigured later. Prefer a dusk vibe? Use dark florals—‘Black Knight’ buddleia, near-black hollyhocks, and burgundy dahlias—for moody twilight drama.
Budget Breakdown:
- Reclaimed brick or tumbled pavers: $200–$600 (for a small curved bed)
- Wrought-iron arbor or metal arch kit: $120–$500
- Climbing roses (2–3 plants): $60–$180
- Perennial fillers (salvia, catmint, foxglove, lavender): $80–$250
- Compost/topsoil mix: $60–$150
- Pea gravel or mulch path: $50–$150
Total Estimated Cost: $570 – $1,830
Best For: Small to medium front yards that need a strong focal entry. Ideal if you love morning coffee outside and want blooms from spring to early autumn.
Key Design Elements:
- Main materials: weathered brick, wrought iron, pea gravel
- Color palette: blush, apricot, and cream roses with blue-lavender accents
- Lighting strategy: position the arbor to greet morning sun; use solar path lights for soft evening twinkle
- Furniture silhouettes: a slim wrought-iron bench or bistro set nearby
- Texture layers: glossy rose foliage, airy salvia spires, soft catmint clouds
- Accent details: finial stakes, copper plant labels, vintage-style watering can as decor
How To Recreate This Look:
- Outline a gentle curve in garden paint or rope; aim for at least 3 feet depth for layers.
- Build a low raised edge using reclaimed brick; dry-stack or mortar depending on permanence.
- Install a wrought-iron arbor at the curve’s apex; anchor deeply for stability.
- Plant climbers first (roses on either side), then medium-height perennials, and soft groundcovers at the lip.
- Top with compost, mulch, and add a pea gravel path that kisses the bed’s edge for a quaint “walk-by” feel.
Why This Looks Expensive: The curved outline plus classic ironwork reads bespoke. Add mature-looking bricks and you telegraph “established garden,” even if you started it last month. That interplay of formal structure and loose blooms screams old-world charm.
Watch Out: Don’t plant roses too close to the brick. Give them 18–24 inches from the edge so they have airflow and don’t scorch against hot masonry.
Pro Styling Tip: Photograph in early morning when petals glow and shadows skim the brick—angle your shot to include the curve for instant depth.
Keep scrolling—next up, a rich tapestry border that turns bare lawn into poetry.
2. Reclaimed Timber Edge With Soft-Silver Dusk And A Copper Birdbath Centerpiece
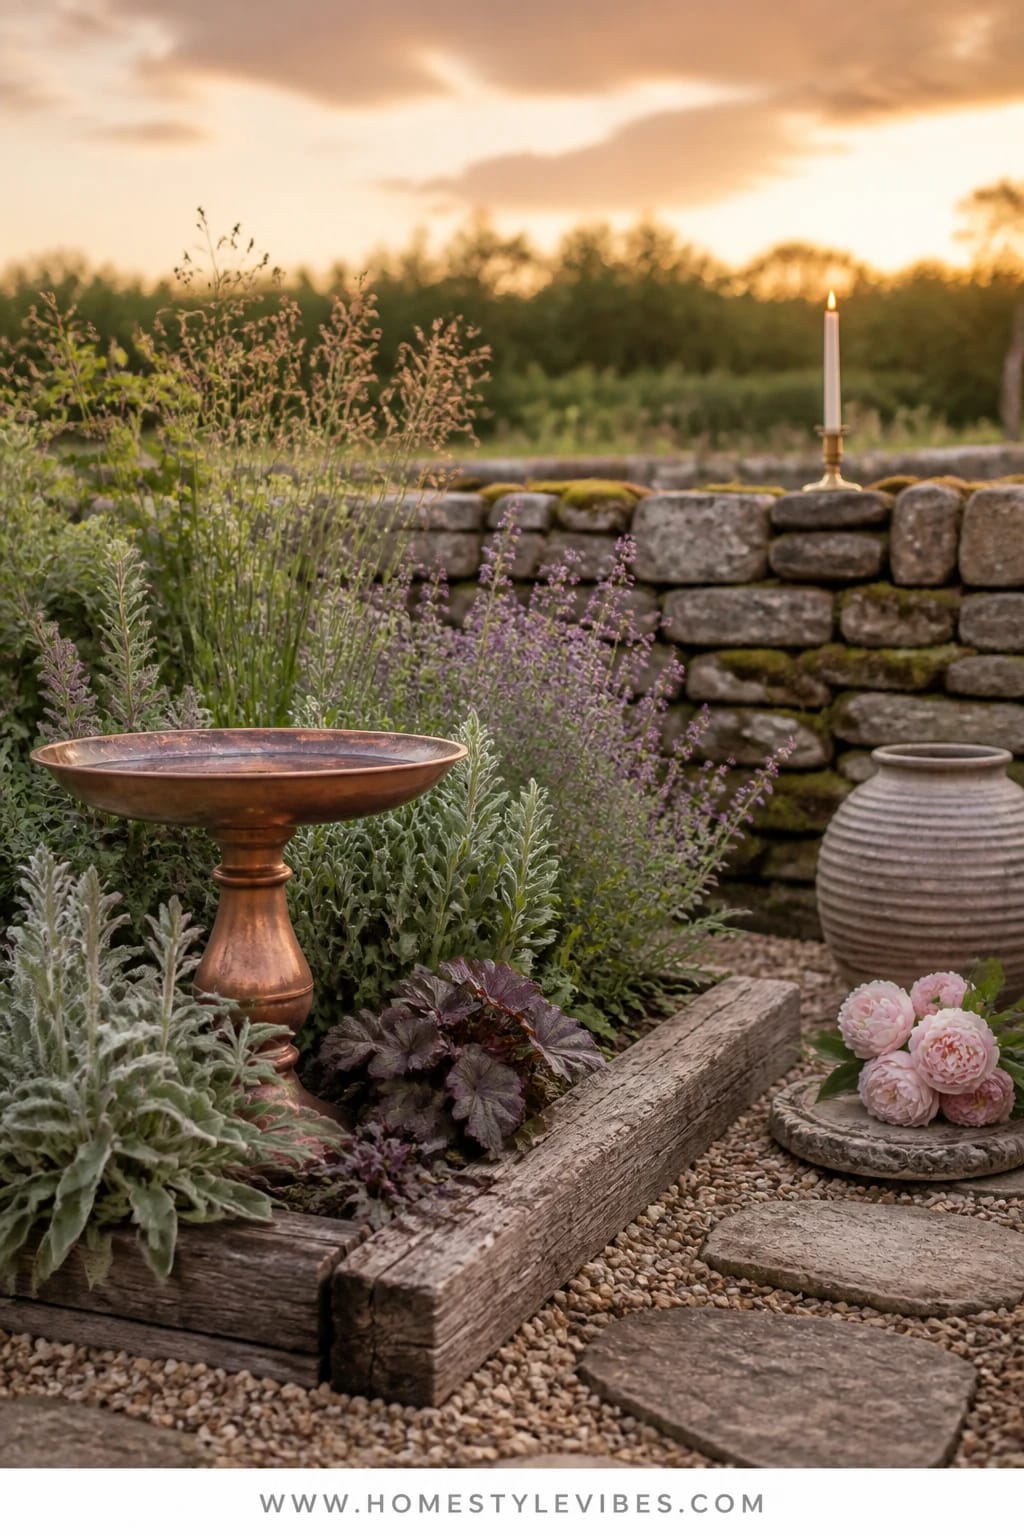
It’s that one corner that always feels flat and tired, no matter what you plant. You’ve tried lining up marigolds like soldiers, but it still looks like a school project. This bed leans into variety—textures, foliage shapes, whispery movement—with a reclaimed timber edge and a burnished copper birdbath as a quiet, sculptural moment. The overall vibe? Gentle, woodsy cottage with dusk tones: silvers, mauves, and seafoam greens that glow at sundown.
Why it works: Timber edging grounds the bed without harsh lines, and that slight elevation keeps moisture consistent. Plants with different leaf textures—lamb’s ear, heuchera, feathery astilbe, ferny yarrow—make the bed read layered and high-style. The copper birdbath ages gracefully, pulling in patina that looks gorgeous with grays and purples. Dusk light loves silver foliage, so everything takes on a soft halo that photographs like a dream.
Go budget-friendly by using salvaged sleepers or landscape timbers and a thrifted bowl set on a short plinth for the “birdbath.” For a tiny space, keep the shapes but reduce the plant count—three varieties repeated rhythmically still give that tapestry look. If your yard gets strong afternoon sun, pivot to drought-tolerant silvery herbs (artemisia, thyme, rosemary) and place the birdbath in partial shade to keep water cooler.
Key Design Elements:
- Main materials: reclaimed timber edging, copper birdbath, crushed slate mulch
- Color palette: silver, mauve, dusky purple, soft green
- Lighting strategy: site the bed where it receives late-afternoon light; use stake lanterns sparingly
- Furniture silhouettes: low timber bench or stump stools nearby for a natural perch
- Texture layers: velvety leaves, plume-like blooms, trailing thyme
- Accent details: aged copper stakes, stone toadstools, vintage glass float tucked between plantings
Budget Breakdown:
- Reclaimed timbers/sleepers: $100–$400
- Copper or copper-look birdbath: $80–$250
- Perennials (8–12 mixed): $120–$360
- Crushed slate or dark mulch: $60–$180
- Compost/soil amendments: $50–$120
Total Estimated Cost: $410 – $1,310
Best For: Medium side-yard borders or an awkward corner. Great if you love evening garden walks and subtle color stories.
How To Recreate This Look:
- Frame a crescent-shaped bed with reclaimed timber; secure with rebar if needed.
- Set the copper birdbath slightly off-center; leave a small planting pocket around it for low groundcovers.
- Plant in drifts: 3–5 lamb’s ear, 3–5 heuchera, 3–5 astilbe, and accents of yarrow or lavender.
- Top-dress with crushed slate to deepen contrast and keep foliage tidy.
- Add a pair of low stake lights to graze the birdbath for a cinematic dusk moment.
Why This Feels Designer: Repetition and restraint create harmony. You’re not tossing random plants in; you’re composing with texture and patina. The copper centerpiece anchors the eye and turns your bed into a styled vignette, not just a planting zone.
One Thing To Avoid: Avoid planting astilbe in full, dry sun. If you’re in a hot zone, cluster it in the shadiest part and water consistently, or swap for Russian sage for similar height and a different texture.
Pro Styling Tip: For photos, mist the copper lightly so it gleams; the water sheen makes every plant look fresher and ups that editorial finish.
Quick reset for your design brain: if one idea resonates more than the others, that’s your starting point. You don’t need all seven. Choose one bed that makes you smile every time you pull into the driveway.
3. Honeyed Gravel Border With Soft-White Twilight And A Stone Urn Focal Point
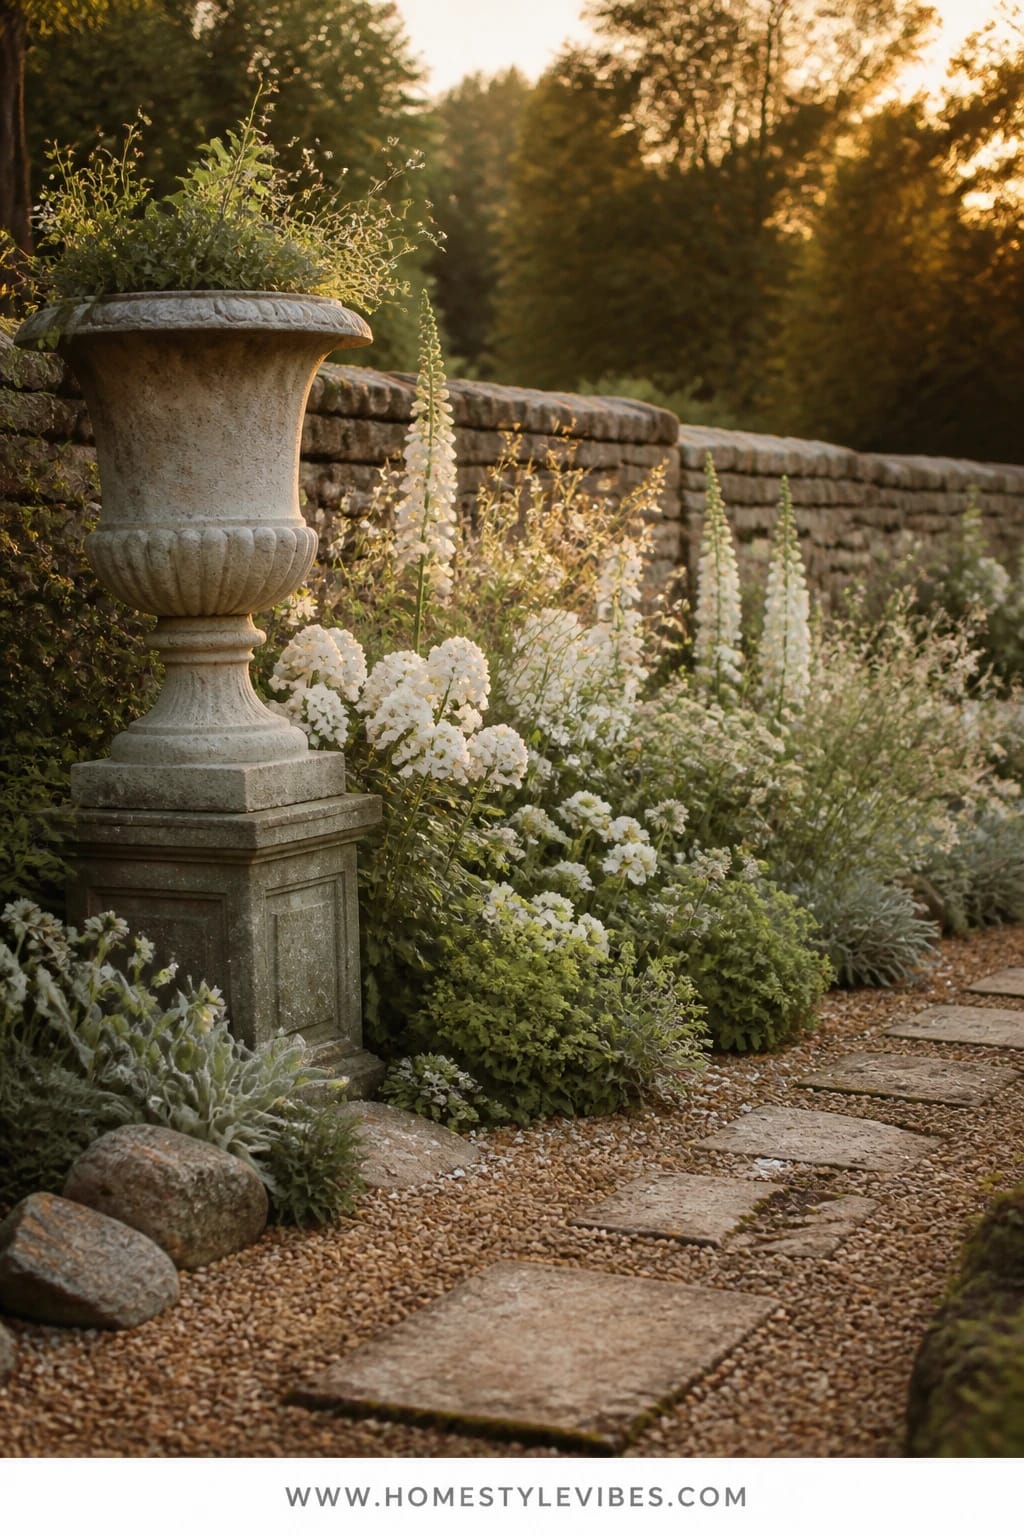
You want calm, but your beds feel busy. Too many colors, no place for the eye to rest. This design is a tonal masterclass: creamy whites, soft greens, and chalky stone. A honeyed gravel border defines the shape, a tall stone urn sits like the protagonist, and the plantings glow at twilight. It reads refined cottage—quiet, restrained, editorial—but still friendly and alive.
Here’s why this actually works: The gravel gives high visual contrast and makes foliage pop. White blooms—garden phlox, campanula, white foxglove, ‘Annabelle’ hydrangea—reflect light at dusk, extending garden “open hours” into evening. A single stone urn (planted with sweet alyssum, ivy, or white trailing verbena) nods to old gardens and naturally centers the view. Maintenance stays reasonable since the color palette is tight and weeds show up quickly on gravel for easy flare-ups.
For a budget spin, use a resin urn with a stone finish and decomposed granite instead of premium gravel. Small-yard version: a 6-foot semicircle hugging a path with one hydrangea and a trio of foxgloves still nails the vibe. If deer visit, swap hydrangea for deer-resistant options like white coneflower and yarrow.
Budget Breakdown:
- Honey gravel or decomposed granite: $100–$350
- Stone or resin urn: $70–$400
- White-flowering perennials/shrubs: $120–$400
- Edging (steel or stone): $80–$220
- Soil/compost: $40–$100
Total Estimated Cost: $410 – $1,470
Best For: Front-of-house beds that need calm curb appeal. Ideal if you entertain at dusk or love fairy-light evenings.
Key Design Elements:
- Main materials: honey gravel, stone urn, steel edging
- Color palette: white, soft green, silvery foliage
- Lighting strategy: warm-white stake lights aimed up through white blooms for glow
- Furniture silhouettes: a narrow teak bench if space allows
- Texture layers: lacy foxglove, mophead hydrangea, airy alyssum
- Accent details: white-painted trellis panels, limestone stepping stones
Why This Reads High-End: Limiting color to whites and greens automatically looks polished. Add tone-on-tone materials (gravel + stone urn) and it whispers quiet luxury. The urn focal point makes the bed feel deliberate, not accidental.
How To Recreate This Look:
- Mark a simple oval or arc and install steel edging for a crisp line.
- Spread weed barrier fabric only where gravel sits; leave planting zones open for roots.
- Place the urn slightly forward of center for asymmetry; fill with airy trailing plants.
- Plant white foxglove at the back, hydrangea midline, and alyssum at the lip.
- Finish with honey gravel, raking in soft waves so it looks natural, not flat.
The Most Common Mistake: Overfilling with too many plant types. Keep to 3–5 species, repeated. That repetition is the part that makes the biggest visual difference.
Pro Styling Tip: For photos, stage a linen throw on the bench and clip two white foxglove stems in a small jug on the urn base—tiny props add “lived-in” charm without clutter.
Did You Know? Creating a shallow “trench” between gravel and lawn (just a 2-inch dip) stops grass from creeping in and also casts a shadow line that photographs like a pro edge.
4. Rustic Willow Wattle With Cloudy-Morning Light And A Vintage Trough Planter
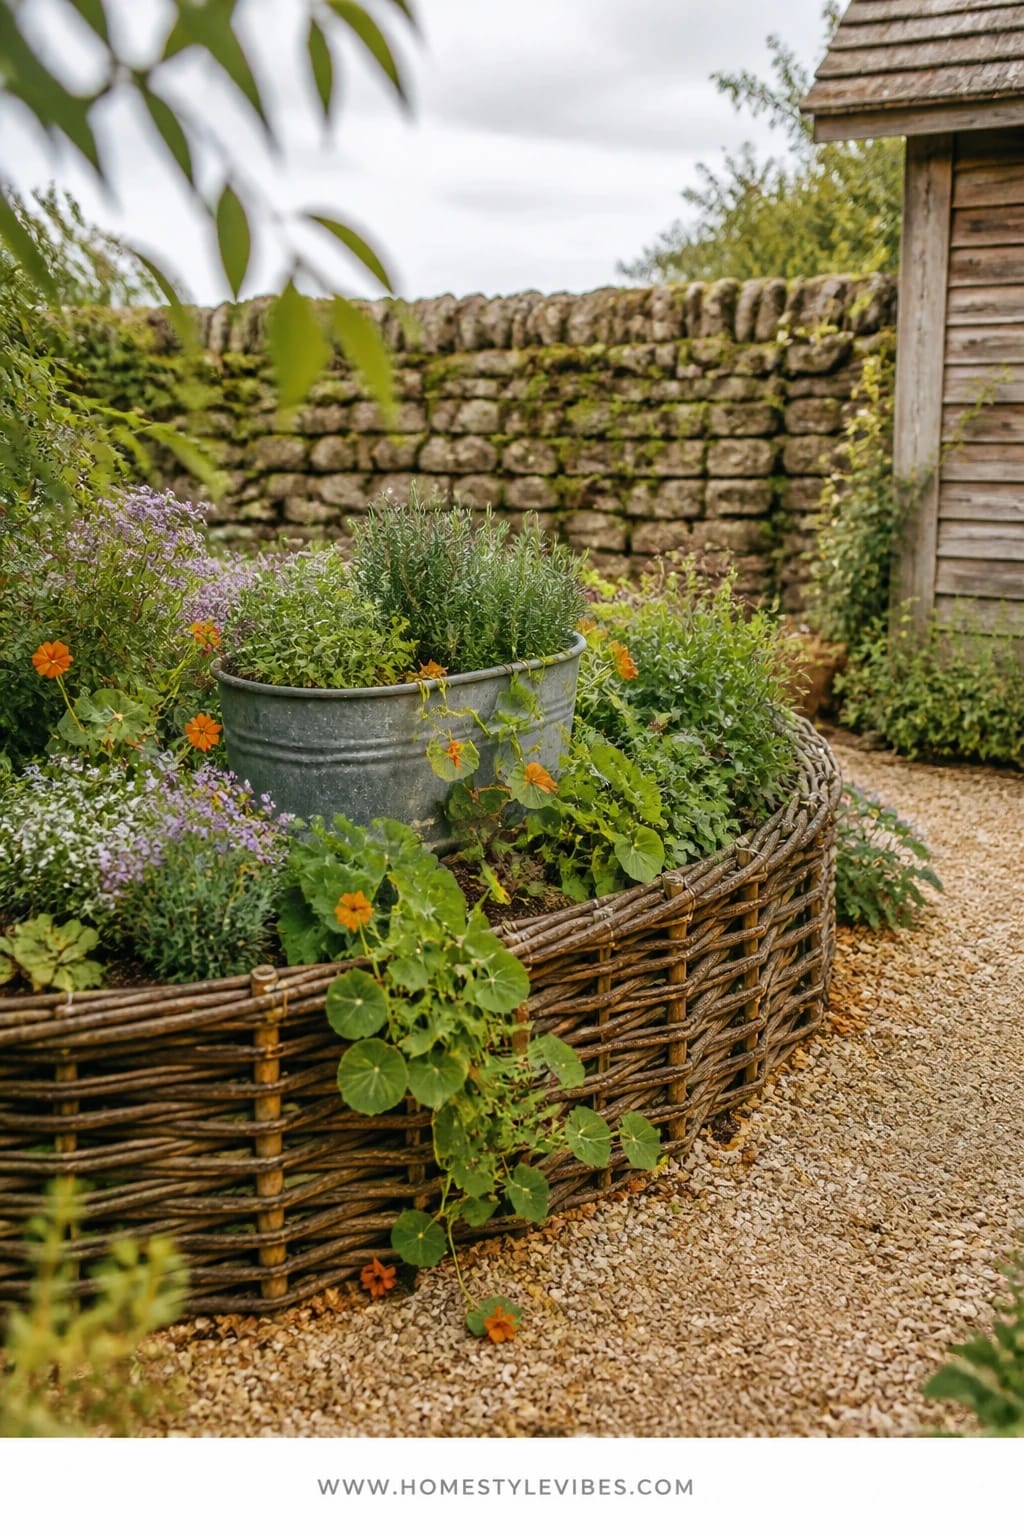
You’ve tried corralling plants with plastic edging, but it always looks cheap. Wattle fencing—the woven willow or hazel panels you see in old English gardens—delivers instant cottage credentials. Pair it with a galvanized vintage trough in the center for herbs or trailing nasturtiums, and site it where soft, cloudy-morning light spills in. This bed feels handmade, humble, and cozy, like a secret tucked into the yard.
It works in real homes because wattle contours easily around trees and uneven ground, and it’s forgiving if your lines aren’t laser-straight. The trough planter adds height and a utilitarian farmhouse note that breaks up florals. Photographs love the repeating horizontal texture of wattle; shadows fall through the weave and give your bed a cinematic backdrop that highlights everything in front.
Variations: If you can’t source willow, DIY with flexible branches or buy pre-made woven panels. On a tight budget, use cedar stakes with twine criss-crossing for a “hint of wattle.” For shade gardens, swap in foxglove, Japanese anemone, and ferns; for full sun, go with cosmos, daisies, and calendula. Renters can assemble a portable wattle ring and plop the trough planter in the center—zero digging.
Budget Breakdown:
- Wattle fencing or DIY materials: $120–$350
- Vintage galvanized trough or new equivalent: $80–$300
- Mixed annuals/perennials (10–15 plants): $150–$400
- Compost and mulch: $60–$120
- Stakes and ties: $20–$50
Total Estimated Cost: $430 – $1,220
Best For: Cottage purists, renters, and anyone craving handmade texture. Works in small yards where you need shape and charm more than mass planting.
Key Design Elements:
- Main materials: willow wattle, galvanized steel, twine
- Color palette: coral, butter yellow, peach, fresh greens
- Lighting strategy: morning or bright overcast for soft shadows and color accuracy
- Furniture silhouettes: a rustic potting bench or crate stack nearby
- Texture layers: feathery cosmos, ruffled calendula, trailing nasturtiums
- Accent details: hand-painted plant markers, terracotta shards as mulch top-dress
How To Recreate This Look:
- Form a rounded or kidney-shaped bed and stake the perimeter with short posts.
- Weave flexible branches between posts to build a 12–18 inch high wattle edge.
- Place the trough off-center; drill drainage holes if needed and fill with herb mix soil.
- Plant in repeating pockets: tall at back, airy mids, trailers at the boarder spilling over wattle.
- Mulch lightly and tuck in twine trellises for sweet peas or mini cucumbers on the edge.
Why This Looks Intentional: The consistent edge texture makes every wild bloom feel “contained.” It reads curated, not chaotic, even when plants lean and tangle in summer.
Don’t Do This: Avoid mixing too many flower forms—if you have ruffles (calendula), pick a simple daisy (cosmos) and a single trailing plant (nasturtium) rather than five different shapes competing.
Pro Styling Tip: For photos, let three nasturtium vines spill over the wattle in different spots; the staggered drape adds rhythm and movement.
Quick Tip: If your garden beds feel flat, add a single vertical element—an obelisk, tall stake, or small fruit tree. Height is the shortcut to romance.
5. Aged Limestone Bed With Rosy-Sunset Glow And A Classic Obelisk Trellis
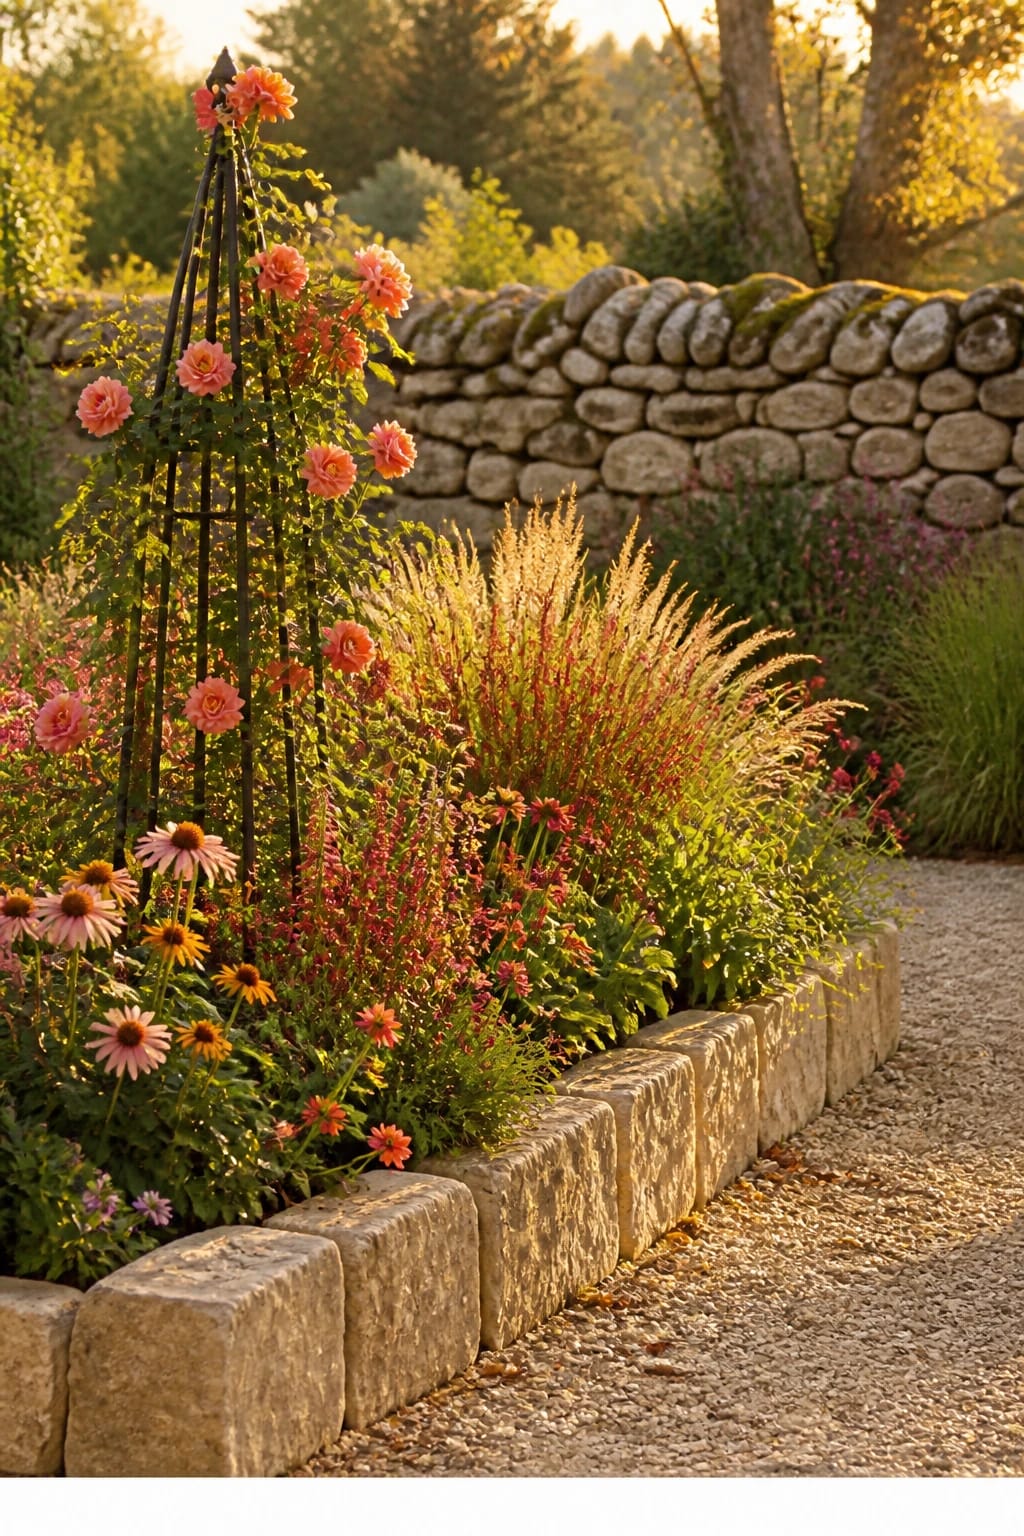
You’ve got a sunny patch that bakes by 3 p.m., and every plant you try sulks. This design embraces the heat with an aged limestone border that reflects rosy-sunset light and a classic wooden or iron obelisk trellis crowned with a vigorous climber. Think romantic heat-tolerant palette: coral roses or scarlet runner beans, penstemon, coneflower, and swaying grasses. The mood is warm, vibrant, slightly Mediterranean-meets-English—blousy but structured.
It works because limestone’s pale tone helps cool the bed and bounce light onto blooms, creating that evening glow that feels like a filter in real life. The obelisk adds vertical punctuation; even when blooms fade, you have sculpture. Drought-tolerant perennials keep maintenance honest. Photographs love the cool stone with warm florals—the contrast creates depth and that painterly backdrop Instagram eats up.
Variations: Budget-friendly? Use cast-concrete blocks in a limestone tint and a DIY obelisk made from cedar strips. Small yard? A single 3×3-foot square with one mini obelisk still delivers. For a deeper, moodier version, swap coral for burgundy dahlias and rust-toned rudbeckia with chocolate cosmos at the base.
Budget Breakdown:
- Limestone or limestone-look blocks: $180–$500
- Obelisk trellis (wood or iron): $60–$300
- Climber (scarlet runner, jasmine, or climbing rose): $10–$90
- Drought-tolerant perennials/grasses: $120–$350
- Soil amendments and mulch: $60–$150
Total Estimated Cost: $430 – $1,390
Best For: Full-sun beds in hot climates; homeowners who want late-day drama and pollinator traffic when entertaining.
Key Design Elements:
- Main materials: aged limestone edging, cedar or iron obelisk, organic mulch
- Color palette: coral, apricot, sunrise pink, soft gold
- Lighting strategy: spotlight the obelisk with a low-voltage uplight for magical evenings
- Furniture silhouettes: a curved-back bench or a metal cafe chair tucked nearby
- Texture layers: upright grass plumes, cone-shaped blooms, trailing verbena
- Accent details: terracotta pots clustered at the bed’s corner, wrought iron hose guide
How To Recreate This Look:
- Build a rectangular or diamond-shaped bed edged with limestone; aim for 8–10 inches of height.
- Set the obelisk slightly off-center and anchor firmly; plant your climber at its base.
- Arrange tall grasses at the far corner, medium perennials mid, and trailing verbena along the edge.
- Layer compost and mulch to keep soil cool and conserve water.
- Add a single warm uplight at the obelisk and a second grazing across the limestone for glow.
Why This Looks Expensive: Pale stone plus statement verticals read custom and timeless. The sunset palette against limestone mimics old estates where gentle aging and romance live side by side.
Watch Out: Don’t crowd the obelisk base with more than one or two climbers; competition leads to tangles and fewer flowers.
Pro Styling Tip: Shoot at golden hour with the uplight just turning on—warm foreground, cool stone, and a haloed climber equals instant cover shot.
Micro-moment: Picture yourself clipping a few coral blooms at 7:45 p.m., the air warm, the stone cool under your palm. That’s the kind of tiny luxury that changes a Tuesday night.
6. Painted Picket Backdrop With Pale-Mint Morning And An Heirloom Bench Anchor
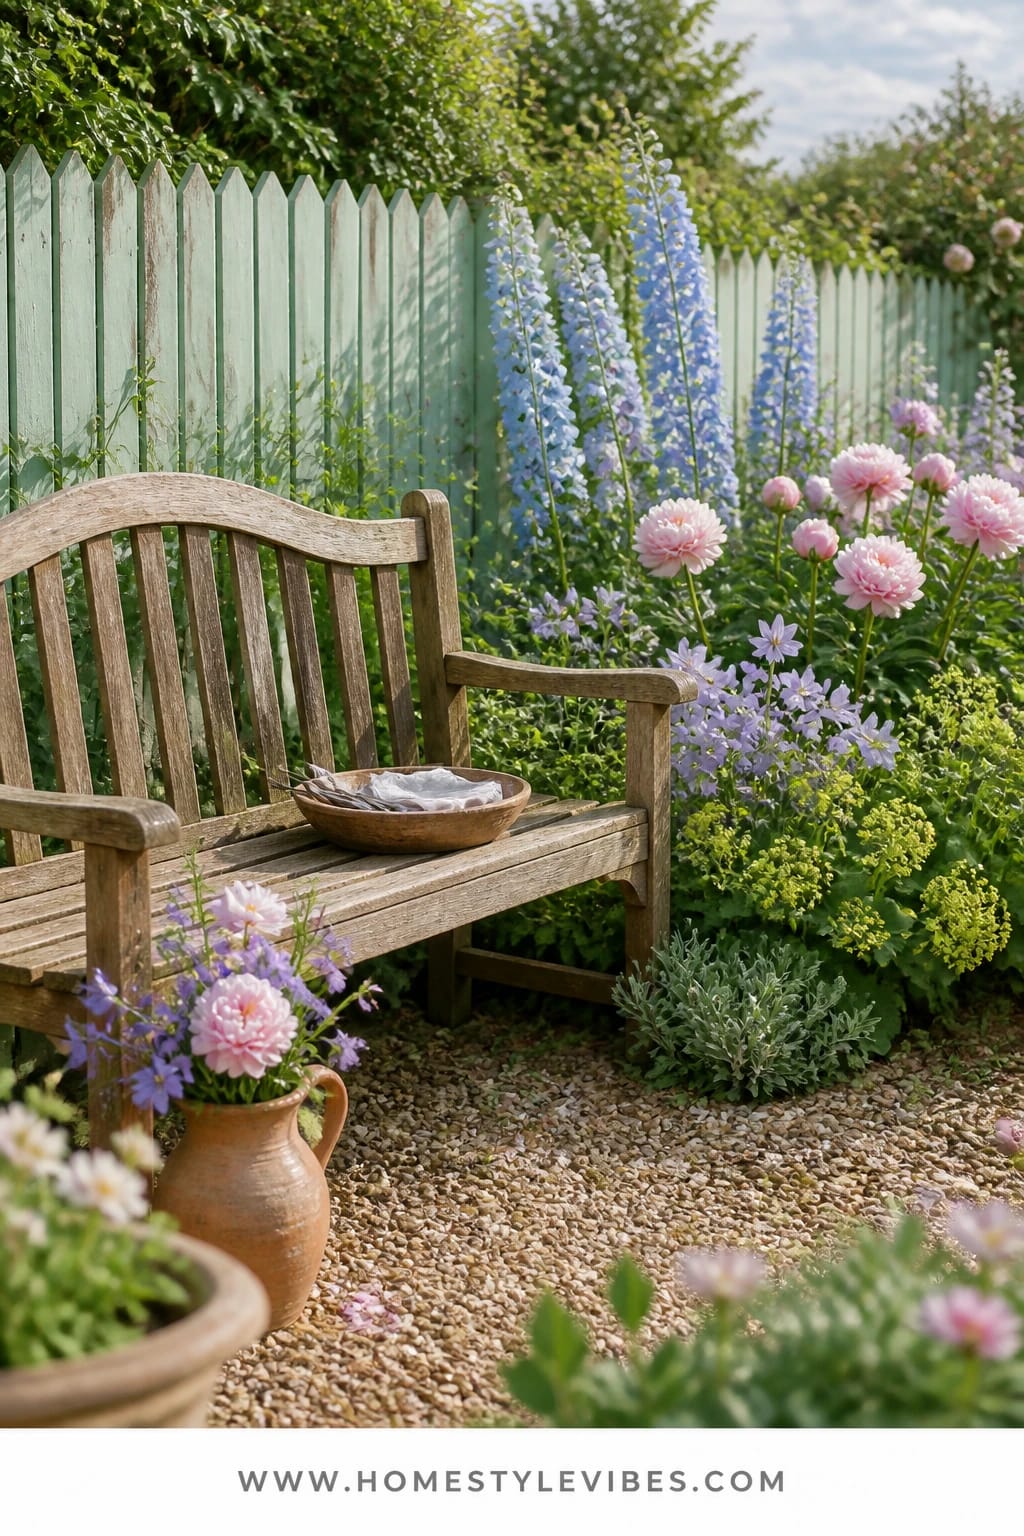
Some beds melt into the fence and disappear. You’ve painted the picket white, but it still reads bland. Here’s the fix: paint the fence a soft pale-mint or moss-gray that flatters florals, then set an heirloom-style wooden bench dead center as your anchor. Surround it with frothy, cottage classics—delphiniums, peonies, campanula, lady’s mantle—for a vintage garden portrait that lives and breathes. The mood is tender and nostalgic, perfect for morning tea.
Why it works: That gentle, colored backdrop makes petals pop more than stark white ever will. It also hides minor fence imperfections and creates a painterly backdrop. A bench pulls the eye to a single point and gives your bed a “purpose,” which buyers love if resale matters to you. Photographs love a repeated vertical (pickets) plus a horizontal anchor (bench) with billowy plants layered in front—your frame writes itself.
Variations: Renters or HOA rules? Use a freestanding trellis panel in that pale-mint shade instead of painting the fence. Budget twist: source a secondhand bench and sand/paint it; keep your plant palette to three bloomers and repeat them in drifts. For a moodier read, go sage fence with plum foxgloves and mauve roses.
Budget Breakdown:
- Exterior paint and supplies: $80–$180
- Vintage or new wooden bench: $70–$400
- Perennials (peonies, campanula, delphinium, lady’s mantle): $160–$450
- Soil and mulch: $60–$140
- Simple trellis panels (if not painting fence): $80–$200
Total Estimated Cost: $370 – $1,370
Best For: Narrow beds along a fence, cottage-style homes, and anyone who wants a styled seating moment surrounded by blooms.
Key Design Elements:
- Main materials: painted wood fence/trellis, wood bench, organic mulch
- Color palette: pale mint or moss-gray backdrop with soft pink, sky blue, butter yellow blooms
- Lighting strategy: let morning light wash the fence; add low solar along the bench legs for evening glint
- Furniture silhouettes: curved-back bench with simple turned legs
- Texture layers: ruffled peonies, spires of delphinium, lacy lady’s mantle
- Accent details: floral cushions in outdoor fabric, a galvanized bucket with gardening tools
How To Recreate This Look:
- Prep and paint the fence or trellis a soft mint or moss-gray; satin finish hides imperfections.
- Place the bench centered along the longest stretch; ensure a flat, mulched pad beneath.
- Plant tall spires behind the bench, medium bloomers at the sides, and low fillers at the front.
- Mulch lightly and set two stepping stones leading to the bench for intent.
- Style with one cushion and a small throw; keep it simple for weather and tidiness.
Why This Feels Designer: The backdrop color is everything. It eliminates that harsh fence-to-flower contrast and creates a soft field where blooms sing. The bench suggests “this is a destination,” not just plant chaos along a boundary.
One Thing To Avoid: Don’t overstuff directly under the bench—leave negative space so the silhouette reads. Plants should frame, not swallow, your anchor.
Pro Styling Tip: Angle your photo from the side so you catch the picket rhythm, bench curve, and plant layers in a single diagonal composition.
Did You Know? A 2-inch difference in bench height can change the whole vibe. Slightly lower benches feel cozier and look better tucked into dense planting because the line doesn’t slice the blooms in half.
7. Crushed Shell Path With Moonlit-Silver Glow And A Vintage Lantern Post
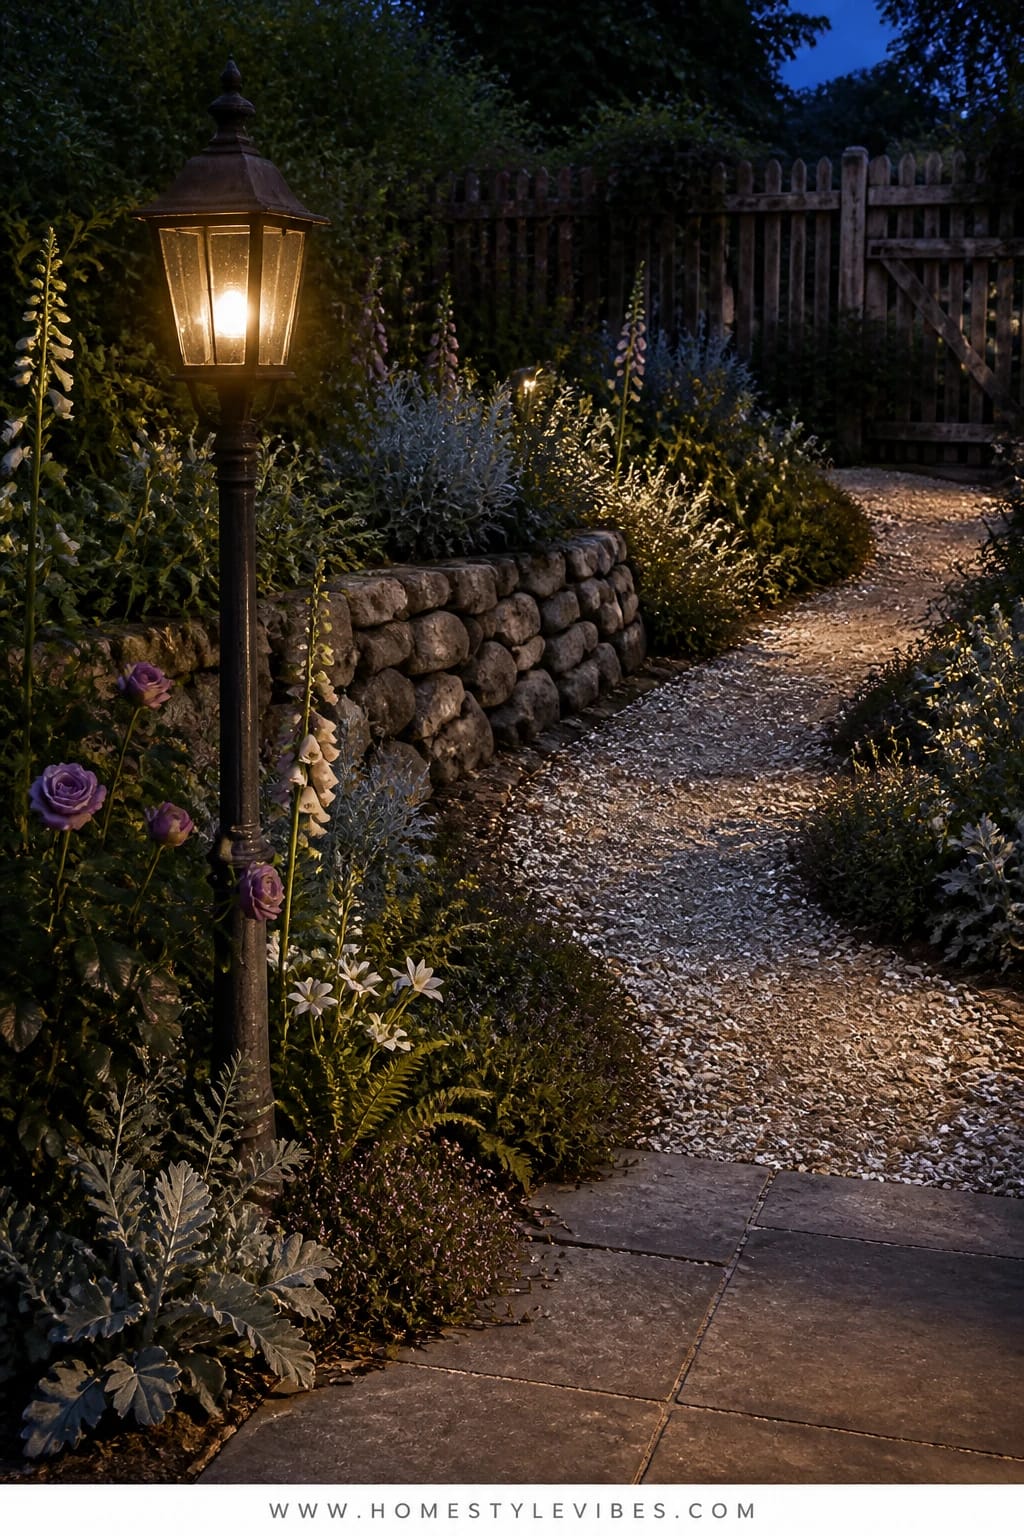
You want night magic. But your beds vanish after sunset, and solar stakes look like runway lights for garden gnomes. This design leans into a moonlit palette—silver foliage, pale blooms, and a crushed shell path that sparkles softly—anchored by a vintage-style lantern post. The effect is romantic and practical: a clear path through a sensory bed that oozes English-garden charm even at midnight.
It works because shell paths bounce light in tiny, twinkly ways and make silver plants (artemisia, dusty miller, lamb’s ear) look luminous. A proper lantern post throws a wider, warmer pool of light, which sculpts form rather than pinpricking it. The color story stays ethereal: whites, creamy yellows, a bit of pale lavender. Photos at dusk look editorial, with reflective surfaces creating soft highlights and gentle shadows.
Budget version? Use pale gravel and a thrifted lantern head on a sturdy wooden post. For renters, lay a temporary path using stepping stones nested into pea gravel. Small-space layout: a 2-foot “ribbon” path that curves around a single dramatic hydrangea and a bank of dusty miller still works wonders. If maintenance worries you, line the path with steel edging to keep shells in place.
Budget Breakdown:
- Crushed shell or pale gravel: $120–$380
- Vintage-style lantern post (solar or wired): $90–$450
- Silver-foliage plants and white bloomers: $140–$420
- Edging (steel or stone): $80–$220
- Soil, compost, and mulch: $60–$140
Total Estimated Cost: $490 – $1,610
Best For: Evening entertainers, moon-garden lovers, and anyone whose garden time begins at dusk. Great for front walks and side-yard journeys.
Key Design Elements:
- Main materials: crushed shells, vintage lantern, steel edging
- Color palette: white, cream, soft lavender, silver-green
- Lighting strategy: one strong ambient lantern plus subtle ground glints from shell reflectivity
- Furniture silhouettes: a slender metal chair tucked near the lantern for quiet night reads
- Texture layers: velvety lamb’s ear, lacey gaura, upright veronica, domed hydrangea
- Accent details: white ceramic pots, iron plant labels, wire basket for snips
How To Recreate This Look:
- Cut a gentle, meandering path; install steel edging for crisp containment.
- Lay a compacted base and top with crushed shells; rake for an even, slightly rippled surface.
- Install the lantern post at a curve; test sight lines from porch and interior windows.
- Plant silver foliage along the edges and group white bloomers in mini drifts.
- Finish with a single low uplight on the hydrangea for a layered light story.
Why This Reads High-End: The limited, moonlit palette with a meaningful light source looks like a curated scene. The shell path feels coastal-English—a little unexpected, very chic—and the lantern makes it feel intentional year-round.
The Most Common Mistake: Skipping the base compaction under shells, which leads to ruts and messy migration into beds. Compact well; your future self will cheer.
Pro Styling Tip: Snap photos five minutes after sunset when the sky is inky blue; the lantern glow, shell sparkle, and silver leaves pop without blowing highlights.
Perspective shift: Remember, this isn’t about recreating a showroom. It’s about building a yard that carries your mornings, your sunsets, your muddy boots, and your champagne toasts. Start with one bed and let it teach you what the rest wants to be.
Anecdote
I tried the moonlit palette in my own narrow side yard last fall, after years of cluttered color. Honest truth? I hesitated over the shell path install because compaction felt intimidating. It took an extra afternoon and a borrowed tamper, but that subtle crunch underfoot now makes every late walk feel special. And yes, the photos look like I hired a stylist. I didn’t. Just leaned into restraint.
Quick Checklist
- Choose one focal structure (arbor, urn, trough, obelisk, bench, or lantern)
- Commit to a tight color story (2–3 bloom colors max)
- Add one material with patina (weathered brick, reclaimed timber, copper, limestone, galvanized steel)
- Build in height shifts (trellis, obelisk, or tall spires)
- Edge cleanly (brick, steel, shell path, or gravel line)
- Layer textures (velvet leaves, airy blooms, trailing spillers)
- Mind the light (dawn-gold, twilight whites, moonlit silver)
- Repeat plants in drifts for rhythm
- Leave negative space around focal pieces
- Photograph in early morning or five minutes after sunset
Frequently Asked Questions
How much does it cost to build one cottage-style flower bed that actually looks polished?
Plan on $400–$1,500 for a small to medium bed if you choose one strong focal (arbor, urn, or bench) and invest in soil and 10–15 plants. Reusing materials—reclaimed brick, thrifted planters—keeps costs closer to the low end.
I have a tiny yard. Which of these cottage garden ideas works best without feeling crowded?
Go with the honeyed gravel border and single stone urn (Design 3) or the wattle-and-trough (Design 4). Both create a strong focal and layered texture in a small footprint and photograph beautifully without needing mass planting.
What if I’m a beginner and worry about maintenance?
Choose drought-tolerant, repeat-blooming perennials like catmint, salvia, yarrow, and coneflower. Keep your palette tight and install mulch to reduce weeding. One focal structure plus three repeat plants is easier to care for than 12 different species.
Can I do any of these if I rent and can’t dig or paint fences?
Yes. Use portable elements: a metal arch with planters at the base, a resin “stone” urn, freestanding trellis panels, and container clusters arranged as a “bed.” The wattle ring with a trough (Design 4) and a small gravel vignette with a bench (Design 6) are renter-friendly.
What’s the most common mistake with romantic English-style beds?
Too many plant types and no focal. Pick a hero (arbor, obelisk, bench), then repeat 3–5 plants in drifts. That’s the secret sauce that makes cottage gardens read romantic instead of messy.
Conclusion
If your yard feels stuck on “almost,” pick one idea from this list and start there. A curved brick bed with an iron arbor, a moonlit shell path with a lantern—one finished vignette can reset how you see the whole garden. Keep it focused: one focal, a tight color story, and honest materials with texture.
The truth is, luxury outside doesn’t come from rare plants. It comes from rhythm, texture, and light. Layer soft foliage against hard edges, let height guide the eye, and use warm or cool light to tell the story at different hours. Restraint is your best friend—leave breathing room so the beauty has space to land.
Pull on your boots, pour a cup of whatever makes you happy, and claim one corner this weekend. You’re not just planting flowers; you’re building a daily ritual. And trust me, that first morning you catch the roses backlit in gold—you’ll know you nailed it.

About the Author

Krisztina P.Rendes, Founder of Home Style Vibes
Founder of Home Style Vibes
Krisztina Puskásné Rendes created Home Style Vibes as a cozy-modern lifestyle space where homemaking meets inspiration. Her goal is to help women create beautiful, organized, and peaceful homes they truly love — without overwhelm. You’ll find here heart-driven content on home decor, cleaning tips, easy family recipes, organization and decluttering, DIY home projects, plants, and seasonal ideas — all designed to bring more calm, comfort, and style into everyday life.