7 Outdoor Entertainment Space Ideas With TV Rooftop Lounge And Outdoor Kitchen
You want those golden-hour backyard hangs—the ones where the grill is working, the TV is streaming the game, and your friends keep saying, “Wait, this is your house?” But every time you step outside, it feels like a half-finished project: tangled cords, mismatched patio chairs, nowhere for people to actually put a drink. You crave clean lines, layered textures, warm light, and a setup that works on a random Tuesday as well as it does for a 12-person watch party. These 7 outdoor entertainment space ideas with TV rooftop lounge and outdoor kitchen fix the chaos with real design that looks editorial and lives easy—no overthinking, no $100k budget. Pick one direction, give it two weekends, and watch your setup shift from “where’s the extension cord?” to “I can’t believe this is ours.” Perfect for anyone who wants their outdoor space to photograph beautifully and function even better—seriously, these are Pinterest-board material.
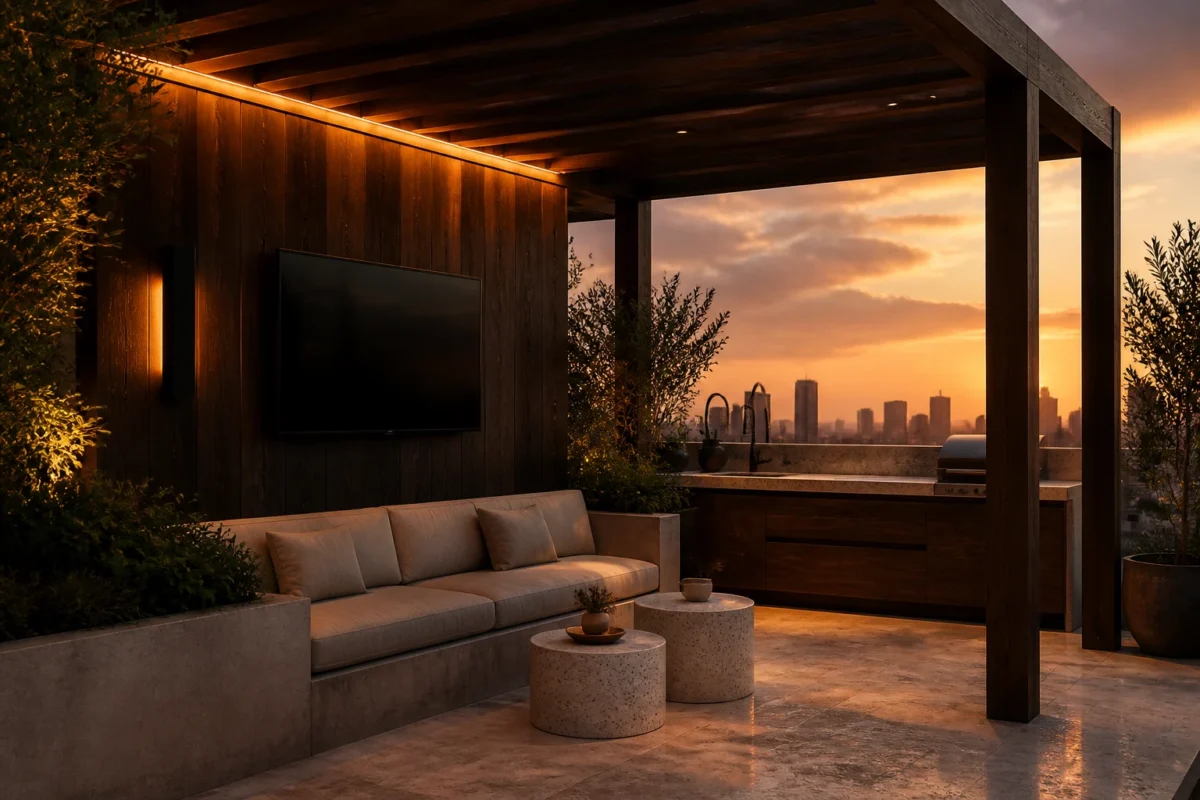
1. Charred Cedar Pergola With Warm Amber Glow And Built-In Concrete Banquette
We’ve all been there: you set up a nice outdoor sofa, and somehow it still feels like the world’s least-inviting waiting room. Too open, too exposed, zero vibe. This design builds a defined zone—charred cedar above, poured concrete beneath—so your outdoor TV area reads like a grown-up room, not a scattered patio experiment.
Expect a mood that feels modern Mediterranean meets moody wine bar. The charred cedar pergola adds drama and sun protection, while the warm amber glow from dimmable string lights and LED strips gives a cinematic quality to the TV. Concrete banquette seating along one side keeps footprints compact and makes small yards feel bigger and more intentional. The light catches on the textured banquette cushions and the matte cedar grain, creating contrast and shadows that photograph like a magazine spread.
Why it works: the pergola frames the TV wall so glare stays in check, the concrete is durable and kid-proof, and cushions are easy to swap seasonally. For a budget version, skip custom poured concrete and use modular concrete blocks with a smooth skim coat. For renters, try a freestanding wood pergola kit and a pair of long storage benches with deep seat pads—similar look, zero demo. Want a darker vibe? Choose black outdoor fans, espresso cushions, and bronze fixtures.
Budget Breakdown:
- Charred cedar pergola: $1,800–$4,200
- Poured concrete banquette or block/skim coat alternative: $600–$2,000
- Weather-rated 55–65” TV + mount: $900–$2,500
- Warm LED string lights and pergola strip lighting: $120–$450
- Outdoor cushions and textiles: $250–$900
- Low-profile coffee table (powder-coated metal): $200–$700
Total Estimated Cost: $3,870 – $10,750
Best For: Narrow patios or small backyards where a single anchored wall works hard. Perfect for dusk-to-late-night hangs and fall game days.
Key Design Elements:
- Main materials: charred cedar, smooth concrete, powder-coated steel
- Color palette: charcoal, warm taupe, amber light, soft ecru
- Lighting strategy: perimeter LED strips and overhead string lights for layered warmth
- Furniture silhouettes: built-in bench + low rectangular table + armless lounge chairs
- Texture layers: heavy-weave outdoor cushions, linen-look pillows, ribbed planters
- Accent details: matte black hardware, rosemary and lavender planters, ceramic lanterns
How To Recreate This Look:
- Start with the pergola to define your “ceiling” and create a frame for the TV wall.
- Add a built-in or modular concrete banquette to anchor seating and hide clutter.
- Layer in dimmable warm LEDs at two heights—overhead and under the bench lip.
- Install a weather-rated TV on a tilt mount to control glare.
- Style with textured cushions, a low metal table, and tall herbs for sculptural greenery.
Why This Looks Expensive: The architectural moves—the pergola and the built-in bench—signal permanence. Repetition in materials and one dominant warm light temperature make the space feel composed, not pieced together.
Watch Out: Don’t mix cool white bulbs with warm amber; the clash kills the vibe. Also, keep the pergola posts aligned with seating edges—misaligned lines are the tiny detail that makes a space feel off.
Pro Styling Tip: For photos, turn off the brightest overheads and let the bench lighting and string lights carry the scene; the shadows under the pergola create a luxe depth that reads beautifully on camera.
Scroll on—next up is a layout that turns a tricky roof deck into a legit destination.
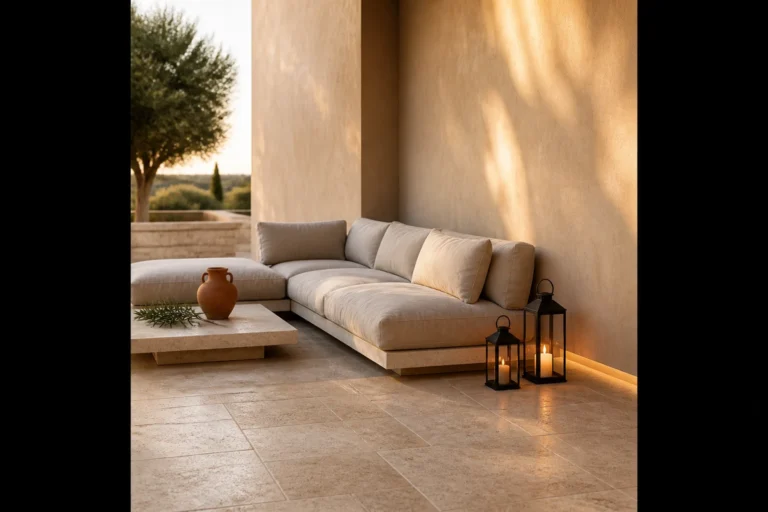
2. Honed Limestone Terrace With Soft Moonlight Sconces And a Curved Outdoor Sectional
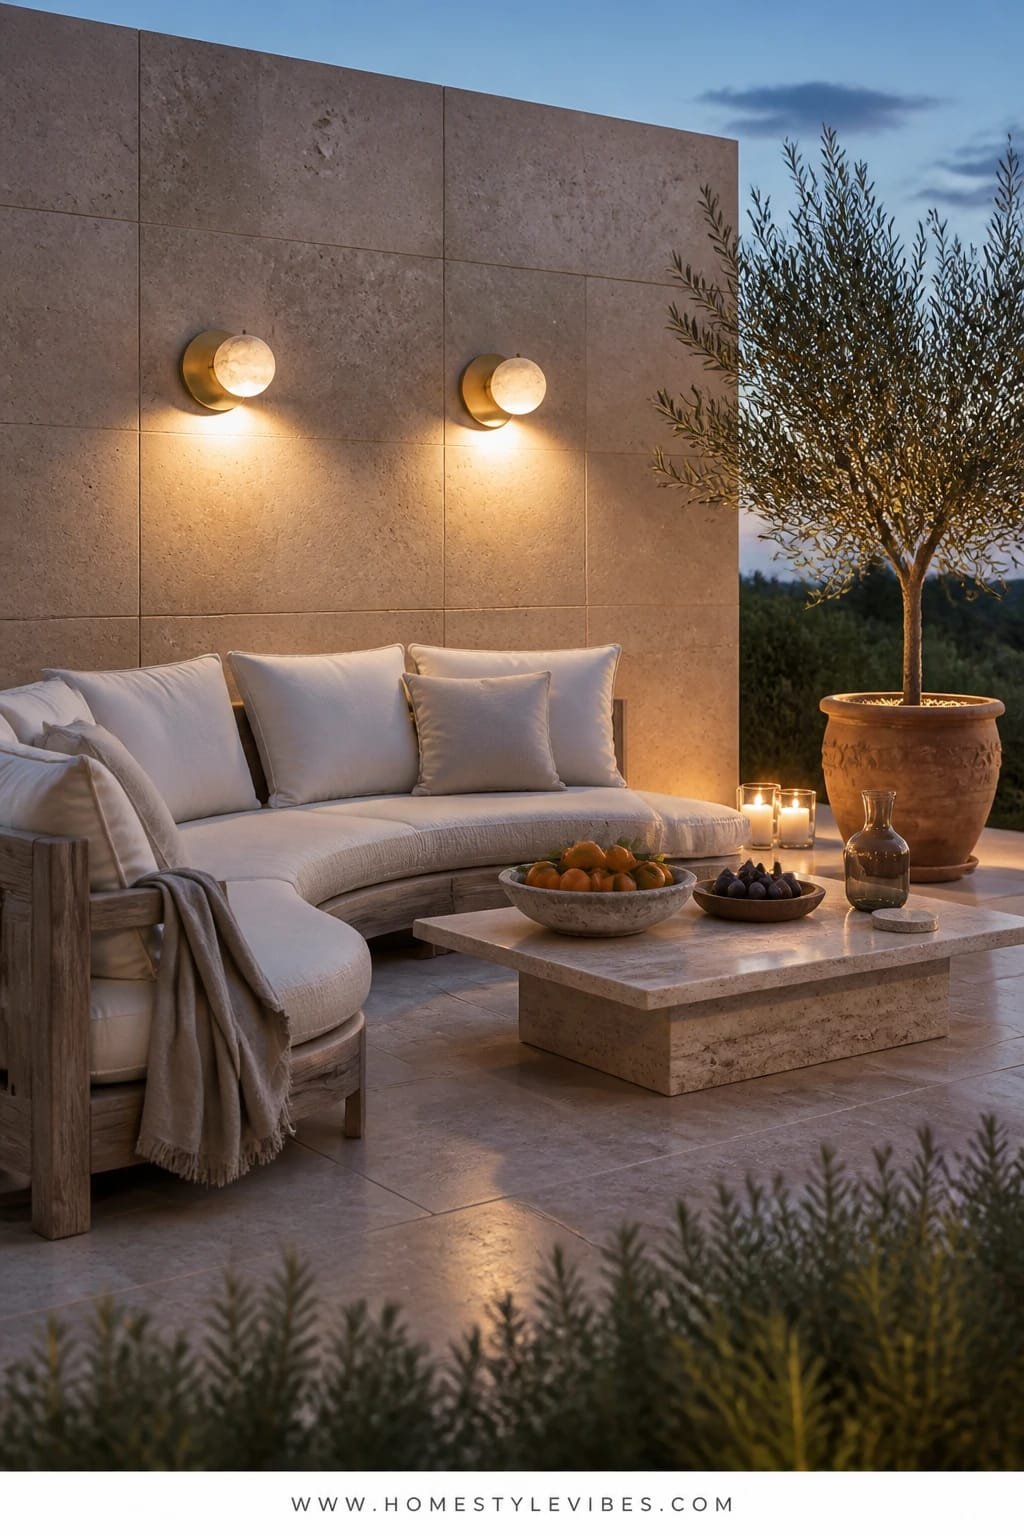
It’s that one corner that always feels off: too boxy, too many legs, nowhere cozy to curl up. You’ve tried moving chairs around, but it still looks like lawn furniture scattered on a chessboard. The fix? Curves. A curved sectional instantly softens a rigid terrace, while honed limestone underfoot glows softly at night.
This mood leans European courtyard meets boutique hotel. Honed stone keeps things cool underfoot and reflects candlelight in the prettiest, low-sheen way. Moonlight-like wall sconces along the parapet or fence provide gentle halos that flatter faces during late-night chats. The curved sectional pushes the zone into “lounge” territory, useful for families and effortless for hosting since it removes the “do we have enough chairs?” math.
Small-space friendly: curves tuck into corners and open up circulation. Family-friendly: performance fabrics, removable covers, and no sharp corners. For budget, use porcelain pavers that mimic limestone. For renters, layer outdoor rugs and curved modular pieces instead of permanent stone. Want drama? Swap soft white sconces for matte black half-dome fixtures with dim-to-warm bulbs.
Budget Breakdown:
- Honed limestone or porcelain-look pavers: $1,200–$4,500
- Curved outdoor sectional (modular): $1,000–$3,500
- Moonlight sconces (weather-rated): $180–$650
- Weather-rated TV and swivel mount: $900–$2,500
- Round pedestal coffee table: $300–$900
- Planters with olive or bay trees: $200–$700
Total Estimated Cost: $3,780 – $12,750
Best For: Rooftop lounges or patios with hard edges. Ideal for people who host often and want a soft, elegant visual line.
Key Design Elements:
- Main materials: honed limestone/porcelain, powder-coated aluminum, performance boucle
- Color palette: bone, warm stone, muted sage, soft black accents
- Lighting strategy: low-glare sconces + candles + subtle under-table glow
- Furniture silhouettes: curved sectional, round pedestal table, tub chairs
- Texture layers: nubby fabrics, smooth stone, matte metal, leafy evergreens
- Accent details: sculptural planters, stone coasters, low bowls of citrus
How To Recreate This Look:
- Map a curved seating arc against your boundary wall or railing.
- Install or place honed-look flooring or rugs that read as one field of color.
- Add soft halo sconces on dimmers at eye level (about 60–66” from the floor).
- Mount the TV on a swivel so it tucks flatter when not in use.
- Style with rounded planters and a pedestal table to echo the curve language.
Why This Feels Designer: The repeated curve motif unifies the scene and counters the harsh geometry of urban terraces. Minimal colors, maximum shape—clean and confident.
One Thing To Avoid: Don’t scatter small tables everywhere; one strong round piece feels intentional and keeps the sightline calm.
Pro Styling Tip: For photos, place a single bowl of green pears or lemons on the table—the saturated color against neutral stone pops without clutter.
Quick Tip: Create a “light map.” Note where the TV glares at 3 pm vs. 8 pm and position sconces and dimmers to complement those shifts. Your nighttime space will feel twice as considered.
Remember, this isn’t about recreating a showroom. It’s about building an outdoor entertainment space that works for your lifestyle and your light. If one idea hums in your chest, start there and ignore the rest for now.
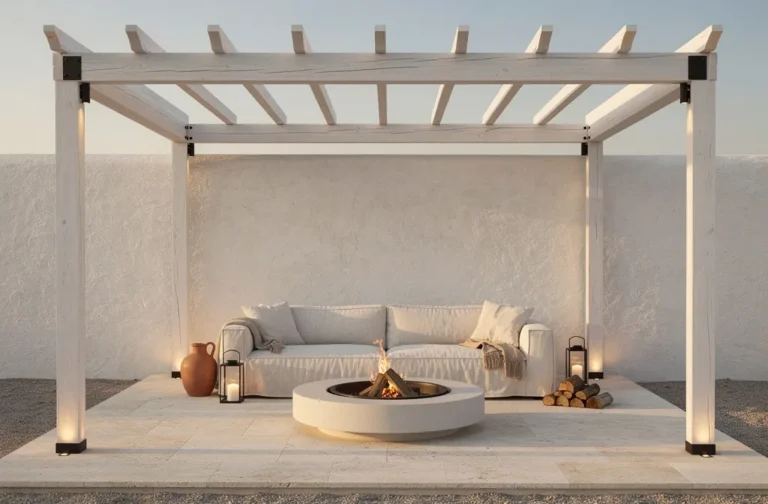
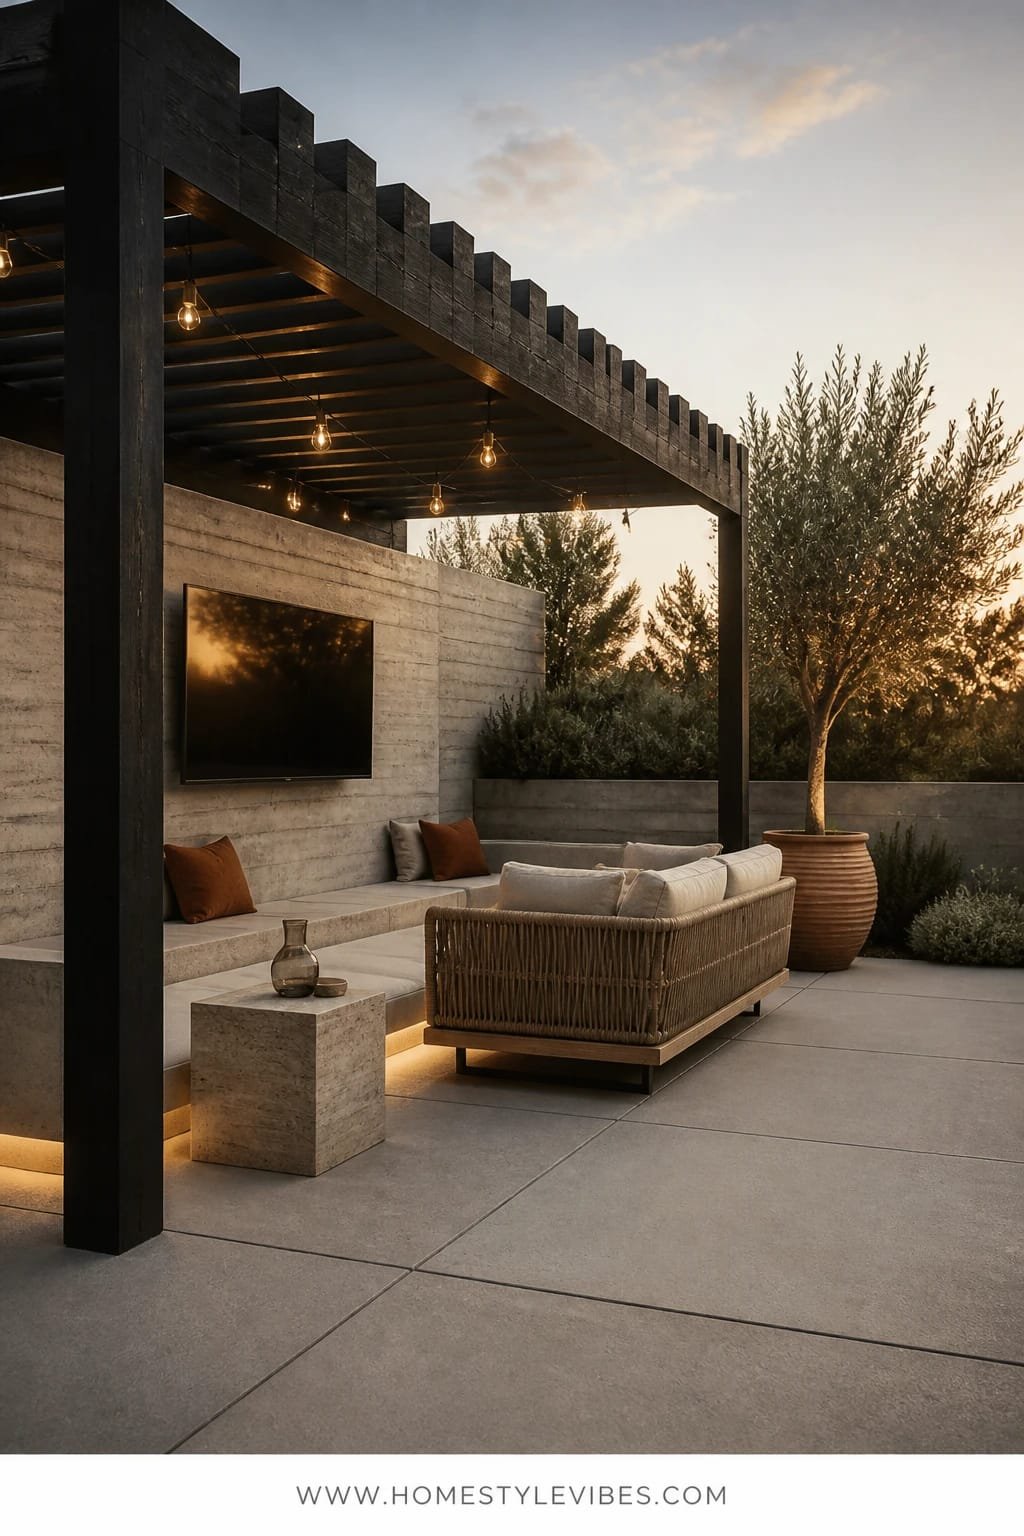
3. Weathered Teak Deck With Golden Cove Lighting And a Linear Fire Table
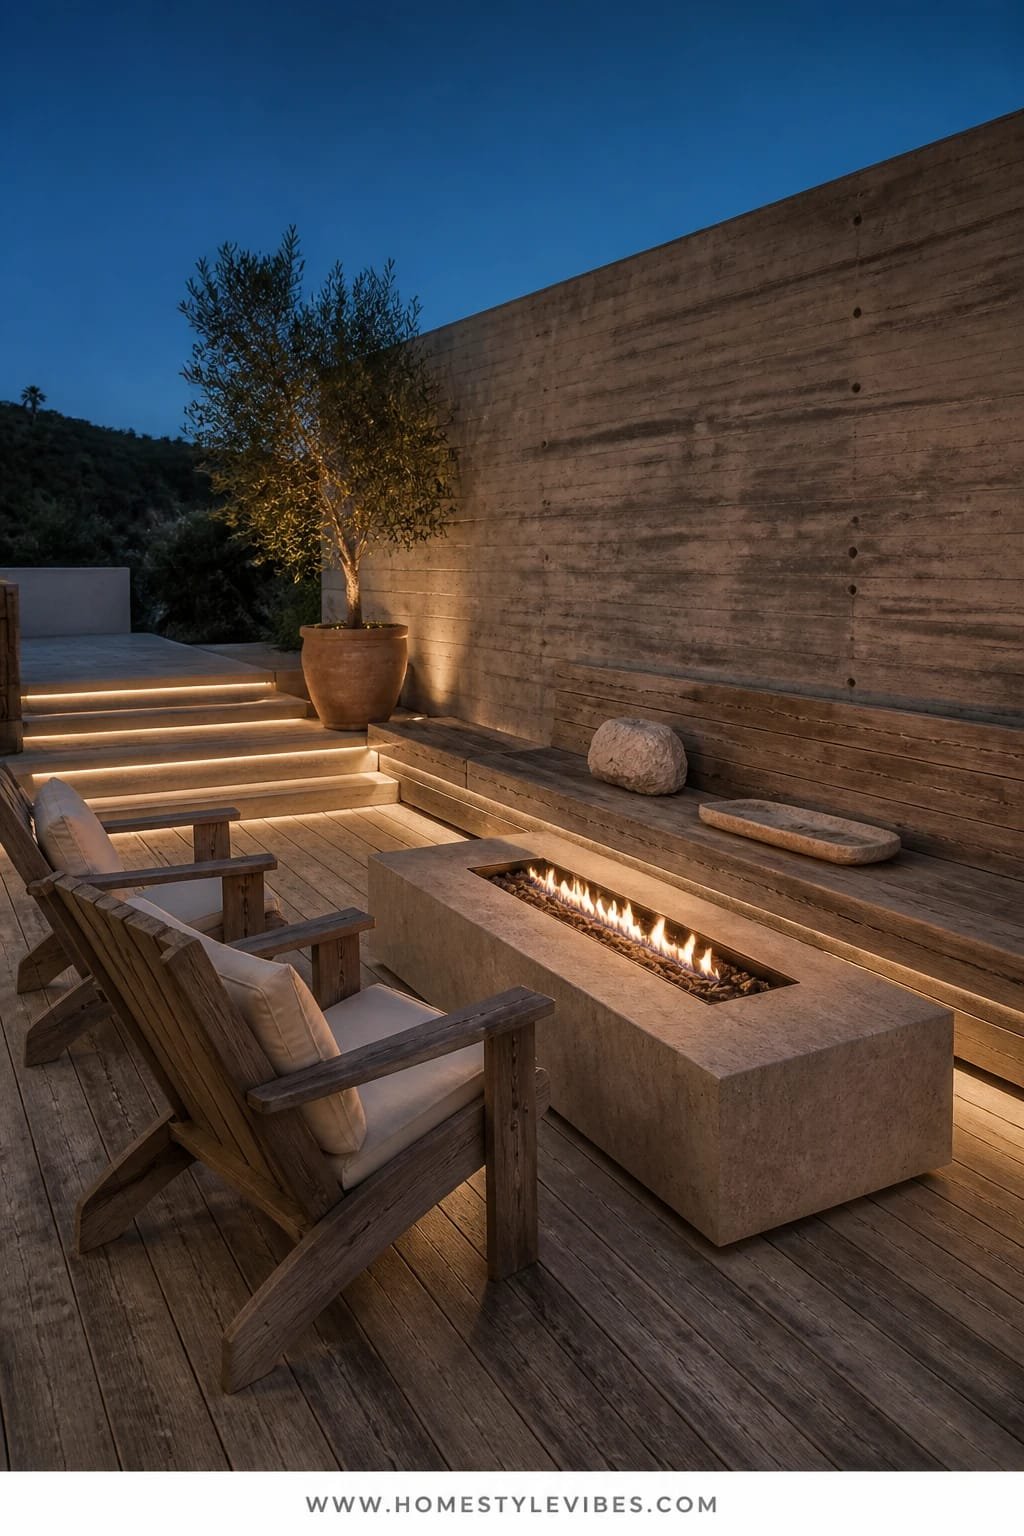
You want a mood that says “understated luxury,” but your deck looks flat, washed out, and kind of… beige. You’ve swapped pillows a dozen times and still can’t get the atmosphere right. Here’s the shift: warm cove lighting tucked under bench edges, layered with a low linear fire table. Suddenly, your teak reads as intentional patina, not tired wood.
The vibe hits coastal calm meets modern lodge. Weathered teak planks bring grain and history; low golden lighting lines the seating edges and stair risers for safety and glow; the fire table anchors gatherings and gives your TV nights a flickering counterpoint. Why it works: height variation. Benches at one level, loungers at another, and the fire table just below sightline build depth and shadow play that photographs beautifully.
Practicality is high: teak ages gracefully, fire tables come with covers, and cove lighting is LED-efficient and long-lasting. Small-space version? Use a compact 48” fire table and a single sectional with a built-in teak backrest. Renter-friendly? Use solar step lights and a portable propane fire bowl instead of a plumbed line.
Budget Breakdown:
- Teak deck boards or maintenance refresh: $600–$4,000
- LED cove lighting and stair lights: $200–$800
- Linear fire table (propane or natural gas): $900–$3,200
- Outdoor TV with partial sun rating: $1,100–$2,700
- Sectional or bench seating (teak or teak-look): $900–$3,000
- Wind guard and cover for fire: $180–$450
Total Estimated Cost: $3,880 – $14,150
Best For: Decks that need atmosphere and warmth. Great for coastal homes and chilly evenings.
Key Design Elements:
- Main materials: weathered teak, glass wind guard, concrete composite fire table
- Color palette: driftwood gray, warm brass, camel, soft white
- Lighting strategy: under-bench cove + stair riser lights + fire glow
- Furniture silhouettes: low modulars, backless benches, slim loungers
- Texture layers: slatted wood, chunky knits, canvas, smooth stone
- Accent details: brass bottle openers, striped wool throws, eucalyptus stems
How To Recreate This Look:
- Refresh or install teak boards with a natural oil finish for depth.
- Mount LED strips under bench lips and along steps, all on one dimmer.
- Place a linear fire table centered on the seating axis for symmetry.
- Angle the TV slightly away from the fire reflection for reduced glare.
- Style with camel-toned cushions, a knit throw, and one oversized tray.
Why This Reads High-End: The glow line—subtle, continuous, and warm—feels architectural, not decorative. Teak’s natural patina pairs with the flame reflection for a rich, layered scene.
The Most Common Mistake: Installing cove lights too bright. Keep lumens low and lean into warmth (2200–2700K) so skin tones look great on movie night.
Pro Styling Tip: Slightly wet the deck boards before shooting photos; the grain deepens and looks insanely luxe for 20 minutes—long enough for the hero shot.
Did You Know? Outdoor TVs come in “shade,” “partial sun,” and “full sun” ratings. Picking the right one matters more than the brand if you want clear picture and longer life.
4. Fluted Concrete Bar With Cool Graphite Uplighting And a Cantilevered Canopy
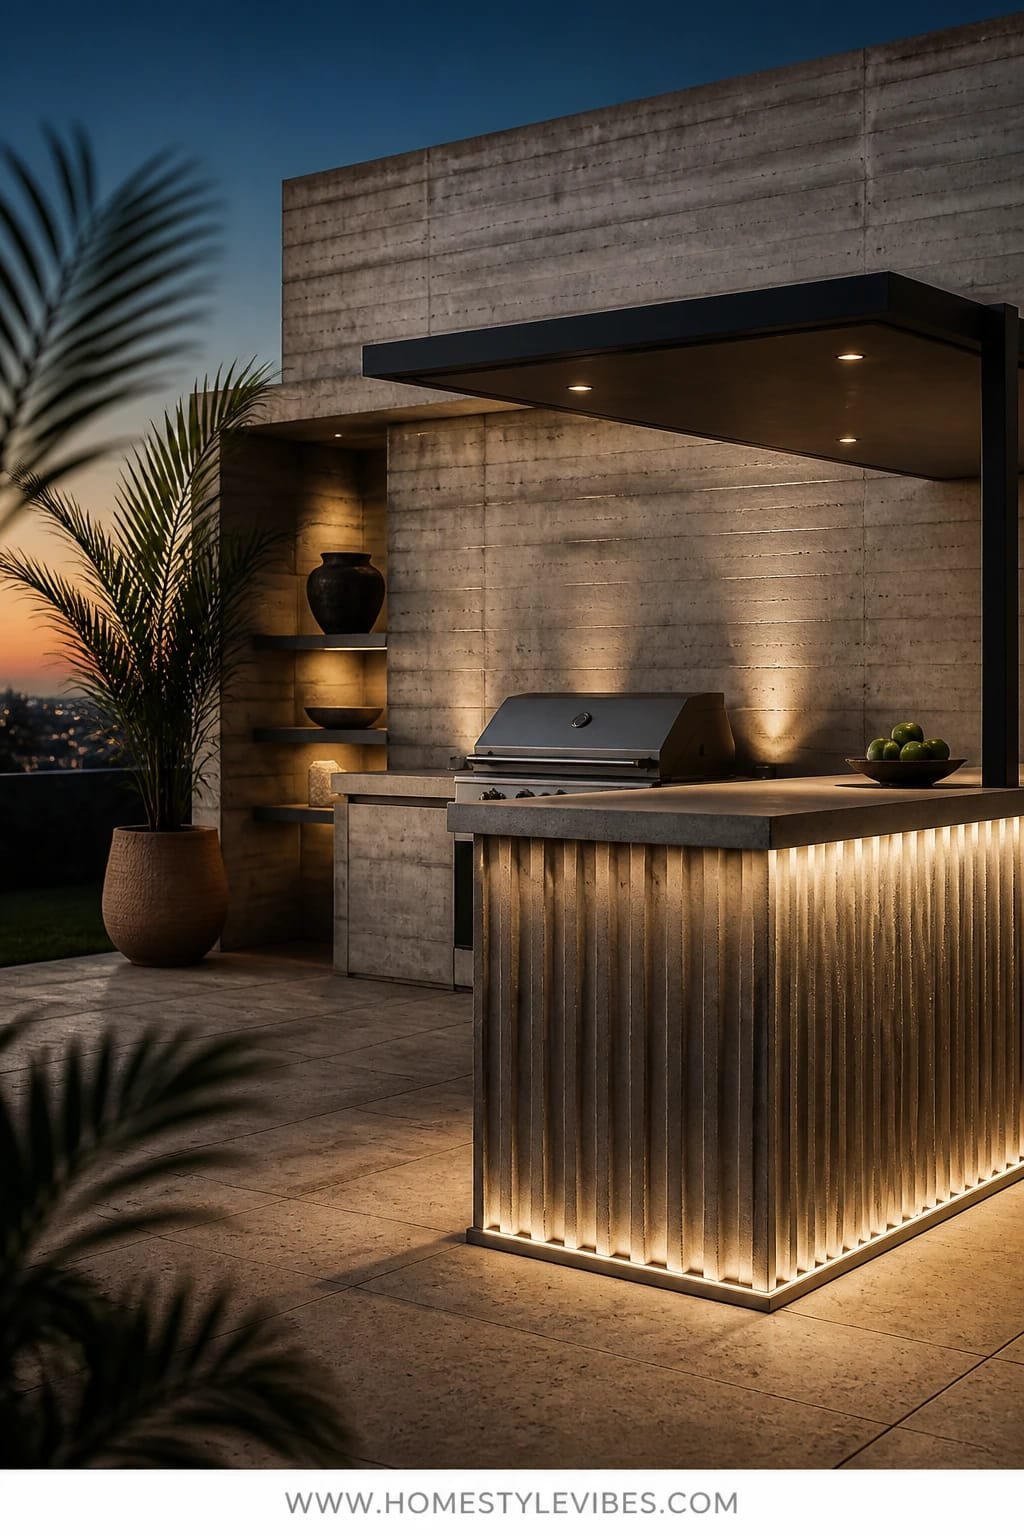
Your outdoor kitchen works, but it doesn’t wow. It’s stainless everything, bright as an operating room, and somehow both cluttered and cold. The move here: introduce fluted concrete for texture, cool graphite uplights to carve shadows, and a cantilevered canopy that shades the cook without closing the view.
Expect a modern metropolitan mood—sleek but tactile, editorial without feeling fussy. Fluted concrete hides scuffs and instantly reads bespoke. Uplighting under the bar face makes those grooves glow after sunset in a dramatic, sculptural way. The canopy keeps heat and glare off the grill zone so your TV sits nearby without suffering reflections. It’s practical, too: the fluting masks minor wear, and the canopy sheds light rain for three-season usability.
Variations: For a smaller space, build a 6–8 foot bar with a single fluted panel and a slim induction cutout for a safer, smoke-light riff. For budget, use fluted cement board panels with a mineral paint finish. For renters, mimic the vibe with fluted planter boxes fronting a portable grill station and a freestanding awning.
Budget Breakdown:
- Fluted concrete panels or cement board + finish: $800–$3,200
- Cantilevered canopy (aluminum or steel): $1,500–$6,000
- Outdoor-rated uplights and strip LEDs: $250–$900
- Grill + undercounter fridge: $1,200–$4,500
- Weather-rated TV and adjustable mount: $900–$2,500
- Stools (powder-coated metal): $240–$900
Total Estimated Cost: $4,890 – $18,000
Best For: Hosts who cook and chat simultaneously. Works in modern homes and townhouses where a clean-lined bar boosts resale.
Key Design Elements:
- Main materials: fluted concrete/cement board, stainless cook surfaces, matte steel
- Color palette: graphite, soft black, pewter, pale ash
- Lighting strategy: uplights to graze texture + task lighting under canopy
- Furniture silhouettes: cantilevered bar, backless stools, slimline consoles
- Texture layers: ribbed concrete, smooth stone, brushed metal, crisp canvas
- Accent details: magnetic knife strip, herb rail, minimal art-light over TV
Why This Looks Intentional: Everything repeats: line, line, line. Fluting on the bar, ribs in the canopy structure, slim stools. The rhythm pulls the eye across and makes the kitchen and lounge read as a single story.
How To Recreate This Look:
- Plan the bar run first and choose fluted panels with consistent spacing.
- Add a cantilevered canopy sized to shade the grill + 2 feet beyond.
- Install cool graphite uplights washing the flutes from below.
- Mount the TV at a 5–10 degree tilt away from the grill reflections.
- Style with two matching planters and sleek, backless stools tucked in.
Don’t Do This: Avoid mixed metals everywhere. Pick one dominant (brushed or matte) and let the others be minimal so you don’t get a chaotic appliance showroom vibe.
Pro Styling Tip: Shoot at blue hour; the cool uplights against warm interior windows in the background create that delicious editorial contrast.
Micro-moment: Picture a midweek dinner—pasta bubbling on the side burner, a friend perched at the bar sipping a cold sauv blanc, the game on mute while music plays. The canopy catches the last light and you’re not squinting or sweating at the grill. That’s the win.
Sometimes the fanciest thing you can do is edit. Fewer finishes, repeated. That’s the secret to spaces that feel calm and expensive—outdoors counts, too.
5. Whitewashed Brick Wall With Sunset Peach Glow And a Slimline Outdoor Projector Screen
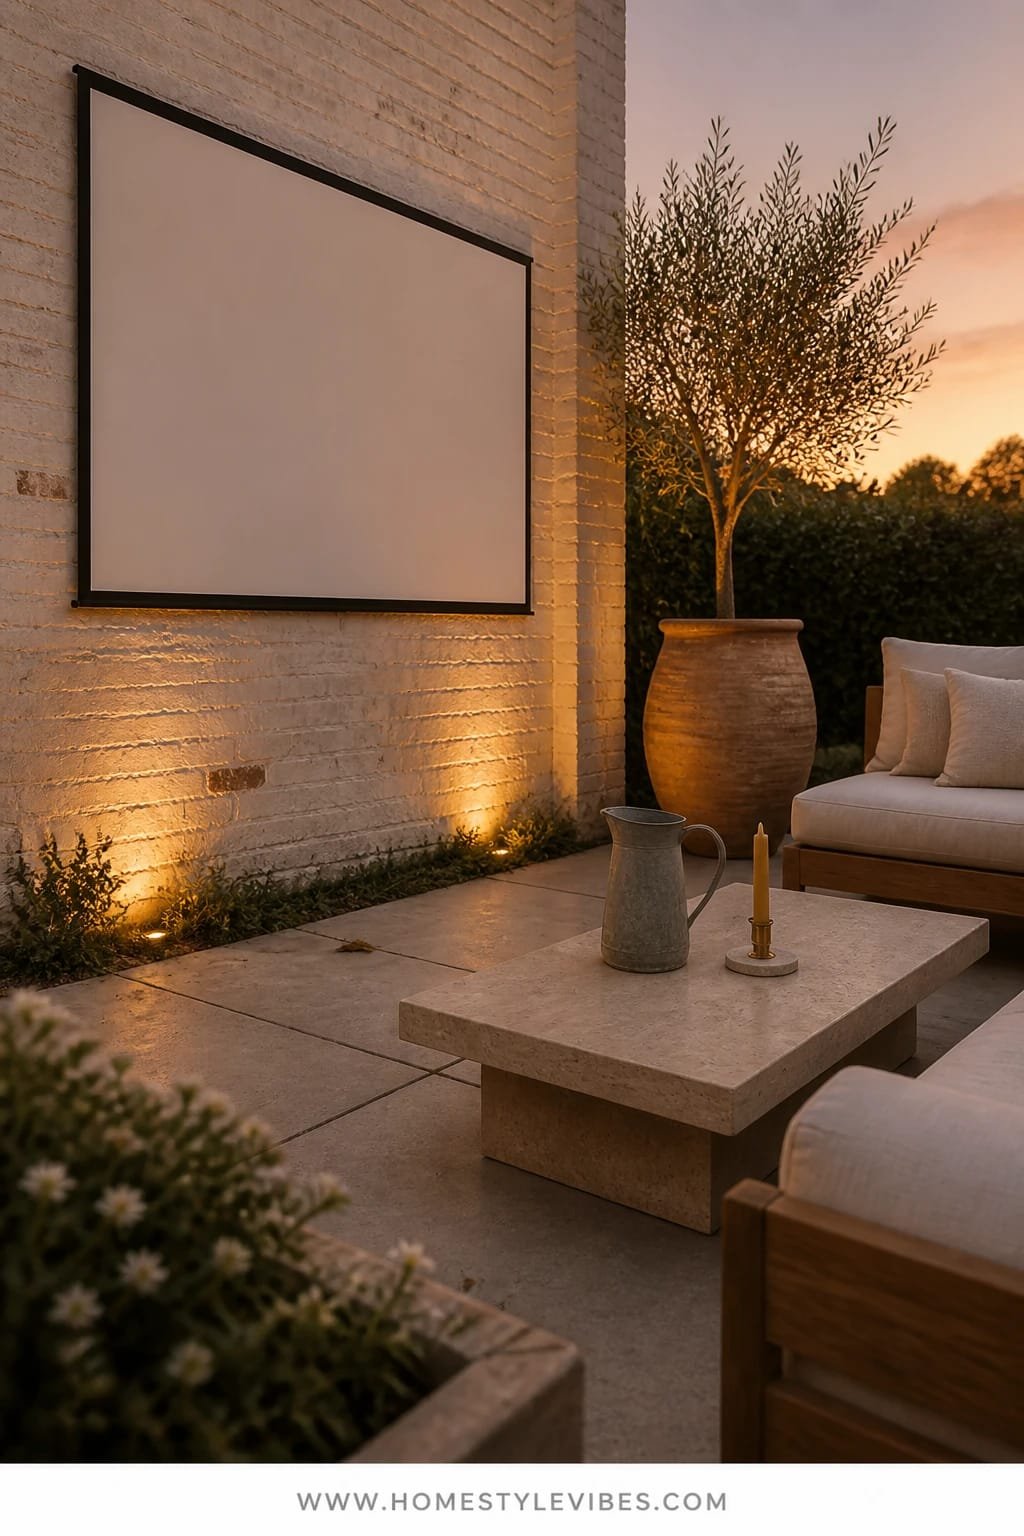
Maybe you hate the idea of a big black TV rectangle dominating your dreamy patio. Totally fair. A projector can be the elegant workaround—hidden by day, cinematic by night—especially against a whitewashed brick wall that takes color like skin takes bronze at golden hour.
The mood is soft, nostalgic, and a little romantic—think backyard cinema meets European cafe. Whitewashed brick provides texture that photographs endlessly well; add sunset-peach lighting washing upward across the wall and your projector image floats without looking sterile. Why it works in real homes: projectors are budget-friendly, renter-okay, and space-saving. Retract the slimline screen when not in use and the wall becomes a gorgeous backdrop for dinners.
Variations: On a tight budget, skip the screen and project directly onto the smoothest section of brick. For small patios, use a short-throw projector and a 90–100” screen. If you prefer cooler tone, swap peach gels for soft neutral 3000K lights, but keep the wash subtle.
Budget Breakdown:
- Whitewash treatment (paint + mineral wash): $120–$450
- Outdoor-rated uplights with peach gels or smart bulbs: $160–$500
- Slimline retractable screen: $200–$700
- Outdoor projector (short-throw optional): $400–$1,600
- Cafe chairs and bistro table set: $250–$900
- Portable speaker or weather-rated soundbar: $150–$600
Total Estimated Cost: $1,280 – $4,750
Best For: Renters and smaller patios where a permanent TV feels heavy. Great for movie nights and low-key dinners.
Key Design Elements:
- Main materials: whitewashed brick, canvas-like screen, wrought iron/bistro metal
- Color palette: chalk white, blush-peach light, black accents, olive-green plants
- Lighting strategy: wall wash + string lights on a dimmer
- Furniture silhouettes: bistro chairs, narrow tables, folding benches
- Texture layers: limey brick, woven seat pads, linen throws, climbing vines
- Accent details: vintage-style sconces, terracotta pots, glass hurricanes
How To Recreate This Look:
- Whitewash the brick in soft, irregular passes for depth—not a flat paint job.
- Mount discrete uplights that can run peach-toned at night.
- Install a retractable screen close to the wall to avoid breeze flutters.
- Place flexible seating that pivots from dining to cinema quickly.
- Style with terracotta, simple linens, and one trailing vine to soften edges.
Why This Looks Expensive: It’s all about restraint. The wall is the art. The screen disappears. The lighting flatters. Nothing screams for attention, yet everything supports the show.
Watch Out: Don’t blast floodlights during movies; they’ll wash the image. Keep light low and raked along the brick instead of at the screen.
Pro Styling Tip: For photos, pre-warm the wall wash to a deeper peach and add one candle cluster to draw the eye through layers of glow.
Quick Tip: Hide cords and projector units in a woven lidded basket with cutouts in the back. Ventilation stays, visual clutter goes.
6. Tumbled Travertine Courtyard With Candlelit Niches And an Arched Pizza Oven
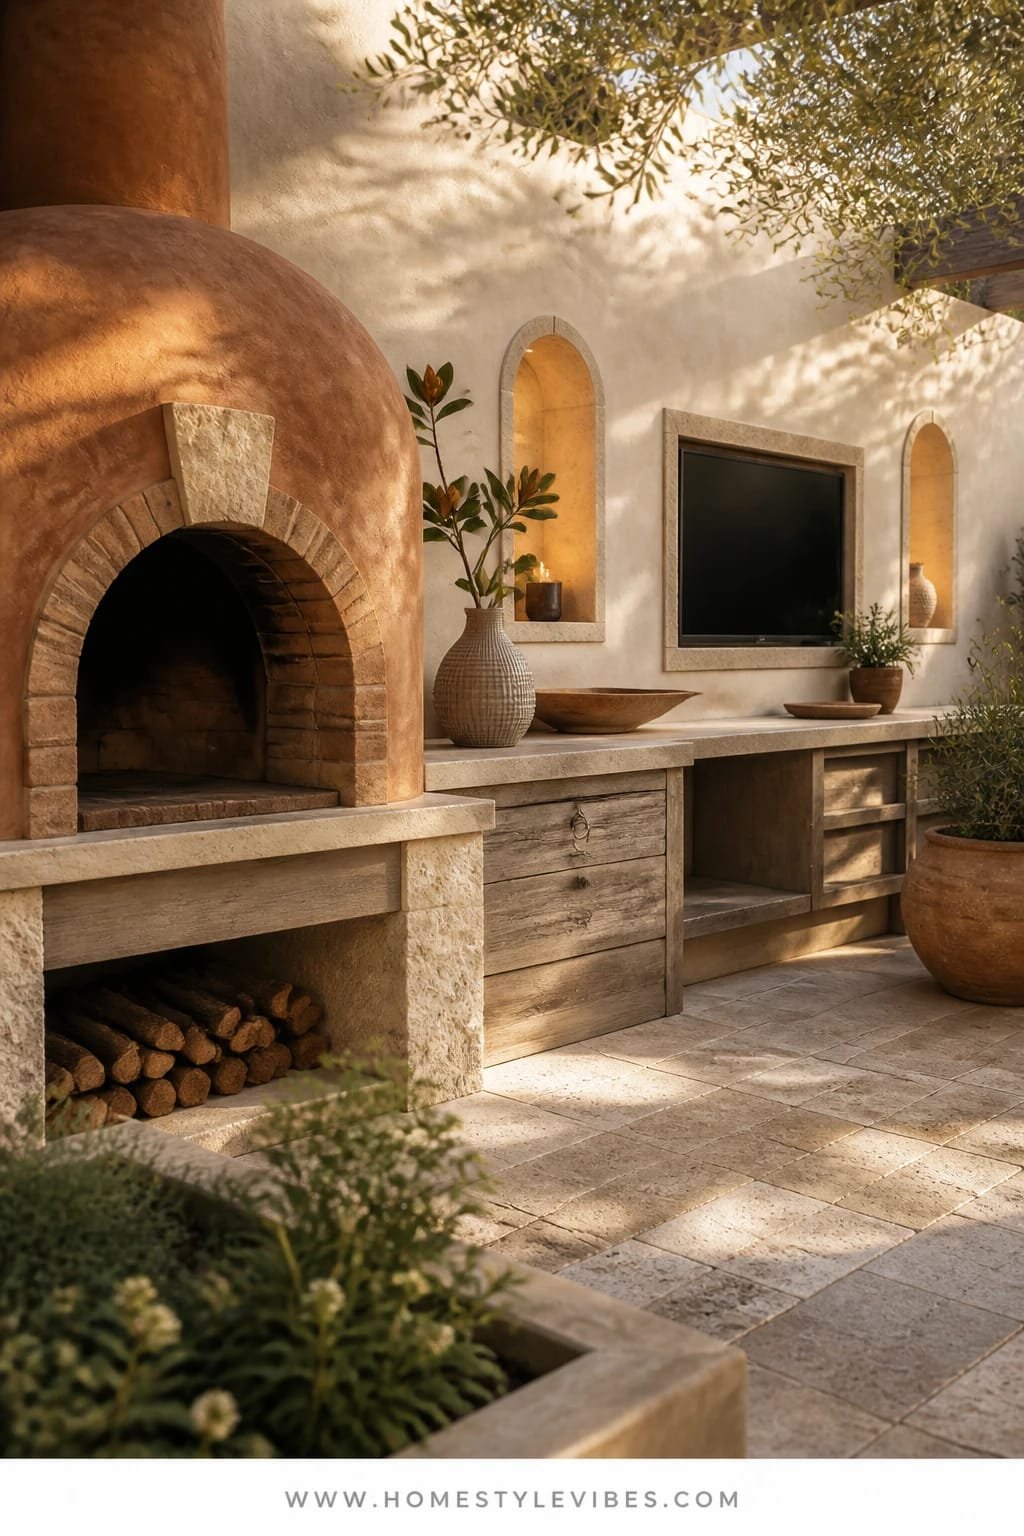
A lot of outdoor kitchens feel… appliance-forward. Too much stainless, not enough soul. If you want warmth and ritual, build a courtyard vibe with tumbled travertine underfoot, candlelit wall niches, and a showpiece arched pizza oven. The TV? It tucks into a shallow niche clad in stone so it belongs instead of barging in.
This leans old-world Mediterranean with real texture: soft, open-pored stone, limewash walls, arched cutouts catching shadow. Lighting is gentle and indirect so food and faces glow. It works for families because kids love a pizza night and adults get a beautiful setting that looks photogenic in every season. Maintenance stays sane: travertine handles spills, and limewash touches up easily.
Small-space take: a counter-depth pizza oven cart, a single arched alcove with candles, and 6×12 travertine laid in herringbone for movement. Budget version: use tumbled porcelain that mimics travertine, and faux-arch panels attached to a fence or stuccoed wall.
Budget Breakdown:
- Tumbled travertine or porcelain lookalike: $1,000–$4,000
- Arched pizza oven (gas or wood): $800–$3,500
- Wall niches (framed or prefab inserts): $400–$1,800
- Rope or niche lighting + candles: $100–$400
- Weather-rated TV in stone niche: $1,100–$2,700
- Rustic dining table and bench: $500–$1,800
Total Estimated Cost: $3,900 – $14,200
Best For: Entertainers who love tactile, cozy evenings and long dinners. Ideal in climates with cool nights.
Key Design Elements:
- Main materials: tumbled travertine, limewash, rustic wood, stone niche
- Color palette: sand, cream, clay, olive
- Lighting strategy: candle niches + rope light shelves + dim sconces
- Furniture silhouettes: chunky table, curved-back chairs, arched oven
- Texture layers: pitted stone, limey walls, linen, olive branches
- Accent details: iron hooks, ceramic pitchers, patinaed trays
How To Recreate This Look:
- Lay travertine in a staggered or herringbone pattern for movement.
- Build or install shallow arches for candle clusters and small herbs.
- Set the pizza oven as the focal arch; echo the curve in chair backs.
- Recess the TV slightly and finish edges in stone or limewash trim.
- Style with linen runners, a single bowl of tomatoes, and olive branches.
Why This Feels Designer: Repetition of arches and a tight, earthy palette create a narrative. The TV integrates into architecture instead of sitting on top of it.
One Thing To Avoid: Don’t use glossy stone sealer; the shine fights the soft, centuries-old vibe. A matte or honed finish keeps it grounded.
Pro Styling Tip: When photographing, blow out three candles in one niche right before the shot—the wisp of smoke against limewash adds life and texture.
Did You Know? Most pizza ovens hit 700–900°F. Keep the TV niche a safe distance and use a heat deflector or side wall to protect it. Performance first, pretty second.
Truth time: I once obsessed over outdoor furniture fabrics for weeks before realizing the real problem was my lighting temperature. I swapped every bulb to 2700K and suddenly my “meh” setup looked like a boutique hotel. If your space feels flat, check the light before buying another pillow.
7. Blackened Steel Pavilion With Firefly String Lights And a Deep Daybed Swing
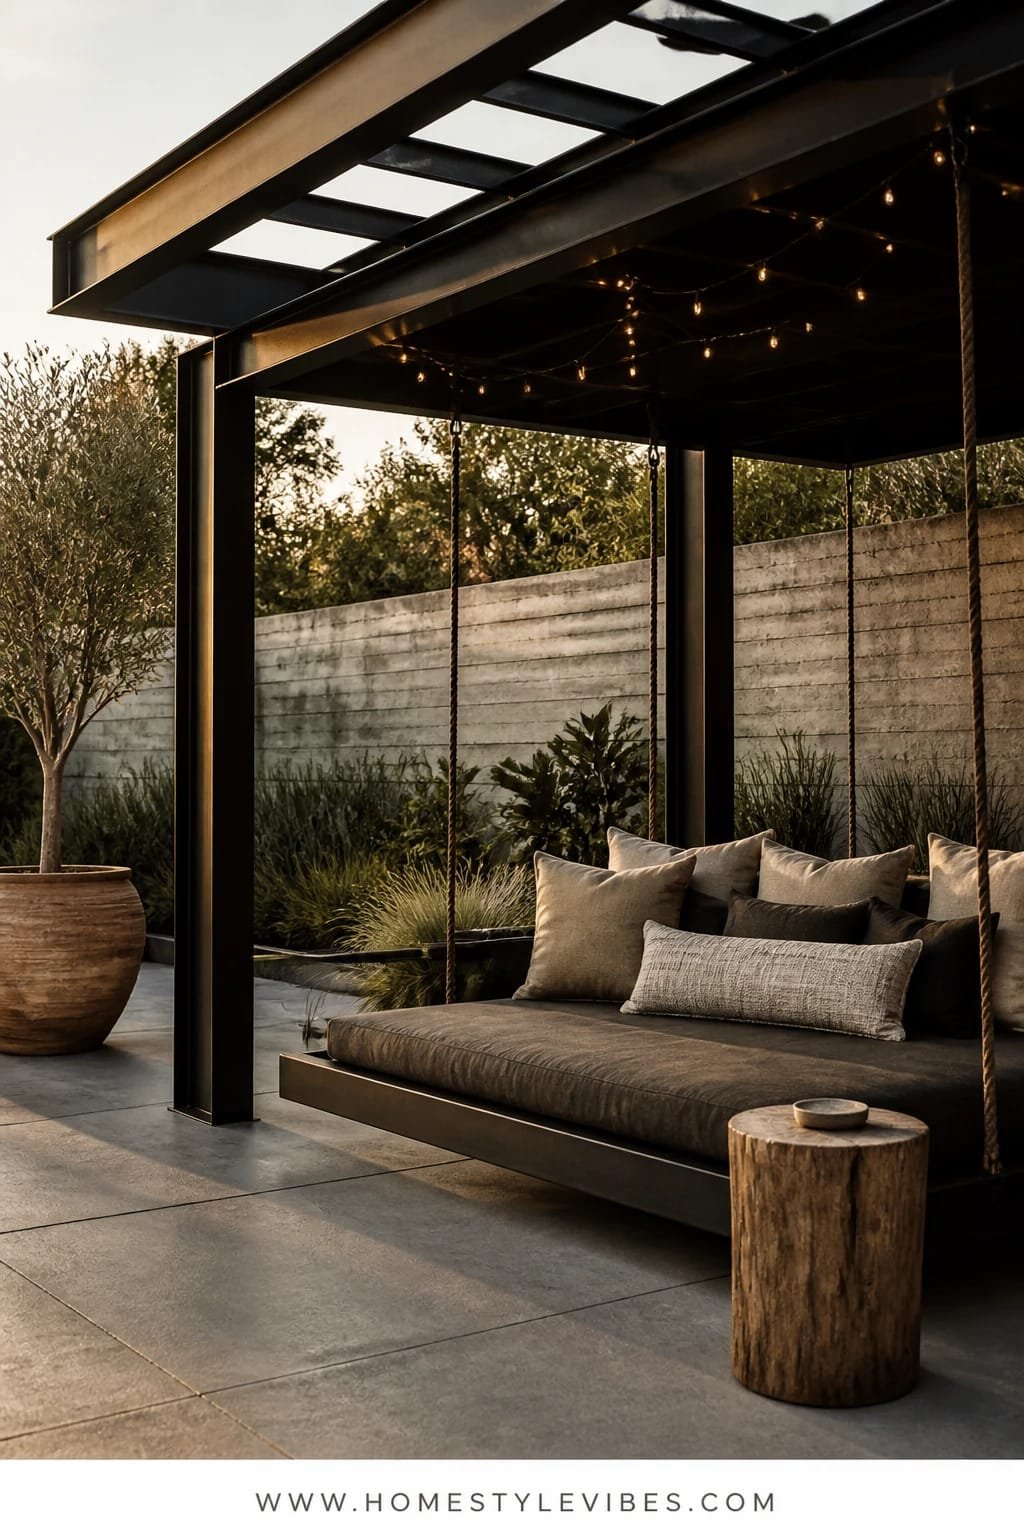
You want drama and comfort. Your yard is pretty, but no one lingers because the seating’s upright and slightly awkward. Enter the pavilion: blackened steel posts, a skeletal roofline for shape, and a giant daybed swing that says, “Stay awhile.” Add firefly string lights—tiny, warm dots that twinkle softly—and your outdoor entertainment space becomes a rooftop lounge energy, even at ground level.
The mood is moody-modern with a hint of whimsy. Blackened steel adds shadow lines and crisp edges. The daybed swing offers a luxe anchor, amazing for weekend naps and late-night shows. Why it works: the swing invites people to flop and settle, which means watch parties naturally last longer. The pavilion creates a calm “room” that blocks some wind and frames your TV, so you can mount it on a side beam with minimal glare.
Variations: For small spaces, scale the swing to a single XL chair swing. Budget version: powder-coated aluminum structure with a black paint finish. Renter-friendly: freestanding A-frame daybed and cafe lights zigzagged above. Darker mood? Layer charcoal cushions with olive and rust pillows; lighter? Go flax and oat with wood beads on the chains.
Budget Breakdown:
- Blackened steel or aluminum pavilion: $2,000–$8,500
- Daybed swing with outdoor mattress: $900–$3,000
- Firefly string lights and dimmer: $120–$450
- Weather-rated TV and corner mount: $900–$2,500
- Outdoor rug (flatweave or recycled PET): $150–$600
- Side tables and lanterns: $200–$700
Total Estimated Cost: $4,270 – $15,750
Best For: Medium to large yards and families who lounge hard. Works especially well for late-night hangs and cozy fall marathons.
Key Design Elements:
- Main materials: blackened steel/aluminum, rope or chain, performance canvas
- Color palette: ink, charcoal, flax, muted olive
- Lighting strategy: dense micro-string lights + low lanterns + indirect TV glow
- Furniture silhouettes: deep daybed, low stools, airy pavilion frame
- Texture layers: matte metal, nubby canvas, soft throws, rough jute
- Accent details: chain sleeves, oversized bolsters, cluster of lanterns
Why This Looks Expensive: The silhouette is strong and simple. One dramatic hero (the swing) and one subtle sparkle layer (fireflies) keep the narrative tight and photogenic.
How To Recreate This Look:
- Install or assemble a pavilion frame with clean lines and intentional proportions.
- Hang a daybed swing centered, with at least 3 feet clearance on all sides.
- Weave micro-string lights across the roofline and down one support for depth.
- Mount the TV off to the side on a swivel so the swing never blocks the view.
- Style with a flatweave rug, oversized bolsters, and two lantern clusters at different heights.
The Most Common Mistake: Overfilling with furniture. Give the swing air to breathe; crowded edges make the pavilion feel cramped and kill the drama.
Pro Styling Tip: For photos, gently nudge the swing before the shot so the pillows crease and the throw drapes—movement reads human and inviting.
Quick Tip: Use chain sleeves or leather wraps on swing chains to prevent hair snags and to photograph cleaner. Tiny fix, huge quality-of-life impact.
Quick Checklist
- Choose a single dominant material for structure (cedar, steel, brick, or stone)
- Pick one consistent bulb temperature for every outdoor light
- Anchor seating with a built-in bench, curved sectional, or deep daybed
- Control glare with tilt/swivel TV mounts and shade from pergolas or canopies
- Repeat shapes (arches, curves, or lines) at least three times
- Use layered lighting: overhead, perimeter, and low accent
- Hide cords and devices in planters, benches, or baskets
- Keep a tight color palette with 1–2 accent tones max
- Add one hero element (fire table, pizza oven, or fluted bar)
- Test the layout at dusk before finalizing light positions
Frequently Asked Questions
How much should I budget to create an outdoor entertainment space with a TV and kitchen?
Most of the ideas above land between $3,500 and $15,000 depending on materials and whether you DIY or hire. Start with one architectural anchor (pergola, pavilion, or bar) and one hero appliance (TV, fire table, or oven) to keep your spend tight and the look unified.
Will a projector actually work outside, or should I stick to a weather-rated TV?
Projectors work beautifully after sunset, especially with a screen and controlled ambient light. If you host daytime watch parties, get a weather-rated TV with the right sun rating and place it under shade to minimize glare.
I have a tiny balcony—can I still do a rooftop lounge vibe?
Yes. Use a curved two-piece modular sofa, a compact projector, and string lights. Keep furniture low and choose one focal point—either a mini bar cart or a small fire bowl (if allowed)—so the layout feels intentional, not cluttered.
How do I maintain materials like teak, limestone, and limewash outdoors?
Teak loves a yearly clean and optional light oil. Limestone and travertine prefer a breathable, matte sealer and gentle cleaners. Limewash touches up easily—keep a small jar for quick fixes after weather or party wear.
I rent—how can I do this without permanent changes?
Go freestanding: pergola kits, outdoor rugs, modular benches, and retractable projector screens. Use planter boxes to define zones and hide cables. Choose solar or plug-in lighting with adhesive clips instead of hardwiring.
Final Thoughts
Pick one idea that feels like a yes and run with it. Maybe it’s the charred cedar drama of a pergola, the hush of curves on a terrace, or the twinkle of firefly lights over a daybed swing. Don’t try to install every trick at once; edit is your friend. A great outdoor entertainment space with TV rooftop lounge and outdoor kitchen comes down to three things: texture that begs to be touched, lighting that flatters at night, and a single hero element that sets the mood.
The truth is, luxury outdoors isn’t about price tags—it’s about restraint and rhythm. Repeat materials, keep your palette calm, and light the edges. Your weekend plans just found their new HQ. You’ve got this—and I can’t wait to see which version of “come over tonight” you bring to life.