7 Boys Kids Bedroom Ideas That Are Cool but Still Practical Now
You want a boys’ bedroom that looks cool enough to screenshot and text to your sister… but you’re haunted by Lego landmines, clothes avalanches, and a desk that never sees an actual pencil. You love clean lines, soft light, and a room that feels like a little world he can grow up in. You hate clutter, chaos, and stuff that breaks after two Saturdays. These 7 boys’ kids bedroom ideas solve the mess at the root—smart storage, right-scaled furniture, and hard-working textiles—so the room looks magazine-worthy and still passes the everyday test. We’ll keep the budget sane, the steps realistic, and the vibe highly photogenic. If you need a hardworking space that still feels like a hug, this is your blueprint.
1. Graphite Cabin Nook with Built-In Reading Loft
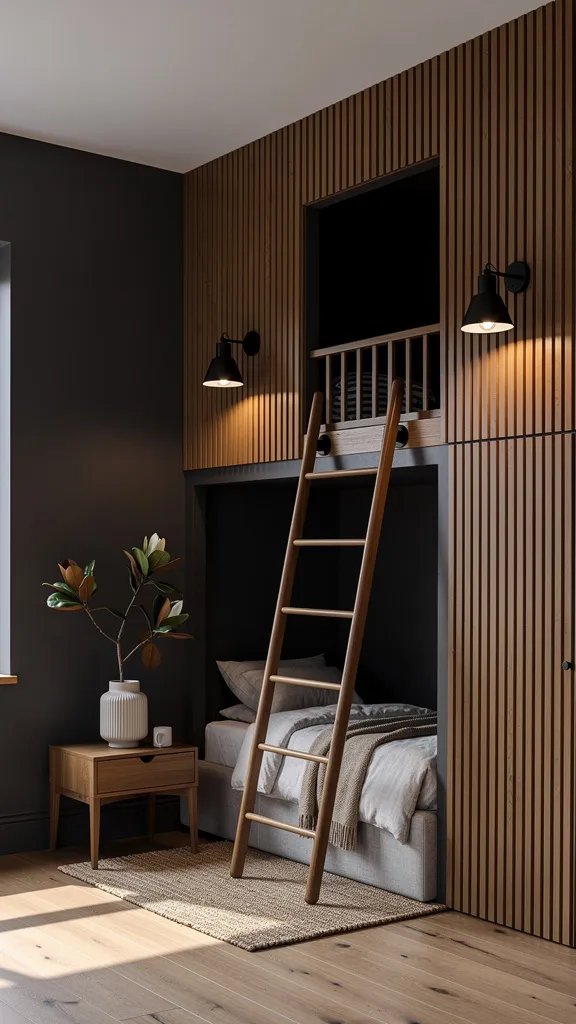
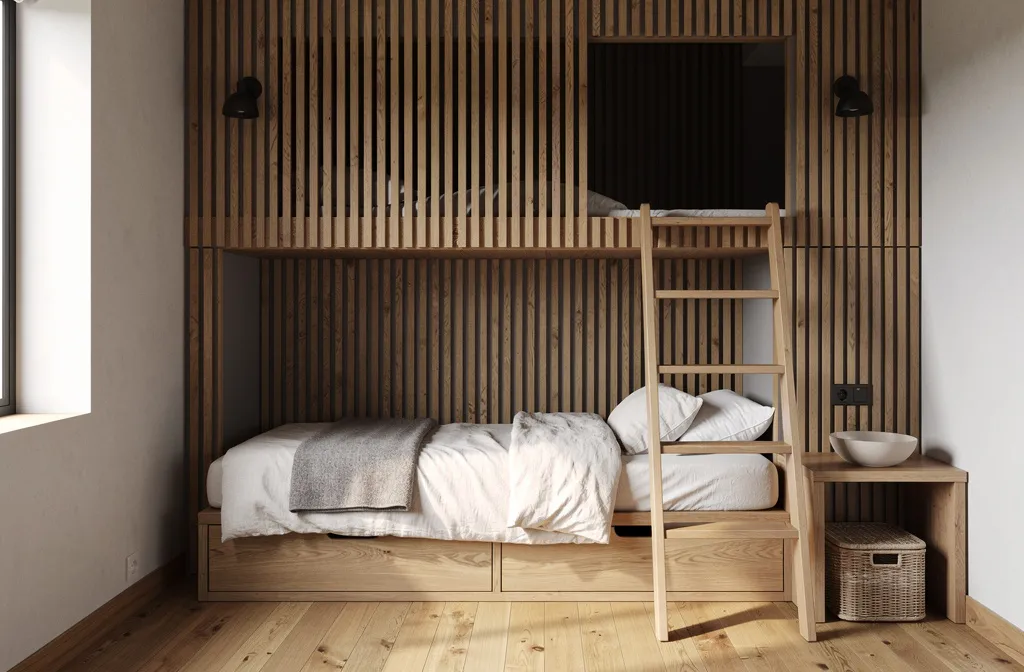
We’ve all been there: the bed floats awkwardly against one wall, a random bookshelf wobbles nearby, and the “cozy reading corner” is just a pile of pillows that never gets used. This design turns one wall into a graphite-toned cabin facade with a tidy built-in loft, creating a destination within the room. Think warm charcoal paint, matte black wall sconces, and honeyed wood slats that frame a little perch where stories happen and socks hide out of sight.
The mood feels modern cabin meets city apartment—calm, grounded, and a little adventurous. It works in real homes because it consolidates function into one wall: bed, storage drawers under the loft, and a reading zone up top. Lighting becomes purposeful instead of accidental; a sconce with a dimmer near the loft casts soft pools of light at bedtime, while a slim ceiling fixture keeps mornings clear and bright. Materials lean into texture: fluted wood panels, graphite paint with a soft eggshell sheen, blackened metal hardware. The result photographs beautifully because of the high contrast of dark walls against natural wood, plus the layered shadows inside the loft nook.
Variations make this easy to pull off. For a budget-friendly version, skip custom carpentry and use two tall wardrobes with a freestanding loft bed between, then add peel-and-stick slat panels. In small rooms, reduce depth and keep the loft lower to maintain head clearance. For renters, create the “built-in look” by painting just a large wall rectangle in charcoal and adding a freestanding bookcase plus a curtain to mimic a nook.
Budget Breakdown:
- Loft bed or custom carpentry: $450–$2,500
- Wood slat panels (real wood or peel-and-stick): $80–$600
- Wall paint in graphite/charcoal: $40–$80
- Sconces with dimmer: $60–$250
- Under-bed drawers or storage bins: $60–$300
- Rug (low pile, patterned): $120–$400
- Cozy textiles (throw, cushions): $50–$180
Total Estimated Cost: $860 – $4,310
Best For: Narrow rooms where a single feature wall will streamline storage and sleep. Ideal for kids who love reading, building forts, or climbing into their own little world.
Key Design Elements:
- Main materials: fluted wood, matte paint, blackened metal
- Color palette: charcoal, warm oak, cream, ink blue accents
- Lighting strategy: dimmable sconce near loft; bright, flush-mount ceiling light
- Furniture silhouettes: boxy loft with clean lines; low, contained storage
- Texture layers: slat paneling, knit throw, nubby rug
- Accent details: leather pull handles, striped cushion covers, framed black-and-white prints
How To Recreate This Look:
- Start with the wall: paint a rectangle or the entire wall in a deep graphite.
- Add a loft bed or build a shallow loft shelf with side rails for safety.
- Layer slat panels behind the loft or on the feature wall for dimension.
- Install a dimmable sconce and a flush-mount ceiling light.
- Style with a textured rug, striped pillows, and a small basket of favorite books.
Why This Looks Expensive: High contrast plus wood detail reads custom. Slats and matte finishes soak up light in a luxe way, while thoughtful lighting creates moody depth that’s hard to fake.
Watch Out: Don’t push the loft too high if your ceilings are standard. You need at least 36 inches of headroom above the mattress to avoid the “bumping the skull on a Tuesday” scenario.
Pro Styling Tip: Shoot the loft at an angle so light grazes the slats; the shadows add that editorial vibe without any filters.
Curious how storage can feel cool instead of clinical? Keep scrolling for a layout that quietly handles all the gear.
2. Urban Explorer Grid: Pegboard Wall + Rolling Desk Zone
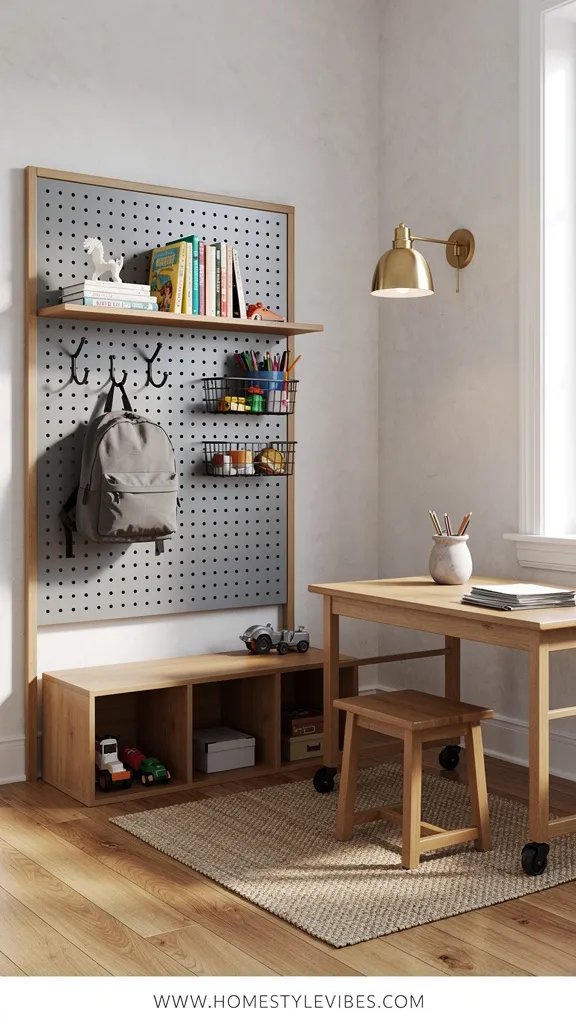
It’s that one corner that always feels off—the desk collects action figures, the art supplies spill over, and homework happens at the kitchen table anyway. The Urban Explorer Grid centers the room with a modular pegboard wall system that grows with your kid: hooks for backpacks, shelves for books, baskets for art. Pair it with a rolling desk that tucks under a window or slides aside for floor play.
The mood lands somewhere between art studio and gear garage—organized, flexible, and full of potential. It thrives in real homes because it adapts: move hooks higher as they grow, swap shelves for baskets during sports seasons, and click in a mini whiteboard during school projects. Lighting stays crisp: a track with adjustable heads washes the pegboard evenly, while a slim task lamp keeps the desktop shadow-free. Birch or beech plywood warms the space; powder-coated brackets inject color without chaos. In photos, the consistent grid reads calm, and the negative space between pegs creates satisfying rhythm.
Try a budget-friendly take with IKEA Skådis panels or a DIY plywood pegboard painted in soft clay. For small rooms, limit the grid to half a wall and use a fold-down desk. For a darker, moodier version, paint the wall deep navy and use natural-wood pegs for contrast. Renters can mount a freestanding grid screen instead of drilling into walls.
Key Design Elements:
- Main materials: plywood or fiberboard peg panels, powder-coated metal, birch desktop
- Color palette: muted clay, navy, birch wood, moss green
- Lighting strategy: adjustable track lighting, clamp-on task lamp
- Furniture silhouettes: slim, rolling desk; stackable stools
- Texture layers: canvas bins, felt cable wraps, woven basket
- Accent details: numbered tags, vintage patches, small globe
Budget Breakdown:
- Pegboard system + accessories: $120–$600
- Rolling desk or casters for existing desk: $100–$450
- Track lighting kit: $130–$350
- Task lamp: $25–$120
- Canvas bins and baskets: $40–$160
- Chair or stool: $40–$180
Total Estimated Cost: $455 – $1,860
Best For: Shared rooms, multi-use spaces, or the kid who makes, builds, and needs to see their tools to use them.
How To Recreate This Look:
- Start with the grid: mount two to four pegboard panels at kid height.
- Add hooks for bags and daily gear at reachable levels.
- Layer shelves and small bins for books and art supplies.
- Install a track light above to brighten the system; aim heads at hot spots.
- Style the desk with one color-coded caddy and a cork board for quick pin-ups.
Why This Feels Designer: Repetition and modularity. The grid keeps everything aligned, and the unified storage accessories make the whole wall read as one custom installation.
One Thing To Avoid: Don’t overload every peg. You need negative space to keep it readable and easy for kids to use.
Pro Styling Tip: Color-block the bins—two tones max—to create visual calm and make the wall photograph like a styled set.
Sometimes a room needs a statement that isn’t loud. The next idea goes soft, tactile, and ridiculously cozy—without turning into a dust trap.
3. Soft-Armor Monochrome: Layered Textures in One Calm Color
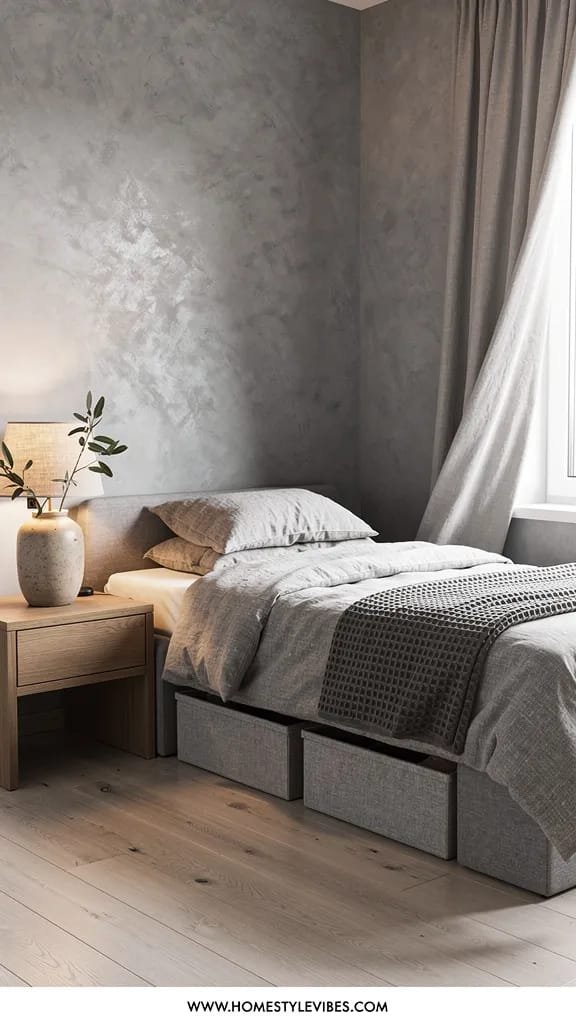
You’ve tried bright bedding, themed decals, and a statement rug, but the room still looks busy and nothing matches after laundry day. Soft-Armor Monochrome leans into one tight color family—think warm gray or olive—and stacks textures for depth: waffle knit blankets, canvas storage, linen curtains, matte paint. It’s the easiest way to make a boys’ bedroom look clean and intentional while still inviting epic pillow forts.
The mood feels Japandi-lite: restful, grounded, and super forgiving for day-to-day life. It works because fewer colors mean less visual noise, and texture becomes the star. Light plays differently across knit, canvas, and matte paint, creating subtle shadows and softness in photos. Durable fabrics like cotton canvas and twill handle real life and wash well. The room stays flexible for years—swap a poster, change a lamp, done.
For a budget version, paint one wall and use a duvet cover and two shams in the same tone. In tiny rooms, keep contrasts light—mushroom gray walls, pale greige bedding—to bounce light around. If your kid loves dark colors, try deep olive with warm white sheets for balance. Renters can add peel-and-stick linen-texture wallpaper on a single wall for that tactile look.
Budget Breakdown:
- Paint or peel-and-stick linen wallpaper: $40–$280
- Monochrome bedding set: $60–$220
- Textured curtain panels: $50–$180
- Canvas storage cubes: $30–$120
- Neutral rug (flatweave): $120–$350
- Simple nightstand + lamp: $80–$260
Total Estimated Cost: $380 – $1,410
Best For: Families craving visual calm. Great in smaller rooms and for kids sensitive to busy patterns.
Key Design Elements:
- Main materials: cotton canvas, linen blend, matte paint
- Color palette: one hue in three tones (light, mid, dark)
- Lighting strategy: warm, diffused lamp light; soft ceiling glow
- Furniture silhouettes: rounded edges, low profile
- Texture layers: waffle knit, canvas bins, flatweave rug
- Accent details: tonal art, wood bead garland, soft-edge frames
Why This Reads High-End: Monochrome with mixed textures looks curated. When you control the palette, even simple pieces feel intentional and expensive-adjacent.
How To Recreate This Look:
- Start with paint: choose one hue and commit to it across walls or one feature wall.
- Add bedding in the same family; vary the textures (smooth duvet, waffle throw).
- Layer a neutral rug and lined curtains that soften window light.
- Install a warm, dimmable table lamp and keep the ceiling fixture simple.
- Style with three tonal accessories max—think a single poster, a wooden tray, a fabric bin.
The Most Common Mistake: Mixing undertones. Cool gray sheets plus warm gray walls can clash. Hold samples side by side under your actual lighting before buying.
Pro Styling Tip: In photos, place the darkest texture at the front corner of the bed; it anchors the frame and makes everything else look airy.
Remember, this isn’t about recreating a showroom. It’s about creating a boys’ bedroom that quietly supports your life. If one idea is speaking to you, circle it. That’s your starting point—everything else can wait.
4. Sports-Locker Chic with Hidden Laundry Tunnel
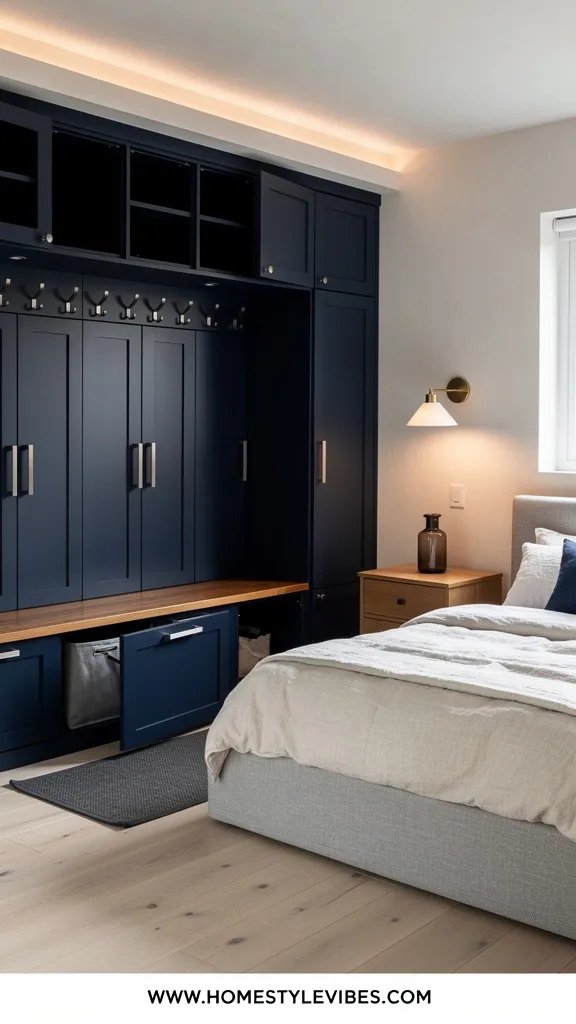
Sports gear spreads. We both know it. Bats in the hallway, shin guards on the windowsill, and a mysterious sock ecosystem under the bed. This layout borrows cues from collegiate locker rooms—individual cubbies, labeled hooks, a bench—and hides the laundry traffic with a tilt-out hamper that looks like another cabinet door. Clean lines, zero nagging.
The vibe mixes industrial and preppy: painted shaker fronts, brushed nickel hardware, a rubber-backed runner. It works for families because action items live where they’re used—cleats by the door, water bottle on a shelf, jersey on a hook. Lighting matters more than you think: under-cabinet puck lights over the bench keep the zone bright and make finding that missing glove a lot easier. Photos love the linear rhythm of repeated doors and that one color-pop stripe on the rug.
On a budget, repurpose two tall bookcases with added doors and a DIY bench between. In small rooms, use a single column of cubbies and mount extra hooks behind the door. For a moodier take, paint the cabinetry deep green and use brass labels. Renters can mimic the effect with a freestanding hall tree and a lidded hamper tucked under a bench.
Budget Breakdown:
- Cabinet frames or wardrobes: $250–$1,200
- Bench + cushion: $80–$350
- Tilt-out hamper hardware: $40–$120
- Hooks and labels: $30–$100
- Runner rug (washable): $60–$180
- Under-cabinet puck lights: $35–$120
Total Estimated Cost: $495 – $2,070
Best For: Active kids, shared rooms, and households where laundry always goes missing. Works beautifully near a bedroom door or along a narrow wall.
Key Design Elements:
- Main materials: painted MDF or plywood, nickel hardware, washable textiles
- Color palette: navy or deep green cabinetry, white or warm gray walls, red or gold accents
- Lighting strategy: pucks over the bench, a bright overhead flush-mount
- Furniture silhouettes: lockers/cabinets with Shaker fronts, low bench
- Texture layers: ribbed cushion, rubber-backed runner, woven hamper liner
- Accent details: numbered labels, pennant flag, framed team photo
How To Recreate This Look:
- Start with a locker zone: two tall units with a bench between.
- Add hooks inside and outside doors for high-use items.
- Layer a tilt-out hamper disguised as a lower cabinet.
- Install puck lights under the cabinets to highlight the bench.
- Style with labeled bins and a durable, stripe-detail runner.
Why This Looks Intentional: Repetition and purpose. When every item has a labeled spot, the whole wall feels architected, not improvised.
Don’t Do This: Skip the labels. Kids need visual cues; without them, everything becomes “miscellaneous” and the system unravels by Thursday.
Pro Styling Tip: Angle the bench cushion stripe to run perpendicular to the runner; the cross-direction adds energy in photos.
We’re halfway in. If your head is buzzing, breathe. You don’t need to do all seven boys’ kids bedroom ideas. One corner. One wall. One weekend. That’s plenty.
5. Space-Map Bunk with Starfield Ceiling and Stash Drawers
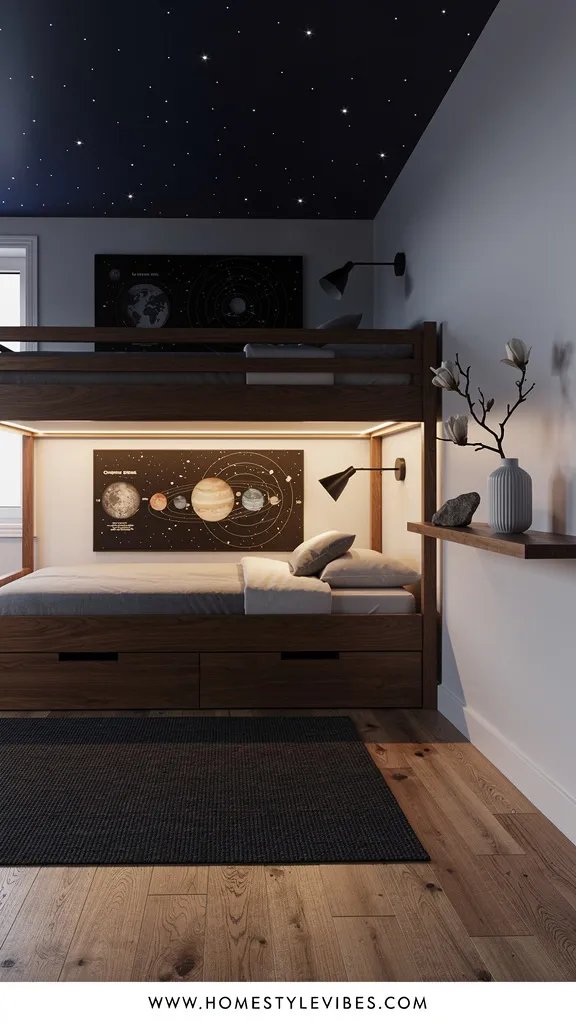
Shared room drama? You try to keep peace, but bedtime turns into a campsite argument over who gets the top and where the “important” rock collection lives. This design turns bunk beds into a tiny galaxy: a navy starfield ceiling, a big solar system map over the lower bunk, and deep drawers under the bed for secret stashes. The whole thing feels like a mission control center… that also cleans up faster.
The mood channels modern adventure: crisp lines, dark blues, warm wood, and focused lighting that mimics star glows. It works for real families because the bunk delineates space—top kid, bottom kid—while built-in lighting kills the need for a room-bright task light at night. Painter’s tape patterns on the ceiling create a subtle constellation effect that looks stunning in low light and in photos. The materials are practical: washable duvet covers, rubberwood or birch bunks, and under-bed drawers with soft-close glides.
On a budget, paint the ceiling navy and add stick-on star decals. In small rooms, use a loft with a reading zone beneath instead of a second bunk. For a renter-friendly version, star decals plus a framed map give the look without paint. Want moodier? Swap navy for black-blue and add warm Edison bulbs on dimmers.
Budget Breakdown:
- Bunk bed with storage drawers: $400–$1,200
- Ceiling paint + decals or stencil: $45–$160
- Clip-on bunk lamps: $30–$120
- Large wall map or mural: $40–$300
- Washable bedding set (two beds): $120–$360
- Low-pile rug: $100–$280
Total Estimated Cost: $735 – $2,420
Best For: Siblings sharing, small rooms, and kids big on space, science, or just night-time magic.
Key Design Elements:
- Main materials: birch or rubberwood, matte navy or black-blue paint
- Color palette: deep blue, white, warm wood, muted gold accents
- Lighting strategy: individual clip lights per bunk, dimmable ceiling glow
- Furniture silhouettes: streamlined bunk with guard rails and integrated drawers
- Texture layers: smooth cotton percale, felt wall pockets, flatweave rug
- Accent details: metallic star stickers, brass knobs, mission badges framed
Why This Looks Expensive: A dramatic ceiling is a designer’s trick. It pulls the eye up, adds depth, and makes even a simple bunk feel custom and theatrical.
How To Recreate This Look:
- Start with the ceiling: paint navy and add subtle star decals clustered above the bunks.
- Add a sleek bunk with under-drawers for storage.
- Layer a large map print to define the lower bunk wall.
- Install clip lights with warm bulbs for each child.
- Style with coordinated bedding and one sturdy rug.
The Most Common Mistake: Choosing glossy ceiling paint. It reflects light in weird ways and shows every roller stroke. Go matte or eggshell, trust me.
Pro Styling Tip: Photograph at night with only the bunk lamps on; the glow against the deep ceiling looks cinematic.
True story: a friend spent weeks agonizing over paint colors before realizing her real issue was lighting. We swapped a cold LED for a warm 2700K bulb and suddenly the “wrong” paint looked right. Lighting makes or breaks the room. Every time.
6. Desert Skater Cool: Clay Walls, Board Rack, and Chill Lounge Bed
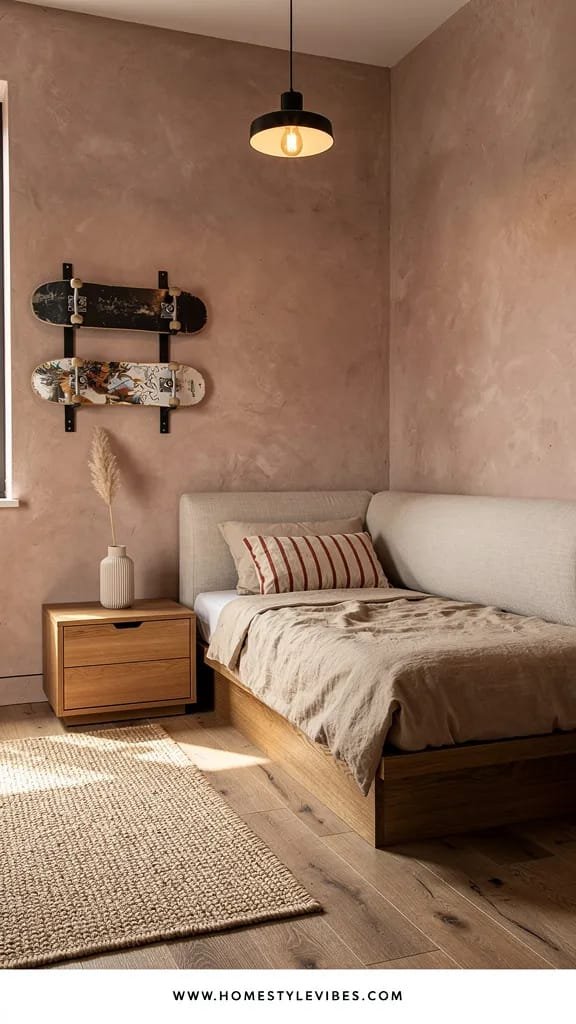
You want cool, he wants “it has to hold my deck,” and the floor wants mercy. Desert Skater Cool blends sun-baked clay walls, a slim board rack, and a lounge-style bed with a bolster so the room doubles as a hangout. It’s warm, unfussy, and practical—like a laid-back Saturday in sneakers.
The mood reads modern Southwest with a street edge: think clay-limewash walls, rust-striped pillow, matte black peg rack. It wins at home because nothing is precious; fabrics are sturdy, the rack keeps decks off the floor, and a platform bed handles roughhousing. Light hits the limewash in waves, giving photos that textured, editorial warmth. Materials—cotton canvas, jute, powder-coated metal—are friendly to scuffs and spot-cleaning.
Going budget? Use clay-tinted paint instead of limewash and a simple wall-mounted guitar hanger for the board. Small room? Choose a daybed with drawers and tuck the rack above. Darker version? Try adobe-rose walls with charcoal bedding and terracotta accents. Renters can fake the plaster with removable textured wallpaper and a freestanding rack.
Budget Breakdown:
- Limewash or clay-look paint: $60–$220
- Daybed or platform bed: $200–$850
- Board rack or heavy-duty peg rail: $40–$180
- Rug (jute or cotton flatweave): $90–$300
- Bedding with bolster pillows: $80–$260
- Ceiling fan or simple pendant: $120–$380
Total Estimated Cost: $590 – $2,190
Best For: Tweens/teens, multipurpose rooms, and anyone with gear that needs a vertical home.
Key Design Elements:
- Main materials: limewash/clay paint, jute, powder-coated metal
- Color palette: clay, sand, rust, black accents
- Lighting strategy: warm ambient light, directional reading sconce
- Furniture silhouettes: low platform/daybed, simple rack
- Texture layers: jute rug, canvas cushions, stitched quilt
- Accent details: striped lumbar, desert print, black metal hooks
Why This Feels Designer: Tone-on-tone walls with texture plus one strong black line (the rack) create instant visual structure. It looks intentional and editorial.
How To Recreate This Look:
- Start with clay-toned paint or limewash for movement on the walls.
- Add a daybed with a bolster for lounge vibes.
- Layer a jute rug and two canvas floor cushions.
- Install a slim board rack at shoulder height.
- Style with a rust-striped pillow and one desert landscape print.
Watch Out: Don’t mount the rack too high. Kids will park boards on the floor if reaching feels annoying. Eye-level is your friend.
Pro Styling Tip: Angle one floor cushion into the frame to create depth and a lived-in feel in photos.
Here’s a gentle reminder: kids change fast. Pick a base that can flex—neutral bed, good lighting—and let the “theme” live in art and textiles. That’s the secret to rooms that age well without constant spending.
7. Tiny Architect: Floor Plan Play with Under-Window Bench and Trundle
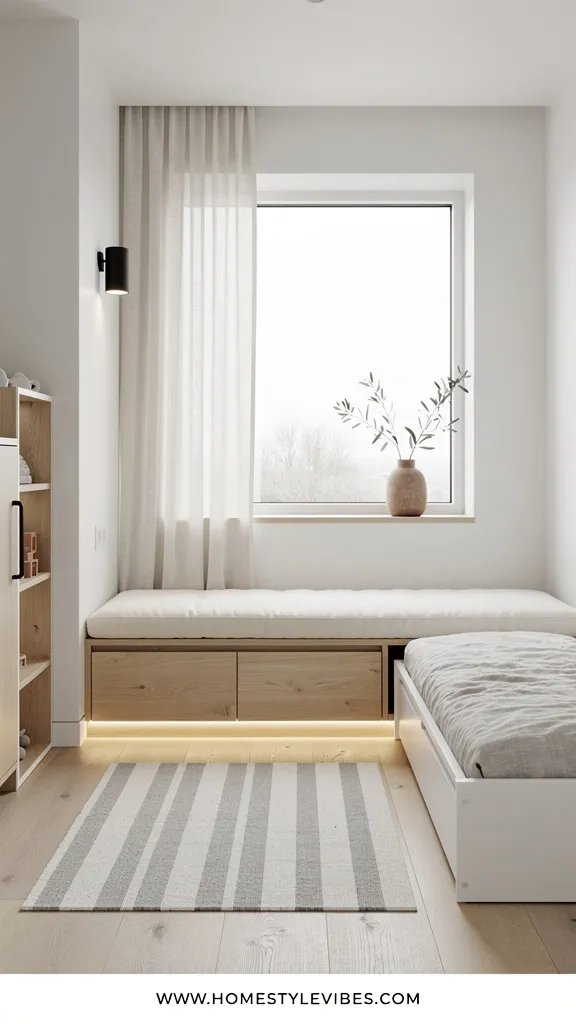
Small kids’ rooms can feel like a puzzle with two missing pieces. The bed blocks the window, there’s nowhere to read, and toy storage becomes a mountain. Tiny Architect uses the window wall as the anchor: a built-in (or faux built-in) bench under the window with a trundle bed tucked beside it. The rest of the layout stays open for play and building tracks—no more stepping over a city of blocks to tuck them in.
The mood feels Scandinavian-bright, cheerful, and orderly. It works in real homes because it solves three layout problems at once: a seat for reading, a bed that doesn’t eat the room, and concealed storage beneath. Daylight bounces off a pale palette—think soft white walls, blond wood, and a pop of cobalt. Photos love the long line of the bench and the way cushions layer at the window like a little café seat.
For a low-cost option, push a storage bench under the window and use a twin daybed with a trundle along the adjacent wall. In very small rooms, choose a shorter bench with drawers only on one side. Renter-friendly? Use two toy chests side by side with a cushion on top; leave the walls as-is and add a peel-and-stick valance.
Budget Breakdown:
- Under-window bench (built-in or freestanding): $180–$900
- Trundle bed or daybed with trundle: $280–$950
- Bench cushion + pillows: $70–$240
- Sheer curtains or Roman shade: $60–$260
- Low book ledges (3–4): $40–$120
- Toy bins for under-bench drawers: $30–$90
Total Estimated Cost: $660 – $2,560
Best For: Small bedrooms that need a defined play zone, families who host cousins or sleepovers, and anyone who wants the window to feel like a moment.
Key Design Elements:
- Main materials: birch or pine, performance fabric cushion, painted MDF book ledges
- Color palette: white, blond wood, cobalt or sunflower accents
- Lighting strategy: maximize daylight with sheers; add a reading sconce by the bench
- Furniture silhouettes: low bench, slim daybed, shallow ledges
- Texture layers: boucle pillow, cotton knit throw, woven bins
- Accent details: simple clock, tiny plant on ledge, framed kid art
How To Recreate This Look:
- Start by clearing the window wall and measuring sill height.
- Add a storage bench that aligns with the sill or sits just below it.
- Place a daybed or trundle along the shortest adjacent wall.
- Install three book ledges at kid height near the bench.
- Style with a cushioned seat, two bright pillows, and sheer curtains hung high.
Why This Looks Expensive: Built-in vibes. Even a freestanding bench that fits wall-to-wall gives that custom millwork moment—especially when the cushion is tailored edge-to-edge.
One Thing To Avoid: Heavy blackout curtains during the day. They eat light and make the room feel smaller. Use sheers with a separate blackout roller if you need darkness at night.
Pro Styling Tip: For photos, angle the camera slightly off-center to catch the bench, bed, and ledges in one frame; the repeating horizontals read clean and architectural.
Micro-moment: picture tossing the last stuffed animal into the bench drawer, sliding the trundle in with one foot, and calling lights out. Two minutes, no trip-over meltdown. That’s the kind of peace a good layout buys you.
Quick Checklist
- Pick one anchor wall and commit to a color or texture
- Install dimmers for bedtime calm and flexible lighting
- Use labeled hooks and bins at kid height
- Choose performance fabrics for bedding and cushions
- Include at least one hidden storage feature (drawers, tilt-out hamper)
- Keep a tight color palette (2–3 tones max)
- Mount curtain rods close to the ceiling
- Use low-pile or washable rugs for easy cleaning
- Add one strong, repeatable element (slats, peg grid, book ledges)
- Photograph with side light for texture and depth
Frequently Asked Questions
How can I keep costs down while still getting a polished look?
Prioritize one architectural moment—like a painted feature wall or a pegboard system—and keep everything else simple. Use budget-friendly staples (IKEA, big-box basics) then swap in nicer hardware and one quality light fixture. That single upgrade usually makes the whole boys’ bedroom look finished.
My kid’s room is tiny. Which idea works best without feeling cramped?
Go for the Tiny Architect layout with an under-window bench and a trundle. It clears floor space, uses the window wall smartly, and creates a play zone that doesn’t fight the bed. Keep colors light and curtains sheer to bounce daylight.
We rent and can’t paint or drill much. What can we do that still feels cool?
Choose peel-and-stick elements: slat-look panels, linen-texture wallpaper, decals for a star ceiling. Use freestanding grids or hall trees for hooks, and rely on plug-in sconces with cord covers. You’ll get a styled look with zero patchwork later.
How do I design a boys’ bedroom that he won’t outgrow in two years?
Keep the base neutral—bed, rug, walls—and let personality live in textiles and art. Themes should be removable: a flag, a poster, a printed duvet. When interests shift, you swap a few items, not the whole room.
What’s the biggest mistake parents make with kids’ bedrooms?
Buying storage last. Plan storage first and at kid height—hooks by the door, bins under the bed, ledges for books. If everyday items have obvious “homes,” the room stays tidy without a daily lecture.
Closing Thoughts
Pick one idea and give it a weekend. That’s all you need to turn the tide. Maybe it’s the graphite loft that makes bedtime feel like an adventure, or the pegboard grid that finally tames the makerspace mess. The truth is, rooms don’t behave until the layout and storage are on your side.
Remember: luxury doesn’t come from fancy brand names. It comes from texture that loves the light, lighting that flatters the color you chose, and restraint—a tight palette, repeated materials, and a plan for where things live. When you combine those, even simple pieces look considered.
So take a breath, choose the boys’ kids bedroom idea that fits your life right now, and start. You’ve got this. And when that first corner clicks into place and the room suddenly looks like the mood board in your head? Seriously—text me the photo. I’ll be cheering from the comments.

About the Author

Krisztina P.Rendes, Founder of Home Style Vibes
Founder of Home Style Vibes
Krisztina Puskásné Rendes created Home Style Vibes as a cozy-modern lifestyle space where homemaking meets inspiration. Her goal is to help women create beautiful, organized, and peaceful homes they truly love — without overwhelm. You’ll find here heart-driven content on home decor, cleaning tips, easy family recipes, organization and decluttering, DIY home projects, plants, and seasonal ideas — all designed to bring more calm, comfort, and style into everyday life.