7 Small Bathroom Ideas That Look Expensive (Even in Tiny Spaces)
You want a bathroom that whispers quiet-luxury every morning. You hate that your square footage, builder-grade finishes, and harsh lighting keep giving “dorm energy.” Imagine creamy stone textures, glowy light that softens your skin in the mirror, and finishes that feel intentional—like you planned every inch on purpose. These 7 small bathroom ideas fix that exact frustration in days or a couple weekends, with options under $1,500 per idea.
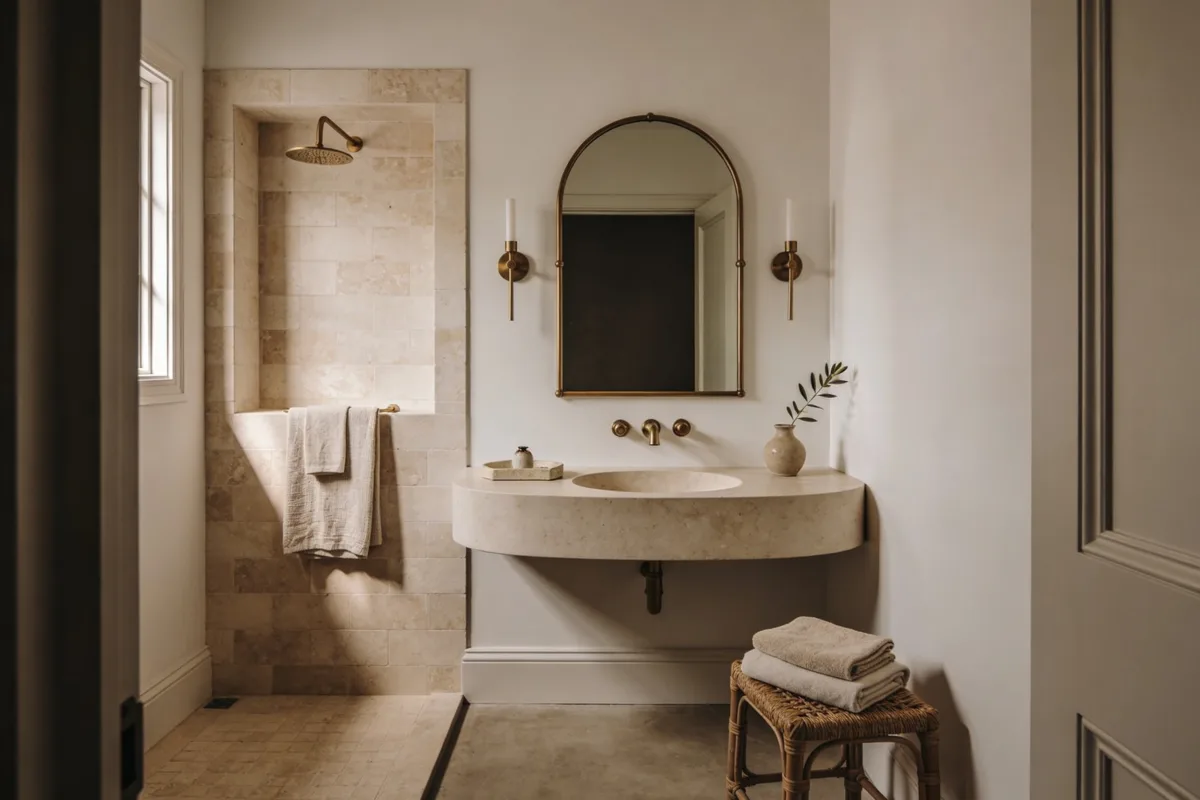
We’ll talk about color that actually photographs well, textures that look rich to the eye and the hand, and swaps that create that boutique-hotel calm. Expect photogenic layers, reader-tested shortcuts, and designs that work in rentals too. If you love a quietly confident vibe and want your morning routine to feel like a soft open to the day, this is your lineup.
1. Soft Stone Spa With Curated Metal Moments
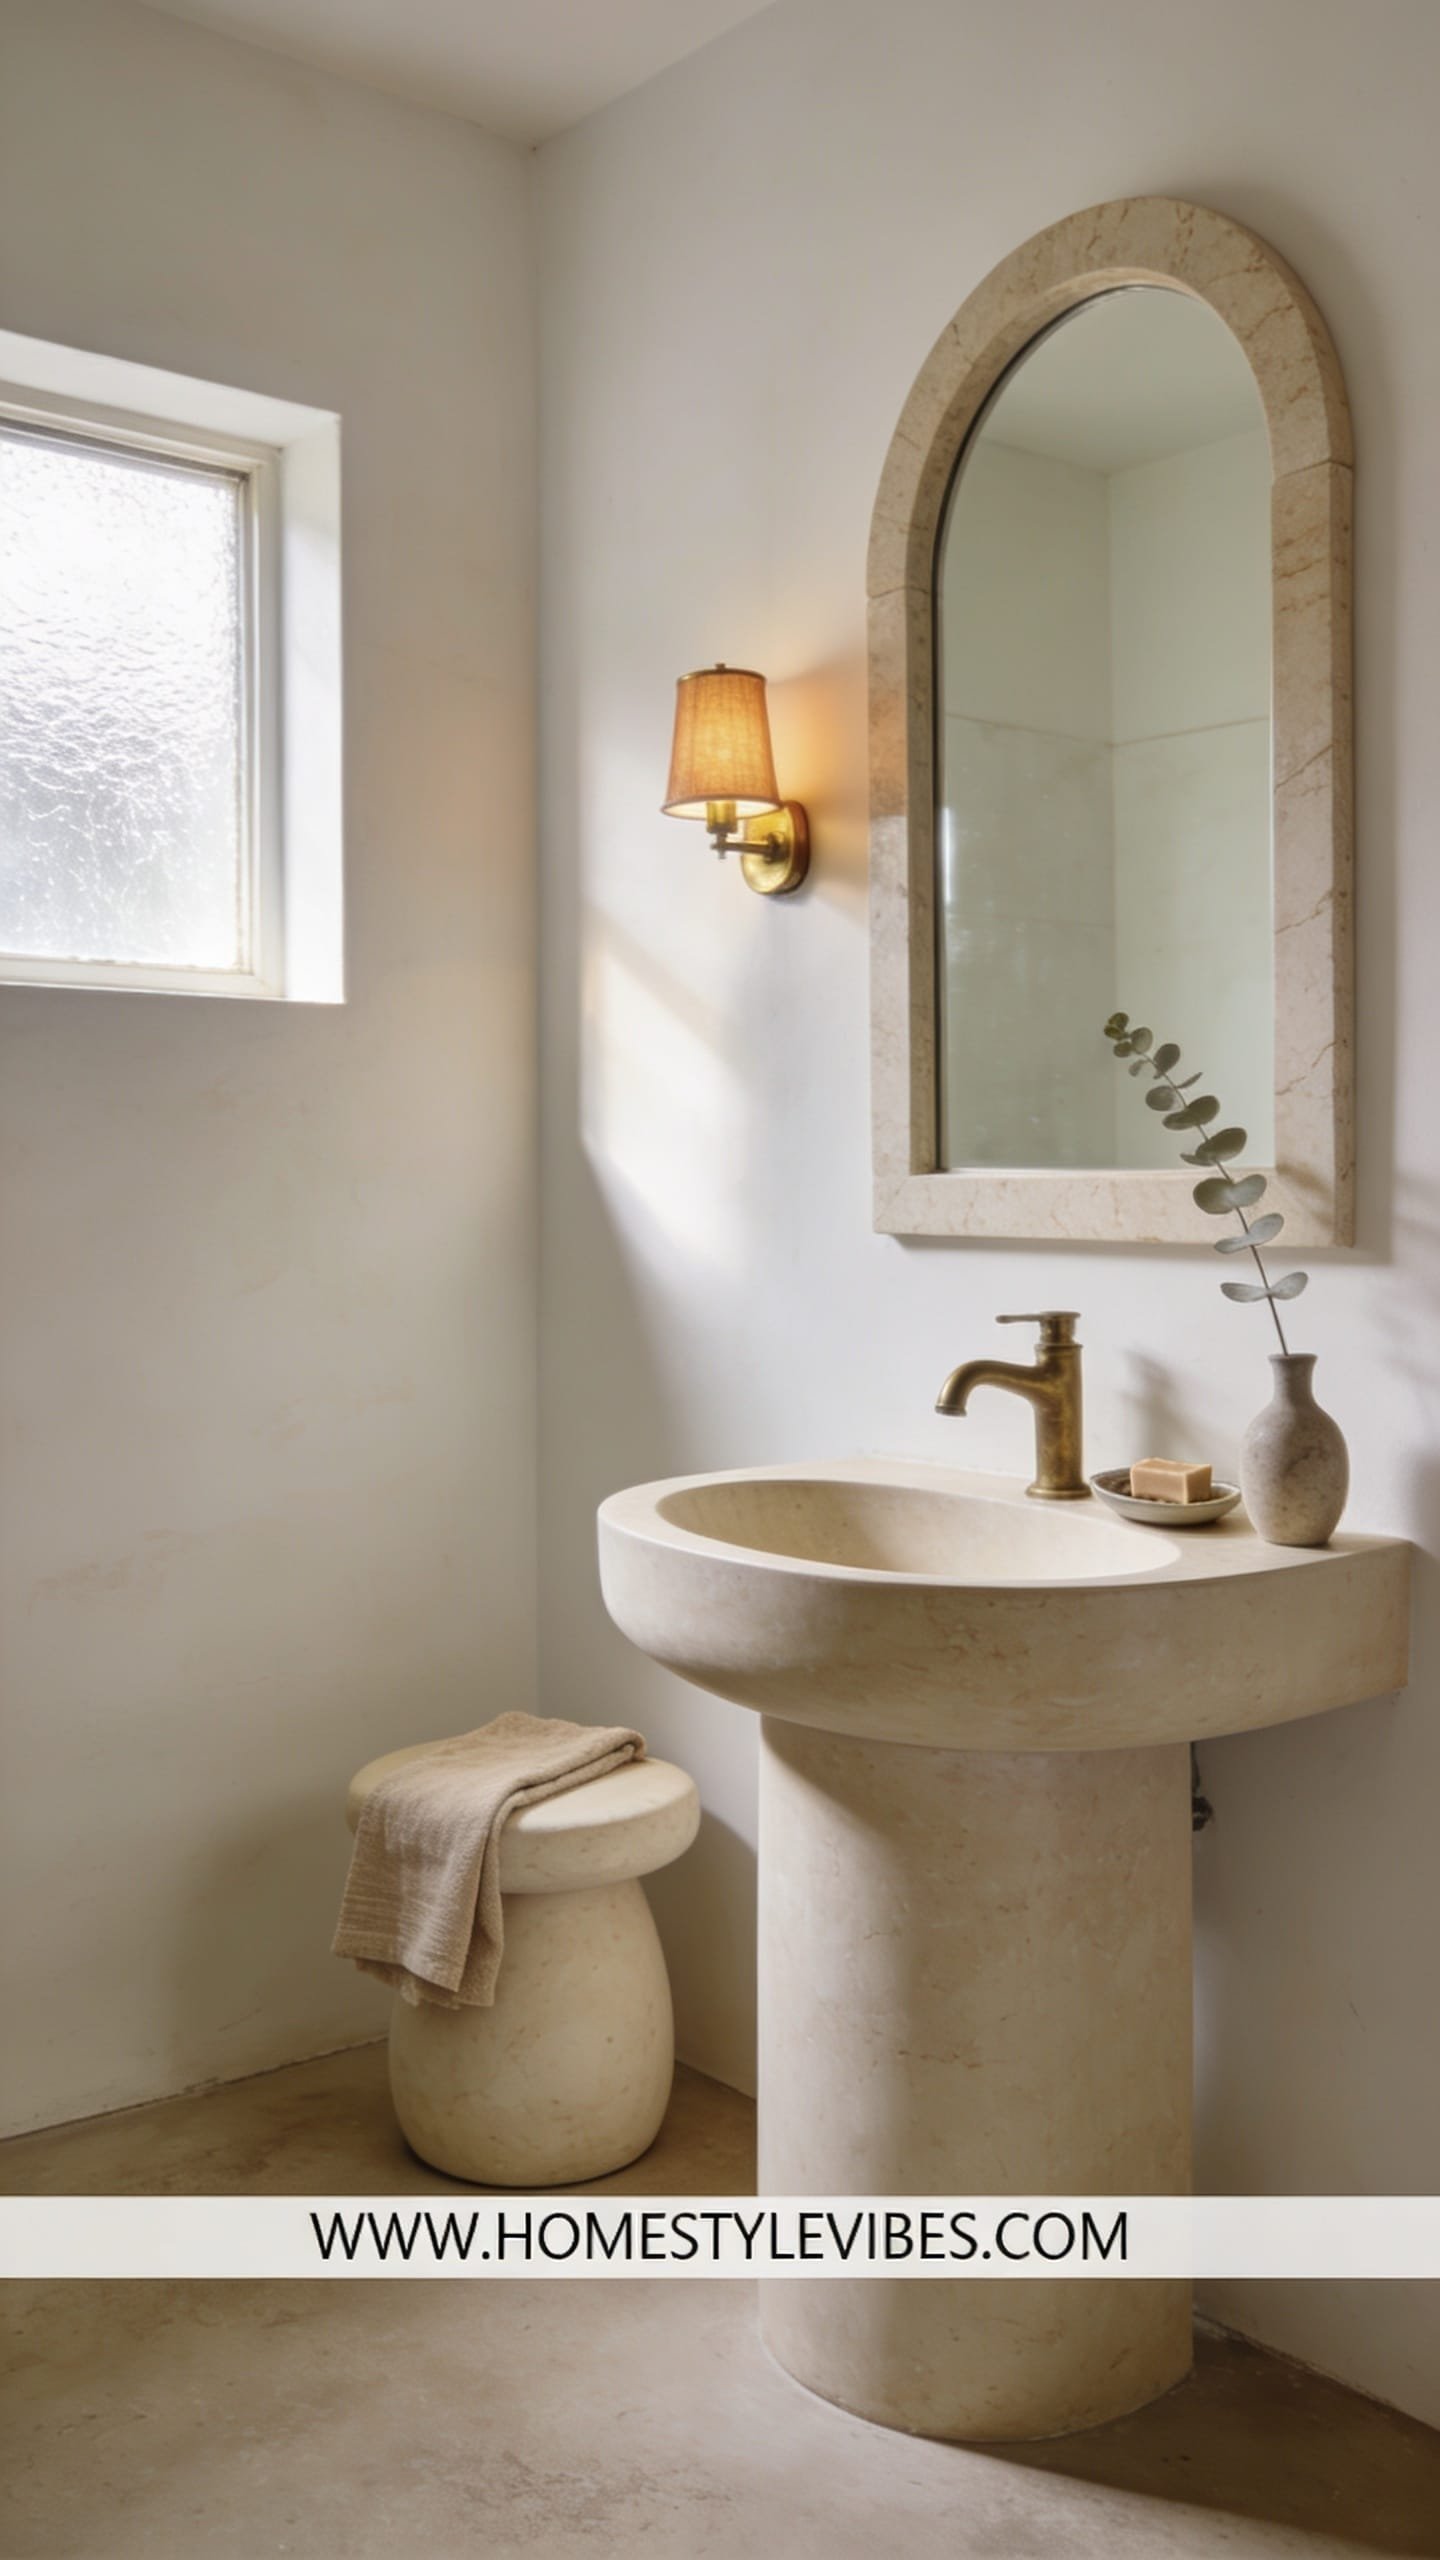
We’ve all been there—standing in a tiny bathroom with cold light bouncing off glossy tiles, every surface feeling hard and shouty. You’ve tried random accessories to warm it up, but it still reads flat. This concept turns small square footage into a soft spa cocoon using creamy stone tones, rounded forms, and just a few thoughtful metal details.
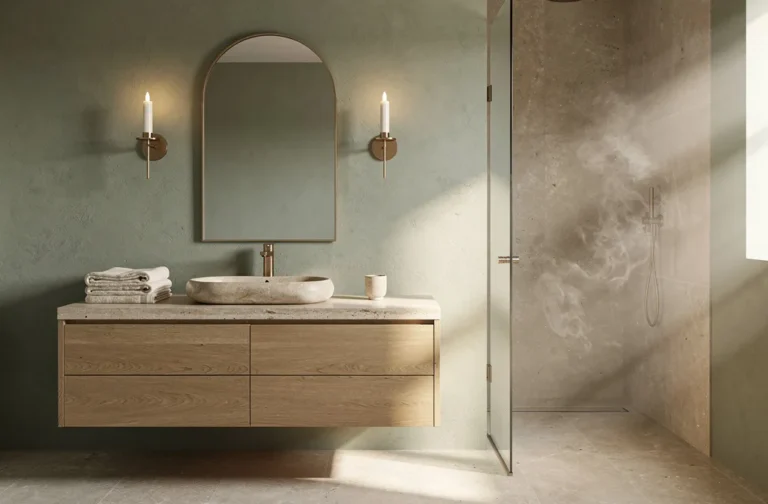
The mood is hotel-spa: serene, tactile, quietly opulent. It works for small spaces because everything leans tonal—soft beiges, pale taupes, warm whites—which keeps visual noise low. Brushed brass or brushed nickel accents read expensive because they catch the light without feeling flashy. Speaking of light, stay away from cool bulbs. Diffuse warm light at eye level (think slim sconces flanking the mirror) for flattering skin tones and a luxe glow.
Lean into materials that do the heavy lifting: stone-look porcelain (honestly indistinguishable from real stone in small doses), sand-colored microcement or Roman clay walls, and a honed quartz remnant for the vanity top. These choices photograph beautifully because of the matte finish, the way shadows soften, and the layered palette—cream on sand on bone. Try a rounded-edge mirror to echo those soft forms and prevent that “hard-edged shoebox” look.
Variations: On a tight budget, use stone-contact paper on the vanity top, repaint the walls in a light beige with a hint of gray-green undertone, and add one statement sconce. For a darker version, try warm greige walls and oil-rubbed bronze fixtures. Renter-friendly swap: removable stone-look wallpaper on the vanity wall, plus a plug-in sconce pair.
Budget Breakdown:
- Stone-look porcelain floor tile: $3–$8/sq ft
- Honed quartz vanity remnant (small): $150–$400
- Brushed brass widespread faucet: $120–$350
- Rounded frameless mirror: $80–$180
- Pair of warm LED sconces: $100–$250
- Microcement/Roman clay kit or paint: $60–$220
- Soft Turkish towels + bath mat: $50–$120
Total Estimated Cost: $560 – $1,620
Best For: Windowless powder rooms or small primary baths. Ideal if you want spa vibes and low-contrast calm that still reads polished.
Key Design Elements:
- Main materials: honed stone-look porcelain, microcement/Roman clay, brushed brass
- Color palette: cream, bone, sand, warm white
- Lighting strategy: warm 2700–3000K sconces at eye level + dimmable overhead
- Furniture silhouettes: rounded mirror, slim vanity with softened edges
- Texture layers: matte walls, nubby towels, soft wool bath mat
- Accent details: unlacquered or brushed brass hardware, a single olive branch in a stone vessel
How To Recreate This Look:
- Start with a tonal paint or Roman clay wall finish in warm cream.
- Add stone-look porcelain on the floor; keep grout thin and color-matched.
- Layer a honed quartz or faux-stone vanity top; round the corners if possible.
- Install warm LED sconces flanking a rounded mirror for flattering light.
- Style with sand-toned towels, a stone vessel with greenery, and a low-profile bath mat.
Why This Looks Expensive: Matte texture plus controlled metals equals quiet confidence. Your eye lands on soft forms and subtle sheen, not chaos. The restraint feels intentional, which reads high-end in photos and in person.
Watch Out: Don’t mix too many metal finishes. Two max. Also avoid cool white bulbs—they create unflattering shadows and kill the spa mood.
Pro Styling Tip: Photograph with one sconce dimmed slightly to create shadow depth along the wall texture; it adds that editorial softness.
Keep scrolling—if you’ve got a pedestal sink and zero storage, the next idea is about to be your best friend.
2. Floating Vanity + Slatted Wood Niche, Hotel-Clean Storage
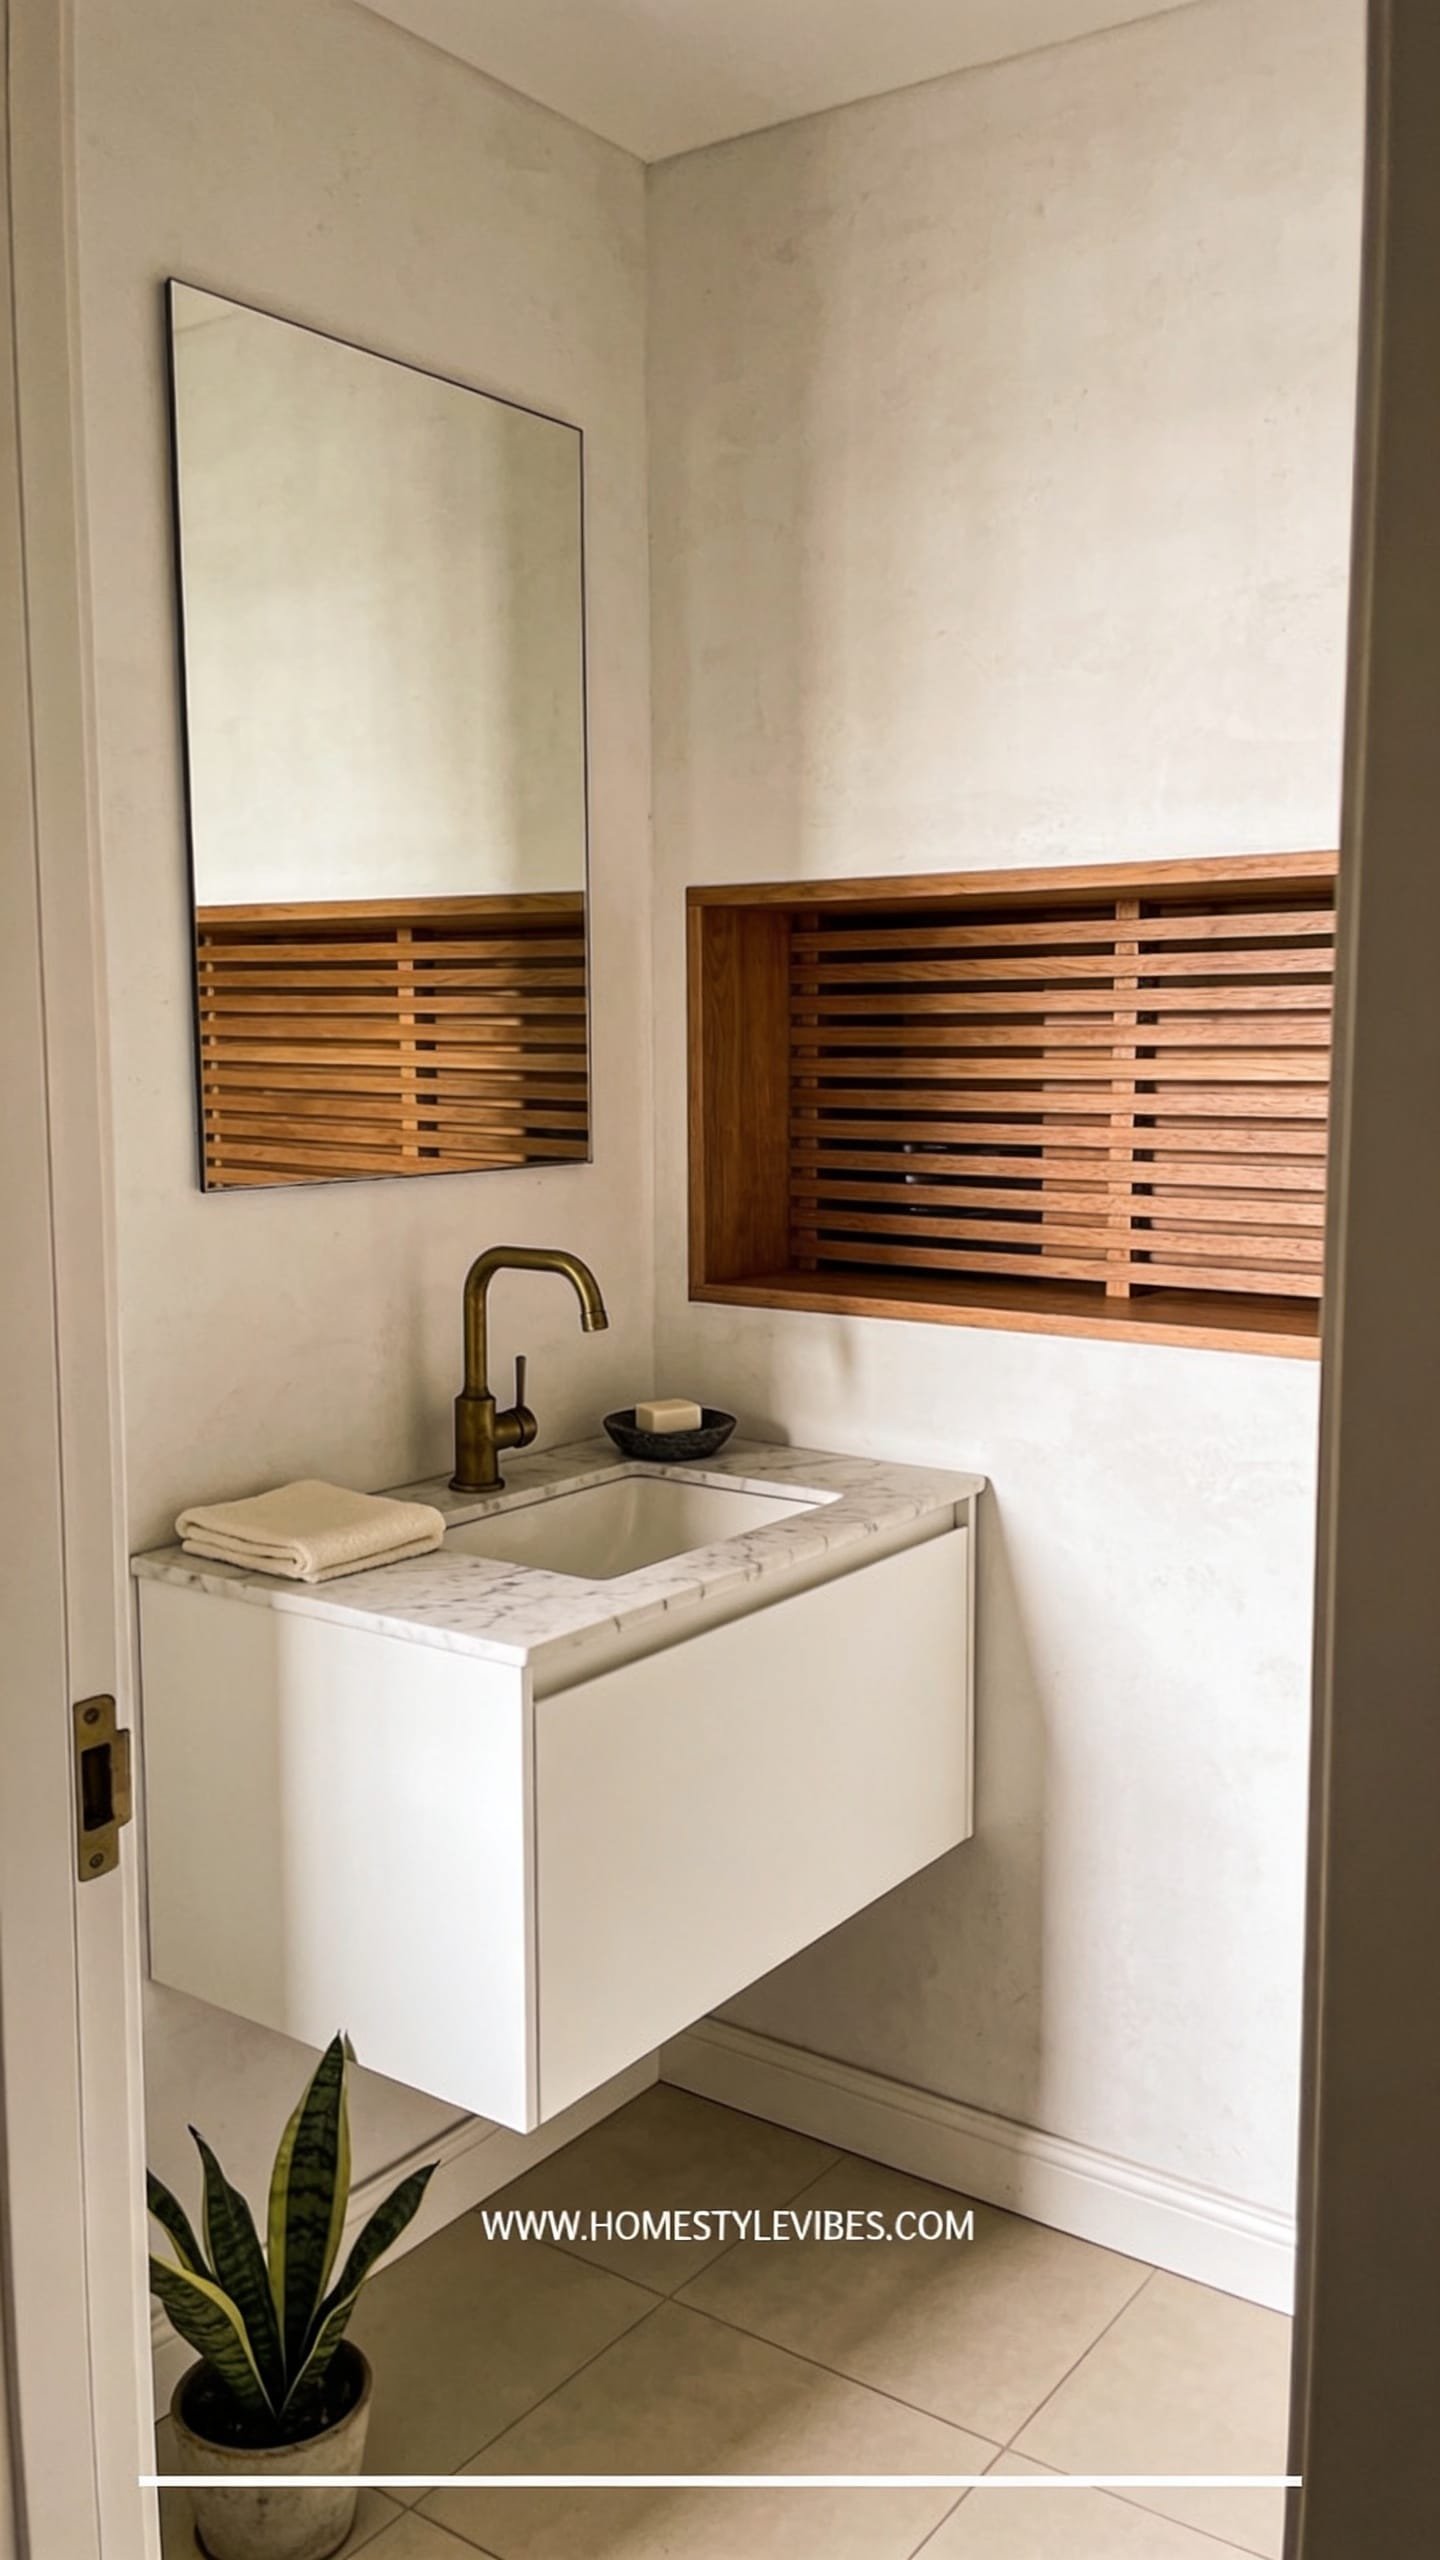
It’s that one corner that always feels off—the pedestal sink where toothpaste and hair ties go to die. You’ve tried baskets and over-the-toilet units, but everything still feels like storage-on-display. This approach keeps storage invisible with a floating vanity and a slim, slatted wood niche that reads bespoke millwork without needing a full reno.
The mood here is contemporary hotel-clean: crisp lines, calm wood warmth, purposeful negative space. Floating the vanity opens floor area, which visually enlarges a small bathroom. Slatted wood adds depth and rhythm, especially behind a toilet or along a narrow side wall. Lighting glides underneath the vanity (LED toe-kick strip) for subtle glow that makes the room feel like it’s levitating.
Materials steer the ship: warm oak or teak-look composite for the niche and vanity fronts, matte black or brushed nickel hardware, and a rectangular integrated sink for that sculpted, boutique vibe. It photographs beautifully because the linear rhythm of the slats creates shadow play, and the floating plane gives your eye a break from floor-to-ceiling repetition.
Variations: Small-space version uses a 24–30 inch floating vanity with a single drawer. Budget-friendly: IKEA Godmorgon with custom wood adhesive panels and slim pulls. Renter-friendly: freestanding vanity with hidden legs and a peel-and-stick slatted panel behind it for the niche effect.
Key Design Elements:
- Main materials: slatted oak/teak composite, matte black metal, integrated sink
- Color palette: warm wood, soft white, graphite accents
- Lighting strategy: LED toe-kick under vanity + vertical mirror lights
- Furniture silhouettes: clean box vanity, sharp-edged rectangular mirror
- Texture layers: wood slats, matte walls, smooth solid-surface sink
- Accent details: slim black pulls, closed canisters, hidden outlet inside vanity
Budget Breakdown:
- Floating vanity (24–36 in): $250–$900
- Integrated solid-surface sink: $180–$450
- Custom or peel-and-stick slat panels: $80–$300
- Matte black faucet: $90–$250
- LED toe-kick kit + driver: $50–$140
- Mirror with vertical lights or side sconces: $120–$350
Total Estimated Cost: $770 – $2,390
Best For: Anyone craving concealed storage in a small bath or powder room, minimalist lovers, and homes aiming for higher appraisal appeal.
How To Recreate This Look:
- Start by choosing a floating vanity with a deep main drawer and organizer inserts.
- Add a slatted wood panel to a dead wall section; frame a small recessed niche if you can.
- Layer an LED strip under the vanity—run it to a door-contact switch if you want automatic night light.
- Install a rectangular mirror with vertical lighting or slim sconces for even face light.
- Style with closed containers and two-tone towels (white with a thin black edge looks luxe).
Why This Feels Designer: Lifted mass + linear texture means controlled shadow and clear hierarchy. Your eye reads purpose, not clutter. Hotels use this formula for a reason.
One Thing To Avoid: Overdoing wood on every surface. Keep the slats focused; pair with white walls or stone so it doesn’t feel like a sauna box.
Pro Styling Tip: For photos, angle the light to catch the slat edges—those tiny shadows signal craftsmanship fast.
Prefer color and character? Let’s move into pattern that still reads grown-up, not chaotic.
Remember, this isn’t about recreating a showroom. It’s about building a space that actually feels like yours. If one idea resonates more than the others, that’s your starting point—you don’t need all seven.
3. Graphic Floor, Quiet Walls: Parisian Powder With Restraint
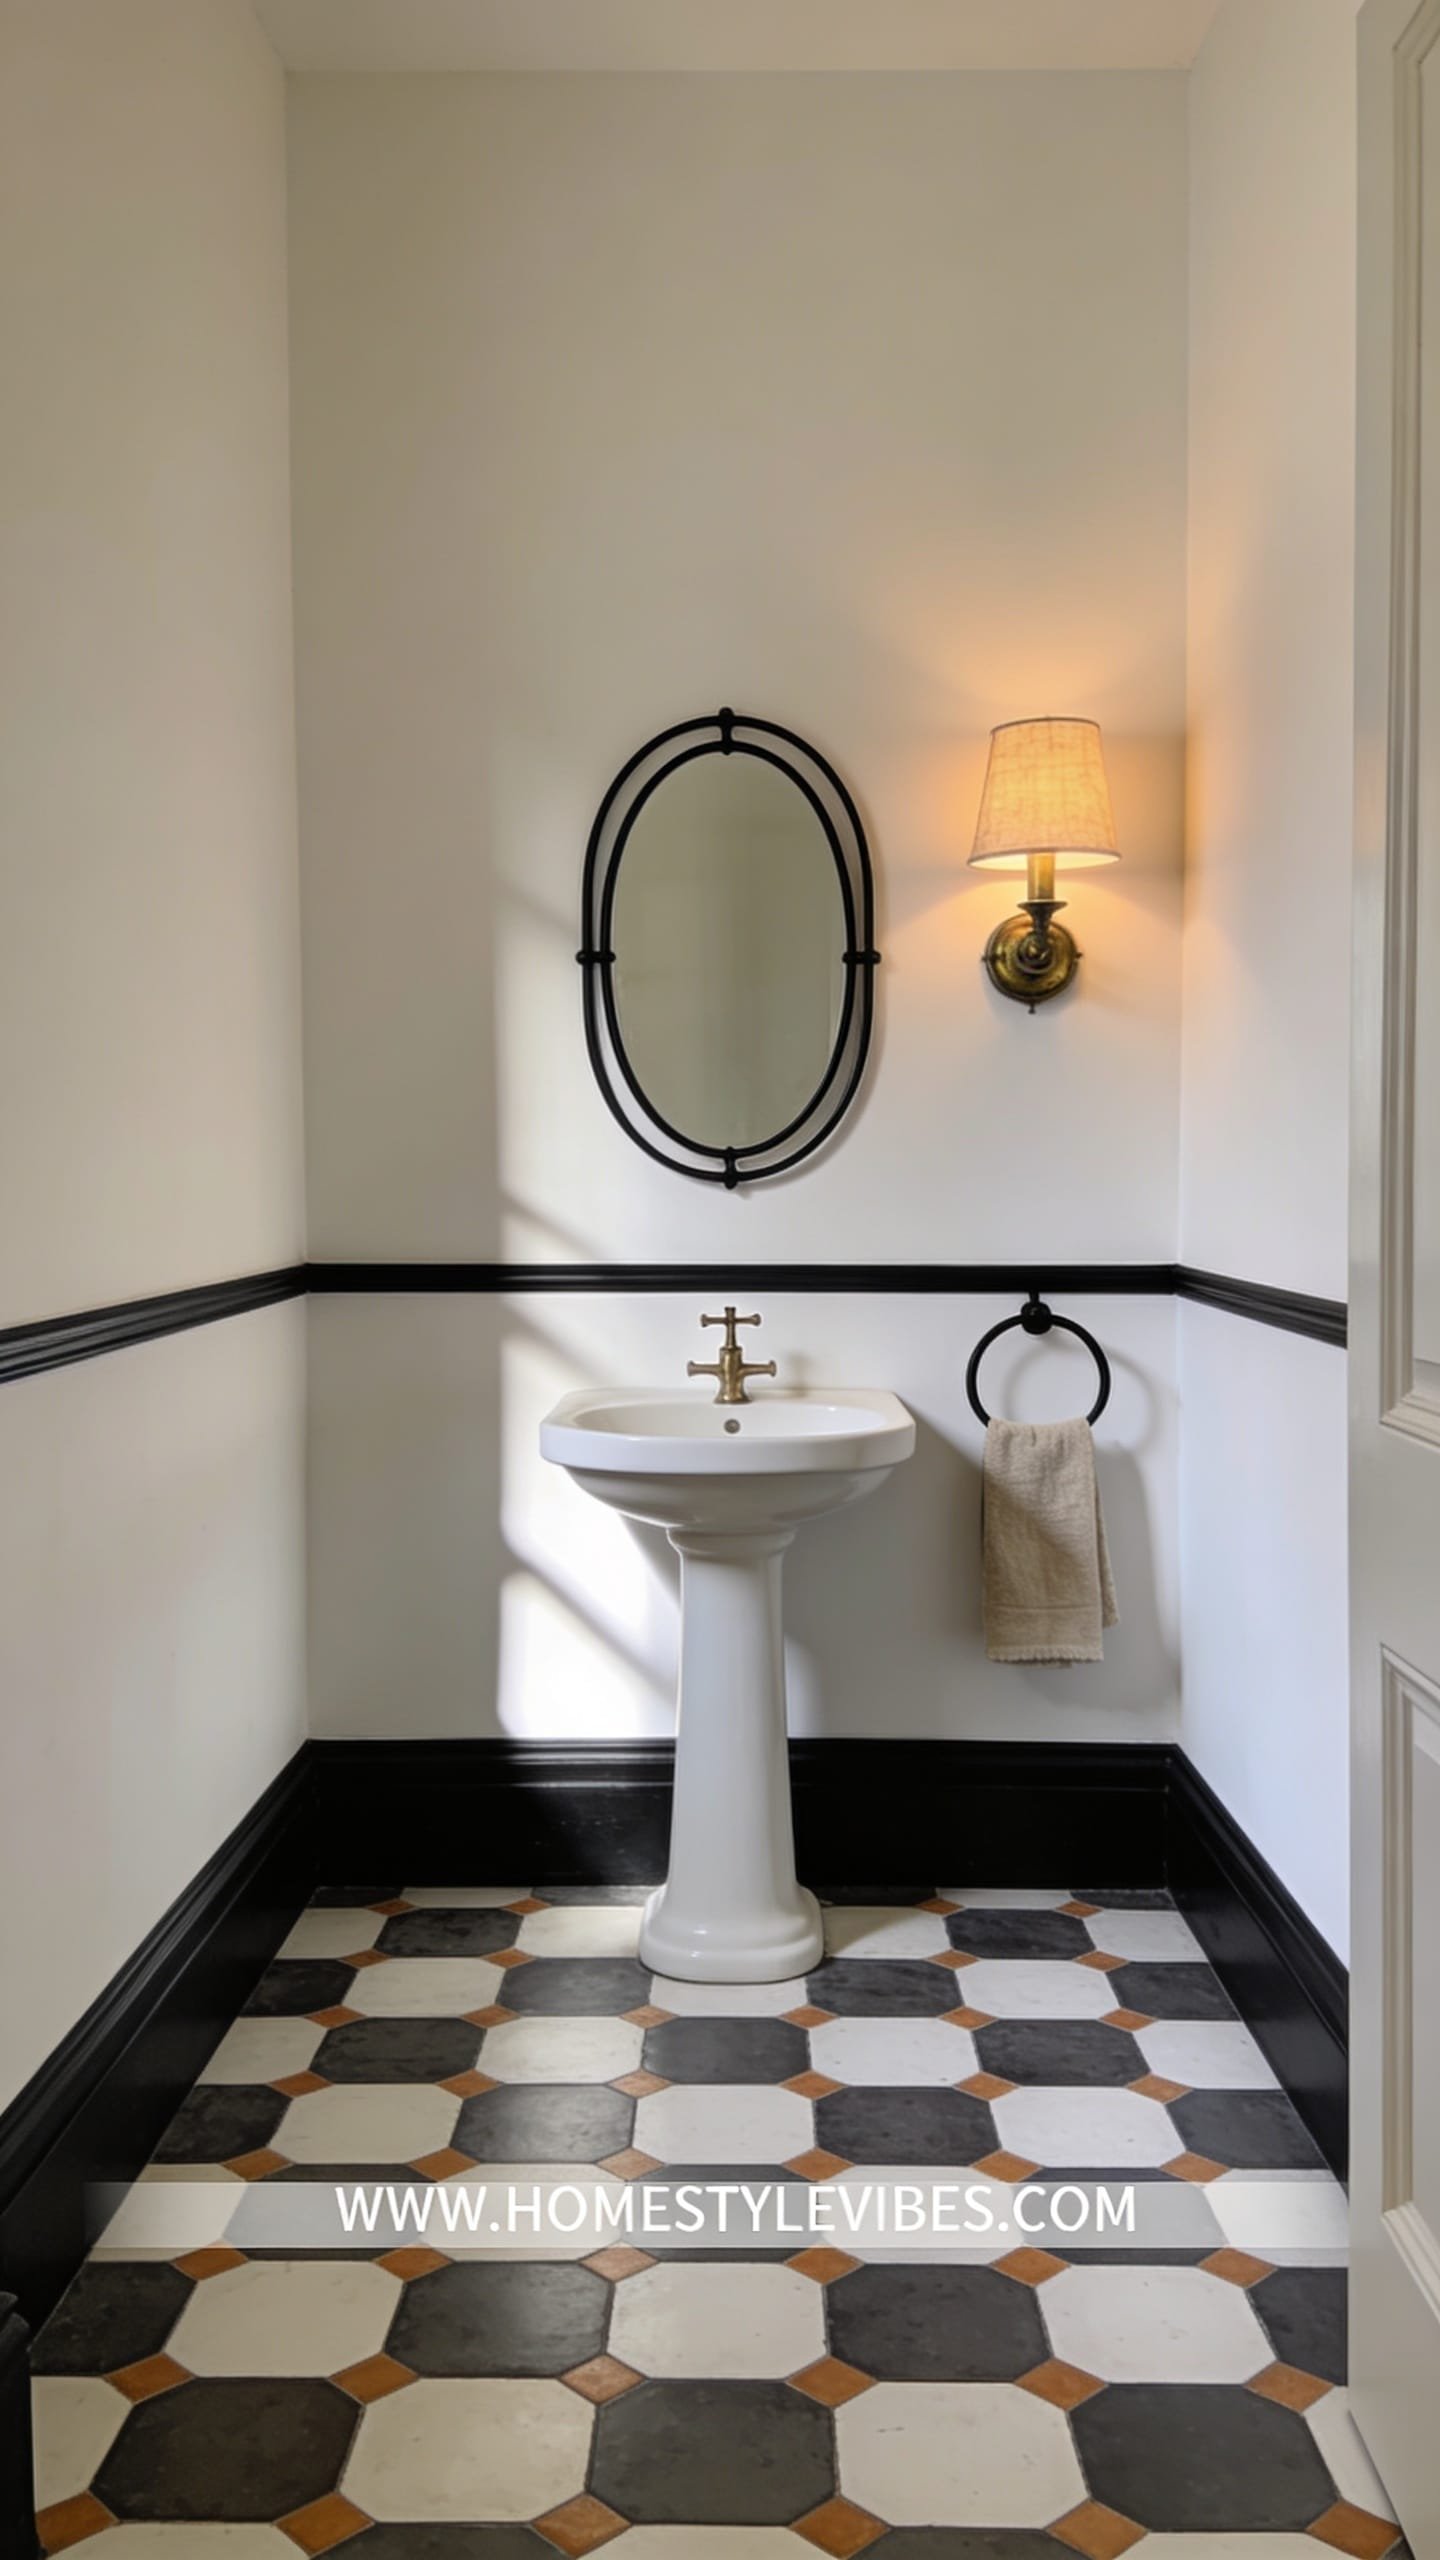
You love pattern but fear your tiny bathroom will feel like a kaleidoscope gone wrong. You’ve tried bold wallpaper, and suddenly the room screamed at you every morning. This approach puts the statement underfoot with a graphic floor and keeps the walls whisper-soft so the room feels balanced and photogenic.
The mood is chic Parisian: a patterned encaustic-look or checkerboard tile floor, pale walls, slim black trim line, and a simple pedestal or console sink. It works in small baths because pattern stays horizontal and contained. Lighting bounces off pale walls, and the pattern pulls the eye across the floor, making the space feel wider. The photos? Chef’s kiss—high contrast at the bottom with creamy negative space above.
Materials matter: porcelain encaustic-look tiles or a classic 2-tone checkerboard, off-white limewash or flat paint, a slender black metal-framed mirror, and antiqued brass or unlacquered brass hardware. A tiny picture light over the mirror or a mini pendant warms the scene.
Variations: Budget-friendly uses peel-and-stick floor tiles in a simple checker. Renter-friendly? Temporary floor tiles over existing vinyl, removable wall molding, and a plug-in picture light. Darker version: charcoal-and-ivory checker with dove-gray walls and bronze hardware.
Budget Breakdown:
- Porcelain patterned or checker tiles: $4–$10/sq ft
- Paint or limewash: $40–$160
- Black framed mirror: $80–$180
- Picture light or mini pendant (dimmable): $70–$220
- Brass faucet/handle set: $120–$300
- Pedestal or slim console sink: $150–$600
Total Estimated Cost: $560 – $1,860
Best For: Powder rooms that entertain often, design lovers who want a bold-but-classy moment, small baths needing visual width.
Key Design Elements:
- Main materials: patterned porcelain tile, limewash/flat paint, metal-framed mirror
- Color palette: ivory, warm white, black, brass hints
- Lighting strategy: overhead dimmer + warm picture light
- Furniture silhouettes: pedestal/console sink, slender mirror
- Texture layers: matte walls, satiny metal, cotton-linen towels
- Accent details: slim black line trim, a single art print, soap in a vintage glass
Why This Reads High-End: Restraint. One hero (the floor), everything else in support. The composition feels editorial because contrast sits where you expect it, and the eye can rest above.
How To Recreate This Look:
- Start by choosing a graphic floor pattern you genuinely love in 2–3 tones max.
- Add creamy walls in a soft matte; consider limewash for texture.
- Layer a black metal-framed mirror and slim brass faucet set.
- Install a small picture light above the mirror for boutique character.
- Style with one art print, a woven basket, and a crisp white towel with black edge.
The Most Common Mistake: Adding a busy patterned shower curtain or wallpaper on top. Keep the vertical planes calm or you’ll lose the cool factor.
Pro Styling Tip: For photos, leave a 2-inch towel fold draped over the console, not perfectly square—lived-in polish reads richer than showroom stiff.
Craving warmth and organic movement instead of crisp contrast? The next one brings the modern Mediterranean sunlight, even if your bathroom has no window.
4. Modern Mediterranean: Limewash Walls + Aged Brass + Terracotta Touch
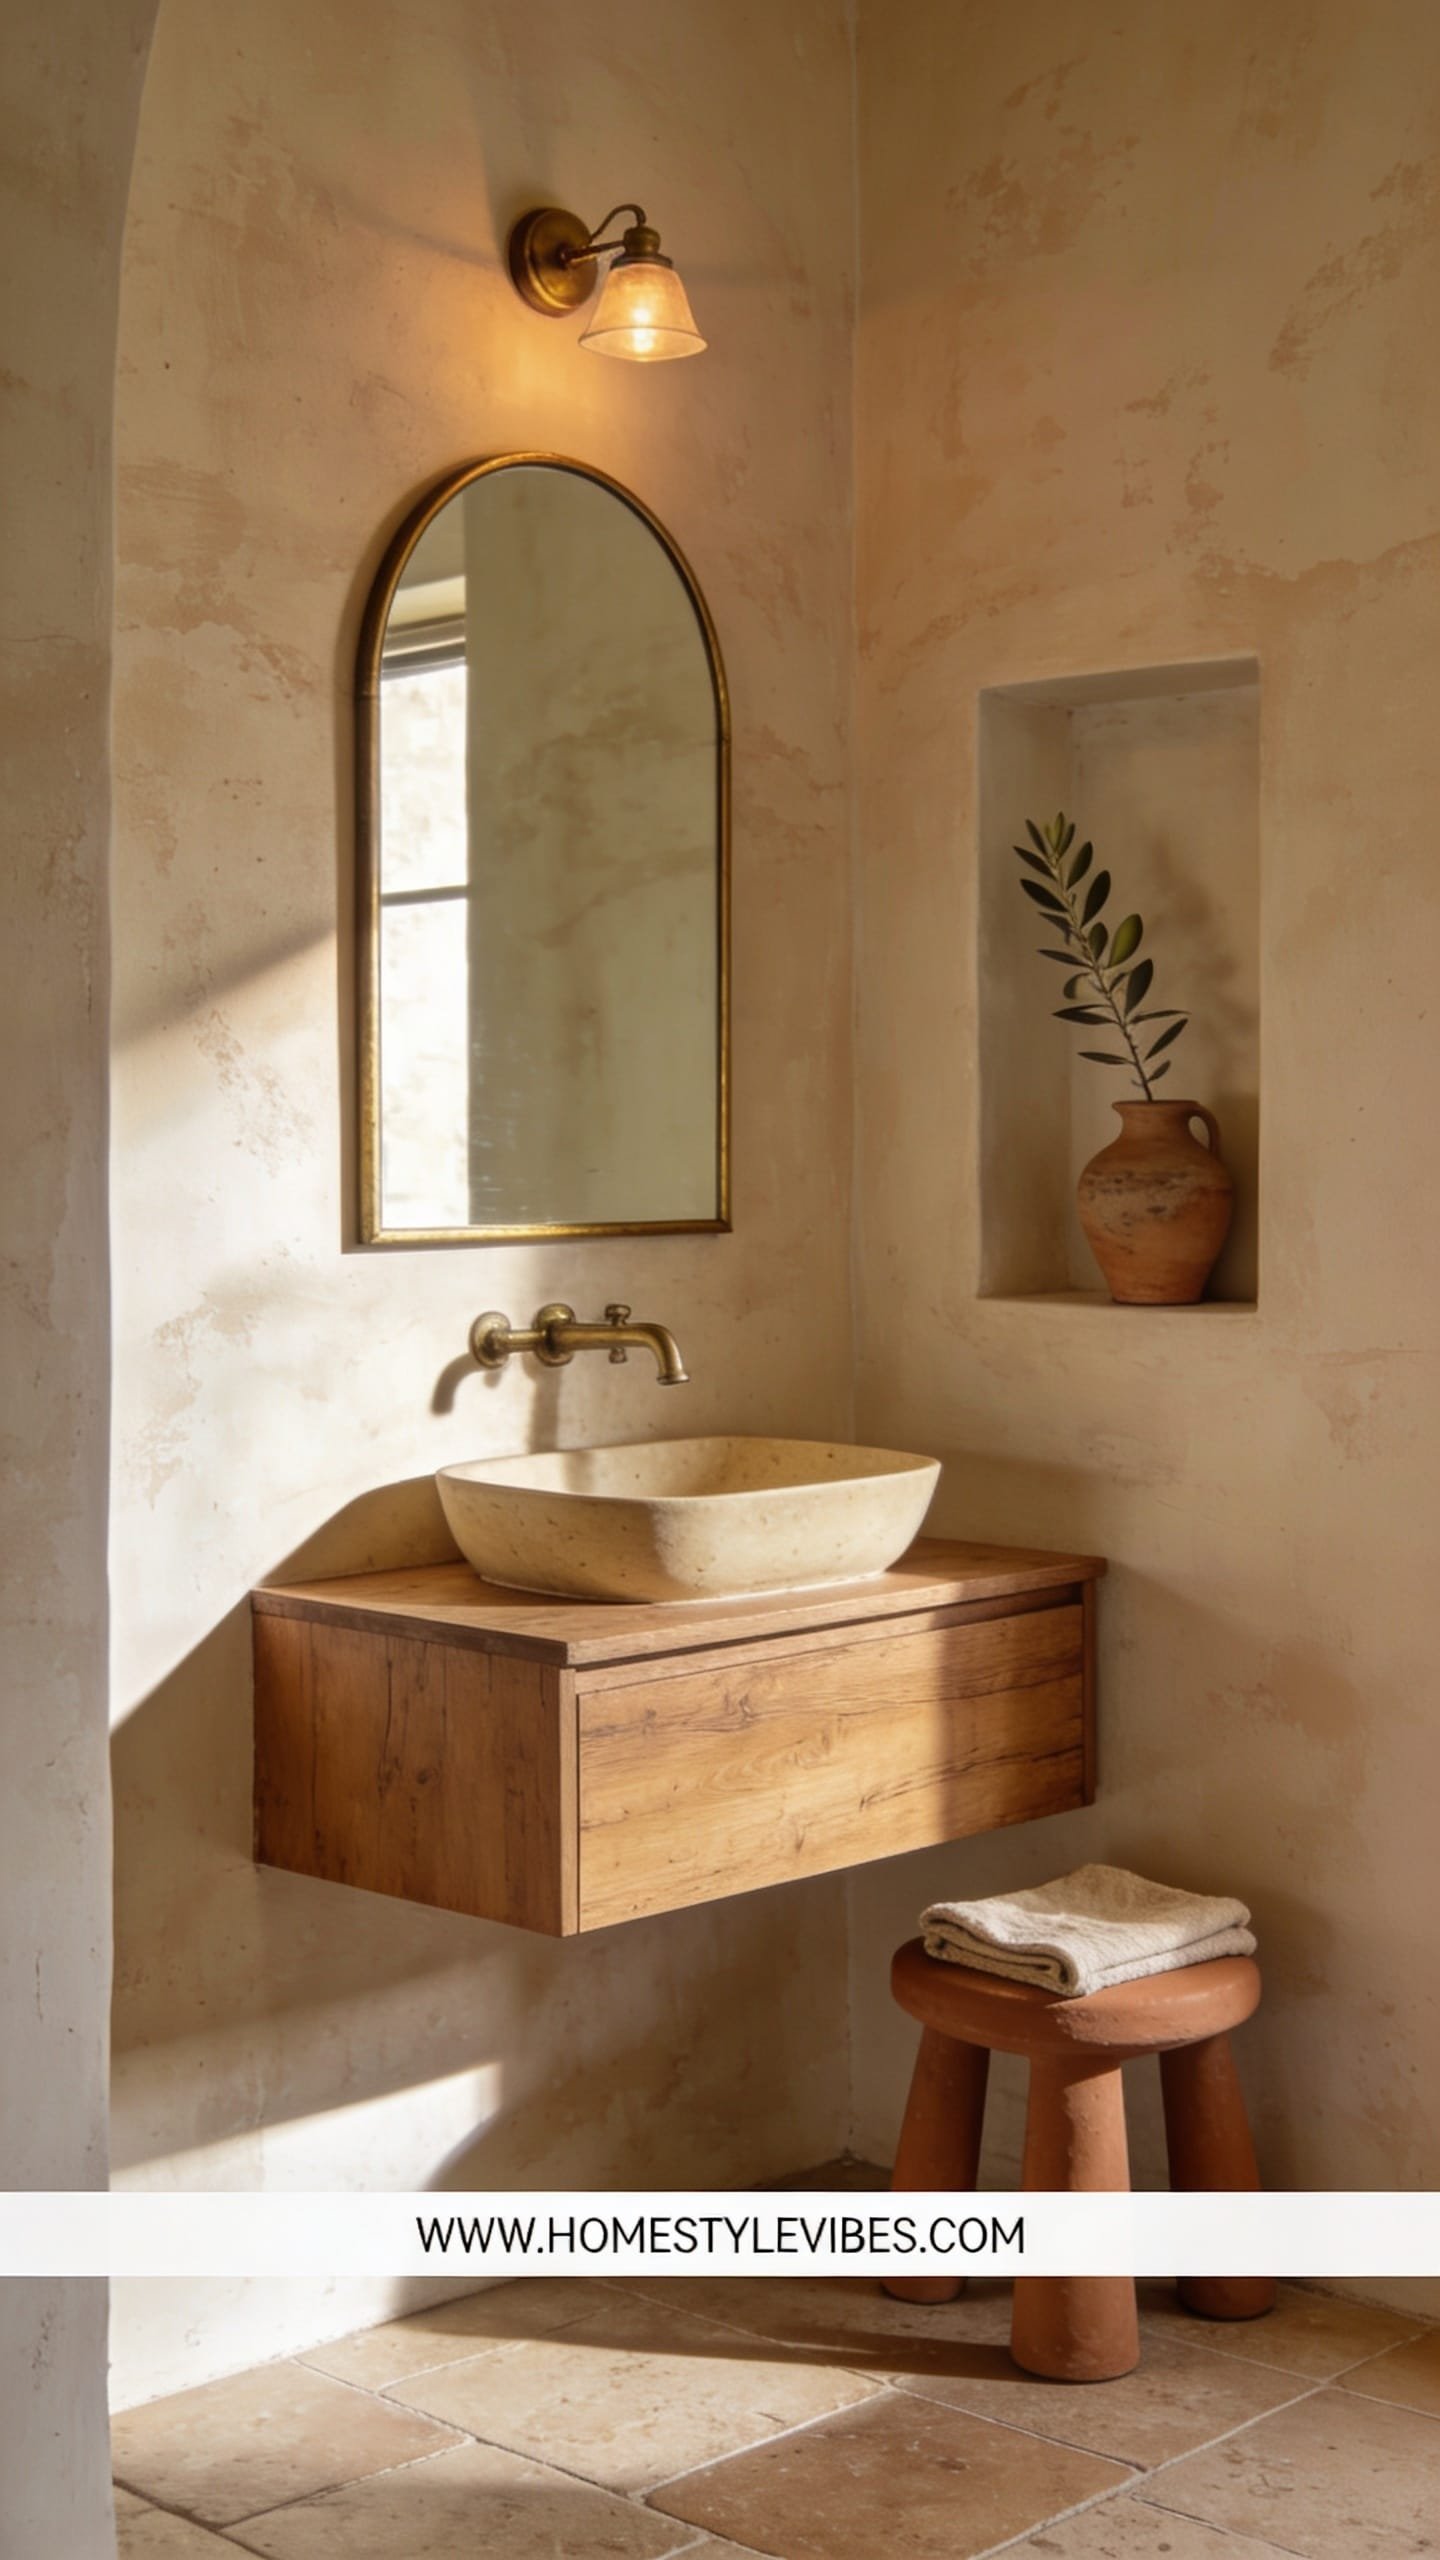
You want your small bathroom to feel like a summer evening in Mallorca. You hate the way glossy white walls feel icy and echo-y. This design leans into texture: softly mottled limewash walls, aged brass, and a terracotta accent that whispers sun-baked earth without going full theme party.
The mood is relaxed Mediterranean: organic, textured, sun-kissed. It thrives in real homes because limewash hides minor imperfections and creates movement that tricks the eye into reading depth. Choose layered lighting: a central semi-flush with a woven or linen shade, plus side sconces in aged brass. In photos, the wall texture makes those pretty, uneven tonal shifts you can’t fake.
Material mix: limewash in a warm neutral (think almond or pale cappuccino), tumbled travertine-look floor tile, aged brass taps, and a terracotta planter or a small handmade clay stool. Keep the vanity in light wood with a chunky edge detail for soul. A waffle cotton curtain in natural white brings that breezy softness.
Variations: Budget? Use mineral paint that mimics limewash. Small-space? Opt for a corner vanity in light oak and keep walls simple except for the vanity wall. Renter-friendly: peel-and-stick plaster-look wallpaper and swap brass via hardware and accessories only.
Budget Breakdown:
- Limewash or mineral paint kit: $60–$220
- Travertine-look porcelain tile: $3–$7/sq ft
- Aged brass faucet + hardware: $150–$400
- Semi-flush linen or woven light: $70–$200
- Light wood vanity: $250–$800
- Terracotta accents (planter/stool): $40–$120
Total Estimated Cost: $570 – $1,840
Best For: Low-light bathrooms that need warmth, anyone craving old-world texture with modern function, year-round sun lovers.
How To Recreate This Look:
- Start with limewash or mineral paint in a warm neutral; work in wide, crisscross strokes.
- Add a light wood vanity with a slightly chunky edge; keep lines simple.
- Layer travertine-look floors or a small rug with terracotta tones if you’re not retiling.
- Install aged brass sconces and a linen-shaded semi-flush overhead.
- Style with a terracotta planter and a small clay tray for hand soap.
Why This Looks Intentional: Every finish feels like it’s been there a while. Patina cues history, which makes inexpensive elements read storied, not new-and-shiny.
Don’t Do This: Avoid bright white, ultra-glossy subway everywhere. The glare kills the old-world vibe and flattens your hard-won texture.
Pro Styling Tip: Shoot with the overhead on low and sconces bright; the wall texture will cradle the light and make your brass glow.
Here’s a little honesty: I once obsessed over a perfect greige paint for weeks, only to discover the real problem was my lighting temperature. Swap the bulbs first. Then pick your paint. Your future self will thank you.
5. Monochrome Marble Moment: Vein-Forward Shower + Framed Minimalism
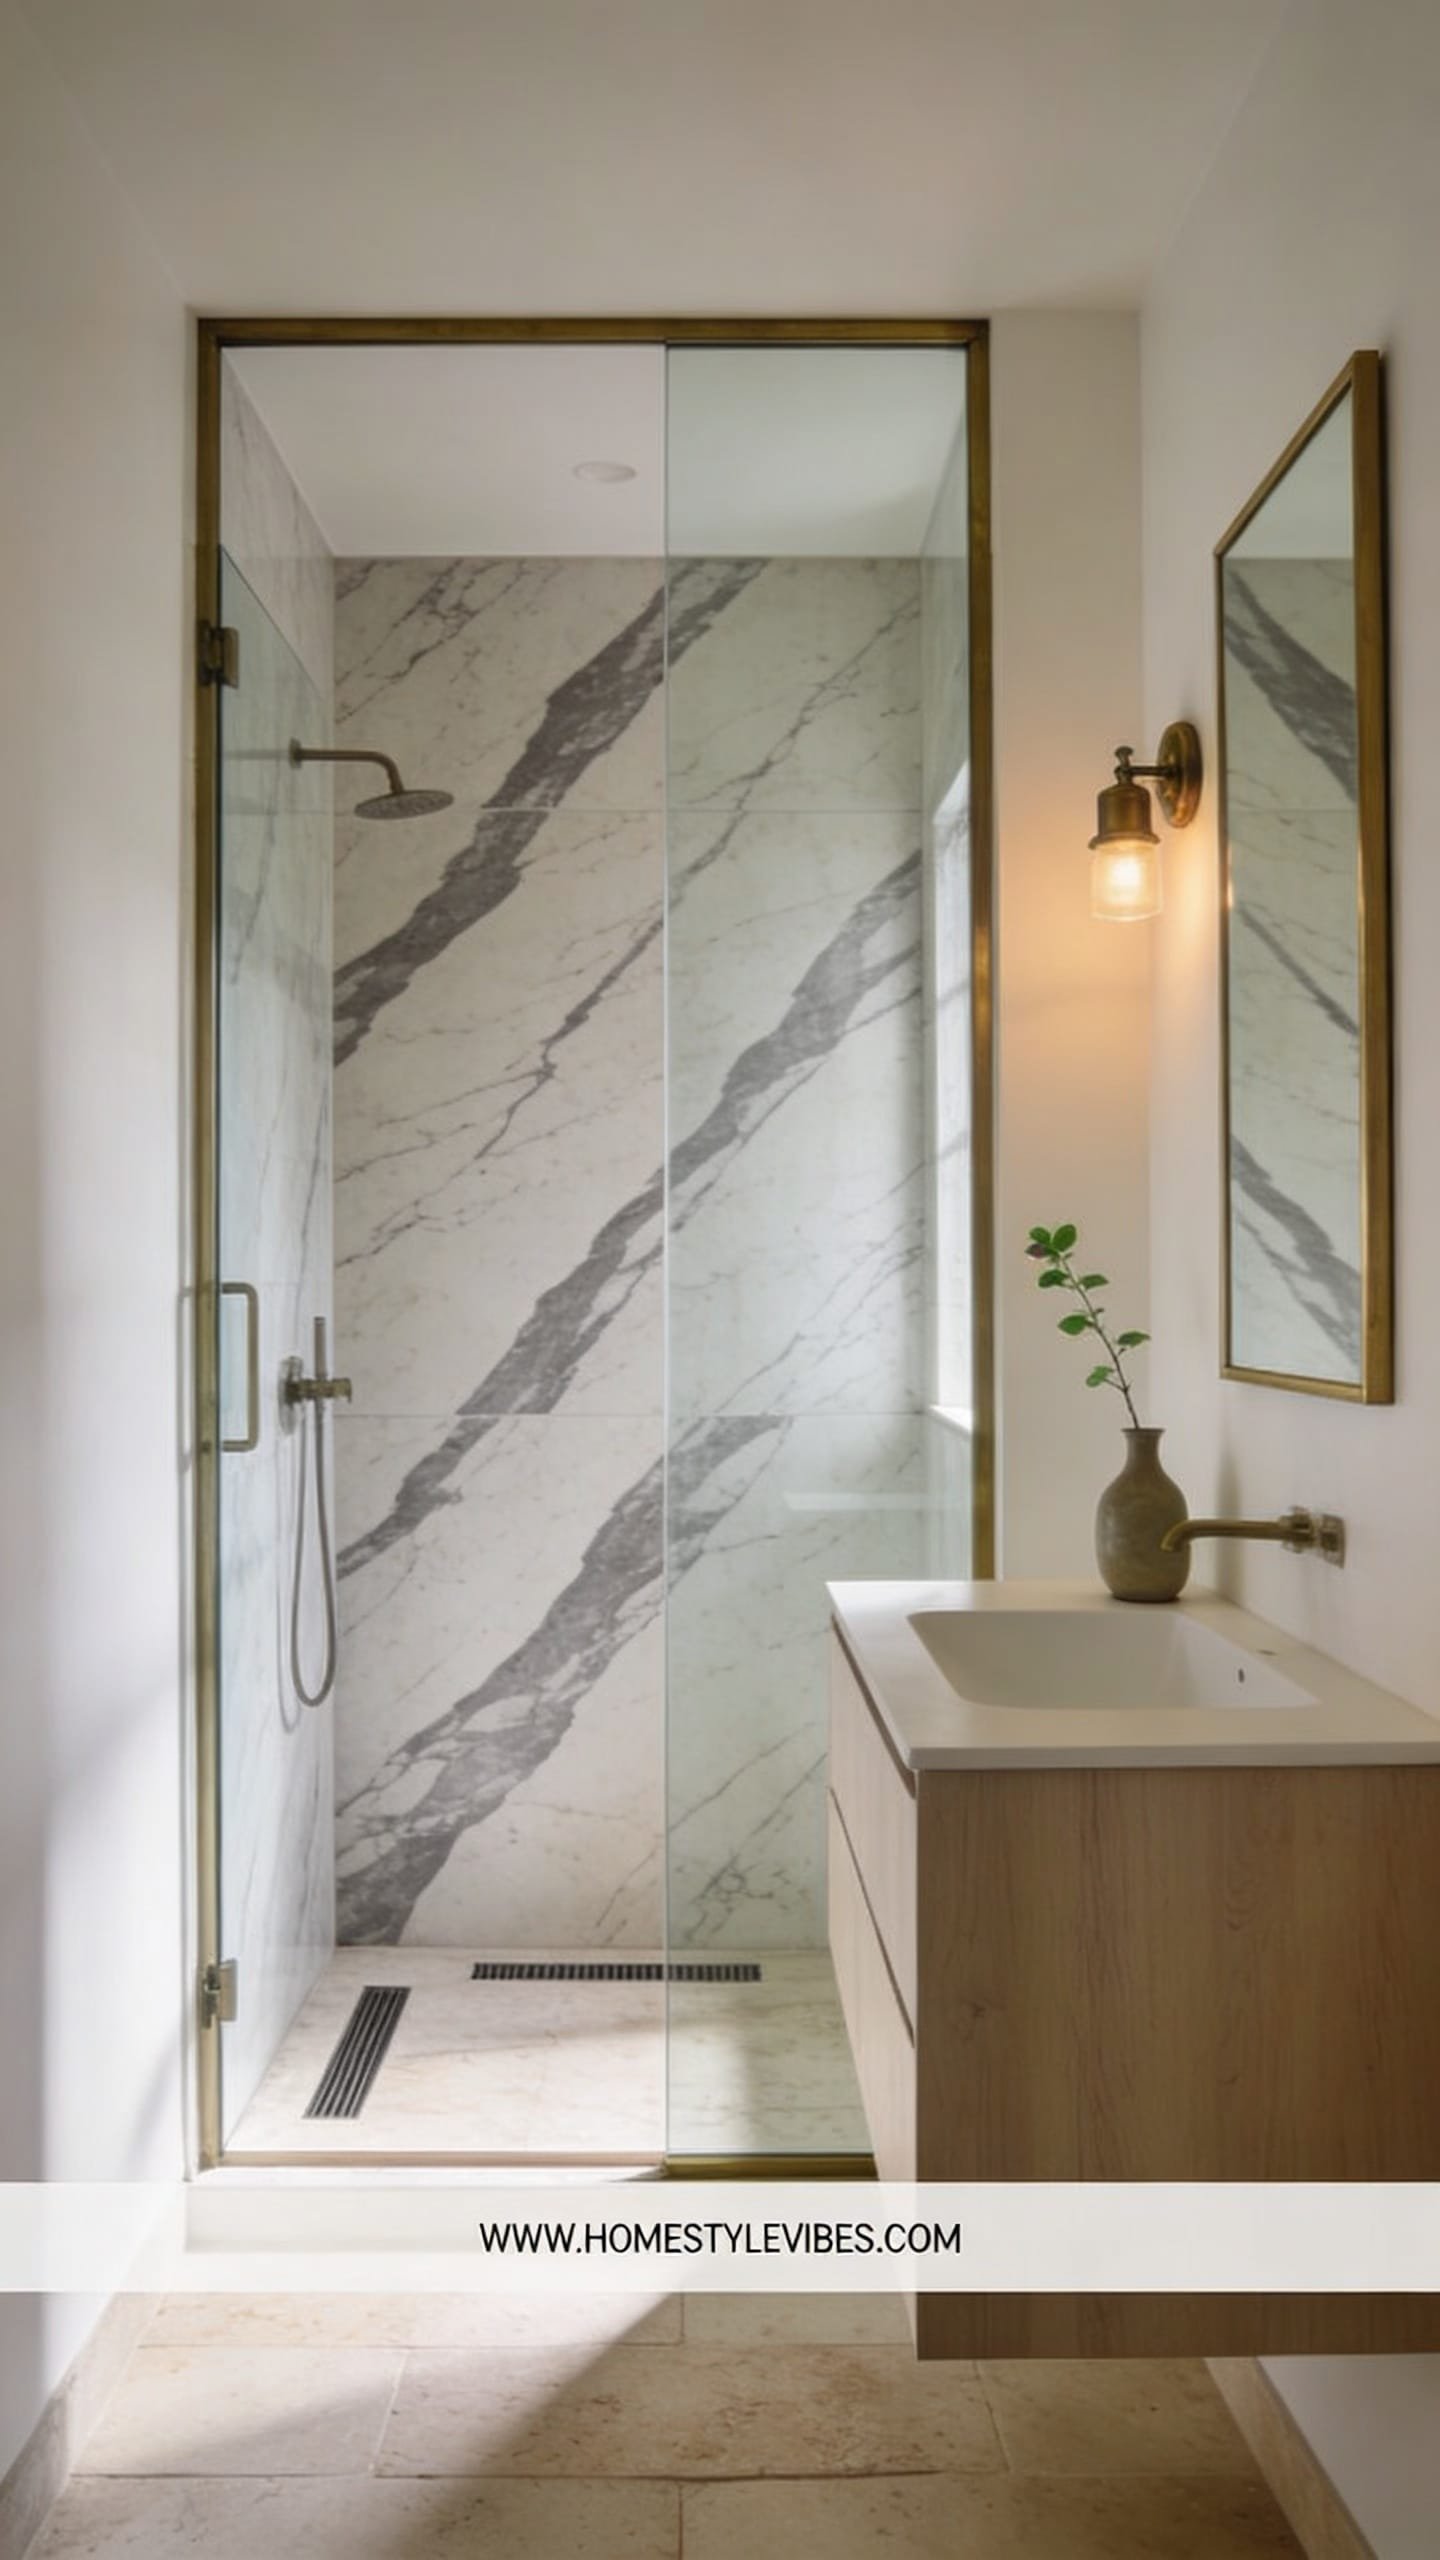
Have you ever tiled a shower, stepped back, and thought, “Why does it still feel basic?” You’ve tried mixing subway and hex, but the patchwork killed the drama. The upgrade here is singular: let a marble (or marble-look) with strong veining be the lead actor in the shower, then keep everything else minimal and framed.
The mood: gallery-like minimalism meets spa. It works in small bathrooms because directional veining draws the eye vertically or horizontally, creating movement and perceived space. Lighting should graze the tile to bring out the stone pattern—recessed lights aimed at the shower wall or a glass panel that lets natural light cross the veining. In photos, this reads luxurious and crisp because the veining does all the storytelling.
Materials: large-format marble-look porcelain or actual marble slabs if budget allows, a slim black or brass shower frame (think steel factory window vibe), and a paper-thin countertop profile. Keep hardware low-profile. Choose a minimal, flat-profile drain cover that matches your metal finish. No visual clutter; the stone is the art.
Variations: Budget-friendly? Use a dramatic marble-look porcelain with matching grout. Small-space version: run the veining vertically to add height. Darker take: deep gray marble-look with bronze framing and warm bulbs for moody elegance.
Key Design Elements:
- Main materials: marble or marble-look porcelain, slim metal shower frame, ultra-simple vanity top
- Color palette: white/ivory with gray veining, black or brass framing
- Lighting strategy: wall-grazing recessed lights + clear glass panel
- Furniture silhouettes: thin-edged vanity, flat-front cabinetry
- Texture layers: polished or honed stone, cotton towels, glass clarity
- Accent details: minimal drain cover, built-in niche with matching stone
Budget Breakdown:
- Marble-look large-format tile: $4–$12/sq ft
- Shower glass with slim frame: $500–$1,200
- Minimal drain + niche trim kit: $80–$200
- Vanity top (thin profile): $200–$500
- Recessed directional lighting: $120–$280
Total Estimated Cost: $900 – $2,392
Best For: Small primary baths and modern homes, anyone wanting a high-contrast, photo-forward shower wall moment.
Why This Looks Expensive: Scale and restraint. One large-format pattern feels architectural. You’re signaling custom work even if it’s savvy porcelain.
How To Recreate This Look:
- Start by selecting a dramatic marble or porcelain with visible veining; commit to one hero.
- Add a slim metal frame on the shower glass—keep lines linear and minimal.
- Layer wall-grazing lights aimed at the stone to enhance veining.
- Install a matching niche with mitered edges or a thin trim to keep lines clean.
- Style with plain white towels and a single black soap dispenser; done.
Watch Out: Don’t cut veining randomly. Dry-lay tiles so the veins flow; mismatches look choppy and cheap.
Pro Styling Tip: Wipe the glass fully and remove drain covers for a clean shot; reflections and busy hardware shout “builder basic.”
Okay, but what if you rent and can’t touch the tile? The next design leans on textiles, color, and fixtures you can take with you.
If you feel a little overwhelmed, breathe. Start with the idea that solves your biggest daily annoyance—lighting, storage, or visual clutter. Solve that one problem first. Everything else gets easier.
6. Renter-Remix: Luxe Layers You Can Pack Up Later
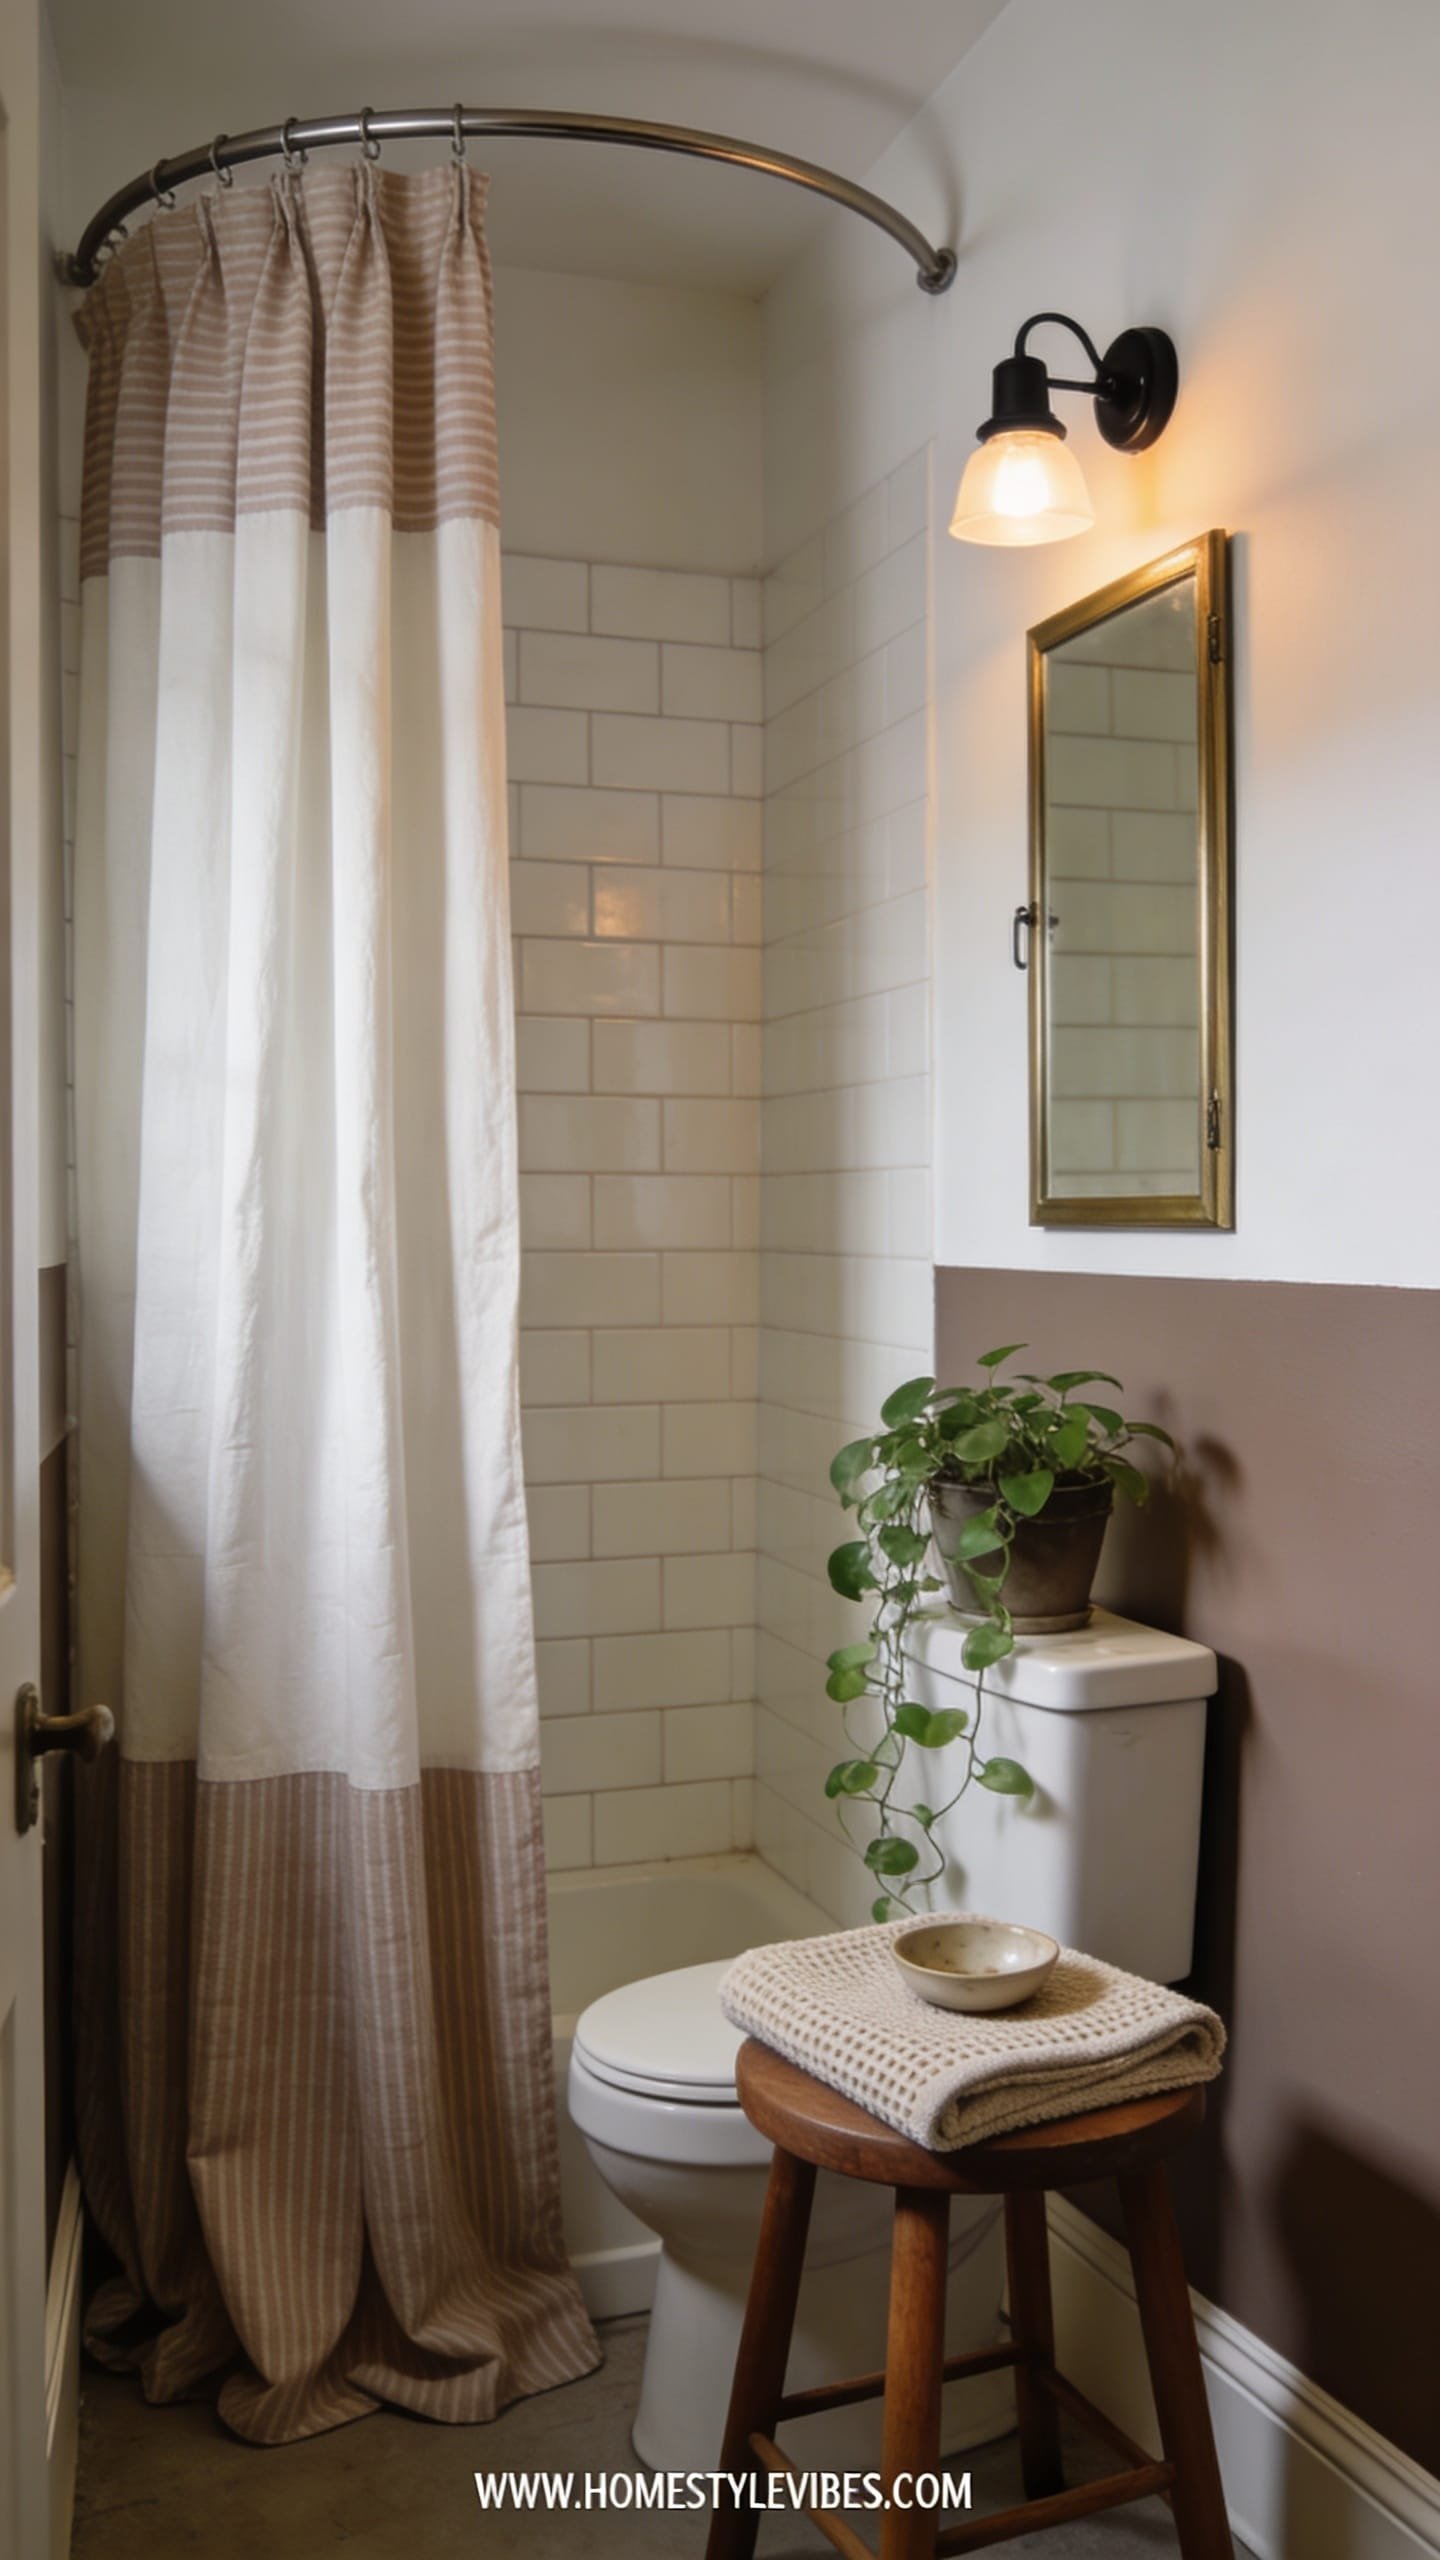
Leases can be ruthless. You want expensive-looking finishes, but the landlord’s off-white tile from 2003 isn’t moving. You’ve tried cute accessories, but the room still reads “temporary.” This renter-friendly blueprint layers in luxury with zero demo and maximum texture you can box up when it’s time to move.
The vibe is boutique-apartment chic: fabric softness, matte metal accents, and strategic lighting. It works because you control the eye with vertical elements and smart color blocking. Use peel-and-stick beadboard or paneling on the lower half of the walls, then paint it a rich neutral like mushroom or olive-gray. Keep the top half bright to lift the ceiling visually. Lighting becomes your bestie: plug-in sconces on either side of a gallery-style mirror give you that flattering face light no rental overhead can match.
Materials: peel-and-stick paneling, plug-in sconces with fabric shades, a luxe shower curtain (linen blend or textured waffle) in extra-long length, thick towels in a non-bright color (think oat or stone), and a chic bath mat with real pile. Swap hardware to matte black or brass—just store the originals. In photos, all that texture—fabric shade, linen folds, beadboard rhythm—reads expensive even if the tile underneath says “rental.”
Variations: Small-space version uses a narrow wall shelf above the toilet with 2–3 lidded boxes for storage. Darker mood: paint the beadboard deep inkwell blue and pair with cream textiles. Budget version: skip paneling and paint the whole room a warm white, then add a sculptural mirror and long curtain.
Why This Feels Designer: Textile dimension and layered light. Most rentals lack both. You’re building softness and shadow where there was only glare.
Key Design Elements:
- Main materials: peel-and-stick paneling, fabric-shade sconces, long linen shower curtain
- Color palette: mushroom/olive-gray + warm white, brass or black accents
- Lighting strategy: plug-in sconces for face light, dimmer on a plug if possible
- Furniture silhouettes: slim wall shelf, rounded mirror
- Texture layers: linen, waffle weave, panel ridges
- Accent details: matching pump bottles, framed art in a moisture-safe frame
Budget Breakdown:
- Peel-and-stick beadboard/paneling: $60–$180
- Plug-in sconces (pair): $90–$260
- Linen or waffle extra-long shower curtain + hooks: $60–$140
- Matte hardware swap set: $40–$120
- Rounded mirror: $70–$160
- Thick towels + bath mat: $70–$150
Total Estimated Cost: $390 – $1,010
Best For: Renters, college grads, short-term stays, or anyone wanting quick, high-impact upgrades in a weekend.
How To Recreate This Look:
- Start by applying peel-and-stick paneling up to 42 inches; paint it mushroom or olive-gray.
- Add a rounded mirror and plug-in sconces with fabric shades at eye height.
- Layer an extra-long shower curtain hung at ceiling height.
- Install matched metal hardware (towel bars, TP holder) and store the originals.
- Style with thick towels, lidded storage, and one framed print.
Don’t Do This: Don’t buy short curtains. The high-water-hem look screams budget fast.
Pro Styling Tip: Slightly puddle the shower curtain for photos; a gentle fold at the floor reads luxe on camera.
Ready for something a little moody and architectural, but still tiny-bath friendly? The next look is all about light and shadow with subtle curves.
7. Curved Niche Noir: Moody Walls + Arched Mirror + Hidden Glow
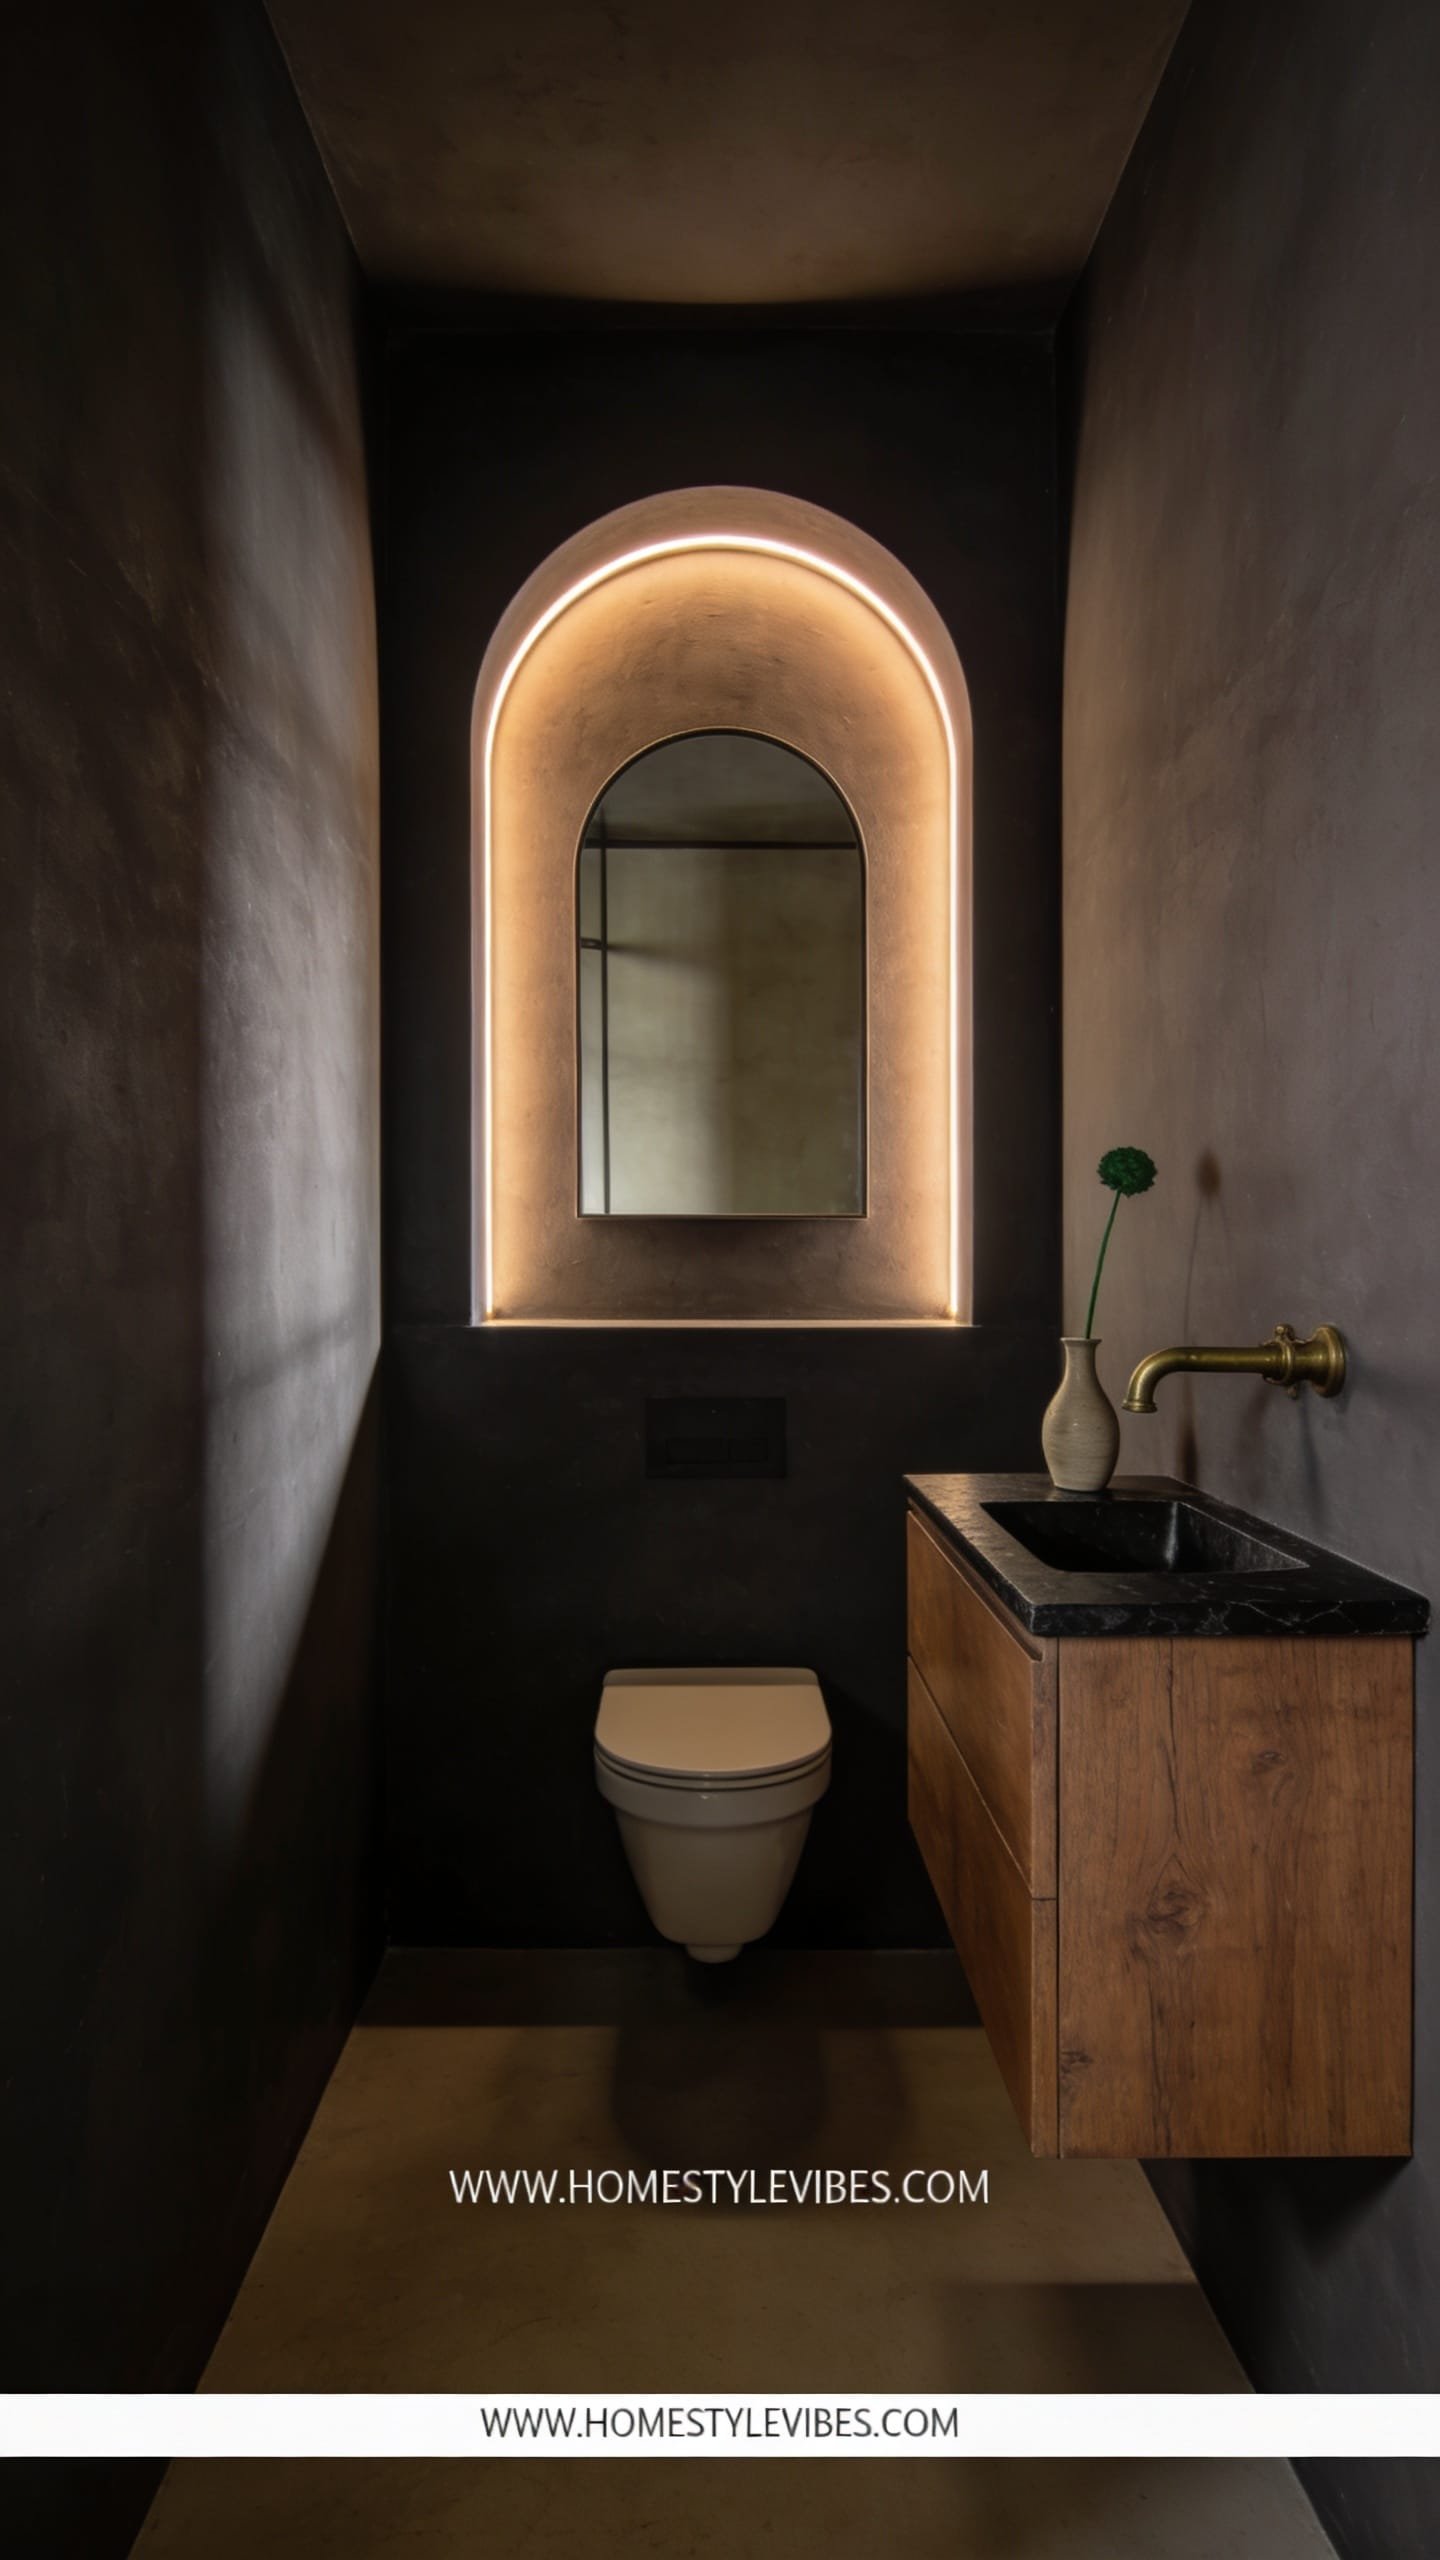
You’ve tried going dark before and it felt cave-like and depressing. You also hated how every speck of dust showed on black gloss. This design leans into depth without the gloom by pairing softly curved forms, velvety paint, and hidden glow light that carves out dimension.
The mood is modern noir meets boutique cocktail bar. It works because curves and light do the spatial trickery: an arched mirror or simple arched niche above the toilet softens corners, and a cove or LED strip tucked behind the mirror or under a tiny ledge creates halo light that lifts the shadows. Keep finishes matte—think velvety charcoal or ink, brushed bronze or soft black metals, and a dark-stained wood vanity with rounded pulls.
Material stack: matte charcoal paint or microcement, fluted or ribbed vanity fronts, bronze hardware, and a smoked glass or clear glass sconce with opal bulb. In photos, the shadows around the arch and fluting deliver that designer-level drama. The trick is not over-lighting the room; let the pools of light sculpt it.
Variations: Small-space version uses an arched peel-and-stick mural behind a frameless mirror to fake a niche. Budget-friendly? Paint just the vanity wall charcoal and add an arched mirror with under-mounted LED strip. Renter-friendly: no hardwiring—use rechargeable puck lights hidden behind the mirror and battery picture lights for mood.
Key Design Elements:
- Main materials: matte charcoal paint, fluted wood fronts, bronze/black metal
- Color palette: charcoal, inky blue-black, walnut, bronze
- Lighting strategy: hidden LED glow behind mirror/ledge + low-brightness sconces
- Furniture silhouettes: arched mirror/niche, rounded drawer pulls
- Texture layers: fluting, velvet-matte walls, smooth opal glass
- Accent details: small marble tray in white for contrast, dark-stem greenery
Budget Breakdown:
- High-cover matte paint/microcement: $60–$220
- Arched mirror: $90–$250
- Fluted vanity panels or adhesive fronts: $80–$240
- Bronze/black faucet + hardware: $150–$400
- LED strip + diffuser for halo: $40–$120
- Opal-glass sconces (pair): $120–$300
Total Estimated Cost: $540 – $1,530
Best For: Evening bath people, urban apartments, anyone who wants drama without glare. Works particularly well in powder rooms.
Why This Looks Expensive: Shadow play and curve control. When light wraps around an arch and grazes fluting, it mimics custom millwork and architectural detail.
How To Recreate This Look:
- Start by painting the vanity wall in a velvety charcoal; use a matte finish.
- Add an arched mirror; mount an LED strip behind it to create a subtle halo.
- Layer fluted fronts on the vanity or install a fluted panel as a backsplash.
- Install low-lumen sconces with opal bulbs for diffused glow.
- Style with a white marble tray and two dark-stem branches for contrast.
The Most Common Mistake: Using high-lumen, cool bulbs in a dark palette. It flattens the room and highlights dust. Choose warm, dimmable, and layered.
Pro Styling Tip: Turn off overheads for photos and let the halo + sconces create depth; angle the camera to catch the arch’s shadow line.
One more micro-story for the road: A friend spent weeks agonizing over paint colors before realizing her gritty, old fan was casting ugly shadows and noise. We replaced the fan with a quiet, warm-light unit and suddenly every paint looked richer. Sometimes the problem isn’t the color—it’s the junky light and hardware throwing it off.
Quick Checklist
- Warm (2700–3000K) dimmable bulbs
- Rounded or arched mirror for softness
- One hero material (stone, pattern, or wood slats)
- Extra-long shower curtain mounted near ceiling
- Matte wall finishes for gentle light
- Slim metal framed shower glass
- Hidden LED toe-kick or halo lighting
- Textured towels in oat, stone, or cream
- Single vase/greenery moment (olive branch, eucalyptus)
- Consistent metal finish across hardware
- Closed storage for daily clutter
- Thin grout lines color-matched to tile
Frequently Asked Questions
How much should I budget to make my small bathroom look expensive without a full renovation?
Plan $400–$1,500 for high-impact swaps: lighting, mirror, textiles, and one major material focus (paneling, tile, or paint). Prioritize warm lighting and a standout element—it’s the fastest path to a rich look.
I’m nervous about dark colors in a tiny bathroom. Will it make the room feel smaller?
Not if you control the light and sheen. Use matte, warm-toned dark paint, add a halo light behind the mirror, and keep fixtures sleek. The depth can actually make the space feel cocooned and intentional.
What if I can’t change the tile or vanity because I rent?
Go textile-heavy and lighting-smart. Use peel-and-stick paneling or wallpaper, install plug-in sconces, hang an extra-long curtain high, and swap hardware temporarily. Those layers distract from dated tile instantly.
I’m worried about maintenance—do these materials hold up?
Yes, if you choose smart finishes. Marble-look porcelain, quartz, and microcement are low-fuss. Stick to brushed metals to hide fingerprints and buy towels in stone or oat tones so stains don’t show fast.
What’s the most common mistake when trying to make a small bathroom look expensive?
Too many focal points. Pick one hero—floor pattern, stone shower, limewash walls—and let everything else support it. Also, cool lighting ruins good materials. Always swap bulbs first.
Closing Thoughts
Pick one idea from these small bathroom ideas that look expensive and start there. Maybe it’s the soft stone spa palette. Maybe it’s the renter-remix with extra-long curtains and plug-in sconces. One weekend, one focused upgrade—you’ll feel the shift every morning.
The truth is, luxury comes from three things: texture, lighting, and restraint. When you choose a hero material, warm up your bulbs, and simplify the supporting cast, your tiny bathroom stops shouting and starts humming. That’s when a space feels finished.
You’ve got this. Start with the swap that fixes your biggest daily annoyance and build slowly. By next month, your bathroom can read “quietly expensive” in person and in photos—no gut reno required, just thoughtful layers and a little confidence.

About the Author

Krisztina P.Rendes, Founder of Home Style Vibes
Founder of Home Style Vibes
Krisztina Puskásné Rendes created Home Style Vibes as a cozy-modern lifestyle space where homemaking meets inspiration. Her goal is to help women create beautiful, organized, and peaceful homes they truly love — without overwhelm. You’ll find here heart-driven content on home decor, cleaning tips, easy family recipes, organization and decluttering, DIY home projects, plants, and seasonal ideas — all designed to bring more calm, comfort, and style into everyday life.