6 Small Front Porch Christmas Decor Ideas That Make a Big Festive Impact
You want your front porch to glow like a welcome hug—true red bows, deep evergreen, warm lights, that classic Christmas curbside sparkle. But your porch is small, the steps are narrow, and every time you try to add “just one more thing,” it looks cluttered instead of charming. This collection of six small front porch Christmas decor ideas solves that exact frustration with outdoor red-and-green classics that read big and feel intentional—without swallowing your square footage or your Saturday.
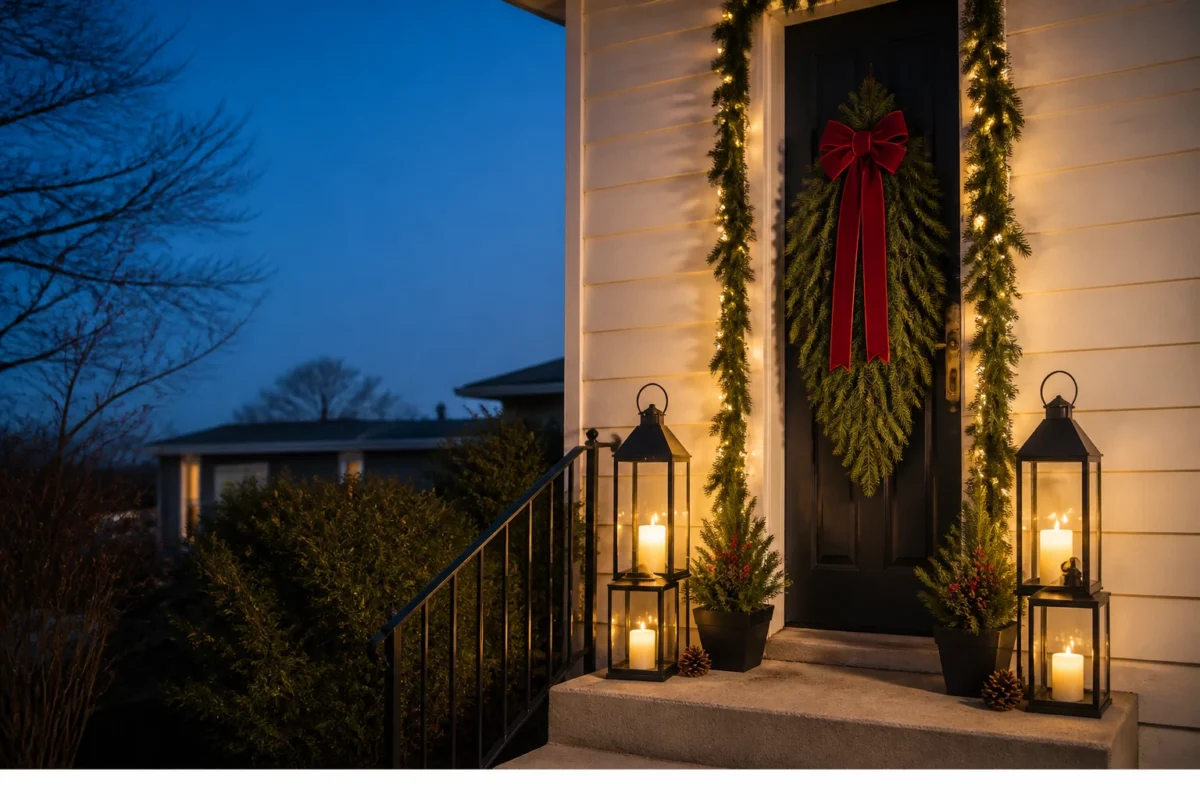
We’re talking layered fresh greenery, bold red velvet ribbon, brass and black lanterns, warm white lights, and just a touch of berry. The details that make classic Christmas so timeless show up here in scaled-down, high-impact moves: door swags instead of bulky wreaths, vertical stacking to save floor space, and lighting choices that turn a tiny porch into a glowy little jewel box at blue hour. Pick one idea and you’ll see a porch-to-curb transformation in under two hours; layer two and your neighbors will do a double-take. These are Pinterest-worthy looks that actually work on modest steps, stoops, and bungalow porches.
Set these up Thanksgiving weekend and ride the cheer through New Year’s. If you love that nostalgic, outdoor red-and-green vibe and want maximum cheer per square foot, you’re in the right place.
1) Fir Door Swag With Red Velvet Ribbon On A Narrow Front Door
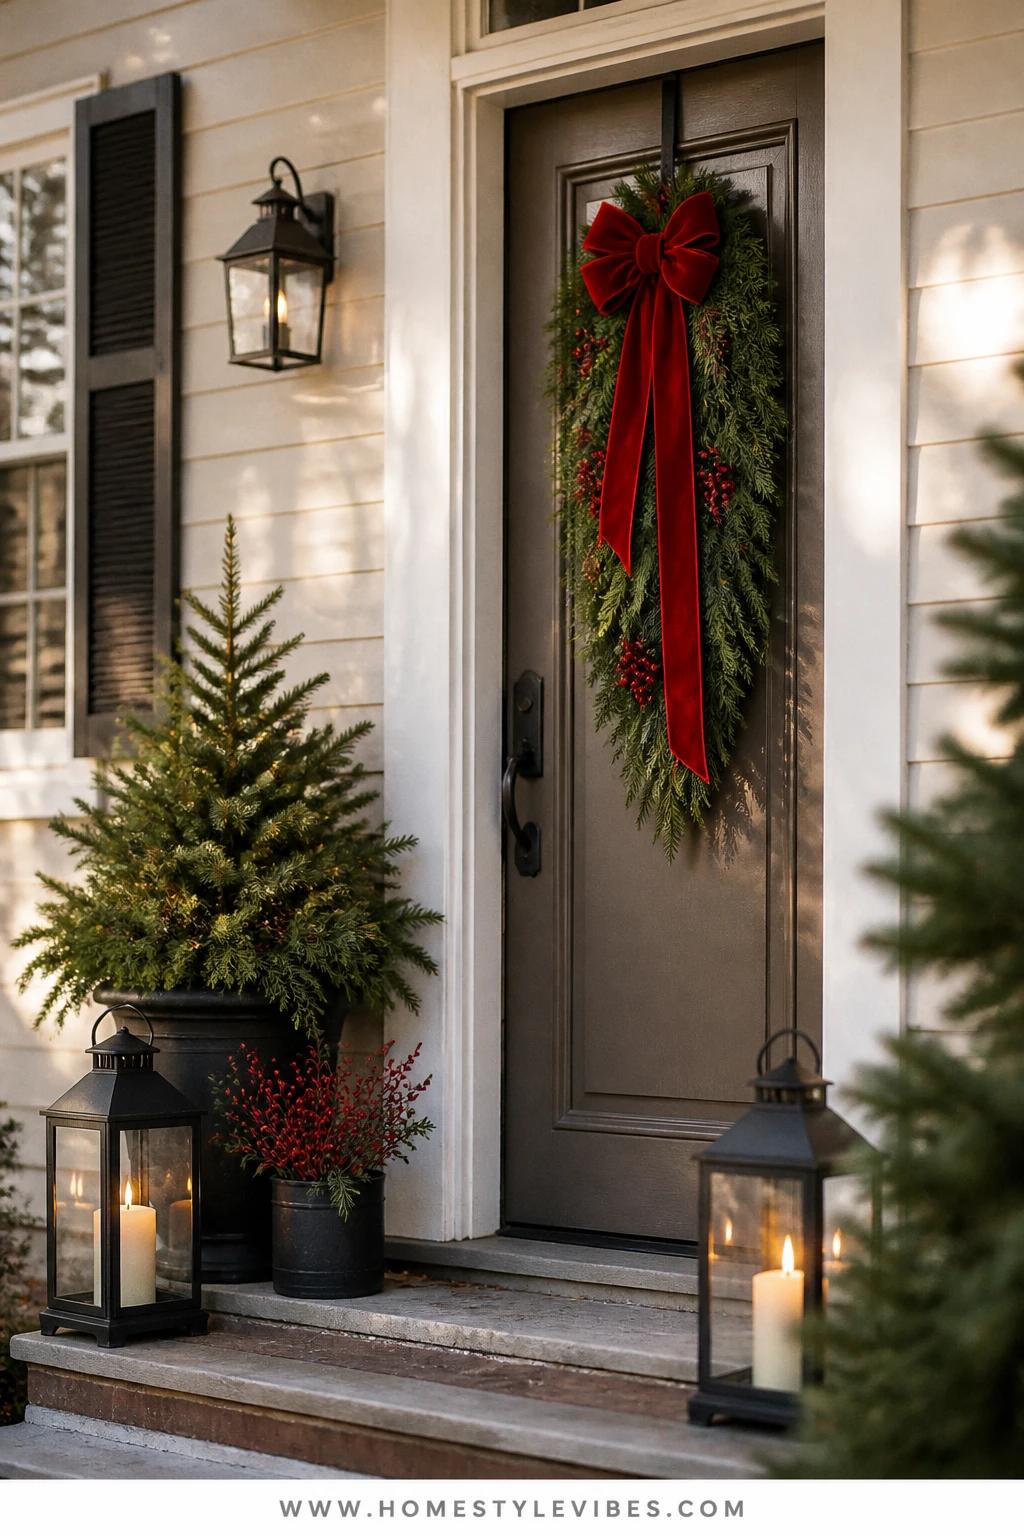
It’s that one spot that always feels off: the small, skinny front door that can’t carry a large wreath without getting swallowed or hitting the storm door. We’ve all tried squeezing in a full wreath and ended up with a door that barely closes. A fresh fir door swag is the tall, slim answer. It reads classic Christmas from the street—deep evergreen, a generous red velvet bow, a few berry sprigs—but it hangs flatter and longer, so your door still functions and your porch reads polished instead of bulky.
This look creates that warm, traditional mood that feels like candlelit carols and home-baked cookies, yet it’s surprisingly practical. Swags store flatter than wreaths, and if you go faux, you’ll reuse it for years. Add warm white micro-lights and your narrow door becomes a vertical beacon. The gentle drop of the greenery frames a brass or black door knocker beautifully, and the red bow gives you the high-contrast pop that photographs so well. From the street, the layered greens catch ambient light, creating depth and subtle shadows you just don’t get with a single-layer wreath.
Variations: Use magnolia leaves mixed with fir for a more Southern classic. Go faux if your porch gets full sun and you’re tired of sweeping needles. For storm doors that sit tight, keep decor within 2 inches of depth and skip any bulky picks.
Timing: Hang it the weekend after Thanksgiving. Replace the red ribbon with a neutral linen ribbon in January and keep the greenery into winter.
Budget Breakdown:
- Fresh fir or mixed-greenery swag: $20–$45 (florist or garden center)
- 2.5″–4″ red velvet ribbon (wired): $8–$18
- Berry picks or faux holly: $6–$15
- Adhesive metal hook or over-door hook: $6–$12
- Battery micro-lights (warm white, timer): $8–$15
Total Estimated Cost: $48 – $105
Best For: Slim front doors, stoops with a storm door, traditional homes where a full wreath looks crowded but you still want classic red-and-green impact.
Key Design Elements:
- Main holiday props: fresh fir swag, red velvet bow, berry picks
- Color palette: deep evergreen, true red, subtle brass/black hardware
- Lighting strategy: battery micro-lights woven into the swag with timer
- Textile and ribbon layers: wide wired velvet bow with long tails
- Greenery and natural elements: fir, cedar, optional magnolia or pine
- Accent details: brass door knocker or black escutcheon plate for contrast
How To Recreate This Look:
- Start with a ready-made swag or bundle fresh branches and secure with floral wire.
- Add a few cedar or pine sprigs for texture variation and movement.
- Weave a strand of warm white micro-lights through the center mass and tuck the battery pack behind.
- Tie a generous red velvet bow with 18–24″ tails; fluff wired edges for fullness.
- Attach berry picks near the bow and at one or two lower points for balance.
- Hang the swag using a low-profile hook; center it just below the upper third of your door for classic proportions.
- Set the lights to a dusk timer so they glow at blue hour without you thinking about it.
Why This Looks Expensive: The proportion is right for a narrow door, the ribbon is lush, and the mixed greenery gives florist-level depth instead of craft-flatness.
Watch Out: Adhesive hooks can fail in extreme cold. Clean the door with rubbing alcohol before applying and give it 24 hours to cure if the forecast allows.
Pro Styling Tip: Angle the bow tails slightly off-center so one drapes into the lower third—this asymmetry reads editorial in photos and catches light beautifully.
2) Paired Black Lanterns With Warm White Lights On Shallow Porch Steps
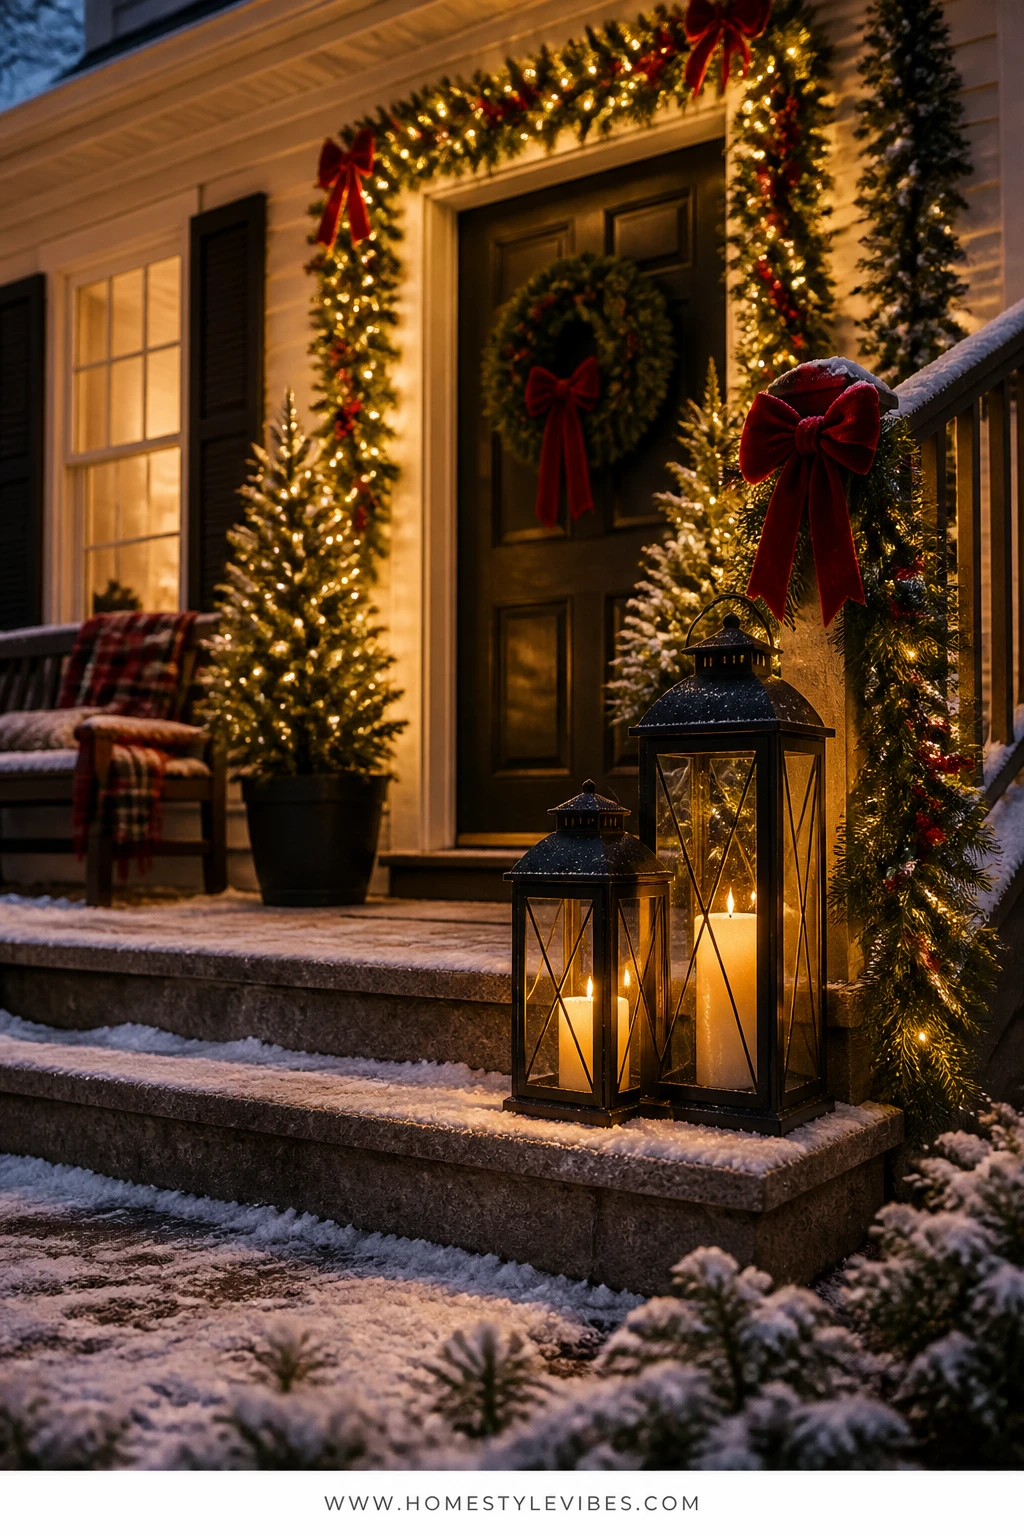
You’ve tried mini trees on the steps, but they trip people or blow over in a storm. When space is tight, paired lanterns create glow without clutter. Two black metal lanterns—one tall, one medium—parked on the shallow step corners bring classic curbside warmth in that red-and-green palette without adding anything underfoot.
The mood is cozy and timeless: warm white flameless candles flicker at dusk, reflecting off metal and glass. Paired lanterns feel intentional, not random. They photograph like a dream because glass doubles the light, and the staggered heights give you instant depth. Tuck a small sprig of fir and a red velvet ribbon tail inside the top handle for that holiday hit without making the lanterns fussy.
Variations: If your steps are super narrow, use one lantern and a small brass bell cluster on the opposite side for balance. For windy porches, choose lanterns with latch doors and weight the base with river stones hidden under the candle.
Timing: Set them out on Thanksgiving weekend and keep them glowing through January—just remove the red ribbon after New Year’s.
Budget Breakdown:
- Set of two black outdoor lanterns: $40–$120
- Flameless candles with timer (2–3): $18–$45
- Small fir sprigs or leftover cuttings: $0–$10
- Red velvet ribbon (scraps from Section 1 work): $0–$6
Total Estimated Cost: $58 – $181
Best For: Tiny stoops, shallow steps, and homes that need nighttime curbside glow without adding floor clutter or cords.
Key Design Elements:
- Main holiday props: black lanterns, flameless candles, velvet ribbon detail
- Color palette: black metal, warm white light, evergreen accent, red ribbon
- Lighting strategy: battery-timer candles for automatic evening glow
- Textile and ribbon layers: slim red velvet tie at the handle
- Greenery and natural elements: a sprig of fir tucked at the top
- Accent details: optional small brass bell cluster on one lantern
How To Recreate This Look:
- Place the taller lantern on the step that sits opposite your door swing; the smaller lantern nests nearby without blocking foot traffic.
- Insert flameless candles and test the timer so they activate at dusk.
- Thread a short red velvet ribbon through the handle and tie in a simple knot; let 6–8″ tails hang.
- Tuck a 4–6″ evergreen sprig under the ribbon knot for a subtle classic nod.
- For symmetry, mirror the setup on both sides of the steps or pair one lantern with a bell cluster opposite.
- Check night visibility from the sidewalk and adjust placement to maximize glow without glare.
Why This Feels Designer: The restrained palette—black, warm white, evergreen, and a single red note—looks curated. The scale difference between lanterns creates visual rhythm that feels “on purpose.”
One Thing To Avoid: Don’t overload lanterns with extra ornaments or fake snow. It muddies the light and can trap moisture that fogs the glass.
Pro Styling Tip: Slightly angle lanterns toward the street so the candle glow catches the glass edge—instant bokeh in evening photos.
Pause here and take a breath. If one idea resonated hard, that’s your start. You don’t need all six—one strong move can make your porch look finished.
3) Cedar Garland With Red Bows Along A Short Railing
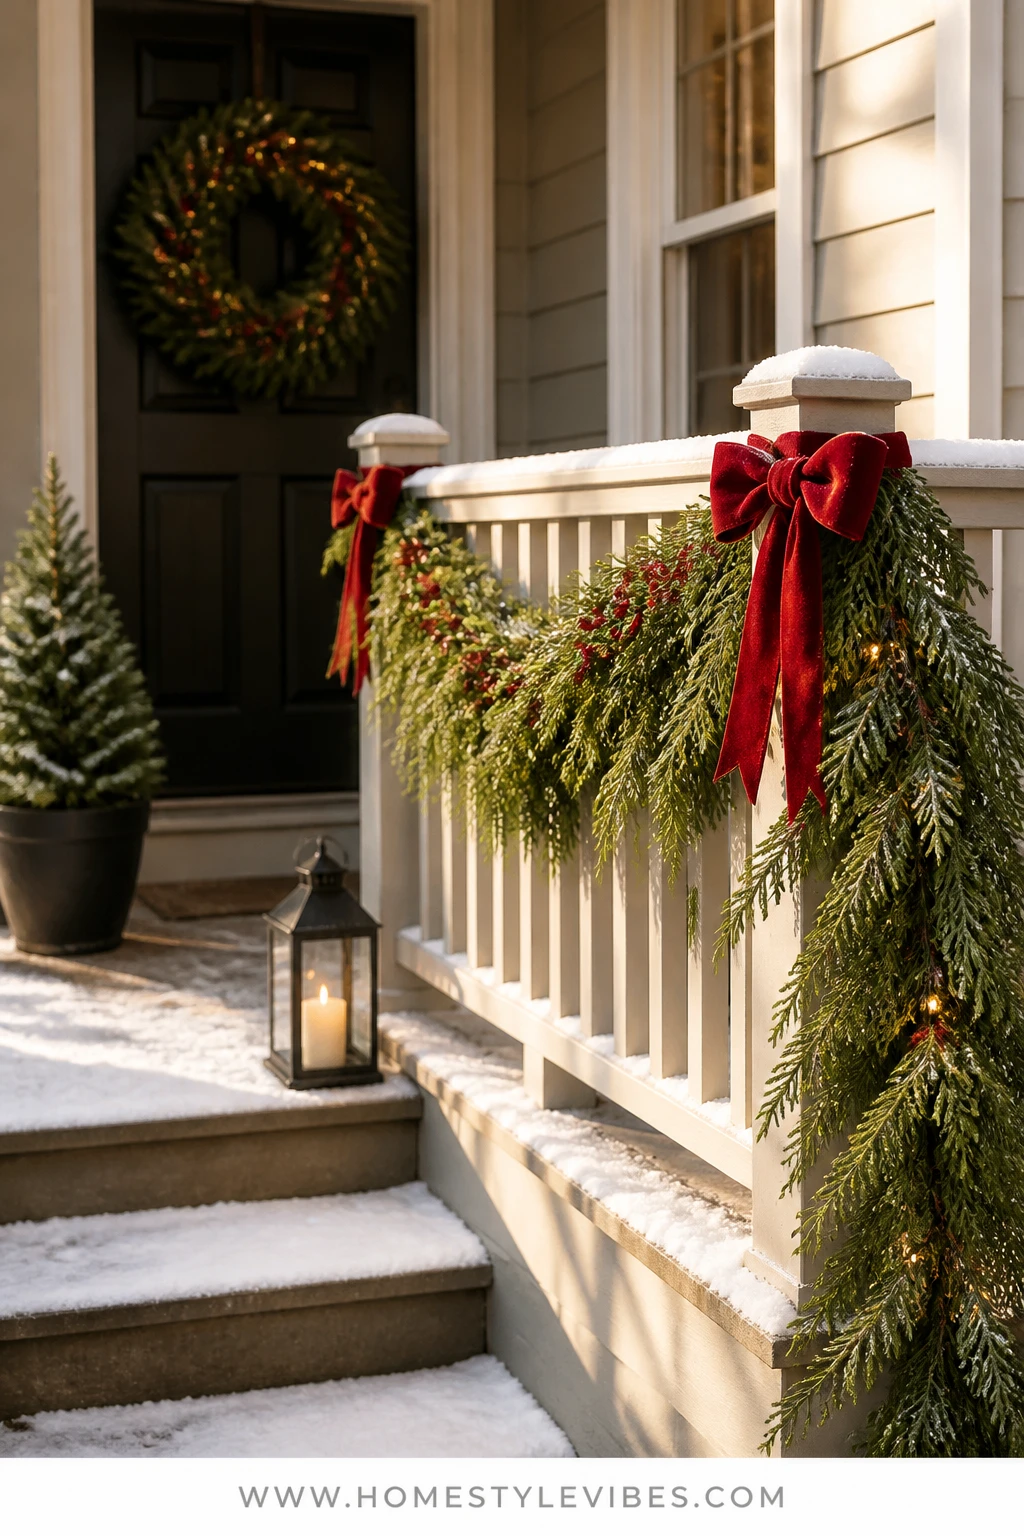
Short porch railings often feel awkward—you try to drape garland, and it either sags too low or looks choppy with the posts. Here’s the fix: a single cedar garland run tight along the top rail, punctuated by neat red velvet bows at each post. It’s a classic Christmas look shrunk to small-porch scale with clean lines and that outdoor red-and-green pop you crave.
This setup reads crisp and intentional, not messy. Cedar has that drapey, soft texture that moves in the breeze and catches light, while wired velvet bows give structure and color. It’s practical too—when garland sits on top of the rail instead of dangling, it doesn’t steal walking clearance. Add a slim strand of warm white mini lights and your railing becomes a light ribbon at dusk. I did this last year on a bungalow with a three-post rail, and the neighbor across the street sent a photo because it “looked like a postcard” at blue hour.
Variations: On metal railings, use zip ties wrapped in green floral tape for an invisible hold. For a very short rail (two posts), place one oversized bow dead center and two mini bows on the posts to keep proportion. If you go faux, choose a mix of cedar and fir for texture and better volume.
Timing: Install the garland early in December. If it’s fresh, expect some needle drop by week three; switch to faux if your rail is in full sun or strong wind.
Budget Breakdown:
- Fresh cedar garland (15–25′): $30–$80 depending on length
- Outdoor-rated mini lights (warm white): $12–$25
- Velvet bows (pre-tied or DIY with 2.5″–3″ ribbon): $10–$30
- Zip ties or floral wire: $4–$8
Total Estimated Cost: $56 – $143
Best For: Small porches with short or low railings where you need a clean, linear statement that doesn’t intrude on walking space.
Key Design Elements:
- Main holiday props: cedar garland, red velvet bows, mini string lights
- Color palette: evergreen, true red, warm white lights
- Lighting strategy: one slim light strand run along the underside for indirect glow
- Textile and ribbon layers: consistent bow size at each post for rhythm
- Greenery and natural elements: drapey cedar for softness and movement
- Accent details: discreet green zip ties, matching door bow for cohesion
How To Recreate This Look:
- Measure the railing and pre-plan bow placement at each post for even spacing.
- Lay the garland along the top rail and secure at posts first, then in the spans between to prevent dips.
- Run the light strand along the inner edge (porch side) and zip-tie every 12–18″ for a tidy line.
- Tie or attach bows at each post, facing the street; fluff wired edges.
- Stand back at sidewalk distance to check symmetry and adjust dips and bow angles.
- Set lights on a smart plug or timer for consistent evening glow.
Why This Reads High-End: Repetition of bows at regular intervals creates architectural rhythm. A single garland line avoids the “beaded necklace” look of choppy segments.
Don’t Do This: Avoid mixing too many greenery types along a short span; it can look busy. One primary texture (cedar) with a few pine sprigs is enough.
Pro Styling Tip: Keep bow tails trimmed to just brush the top of the rail—shorter tails read tailored and photograph cleaner.
4) Fresh Evergreen Planters With Red Berry Picks Beside A Compact Porch Chair
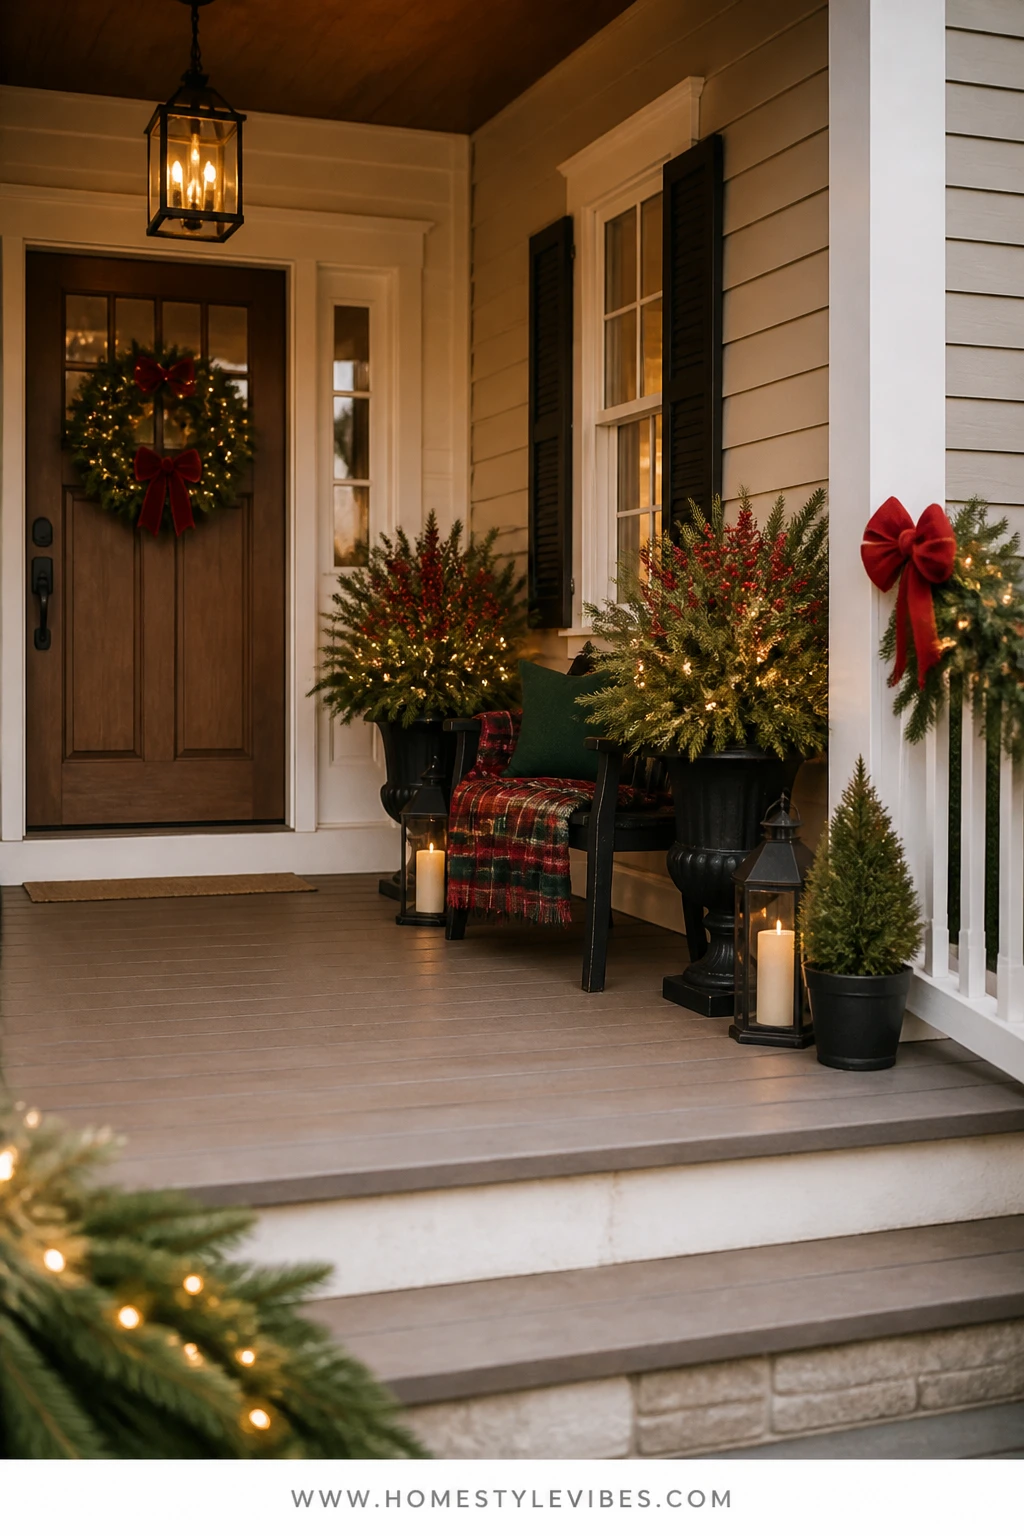
Small porches with a single chair or little bench can feel like they’re missing a “moment.” You add pillows and it still looks like summer. Anchoring each side of that chair with fresh evergreen planters instantly brings the season in, adds height, and frames your seating without cluttering the floor. Think classic urns or matte black planters with layered fir, cedar, and pine, plus bright red berry picks for that Christmas hit.
The vibe is rich and garden-forward—like a tiny winter garden party on your stoop. Fresh greens smell incredible (IMO, fresh cedar wins on scent, faux wins on staying power). Add a single strand of warm white fairy lights per planter and you get sparkle peeking through branches at night. These photograph beautifully thanks to the height variance and the red berries popping against deep green. And they’re child- and pet-friendly when you skip glass ornaments.
Variations: If your porch faces strong wind, choose low, heavy planters to prevent tip-overs. On a budget, use soil from your summer pots and just insert cut greens. For a tighter color story, swap red berries for matte red shatterproof ornaments on picks and tuck them deep for subtlety.
Timing: Build these early December; refresh a few sprigs mid-month if you’re in a dry climate. After New Year’s, snip out the red accents and keep the greens through January.
Key Design Elements:
- Main holiday props: black planters, mixed evergreen cuttings, red berry picks
- Color palette: evergreen, true red, black planter, warm white lights
- Lighting strategy: micro-lights wrapped around the central branch for internal glow
- Textile and ribbon layers: optional small red plaid pillow on the chair to echo berries
- Greenery and natural elements: fir for structure, cedar for drape, pine for height
- Accent details: a discreet brass bell cluster tied to the planter rim
Budget Breakdown:
- Planters or urns (pair): $50–$160 (reuse each year)
- Bundles of mixed greens: $20–$50
- Red berry stems: $10–$25
- Micro-lights (2 strands): $12–$30
- Potting soil or leftover soil: $0–$10
Total Estimated Cost: $92 – $275
How To Recreate This Look:
- Fill planters with soil or floral foam to anchor stems.
- Insert tall pine branches in the center for height and line-of-sight drama.
- Layer in fir for fullness, then drape cedar around the edges for softness.
- Add 5–7 red berry stems at varying heights, concentrating near the front for street visibility.
- Wrap a micro-light strand around the central branches and tuck the battery pack at the back.
- Position planters flanking the chair legs, leaving space for feet and bags.
Why This Looks Intentional: The planters echo the vertical lines of your door and furniture, creating a triangle of focus: planter, chair, planter. Repeating berries ties the palette together without overdoing ribbon.
Watch Out: Don’t leave micro-light battery packs exposed. Moisture can corrode them fast in December drizzles—tuck and tape behind greenery.
Pro Styling Tip: For photos, spritz the greenery lightly with water just before shooting; the leaves catch light and look freshly cut.
Remember: this isn’t about recreating a showroom. It’s about a porch that feels like yours and makes you smile when you pull into the driveway.
5) Red Velvet Bow Trio With Brass Bells On A Centered Porch Light
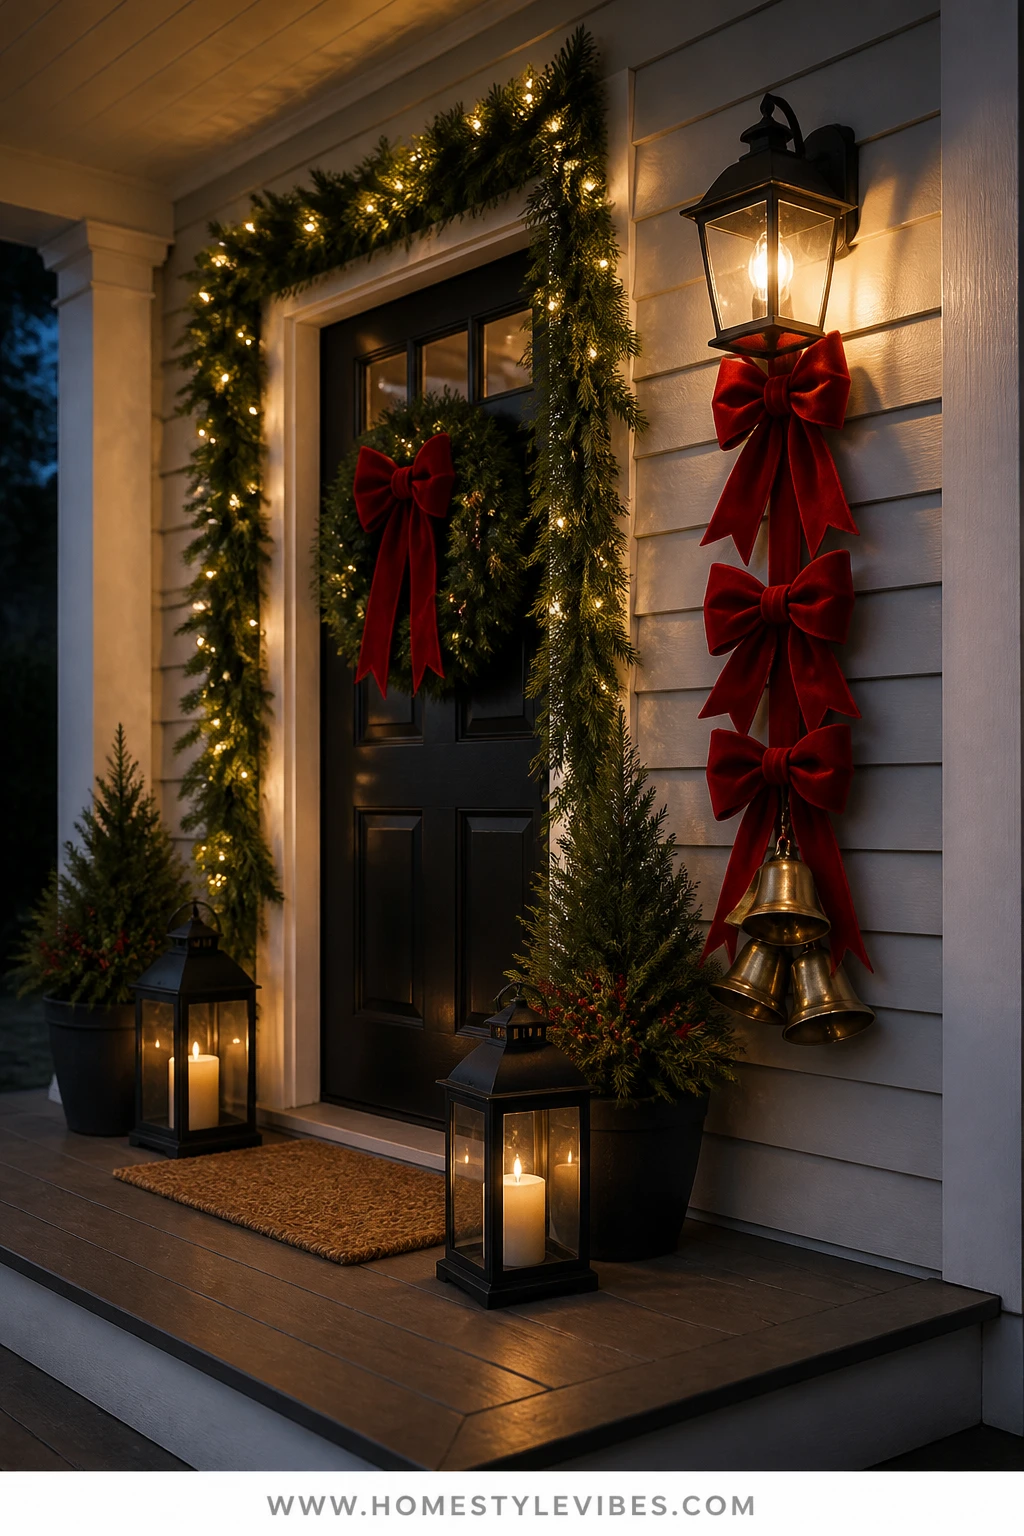
That porch light you ignore 11 months out of the year? It’s your best small-space anchor in December. When floor space is limited, dress the vertical. A trio of red velvet bows cascading from the porch sconce or ceiling light, finished with a cluster of antique-style brass bells, gives you instant holiday punctuation exactly where eyes already go at night: the light source.
This creates a crisp, classic moment that doesn’t need a lot of square footage or maintenance. The brass bells catch the glow and give you a soft jingle when the door opens—festive without kitsch. It stores flat, goes up in minutes, and won’t block foot traffic. Plus, photographed at dusk, the warm white bulb haloing that red-and-gold detail is pure curb appeal.
Variations: If you have a hanging lantern, tie one oversized bow at the top cage, then hang two smaller bows down the chain with the bell cluster at the bottom. For a wall sconce, hang the trio from a removable hook above the fixture rather than the fixture itself to avoid heat issues.
Timing: Pop this up right after your wreath or swag for a coordinated look. Swap the red bows for simple twine in January and keep the bells as winter charm.
Budget Breakdown:
- Red velvet ribbon (wired, 10–15 yards): $12–$24
- Brass bell cluster (3–5 bells): $12–$35
- Outdoor-rated adhesive hook or clear hook strip: $6–$12
Total Estimated Cost: $30 – $71
Best For: Porches with zero floor space and a single focal light; homeowners who want a quick, high-impact accent with almost no storage footprint.
Key Design Elements:
- Main holiday props: red velvet bow trio, brass bell cluster
- Color palette: true red, antique gold/brass, warm white light
- Lighting strategy: rely on the porch light’s warm glow to backlight the bows and bells
- Textile and ribbon layers: three bows in descending sizes for a waterfall effect
- Greenery and natural elements: optional small fir sprig tucked at the top knot
- Accent details: a slim velvet tail extended to mid-fixture length for elongation
How To Recreate This Look:
- Make three bows: large (6–7″ loops), medium (5″ loops), small (4″ loops), each with 10–14″ tails.
- Loop the small bow tails through a bell cluster and knot securely.
- Stack the bows vertically by tying their center knots together with floral wire, largest at the top.
- Attach the top bow to an adhesive hook placed above your sconce or at the top of the light chain.
- Adjust tail lengths so the bottom bell cluster sits at eye level without touching the hot glass.
- Turn on the porch light at dusk and check for safe clearance and visible glow on brass.
Why This Looks Expensive: Layered bow sizes and real metal bells feel bespoke. The light-reflective brass adds a luxe note without crowding the porch.
The Most Common Mistake: Hanging the bow too low so it touches a hot bulb or blocks the motion sensor. Keep a 3–4″ gap from any heat source and test the sensor after installing.
Pro Styling Tip: Angle the bottom bell just slightly outward so it catches the porch light—tiny detail, big payoff in evening photos.
6) Mini Evergreen Pair With Red Velvet Sashes At The Doorstep Corners
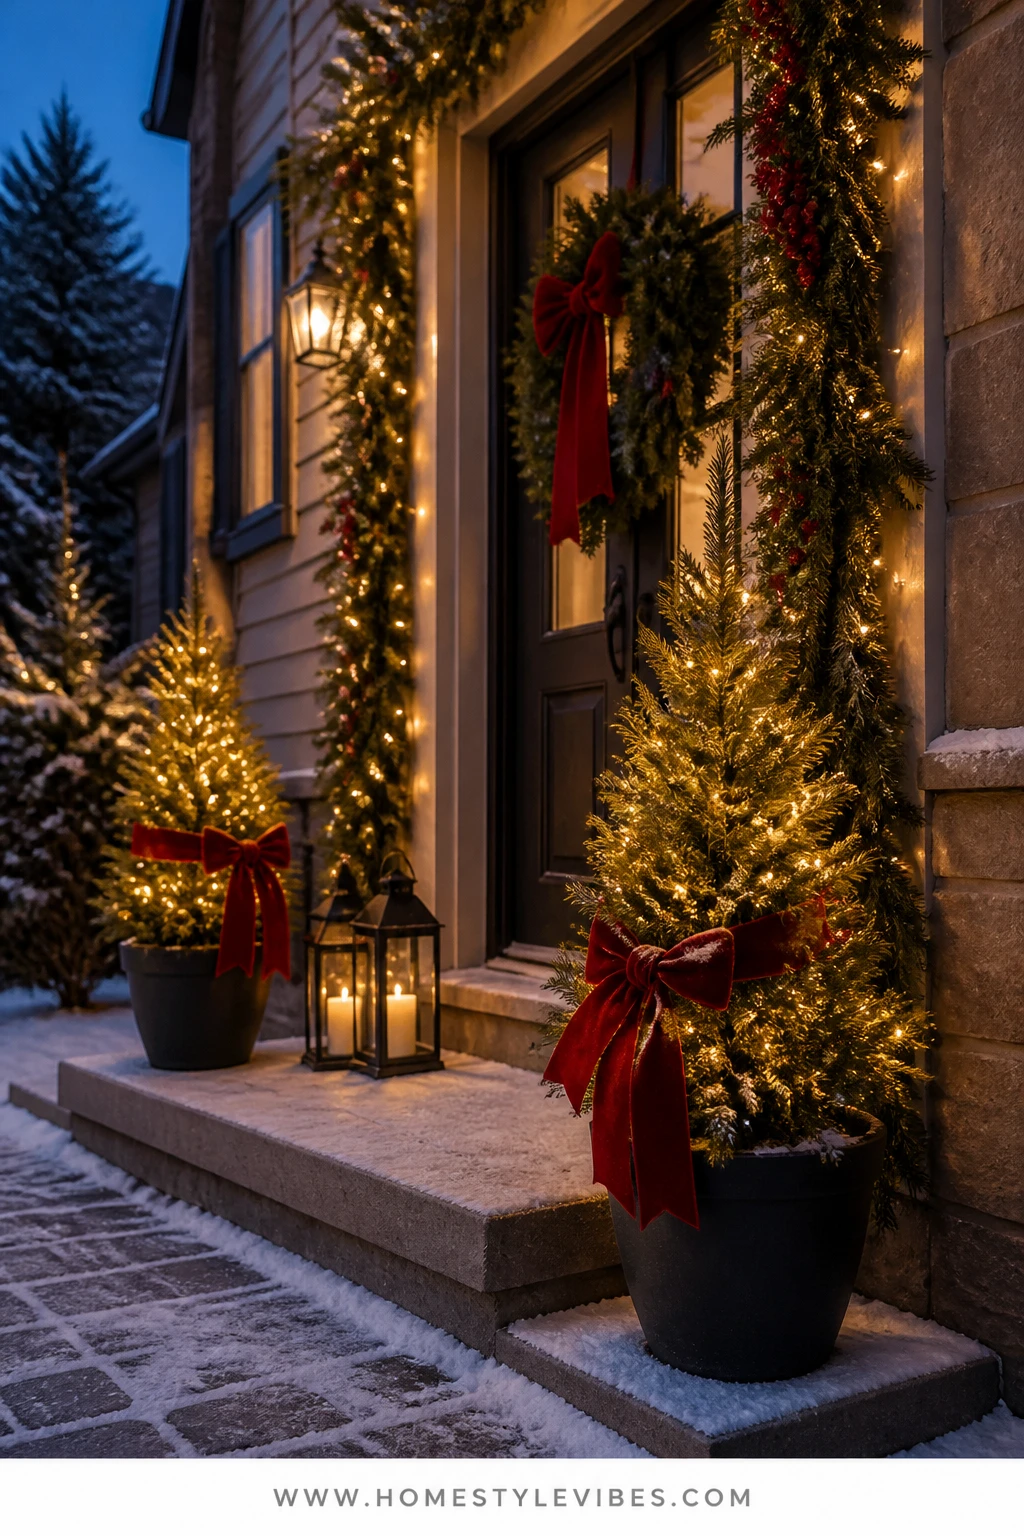
You want the look of flanking trees, but standard porch trees are too wide and topple in wind. The secret isn’t skipping trees—it’s scaling them and cinching the palette. A pair of mini evergreens (18–36″ tall) in black pots at the doorstep corners, each wrapped with a red velvet sash and lit with warm micro-lights, delivers that classic Christmas symmetry without hogging precious inches.
The mood is traditional and cheerful, and the scale keeps the entry usable for packages and boots. Lights tucked in close to the trunk create that “sparkle from within” that feels like jewelry. I tried this on my own front stoop last December after losing a full-size planter to a surprise gust—the minis didn’t budge, and the subtle height framed the doormat perfectly. Plus, they photograph beautifully: tight light clusters read like little constellations, and the red sashes give your camera a crisp focal point.
Variations: Use live dwarf Alberta spruce if you want to plant them later, or faux if your porch bakes in afternoon sun. Add a single brass bell tied low on each pot for a gentle jingle. For ultra-small stoops, place both minis on one side in a staggered-height duo and anchor with a single lantern on the opposite side.
Timing: Set these up the first week of December. After New Year’s, remove the sashes and keep the green glow into January.
Budget Breakdown:
- Two mini evergreens (live or faux): $30–$120 total
- Two black pots or planters: $30–$80
- Two strands of warm micro-lights: $12–$30
- Red velvet ribbon (wide, for sashes): $10–$20
- Optional brass bell pair: $10–$20
Total Estimated Cost: $92 – $270
Best For: Small steps and stoops needing symmetrical framing at the doorway without interfering with door swing or deliveries.
Key Design Elements:
- Main holiday props: mini evergreens, red velvet sashes, micro-lights
- Color palette: evergreen, true red, black planter, warm white lights
- Lighting strategy: tight spiral on the inner branches for jewel-like sparkle
- Textile and ribbon layers: wide velvet sashes tied in a flat knot for a tailored look
- Greenery and natural elements: dwarf spruce or faux mini fir
- Accent details: low brass bell at pot rim, centered on the street-facing side
How To Recreate This Look:
- Pot the minis securely with soil or weight the base with stones to prevent tip-overs.
- Wrap micro-lights from trunk outward, keeping bulbs closer to the center for depth.
- Cut wide velvet ribbon to wrap once around each tree at the mid-point; tie a snug, flat knot and angle tails downward 6–8″.
- Place trees at the outer corners of your doormat, clearing door swing by at least 2″.
- Set lights on a timer and test nighttime visibility from the street.
- Optional: Tie a brass bell to the front of each pot at 4″ height for subtle shine.
Why This Looks Expensive: Restraint. No ornaments, just lush greens, a single red textile, and thoughtful lighting. It’s the quiet confidence of classic style.
Watch Out: Avoid trailing cords across the walkway. Go battery-powered, or run a flat outdoor extension along the porch edge secured with outdoor-rated clips.
Pro Styling Tip: Pull one tree a hair forward so they’re not on the same visual plane—tiny depth shifts read beautifully on camera.
If your shoulders dropped reading that last section, that’s the sign. Pick the idea that feels easiest and most “you,” then stop. A simple, confident porch always beats an overstuffed one.
Quick Checklist
- Fresh fir or cedar door swag with wired red velvet bow
- Battery micro-lights with timers for set-and-forget glow
- Paired black lanterns with flameless candles
- Cedar garland secured along the top rail with regular bow spacing
- Mixed evergreen planters with red berry stems
- Red velvet bow trio and brass bells on the porch light
- Mini evergreen pair in black pots with red velvet sashes
- Green zip ties, floral wire, and outdoor-rated hooks
- Smart plug or dusk-to-dawn timers
- Spare ribbon tails trimmed for a tailored finish
Frequently Asked Questions
How do I keep my small front porch Christmas decor from looking cluttered?
Anchor one or two vertical focal points (door swag and porch light bows), then add one ground-level glow (paired lanterns or mini trees). Repeat the same red-and-green palette and avoid adding a fourth or fifth element. Consistency reads calm; repetition reads intentional.
Fresh or faux greenery for a small porch—what lasts longer and still looks classic?
Fresh wins on scent and natural drape, especially cedar for longevity. Faux wins on staying power and less mess. If your porch gets a lot of sun or wind, go faux on the garland and fresh in contained planters you can mist. Mixing the two is completely fine and still looks classic.
When is the best time to put up outdoor red-and-green porch decor?
Thanksgiving weekend is ideal. Hang the door swag and garland first, then layer lanterns and planters. Most of these pieces can stay through New Year’s; swap out red bows for neutral ribbon in January if you want a wintery extension.
Are lights and candles safe near greenery outdoors?
Use outdoor-rated string lights and battery flameless candles only. Keep bulbs from direct contact with dry greens, and avoid clustering too many lights in one tight spot. If anything feels hot to the touch, space it out or switch to micro-lights that run cooler.
Any kid- or pet-safety tips for small porches?
Skip glass ornaments and unsecured cords at ground level. Choose weighted planters to prevent tipping, and use flameless candles in lanterns. Hang bells and bows out of reach if you have a curious pup that thinks everything red is a toy.
Closing Thoughts
Small front porch Christmas decor doesn’t have to mean small visual impact. With classic red velvet bows, deep evergreen, and a warm light story, you can make even the tiniest stoop feel like a festive welcome. The secret isn’t “more stuff”—it’s clarity: one strong moment at the door, one at the light, one at the steps. That’s it.
Start with the element that made your heart nod—maybe it’s the slim fir swag, maybe it’s the lantern glow. Add one more layer if you want. Then call it. You’ll have that timeless outdoor red-and-green curb appeal, the kind that makes coming home in the dark feel joyful. You’ve got this—seriously. A bow, a bit of green, a warm glow at dusk. Classic Christmas, perfectly scaled to your real life.

About the Author

Krisztina P.Rendes, Founder of Home Style Vibes
Founder of Home Style Vibes
Krisztina Puskásné Rendes created Home Style Vibes as a cozy-modern lifestyle space where homemaking meets inspiration. Her goal is to help women create beautiful, organized, and peaceful homes they truly love — without overwhelm. You’ll find here heart-driven content on home decor, cleaning tips, easy family recipes, organization and decluttering, DIY home projects, plants, and seasonal ideas — all designed to bring more calm, comfort, and style into everyday life.