7 Best Laminate Countertops That Look High-End on a Budget Now Reviewed
You want countertops that look like art—soft veining, subtle sheen, the kind of surface that makes morning coffee feel like vacation. You hate sticker shock, messy installs, and materials that age badly. Picture this: natural light gliding over stone-like patterning, brass peeking out, wood tones grounding it all. These seven laminate countertop ideas solve the exact frustration of craving high-end style on a budget, with specific finishes and styling that photograph beautifully and hold up to real life.
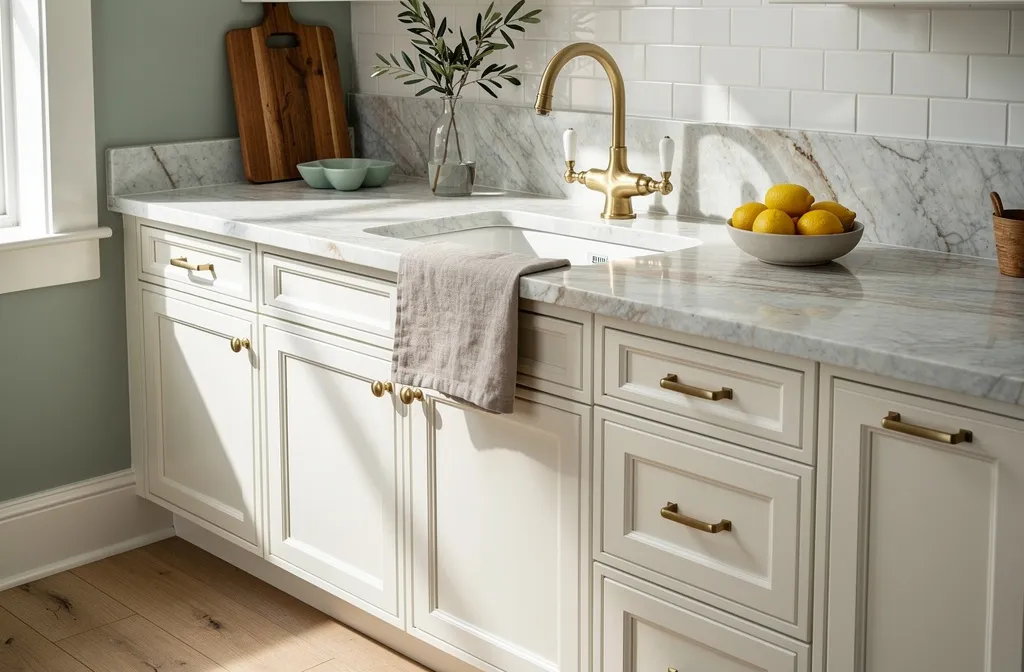
We’ll keep it under $2,500 per kitchen update and give you exact pairings—paint colors, hardware finishes, backsplash choices—that make laminate look luxe. Consider this your step-by-step guide to a kitchen that finally looks finished and camera-ready. If you love refined, Pinterest-worthy moments but need them to survive Tuesday’s spaghetti night, this list is for you.
1. Calacatta Cloud Laminate With Slimline Edge and Warm Brass
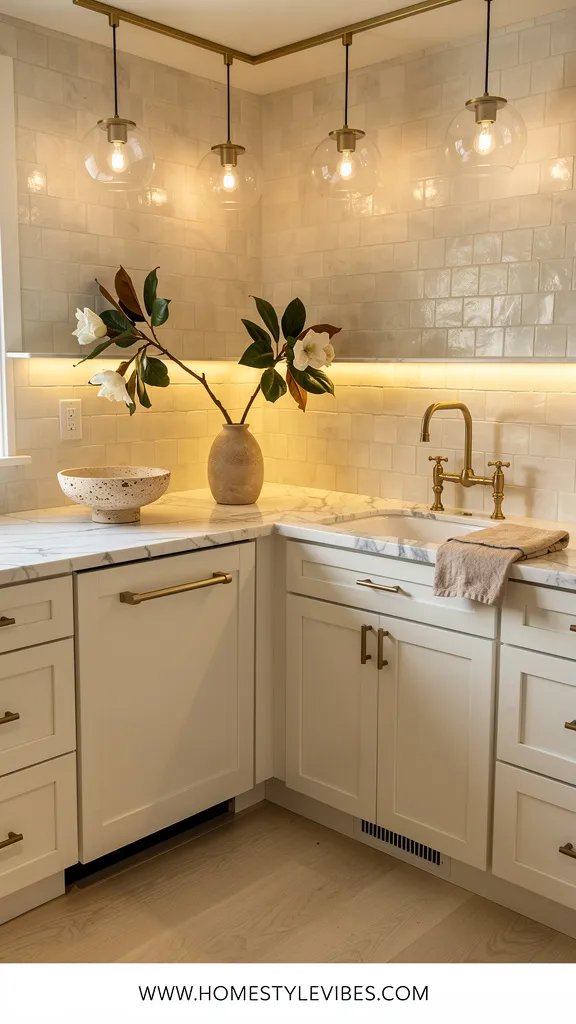
We’ve all been there: you want the drama of marble but can’t babysit it with coasters and prayers. Calacatta-look laminate gives that bold veining without the anxiety. This design leans into hotel-chic—soft white, warm brass, and a whisper of oatmeal linen textures—so your kitchen feels bright, balanced, and elegant without any of the fussy upkeep.
It works in real homes because the slimline edge profile reads modern and intentional. Pair it with a soft white cabinet (think creamy, not blue-white) and satin brass hardware to pull out the warmth in the marble veining. Lighting matters here: choose warm LEDs (2700–3000K) to keep the surface creamy instead of stark, and add a dimmer so the veining shows a gentle gradient at night. Why does this photograph beautifully? High contrast between the countertop’s delicate veining and clean cabinet fronts, plus brass gleam catching the eye. Instant depth without clutter.
Try variations. For a small-space version, run the same laminate vertically as a short 4–6 inch backsplash to simplify lines and avoid visual noise. For a darker twist, use deep mushroom or greige lower cabinets with the same top; your counters pop, your base looks sculptural. For a renter-friendly swap, cut a piece of matching laminate for an island or console top only—one hero surface.
Budget Breakdown:
- Calacatta-look laminate sheet or prefab top: $300–$900
- Slimline/flat edge fabrication: $150–$400
- Satin brass pulls/knobs: $80–$250
- Warm LED under-cabinet lighting: $60–$180
- Matching short backsplash piece: $120–$280
Total Estimated Cost: $710 – $2,010
Best For: Bright kitchens craving softness; resale-minded updates that feel classic yet fresh. Works in small condos and open-plan family homes.
Key Design Elements:
- Main materials: Calacatta-cloud laminate, satin brass, warm white paint, linen-look textiles
- Color palette: Creamy white, warm brass, soft greige
- Lighting strategy: Warm under-cabinet strips, dimmable overheads
- Furniture silhouettes: Slab or Shaker doors, slim counter edge
- Texture layers: Linen napkins, matte ceramics, brushed metal
- Accent details (hardware, decor pieces, plants): Brass pulls, a single olive plant, a ribbed ceramic utensil crock
How To Recreate This Look:
- Start with a Calacatta-look laminate that has soft, warm veining.
- Add a slimline edge profile for a modern, refined line.
- Layer in warm white or greige paint on cabinets to match the veining undertone.
- Install warm LED strip lights under upper cabinets to highlight the faux marble pattern.
- Style with satin brass hardware and one or two linen accents for softness.
Why This Looks Expensive: Slim edges plus controlled brass accents mimic stone-and-metal pairings you see in boutique hotels. The veining does the visual heavy lifting, so everything else can stay pared back.
Watch Out: Don’t choose a too-blue white paint or cool lighting; it turns the “marble” gray and flat. And skip busy backsplashes—this countertop wants quiet company.
Pro Styling Tip: Photograph with a single brass object catching light at the edge of frame—glow + veining = editorial depth.
Quick Tip: Ask for laminate samples in at least 8×10 size. Small chips hide pattern repeats and color shifts that show up big in a real kitchen.
2. Warm Walnut Butcher-Block-Look Laminate With Waterfall Edge
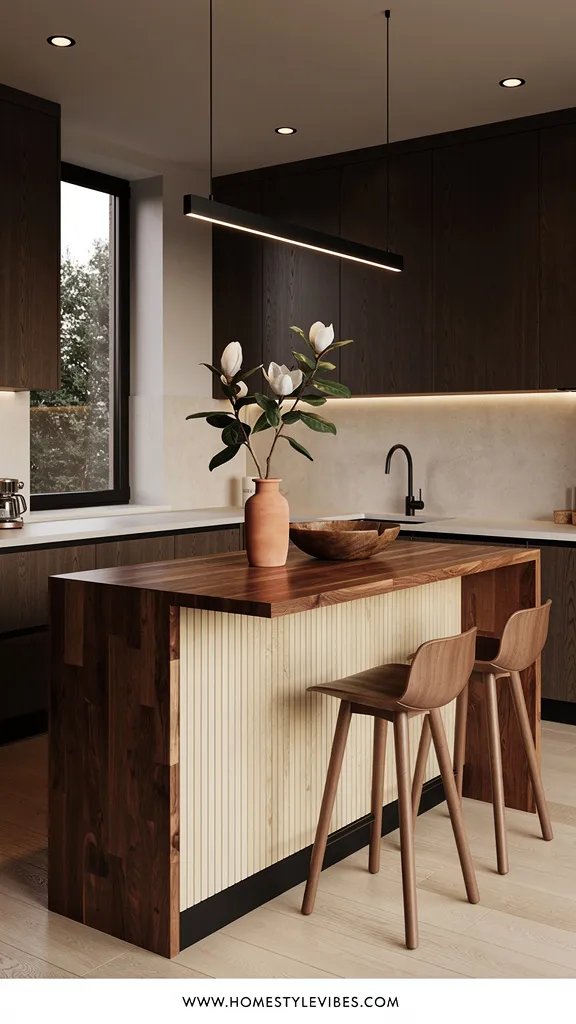
It’s that one corner that always feels off—the island that never feels intentional. You’ve tried trays and fruit bowls, but it still looks like a leftover table from college. The fix? A wood-look laminate with a waterfall edge that drapes down the side. It reads like custom millwork without the humidity issues or oiling schedule of real butcher block.
The mood skews modern organic: warm walnut grain, matte black accents, and fluted panels. It looks high-end because that waterfall edge frames your island like a piece of furniture. Perfect for families because laminate laughs at spaghetti sauce and marker mishaps. Lighting should provide side-wash glow to emphasize the grain—pendant lights slightly offset help cast elegant shadows down the waterfall panel. In photos, you get crisp vertical lines and wood texture that feels touchable.
Two variations seal the deal. For small spaces, do a half-waterfall (one side only) and pair with slim counter stools. For a darker vibe, use the same walnut top with charcoal cabinets and smoked bronze hardware. Renter workaround: Create a “bar cart island” with a laminate top and furniture legs—you take it when you move.
Key Design Elements:
- Main materials: Walnut-look laminate, matte black or bronze hardware, fluted wood or MDF panels
- Color palette: Warm walnut, charcoal, creamy white walls
- Lighting strategy: Offset pendants for side shadows on waterfall edge
- Furniture silhouettes: Backless stools, rounded seats, thin legs
- Texture layers: Ribbed glass, woven seat cushions, soft cotton towels
- Accent details: A single bowl with seasonal fruit, a black salt cellar, an herb pot
Budget Breakdown:
- Walnut-look laminate and fabrication: $450–$1,200
- Waterfall panel fabrication/install: $250–$700
- Pendant lighting (pair): $150–$500
- Matte black pulls/knobs: $60–$200
- Fluted paneling for island face: $180–$450
Total Estimated Cost: $1,090 – $3,050
Best For: Open-plan spaces seeking a furniture-like island focal point; busy families who want the wood look without babying it.
How To Recreate This Look:
- Start with a walnut-look laminate that has a varied, believable grain.
- Add a full or half waterfall edge down one or both sides of the island.
- Layer in fluted paneling on the island face for dimension.
- Install offset pendants to graze the grain and create depth.
- Style with a single sculptural bowl and backless stools to keep lines clean.
Why This Feels Designer: The waterfall edge suggests custom millwork. Paired with fluting and matte metal, it cues “bespoke” even in a small kitchen.
One Thing To Avoid: Over-grained laminate with exaggerated contrast looks fake. Choose a mid-contrast pattern that echoes real walnut.
Pro Styling Tip: Angle stools slightly—10 degrees off parallel—so legs overlap in photos and create layered lines.
Did You Know? Many laminate lines include matching edge banding. Request it for seams and sides to avoid that telltale dark line that ruins the illusion.
Remember, this isn’t about recreating a showroom. It’s about building a kitchen that supports your life and still makes your heart skip a beat when you walk in. If one idea speaks to you, start there and do it fully—you don’t need five upgrades to see a big shift.
3. Honed Black Slate-Look Laminate With Integrated Draining Grooves
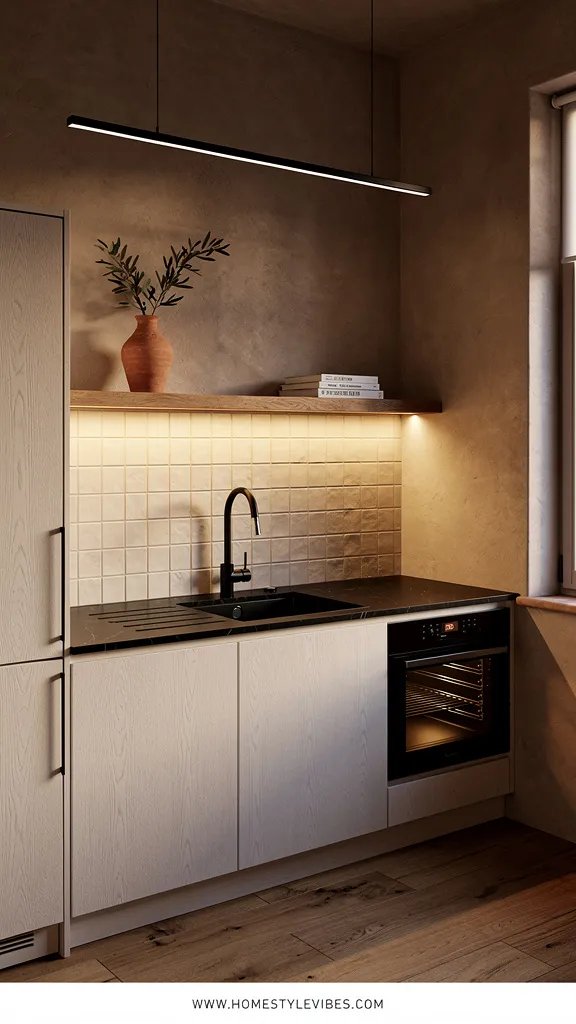
You want moody and modern, but dark counters can feel flat or dusty fast. The answer: a honed slate-look laminate with just enough texture to hide fingerprints and an extra detail most people skip—simple routed draining grooves alongside the sink. It’s minimal, striking, and wildly practical.
This look creates a grounded, modern Mediterranean mood, especially with plaster or limewash walls and warm oak shelves. It works beautifully in small kitchens because the matte surface absorbs glare while the surrounding walls and shelves bounce light back. Go with warm-to-neutral LEDs overhead (3000–3500K) so the surface looks like real stone, not chalk. Photographs love the light sink shine against the soft counter matte—contrast is your friend.
Variations to try: In a bright kitchen, use matte black hardware for cohesion. In a lower-light space, add bronze or antique brass taps for subtle glow. Renters can mimic the draining grooves by using a matching matte drying rack they stash under the sink.
Budget Breakdown:
- Honed black slate-look laminate: $350–$1,000
- Fabrication with simple routed grooves: $120–$300
- Undermount or drop-in sink: $120–$450
- Matte black or bronze faucet: $120–$400
- Open oak shelving: $100–$350
Total Estimated Cost: $810 – $2,500
Best For: Compact kitchens, moody palettes, and anyone who wants low-gloss practicality that still reads sculptural.
Key Design Elements:
- Main materials: Slate-look laminate, oak, limewash or plaster paint
- Color palette: Charcoal, warm white, oak, soft bronze
- Lighting strategy: 3000–3500K overhead + spot lighting at sink
- Furniture silhouettes: Simple slab doors, thin open shelves
- Texture layers: Plaster walls, matte ceramics, linen hand towels
- Accent details: Bronze tap, black soap dispenser, a single citrus bowl
Why This Reads High-End: The draining grooves feel custom, like something you’d see in a chef’s kitchen. Matte finishes keep everything calm and architectural.
How To Recreate This Look:
- Start with a matte slate-look laminate with subtle patterning.
- Add a clean undermount or tidy drop-in sink.
- Layer routed grooves next to the sink for that “custom fabricator” touch.
- Install open oak shelves to warm the space and hold everyday ceramics.
- Style with a small bronze accent and one bowl of lemons for color pop.
The Most Common Mistake: Pairing this with glossy cabinets. High-shine below a honed top creates visual static. Stick to satin or matte on doors.
Pro Styling Tip: Shoot from a low angle so the grooves catch light—lines lead the eye straight to your sink vignette.
4. Pietra Grigio Laminate With Thick Bullnose and Checkerboard Floors
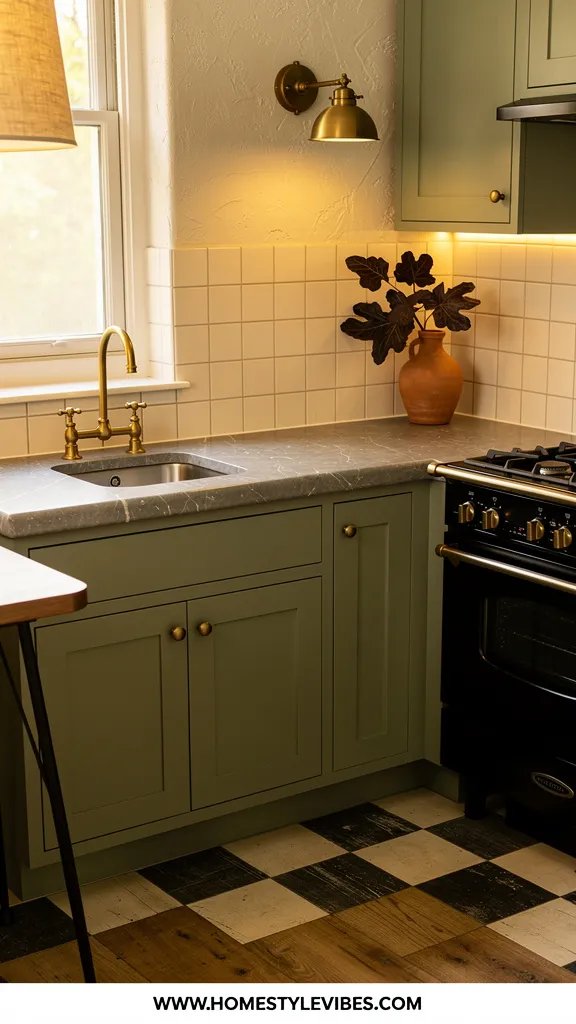
You’ve tried the thin-edge modern thing, but it left your kitchen feeling a touch cold. Thick edges bring warmth and charm. A Pietra Grigio or soapstone-look laminate with a generous bullnose edge leans European-cafe when paired with checkerboard floors. It’s nostalgic without feeling costume-y.
This combo creates a cozy, collected mood. It loves cottages, bungalows, and city apartments with character. Lighting should be layered: a soft pendant over the table, a sconce near the range, and under-cabinet strips for task work. Photography perks? The bullnose throws a small, pleasing shadow that gives depth to cabinet faces, and the checkerboard anchors the whole frame.
For variations, scale the checkerboard in a small kitchen—try 8-inch tiles to reduce busyness. Want more drama? Use a darker pietra with off-white cabinets and antique brass latches. Renter style: lay peel-and-stick checker tiles and a new counter only on your most visible run; leave the rest for later.
Budget Breakdown:
- Pietra/soapstone-look laminate: $350–$1,000
- Thick bullnose fabrication: $180–$500
- Checker peel-and-stick floor tiles: $120–$300
- Antique brass latches/knobs: $120–$280
- Single pendant + dimmer: $100–$300
Total Estimated Cost: $870 – $2,380
Best For: Vintage homes, renters who want big style with reversible floors, anyone craving charm over minimalism.
How To Recreate This Look:
- Start with a medium-dark stone-look laminate and request a chunky bullnose.
- Add checker flooring that echoes the counter undertones.
- Layer antique brass hardware for a heritage note.
- Install a warm globe pendant on a dimmer.
- Style with a striped cafe towel and a small bread board near the range.
Key Design Elements:
- Main materials: Pietra-look laminate, peel-and-stick tile, brass
- Color palette: Charcoal, soft ivory, brass, natural wood
- Lighting strategy: Pendant + task + accent
- Furniture silhouettes: Classic Shaker or inset doors, rounded edges
- Texture layers: Woven basket, linen runner, matte ceramics
- Accent details: Framed vintage print, wooden pepper mill, fresh eucalyptus
Why This Looks Intentional: The repetition of curves—bullnose edge, rounded globe pendant, soft-corner decor—feels cohesive. Checkerboard grounds it like a tailored suit.
Don’t Do This: Avoid high-contrast, glossy subway tile with the checker floor. It creates visual noise. Use a satin square tile or painted wall instead.
Pro Styling Tip: For photos, angle the checkerboard lines to run into the frame corner—instant energy and perspective.
Quick Tip: If you’re doing peel-and-stick floors, snap chalk lines and dry-lay first. Tiny misalignments get louder across the room.
A friend of mine spent weeks agonizing over paint colors before realizing the real problem was her lighting. We swapped to warm bulbs and added a dimmer—suddenly her “too green” cabinets looked nuanced and gorgeous. The point: fix sources of light first; everything else snaps into place.
5. Travertine-Toned Laminate With Micro-Tile Backsplash and Curved Corners
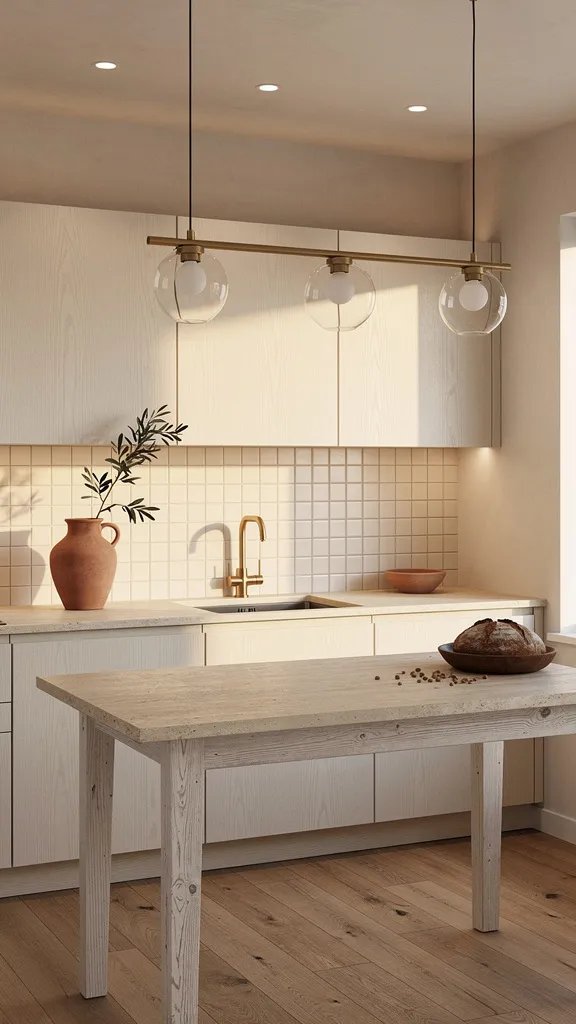
You want that sun-baked, modern Mediterranean feel—the one where bread crumbs on the counter somehow look like a scene from a cookbook. Travertine-look laminate brings creamy, stone-like warmth without the holes and sealing of real travertine. Add a micro-tile backsplash (think 1×1 or 2×2 squares) and slightly curved counter corners for a soft, lived-in vibe.
Why this works in real homes: the light, sandy tone reflects daylight and pairs beautifully with natural oak, terracotta, and white plaster. Kids? Spills disappear visually on the speckled surface. Keep lighting warm and slightly indirect; wall sconces that wash the backsplash create little highlights on each tile, stunning in photos. Layered texture—tiny grout lines, soft counters, woven baskets—reads rich.
Variations: In a small galley, run the micro-tile only halfway up to keep it airy. For drama, add a clay-colored range hood or terracotta pots. Renter-friendly? Use removable micro-tile sheets or a beadboard panel painted warm white; keep the curved corner detail for that soft custom feel.
Budget Breakdown:
- Travertine-look laminate: $320–$950
- Curved/rounded corner fabrication: $120–$260
- Micro-tile backsplash + grout: $180–$600
- Wall sconces (pair): $120–$340
- Natural wood open shelf: $70–$220
Total Estimated Cost: $810 – $2,370
Best For: Sunlit kitchens, relaxed hosts, anyone craving warmth and texture without heavy pattern.
Key Design Elements:
- Main materials: Travertine-look laminate, micro-tile, oak
- Color palette: Sand, cream, oak, terracotta accents
- Lighting strategy: Wall-washed sconces, warm pendants
- Furniture silhouettes: Soft edges, rounded corners, simple handles
- Texture layers: Woven seagrass, linen curtains, matte pottery
- Accent details: Terracotta planter, olive oil decanter, wooden spoons in a crock
Why This Feels Designer: The scale play—micro tiles against soft-edge counters—shows intention. Designers obsess over proportion because cameras do too.
How To Recreate This Look:
- Start with a warm, lightly speckled travertine-look laminate.
- Add rounded corners for a friendly, custom detail.
- Layer micro-tile in a soft, matte finish for depth.
- Install simple wall sconces to wash the tile and create glow.
- Style with woven trays and one terracotta accent for grounded color.
Watch Out: Don’t pick micro-tiles with glossy finish—they throw harsh glares and show every splash. Choose satin or matte for a soft glow.
Pro Styling Tip:</-strong> In photos, sprinkle a few breadcrumbs or lemon zest for texture. Real life signs make this palette sing.
Did You Know? Some laminate brands offer textured finishes that mimic stone pores. Choose “honed” or “velvet” textures; they hide smudges and boost realism.
6. Soft Concrete-Look Laminate With Floating Shelf Ledge and Black Framing
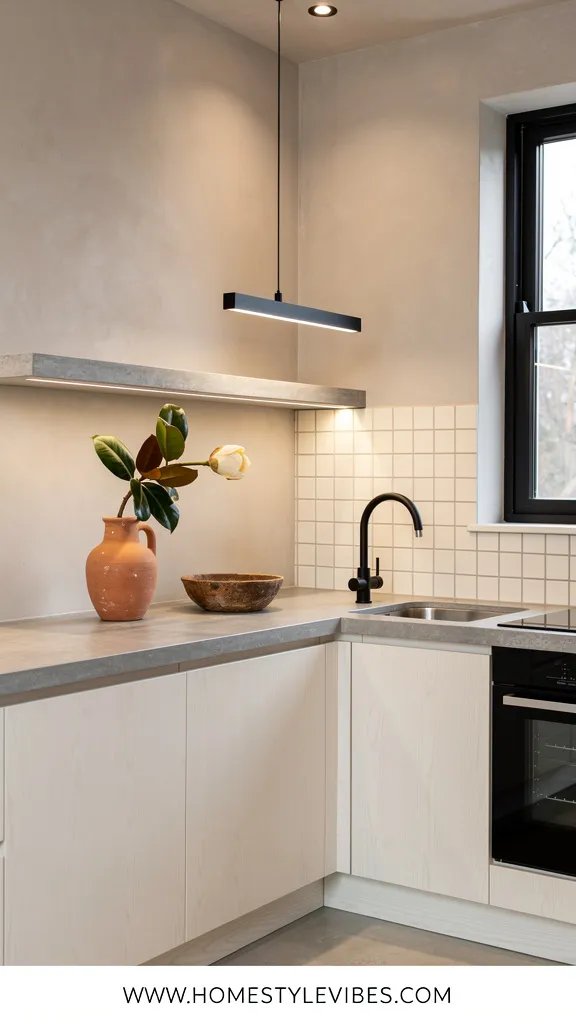
Maybe you’re over the fake-stone debate entirely and want something quiet, architectural, and undeniably cool. Concrete-look laminate nails that editorial loft feel—smooth, chalky, and unfussy. Add a slim floating shelf ledge (2–3 inches thick) that runs parallel to the counter for a curated display and install a black-framed window treatment or simple steel-look brackets to frame the scene.
The mood is urban Japandi: calm, minimal, tactile. Great for resale because it stays neutral while still feeling design-forward. Lighting should be crisp but not icy—target 3000K and consider a track with adjustable heads to graze the ledge and cast soft shadows. It photographs beautifully because of long linear elements: counter, ledge, frames. Lines make kitchens look bigger and more intentional.
Variations: In a narrow kitchen, run the ledge only on one wall to avoid clutter. For warmth, add a single walnut cutting board and linen runner. Renter-friendly: create a removable ledge using shelf brackets and a painted MDF board; match the laminate color for cohesion.
Budget Breakdown:
- Concrete-look laminate: $300–$900
- Floating shelf ledge materials: $80–$250
- Black brackets or frames: $60–$200
- Adjustable track lighting: $120–$350
- Minimal hardware (black or stainless): $80–$200
Total Estimated Cost: $640 – $1,900
Best For: Apartments, modern townhomes, and anyone who wants a neutral surface that supports artful styling without competing.
How To Recreate This Look:
- Start with a soft, mid-gray concrete-look laminate in a matte finish.
- Add a slim floating ledge aligned with or slightly above backsplash height.
- Layer black-framed moments: a slim rod, brackets, or a framed print.
- Install adjustable track lighting to graze the ledge and counter.
- Style with a couple of tall bottles or a single sculptural vase to draw the eye up.
Why This Reads High-End: The restraint. Concrete-look surfaces with linear styling and perfect lighting feel like a design studio crafted the room.
The Most Common Mistake: Over-accessorizing the ledge. Leave negative space so the line stays strong and the counter looks intentional.
Pro Styling Tip: For photos, stagger objects on the ledge at different heights but keep the color palette tight—gray, black, one natural wood note.
Quick Tip: If your kitchen runs dark, add a slightly warm undertone in the gray (greige) so skin tones don’t look sallow near the counter.
I tried a concrete-look laminate in my own studio kitchenette last fall and honestly couldn’t believe the difference. The second I added a skinny ledge and warm track lights, the whole space read like a design showroom—only I still wiped it with one soapy sponge and called it a day.
7. Veined Onyx-Look Laminate With High Backsplash and Chrome Details
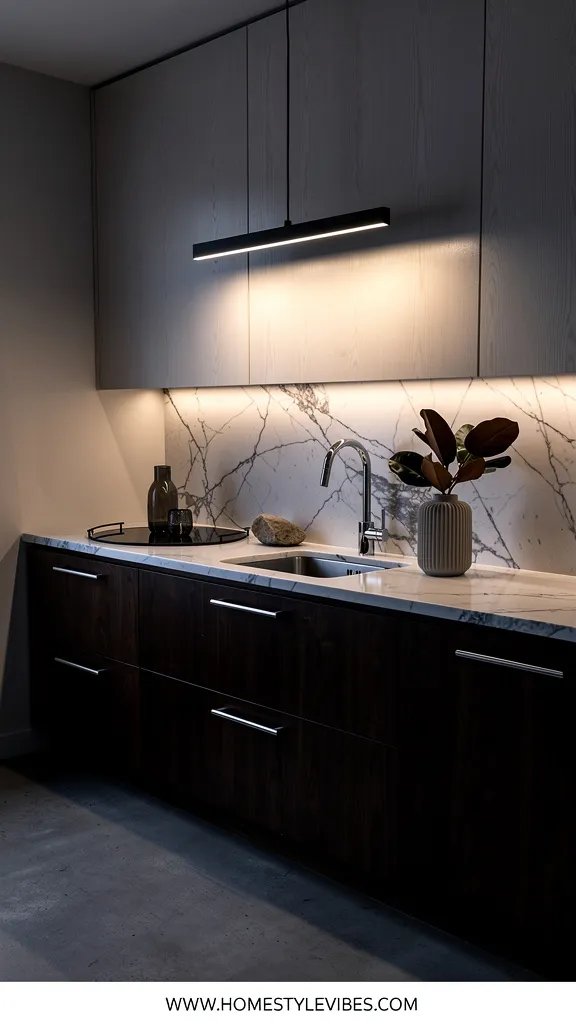
You want drama. A bit of sparkle, a bit of old-Hollywood gloss. Onyx-look laminate with delicate, high-contrast veining gives you that runway moment without precious upkeep. Take the backsplash 12–18 inches high in the same laminate for a seamless, luxe wall wash, then pair it with chrome hardware and a mirrored tray for punches of reflection.
This look sets a glamorous, evening-ready mood. Great in condos with less natural light because reflective moments bounce brightness around. Use cooler-white bulbs sparingly (around 3500K) only at the backsplash to make the veining pop, and keep overheads warmer so faces don’t feel harsh. Photos love this because veins extend from counter up the wall, guiding the eye vertically. It’s bold, but anchored by clear hardware choices.
Variations include a grayscale version with matte gray cabinets, or a warmer take with champagne chrome and cream walls. For small spaces, keep everything else minimal—flat-panel doors, one sculpture, done. Renter-friendly styling: on an existing counter, add a laminated tray or mini backsplash panel behind the cooktop to fake the effect.
Budget Breakdown:
- Onyx-look laminate for counter + tall backsplash: $500–$1,400
- Fabrication for integrated short shelf or ledge: $150–$350
- Chrome hardware set: $90–$220
- Under-cabinet lighting with two color temps: $130–$300
- Mirrored or glass tray: $30–$90
Total Estimated Cost: $900 – $2,360
Best For: Smaller kitchens that need visual drama; night owls who want a “cocktail hour” vibe every time the lights go down.
Key Design Elements:
- Main materials: Onyx-look laminate, chrome, glass
- Color palette: Soft black, gray veining, cream or pale gray walls
- Lighting strategy: Dual-temp under-cabinet lights; warm ambient + cool accent
- Furniture silhouettes: Slab doors, thin lines, no-fuss bar pulls
- Texture layers: Gloss glass, satin paint, a single velvet kitchen towel (yes, really)
- Accent details: Mirrored tray, cut crystal glass, a single orchid stem
Why This Looks Expensive: Vertical repetition of veining across counter and backsplash creates the “wrapped in stone” effect. Chrome adds crisp highlights like jewelry.
How To Recreate This Look:
- Start with a high-contrast onyx-look laminate and order extra for the taller backsplash.
- Add chrome bar pulls and a simple chrome faucet to echo the reflective theme.
- Layer under-cabinet lights set slightly cooler to make veining stand out.
- Install a small matching laminate ledge to corral bottles or a candle.
- Style with one mirrored or glass tray and keep the rest blank to let the stone pattern breathe.
Don’t Do This: Avoid mixing too many metals here; onyx-look surfaces need discipline. One secondary warm metal at most (tiny touch), or it starts to feel costume-y.
Pro Styling Tip: Shoot at dusk with only under-cabinet lights on—the veins glow, chrome sparkles, and the room feels like a moody bar.
Did You Know? Many laminate lines come in “premium finish” tiers with deeper texture embossing. That micro-texture absorbs light and fakes stone more convincingly on camera.
If you’re feeling overwhelmed, breathe. You don’t need to renovate everything at once. Start with a single run of laminate that sets the tone—an island, a coffee bar, a main prep zone. Confidence builds fast when one corner finally clicks.
Quick Checklist
- Choose a laminate with undertones that match your cabinet paint and lighting
- Commit to one edge detail that supports the mood: slimline, bullnose, or waterfall
- Pick lighting temperature (2700–3500K) based on how you want the surface to read
- Keep backsplashes calm when counters are patterned
- Use matching edge banding to avoid dark seam lines
- Repeat one material or color at least twice for cohesion
- Limit decor to one or two sculptural pieces per zone
- Test large samples in your actual lighting before ordering
- Add a dimmer—shadows and glow make laminate look richer
- Photograph at an angle that showcases edge profiles and subtle texture
Frequently Asked Questions
How durable are laminate countertops for daily cooking and kids?
Modern laminate holds up well to spills, stains, and quick knife mishaps. Use cutting boards and trivets, wipe with a non-abrasive cleaner, and you’ll get years of hard use without drama. It’s a practical choice for family kitchens that still want style.
Can I install laminate over my existing countertops to save money?
Yes, in many cases you can overlay with new laminate or replace the top while keeping existing cabinets. Check that your substrate is flat and sound. A good fabricator can advise on whether overlay or full replacement makes more sense for your kitchen.
Will laminate look fake compared to real stone in photos?
Not if you choose believable patterns and control lighting. Matte or honed textures, warm LEDs, and restrained styling make laminate read convincingly on camera. Avoid ultra-gloss finishes and overly busy patterns that scream “print.”
What’s the best edge profile for a high-end look on a budget?
Slimline edges look modern and crisp, bullnose brings classic charm, and waterfall edges feel custom. Pick the one that matches your cabinet style and room mood. The key is consistency across all runs for a cohesive, intentional result.
I have a tiny kitchen—won’t patterned laminate make it feel busy?
Choose subtle veining or a soft concrete look, then keep backsplash and hardware simple. Use under-cabinet lighting to highlight texture, not contrast. In small spaces, clean lines and one hero surface beat multiple attention-grabbing elements.
Your Next Step
Pick one of these seven laminate countertop looks and commit to it fully. Calacatta with brass, walnut waterfall, honed black with draining grooves—whichever one sparks that tiny flicker of “yes.” Order large samples, set them on your current counters for a week, and watch how they shift from morning light to dinner-time glow.
The truth is, luxury isn’t a price tag. It comes from texture that begs to be touched, lighting that flatters the surface, and restraint that leaves room to breathe. Get those three right and even laminate feels like the good stuff.
You’re closer than you think. One choice, one edge profile, one calm backsplash—and suddenly your kitchen looks like you meant it. You’ve got this. And when your coffee tastes better tomorrow morning, send me a mental cheers.

About the Author

Krisztina P.Rendes, Founder of Home Style Vibes
Founder of Home Style Vibes
Krisztina Puskásné Rendes created Home Style Vibes as a cozy-modern lifestyle space where homemaking meets inspiration. Her goal is to help women create beautiful, organized, and peaceful homes they truly love — without overwhelm. You’ll find here heart-driven content on home decor, cleaning tips, easy family recipes, organization and decluttering, DIY home projects, plants, and seasonal ideas — all designed to bring more calm, comfort, and style into everyday life.