7 Kitchen Cabinet Makeover Ideas That Look Like a Complete Renovation
You want that sunlit, magazine-ready kitchen where the cabinets look custom, the counters gleam, and the whole room finally feels pulled together. You hate that every morning you walk into a space that feels tired, yellowed, and oddly dark no matter how many times you mop. This is your shortcut: seven kitchen cabinet makeover ideas that look like a complete renovation, sized for real homes, real budgets, and real schedules. Think buttery light catching brushed brass, limewash that softens shadows, fluted wood that adds rhythm, and moody paint that makes your hardware sing. With a weekend or two and a budget cap you control—$250 to $3,500 depending on the route—you can pull off a kitchen that photographs beautifully and makes you genuinely excited to cook breakfast again. Consider this your Pinterest-worthy playbook for a kitchen that feels like you, not a showroom. Perfect for anyone who wants impact fast, craves texture and warmth, and refuses to settle for builder-basic anymore.
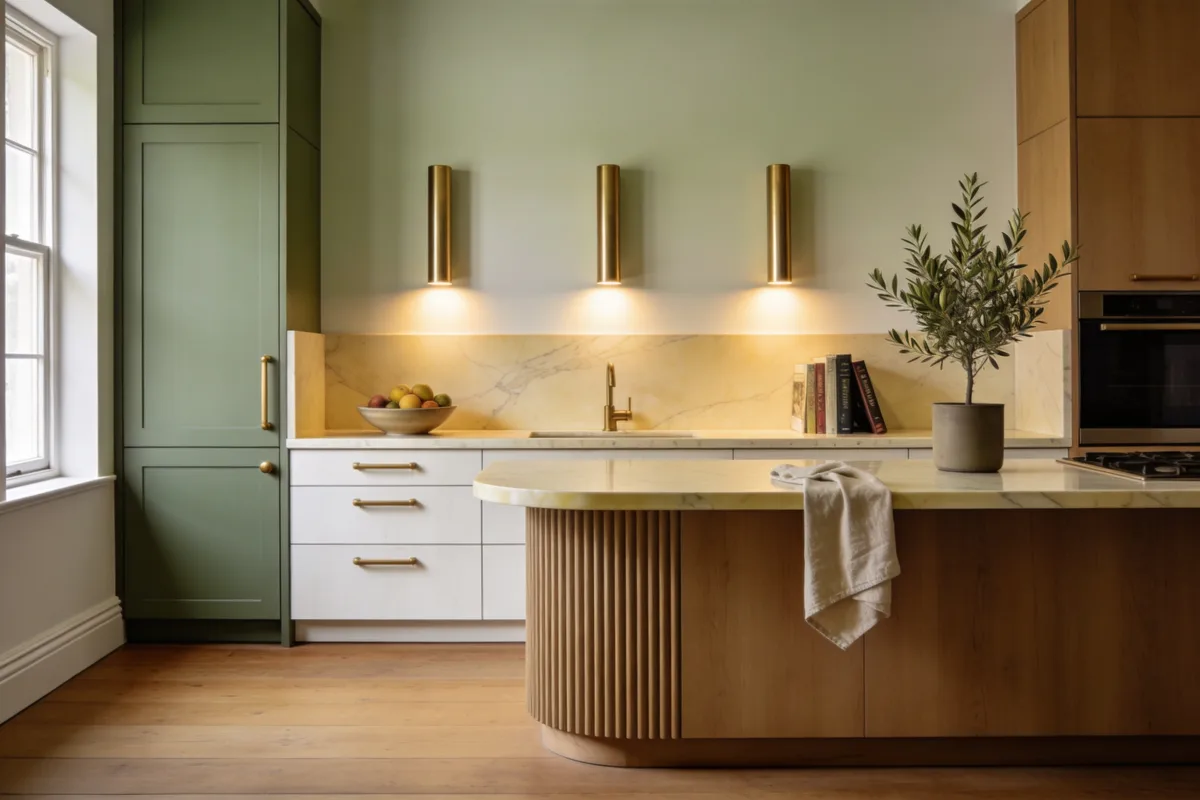
1. Warm Minimal Cabinets with Wrapped Counter Edges and Architectural Lighting
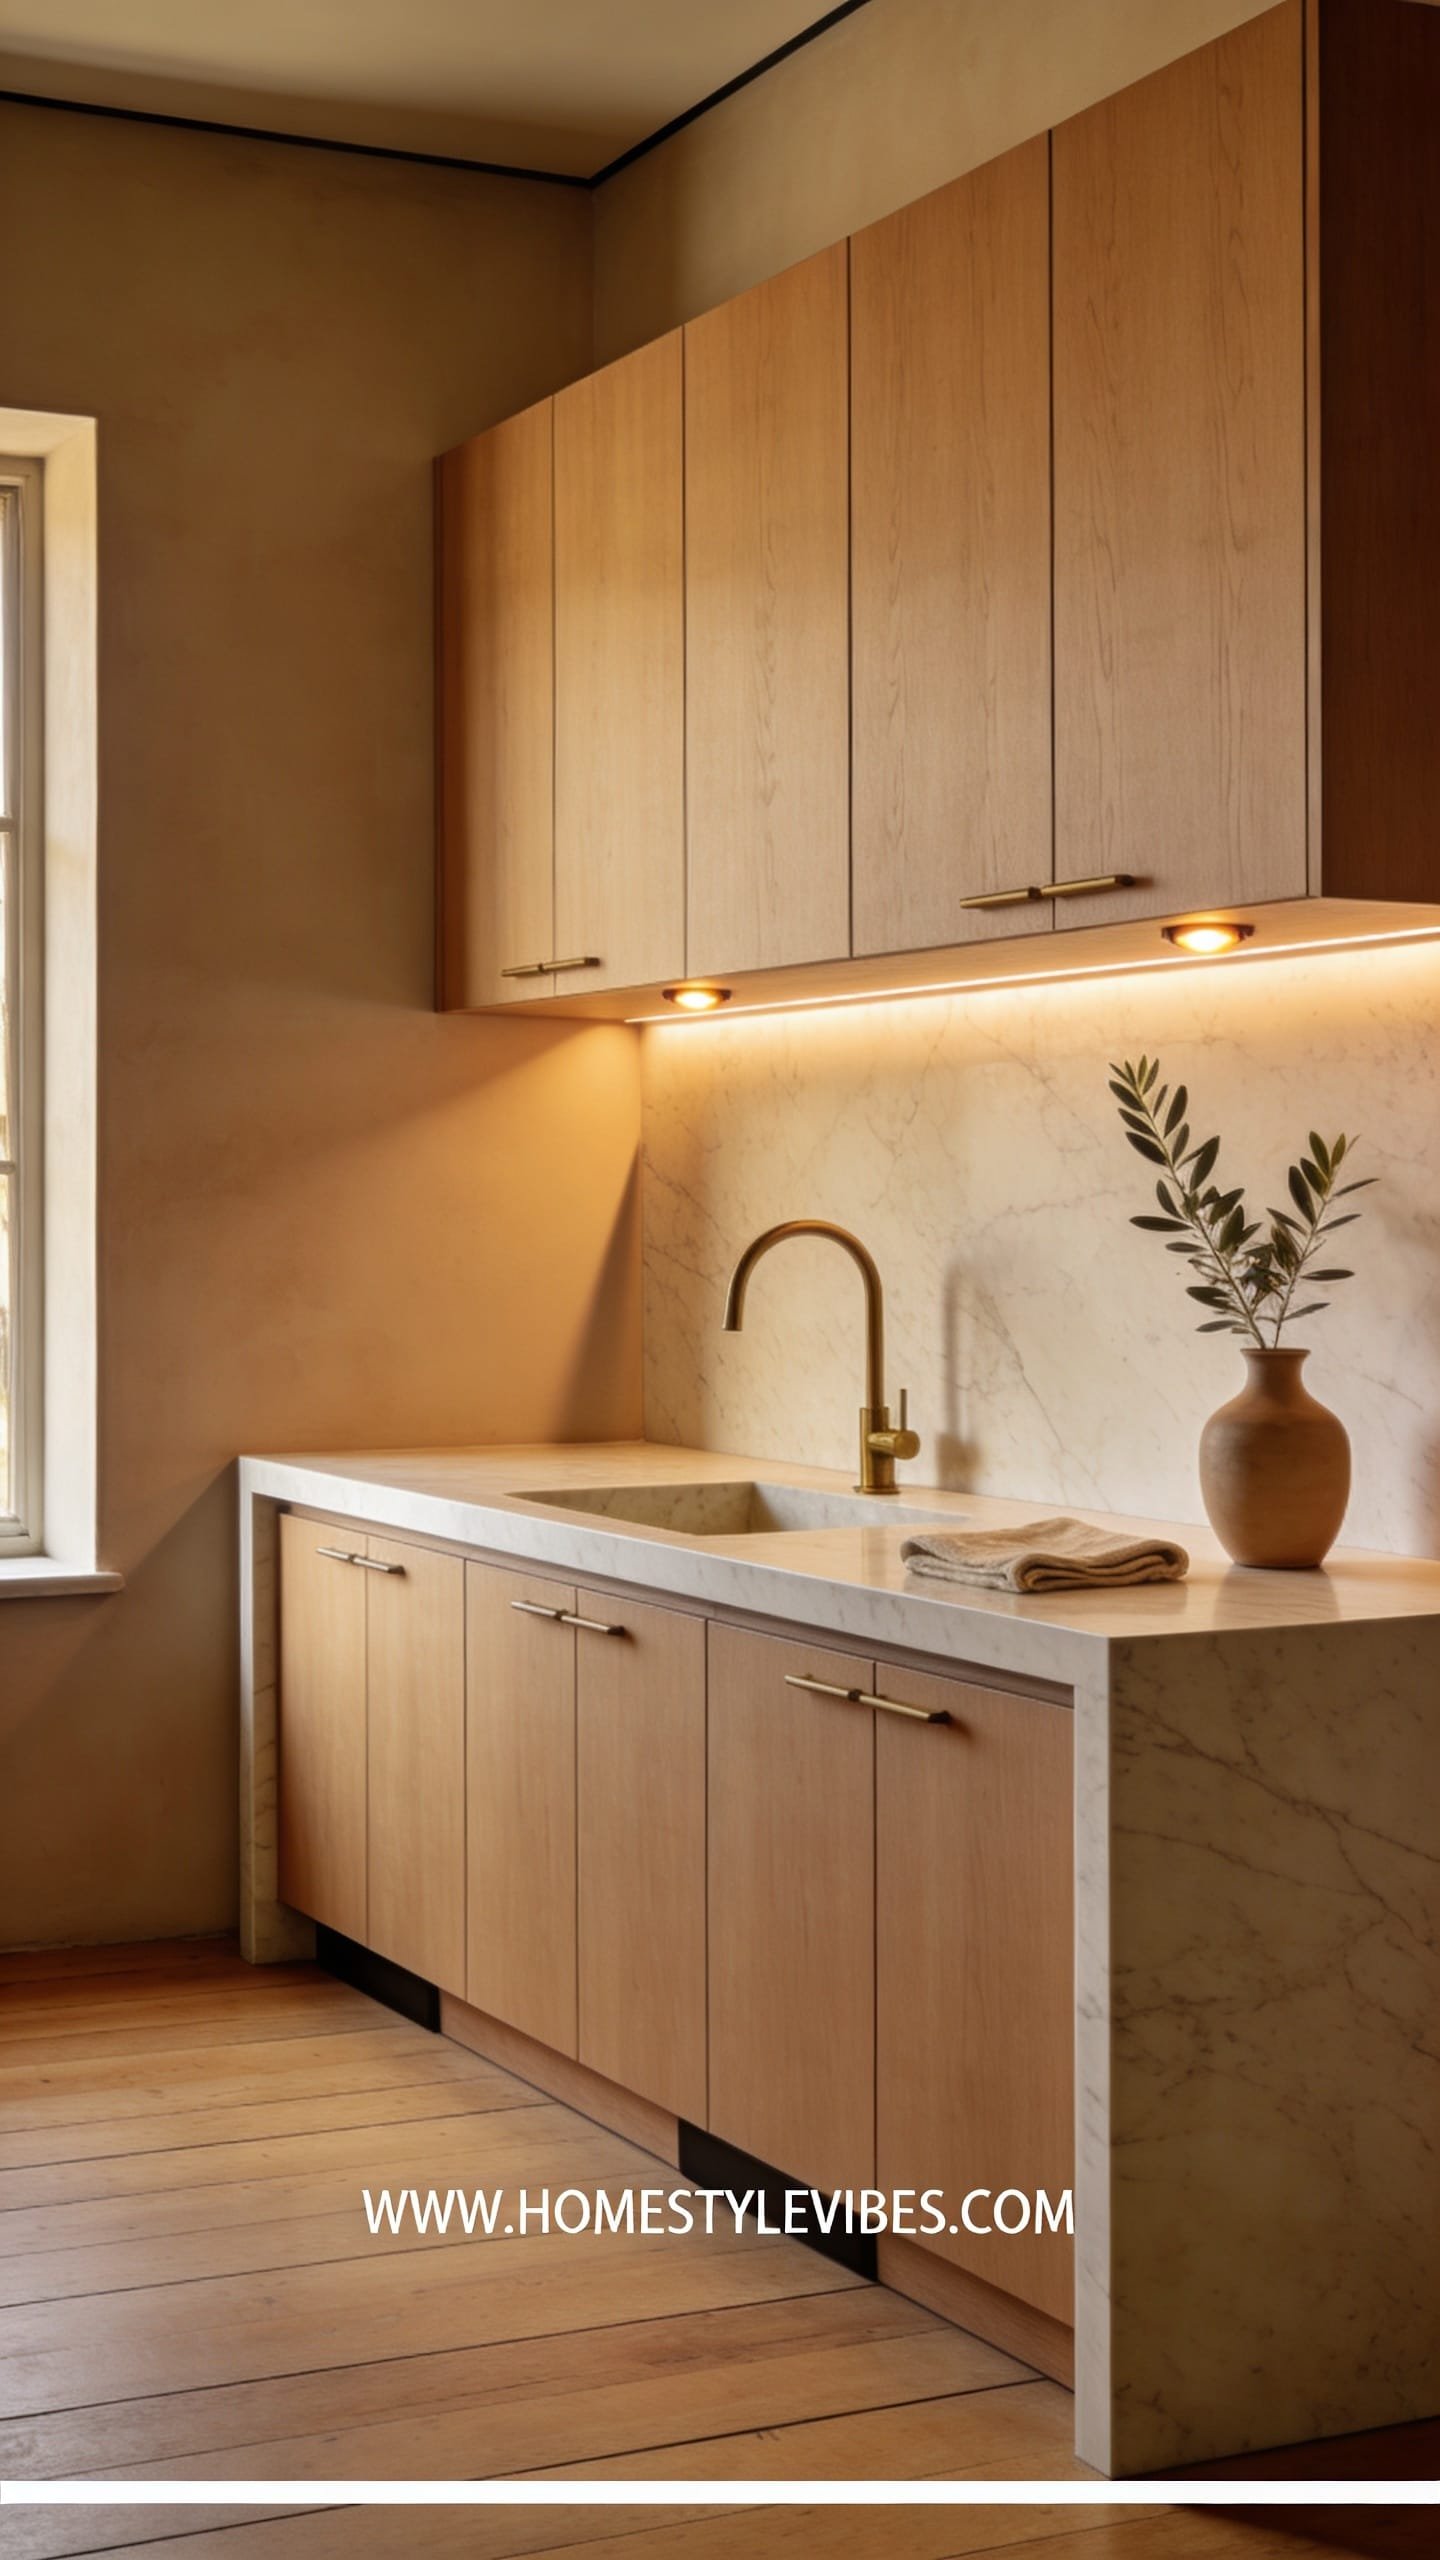
We’ve all been there: you love your cabinet layout, but the doors feel flat, the counters won’t quit reflecting a sickly glare, and your island reads like a lost piece of office furniture. This design dials up warmth and dimensionality with a clean palette, wrapped countertop edges, and a simple lighting strategy that turns your cabinets into quiet architecture. The mood? Warm minimal—calm, tactile, and a little bit luxe without being precious.
Why it works in real homes: it smooths out visual clutter and creates one strong focal line so the room looks intentional. Lighting does heavy lifting here. A pair of slim LED strips under the uppers and one architectural sconce over the sink take your cabinet faces from “matte brown rectangles” to “soft planes with depth.” Dominant materials include honed stone or a convincing laminate with mitered, waterfall-style edges on the island, warm wood cabinet fronts, and brushed bronze hardware. This setup photographs beautifully because the warm undertones, shadow play under the uppers, and a continuous counter edge create layered contrast without chaos.
Variations: on a tight budget, skip new counters and wrap your existing island with a stone-look waterfall panel on just one side—instant drama. For small spaces, choose lighter wood stain and micro pulls in a warm brass to avoid visual noise. For a darker version, go espresso wood and creamy counters with parchment-colored undercabinet light glow. Renter-friendly? Use adhesive wood grain panels for a believable front refresh and battery-operated LED light bars.
Budget Breakdown:
- Under-cabinet LED strips: $60 – $200
- Brushed bronze or brass hardware set: $120 – $350
- Counter waterfall panel or mitered edge (laminate or veneer): $250 – $900
- Single statement sconce over sink: $120 – $350
- Adhesive wood-look panels or veneer for door fronts: $150 – $600
- Painter’s supplies (if staining or sealing): $40 – $120
Total Estimated Cost: $490 – $2,520
Best For: Open-plan kitchens that need a calmer focal point; households that want easy maintenance and a soft, evening glow for entertaining.
Key Design Elements:
- Main materials: warm oak or walnut tones, honed stone or laminate with wrapped edges, brushed bronze
- Color palette: honey wood, cream, soft white, warm gray
- Lighting strategy: continuous LED runs under uppers; single sculptural sconce
- Furniture silhouettes: slab or slim-shaker cabinet faces, crisp-edge island
- Texture layers: honed surfaces, subtle wood grain, soft textiles (linen hand towels)
- Accent details: low-profile pulls, a single pottery vase, olive branches
How To Recreate This Look:
- Start with lighting: install continuous under-cabinet LEDs and a single sculptural sconce.
- Add wrapped edges: upgrade the island with a mitered or waterfall panel on at least one side.
- Layer warmth: swap hardware to brushed bronze or satin brass with clean lines.
- Install adhesive veneer or reface door fronts for a consistent wood tone.
- Style with restraint: one tall vase, neutral towels, a wooden board leaned casually for height.
Why This Looks Expensive: The consistent warm palette, architectural lighting, and wrapped edge read like custom millwork. Continuous lines trick the eye into seeing a high-end build.
Watch Out: Don’t pick LEDs that skew blue; they’ll fight your warm wood. Aim for 2700–3000K so your cabinets glow, not glare.
Pro Styling Tip: Angle the sconce light so it rakes gently across the cabinet faces—soft shadows photograph like sculpture.
Keep scrolling—next up gets textural fast and works wonders on flat, lifeless doors.
2. Fluted Panel Cabinet Fronts with Latte Paint and Soft-Black Accents
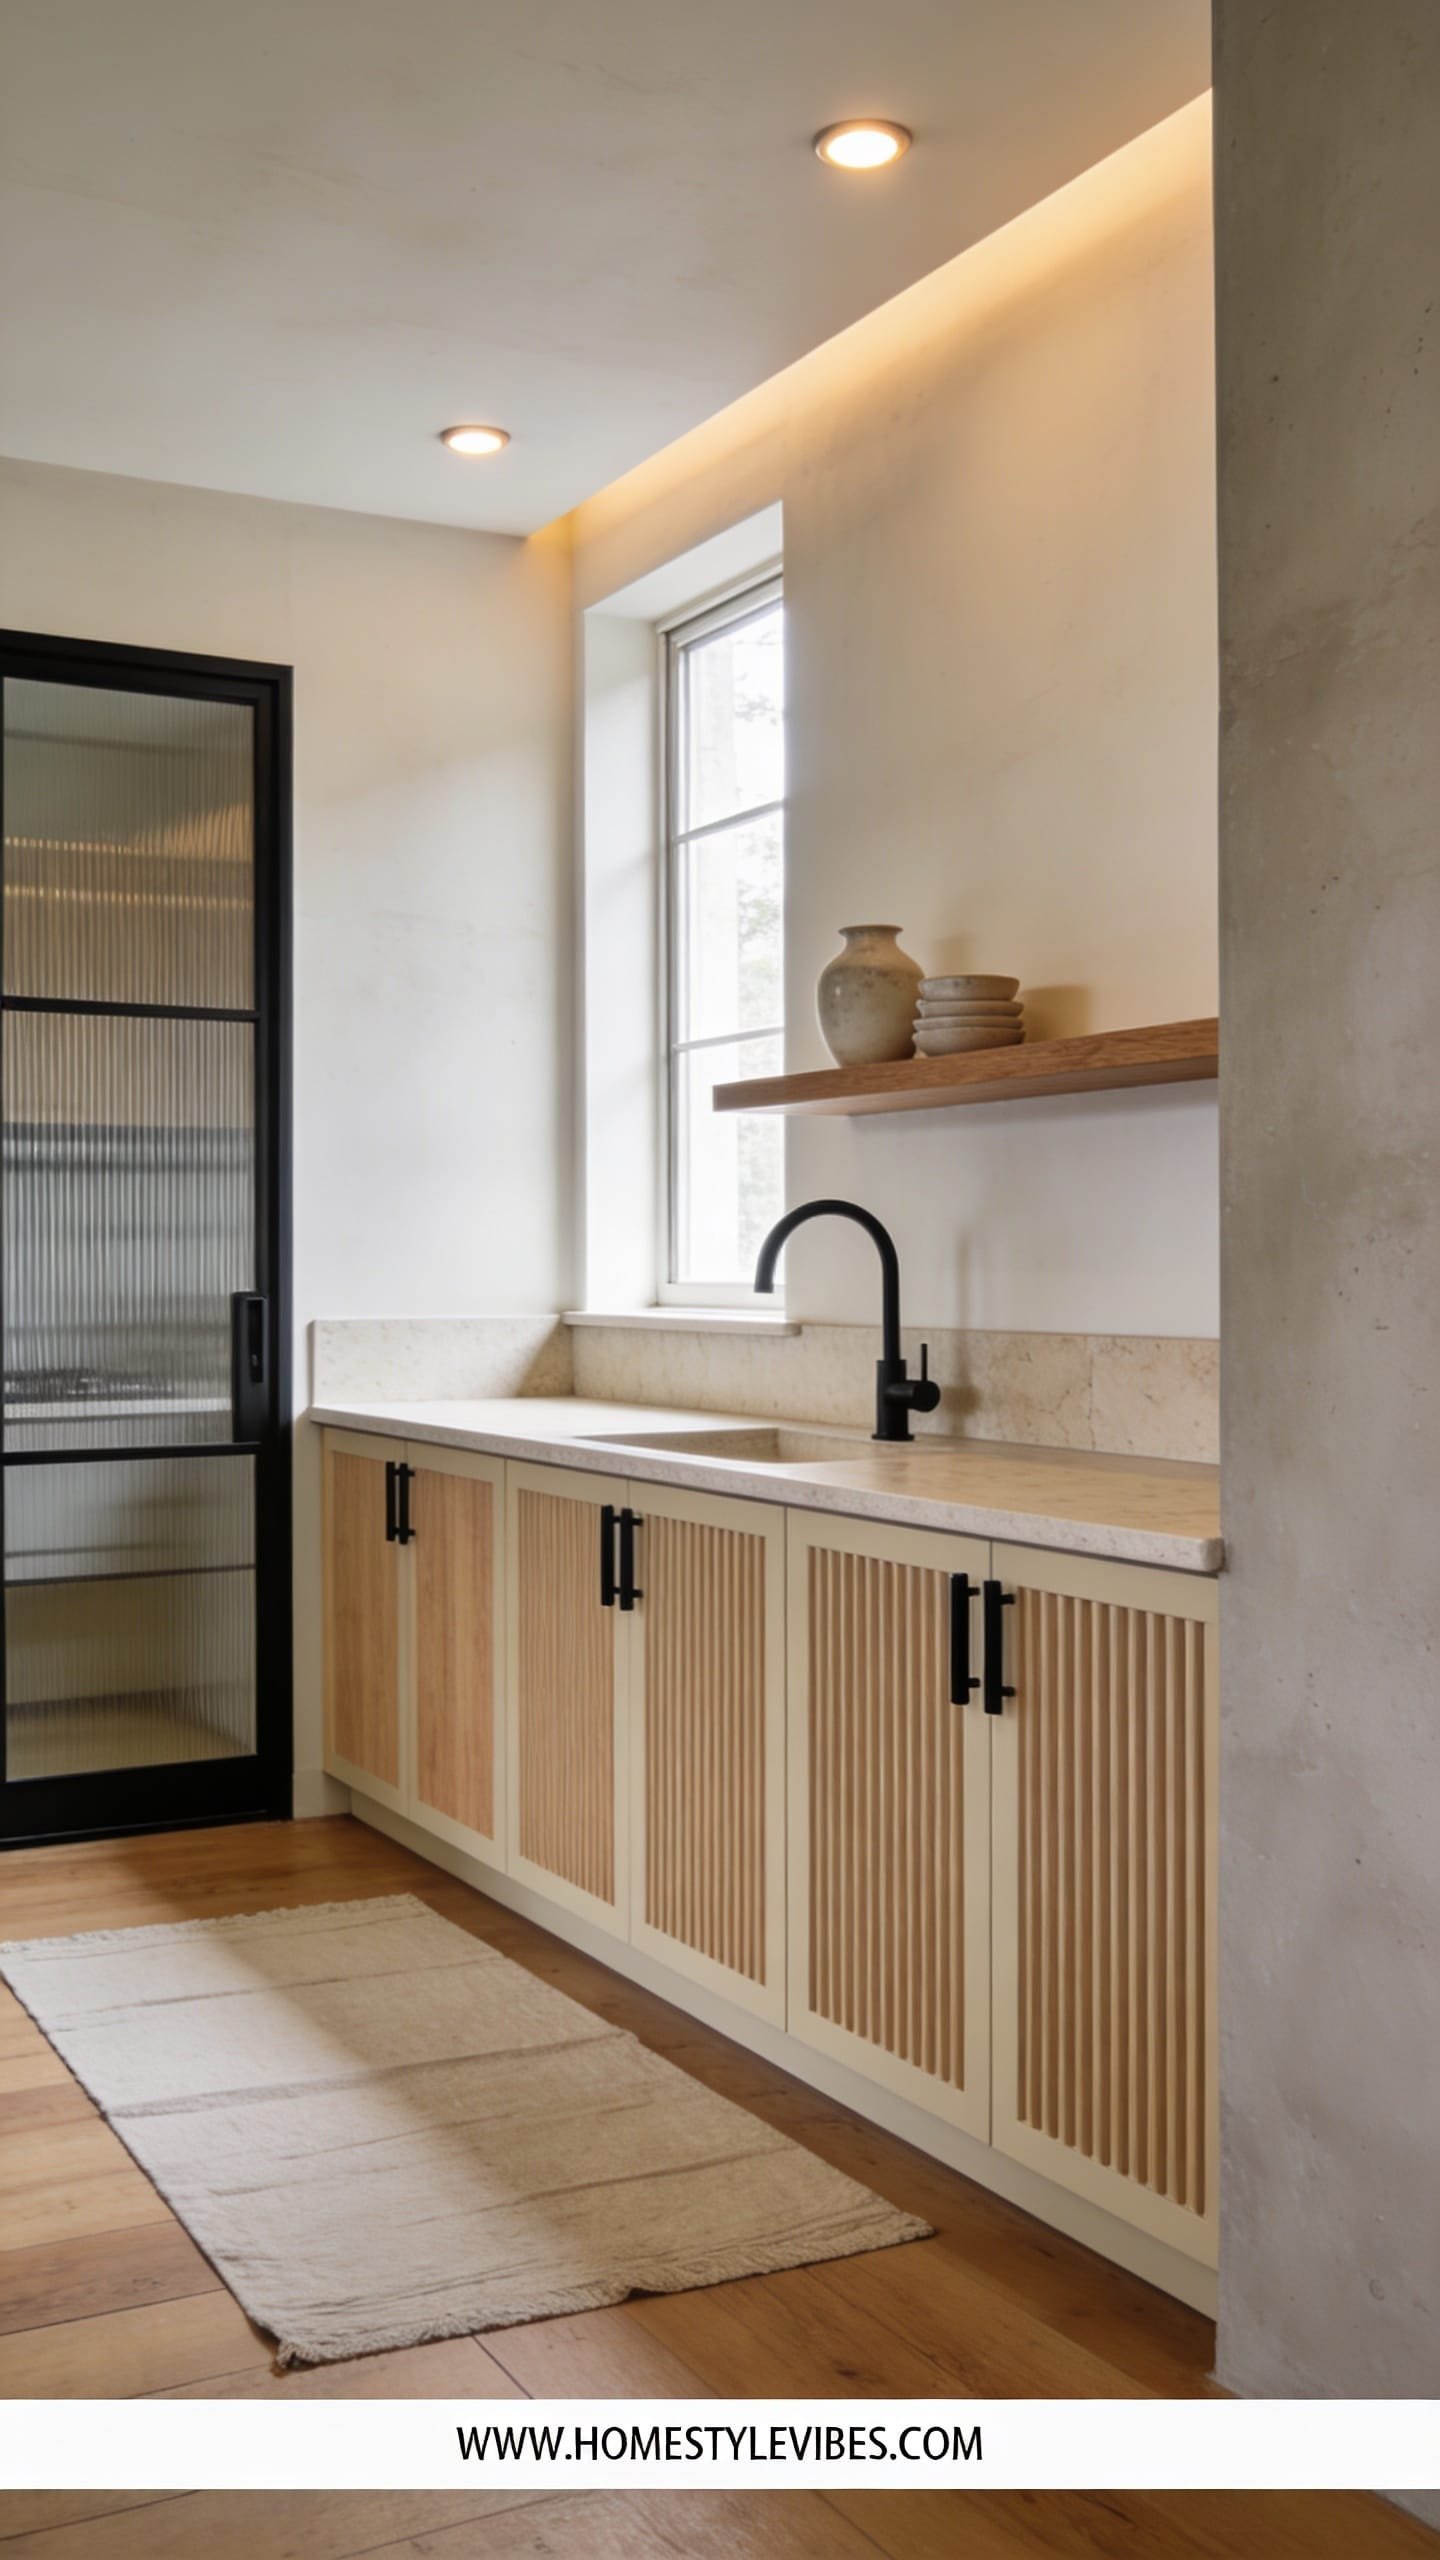
It’s that one corner that always feels off: flat doors that never look “finished,” no matter how many fancy canisters you buy. You’ve tried new pulls, but it still looks builder-basic. Adding fluted panels to your cabinet fronts gives rhythm, depth, and that custom-joinery vibe. The mood lands in modern Mediterranean meets Japandi-cozy: quiet, textured, and undeniably tactile.
Real-life benefits? Fluting forgives fingerprints and hides tiny dings. Light rakes across the ridges, which means your kitchen suddenly has movement even in still photos. Latte paint keeps it warm and current, while soft-black hardware grounds the palette. Materials do the heavy lift: reeded MDF or half-round trim, satin paint, and a single stone or concrete accent like a little plinth for your soap. It photographs beautifully because the repeating lines create a pattern that reads richly on camera without feeling busy in person.
Variations: budget-friendly version uses half-round dowels cut in half and glued as fluting, then painted. Small space? Use narrower flutes and stick to upper cabinets only. Darker version swaps latte for deep mushroom or cocoa. Renter-friendly: use fluted peel-and-stick panels on only the island and change hardware.
Key Design Elements:
- Main materials: fluted MDF or trim, satin enamel, soft-black hardware
- Color palette: latte, almond, cream, soft black
- Lighting strategy: warm under-cabinet spots to highlight ridges
- Furniture silhouettes: simple, flat-front doors become fluted faces
- Texture layers: ribbed fronts, linen runners, matte ceramics
- Accent details: slender black pulls, small travertine tray, fresh basil plant
Budget Breakdown:
- Fluted MDF or trim: $120 – $500
- Construction adhesive and brad nails: $25 – $60
- Satin enamel paint + primer: $60 – $140
- Soft-black hardware set: $100 – $280
- Under-cabinet puck or strip lights: $40 – $150
Total Estimated Cost: $345 – $1,130
Best For: Anyone craving texture without changing layout; smaller kitchens that need visual interest without clutter.
How To Recreate This Look:
- Start by cleaning, deglossing, and lightly sanding existing doors.
- Add fluting: cut trim to size and adhere evenly; fill nail holes, caulk edges.
- Prime thoroughly; paint in satin finish for a soft, wipeable surface.
- Install soft-black hardware with slim profiles.
- Light the ridges: add small warm LED strips or pucks under uppers.
Why This Feels Designer: Repetition and proportion. The ribbed texture introduces shadow and cadence, which designers rely on to add quiet luxury without loud color.
One Thing To Avoid: Overwide fluting on small doors. Keep scale consistent so the pattern looks tailored, not chunky.
Pro Styling Tip: Style a single ribbed ceramic vase near the fluted doors—echoing that texture tricks the camera into reading “custom.”
Ready for color that reads timeless on Zillow photos and cozy during midnight snacks? Keep going.
Remember, this isn’t about recreating a showroom. It’s about building a kitchen that works for your routines and your light. If one idea speaks to you, that’s your first move—edit, don’t overhaul.
3. The Deep Paint Flip: Inkwell Lowers, Creamy Uppers, and Aged Brass
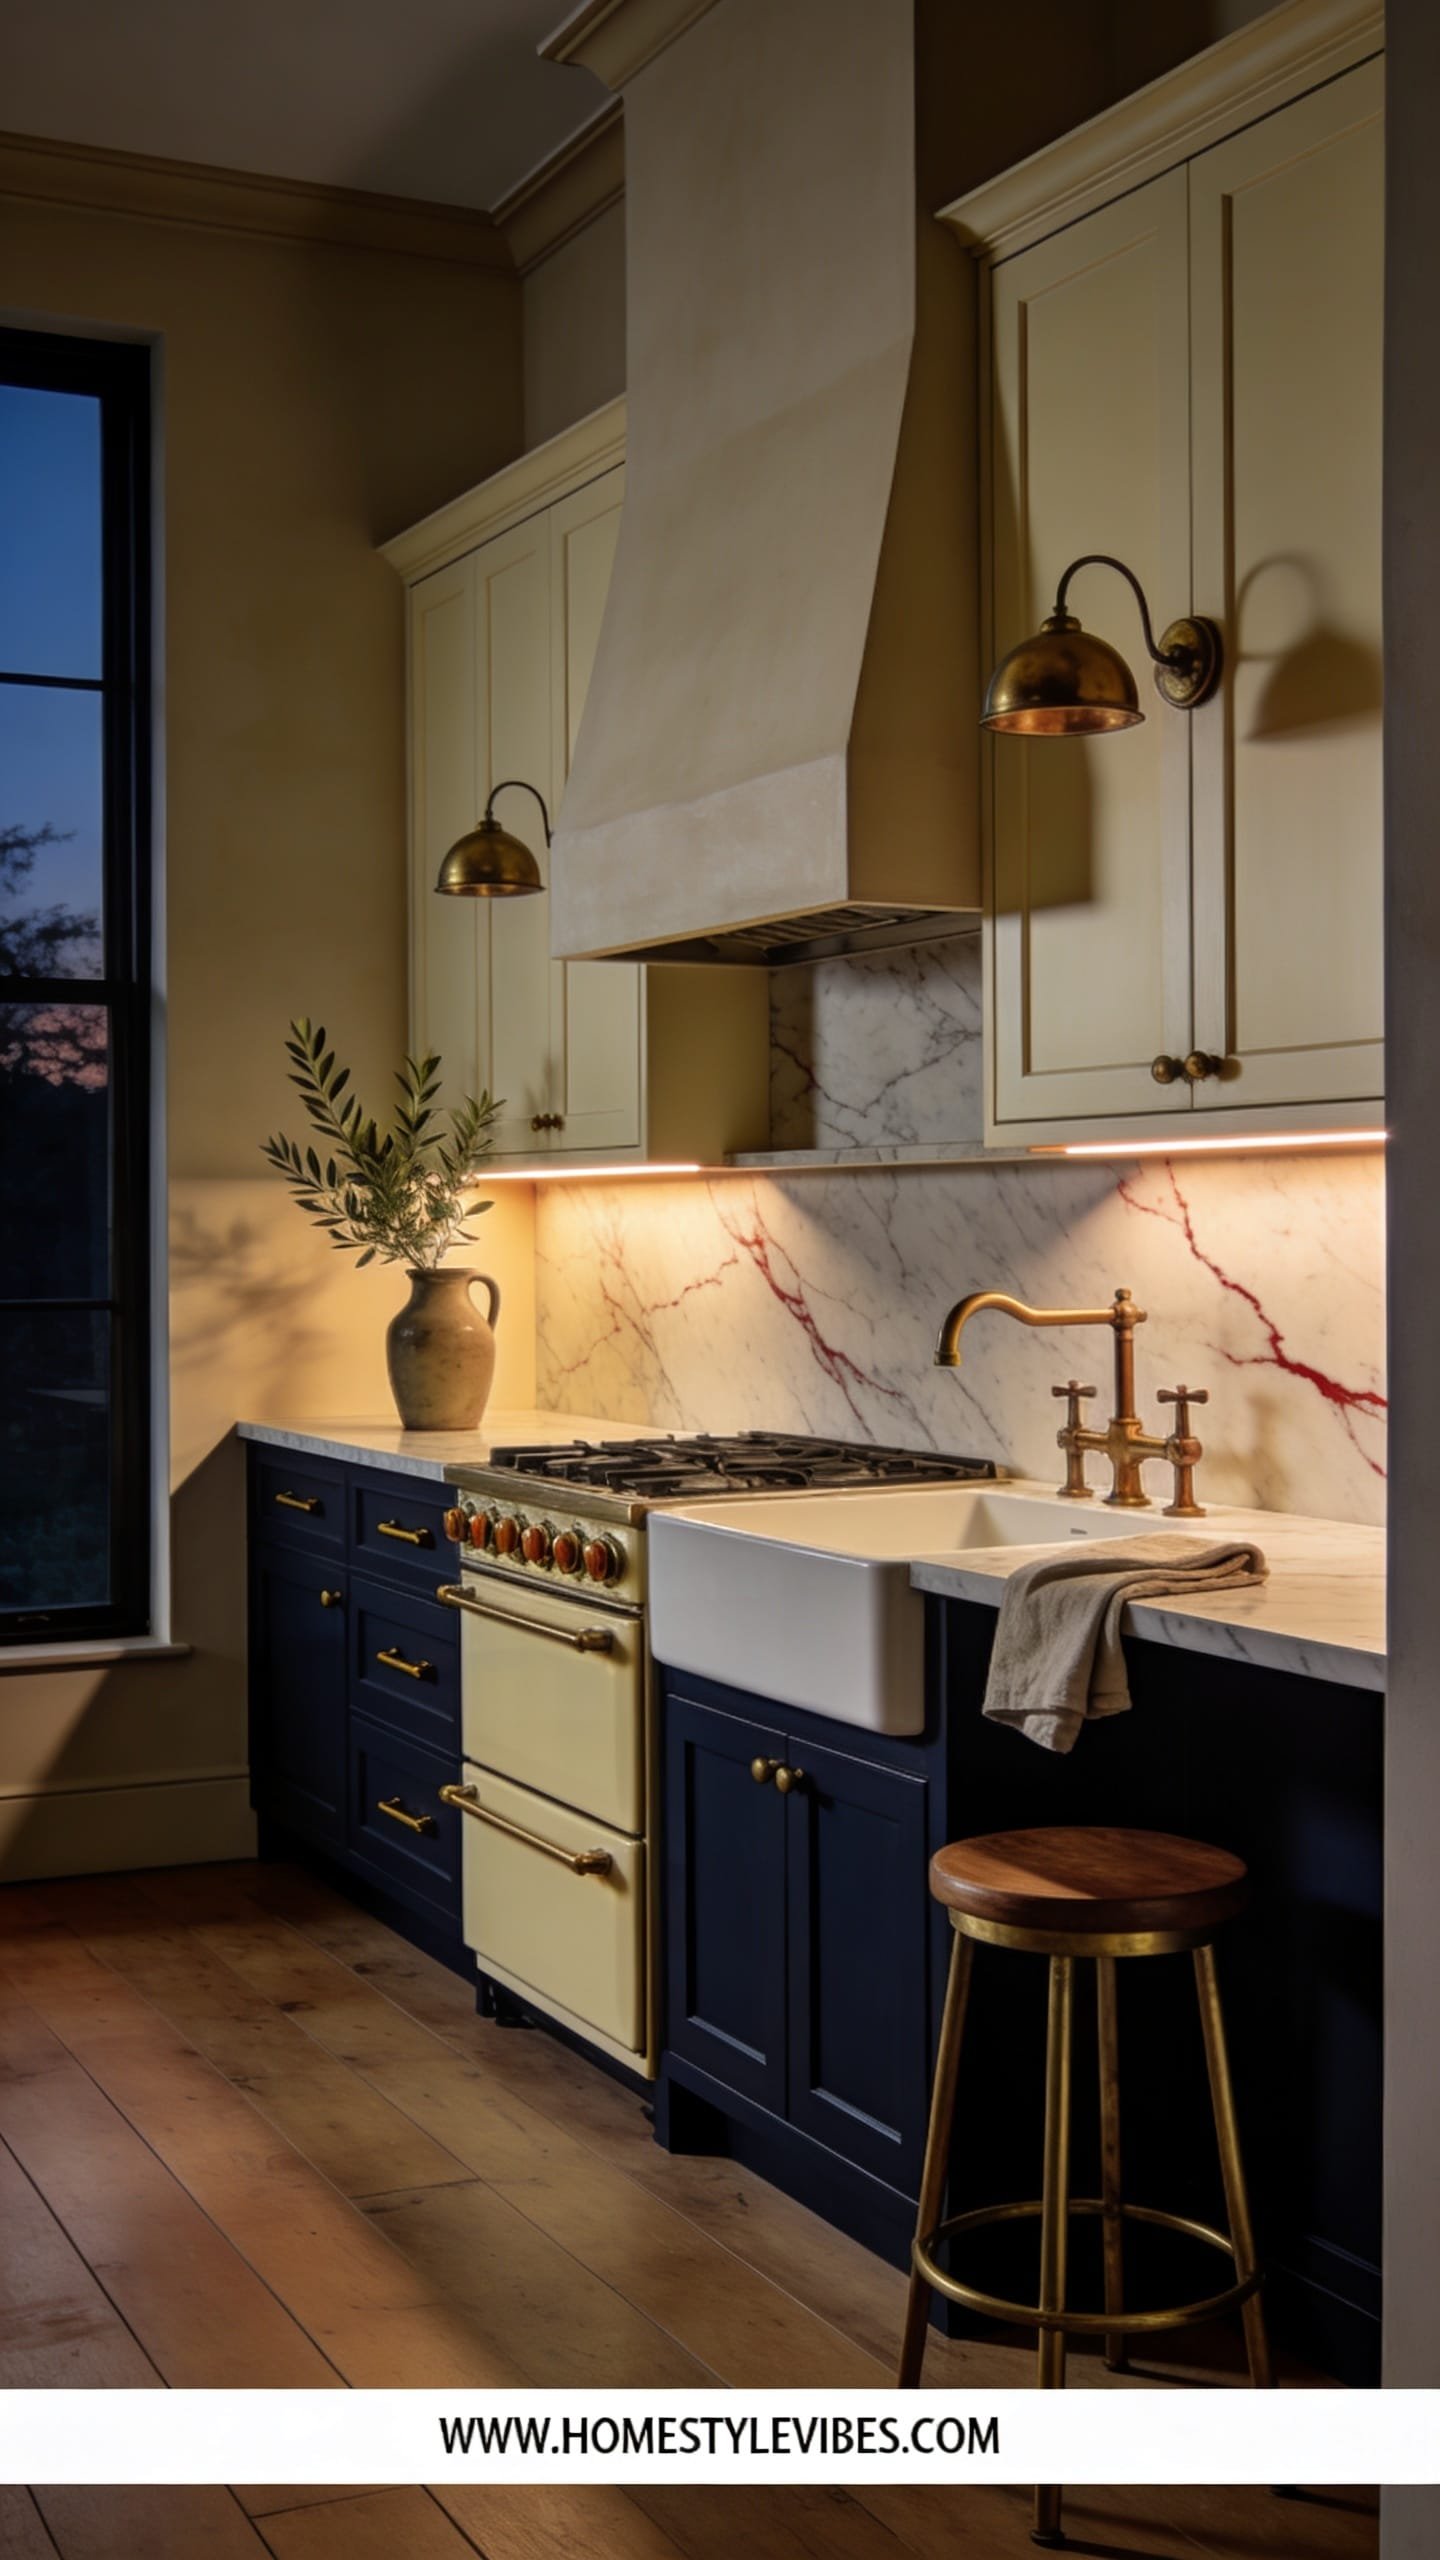
You want mood, but you’re scared of making the kitchen feel like a cave. You’re not alone. This two-tone cabinet makeover pairs inky lowers with creamy uppers so you get drama where it counts and airiness where you need it. The vibe leans modern heritage: think bistro-meets-townhouse with a touch of polish.
Why it works day-to-day: darker lowers hide scuffs and baseboard grime, while light uppers reflect sunlight and keep sightlines open. Lighting matters—warm under-cabinet LEDs kiss the counter and create a subtle gradient on the lowers at night, while aged brass or unlacquered hardware adds character that improves with wear. Materials: satin paint in a rich near-black (Inkwell, Railings, or Tricorn Black softened with a dollop of charcoal), creamy white on top, and real brass or convincingly antiqued metal. Photos love the high contrast, the soft highlight on the brass, and that clean horizon line where light uppers meet moody bases.
Variations: on a budget, paint only the lowers and swap hardware. For small spaces, choose a softer lower color like deep slate. Prefer a darker mood? Paint the crown on the uppers to dissolve into the ceiling and add a slender picture light above open shelves for glow. Renter fix: paint just the island and switch to magnet-mounted brass knobs you can take with you.
Budget Breakdown:
- Cabinet paint + primer (quality matters): $120 – $280
- Hardware in aged brass: $150 – $450
- Under-cabinet LED tape: $60 – $200
- Fillers, sandpaper, tack cloths, brushes/rollers: $40 – $100
Total Estimated Cost: $370 – $1,030
Best For: Kitchens with decent natural light; busy households that need forgiving lowers and bright uppers; resale-conscious owners who want timeless contrast.
Key Design Elements:
- Main materials: satin enamel paint, real or aged-look brass
- Color palette: near-black, cream, warm brass, natural wood boards
- Lighting strategy: soft under-cabinet runs and a warmer bulb in the main pendant
- Furniture silhouettes: classic shaker or clean slab works equally well
- Texture layers: linen curtains, oak cutting board, matte pottery
- Accent details: a framed sketch near the backsplash, salt cellar on a brass tray
Why This Reads High-End: Deliberate contrast plus real metal. The eye reads the weight at the bottom and the light at the top as architectural balance—like a well-tailored outfit.
How To Recreate This Look:
- Degloss and sand your cabinets; vacuum dust and tack-cloth surfaces.
- Prime with a bonding primer, then paint lowers in a deep, saturated satin.
- Paint uppers a warm cream—test next to your countertop first.
- Install aged brass hardware; mix knobs on uppers with pulls on lowers.
- Add warm under-cabinet light and switch your overhead bulbs to 2700K.
The Most Common Mistake: Choosing a stark blue-white for the uppers. It will clash with warm counters and make the brass read orange. Pick a cream with a touch of gray or yellow undertone.
Pro Styling Tip: Leave a 6-inch breathing zone on the counter at the end of a run—empty space photographs as “calm.”
4. Linen-Look Paint Technique with Stone Knobs and Quiet Shelving
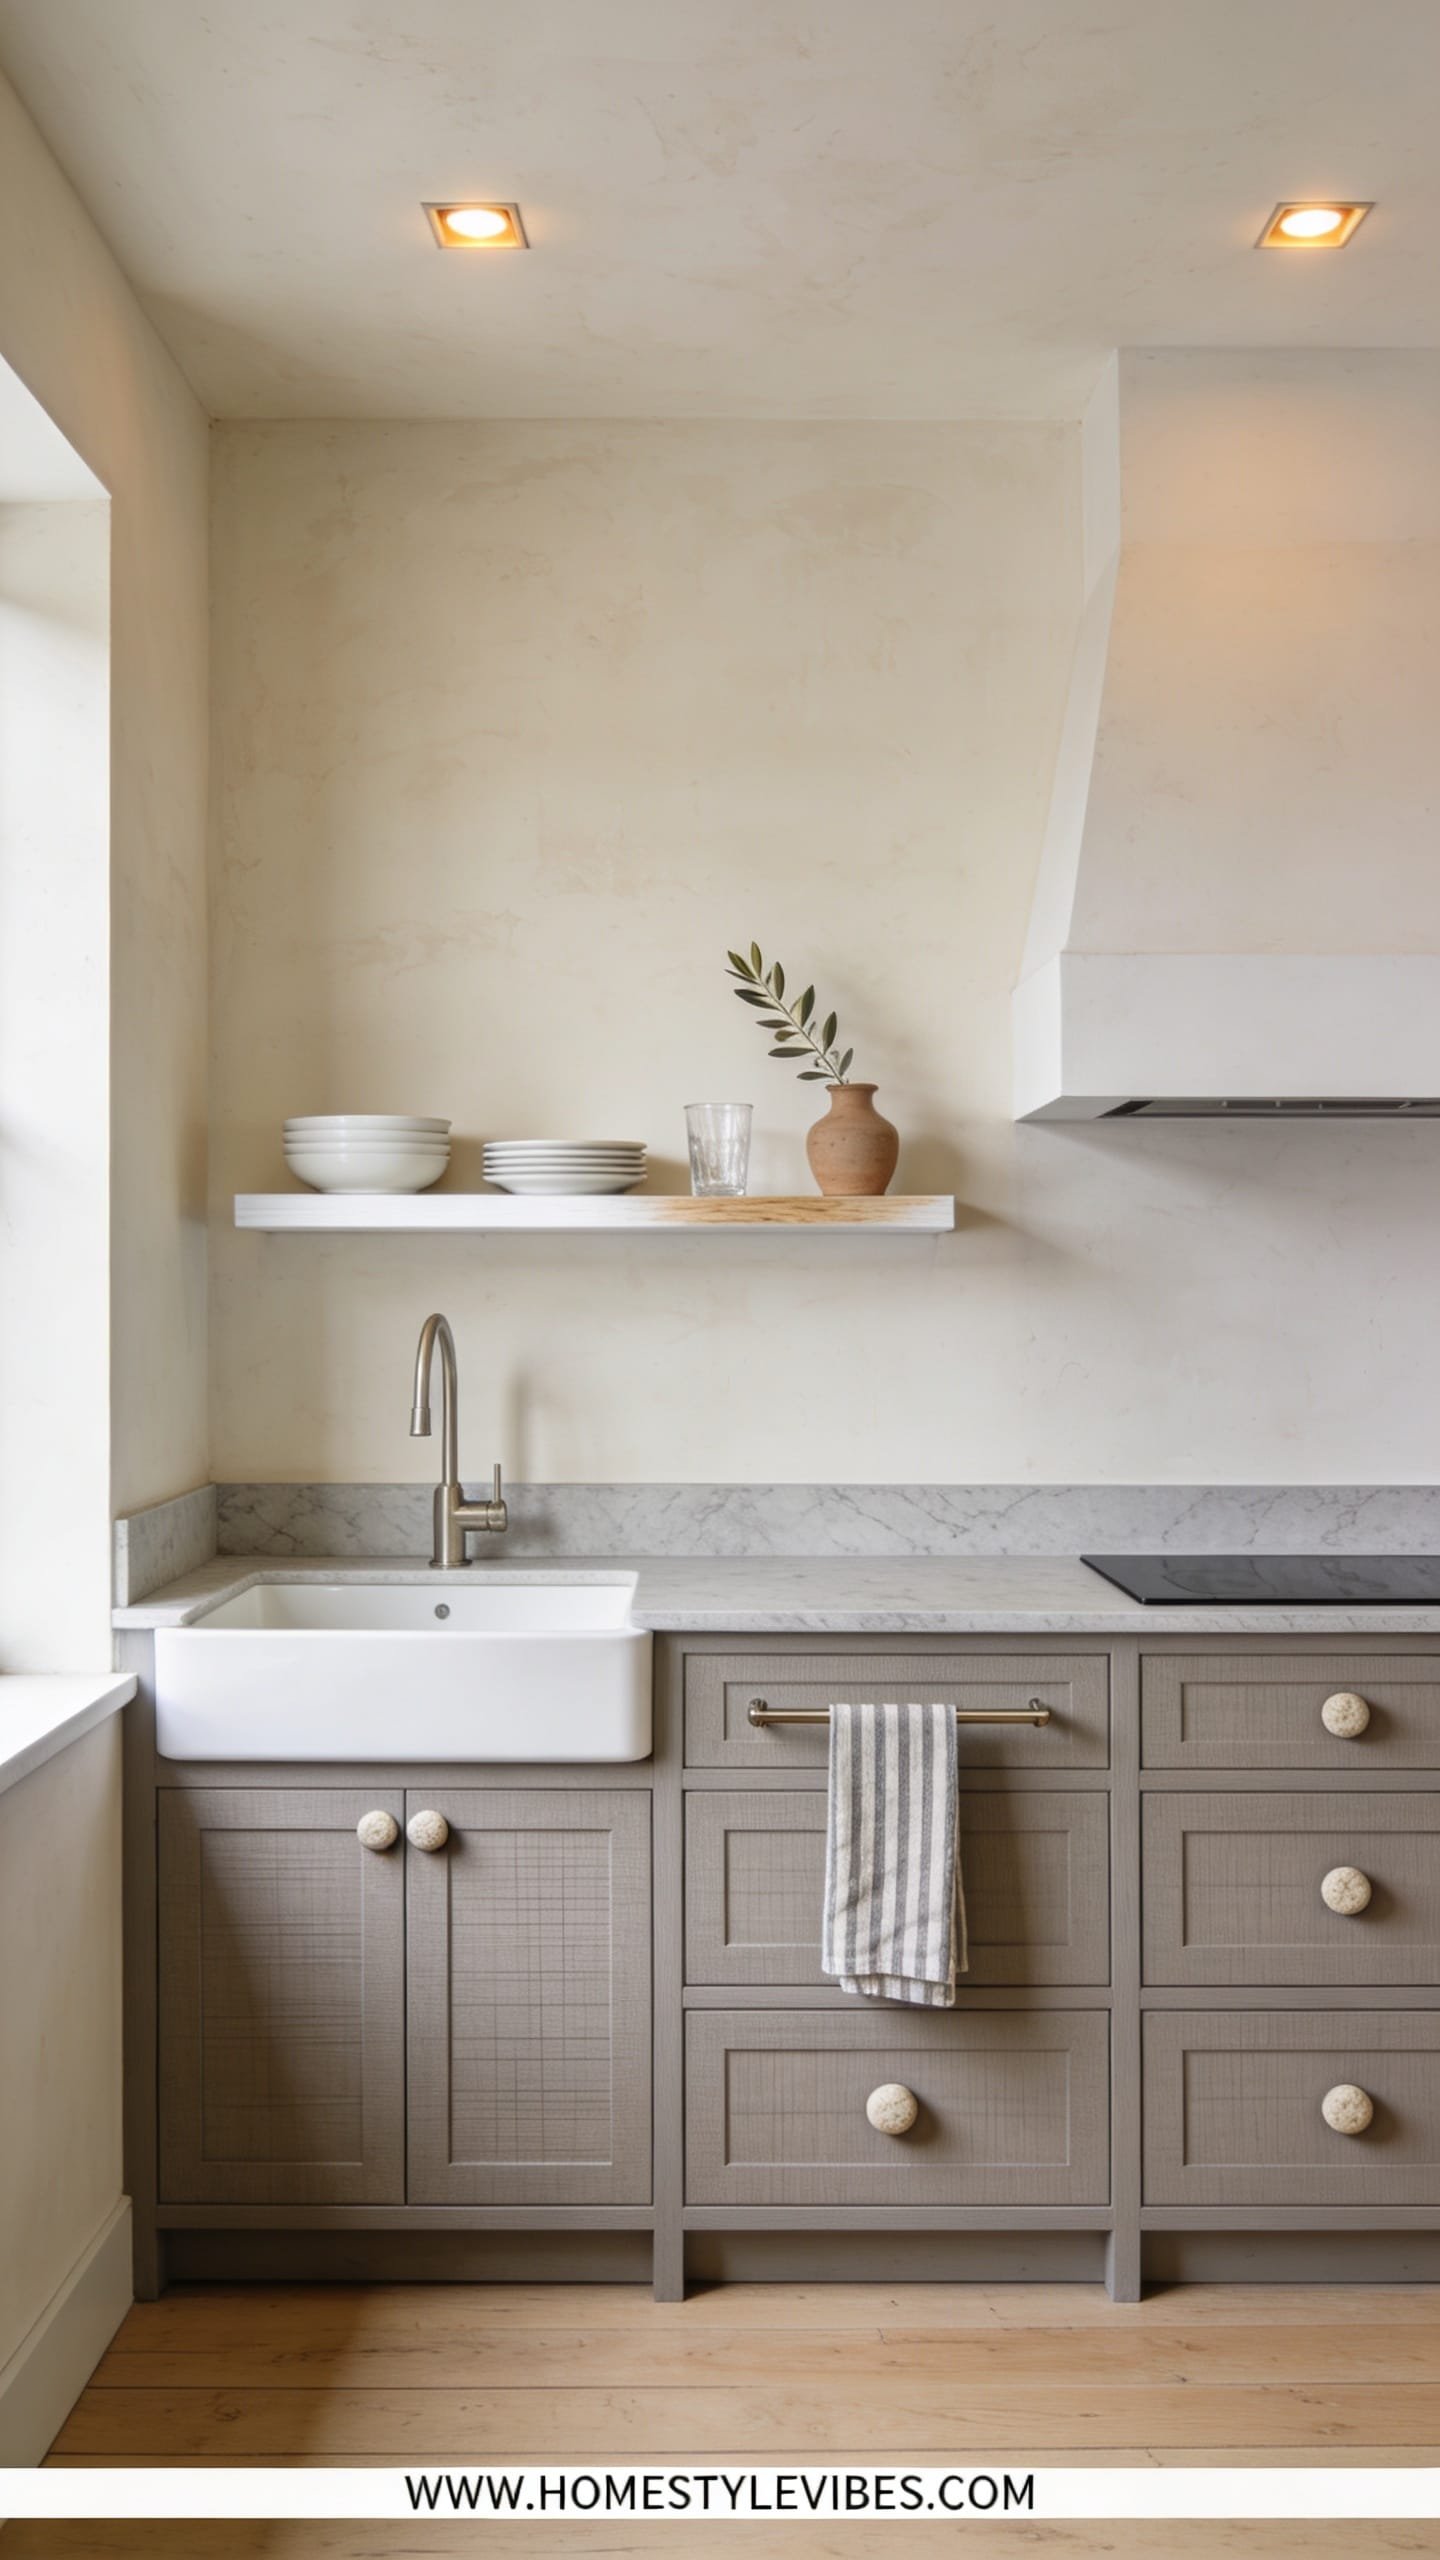
You’ve scrubbed, rearranged, and even bought new dish towels, but the cabinets still feel flat and a little plastic. I’ve been there. This makeover uses a subtle linen-look paint technique—think whisper texture, not faux finish—paired with stone knobs and a single quiet floating shelf. The vibe nods to boutique European rentals: clean, textured, and slightly artisanal.
In daily life, the gentle texture masks micro-impacts better than a dead-flat paint job and pairs nicely with hand-washable surfaces. Materials include a matte enamel base in a warm neutral, a dragged topcoat, and honed stone or travertine knobs. Lighting should be diffuse: consider a linen-shaded pendant or a frosted-glass flush mount to keep shadows soft. Cameras adore this look because the microtexture breaks up glare and creates depth; add one clean shelf for a curated still life and you’ve got instant editorial charm.
Variations: budget-friendly? Use wooden knobs painted to mimic stone and a DIY shelf with limewash. Small kitchen? Apply the linen technique only to the uppers. Darker version? Taupe or greige base with deeper rope-gray in the drag layer. Renter option: test the linen technique on the island only and swap in removable adhesive marble-look shelf behind the sink for a temporary vignette.
Budget Breakdown:
- Base paint + topcoat in complementary neutrals: $100 – $220
- Stone or travertine knobs: $120 – $400
- Single floating shelf and brackets or concealed hardware: $60 – $180
- Linen-shaded pendant or frosted flush mount: $90 – $300
- Tools: high-density foam roller, dry brush, dragging tool: $25 – $60
Total Estimated Cost: $395 – $1,160
Best For: Kitchens with hard surfaces that feel cold; spaces that need softness without losing practicality.
How To Recreate This Look:
- Clean, sand, and prime cabinets; roll on a matte neutral base.
- Mix a slightly darker or lighter topcoat; use a dry brush or dragging tool to create a fine, linen-like strié.
- Install stone-look knobs; keep shapes simple and tactile.
- Mount a single floating shelf near a natural light source for display.
- Swap in a linen-shaded pendant for diffuse, warm light.
Why This Looks Intentional: The finish is subtle but layered, and the tactile knobs repeat the stone story. Designers love a through-line—here it’s “soft texture.”
Don’t Do This: Avoid heavy, streaky texture. Keep the drag light and consistent. Practice on the inside of a door first—it’s tricky at the start, but once you nail the pressure, it’s zen.
Pro Styling Tip: On the floating shelf, style odd numbers and vary heights; leave a negative space pocket for the eye to rest—photos love it.
Before we go bold, take a breath. You don’t need every idea. Choose the one that solves your biggest daily annoyance and run with it. Momentum beats perfection.
5. Rattan + Cane Inset Doors with Putty Frames and Milk-Glass Pendants
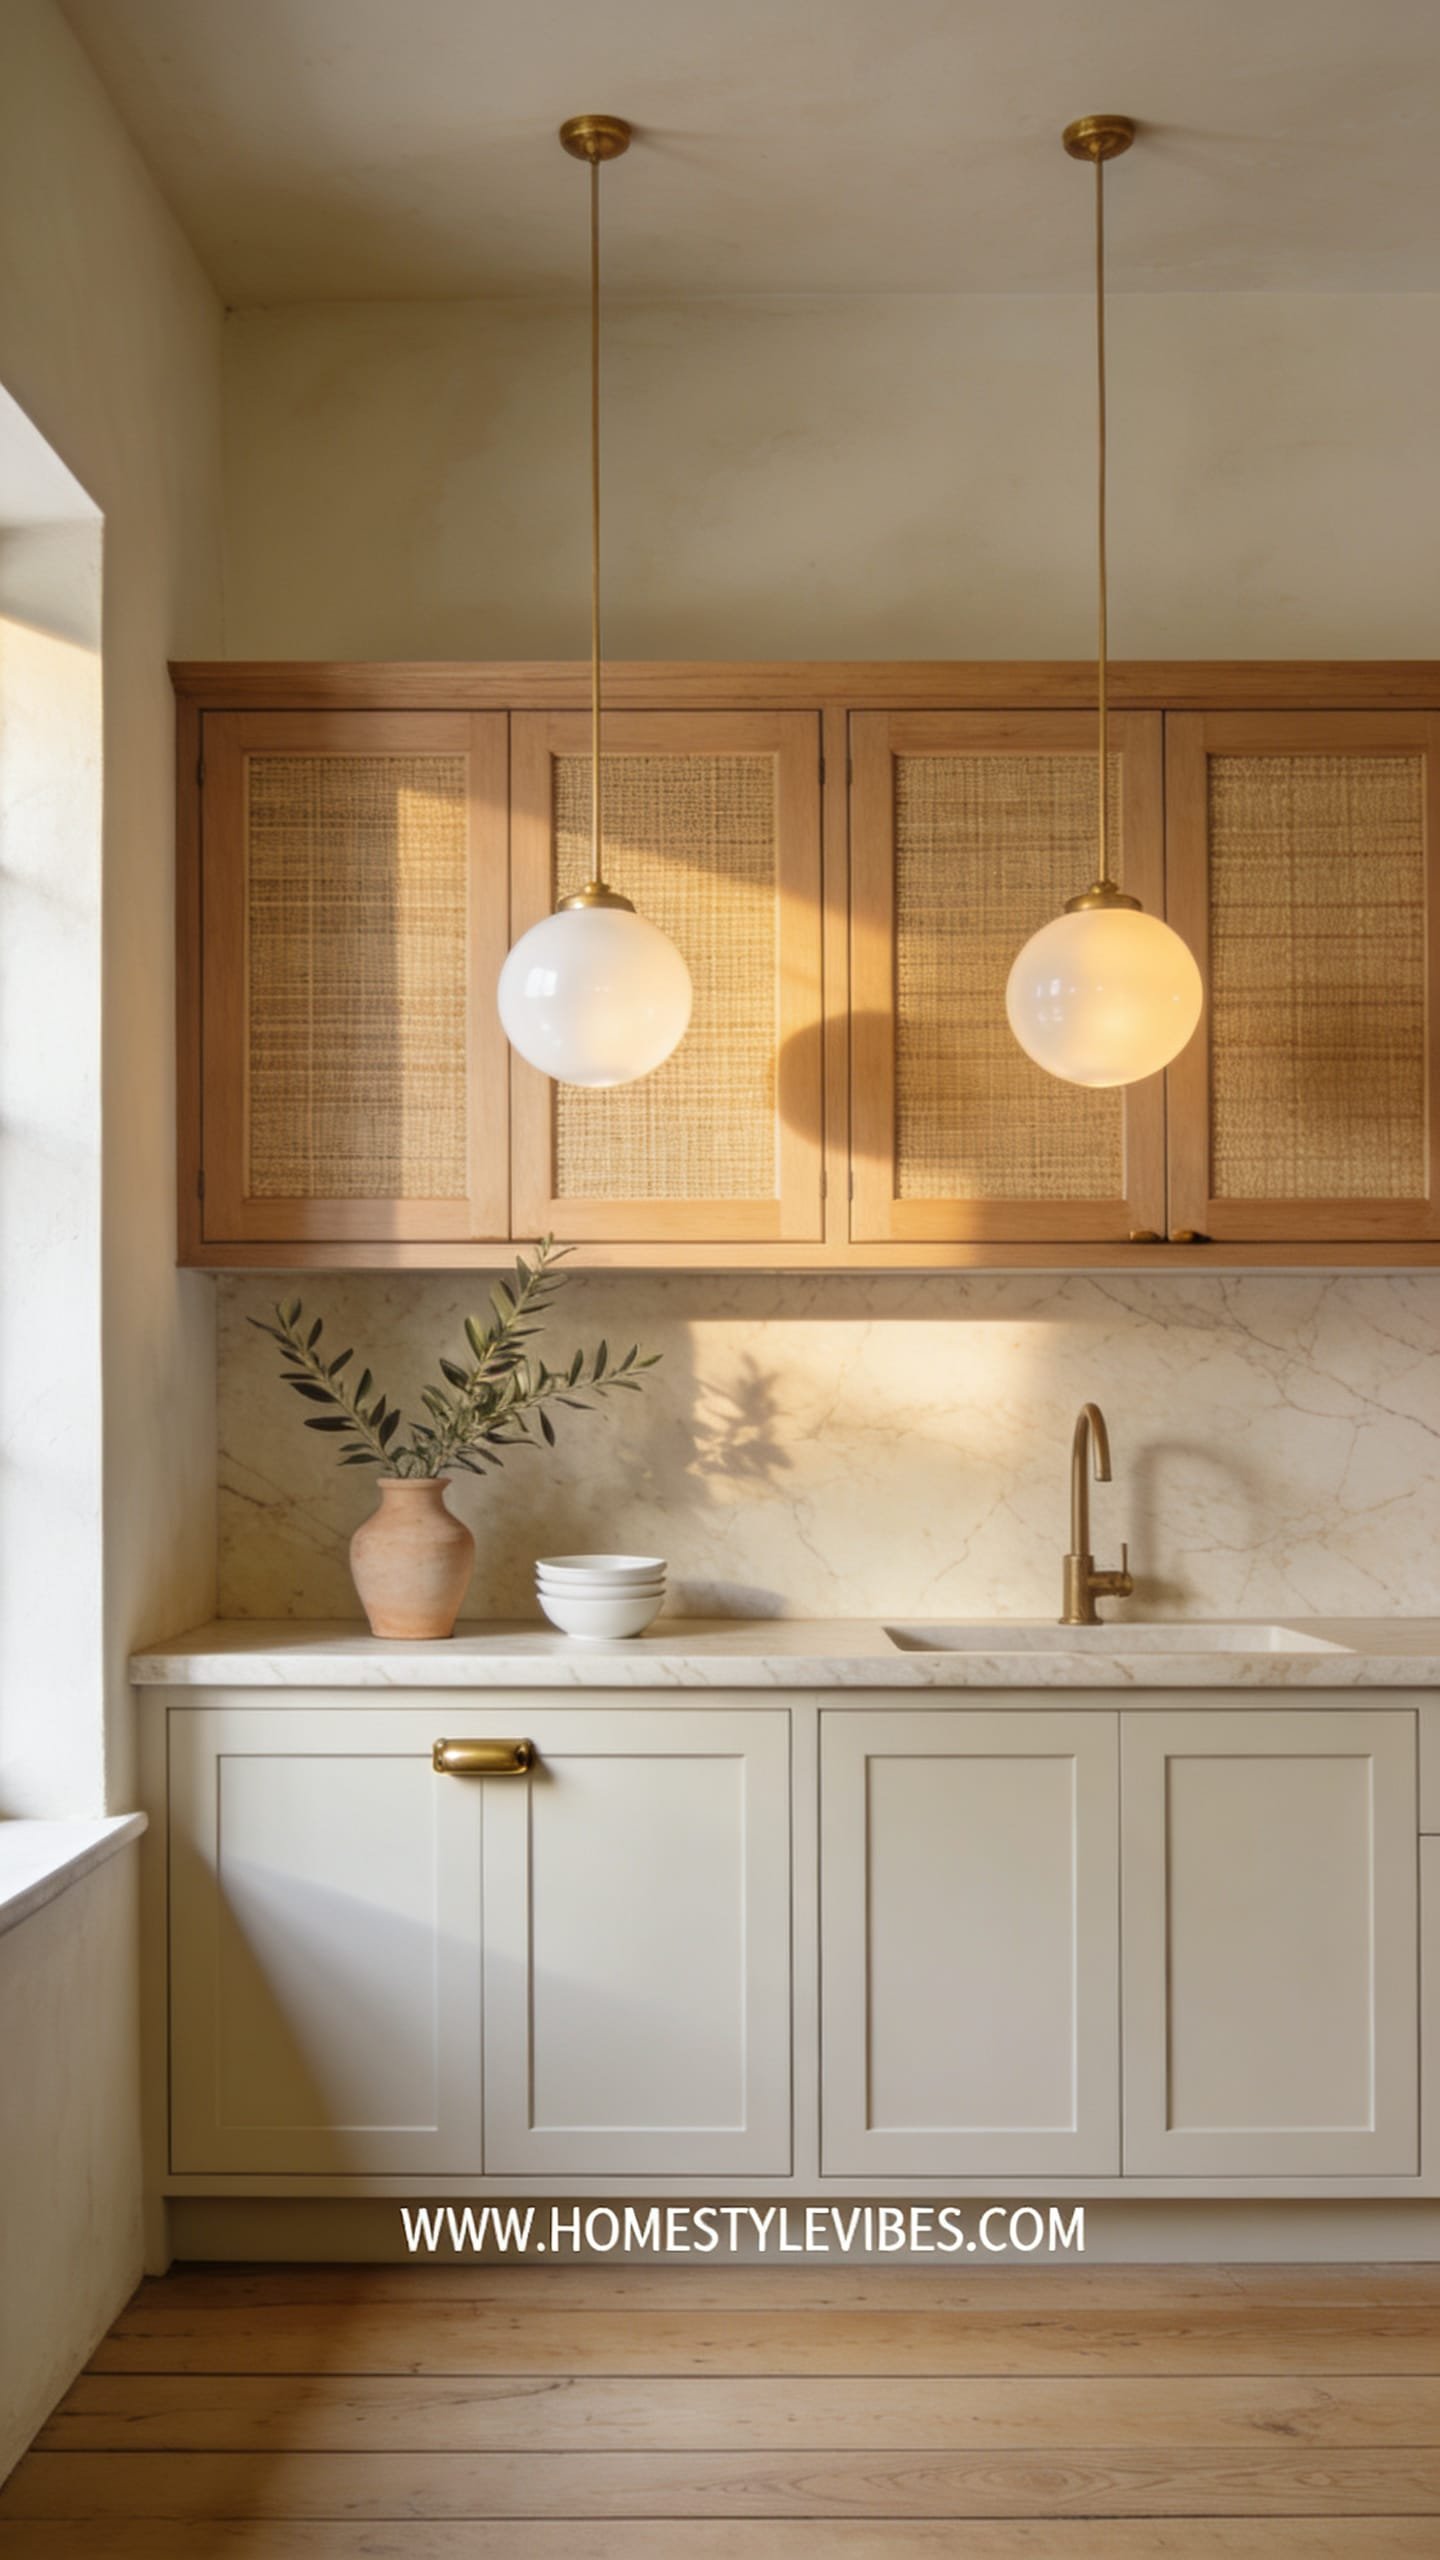
You crave natural texture, but your cabinets read synthetic and overly glossy. It’s frustrating when even fresh paint won’t add soul. Cane and rattan insets instantly warm up a sterile kitchen while letting light breathe through select doors. The mood channels modern Mediterranean cottage: breezy, organic, and sun-kissed.
Here’s why it works at home: cane hides visual clutter while hinting at texture, so your upper cabinets feel lighter without going fully open-shelf. Putty-colored frames prevent high-contrast chaos and keep the look relaxed. Milk-glass pendants round everything off and cast flattering, shadow-free light at night. Materials: pre-woven cane panels, putty-tone paint, slim-lipped frames, and simple latches or small brass knobs. Photographs adore the subtle weave and the way light blurs what’s inside—soft, romantic, not messy.
Variations: budget-friendly uses cane on just two upper doors and paint on the rest. Small kitchen? Choose cane only on the cabinet nearest the window. Darker version pairs cocoa frames with natural cane and blackened brass knobs. Renter-friendly: swap only the door fronts on an IKEA system and store the originals.
Budget Breakdown:
- Pre-woven cane or rattan: $60 – $220
- Door frame materials (poplar, MDF) and router bits: $80 – $240
- Putty-tone paint + primer: $70 – $160
- Milk-glass pendant(s): $120 – $420
- Small brass knobs or latches: $80 – $220
Total Estimated Cost: $410 – $1,260
Best For: Windowside upper cabinets; summer houses; anyone who wants airy storage without committing to open shelves.
Key Design Elements:
- Main materials: cane insets, putty paint, milk glass, warm brass
- Color palette: putty, sand, straw, blush-beige
- Lighting strategy: diffused pendants, daylight emphasis
- Furniture silhouettes: slim frame doors with inset panels
- Texture layers: woven cane, linen runners, terracotta
- Accent details: tiny brass latches, a pale stone fruit bowl
How To Recreate This Look:
- Remove select upper doors; cut center panels to create frames.
- Staple or spline the cane behind the frame, ensuring even tension; lightly mist cane first so it tightens as it dries.
- Prime and paint frames in a soft putty tone.
- Install discrete brass knobs or latches.
- Hang milk-glass pendants at eye level for flattering task light.
Why This Looks Expensive: Natural materials plus restraint. Using cane on only a few doors feels curated, not themed. The putty tone avoids the starkness that can make cane look cheap.
Watch Out: Don’t over-stretch cane; it can warp frames as it dries. Lightly mist, attach, and let it tighten naturally.
Pro Styling Tip: Keep interior contents pale—white dishes or clear glass—so the cane diffuses light and photos read clean.
6. Stone-Forward Makeover: Slim Backsplash Ledge, Counter-to-Ceiling Slab, and Hardware Disappears
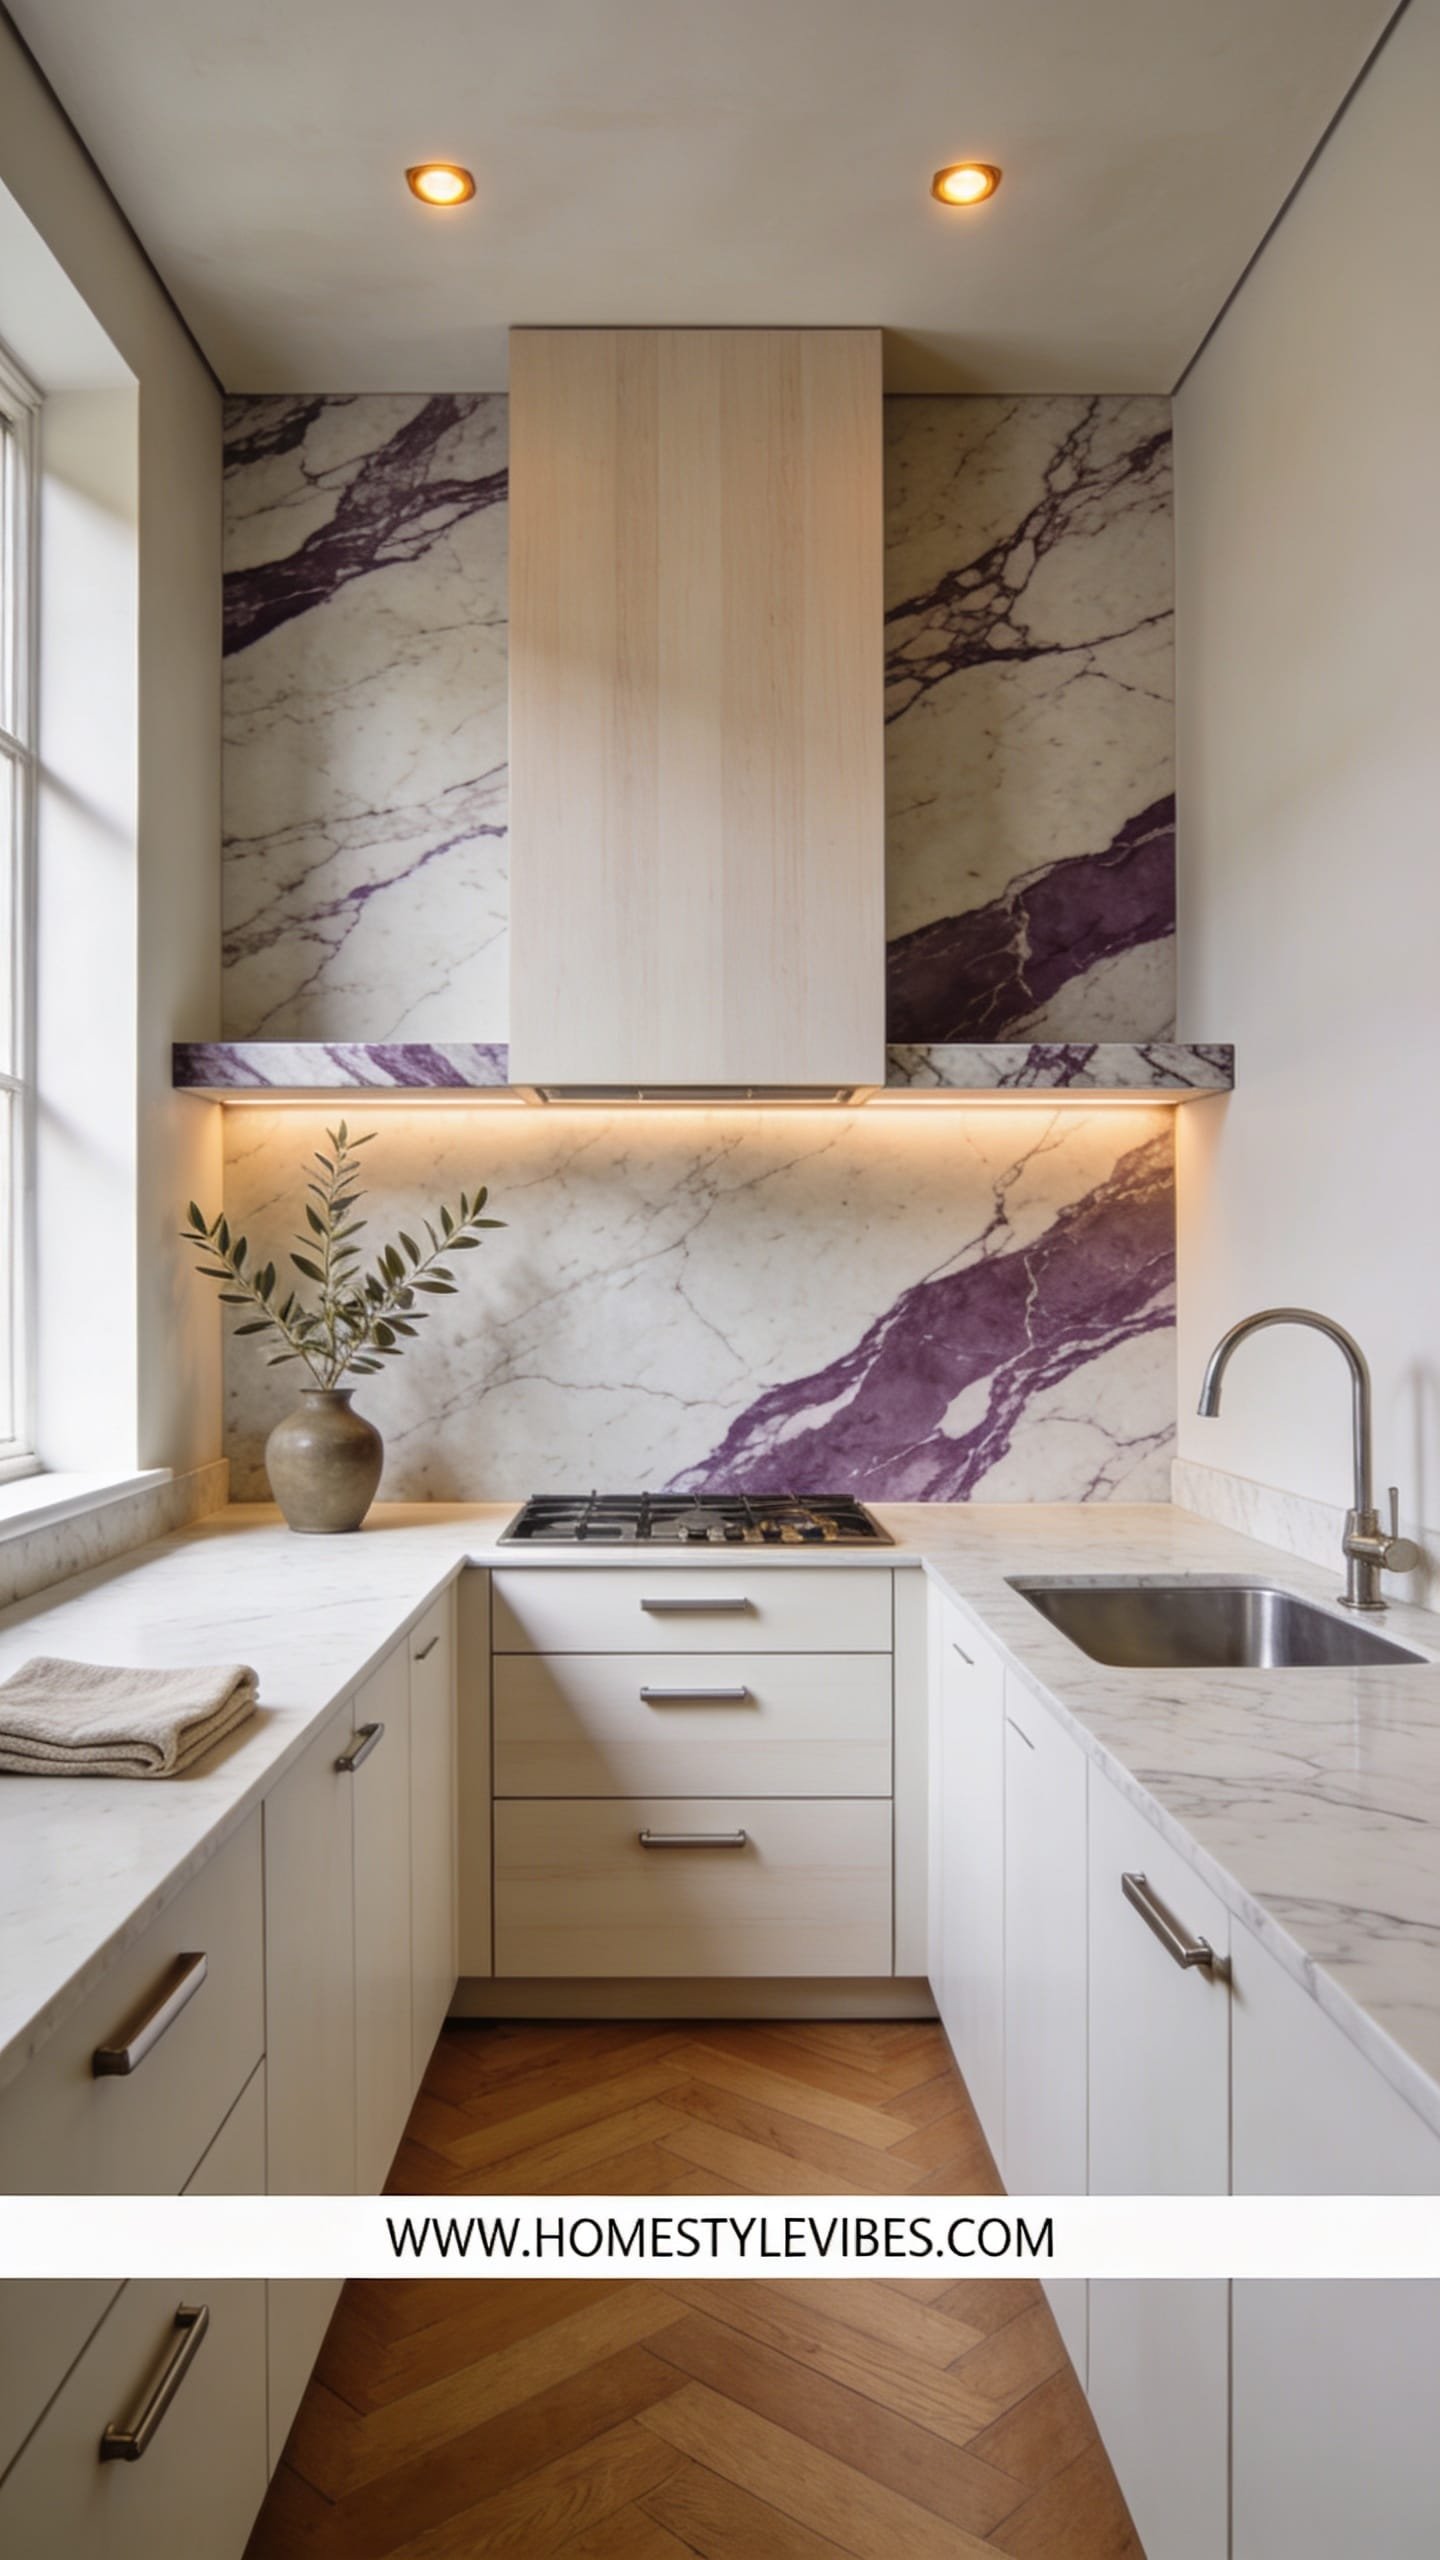
You envy those editorial kitchens where the stone takes center stage, but your cabinets hog all the attention. You’ve replaced hardware and added shelves, but the look stays choppy. This makeover makes the stone the star: run the backsplash to the ceiling behind the range or sink, add a slim ledge, and keep cabinet faces quiet with integrated pulls or touch latches. The mood screams boutique-hotel suite kitchen—elegant, sculptural, and serene.
It works in real life because the strong stone moment focuses the eye, which instantly makes standard cabinets feel custom. Lighting counts: a narrow picture light above the slab or a pair of minimal wall spots turn texture into drama. Materials: a stone remnant or porcelain slab for budget-friendliness, integrated rail pulls, and flat, uninterrupted faces. Photographically, you’ll get depth from veining, a crisp vertical shot with the ledge, and gorgeous highlights where light skims the stone.
Variations: budget route uses large-format porcelain tile with minimal grout for a slab effect. Small kitchen? Do a single feature panel behind the sink. Darker mood? Choose soapstone-look porcelain, then warm things up with linen shades and brass rail pulls. Renter-friendly: faux slab panels with removable adhesive solely behind the range (use with caution and proper clearances) plus a tiny ledge shelf hung on studs, not tile.
Budget Breakdown:
- Stone remnant or porcelain slab/tile: $300 – $1,800
- Slim stone or wood ledge: $80 – $240
- Integrated pulls or touch latches: $120 – $380
- Picture light or wall spots: $120 – $360
- Adhesives, sealers, and install materials: $60 – $180
Total Estimated Cost: $680 – $2,960
Best For: Kitchens with a decent focal wall; homeowners who want high-impact visuals with minimal cabinet changes.
How To Recreate This Look:
- Select a stone or porcelain with subtle, elegant veining that complements your cabinet finish.
- Run the slab or large-format tile to the ceiling on one wall; keep grout lines micro-thin if using tile.
- Add a 1–1.5 inch deep ledge midway for oils and a candle; keep it minimal.
- Replace visible pulls with integrated rails or push latches on key runs.
- Install a picture light that grazes the stone for evening drama.
Why This Feels Designer: Monolithic moves—floor-to-ceiling elements—make a space feel custom. When stone dominates, everything else reads as quietly intentional.
One Thing To Avoid: Busy countertops plus busy backsplash. Pick one star. If the slab is expressive, keep counters simple.
Pro Styling Tip: On the ledge, group two bottles and one small sculptural object; keep labels minimal so photos don’t feel cluttered.
Almost there. The next idea is for the night owls who crave glow and a touch of drama.
If you’re feeling overwhelmed, zoom in on one wall, one bank of cabinets, or even just the island. Edit and layer. Small controlled changes feel surprisingly major once you live with them a week.
7. The Evening Kitchen: Reeded Glass Uppers, Charcoal Stain, and Ribbon Lighting
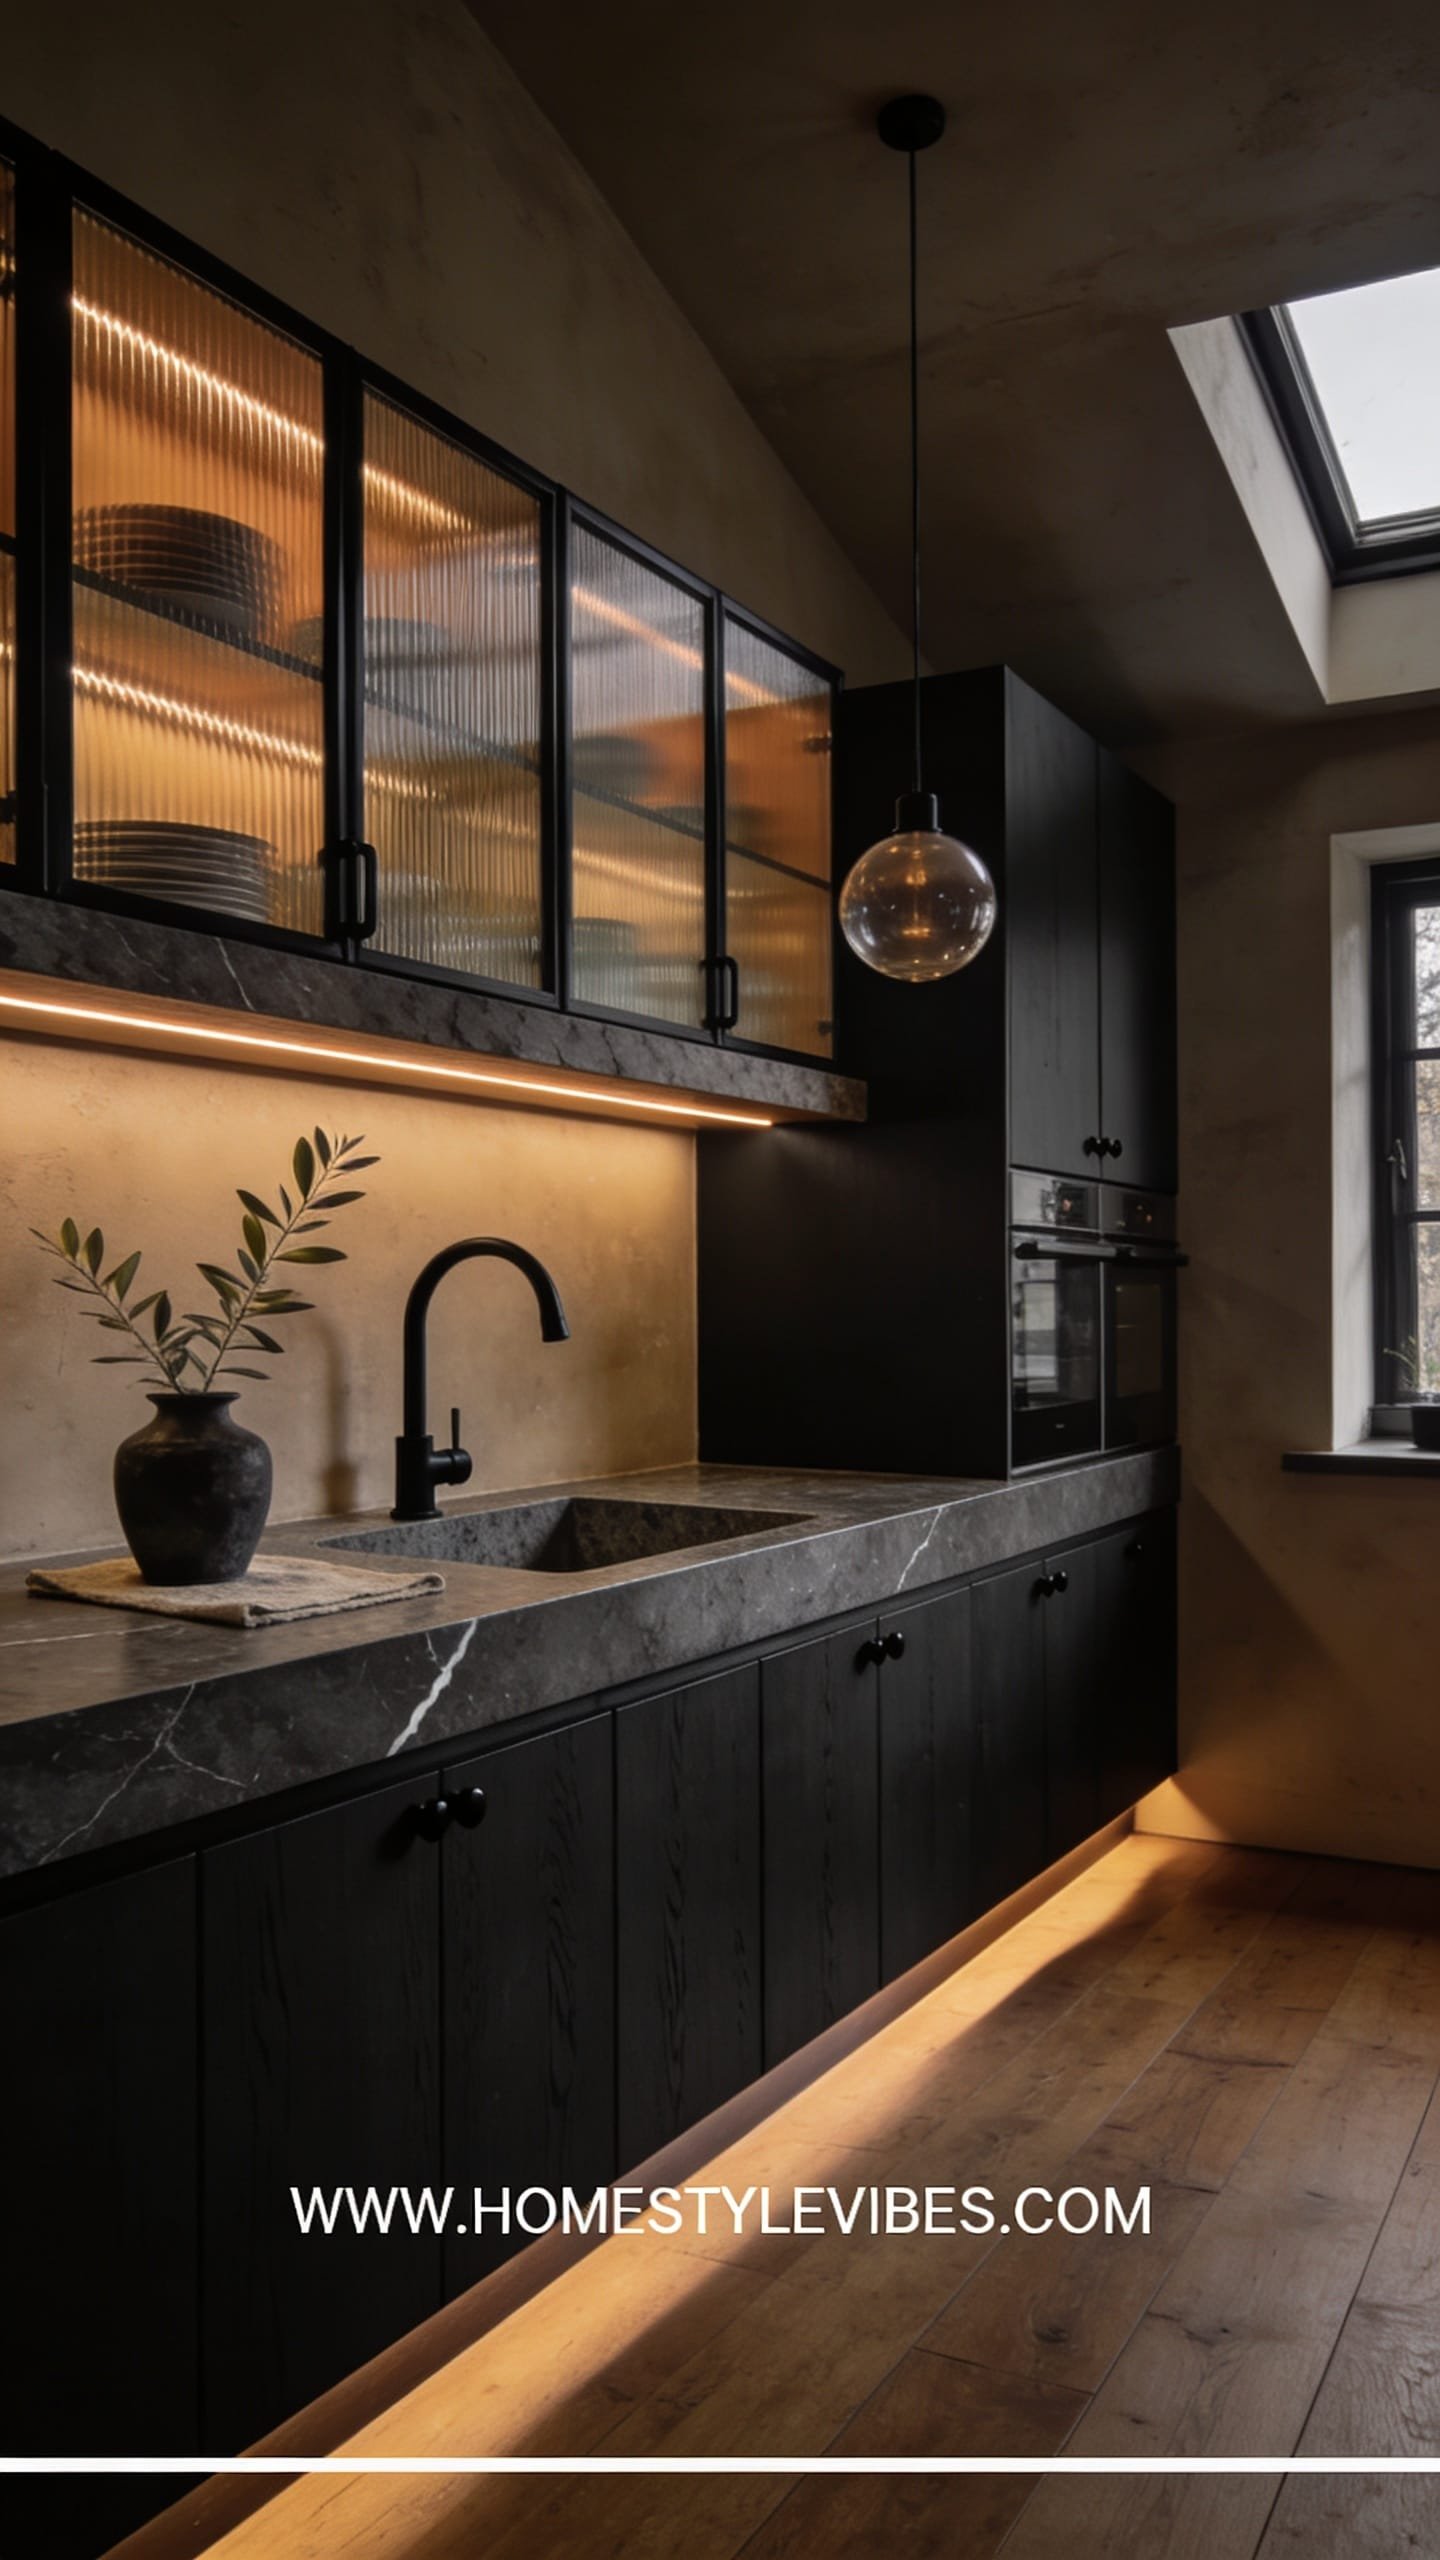
You’ve got decent cabinets, but after sunset the kitchen goes flat and a bit gloomy. You’ve tried brighter bulbs, but they make everything look harsh and cafeteria-lit. This design turns your kitchen into a cozy evening lounge with reeded glass uppers, charcoaled wood stain on lowers, and continuous “ribbon” lighting tucked into reveals and toe-kicks. The mood is modern speakeasy meets family-friendly—dramatic but warm, grown-up but practical.
Why it works at home: reeded glass blurs dishes and lets the light inside the cabinets glow softly like lanterns. Charcoal stain adds depth while preserving wood grain, so it stays warm, not dead. Ribbon lighting under toe-kicks and within cabinet frames creates floating effects that feel high-tech but cozy. Materials: smoked or reeded glass inserts, stain-and-seal system, dimmable LED tape, and a strong dimmer setup. On camera, the internal glow behind the glass and the gentle halo at the toe-kick create layers of light that feel cinematic.
Variations: budget version uses reeded acrylic instead of glass and stains only the island. Small space? Keep lowers medium walnut and add ribbon lighting for float, then upgrade just two upper doors to reeded glass. Darker version uses almost-black stain with warm 2400–2700K LEDs. Renter-friendly: rechargeable LED ribbons and clip-in acrylic panels that sit inside door frames.
Budget Breakdown:
- Reeded glass or acrylic panels: $120 – $420
- Charcoal stain + topcoat: $60 – $160
- Dimmable LED tape + drivers + dimmer: $150 – $420
- Interior cabinet puck lights: $60 – $180
- Misc install (edge profiles, clips, sandpaper): $40 – $100
Total Estimated Cost: $430 – $1,280
Best For: Households that cook in the evening; entertainers who want mood lighting that still functions for prep.
Key Design Elements:
- Main materials: reeded glass, stained wood, dimmable LEDs
- Color palette: charcoal, deep walnut, warm white light, softened brass
- Lighting strategy: interior cabinet glow, toe-kick ribbon, dimmable overhead
- Furniture silhouettes: slab or slim shaker with glass upper inserts
- Texture layers: visible wood grain, fluted glass, weaves in rugs
- Accent details: smoked bronze hardware, dark vintage rug runner, a bowl of figs for color
How To Recreate This Look:
- Pop out upper door center panels; replace with reeded glass or acrylic.
- Lightly sand lowers; apply charcoal stain and a satin topcoat to keep the grain visible.
- Install dimmable LED tape at toe-kicks and within upper cabinet frames; hide drivers in a base cabinet.
- Add interior puck lights to glass-front uppers for lantern glow.
- Switch your wall controls to dimmers and set nighttime scenes.
Why This Looks Expensive: Layered lighting. When light appears to come from multiple depths—inside cabinets, under bases, overhead—the space reads custom and considered.
The Most Common Mistake: Using cool LEDs. Cool light turns food gray and makes stain look ashy. Stick to 2400–3000K.
Pro Styling Tip: For photos, kill the overheads and let the cabinet and toe-kick glow do the work; the shadows will look moody, not murky.
Small confession: the first time I tried toe-kick LEDs, I installed them an inch too far back and lost the “float.” It’s a tiny detail, but bringing the strip forward so the light grazed the floor made all the difference.
Quick Checklist
- Warm under-cabinet LED strips (2700–3000K)
- Brushed brass or bronze hardware in consistent profiles
- Adhesive veneer or reface kit for door fronts
- Fluted trim or MDF for ribbed cabinet faces
- Two-tone paint plan: deep lowers, creamy uppers
- Subtle linen-look paint technique tools
- Stone or travertine knobs
- Selective cane or rattan insets for upper doors
- Milk-glass or linen-shaded pendants
- Counter-to-ceiling slab or large-format tile
- Slim backsplash ledge for oils and display
- Integrated pulls or push latches to simplify faces
- Reeded glass for select upper doors
- Dimmable ribbon lighting for toe-kicks and reveals
- High-quality primer and satin enamel for durability
Frequently Asked Questions
How much should I budget for a kitchen cabinet makeover that feels like a full renovation?
Most of these projects land between $350 and $3,000 depending on scope. Painting and hardware swaps usually stay under $1,000. Adding fluting, cane, or glass might push it to $1,200–$2,000. A stone-forward backsplash wall can reach $3,000 if you choose real slab, but porcelain tile keeps costs lean.
I’m nervous about dark lowers. Will they make my small kitchen feel smaller?
Not if you keep uppers light and add warm under-cabinet lighting. Dark lowers ground the room, hide scuffs, and create a balanced horizon line. In tiny kitchens, choose deep slate over pure black and keep hardware slender to avoid visual bulk.
What if I rent and can’t change the cabinets permanently?
Focus on reversible moves: adhesive veneers, new hardware you can keep, rechargeable under-cabinet lights, reeded acrylic panels that sit in existing frames, and painting only a removable island. Keep original parts labeled and safe to swap back.
How do I keep these finishes looking good with kids and daily cooking?
Choose satin or matte enamel for wipeability, dimmable warm LEDs that hide smudges at night, and hardware with enough projection for easy grip. Fluted panels and linen-look textures disguise small dings. Seal cane and stone knobs with an appropriate protectant if splashes are frequent.
What’s the biggest mistake people make with kitchen cabinet makeovers?
Ignoring undertones and lighting. A paint color that looks perfect in the store can skew green or pink under your bulbs. Test samples next to your counters and turn on evening lights. Also, avoid mixing too many hardware styles—consistency looks planned.
Final Thoughts
Pick one idea that solves your biggest irritation and start there. Maybe it’s the flat, lifeless doors—go fluted. Or the harsh evening light—add ribbons and reeded glass. You don’t need a brand-new kitchen to change how it feels; you need the right sequence: texture, lighting, restraint.
The truth is, luxury in a kitchen comes from quiet layers: the way light grazes a surface, the warmth of a metal finish, the repeat of a single line or texture. These seven kitchen cabinet makeover ideas aim for that—photogenic, functional, and calm. Start small, stay consistent, and give yourself a weekend to live with each change before moving on.
You’ve got this. Seriously. The next time you flip on the lights and see soft shadows dancing across your cabinets, you’ll wonder why you waited so long.

About the Author

Krisztina P.Rendes, Founder of Home Style Vibes
Founder of Home Style Vibes
Krisztina Puskásné Rendes created Home Style Vibes as a cozy-modern lifestyle space where homemaking meets inspiration. Her goal is to help women create beautiful, organized, and peaceful homes they truly love — without overwhelm. You’ll find here heart-driven content on home decor, cleaning tips, easy family recipes, organization and decluttering, DIY home projects, plants, and seasonal ideas — all designed to bring more calm, comfort, and style into everyday life.