7 DIY Christmas Tree Ornaments That Look Like Heirlooms
You want a Christmas tree that looks storied and soulful—like it’s been loved for generations. You hate that your ornament box feels like a mishmash of whatever was on sale last year. Here’s the truth: that heirloom look isn’t about luck at the antique store. It’s about choosing the right materials, finishes, and little time-worn details—and yes, you can DIY it. These 7 DIY Christmas tree ornaments that look like heirlooms deliver that cottage-and-vintage glow: cream and sage, soft gold, aged whites, gingham ribbon, dried oranges, tiny bottle-brush trees, and hand-touched textures that feel like they were pulled from Grandma’s attic (in the best possible way).
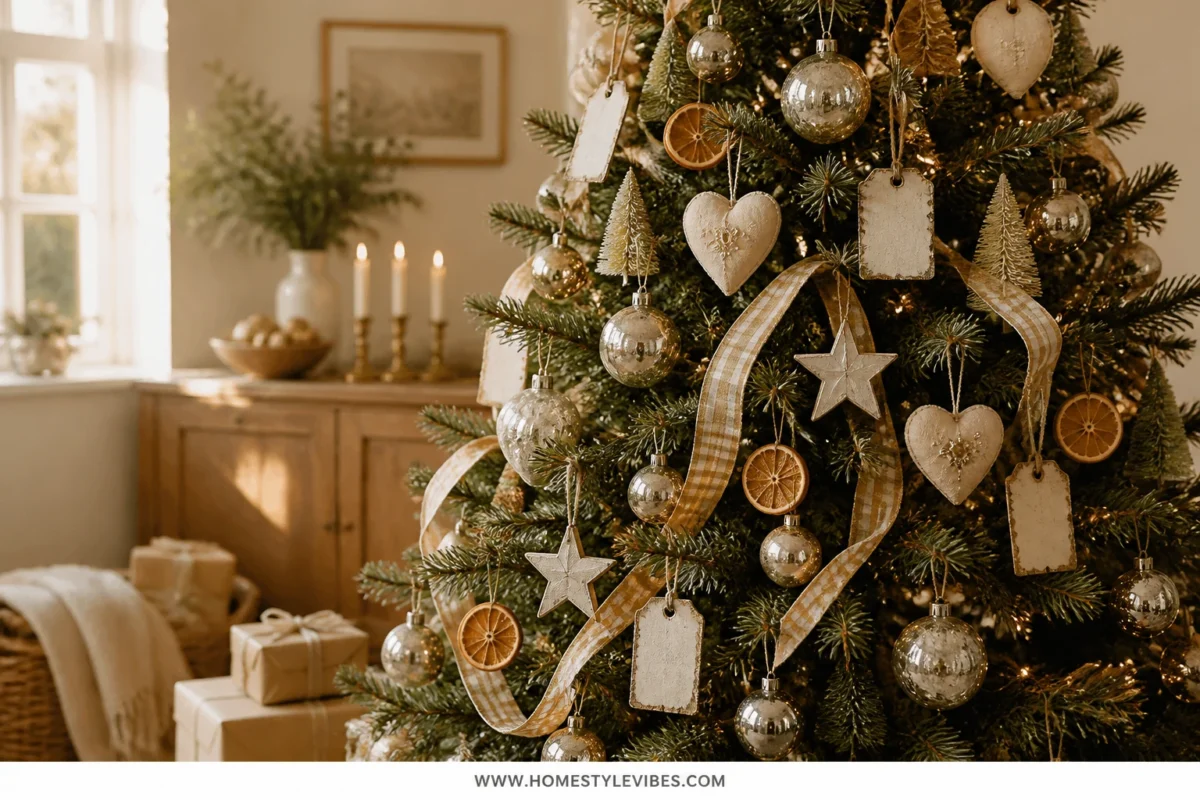
We’ll build pieces that look convincingly old—no glitter explosions, no neon. Think: faux mercury glass, embroidered felt with tiny seed beads, paint-washed wood, and aged paper with soft deckled edges. I’ll keep the materials accessible and the steps doable after dinner. Budget-wise, plan for a handful of $10–$20 projects you can make in batches. The result? A tree with consistent color, warm candle glow (flameless, of course), and ornaments that photograph beautifully and actually feel like they belong together. These are Pinterest-worthy but built for real life—and they’ll nest into your storage bin and come back better each year. If you love a storybook vibe with a touch of nostalgia, this is your season.
1. Antiqued Mercury-Glass Baubles with Soft Gold Gingham on the Tree
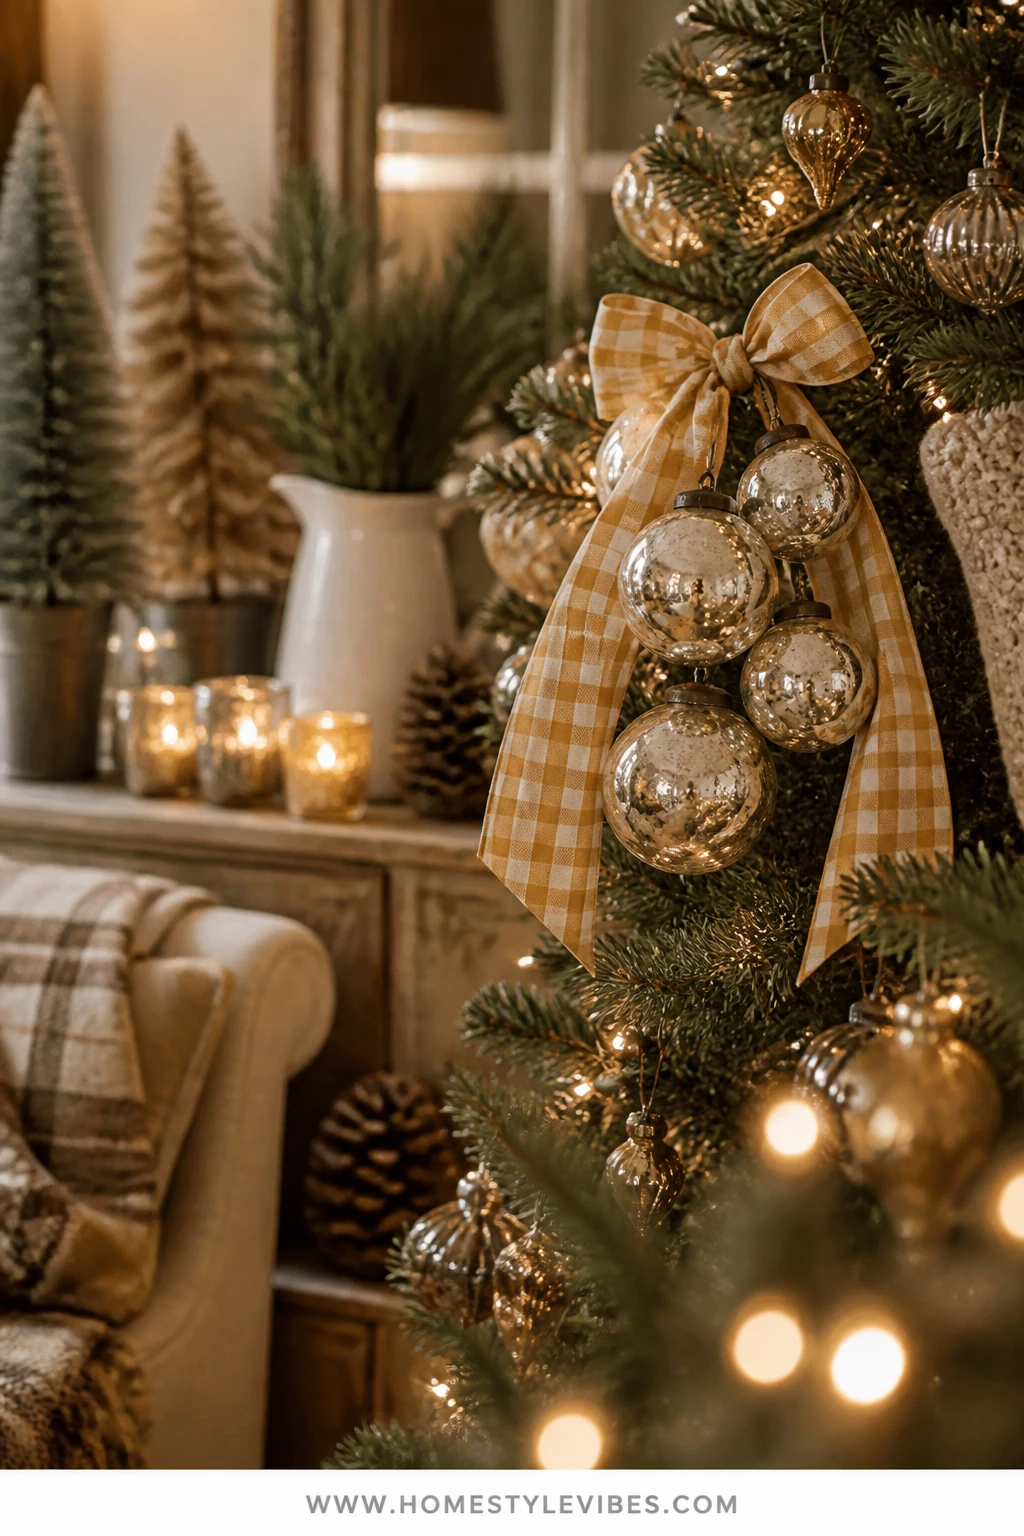
We’ve all been there: your tree goes up, the lights are twinkling, and then those shiny store-bought balls feel a little…flat. This DIY creates that European flea-market shimmer without the treasure hunt. The mood is cottage-and-vintage to the core—antiqued silvering, soft gold ribbon tails, and the clink of glass that looks much pricier than it is. On a lit tree, these bounce warm reflections and create the prettiest bokeh in photos.
Why it works in real homes: these are batch-friendly, forgiving to make, and you control the palette so everything finally looks cohesive. Warm white lights against the slightly mottled “mercury” finish read rich and timeworn. I tried this on my own tree last December and honestly couldn’t believe the difference—suddenly the whole tree looked curated instead of chaotic. Store them wrapped in tissue and they’ll look just as good next year.
Variations: Try ivory velvet ribbon instead of gingham for a quieter look. For homes with small kids, do this treatment on shatterproof plastic ornaments—the finish still looks charming, minus the heart-stopping glass moments. Make-ahead: antique them in November and tie the bows the night you trim the tree for a fresh, crisp ribbon look.
Supplies and Cost:
- Clear glass or shatterproof ornaments (set of 12): $10–$20
- Mirror effect spray paint or silver leafing kit: $8–$15
- White vinegar + water in a mist bottle: $2
- Soft gold gingham or ivory velvet ribbon: $5–$10
- Cotton swabs, painter’s tape, gloves: $3–$5
Total Estimated Cost: $25 – $45 for 12–16 baubles
Time and Skill Level: 60–90 minutes active time, plus drying · Easy
Best For: Traditional or cottage homes that crave warmth and cohesion from Thanksgiving weekend through New Year’s; beautiful on full, classic trees or slimmer pencil trees in corners.
Key Design Elements:
- Main holiday props: faux mercury-glass ornaments, gingham/velvet ribbon
- Color palette: aged silver, ivory, soft gold, sage
- Lighting strategy: warm white string lights for gentle glow and reflection
- Textile and ribbon layers: narrow 3/8″ or 5/8″ ribbons tied in long tails
- Greenery and natural elements: fresh or faux cedar branches to soften glare
- Accent details: small brass hooks instead of wires for a refined hang
How To Make It:
- Remove ornament tops and tape the edges to protect the metal caps.
- Lightly mist the inside or outside of each ornament with a 50/50 vinegar-water mix for that mottled, pitted look.
- Spray a thin layer of mirror effect paint; let it bead where the vinegar sits. Blot gently with a paper towel for variation.
- Repeat 2–3 light coats, letting each dry 5–10 minutes. Rotate for even aging.
- Once dry, remove tape and reattach tops; thread with soft gold gingham or velvet ribbon.
- Tie generous bows or long tails; trim ends on a diagonal for a finished look.
- Hang near light clusters so the antique patina catches gentle glimmers.
Why This Looks Expensive: The real trick is restraint—thin, layered mottling, not heavy coverage. The subtle aging plus tailored ribbon reads vintage, not crafty.
Watch Out: Don’t over-spray. Thick coats look like chrome, not mercury. If that happens, re-mist with vinegar-water and dab to break up the sheen.
Pro Styling Tip: Hang these first at varying depths on the branches, then tuck warm lights just behind them to capture luminous halos in photos.
2. Hand-Embroidered Felt Cameos with Cream Wool and Sage Thread on Mid-Tree Branches
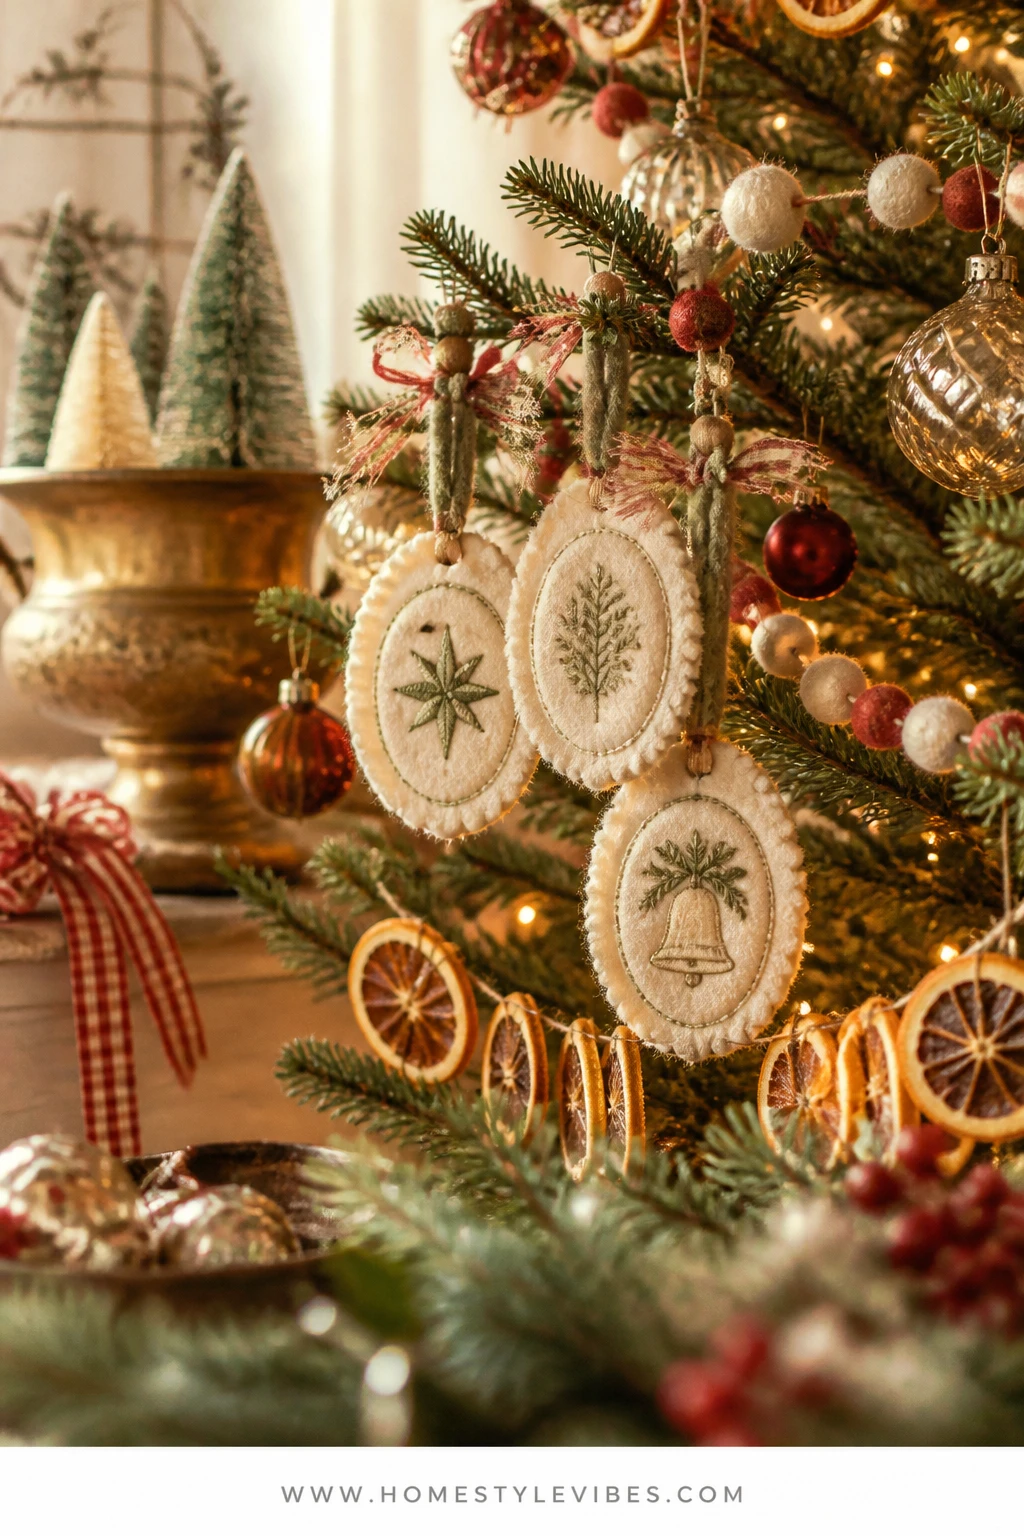
It’s that one part of the tree that always feels flat—the middle where everything sinks visually. You’ve tried bigger baubles, but it still lacks personality. Enter hand-embroidered felt cameos: layered wool ovals with tiny motifs (a star, an evergreen sprig, a bell) stitched in sage and cream. They’re soft, storybook, and whisper “keepsake.” On the tree, they add beautiful matte texture that balances the sparkle elsewhere.
The atmosphere they create is gentle and nostalgic. Felt mutes glare, so these sit happily near brighter ornaments without competing. They’re beginner-friendly and soothing to make while you binge a cozy show. Low-mess, highly packable, and kid-safe. Make a batch in early November and add more as December unfolds. Come January, a few neutral ones can hang on a branch in a crock as quiet winter decor.
Variations: Add tiny seed beads for a hint of old-world sparkle. For a small-space tree, scale them down to 2-inch mini cameos and cluster three together on a single branch for impact without bulk.
Supplies and Cost:
- Wool felt sheets in cream, sage, and soft gold: $6–$10
- Embroidery floss (sage, cream, soft gold): $3–$6
- Embroidery needles, small scissors: $5
- Soft twine or narrow ribbon for hanging: $2–$4
- Optional tiny seed beads: $3
Total Estimated Cost: $15 – $25 for 8–12 cameos
Time and Skill Level: 2–3 hours for a dozen (hello, movie night) · Beginner
Best For: Families who love handmade touches; looks beautiful on traditionally lit trees or slim Scandinavian-style trees needing warmth.
Key Design Elements:
- Main holiday props: oval felt layers, embroidery motifs
- Color palette: cream, sage, soft gold accents
- Lighting strategy: nestle near warm lights for soft highlights on stitches
- Textile and ribbon layers: wool felt + twine or skinny ribbon hangers
- Greenery and natural elements: tuck near cedar-heavy areas for a tonal look
- Accent details: blanket stitch edging for a finished, heirloom border
How To Make It:
- Cut two ovals per ornament: a larger cream base and a slightly smaller sage top.
- Lightly sketch a simple motif on the top layer: star, evergreen, bell, or sprig.
- Backstitch the motif in cream or soft gold; add a few seed beads if desired.
- Layer top over base and blanket stitch the edges together in a contrasting floss.
- Attach a loop of twine or ribbon at the top between layers as you stitch closed.
- Steam lightly to smooth; let cool flat before hanging.
Why This Feels Designer: Tone-on-tone embroidery and clean edges read as boutique, not craft hour. Repeating a simple set of motifs ties the tree together visually.
One Thing To Avoid: Overly detailed designs. Keep lines simple so they read from a few feet away; fussy motifs get lost in the branches.
Pro Styling Tip: Hang these mid-depth, not just on the branch tips; it creates soft layers that photograph like a cozy storybook illustration.
Remember, this isn’t about recreating a showroom. It’s about making a tree that feels like your family—history-rich, easy to live with, and quietly wow.
3. Pressed-Flower Glass Frames with Ivory Ribbon by the Window-Facing Side
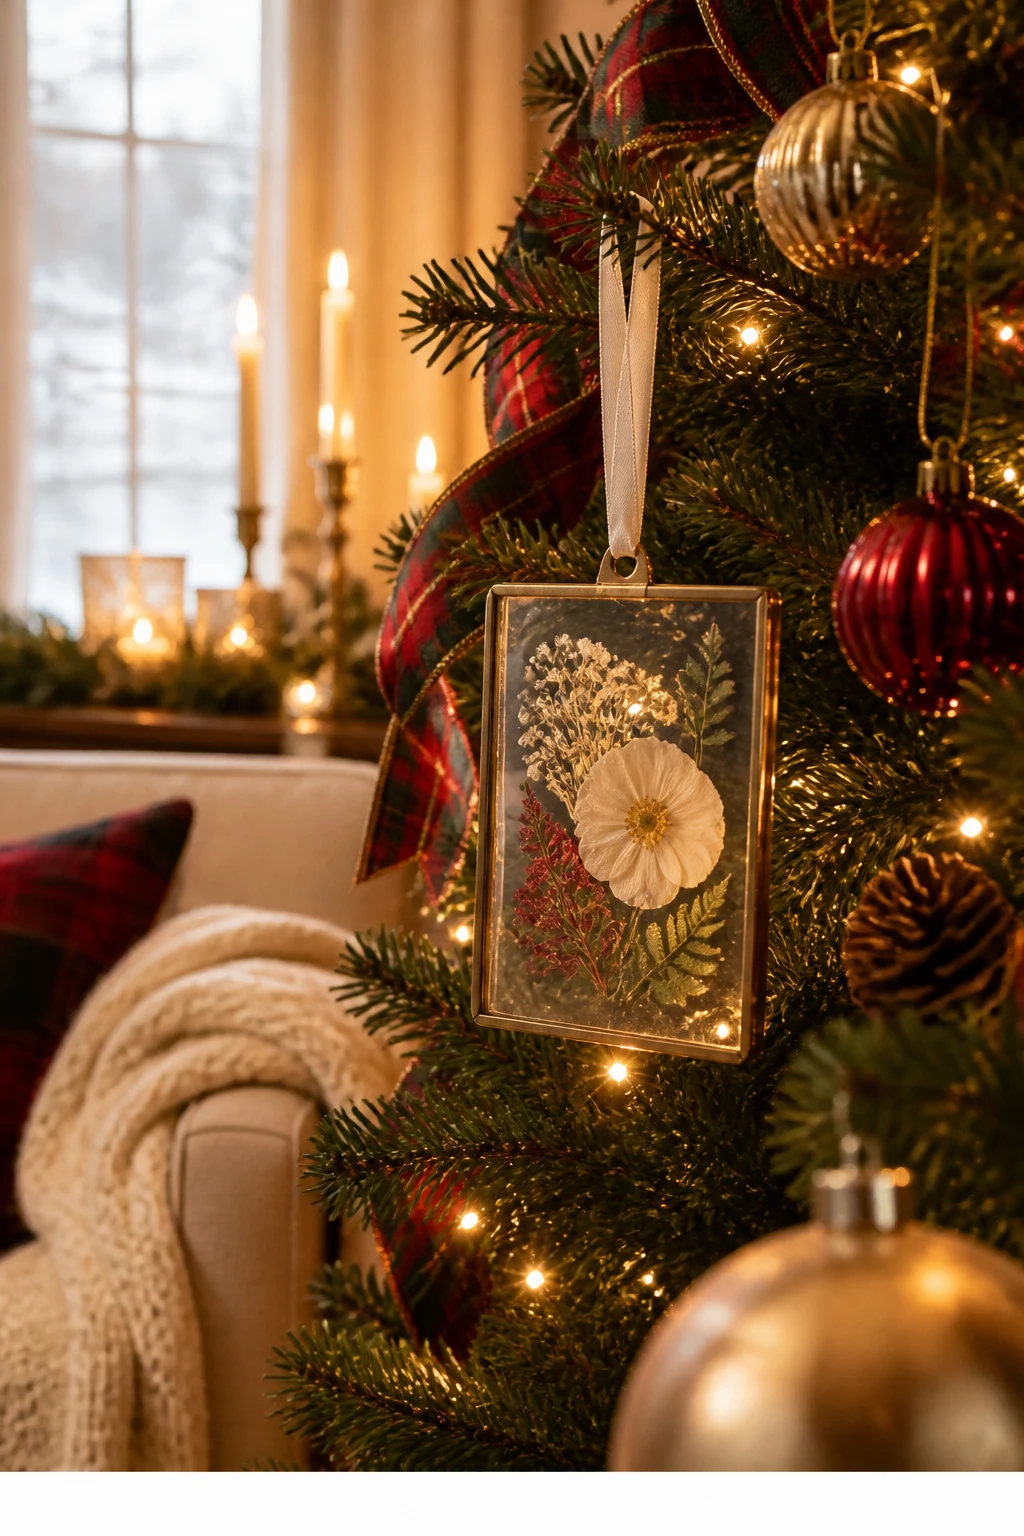
You love the idea of clear glass ornaments, but they can skew modern or cold. These delicate pressed-flower frames look like they came from a European market stall—botanical, ivory-tied, and softly romantic. When the tree sits near a window, the low winter light pours through the glass and petals, and suddenly the whole corner hums with warmth.
This works beautifully if you crave vintage charm without more “stuff.” The frames are slender and pack flat. You can use real pressed florals from summer (hydrangea bits, fern fronds) or snag a pressed-flower set online. It’s an elegant nod to nature that complements dried orange slices and bottle-brush trees.
Variations: For a budget version, sandwich florals between two pieces of acetate and outline the edges with copper foil tape. For a kid-friendly alternative, use pressed paper snowflakes or sheet music hearts instead of florals—still heirloom-y, less fragile.
Supplies and Cost:
- Glass floating frames (2″–3″ size), set of 6: $12–$18
- Pressed flowers/ferns: $5–$10
- Ivory or cream silk ribbon: $6–$10
- Optional copper foil tape (if making your own “frame”): $5–$8
Total Estimated Cost: $23 – $38 for 6–8 ornaments
Time and Skill Level: 45–60 minutes · Easy
Best For: Trees near windows or French doors where daylight can backlight the ornaments; cottage, farmhouse, or vintage interiors.
Key Design Elements:
- Main holiday props: small glass frames, pressed botanicals
- Color palette: ivory, soft green, faint blush or butter-yellow petals
- Lighting strategy: rely on daylight glow by day, warm fairy lights by night
- Textile and ribbon layers: thin silk or rayon ribbon with slight sheen
- Greenery and natural elements: pairs beautifully with eucalyptus and cedar
- Accent details: a dab of antique gold Rub ’n Buff on frame edges for patina
How To Make It:
- Open each frame and place a small pressed flower or fern centered inside.
- Add a tiny piece of double-sided tape to anchor delicate petals if needed.
- Close the frame and gently burnish edges; add a tiny smear of gold wax on corners to “age.”
- Tie with an 8–10″ length of ivory ribbon; leave long tails for romance.
- Hang on the side of the tree that catches natural light; balance them so they glint between branches.
Why This Reads High-End: Real botanicals and silk ribbon always elevate. The negative space of glass lets the tree and lights show through—quiet luxury.
Don’t Do This: Avoid bulky blooms; use petite petals and ferns. Overfilled frames look cluttered and heavy on a delicate tree branch.
Pro Styling Tip: Cluster two frames at different heights on one branch for a layered “found object” effect in photos.
If one idea resonates more than the others, that’s your starting point. You don’t need all seven. One repeated motif can make the whole tree suddenly feel intentional.
4. Aged Sheet-Music Rosettes with Soft Gold Edges Near the Tree’s Upper Third
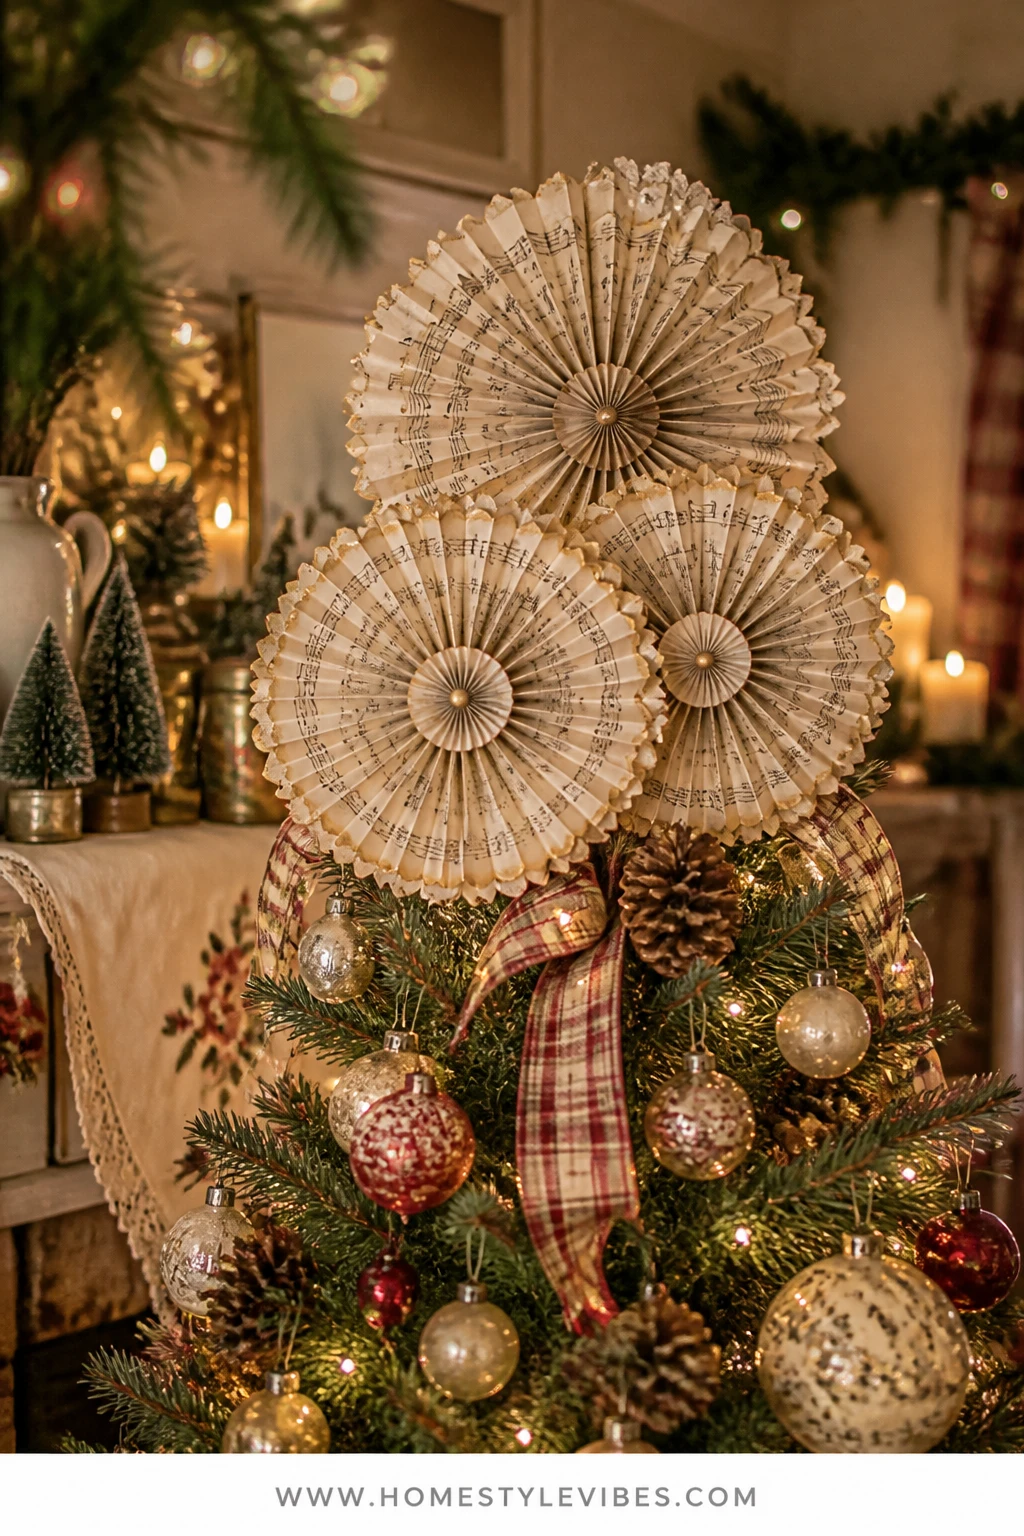
The top third of the tree can feel sparse, especially if you don’t love a giant topper. Paper rosettes made from aged sheet music solve that gap and look convincingly antique with deckled edges and soft gold brushed lightly along the ridges. They’re light, they perch perfectly in that airy zone, and they nod to carols without plastering lyrics across your tree.
These photograph like a dream: all those pleats catch warm light and create a halo around the notes. They store flat, they’re inexpensive, and they bring a museum-of-music vibe to a cottage-style tree. Skill-wise, we’re folding, gluing, and adding tiny buttons or brass brads for a “collected” finish.
Variations: Swap sheet music for pages from a vintage-looking book (public domain, please) and stamp a tiny star in the center. For a quieter palette, tea-stain white cardstock and skip visible notes entirely—just texture and soft gold edges.
Supplies and Cost:
- Printable sheet music or thrifted scores: $2–$6
- Tea or coffee for staining: pantry
- Glue gun + sticks: on hand
- Soft gold acrylic paint or gold wax: $4–$8
- Small buttons or brass brads for centers: $3–$5
- Ivory thread or ribbon loops: $2–$4
Total Estimated Cost: $12 – $20 for 10–12 rosettes
Time and Skill Level: 90 minutes · Easy
Best For: Filling the upper third of medium to tall trees when a big topper feels fussy; classic or cottage rooms with warm white lights.
Key Design Elements:
- Main holiday props: pleated paper rosettes, music notes, small buttons
- Color palette: aged ivory, faded black ink, soft gold
- Lighting strategy: position near mini-lights so gold edges glow
- Textile and ribbon layers: ivory thread loops to keep things minimal
- Greenery and natural elements: tuck alongside sprigs of cedar for depth
- Accent details: lightly torn edges for genuine timeworn character
How To Make It:
- Tea-stain pages (dip, blot, lay flat). Let dry fully until crisp.
- Accordion-fold each page into 1/2″ pleats; join ends to form a circle.
- Press center to flatten into a rosette; hot glue a small paper circle to secure back.
- Brush a whisper of soft gold across pleat edges. Less is more.
- Glue a tiny button or brad in the front center.
- Attach a thread loop to the back and perch in the upper third of the tree.
Why This Looks Intentional: Repeating rosettes high on the tree creates rhythm and draws the eye upward without a showy topper.
The Most Common Mistake: Over-saturating with paint. Keep gold to the ridges only to preserve the aged paper look.
Pro Styling Tip: Angle a few rosettes slightly, not all face-front; the varied tilt catches light like antique fans in photos.
5. Salt-Dough Cameos with Softly Stamped Motifs and Sage Velvet on Lower Branches
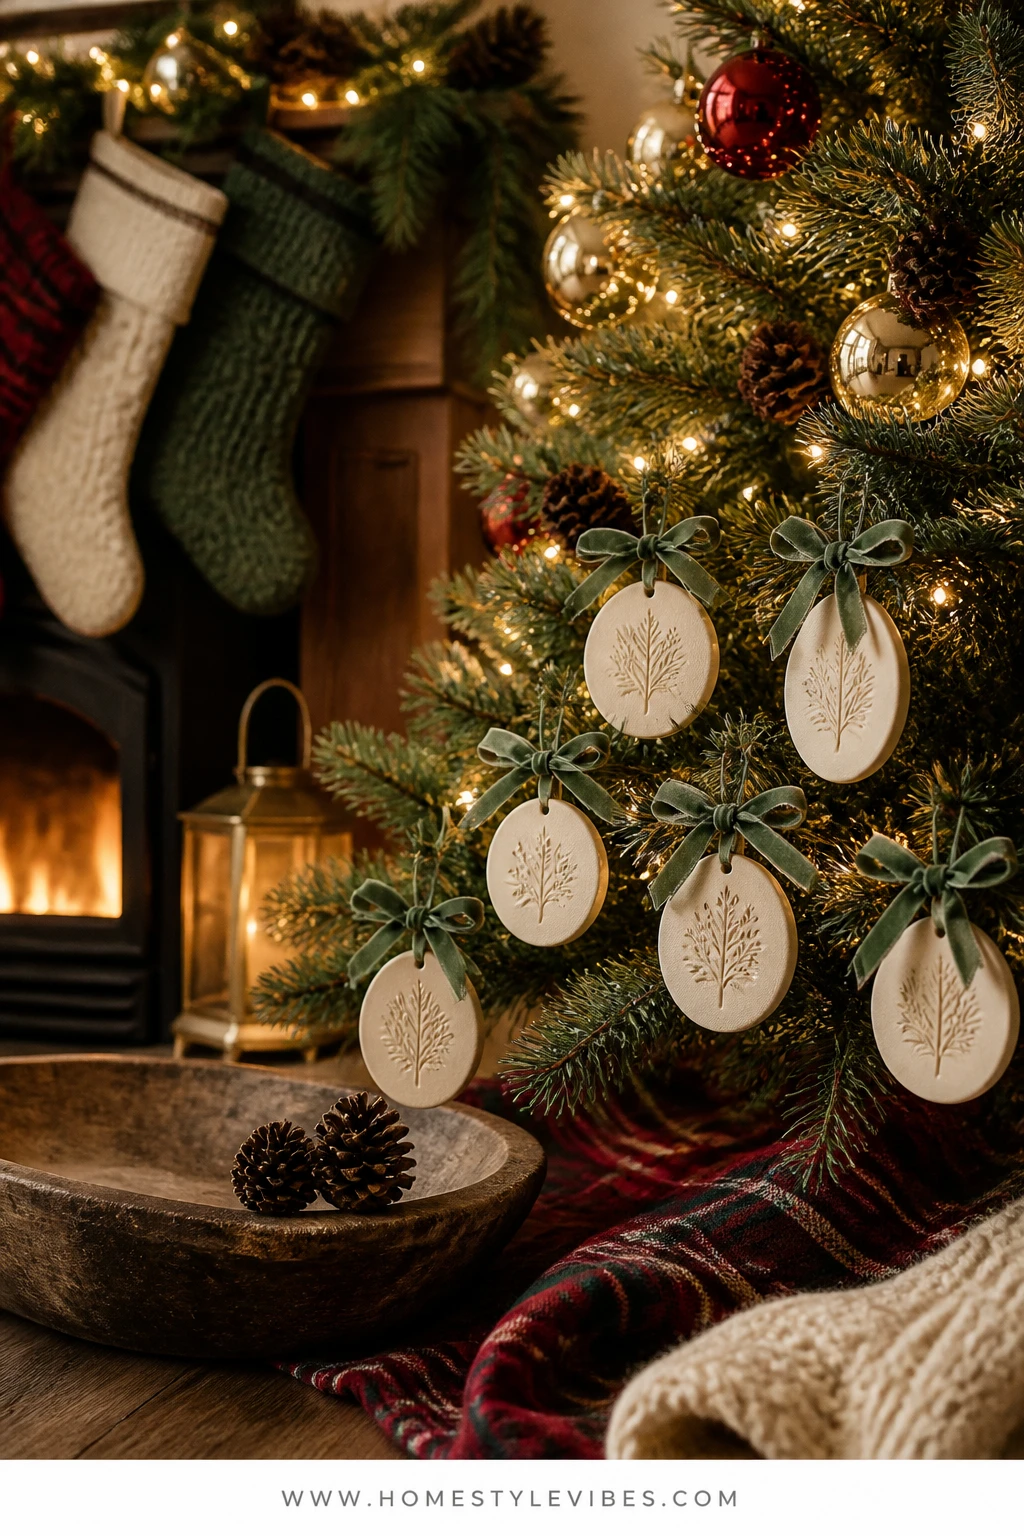
You’ve got energetic kids or a wiggly pup, and the lower third of the tree becomes a danger zone. Glass down low? Hard pass. Salt-dough to the rescue—but not the preschool version. Think creamy, smoothed disks or ovals with softly stamped motifs (a pine sprig, a tiny star), sanded edges, and a coat of satin varnish so they look like old ceramic cameos.
They’re nearly unbreakable, matte, and wonderfully tactile. On a classic tree with warm lights, the soft curves balance all the sparkle above. They’re practically free, batch-friendly, and they store like a dream. I once lost a box of these in the linen closet for a year, found them again, and they still looked perfect—no chips, no weird smells, just sweet nostalgia.
Variations: Press vintage lace into the surface before baking for a delicate texture. For a heritage nod, stamp an initial for each family member and dot a tiny gold edge around the rim with a paint pen.
Supplies and Cost:
- Salt, flour, water: pantry basics
- Circle/oval cookie cutters: $5
- Rubber stamps (pine sprig, star), or use a toothpick for a simple line drawing: $3–$8
- Fine-grit sandpaper: $3
- Acrylic paint in ivory + soft gold, satin varnish: $6–$10
- Sage velvet ribbon: $6–$10
Total Estimated Cost: $12 – $28 for 20–30 ornaments
Time and Skill Level: 2 hours active + bake/cool time · Beginner
Best For: Families with kids and pets; filling the lower branches in a way that still feels heirloom-worthy.
Key Design Elements:
- Main holiday props: salt-dough cameos with stamped motifs
- Color palette: cream, ivory, soft gold accents, sage ribbon
- Lighting strategy: let warm lights skim the surface for gentle shadows
- Textile and ribbon layers: sage velvet for coziness and color tie-in
- Greenery and natural elements: pairs well with pinecones and dried oranges
- Accent details: satin varnish to mimic ceramic sheen, not gloss
How To Make It:
- Mix 2 cups flour, 1 cup salt, ~1 cup water to a firm dough. Knead 5 minutes.
- Roll to 1/4″ thick; cut shapes. Use a straw to make a clean hanger hole.
- Stamp a simple motif or etch a line drawing. Bake at 200°F for 2–3 hours until dry.
- Sand edges lightly. Paint with diluted ivory for a porcelain-like wash.
- Dry, then add a soft gold rim detail if you like; seal with satin varnish.
- Thread with sage velvet ribbon and hang low where hands and paws roam.
Why This Looks Expensive: The sanded edges and satin finish mimic bisque ceramics. Matching sage ribbon makes the whole set feel curated.
Watch Out: Don’t bake hot and fast—cracking happens. Low and slow is the way for that smooth, heirloom look.
Pro Styling Tip: Cluster two or three cameos on one sturdy branch with slightly different ribbon lengths for a layered still-life effect.
Small confession: I love a fancy ornament as much as anyone, but this is where heirloom style really happens—simple materials, cared for well, repeated with intention.
6. Ribbon-Wrapped Vintage Spools with Faded Red and Soft Gold Tucked Along the Trunk
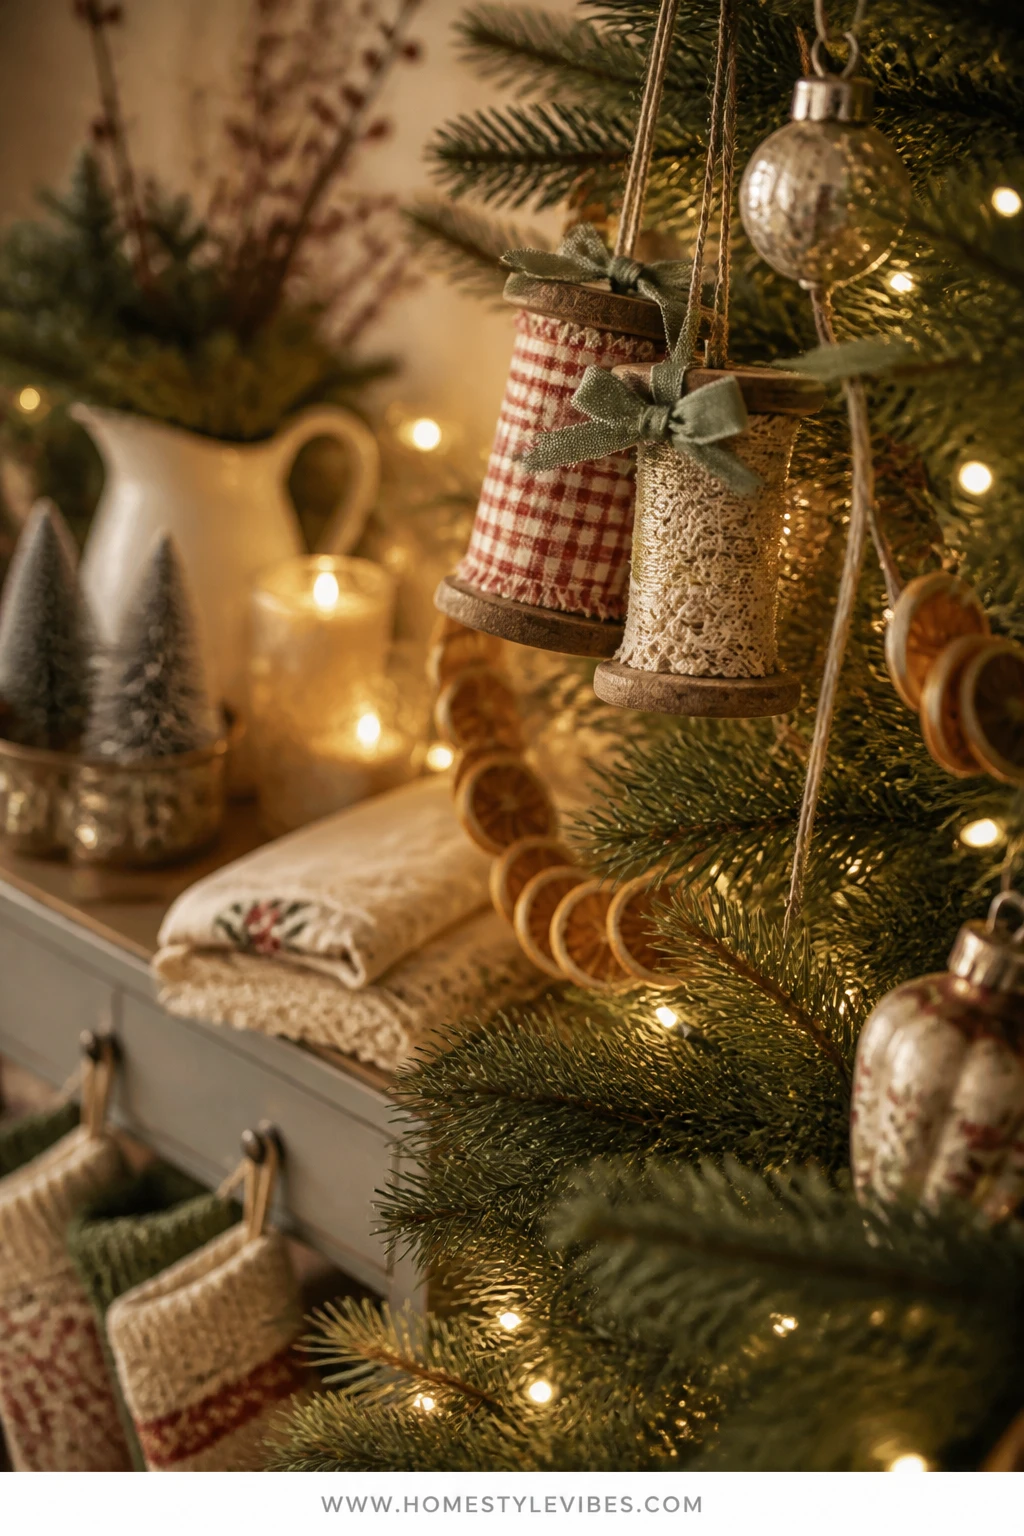
It’s easy to decorate the branch tips and forget the trunk, which is why your tree sometimes reads sparse from certain angles. Vintage-style wooden spools wrapped with faded red gingham, soft gold thread, and little snippets of lace create that “grandma’s sewing drawer” moment. They tuck deep inside the tree to fill the inner shadows and bring depth where the lights glow the warmest.
These are quick to make and endlessly reusable. Wood spools add natural warmth and zero glare, which helps your shinier ornaments shine brighter. Plus, they store neatly in a jar—no tissue necessary. They’re a love note to the cottage aesthetic: aged wood, textiles, and a whisper of soft metallic thread.
Variations: If you can’t find vintage spools, buy new unfinished ones and rub a tiny bit of brown furniture wax for instant patina. For a neutral look, wrap with cream linen tape and sage thread only.
Supplies and Cost:
- Wooden spools (new or vintage), set of 20: $10–$16
- Narrow gingham ribbon in faded red, lace trim: $6–$10
- Soft gold thread or baker’s twine: $3–$6
- Glue stick or double-sided tape: $2–$4
- Mini eye screws or hooks (optional): $3
Total Estimated Cost: $21 – $36 for ~20 ornaments
Time and Skill Level: 45 minutes · Easy
Best For: Trees that feel hollow; classic or farmhouse rooms that want subtle textile storytelling.
Key Design Elements:
- Main holiday props: wooden spools, gingham, lace, gold thread
- Color palette: warm wood, cream, faded red, soft gold
- Lighting strategy: nestle near trunk lights for a firefly glow on threads
- Textile and ribbon layers: mixed ribbons for old-sewing-basket charm
- Greenery and natural elements: sit between deep branches for shadow play
- Accent details: tiny safety pins or thimbles as occasional charms
How To Make It:
- Wrap each spool with a layer of ribbon or lace; secure with a bit of glue or tape.
- Wind soft gold thread over top in a few crisscross passes for shimmer.
- Attach a small hook or tie a simple loop through the spool center.
- Tuck spools along the trunk and inner branches to fill dark gaps.
- Balance with glass ornaments on the outer tips for depth from every angle.
Why This Looks Expensive: Mixing ribbons and threads on real wood creates authentic texture. The trunk fill gives the tree that decorator-level fullness.
One Thing To Avoid: Don’t overload the outer tips with spools; they shine inside the tree. Too many out front looks busy.
Pro Styling Tip: Photograph slightly off-center so the glinting gold thread peeks from the shadows—instant depth.
Pause and breathe. If your tree is already up, just add one of these ideas tonight. No need to start from scratch. Ornaments are the story you layer over time.
7. Mini Bottle-Brush Dioramas in Clear Orbs with Aged White Snow at Eye Level
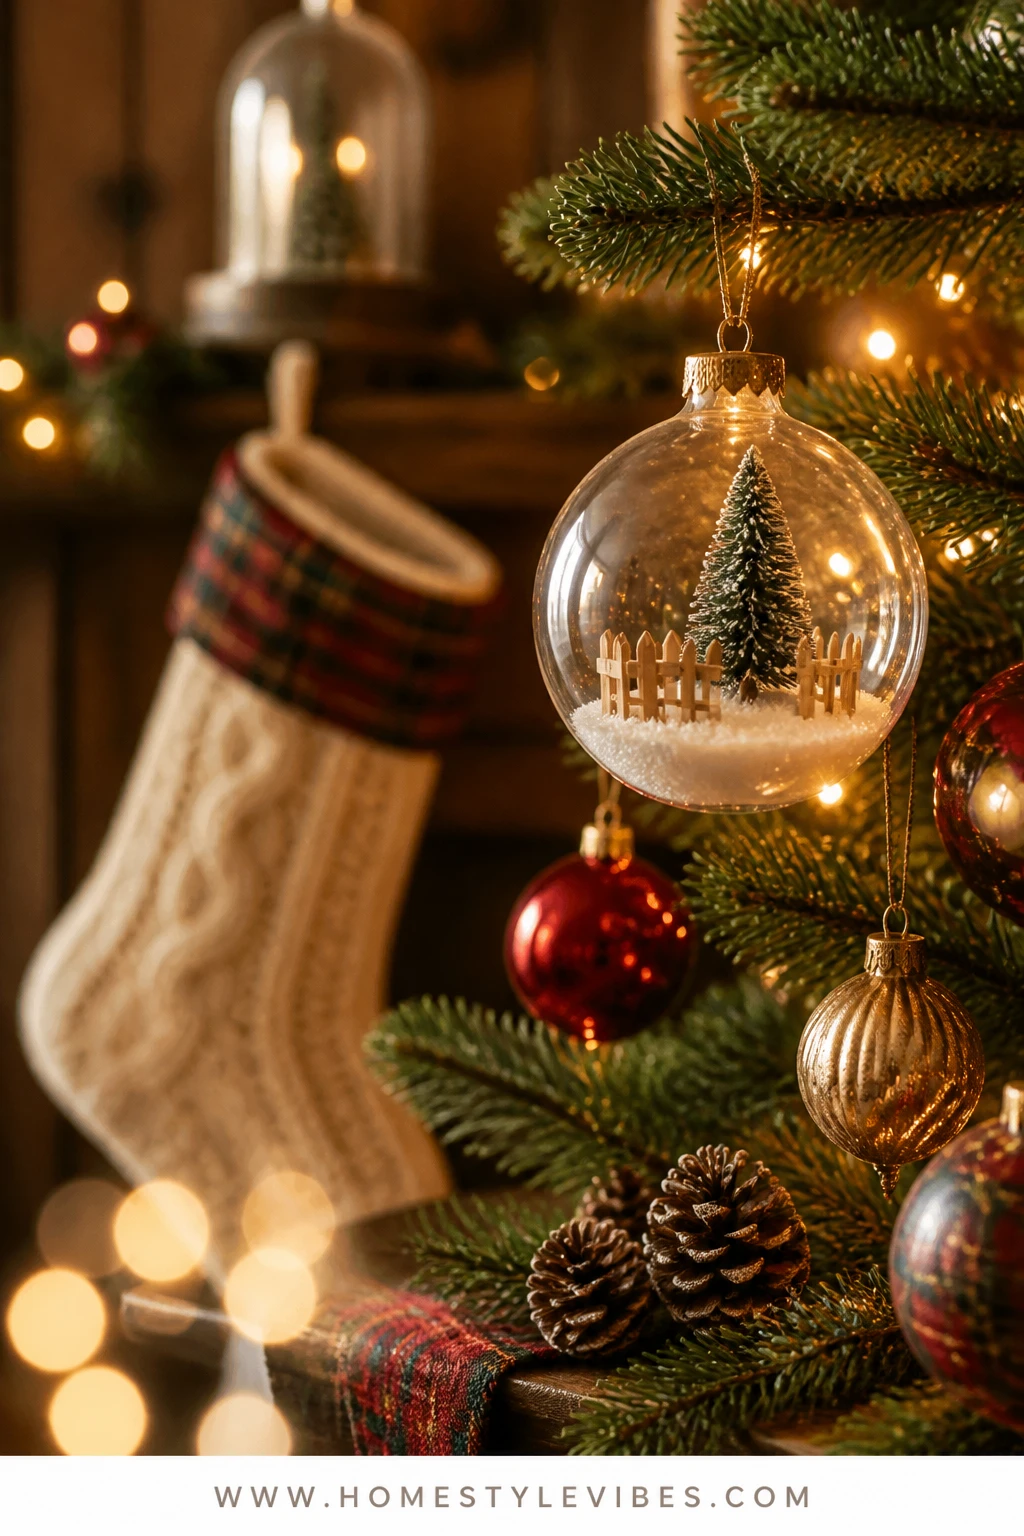
Your eye-level branches deserve a little scene-setting moment. Clear plastic or glass orbs transformed into micro snow-globe dioramas—tiny bottle-brush trees, a speck of kraft “fence,” a sprinkle of aged white “snow”—feel like lost treasures rediscovered each December. They’re nostalgic without kitsch, and the soft clink against neighboring glass ornaments is the sound of the season.
I learned the lighting secret from a friend who bought three different garlands before realizing the real problem was her lighting depth: place a warm bulb right behind the diorama and the “snow” glows like morning light on a frosted lawn. These store in an egg carton, they’re lightweight, and you can customize each one with miniature details that nod to your family—initials on a tiny sign, a painted red door, a teeny sled.
Variations: For a greener palette, skip the fake snow and use a mossy base with a cream house. For a neutral Scandinavian nod, keep the interiors monochrome: ivory tree, ivory base, linen ribbon.
Supplies and Cost:
- Clear fillable ornaments (75–90 mm), set of 6: $8–$12
- Mini bottle-brush trees in cream/green: $5–$10
- Faux snow or Epsom salt mixed with a pinch of tea-stained glitter: $3–$6
- Kraft paper or thin wood for fences/paths: $2–$5
- Tacky glue, tweezers: $3–$5
- Ivory or soft gold ribbon: $4–$8
Total Estimated Cost: $25 – $40 for 6–8 dioramas
Time and Skill Level: 90 minutes · Easy-Intermediate (tiny tweezers work!)
Best For: Eye-level branches on medium or tall trees; anyone who loves a storybook, old-village vibe inside the home.
Key Design Elements:
- Main holiday props: clear orbs, mini bottle-brush trees, faux snow
- Color palette: cream, soft green, aged white, a hint of kraft brown
- Lighting strategy: position a warm light directly behind each globe
- Textile and ribbon layers: ivory/soft gold hanging ribbons
- Greenery and natural elements: balance with cedar sprigs nearby
- Accent details: tiny kraft fences, micro signs, or a red door as a single accent
How To Make It:
- Open each fillable orb. Add a teaspoon of faux snow or Epsom salt for the base.
- Glue a mini tree to a small kraft paper circle; let set so it stands upright.
- Place the tree disc inside the orb; add a tiny fence or sign, securing with a dot of glue.
- Close the orb and gently shake to settle snow. Wipe fingerprints with a soft cloth.
- Tie with ivory ribbon and hang at eye level with a warm bulb just behind.
Why This Feels Designer: Micro scenes suggest memory and craftsmanship. The careful lighting placement creates cinematic glow—small detail, big payoff.
Don’t Do This: Avoid overfilling with snow; it buries the scene and looks messy. A thin layer feels more believable.
Pro Styling Tip: For photos, angle one diorama slightly toward the camera and blur a mercury-glass ornament in the foreground—instant depth and sparkle.
Imperfection moment: tweezers can slip, and you’ll sneeze glitter-snow at least once. It’s fine. Real heirlooms have fingerprints in their stories.
Quick Checklist
- Faux mercury-glass finish with vinegar-misted mirror paint
- Soft gold or ivory ribbon in consistent widths
- Hand-embroidered felt cameos with simple motifs
- Pressed-flower glass frames with silk ribbon
- Tea-stained sheet-music rosettes with gold-touched edges
- Salt-dough “ceramic” cameos with satin varnish
- Ribbon-wrapped wooden spools for trunk depth
- Mini bottle-brush dioramas in clear orbs
- Warm white lights placed behind special ornaments
- Consistent palette: cream, sage, soft gold, faded red accents
Frequently Asked Questions
How much should I budget to make a whole tree’s worth of these heirloom-look ornaments?
Plan $60–$120 for supplies if you make a mix of the projects here in batches of 6–12 each. You can reduce costs by using pantry basics (salt dough), skipping specialty ribbons, and repurposing old ornaments for the mercury finish.
Can I use real greenery on the tree with these DIY ornaments?
Yes. Fresh cedar and fir look incredible with these textures. Just avoid placing delicate paper rosettes directly against wet sap. Also, keep faux-snow dioramas away from overly sappy spots to prevent clouding.
When should I start making these to avoid last-minute stress?
Begin in early November. Do one project per week. Mercury baubles and salt-dough cameos are great first. Pressed-flower frames and dioramas can happen closer to tree-trimming weekend.
Are glass ornaments safe with kids and pets?
Use shatterproof blanks for the mercury look and hang glass higher. Fill the bottom third with felt and salt-dough pieces. Skip hooks in kid zones—tie ribbons directly to branches so curious hands don’t pull them off easily.
What about fire safety with lights near paper and felt ornaments?
Use modern LED string lights; they stay cool. Keep all paper and textiles a finger’s width from bulbs and avoid any open flames near the tree. Flameless candles on nearby surfaces give you that candle glow without risk.
Conclusion
Pick one idea and start tonight. A handful of salt-dough cameos or a run of mercury-glass baubles can shift your tree from “random” to “remembered.” The secret isn’t spending more—it’s repeating materials and colors with care.
If cottage-and-vintage is your love language, these DIY Christmas tree ornaments that look like heirlooms will give you the story: aged whites, soft sage, gentle gold, ribbon that whispers instead of shouts. Layer them with warm lights and a few pinecones, and you’ll have that quiet, nostalgic glow that makes the room feel finished, like the holidays you remember and the ones you’re building now.
Seriously, you’ve got this. One ribbon, one stitch, one tiny bottle-brush tree at a time—and suddenly your tree looks like it’s been in the family for decades.

About the Author

Krisztina P.Rendes, Founder of Home Style Vibes
Founder of Home Style Vibes
Krisztina Puskásné Rendes created Home Style Vibes as a cozy-modern lifestyle space where homemaking meets inspiration. Her goal is to help women create beautiful, organized, and peaceful homes they truly love — without overwhelm. You’ll find here heart-driven content on home decor, cleaning tips, easy family recipes, organization and decluttering, DIY home projects, plants, and seasonal ideas — all designed to bring more calm, comfort, and style into everyday life.