4 Easy Christmas Bark Recipes That Make the Prettiest Edible Gifts
You want Christmas bark that looks boutique-beautiful and actually tastes incredible. But the chocolate blooms, the swirls smear, and your “giftable” tray turns into a sticky situation right when you need to pack cookie tins. Here’s the fix: four easy Christmas bark recipes that set cleanly, snap smartly, and ship like a dream—without fancy equipment or a candy thermometer. They’re photogenic, budget-friendly, and absolutely achievable on a busy December weeknight. Bookmark this for your gift list and cookie exchange lineup.

Quiz: What’s the single most important step for smooth, glossy Christmas bark with a clean snap?
- Adding extra butter for shine
- Chilling the bark in the freezer immediately
- Tempering or using faux-tempered melting wafers correctly
- Stirring in a splash of water
Answer: 3 — Tempering (or correctly using high-quality melting wafers) creates that glossy finish and crisp snap. Water makes chocolate seize, and butter dulls the finish.
1. Classic Peppermint Bark With Shattered Candy Canes And Marble Swirls
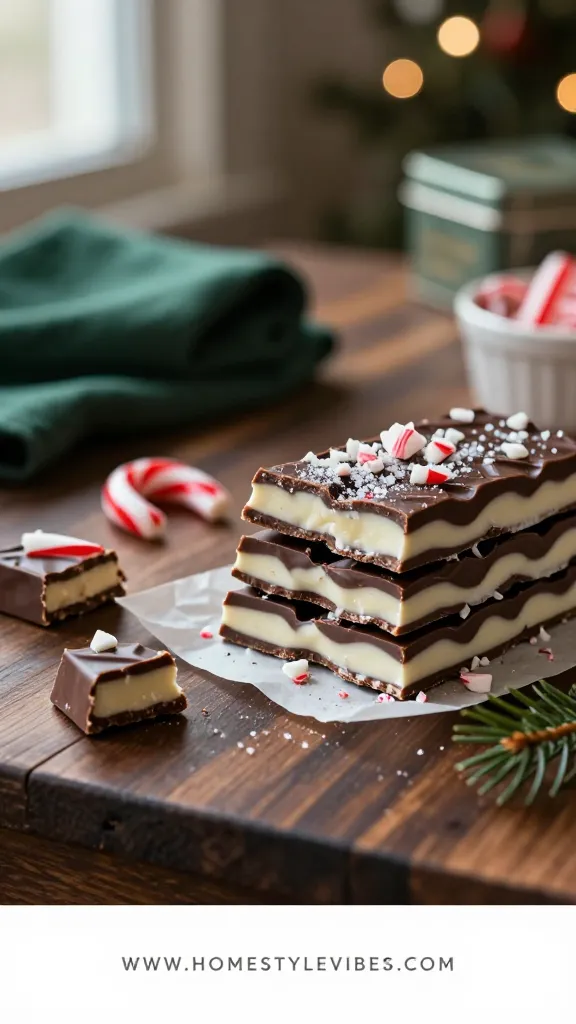
This is the Christmas bark everyone expects in the tin—peppermint-laced, red-and-white gorgeous, and impossibly giftable. The secret isn’t more mint—it’s layering tempered or wafer-melted chocolates and letting each layer partially set before you swirl. That gives clean stripes instead of muddy marbling.
Bring this to a cookie exchange or tuck into cellophane bags for teachers and neighbors. Texture-wise, think crisp snap, cool peppermint, and tiny crunchy bits of candy cane that sparkle on top. Make it up to 2 weeks ahead and store airtight in a cool, dry cupboard; don’t refrigerate unless your kitchen runs hot, because condensation dulls the finish.
Variation ideas? Swap the dark chocolate base for milk if you want sweeter vibes, or go nut-free and gluten-free as written (double-check candy cane labels). For a dairy-free take, use certified dairy-free dark and white-style chips.
Prep Time: 20 minutes
Cook Time: 0 minutes
Total Time: 1 hour (includes setting)
Servings: 24 pieces
Best For: Cookie exchanges, office tins, and make-ahead gifting that travels well.
Ingredients:
- 12 oz high-quality dark chocolate wafers or bars, chopped
- 12 oz high-quality white chocolate wafers or bars, chopped
- 1/2 tsp peppermint extract, divided
- 1 cup crushed candy canes (about 6 regular canes), divided
- 1 tbsp neutral oil (only if using bars and skipping tempering; omit if properly tempering), divided
- Fine sea salt, a pinch
- Serving vessel: Rimmed half sheet pan (18×13 in) lined with parchment
- Garnish: Extra fine candy cane dust and a few larger shards for contrast
Instructions:
- Line the sheet pan with parchment so it overhangs on two sides for easy lifting. Set aside 2 tablespoons of the crushed candy canes for garnish.
- Melt the dark chocolate: Microwave in 20-second bursts, stirring each time, until mostly melted with a few unmelted bits; stir to finish melting. Aim for glossy, fluid chocolate. Stir in 1/4 tsp peppermint extract and a pinch of salt. If not tempering, add 1/2 tsp oil for easier spreading.
- Spread the dark chocolate over the parchment to a roughly 10×14-inch rectangle, about 1/8–1/4 inch thick. Tap the pan to level. Sprinkle with 1/3 cup crushed candy canes. Let sit 8–10 minutes until the surface is just set but still slightly tacky to the touch.
- Melt the white chocolate the same way. Stir in 1/4 tsp peppermint extract. If not tempering, add 1/2 tsp oil. Pour in ribbons over the dark layer.
- Use a skewer or butter knife to drag short S-shaped lines for marbling. Don’t overdo it—6–8 passes are enough to keep white distinct from dark.
- Top with remaining candy cane pieces and a dusting of fine crumbs. Press very lightly so they adhere without sinking.
- Let set at cool room temperature 45–60 minutes until firm. If your kitchen is warm, refrigerate 10–15 minutes at the end, then bring to room temp before cutting to avoid condensation.
- Lift out by the parchment and break into irregular pieces, aiming for 2–3 inch shards.
Pack in cellophane bags with a twist tie or layer between parchment in metal cookie tins. Shelf life: 10–14 days at cool room temp. For a kid-friendly twist, add mini marshmallows on top (press in lightly) and skip the extract for a softer mint profile.
Pro Plating Tip: Arrange shards standing upright in a white rectangular platter and sprinkle a final pinch of candy cane dust around the base for a snowy effect.
Ready for a cozy, spiced vibe that tastes like your favorite coffeehouse latte? The next bark brings warm gingerbread notes and a cookie crumble crunch.
2. Gingerbread Spice White Chocolate Bark With Gingersnap Crunch And Gold Sparkle
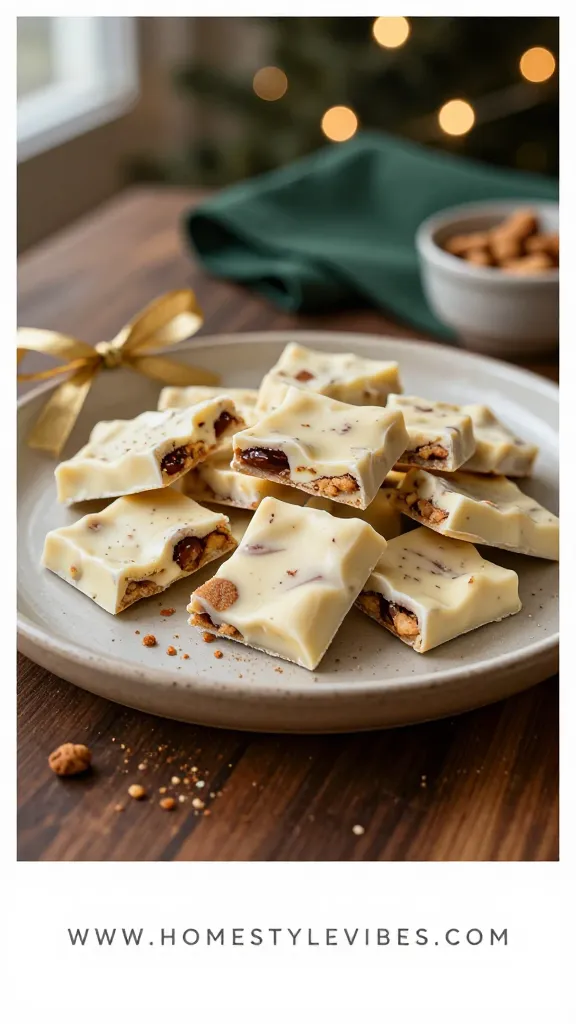
I made a version of this for my neighbor’s cookie exchange last December, and someone actually asked if I’d ordered it from a fancy bakery. It’s that pretty. The profile is creamy white chocolate, deep molasses cookie bits, and a ginger-cinnamon-nutmeg warmth that perfumes the whole kitchen.
This Christmas bark gifts beautifully because the texture stays snappy, and the color palette—ivory, cinnamon-brown, and a touch of edible gold—looks luxe in clear cello. The technique that matters here: bloom your spices in a hint of warm oil before stirring into the chocolate. It wakes them up without making the chocolate grainy.
Make it 7–10 days ahead. Avoid the fridge; store airtight with parchment between layers. For gluten-free gifting, use GF gingersnaps. Want a nuttier version? Add toasted chopped pecans, but label for allergies.
Prep Time: 15 minutes
Cook Time: 0 minutes
Total Time: 50 minutes (includes setting)
Servings: 24 pieces
Best For: Elegant hostess gifts and coffee pairings; the spice warms up winter mornings.
Ingredients:
- 24 oz high-quality white chocolate wafers or bars, chopped
- 1 tsp neutral oil
- 1 1/4 tsp ground ginger
- 1 tsp ground cinnamon
- 1/8 tsp ground nutmeg
- 1/8 tsp ground cloves
- Pinch fine sea salt
- 1 cup crushed gingersnaps (about 10 cookies)
- 2 tbsp finely chopped crystallized ginger (optional but amazing)
- 1–2 tsp edible gold sanding sugar or gold sprinkles for garnish
- Serving vessel: Quarter sheet pan (9×13 in) lined with parchment
- Garnish: Extra gingersnap crumbs and gold sanding sugar
Instructions:
- Line the quarter sheet pan with parchment, leaving overhang. Set aside 2 tablespoons gingersnap crumbs for garnish.
- Warm 1 tsp oil in a small skillet over low heat 30 seconds. Stir in ginger, cinnamon, nutmeg, and cloves; warm just until fragrant, 20–30 seconds. Remove from heat to cool 2 minutes.
- Melt white chocolate in a microwave-safe bowl in 20-second bursts, stirring often, until mostly melted; stir to finish. Add the warm spiced oil and a pinch of salt; stir until completely smooth and uniformly speckled.
- Pour chocolate onto the lined pan and spread to about 1/4 inch thickness. Tap to level and release air bubbles.
- Immediately sprinkle with crushed gingersnaps and crystallized ginger. Press very gently so they adhere.
- Finish with reserved crumbs and a dusting of gold sanding sugar. Let set at cool room temp 35–45 minutes until firm.
- Lift by parchment and break into shards. Aim for even distribution of cookie chunks in each piece.
For a kid-friendlier spice, cut the cloves and nutmeg in half. Dairy-free version: use a dairy-free white-style baking bar. This bark ships well because it’s a single chocolate type—no risk of layers separating in transit.
Pro Plating Tip: Pile pieces in a matte black bowl for contrast so the white chocolate and gold flecks pop in photos.
Cooking doesn’t have to be a performance. If you nail even one of these this week, that’s a win. And if the swirl isn’t perfect? Break it into shards and call it “rustic chic.” Everyone will still ask for the recipe.
3. Cranberry Pistachio Dark Chocolate Bark With Orange Zest And Jewel-Tone Shine
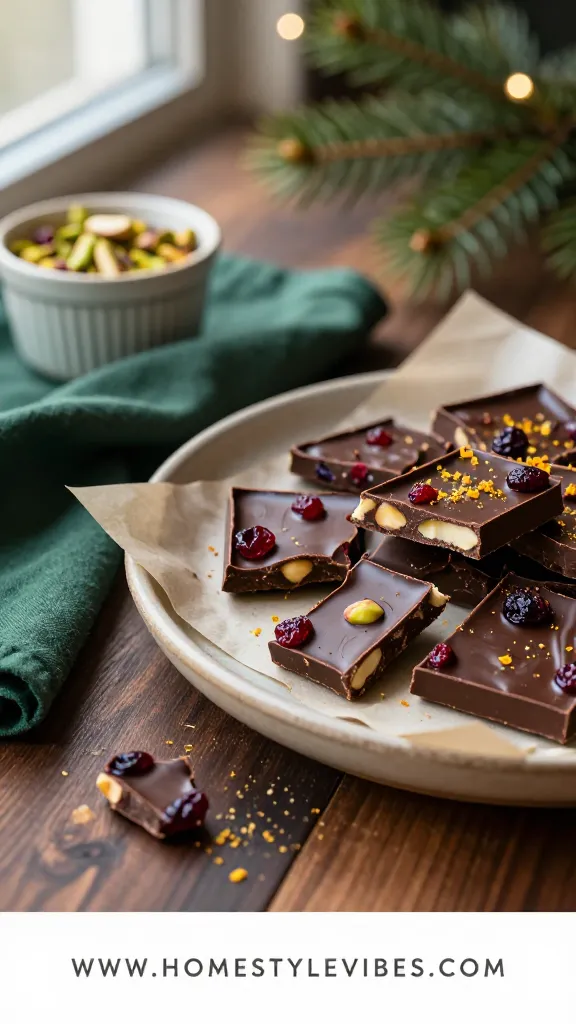
Here’s the showstopper for the friend who swears they’re “not a sweets person.” Dark chocolate gets studded with tart dried cranberries and buttery pistachios, then brightened with a kiss of orange zest. The colors scream holiday: deep mahogany, ruby, emerald, and glints of citrus oil.
Why it works for gifting: the balance. The cranberries cut the sweetness, the nuts add crunch, and the orange scents the whole batch without overpowering. Technique-wise, rub zest with a little sugar to draw out citrus oils before sprinkling—it perfumes the bark without adding moisture.
Make-ahead is easy: store airtight with parchment between layers at cool room temperature up to 2 weeks. For nut-free gifting, swap pistachios for toasted pumpkin seeds. I once tucked a bag of this into a friend’s stocking, and we ended up “taste-testing” half the batch while wrapping gifts at midnight. No regrets.
Ingredients:
- 20 oz high-quality dark chocolate wafers or bars (60–70%), chopped
- 3/4 cup dried cranberries
- 3/4 cup shelled pistachios, roughly chopped
- 1 tbsp granulated sugar
- 1 tbsp finely grated orange zest (from 1 large orange)
- 1/8 tsp fine sea salt
- Serving vessel: Large marble board or wood board lined with parchment for setting and serving
- Garnish: Extra cranberries, pistachio dust, and a few fine strands of orange zest
Prep Time: 15 minutes
Cook Time: 0 minutes
Total Time: 45 minutes (includes setting)
Servings: 20–24 pieces
Best For: Gifting to dark-chocolate lovers and pairing with cheese boards for holiday parties.
Instructions:
- Line a rimmed sheet or your marble/wood board with parchment.
- Combine sugar and orange zest in a small bowl. Use fingers to rub until the sugar turns orange and fragrant.
- Melt the dark chocolate in 20-second microwave bursts, stirring between each, until smooth and glossy. Stir in salt.
- Pour chocolate onto parchment and spread to 1/4 inch thickness. Tap to level.
- Scatter cranberries and pistachios evenly over the surface, then sprinkle the orange sugar. Reserve a small pinch of each for finishing.
- Press gently so toppings adhere. Let set at cool room temperature 30–40 minutes until firm to the touch.
- Break into shards and finish with reserved toppings and a few extra wisps of fresh zest.
Variation: Add 2 tbsp finely chopped candied orange peel for deeper citrus. For a seed-forward take, use pepitas and sunflower seeds, then a whisper of flaky salt. Shipping tip: pack in snug layers with parchment; avoid overfilling the tin to prevent breakage.
Pro Plating Tip: Stack shards slightly overlapped on a slate board so the red-green toppings layer visually; sprinkle a tiny halo of pistachio dust around the edges.
Not every batch needs to look like it came from a magazine. The shiny snap and flavors carry the gift. If your shards are quirky sizes, pack a “bark medley” and pretend you planned it that way—honestly, it’s charming.
4. Salty Toffee Pretzel Milk Chocolate Bark With Caramel Drizzle And Crunch

If you love sweet-salty desserts, this Christmas bark is a crowd-pleaser that disappears faster than any cookie on the plate. Milk chocolate is the base, pretzels bring crunch, and a quick stovetop cheat-toffee adds buttery depth. A final caramel zigzag looks bakery-fancy without fuss.
Here’s why it works: texture layers. You get snap from the chocolate, jagged crunch from pretzels, and those tiny toffee pebbles that melt into caramelly pockets. It’s party-ready, travels well, and it’s the one people reach for after a glass of bubbly.
Make ahead 5–7 days. Store airtight in a cool pantry. For nut-free gifting, keep as written. Want a bolder salt hit? Finish with flaky sea salt, but go light—milk chocolate is sweeter than dark.
Prep Time: 20 minutes
Cook Time: 6 minutes (toffee)
Total Time: 1 hour (includes setting)
Servings: 24 pieces
Best For: Movie nights, office parties, and salty-sweet snackers on your gift list.
Ingredients:
- 20 oz milk chocolate wafers or bars, chopped
- 1 1/4 cups mini pretzels, lightly crushed
- 1/2 cup toffee bits (Heath bits or homemade below)
- 2 tbsp caramel sauce (thick, room temp), for drizzle
- 1/4 tsp flaky sea salt (optional garnish)
- For quick skillet toffee (optional if not using store-bought): 4 tbsp (1/2 stick) unsalted butter, 1/3 cup light brown sugar, 1/8 tsp fine salt, 1/8 tsp baking soda, 1/2 tsp vanilla
- Serving vessel: Parchment-lined jelly roll pan (10×15 in)
- Garnish: Extra pretzel shards and a few pinches of flaky sea salt
Instructions:
- Line the jelly roll pan with parchment.
- If making quick toffee: In a small skillet, melt butter with brown sugar and fine salt over medium heat, stirring until bubbling. Cook 2–3 minutes, stirring, until the mixture turns glossy and slightly thickens. Remove from heat; stir in baking soda and vanilla. Pour onto a parchment piece and spread thin. Cool 5 minutes, then chop into small bits.
- Melt the milk chocolate in 20-second microwave bursts, stirring until smooth and glossy.
- Pour chocolate into the pan and spread to about 1/4 inch thickness. Tap to level.
- Scatter crushed pretzels and toffee bits evenly. Press gently so they adhere.
- Warm caramel sauce 5–10 seconds if needed. Drizzle in thin zigzags over the bark. Finish with a light pinch of flaky sea salt if using.
- Let set at room temperature 40–50 minutes until firm. Break into pieces.
Variation: Use dark chocolate for a less-sweet base or swirl half milk, half dark for contrast (pour in alternating puddles, then lightly marble). Dairy-free: use dairy-free chocolate and a coconut-milk caramel; skip butter-toffee and sub crunchy cocoa nibs for texture.
Pro Plating Tip: Fan pieces on a red ceramic platter with a few intact mini pretzels tucked between shards for instant visual storytelling.
Quick Checklist
- Use high-quality melting wafers or properly temper chocolate for a glossy snap
- Line pans with parchment and leave overhang for easy lifting
- Let base layers partially set before adding a second chocolate layer
- Press toppings gently so they adhere without sinking
- Keep water away from chocolate to prevent seizing
- Store airtight at cool room temperature with parchment between layers
- Label tins with allergens like nuts, dairy, or gluten
- Ship snugly packed to limit breakage and temperature swings
- Use contrasting platters to make colors and swirls pop
- Make 5–14 days ahead depending on toppings; avoid humid fridges
Frequently Asked Questions
Can I use chocolate chips instead of melting wafers or tempered chocolate?
Yes, but results vary because chips contain stabilizers and often set dull. Use high-quality chips and add 1/2–1 tsp neutral oil per 12 oz for spreadability, or choose melting wafers for reliable gloss and snap.
How long does Christmas bark stay fresh, and do I need to refrigerate it?
Christmas bark stays fresh 7–14 days at cool room temperature in an airtight tin. Skip the fridge unless your kitchen is warm; humidity causes condensation that dulls chocolate and softens crunchy toppings.
What are the best nut-free options for toppings?
Pretzels, crushed candy canes, dried fruit, pumpkin seeds, sunflower seeds, cocoa nibs, and cookie crumbs are great nut-free choices. Always label tins clearly if you’ve used nuts in any other batch nearby.
How do I scale these recipes for a big gifting day?
Double the ingredients and use two lined sheet pans per flavor. Melt chocolate in batches so it stays workable, and rotate pans on separate counters to set while you decorate the next one.
Can I freeze bark to make it way ahead?
Yes, you can freeze bark for up to 2 months in double-wrapped, airtight layers, but expect minor bloom when thawed. Thaw in the unopened container at room temperature to reduce condensation and preserve texture.
Bring It Home
Start with one Christmas bark this week—peppermint if you crave classic, cranberry-pistachio if you want jewel-toned drama. The truth is, gifting well isn’t about perfection; it’s about sharing something thoughtful that tastes as good as it looks.
Make a batch, snap a photo, and tuck it into a tin with parchment. You’ll feel that tiny thrill when someone cracks a shard and goes quiet for a second. That’s your cue: you’ve got this, and your edible gifts are officially on everyone’s wish list.

About the Author

Krisztina P.Rendes, Founder of Home Style Vibes
Founder of Home Style Vibes
Krisztina Puskásné Rendes created Home Style Vibes as a cozy-modern lifestyle space where homemaking meets inspiration. Her goal is to help women create beautiful, organized, and peaceful homes they truly love — without overwhelm. You’ll find here heart-driven content on home decor, cleaning tips, easy family recipes, organization and decluttering, DIY home projects, plants, and seasonal ideas — all designed to bring more calm, comfort, and style into everyday life.