Strawberry Cheesecake Cookies: Soft, Chewy Cookies Filled with Cream Cheese and Real Strawberries
You want cookies that taste like strawberry cheesecake… but you also want them to feel like cookies. Soft. Chewy. A little gooey in the middle. Not a dry “pretty” cookie that crumbles like sad sand. So yeah—these Strawberry Cheesecake Cookies hit the sweet spot.
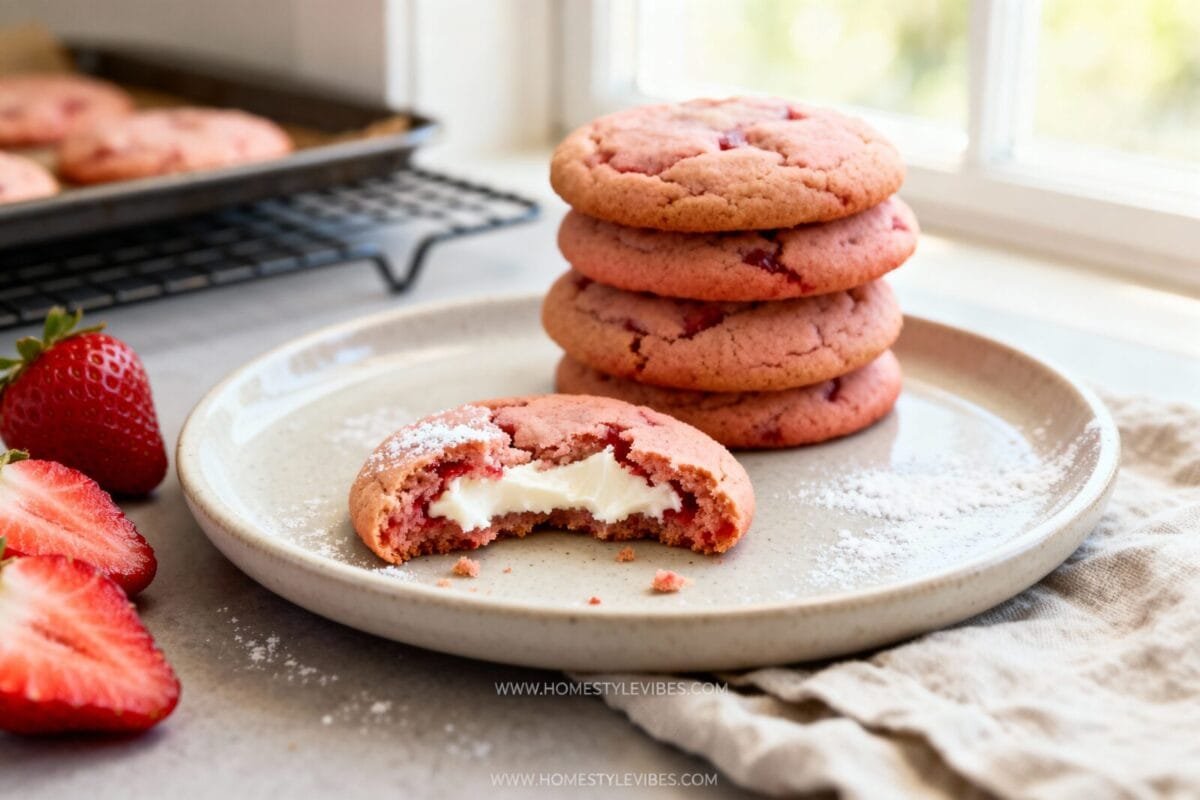
They’ve got a real cream cheese center (not just “cheesecake vibes”), plus real strawberries folded into the dough. And you don’t need anything fancy. You just need a bowl, a mixer (or strong arms), and the willingness to freeze little cream cheese blobs like you’re prepping snacks for a tiny, very picky queen.
Last Friday night, I made a batch while my daughter crawled laps around the kitchen island and tried to steal a silicone spatula (she can’t talk yet, but she sure can communicate “mine” with her whole face). My husband walked in, saw cream cheese dollops on a tray, and went,
“You’re serious?”
Yup. Dead serious. These cookies reward the chaos.
And hey—ever wondered why some strawberry cookies taste weirdly… flat? Hold on, because the “why” matters here, and it’s the difference between “wow” and “why did I do this to myself.”
Why This Recipe Works
- You freeze the cream cheese filling first so it stays tucked inside the cookie instead of melting into a creamy puddle. I tried skipping this once, and the centers basically vanished. Ugh.
- You use real strawberries the smart way—small dice, pat them dry, and don’t dump in a watery mess. Cookies hate puddles. Cookies want boundaries.
- You add a little cornstarch so the cookie stays soft and chewy even after it cools. IMO, cornstarch in cookies feels like a tiny cheat code.
- You bake “until set, not until brown” because overbaking turns these into crumbly strawberry sadness. Nobody asked for that.
- You get cheesecake flavor without a whole cheesecake which feels like winning at life on a Tuesday.
Next up, let’s put everything you need on the counter so you don’t realize mid-mix that you ran out of vanilla (ask me how I know).
What You Will Need
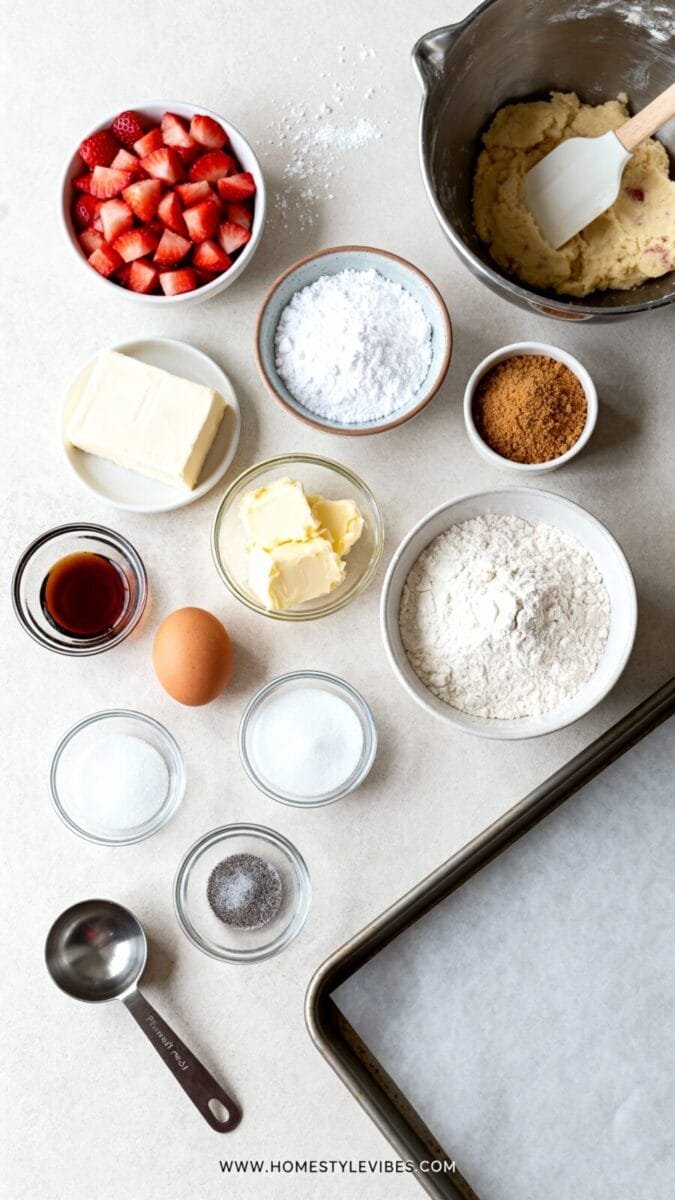
The ingredients that make these taste like a bakery cookie
- Cream cheese (full-fat): You want that real cheesecake feel, not a “lite” version that tastes like regret.
- Powdered sugar: Sweetens and thickens the filling so it scoops cleanly.
- Butter (unsalted, softened): Soft butter blends smooth and gives you that chewy bite.
- Brown sugar + granulated sugar: Brown sugar brings moisture and a caramel note; white sugar keeps edges lightly crisp.
- 1 large egg: Binds everything and keeps the cookie tender.
- Vanilla extract: Don’t skip it. Just don’t.
- All-purpose flour: Spoon and level it—don’t pack it like you’re building a sandcastle.
- Cornstarch: The softness insurance policy.
- Baking soda: Gives lift so the cookies don’t bake up dense.
- Salt: Makes strawberry + cheesecake flavors pop.
- Fresh strawberries: Small diced. Pat dry. (Yes, really. Every. Single. Time.)
- Optional: White chocolate chips (8 oz) or crushed freeze-dried strawberries for extra punch. FYI, freeze-dried strawberry bits boost flavor without adding moisture.
The tools that save your sanity
- Hand mixer or stand mixer (a spoon works too, but your wrist may file a complaint)
- Baking sheets + parchment paper
- Small cookie scoop (or a tablespoon)
- Paper towels for drying the strawberries
Quick strawberry note: Fresh berries carry a lot of water. If you toss them in wet, they leak. Then your dough turns sticky, and the cookies spread like pancake batter. (Not cute.) Pat them dry like you mean it.
Okay, deep breath. Back to it.
Next, I’ll show you the exact way to stuff these so you actually get a creamy center instead of a weird cream-cheese swirl situation.
Step by Step Instructions
The little freeze-first move that makes the centers stay put
Start with the cheesecake filling, because it needs freezer time. And because… I mean, you’ll see.
- Make the filling: In a bowl, mix 8 oz cream cheese, 1/3 cup powdered sugar, 1/2 tsp vanilla, and a tiny pinch of salt. I mix until smooth and thick. If it looks runny, you probably overmixed or your cream cheese got too warm—chill it for 10 minutes and try again.
- Scoop and freeze: Scoop about 1 to 1 1/2 teaspoons per dollop onto a parchment-lined plate or small tray. Freeze for 30–45 minutes, until firm. I usually tell myself “I’ll clean the kitchen while it freezes,” and then I stare at my phone like a raccoon. So… do what you can.
The dough that stays soft and chewy
While the filling freezes, you’ll make the cookie dough. This part feels normal, comforting, like classic cookie therapy.
- Cream butter + sugars: In a large bowl, beat 1/2 cup (1 stick) softened unsalted butter with 1/2 cup brown sugar and 1/4 cup granulated sugar for about 1–2 minutes. You want it fluffy-ish, not gritty. If the butter still looks chunky, give it another 20 seconds.
- Add egg + vanilla: Beat in 1 large egg and 2 tsp vanilla. The batter should look glossy and smooth. If it looks curdled, your butter was too cold—keep mixing and it usually comes together.
- Mix dry ingredients: In a separate bowl, whisk 1 3/4 cups all-purpose flour, 1 tbsp cornstarch, 1/2 tsp baking soda, and 1/2 tsp salt.
- Combine: Add the dry mix into the wet mix and stir until you don’t see flour streaks. Don’t overmix. Overmixing makes tough cookies, and life is already tough enough, okay fine.
Now the strawberries. This is where people get sloppy (no shade, I’ve done it too).
- Prep the strawberries: Dice 3/4 cup fresh strawberries into small pieces, then press them gently between paper towels. I once skipped this because I felt “brave,” and the dough turned into sticky pink glue. Cute, but also… not bakeable.
- Fold them in: Gently fold in the strawberries. Add 3/4 cup white chocolate chips if you want that strawberry-cheescake-and-cream vibe. (Also yes, I just spelled that wrong, and I’m leaving it.)
But here’s my tiny rant: people online love to say “just add fresh strawberries!” like it’s nothing. No mention of water. No mention of spreading. No mention of the emotional damage when your cookies bake into thin pink frisbees. So I’m telling you the truth: dry the berries, keep them small, and don’t overload the dough. Your future self will feel so smug.
Next comes the stuffing part—the slightly messy, weirdly satisfying step where you wrap dough around frozen cheesecake centers and realize you’re basically doing edible crafts, and then you’ll…
Step by Step Instructions (continued)
The stuffing method that actually keeps the filling inside
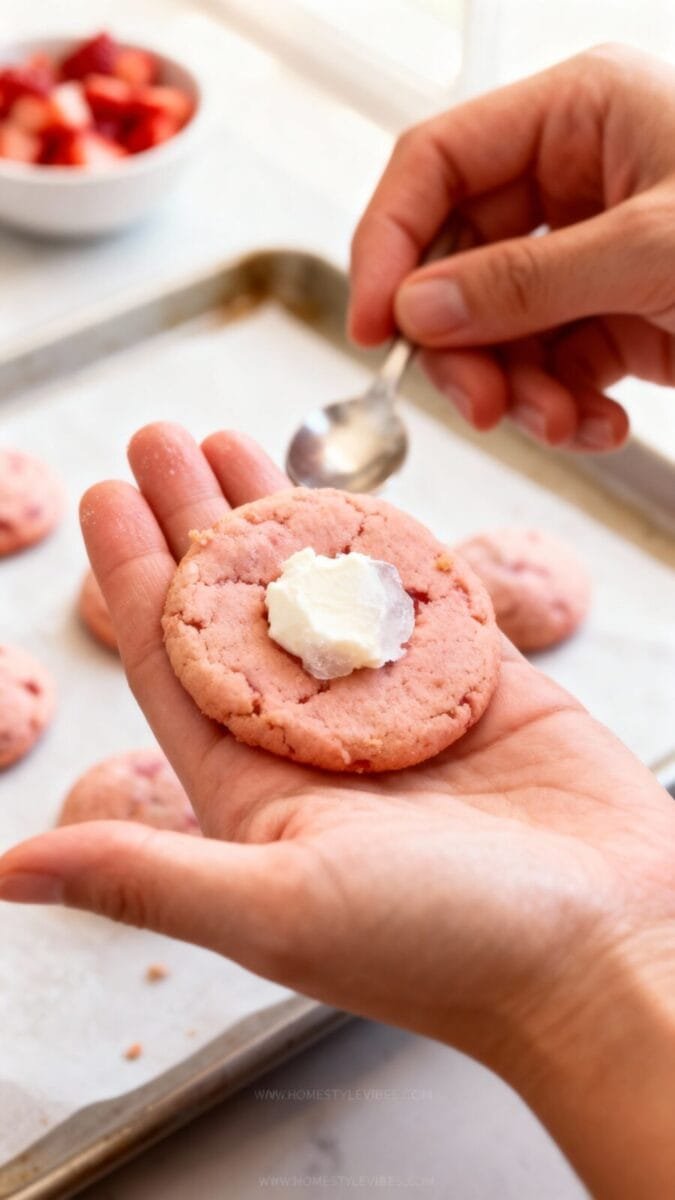
…so you’ll grab the frozen cream cheese dollops and start assembling. No need to overthink it—just don’t let the filling sit out too long.
- Preheat the oven: Set it to 350°F. Line two baking sheets with parchment.
- Scoop the dough: Scoop about 2 tablespoons of dough per cookie (a medium scoop helps). If the dough feels too sticky, chill it for 10 minutes. Actually… scratch that. Chill it for 10 minutes anyway if your kitchen feels warm.
- Wrap the filling: Flatten a dough scoop in your palm, place a frozen filling dollop in the center, then pinch dough around it until sealed. Roll gently into a ball. If a little filling peeks out, pinch it closed like you’re tucking in a baby blanket.
- Space them out: Place cookies about 2–3 inches apart. These spread a bit, and they deserve personal space.
And if you’re wondering, “Do I have to seal them perfectly?” No. But you do need to seal them enough that the filling doesn’t escape like it has places to be.
The bake time that keeps them soft (not dry)
- Bake: Bake for 10–12 minutes. Pull them when the edges look set and the tops look slightly underdone. They finish baking on the tray. If you wait for golden tops, you’ll overbake them. I did that once and felt personally attacked by my own cookies.
- Cool: Let them cool on the baking sheet for 10 minutes before moving. The centers stay delicate while hot.
Mini reality check: Your cookies may look “too pale” at 11 minutes. Trust the set edges. Trust the carryover heat. Trust me (and my batch that baked for 11 mintues and still vanished in a day).
Next, let’s talk about storage, because cream cheese centers change the whole “leave them on the counter for a week” situation.
How to Store
The keep-it-fresh approach that doesn’t dry them out
Because these have cream cheese filling, I store them in the fridge after they cool. I keep them in an airtight container, and I stack them with parchment between layers so they don’t stick.
- Fridge: Store for up to 5 days. Let a cookie sit at room temp for 10–15 minutes before eating so the center tastes creamy again.
- Room temp: I feel fine leaving them out for a few hours during a party, but I don’t leave them out overnight. I like living on the edge, but not that edge.
- Freezer: Freeze baked cookies for up to 2 months. Thaw in the fridge overnight, then let them warm slightly before eating. (My husband “tests” one while it’s still half frozen. He insists it tastes like strawberry ice cream cake. He isn’t wrong.)
Next, I’ll give you a few fun tweaks so you can match your mood—extra strawberry, extra tang, extra cozy.
Options, Variations You Can Try
Make them louder: more strawberry, more cheesecake energy
- Strawberry boost: Add 2–3 tablespoons crushed freeze-dried strawberries to the dough. You get more flavor without extra moisture. No idea why, but it helps.
- Lemon pop: Add 1 teaspoon lemon zest to the cream cheese filling. It tastes bright, like you just opened a window in winter.
- Jam center swap: Mix 1 tablespoon strawberry jam into the filling for a swirl. Don’t add more or it gets too loose.
- Chocolate moment: Skip white chocolate chips and add semi-sweet instead. It tastes like a chocolate-covered strawberry met a cheesecake. Weirdly perfect.
Next, I’m going to point out the mistakes that ruin these, so you don’t have to learn the hard way like I did at Aldi.

Common Mistakes
The stuff that makes cookies spread, leak, or go blah
- You didn’t dry the strawberries: Wet berries dump water into the dough. Then the cookies spread thin and bake unevenly. Hey, don’t roll your eyes—I’ve been there too.
- You skipped freezing the filling: The center melts into the dough and disappears. You still get a tasty cookie, but you lose the whole “cheesecake center” point.
- You overbaked: You want set edges, not browned tops. Pull them earlier than your instincts tell you.
- You overstuffed: Too much filling breaks through and leaks out. Keep the dollops small. The cookie doesn’t need therapy, it needs balance.
- You didn’t seal the dough: Pinch it closed. Roll gently. Treat it like a tiny present you don’t want to rip open.
Okay, let’s pause for a sec…
Three months ago, I stood in Aldi with a cart full of groceries and a head full of “I’ll bake tonight.” Then my tap-to-pay said no. Twice. The receipt smelled like cinnamon from my latte, and I wanted to evaporate. So yeah, I came home, made cookies anyway, and decided: if the day feels embarrassing, the dessert needs to feel extra comforting. Next up, quick questions people always ask so you don’t have to scroll comments for 20 minutes.
FAQ
The quick answers that save your time
Can I use frozen strawberries? You can, but they add way more moisture. If you use them, thaw, drain, and pat them really—really dry. Even then, expect more spreading.
Do I have to chill the dough? Sometimes you can skip it. Actually wait, no, I take that back—if your kitchen feels warm or the dough looks sticky, chill for 10–20 minutes. It helps the cookies hold shape.
Can I make the filling ahead? Yes. Freeze the dollops up to 2 days ahead, covered. Then assemble when you’re ready.
Why do my cookies crack on top? You probably added a touch too much flour or baked a minute too long. Spoon and level the flour, and pull the cookies when they look slightly underdone in the center.
Can I double the batch? Totally. Double everything and freeze extra filling dollops. Your future self will feel like a domestic wizard.
Next, I’ll wrap it all up in a way that makes you want to preheat your oven right now (or at least bookmark this for later).
Wrapping Up
These cookies give you the best parts of strawberry cheesecake—creamy center, sweet-tangy bite, real berry flavor—without the whole cheesecake commitment. You freeze the filling, dry the strawberries, bake until just set, and you end up with soft, chewy cookies that feel a little fancy but still easy.
So yeah, make them for a holiday tray, a girls’ night, or a random Tuesday when your brain feels like mush. My husband “accidentally” ate three in a row and acted shocked each time, and my 1-year-old tried to hand me crumbs like a gift (she can’t say a word yet, but she definitely says “love you” in crumbs).
Hey, don’t roll your eyes—go make the batch. You’ll pull them from the oven, see that creamy center, and feel ridiculously proud for something that took, what, 30 minutes of actual work?
Anyway… you got this, and if one cookie leaks a little filling, just call it “rustic” and keep going…