Aesthetic & Healthy Snack Ideas That Look Like a Dessert
You want snacks that look like a café treat, taste like a little reward, and still make your body feel good afterward. You also want them to fit into real life, not a fantasy where you have unlimited time and zero dishes.
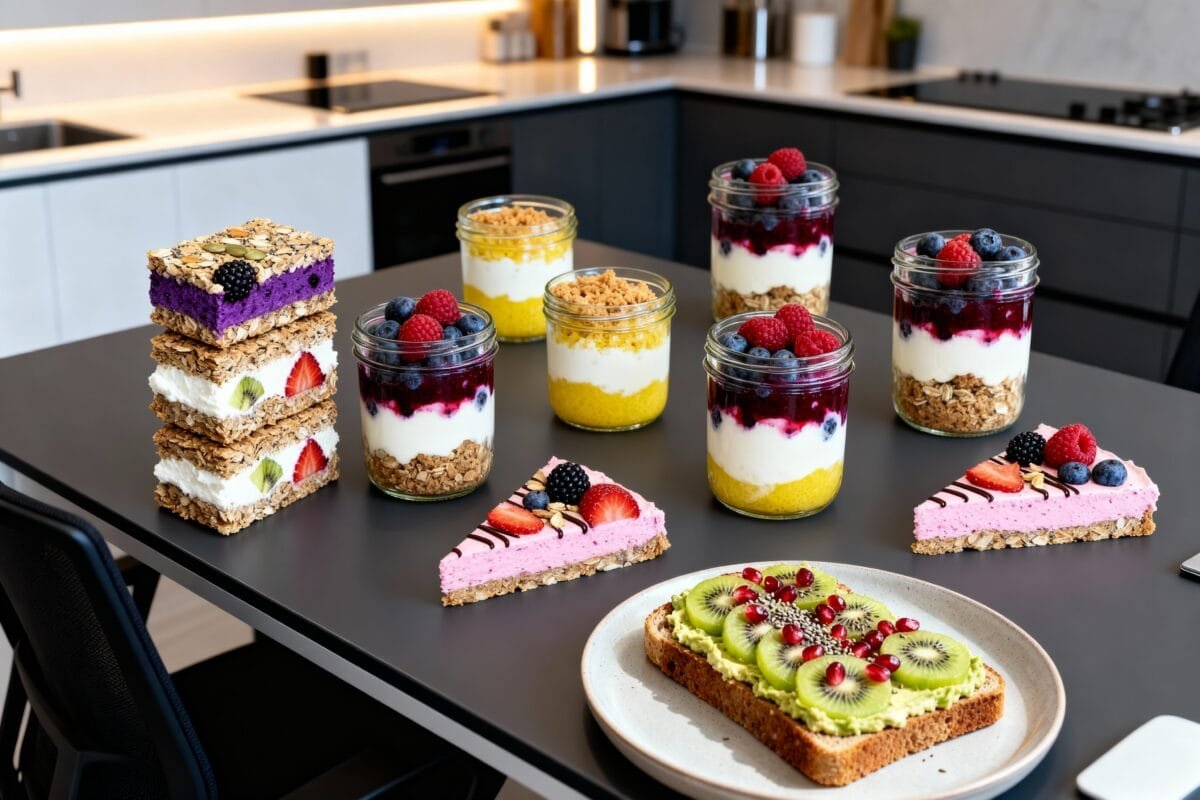
These are those snacks: pretty, colorful, creamy, crunchy, and absolutely Pinterest-worthy. Ready to make your snack routine look like a dessert menu without actually turning into a sugar spiral?
1. Berry Yogurt Snack Squares That Look Like a Bakery Display
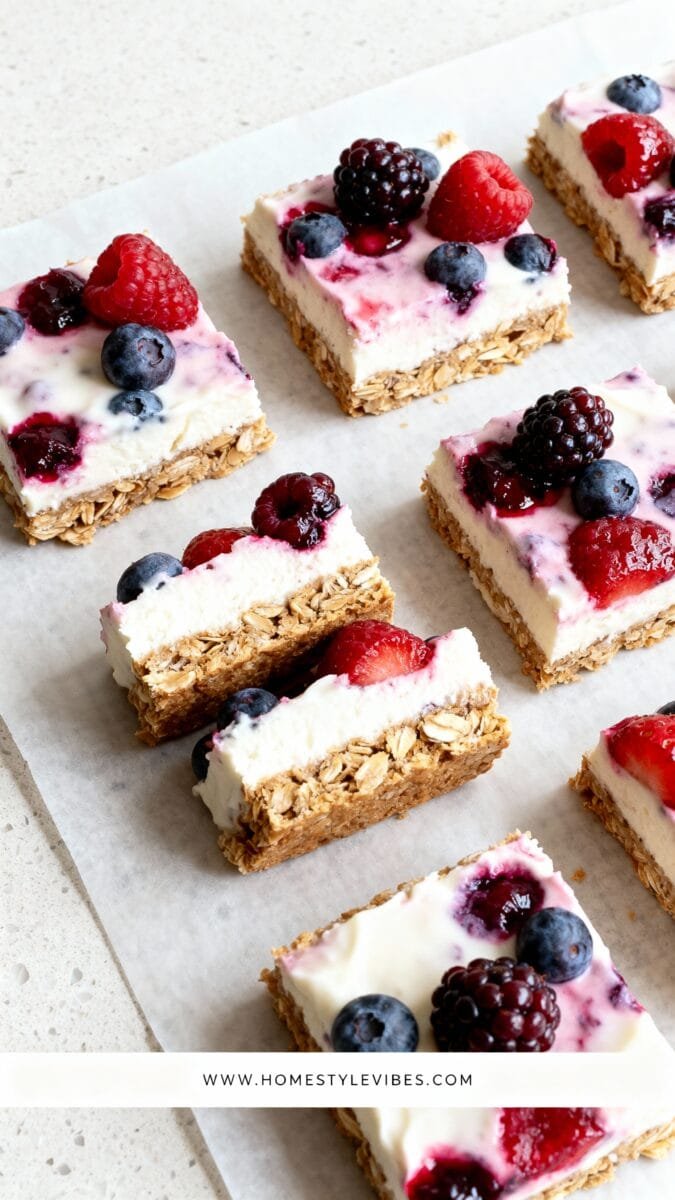
These squares look like you bought them from a fancy spot that charges extra for “handcrafted.” You don’t need baking skills, you don’t need a mixer, and you definitely don’t need to pretend you enjoy complicated recipes. You just need a fridge and a tiny bit of patience while things set.
Eat these in the morning when you want something sweet with your coffee but you refuse to start the day with a sugar crash. Grab one in the afternoon when your brain wants cookies and your stomach wants something that actually lasts. Pack them for a workday snack because they hold their shape and don’t explode all over your bag.
Busy days love these because you make one pan and you get multiple snacks with zero daily effort. You don’t stand in the kitchen deciding what to eat while you get hangrier by the second. You slice, store, and reach for them like the organized person you swear you are deep down.
They keep you full because Greek yogurt brings real protein, the berries add fiber and volume, and the base adds a little fat so you don’t feel hungry again in twenty minutes. That protein-fiber-fat combo helps your body stay steady. Your snack stops acting like a teaser and starts acting like fuel.
For meal prep, line your pan with parchment so you lift the whole thing out cleanly. Store squares in a single layer for the prettiest look, or stack them with parchment between layers if you need space. Keep them cold for the best texture and the sharpest edges.
Variation ideas make these feel new all week. For a kid-friendly version, stir a little mashed banana into the yogurt layer and use sliced strawberries for extra “dessert energy.” For dairy-free, use a thick coconut yogurt and add an extra tablespoon of chia to help it set firmly.
Ingredients:
- 2 cups plain Greek yogurt (or thick coconut yogurt for dairy-free)
- 2 tablespoons honey or maple syrup
- 1 teaspoon vanilla extract
- 1 1/2 cups mixed berries (strawberries, blueberries, raspberries)
- 1 1/4 cups rolled oats
- 1/2 cup almond flour (or oat flour)
- 1/3 cup melted coconut oil
- 2 tablespoons chia seeds
- Pinch of salt
- Optional: 2 tablespoons chopped pistachios for topping
Instructions:
- Line an 8×8-inch pan with parchment paper and leave overhang on two sides.
- Mix rolled oats, almond flour, melted coconut oil, chia seeds, and salt until the mixture looks evenly coated.
- Press the oat mixture firmly into the pan to form a compact base.
- Stir Greek yogurt, honey, and vanilla until smooth and glossy.
- Spread the yogurt layer over the base and smooth the top with a spatula.
- Scatter berries over the yogurt and press them gently so they sit slightly in the surface.
- Chill for at least 4 hours, or overnight for the cleanest slices.
- Lift out using parchment, slice into squares, and store chilled.
Serve these cold for the sharpest edges and the prettiest layers. Add chopped pistachios for crunch, or drizzle a tiny bit of melted dark chocolate if you want a “dessert but make it smart” finish. If you plan to pack them, wrap each square in parchment so they stay neat and don’t stick together. This snack makes you feel like you have your life together, even when your calendar says otherwise.
2. Layered Oat Cream Sandwich Bars with Kiwi & Strawberry
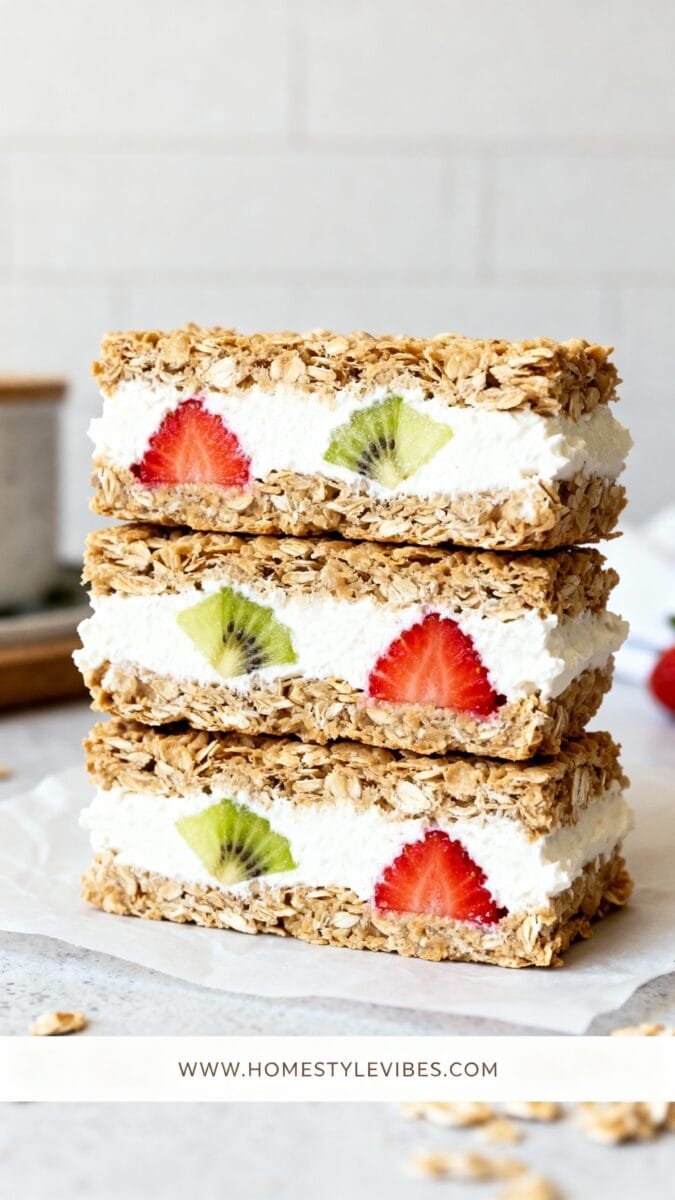
These bars look like a bakery-style dessert, but they’re actually a smart, no-bake snack you can prep ahead and slice cleanly. Two soft oat layers sandwich a thick, white cream filling studded with fresh kiwi and strawberry pieces. The result feels light, fresh, and indulgent without being heavy.
This snack works best in the afternoon or early evening, especially when you want something sweet but not overly rich. It pairs perfectly with coffee or tea and feels “treat-like” without tipping into full dessert territory. Kids love it too, because it looks like a real dessert bar.
On busy days, these bars shine because they’re fully make-ahead and hold their shape well. They don’t crumble, don’t melt, and don’t require utensils. You can slice them once, store them, and grab them straight from the fridge.
They keep you full thanks to the slow-digesting oats, plus the protein and fat from the creamy filling. The kiwi and strawberries add freshness and prevent the bars from feeling dense or overly sweet.
Reality check: This recipe sets properly because the oat layers are compact and lightly bound with oil and honey, while the cream layer stays stable thanks to thick Greek yogurt (or skyr) and optional chia seeds. The fruit is chopped small to prevent excess moisture from breaking the structure.
Ingredients:
- 2 cups rolled oats
- 1/2 cup almond flour (or finely ground oats)
- 1/3 cup melted coconut oil
- 3 tablespoons honey or maple syrup
- Pinch of salt
- 1 1/2 cups thick Greek yogurt or skyr
- 1 teaspoon vanilla extract
- 1 kiwi, peeled and finely diced
- 3–4 strawberries, finely diced
- Optional: 1 tablespoon chia seeds (for extra stability)
Instructions:
- Line an 8×8-inch pan with parchment paper, leaving overhang on the sides.
- In a bowl, mix rolled oats, almond flour, melted coconut oil, honey, and salt until evenly coated.
- Press half of the oat mixture firmly into the bottom of the pan to create a compact base.
- In another bowl, stir Greek yogurt, vanilla, and optional chia seeds until smooth.
- Gently fold in the diced kiwi and strawberries.
- Spread the cream layer evenly over the oat base.
- Carefully press the remaining oat mixture on top, using your hands or a spatula.
- Refrigerate for at least 4 hours, preferably overnight, until fully set.
- Lift out using parchment and slice with a sharp knife.
Serve chilled for the cleanest layers. If you want extra visual appeal, sprinkle a few strawberry slices on top before serving. These bars hold well for 3–4 days in the fridge and slice beautifully when cold.
3. Kiwi & Pomegranate Avocado Toast That Looks Like Art
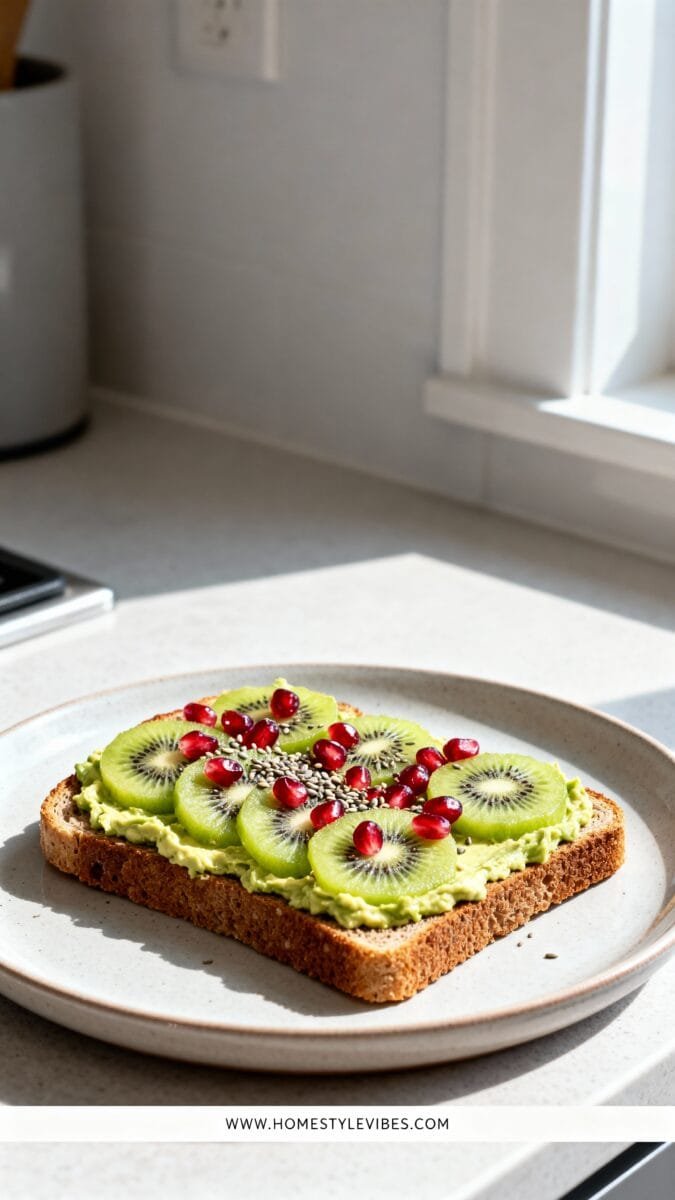
This toast looks like you paid someone to style it for a photoshoot. The green base, the jewel-toned fruit, and the clean lines make it look expensive, even though you can make it in minutes. It tastes fresh, creamy, and slightly sweet, with just enough salt to keep it interesting.
Eat this in the morning when you want energy without heaviness. Make it in the afternoon when you crave something pretty and satisfying but you don’t want a sugar crash. Serve it as a “snack dinner” side moment when you want something light and snacky but still substantial.
Busy days love this because you don’t cook anything beyond the toast. You mash, top, and eat. You don’t deal with pans, and you don’t deal with cleanup that feels disproportionate to a snack.
It keeps you full because avocado brings healthy fat that actually sticks around, and whole grain bread brings fiber that slows digestion. Fruit adds volume and natural sweetness, and that helps your brain feel satisfied too. You get “dessert vibes” without making your blood sugar throw a tantrum.
For meal prep, mash avocado with lemon juice and store it in a small airtight container. Press plastic wrap directly on the surface to reduce browning. Toast stays best fresh, but you can pre-slice fruit so assembly takes seconds.
For variations, go kid-friendly by using bananas and strawberries instead of kiwi and pomegranate. If you want a dairy-free protein boost, sprinkle hemp seeds or chia on top. If you need gluten-free, use your favorite gluten-free bread and toast it until crisp.
Ingredients:
- 2 slices whole grain bread (or gluten-free bread)
- 1 ripe avocado
- 1 teaspoon lemon juice
- Pinch of salt
- 1 kiwi, peeled and sliced
- 2 tablespoons pomegranate arils
- Optional: 1 teaspoon honey
- Optional: 1 tablespoon hemp seeds or chia seeds
Instructions:
- Toast the bread until crisp and golden.
- Mash avocado with lemon juice and salt until creamy.
- Spread the avocado mash evenly over the toast.
- Arrange kiwi slices on top in a neat pattern.
- Sprinkle pomegranate arils over the kiwi for color and crunch.
- Add optional hemp seeds or chia, then drizzle honey lightly if you want extra sweetness.
Serve immediately for the best crunch. If you want a stronger dessert vibe, add a tiny drizzle of honey and a sprinkle of seeds for that “I definitely know what I’m doing” look. For a more savory twist, skip honey and add a pinch of flaky salt. This toast looks dramatic, tastes fresh, and takes less time than you spend choosing what to snack on.
4. Berry Cheesecake Dessert Jars That Keep You Satisfied
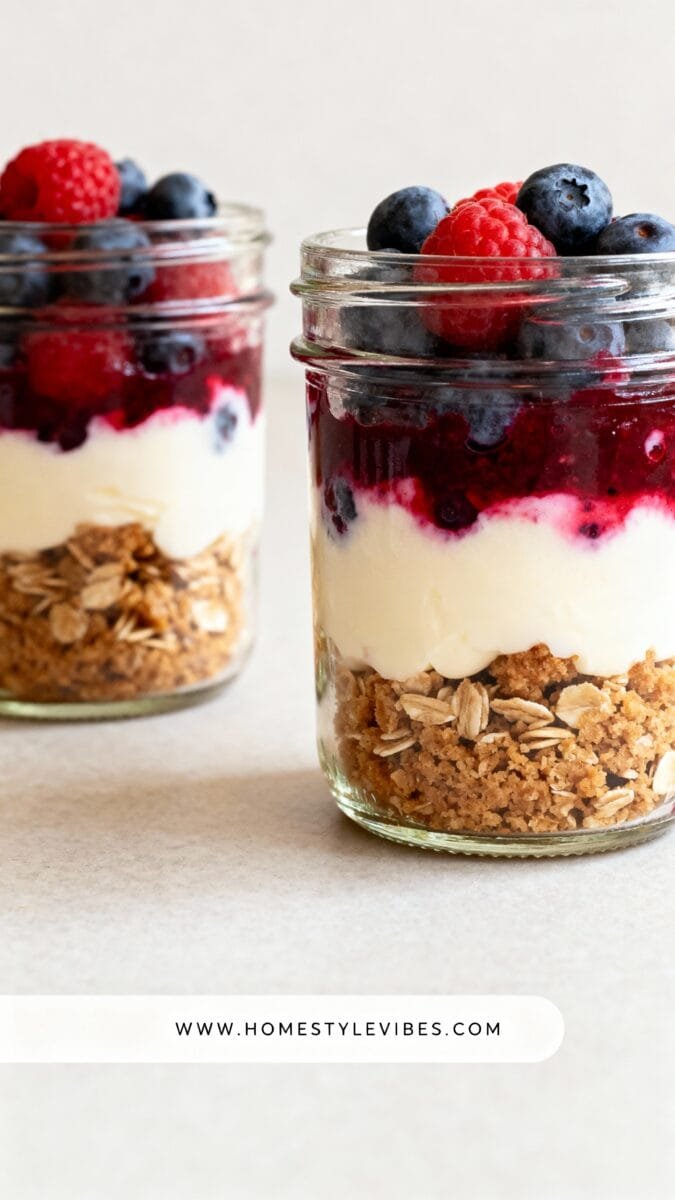
These jars look like mini cheesecakes, and they taste like a treat, but they still behave like a smart snack. You get creamy, tangy, sweet, and fruity in every bite. You also get a snack that feels like a reward, which matters when your day feels like a never-ending to-do list.
Eat these in the afternoon when you want something sweet and creamy but you still need mental clarity afterward. Make them as a late-night snack when you want dessert vibes without a heavy sugar hit. Pack them for workdays because the jar makes everything tidy and portable.
Busy days love these because you prep several jars in one go. You don’t cook, you don’t bake, and you don’t stand there measuring flour like you’re auditioning for a baking show. You just layer and chill.
They keep you full because Greek yogurt and cottage cheese bring protein, and the crust layer brings fiber from oats and fat from nuts or almond flour. Protein keeps hunger away, and fat keeps cravings calmer. You end up satisfied instead of hunting for another snack.
For storage, keep jars sealed in the fridge for up to four days. Keep crunchy toppings separate if you want maximum texture. If you travel with them, pack the crumble in a small container and sprinkle it on right before eating.
For variations, go dairy-free by using a thick plant-based yogurt and blending in a tablespoon of chia seeds for body. For kids, sweeten the filling with mashed banana and use crushed graham crackers for that familiar cheesecake vibe.
Ingredients:
- 1 cup Greek yogurt
- 1/2 cup cottage cheese (or more Greek yogurt)
- 2 tablespoons honey or maple syrup
- 1 teaspoon vanilla extract
- 1 1/2 cups mixed berries
- 1 cup rolled oats
- 1/3 cup almond flour
- 2 tablespoons melted coconut oil
- Pinch of salt
- Optional: 1 tablespoon lemon zest
Instructions:
- Blend Greek yogurt, cottage cheese, honey, vanilla, and optional lemon zest until smooth.
- Mix oats, almond flour, melted coconut oil, and salt to form a crumble base.
- Spoon a layer of crumble into the bottom of each jar.
- Add a layer of the creamy filling.
- Add a layer of berries, lightly pressing them against the glass for a pretty look.
- Repeat layers until the jar fills, then top with extra berries.
- Chill for at least 2 hours so flavors meld and texture firms up.
Serve these chilled with a spoon and zero guilt. For extra dessert energy, add a thin drizzle of melted dark chocolate or a sprinkle of crushed pistachios on top right before eating. If you want a brighter flavor, add lemon zest and a few blueberries. These jars feel fancy, travel well, and give you that “I ate dessert” satisfaction while still keeping you fueled.
5. Strawberry Chocolate Yogurt Bark That Snaps Like Candy
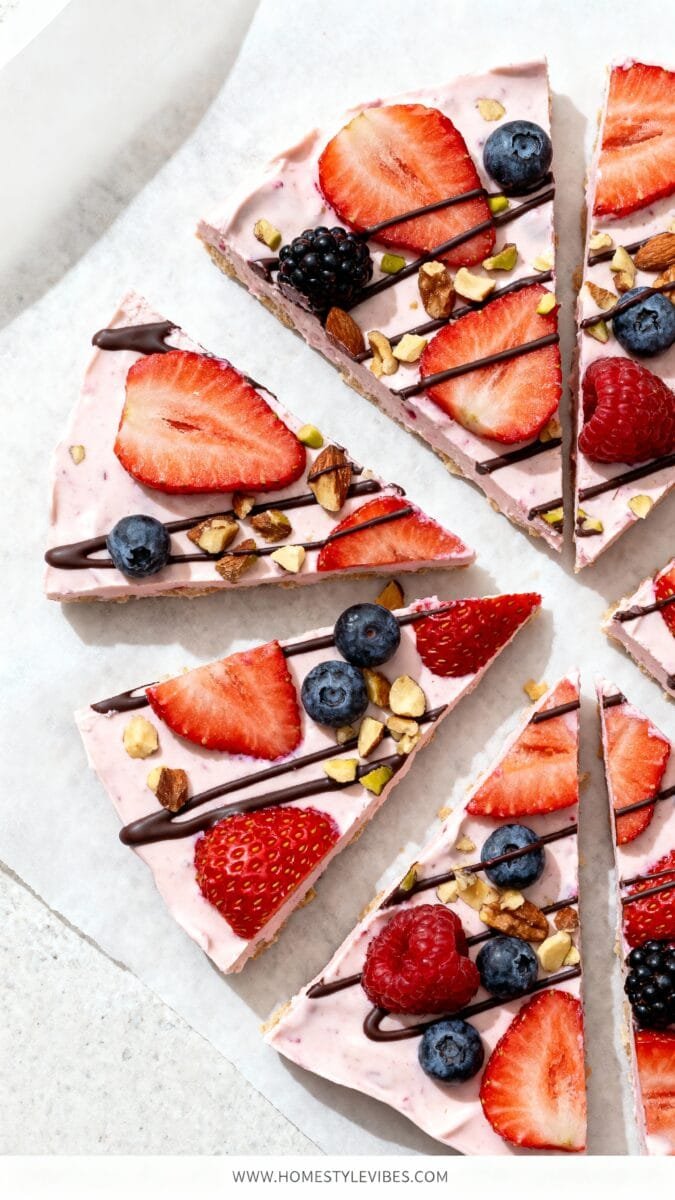
This snack looks like a fancy dessert board, but you make it with a bowl and a spatula. The bright fruit, the creamy base, and the chocolate drizzle give you pure dessert vibes. It also breaks into gorgeous shards, which instantly makes it feel more special than it has any right to feel.
Eat this when you want something cold and sweet, especially in the afternoon or after dinner. Pack it as a workday treat if you have a freezer at work, or keep it at home for those “I want dessert but I also want to sleep well” moments. Kids love it because it feels like candy, and adults love it because it doesn’t wreck your day.
Busy days love this because you prep it once and then you basically snack on autopilot. You don’t measure much, and you don’t cook anything. You just spread, sprinkle, freeze, and snap pieces off when cravings show up.
It keeps you full because Greek yogurt brings protein and the toppings add fiber and fat. Add nuts or seeds and the snack becomes even more satisfying. Chocolate gives your brain that “treat” signal, but the protein keeps the snack from turning into a sugar rollercoaster.
Store bark in a freezer-safe container with parchment between layers. It lasts about two months in the freezer, which means you can keep it as a long-term snack backup. Let it sit for a minute before eating so it softens slightly and tastes extra creamy.
For variations, go dairy-free with thick coconut yogurt and add extra chia seeds to help it hold. For a kid-friendly version, use mini chocolate chips and sliced bananas. For a more grown-up vibe, add crushed pistachios and a tiny sprinkle of flaky salt.
Ingredients:
- 2 1/2 cups plain Greek yogurt (or thick coconut yogurt)
- 2 tablespoons honey or maple syrup
- 1 teaspoon vanilla extract
- 1 cup sliced strawberries
- 1/3 cup blueberries or raspberries
- 1/4 cup chopped almonds or pistachios
- 1/4 cup melted dark chocolate
- Optional: 1 tablespoon chia seeds
Instructions:
- Line a baking sheet with parchment paper.
- Stir Greek yogurt with honey, vanilla, and optional chia until smooth.
- Spread the yogurt mixture into an even layer about 1/4-inch thick.
- Top with strawberries, berries, and chopped nuts.
- Drizzle melted dark chocolate across the top in thin lines.
- Freeze for at least 3 hours until firm.
- Break into pieces and store in a freezer-safe container.
Serve straight from the freezer for the best snap. If you want a softer bite, let it sit for one minute before eating. Try it with strawberries and pistachios for the prettiest color contrast, or swap fruit based on the season. This bark satisfies cravings fast, looks gorgeous, and honestly makes you feel like you hacked dessert.
6. Lemon Blueberry Oat “Crumble” Cups That Feel Like Mini Pies
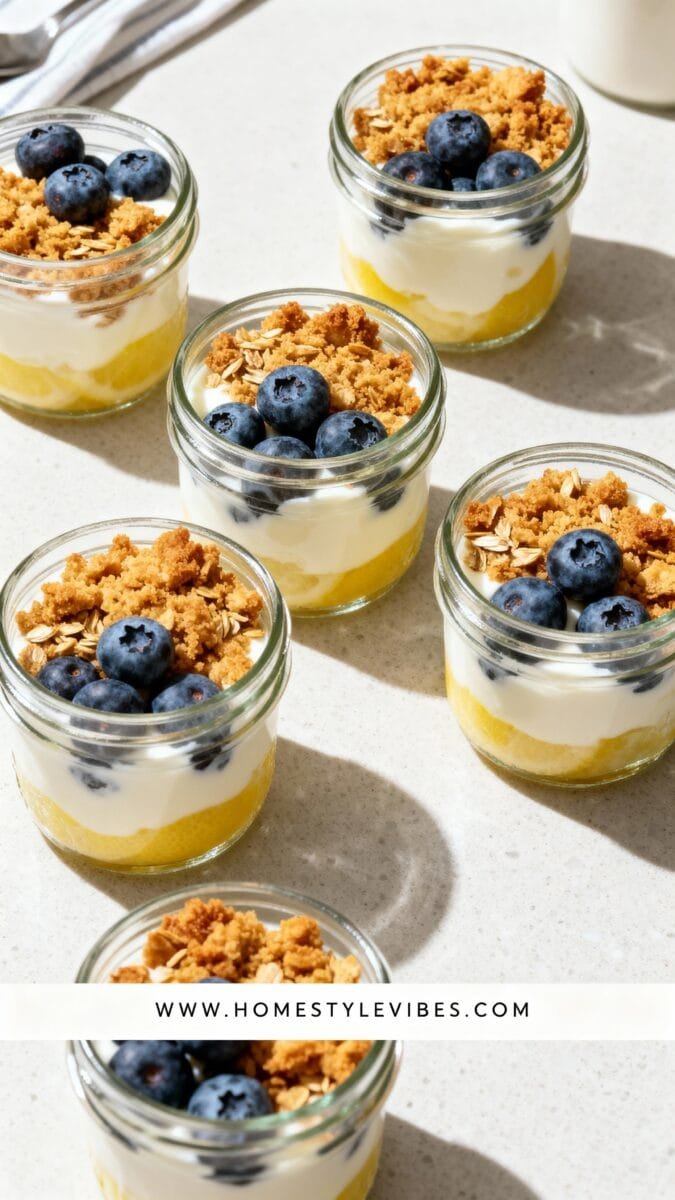
These cups look like little dessert parfaits with a pie-meets-crumble vibe. You get bright lemon, juicy blueberries, creamy yogurt, and crunchy oat crumble. They look layered and dramatic, but you can assemble them quickly with basic ingredients.
Eat these in the morning when you want something that feels like a bakery treat but still fuels you. Eat them in the afternoon when you want a sweet snack that doesn’t leave you hungry again immediately. Take them on a workday because they travel well in jars and keep your snack game strong.
Busy days love these because you can prep the crumble in one batch and use it all week. You can also assemble multiple cups in minutes. You won’t stand there debating snacks while you slowly lose the will to exist.
They keep you full because Greek yogurt delivers protein and the crumble delivers fiber and fat. Blueberries add volume and fiber too. That combination keeps you satisfied longer than a pastry ever will.
For storage, keep assembled cups in the fridge for up to three days. Keep crumble separate if you want it crisp. If you assemble the cups ahead, expect the crumble to soften slightly, which some people actually love.
For variations, make it dairy-free with coconut yogurt and use maple syrup. For gluten-free, use certified gluten-free oats. For a kid-friendly version, swap lemon for vanilla and add a few mini chocolate chips to the crumble.
Ingredients:
- 2 cups plain Greek yogurt
- 2 tablespoons honey or maple syrup
- 1 teaspoon vanilla extract
- 1 teaspoon lemon zest
- 1 tablespoon lemon juice
- 1 1/2 cups blueberries
- 1 1/4 cups rolled oats
- 1/3 cup almond flour
- 3 tablespoons melted coconut oil
- Pinch of salt
- Optional: 1/2 teaspoon cinnamon
Instructions:
- Mix oats, almond flour, melted coconut oil, salt, and optional cinnamon to form a crumble.
- Toast the crumble in a dry pan over medium heat for 4 to 6 minutes, stirring often, until golden and fragrant.
- Stir Greek yogurt with honey, vanilla, lemon zest, and lemon juice until smooth.
- Spoon yogurt into jars or cups.
- Add a layer of blueberries, pressing some against the sides for a pretty look.
- Top with a generous sprinkle of crumble.
- Repeat layers if you use larger jars, then chill until ready to eat.
Serve these cold for the brightest flavor. Add extra lemon zest on top if you want a “wow” finish. If you want more dessert vibes, drizzle a teaspoon of honey over the crumble right before eating. These cups feel like mini pies in snack form, and they keep you full enough that you don’t immediately start thinking about your next snack.
7. Seeded Oat Snack Squares with Purple Berries
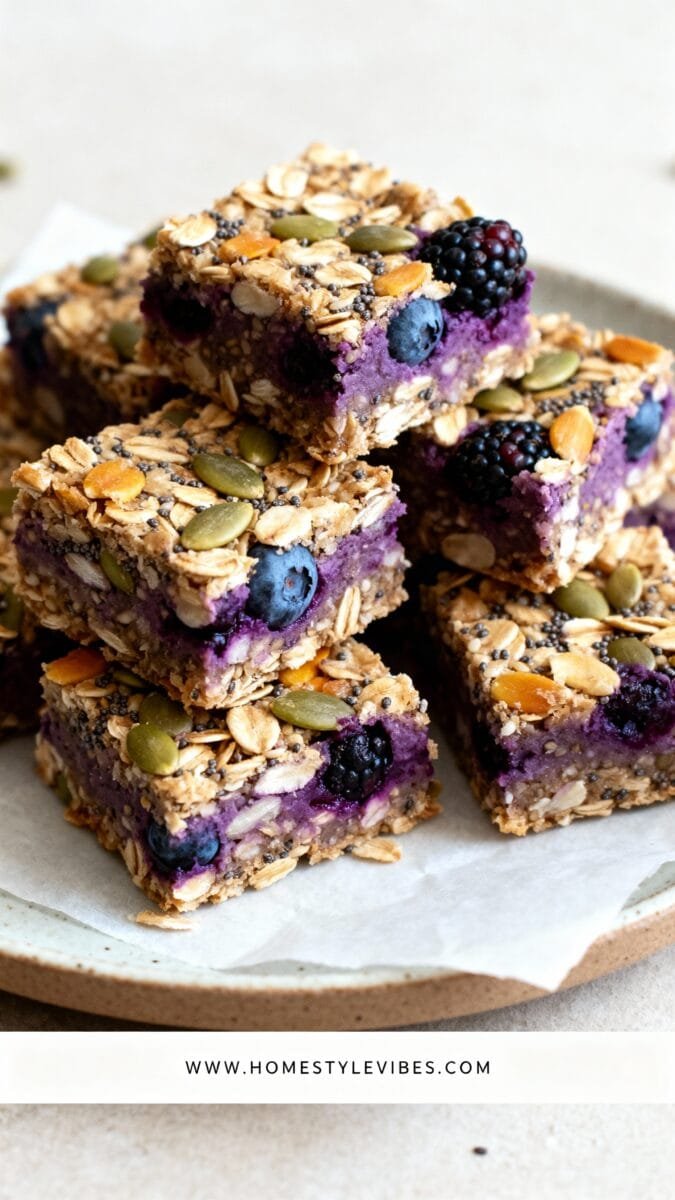
These snack squares are denser, more rustic, and completely different in feel from creamy dessert bars. They’re packed with oats, seeds, and deep purple berries, giving them a hearty, bakery-style look that still feels clean and modern. Think “energy square,” not soft dessert.
This snack works best on busy mornings, long afternoons, or travel days when you need something sturdy and filling. It doesn’t melt, doesn’t require refrigeration for short periods, and holds up well in lunchboxes or bags.
Busy days benefit because you make one pan and get multiple grab-and-go portions. No slicing disasters, no sticky mess, no fragile layers to worry about.
They keep you full thanks to fiber-rich oats, healthy fats from seeds, and natural sugars from berries. This combination slows digestion and keeps energy steady instead of spiking and crashing.
Reality check: These squares bind properly because the berry mixture is lightly cooked to reduce moisture, and the oats and seeds absorb liquid as they chill. This prevents soggy bottoms and crumbly cuts.
Ingredients:
- 1 3/4 cups rolled oats
- 1/4 cup pumpkin seeds
- 2 tablespoons sunflower seeds
- 2 tablespoons chia seeds or ground flaxseed
- 1/3 cup almond butter or peanut butter
- 1/4 cup honey or maple syrup
- 2 tablespoons coconut oil, melted
- 1 cup purple berries (blueberries, blackberries, or a mix)
- 1 teaspoon lemon juice
- Pinch of salt
Instructions:
- Line an 8×8-inch pan with parchment paper.
- In a small saucepan, cook the berries with lemon juice over medium heat for 4–5 minutes until they release juices and slightly thicken.
- Remove from heat and let cool for 5 minutes.
- In a bowl, mix rolled oats, pumpkin seeds, sunflower seeds, chia seeds, and salt.
- Add nut butter, honey, melted coconut oil, and the cooled berry mixture.
- Stir until thick and evenly combined.
- Press firmly into the prepared pan.
- Refrigerate for at least 3 hours until fully set.
- Slice into squares with a sharp knife.
These squares taste best slightly chilled but also hold up at room temperature for several hours. For variation, swap berries seasonally or add shredded coconut for texture. They’re sturdy, filling, and visually distinct from creamy dessert-style snacks.