7 Steal-Worthy Backyard Garden Ideas on a Budget That Look Expensive
You step outside wanting that calm, private, magazine-worthy oasis—and instead, you see a jumble of mismatched pots, patchy grass, and a plastic chair that squeaks every time you sit. We’ve all been there. The dream? Golden evening light on textured stone, layered greenery, and a space that makes your shoulders drop the second you arrive with your iced tea. These 7 backyard garden ideas on a budget that look expensive will fix the visual chaos and give you that polished, photogenic vibe—without a trust fund.

Each idea elevates your backyard using smart materials, intentional color, and small upgrades that read high-end onscreen and in real life. We’ll talk about crushed stone that looks like a designer courtyard, paint that turns fence panels into architectural drama, and plant silhouettes that feel sculptural. Expect texture, shadow play, and gorgeous contrast. These are Pinterest-friendly, weekend-achievable, and renter-welcoming. If you love calm spaces with hotel energy and a hint of vacation, keep scrolling.
1. Courtyard Gravel Lounge With Mediterranean Glow

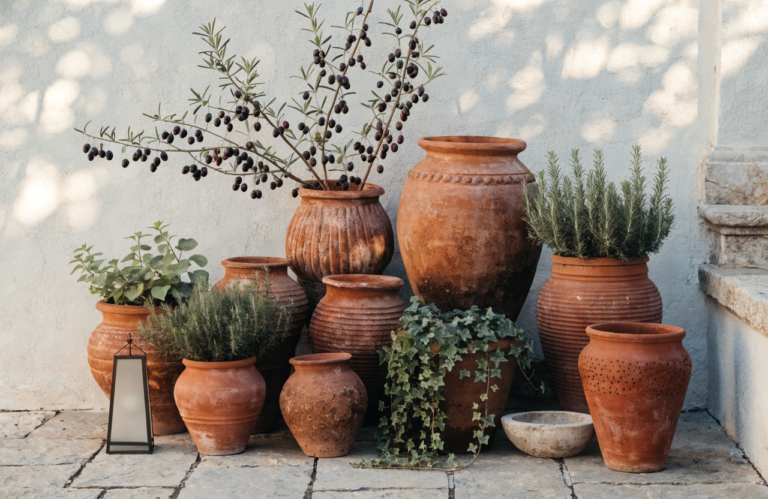
We’ve all been there—trying to coax “oasis” out of a rectangle of tired lawn. You’ve tried new cushions, maybe a string light or two, but it still reads “backyard,” not “courtyard.” This design flips that story by building a defined gravel terrace that feels intentional, European, and wildly relaxing. Think creamy decomposed granite or pale pea gravel, a low-slung seating moment, oversized planters with olives or rosemary, and a soft, candlelit twinkle as the sun dips. The vibe is modern Mediterranean meets wine-at-golden-hour.
Why it works at home: gravel’s budget-friendly, fast to install, and instantly unifies a messy yard. It suits small spaces because the surface reads continuous and clean. Families love it because it drains well and stays usable after rain. Lighting plays a starring role: stake lights and lanterns cast long, cinematic shadows across the stones, adding luxe depth that photographs beautifully. The sound of your footsteps on gravel? Instant escapism.
Why It Looks Expensive: edging plus uniform color equals designer. By framing the area with steel or brick edging and choosing a single gravel tone, you create clean geometry and that “architect did this” energy. Add a trio of oversized planters in one finish—terracotta, matte black, or textured stone—and suddenly the scatter of stuff becomes a styled scene.
Materials: crushed stone or decomposed granite, metal or brick edging, oversized terracotta or fiberstone planters, teak or powder-coated lounge chairs, outdoor lanterns, and olive/rosemary/lavender for sculptural greenery. It photographs beautifully because the pale ground bounces light upward, plants cast soft shadows, and textures layer—smooth pot, rough gravel, airy foliage—creating depth your phone camera loves.
Variations:
– Budget-friendly: use pea gravel and recycled brick as edging; upcycle terracotta pots with limewash.
– Small-space: a 6×8 mini terrace fits two chairs and one large planter; edit hard.
– Renter-friendly: lay contractor’s fabric, pour gravel, and create “edging” with a row of planters—fully removable when you move.
Key Design Elements:
- Main materials: decomposed granite or pea gravel, terracotta/fiberstone planters, powder-coated steel
- Color palette: warm neutrals (sand, clay, olive green, soft black)
- Lighting strategy: low lanterns + stake lights to graze texture and create shadow drama
- Furniture silhouettes: low, angular lounge chairs; simple bistro table; curved planters
- Texture layers: rough gravel, matte pots, soft linen cushions, woody rosemary
- Accent details (hardware, decor pieces, plants): brass lantern handles, cotton throws, olive trees, lavender
How To Recreate This Look:
- Start with marking a rectangle or oval; install simple metal or brick edging.
- Add landscape fabric for weed control, then pour 2–3 inches of gravel and rake smooth.
- Layer in oversized planters in grouped odd numbers; plant olives, rosemary, and lavender.
- Install low stake lights around edges; add lanterns near seating for glow.
- Style with two lounge chairs, a small side table, and one tactile throw pillow per chair.
Why This Looks Expensive: restraint. One ground material, repeating plant types, and large-scale planters read curated, not cluttered—exactly what high-end landscapes do.
Common Mistakes To Avoid: skimping on edging or fabric (weeds happen), mixing too many gravel colors, and over-stuffing accessories. Keep it simple and substantial.
Pro Styling Tip: Photograph at golden hour; angle your shot so lanterns sit foreground with soft-focus planters behind—instant depth and that honeyed glow.
Ready for something lusher and a little moody? Keep scrolling.
2. Moody Fence Makeover With Layered Greenery Walls
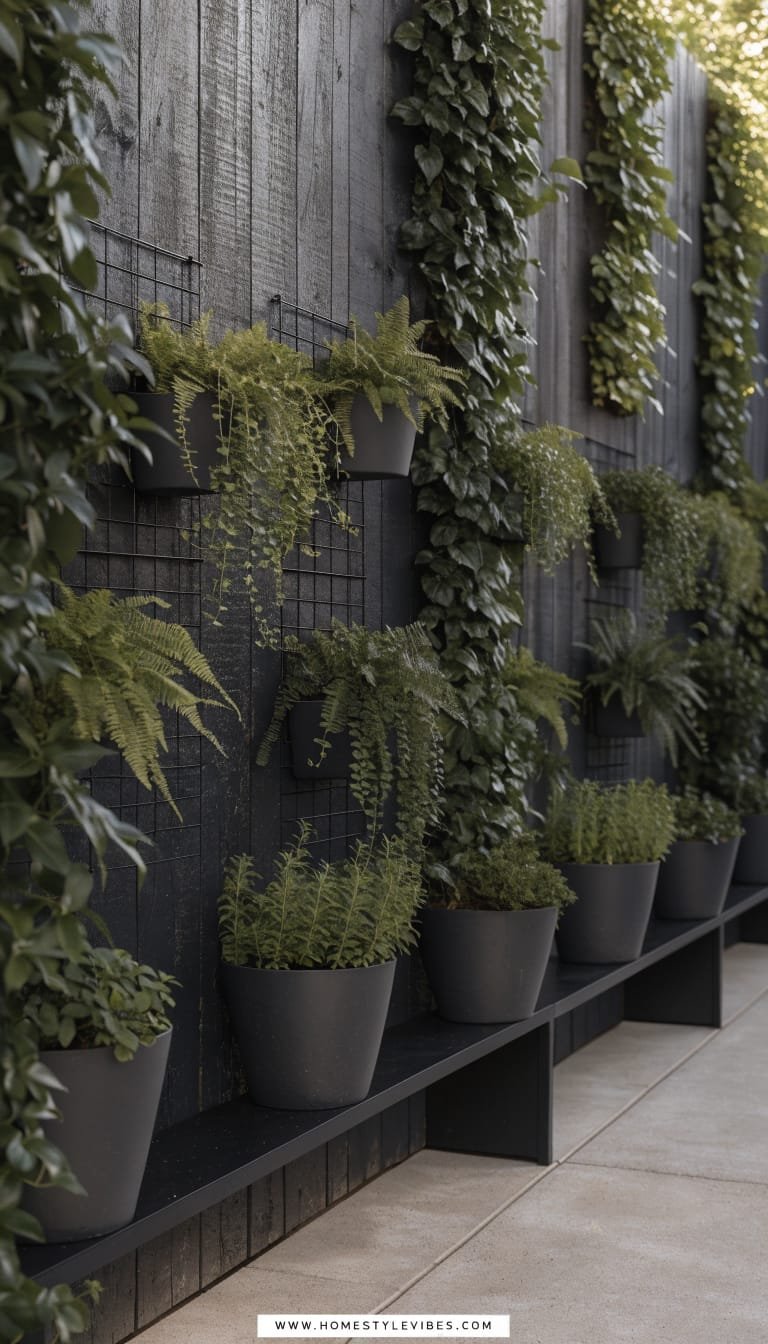
It’s that one fence you keep ignoring—the sun-bleached, patchy panel that screams “backyard rental.” You’ve tried hanging a decor sign (cute) and a random trellis (crooked), but it still drags the whole space down. This design flips the vertical surface into your star: paint the fence a deep, inky charcoal, then layer slim ledge shelves, trellised climbers, and gallery-style planters. The mood? Boutique-restaurant courtyard with insanely lush backdrop.
Why it works: dark paint erases visual noise and pushes the boundary line back, making small spaces feel deeper. Plants pop against the shadowy backdrop while minimal hardware keeps maintenance easy. Evening lighting grazes across textured leaves for a moody, high-contrast look. Family-friendly because everything stays off the ground; renters benefit from removable planter brackets.
Why It Looks Expensive: tonal commitment. High-end yards use a bold architectural color to unify chaos. The blackened fence mimics charred wood (Shou Sugi Ban vibes) without the cost. Add repetition—same planter style, same trellis pattern—and the wall becomes an intentional feature, not a fix.
Materials: exterior fence paint in soft black/charcoal, slim cedar 1x3s for ledges, black metal bracket planters, wire trellis, and plantings like jasmine, star jasmine, ivy, or potato vine. Photographs beautifully because the dark base increases contrast; glossy leaves plus matte paint equal editorial drama.
Variations:
– Budget-friendly: use masonry paint on brick/block; DIY trellis with jute twine and eye hooks.
– Small-space: a single 6-foot panel done perfectly beats a long run done halfway.
– Renter-friendly: tension-mounted trellises and over-the-fence hook planters—zero drilling.
Key Design Elements:
- Main materials: exterior paint, cedar ledges, matte black brackets, wire trellis
- Color palette: charcoal/soft black, deep greens, hits of brass or aged zinc
- Lighting strategy: string lights on dimmer + up-lights at base of climbers
- Furniture silhouettes: slim bench beneath, bistro chairs, rounded side table
- Texture layers: matte paint, glossy leaves, metal hardware, soft mossy planters
- Accent details: brass house numbers/art plaque, simple watering can, climbing jasmine
How To Recreate This Look:
- Start with a deep-clean and a coat of charcoal/soft black exterior paint on the fence.
- Add slim cedar ledges every 18–24 inches to create staggered display shelves.
- Layer a simple wire trellis behind key zones; plant climbers at base.
- Install up-lights at the foot of the fence; drape string lights overhead on a dimmer.
- Style with repeated black metal planters, trailing greenery, and one hero statement plant.
Why This Looks Expensive: architectural backdrop + plant theater. When the background disappears, even humble plants look like sculptures.
Common Mistakes To Avoid: choosing glossy paint (shows imperfections), mixing too many planter styles, and overcrowding the wall. Give each plant breathing room.
Pro Styling Tip: For photos, mist leaves lightly to catch light; shoot from a shallow angle so trellis lines add graphic depth.
Craving warmth and glow next? Let’s add firelight and stone without the price tag.
3. DIY Fire Bowl Patio With Stone-Look Drama
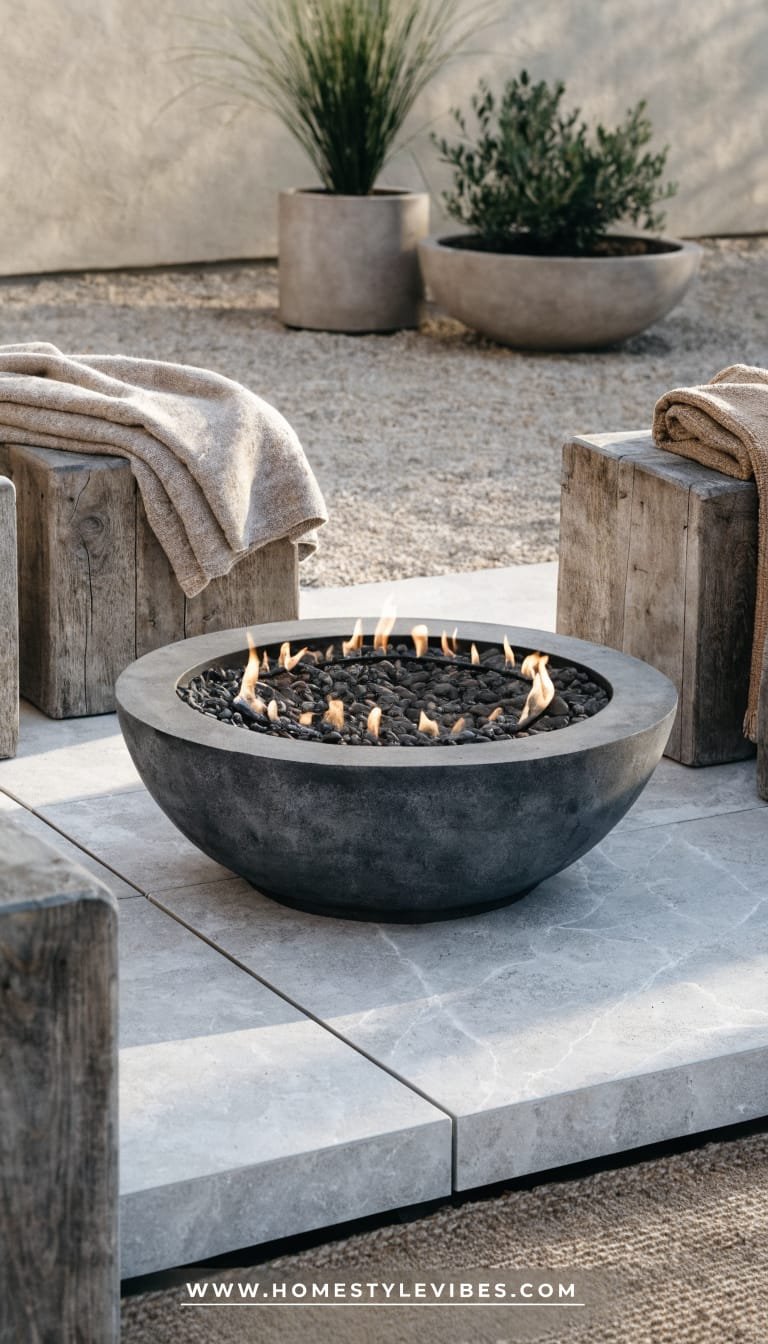
You’ve wanted a fire feature forever, but custom pits feel intimidating and expensive. You’ve tried tabletop torches—they look like afterthoughts. This version lands right in the sweet spot: a sleek, safe propane or gel-fuel fire bowl set on a faux-stone patio square, flanked by weathered wood stools and layered with natural textiles. The mood: modern lodge meets city courtyard—cozy, sculptural, and perfect for s’mores or a glass of red.
Why it works: movable elements make this renter-friendly and adaptable. The “stone” patio can be an easy grid of large-format concrete pavers set over sand—a budget win that looks custom. At night, the flame uplights faces and planters, creating magazine-level warmth. It’s easy to maintain and scales for any yard.
Why It Looks Expensive: scale and stone simulation. Large pavers (24–36 inches) minimize grout lines for a luxe look. A matte, bowl-shaped fire feature in concrete finish reads designer without bespoke costs. Keeping the color palette tight—stone, soft black, oatmeal—adds sophistication.
Materials: large-format pavers, leveling sand, rubber mallet, propane or gel-fuel fire bowl, teak or acacia stools, wool-blend outdoor blankets, tall grasses in planters (panicum, feather reed). Photos love it because flame + stone = high contrast; smooth pavers next to tufted grasses create textured vignettes.
Variations:
– Budget-friendly: use dry-laid stepping stones with pea gravel infill; pick a smaller fire bowl.
– Small-space: one 5×5 grid of pavers with two chairs—done.
– Renter-friendly: lay pavers over a weed barrier; no mortar needed, disassemble when moving.
Key Design Elements:
- Main materials: concrete-look fire bowl, large pavers, acacia stools, tall grass planters
- Color palette: stone gray, soft black, bone, oat, flickers of warm flame
- Lighting strategy: the fire is the hero; supplement with low lanterns at perimeter
- Furniture silhouettes: curved bowl, blocky pavers, slender stools, low lounge chairs
- Texture layers: smooth concrete, rough acacia, airy grasses, nubby blankets
- Accent details: marshmallow skewers, matte black tongs, ceramic mugs
How To Recreate This Look:
- Start with a flat area; dig 2 inches, add leveling sand, and compact.
- Add your paver grid; tap level with a rubber mallet and check spacing.
- Layer in the fire bowl centered; hide propane tank behind a planter if needed.
- Install a perimeter of planters with tall, swaying grasses for movement.
- Style with two lounge chairs, two stools, soft blankets, and one low lantern cluster.
Why This Looks Expensive: symmetry and negative space. Give the fire bowl breathing room—no clutter nearby—and it reads gallery-piece instead of gadget.
Common Mistakes To Avoid: mixing paver sizes randomly, skipping leveling (wobbles kill the vibe), and using shiny metal bowls that reflect everything. Matte finishes photograph best.
Pro Styling Tip: Shoot with the flame mid-height; too tall blows out highlights, too low disappears. Frame a tuft of grass in the foreground for romantic blur.
Want something lush and edible that still looks designer? Let’s make utility feel couture.
4. Raised Bed Kitchen Garden With Hotel-Cart Polish
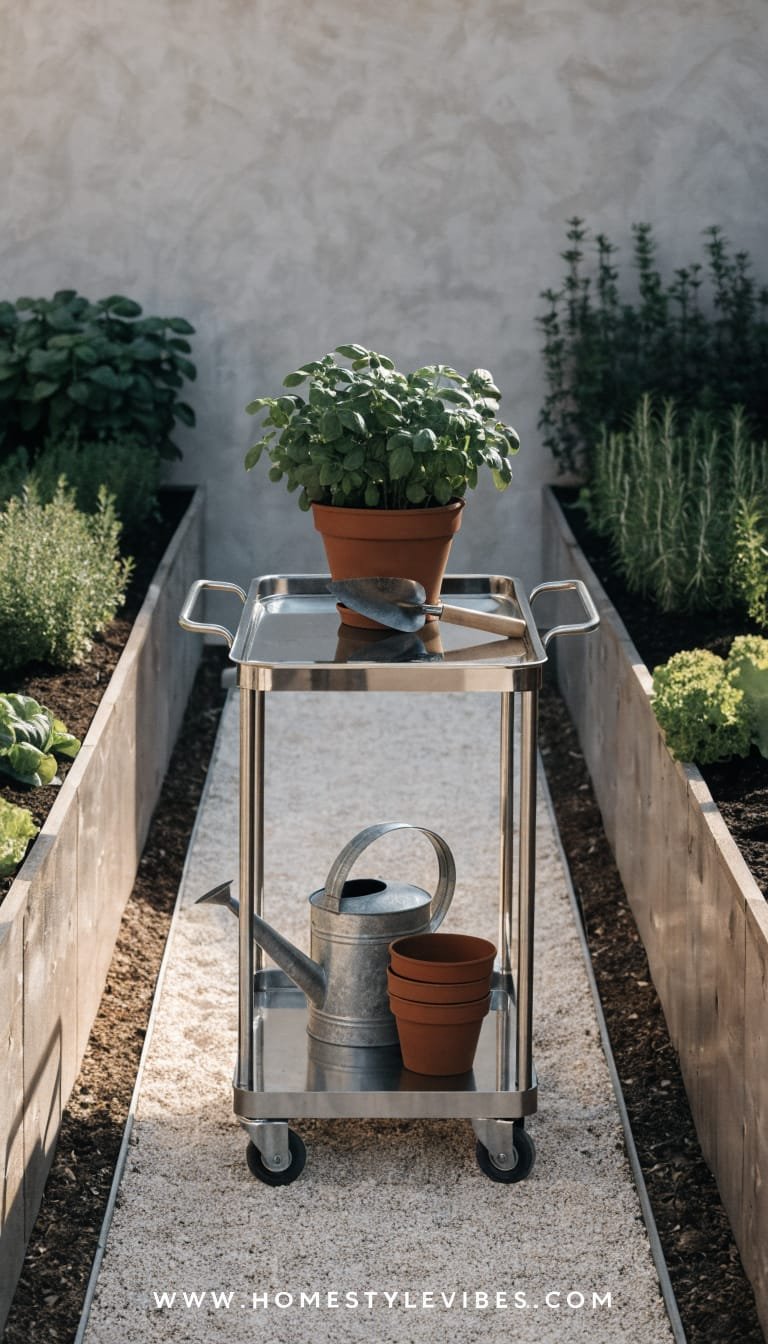
It’s the herb chaos for me—tiny pots tipping over, basil bolting, rosemary doing the absolute most. You’ve tried a random planter or two, but it still looks like plant storage. This design corrals the chaos into elevated, symmetrical raised beds and a single chic potting/serving cart. The mood feels like a boutique hotel courtyard meets farmer’s market: productive yet polished.
Why it works: waist-high beds save your back and organize crops for easy harvest. Paths of gravel or bark keep things clean; a slim watering line or soaker hose reduces maintenance. Lighting? Solar stake lights along the bed fronts create soft geometry at dusk. This setup works in small yards, side yards, even patios with elevated trough planters.
Why It Looks Expensive: geometry and repetition. Matching raised beds set parallel, with a centered cart or birdbath, create a formal axis that screams “designer drew this.” Metal troughs or cedar with a consistent stain add uniformity. Grouping varieties by color or leaf shape makes every photo frame a moment.
Materials: cedar or galvanized trough beds, pea gravel or shredded bark for paths, brass hose fittings, a bar-cart-style potting station, black plant labels, herbs (thyme, basil, chives), compact veg (kale, peppers), and edible flowers (nasturtium). Photos love the contrast between matte soil, silvery metal, and glossy leaves.
Variations:
– Budget-friendly: cinder block or pallet wood beds; paint blocks soft beige for a cohesive look.
– Small-space: two slim troughs against a wall with a narrow gravel strip.
– Renter-friendly: trough planters on casters; roll them to chase the sun.
Key Design Elements:
- Main materials: cedar or galvanized troughs, pea gravel, brass hose fittings, bar cart
- Color palette: sage, silver, charcoal, soft tan, herbaceous greens
- Lighting strategy: low solar stakes on fronts; a clip-on task light at the cart
- Furniture silhouettes: rectangular beds, slim cart, curved watering can
- Texture layers: ribbed metal, rough cedar, crumbly soil, waxy chard leaves
- Accent details: black plant markers, linen harvest bag, terracotta pots
How To Recreate This Look:
- Start with two to four matching raised beds; align them parallel with a central path.
- Add weed barrier and fill paths with pea gravel or bark to define zones.
- Layer soil mix (compost + topsoil); install drip or soaker hoses for tidy irrigation.
- Install solar stake lights evenly across the bed fronts for rhythm.
- Style with a slim cart at the path end, uniform markers, and grouped herbs by variety.
Why This Looks Expensive: a working garden with hospitality cues (cart, labels, uniform edges) feels intentional—like a private chef is about to step outside.
Common Mistakes To Avoid: mixing bed styles, using neon plant markers, and letting hoses snake everywhere. Hide lines beneath mulch or along bed edges.
Pro Styling Tip: Harvest right before photos—tiny bundles of thyme on the cart and a clean, damp trowel read editorial and fresh.
Maybe you want romance and a little ceremony. Enter the archway of your dreams—on a budget.
5. Arched Entry Arbor With String-Light Canopy
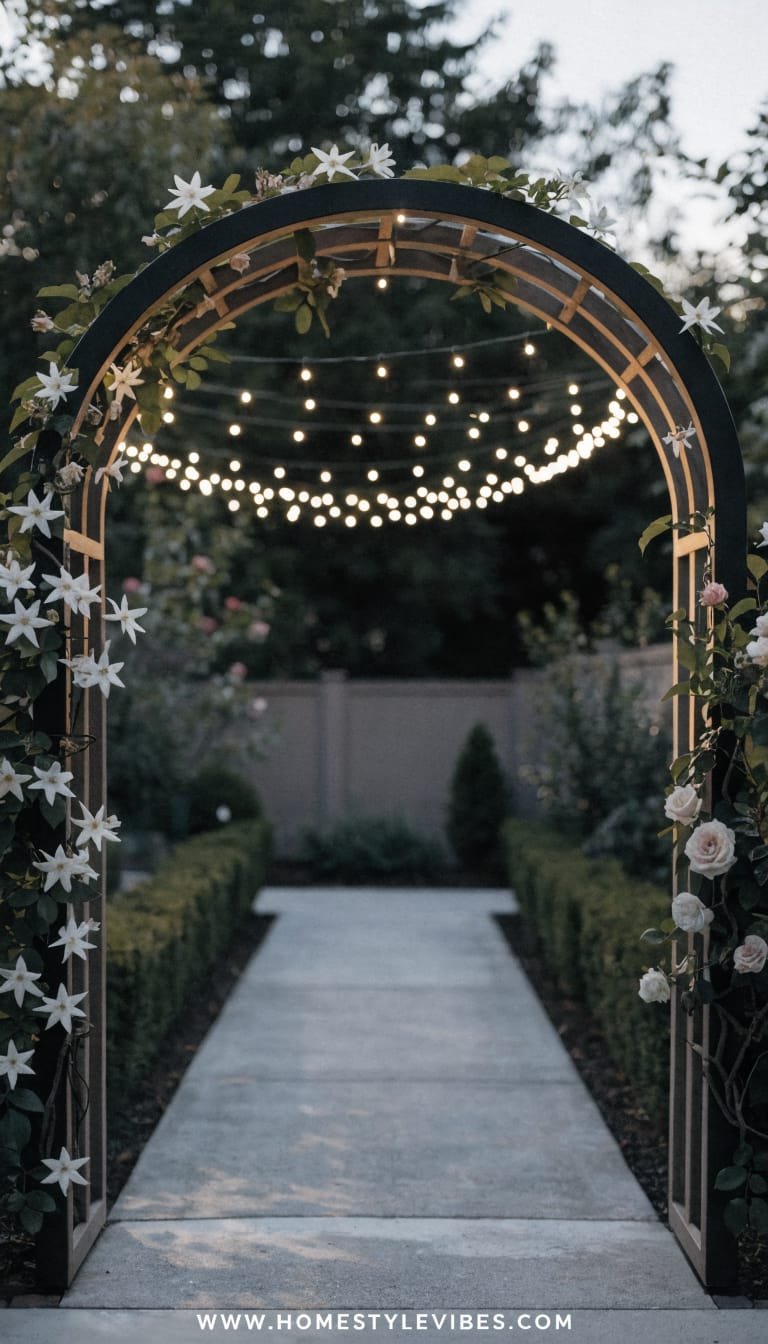
You’ve tried flanking your path with solar lights, but it still feels like…a path. Not an arrival. This design gives your backyard a cinematic entrance: a simple wood or metal arbor that frames your walkway, anchored by climbing roses or jasmine, with a subtle string-light canopy overhead. The mood is storybook-but-modern—think garden wedding meets everyday dinner outside.
Why it works: a vertical frame announces “you’re entering a space,” which makes any yard feel luxuriously planned. Even tiny yards gain structure and height. Lighting strung from the arbor to nearby posts diffuses into a soft ceiling; it makes evening dinners glow (and helps keep bugs at bay above, not at eye level). Maintenance stays easy with repeat plantings and a clear path line.
Why It Looks Expensive: silhouette and ceremony. An arch instantly reads as custom, especially when you repeat curves in planters or chair backs. Keeping the canopy lights in straight, subtle lines (not swaggy chaos) preserves that crisp, high-end look.
Materials: prefab arbor (cedar or black metal), galvanized post anchors, string lights on a dimmer, ground spikes, and climbers (new dawn rose, star jasmine). To photograph, the arch gives you a natural frame; the bokeh from lights at night = magic.
Variations:
– Budget-friendly: two 4×4 posts with a curved top rail; paint soft black to disguise DIY joints.
– Small-space: a narrow arbor over a 30-inch stepping-stone path; plant a single climber each side.
– Renter-friendly: freestanding planters hold posts with bagged gravel as ballast—no digging.
Key Design Elements:
- Main materials: cedar/metal arbor, dimmable string lights, climbing plants, gravel or stepping stones
- Color palette: soft black or natural wood, creamy blooms, deep green leaves, warm white light
- Lighting strategy: canopy grid (straight lines), low path markers for safety
- Furniture silhouettes: curved-back dining chairs near the arch echo the shape
- Texture layers: smooth metal/wood, rough gravel, delicate petals, warm filament bulbs
- Accent details: simple doorbell chime near gate, small plaque, scented blooms
How To Recreate This Look:
- Start with placing the arbor at your path entrance; anchor posts securely.
- Add a straight run of dimmable string lights overhead, from arbor to two rear posts.
- Layer stepping stones or gravel beneath to define the walkway.
- Install two climbers and train them early with soft ties along the frame.
- Style with a small bench or two lanterns just beyond the arch to “reward” arrival.
Why This Looks Expensive: clear thresholds signal design intention. Guests feel guided—like the space has a floor plan—instant boutique energy.
Common Mistakes To Avoid: droopy, tangled lights; choosing too-cool LED bulbs; and overloading the arch with mixed vines. Keep the lines taut and the plant palette tight.
Pro Styling Tip: Shoot from slightly off-center so the arch overlaps layered foliage behind it; the curve against texture makes the frame feel lush and dimensional.
Want quiet luxury without heavy maintenance? Enter the calm of gravel, stone, and a single sculptural tree.
6. Zen Corner With Water Ripple and Monochrome Planting

You’ve tried jam-packing a shady corner with random plants, but it still feels flat and fussy. This design edits hard: a compact, monochrome planting palette around a bowl fountain or ripple water feature. The mood is hotel-spa meets Japanese courtyard—minimal, calm, and meditative. You’ll actually want to sit here and breathe.
Why it works: repetition calms the eye, while water sound masks street noise. In real homes, this thrives in awkward corners where grass fails. Lighting lifts it at night with a single spotlight grazing a sculptural trunk or leaf fan. It’s family-friendly because nothing delicate sits in traffic zones, and maintenance stays low thanks to evergreen choices.
Why It Looks Expensive: negative space + refined materials. A single boulder, a smooth bowl, and three plant species repeated looks like a designer curated it. The restrained palette tricks the eye into reading it as “intentional and premium.”
Materials: black or gray gravel, a low bowl fountain (solar or plug-in), a Japanese maple or olive standard as a focal tree, repeating groundcover (liriope, mondo grass), and a single accent boulder. It photographs beautifully because it layers foreground gravel texture with a smooth water surface and a strong vertical feature—simple, graphic, elegant.
Variations:
– Budget-friendly: repurpose a large ceramic pot into a bubbling fountain with a small pump; use local gravel.
– Small-space: even a 4×4-foot square transforms with a mini bowl, a dwarf maple, and two groundcovers.
– Renter-friendly: assemble in a large, shallow planter tray; place on patio with felt pads.
Key Design Elements:
- Main materials: dark gravel, smooth bowl fountain, sculptural tree, accent boulder
- Color palette: charcoal, soft black, moss greens, muted burgundy (maple)
- Lighting strategy: one narrow-beam spotlight up-lighting the tree; tiny puck on fountain if desired
- Furniture silhouettes: a single low bench or stool in wood or stone
- Texture layers: matte gravel, glossy water, papery leaves, rough stone
- Accent details: bamboo rakes, black river pebbles, discrete cable management
How To Recreate This Look:
- Start with clearing a defined square or circle; lay landscape fabric and a 2-inch gravel bed.
- Add your bowl fountain slightly off-center; run power neatly or go solar.
- Layer a focal tree at the back; underplant with one or two repeating groundcovers.
- Install a single spotlight aimed through leaves for shadow play at dusk.
- Style with one accent boulder and a low bench; don’t add trinkets—let silence be the luxury.
Why This Looks Expensive: designers know when to stop. Monochrome palette, one hero feature, and texture contrast do the heavy lifting.
Common Mistakes To Avoid: mixing too many plant types, choosing multicolor gravel, and over-lighting the area. Maintain restraint.
Pro Styling Tip: For photos, dampen the gravel to deepen the charcoal tone; capture reflections of leaves in the fountain for a high-end editorial feel.
If you crave social energy and alfresco dinners, this next one turns utility zones into a wow-moment dining room.
7. Bistro-Style Dining Nook With Painted Concrete Rug
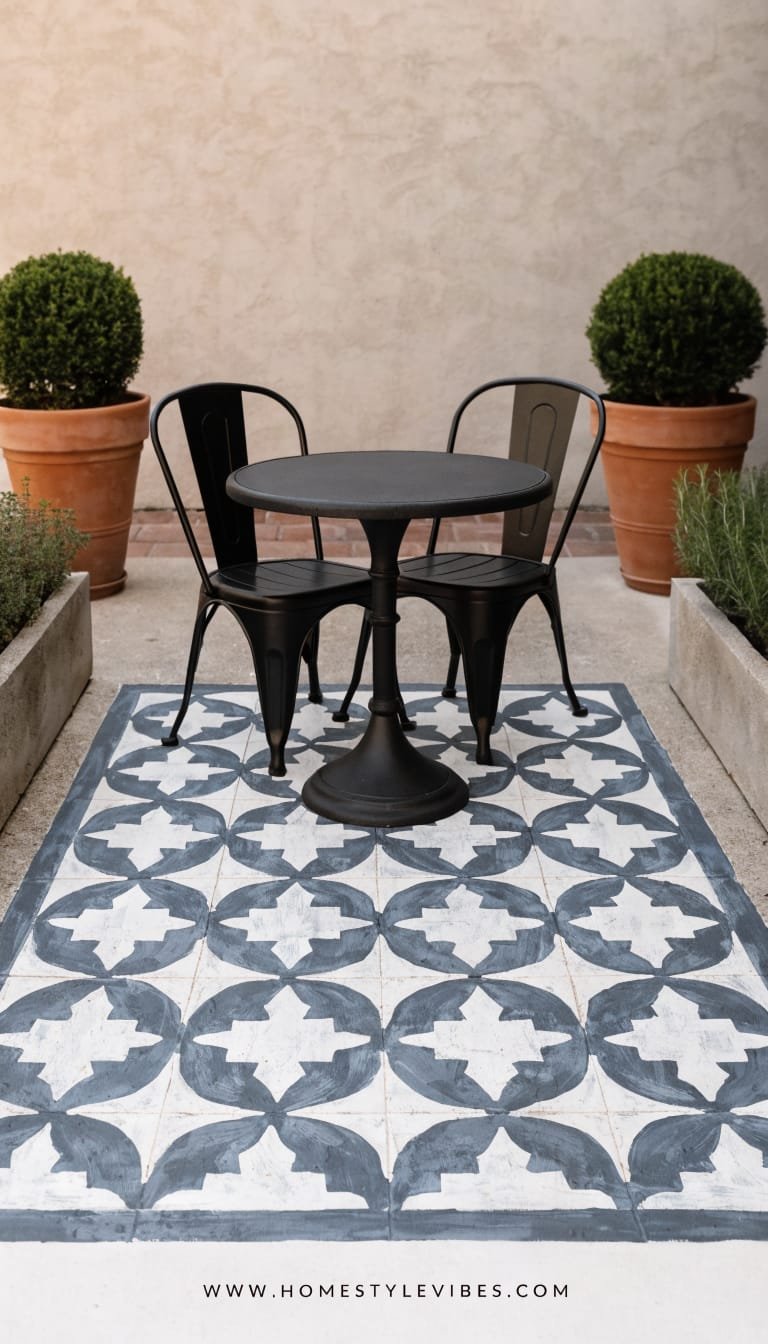
Maybe your patio feels like a spillover zone for shoes and the grill. You’ve tried a standard outdoor rug, but it fades, mildews, or just looks…meh. This idea paints a “tile” rug directly onto concrete or pavers, frames it with planters, and layers in a round bistro table and café chairs. The mood is Parisian courtyard meets backyard brunch—charming, crisp, and surprisingly durable.
Why it works: a painted rug defines dining without buying a ton of furniture. Round tables save space and keep traffic flowing. Overhead, a simple parasol or a cafe-stripe shade softens light. In small yards, this micro-room reads intentional and inviting. Cleanup’s easy; just hose it off.
Why It Looks Expensive: faux-tile patterns done in a restrained palette mimic encaustic or hand-painted cement tile. When you repeat the motif in napkins or the umbrella stripe, it feels cohesive and styled. A single metal candle sconce on the wall nearby clinches the bistro vibe.
Materials: porch and floor paint (base + pattern color), painter’s tape or a tile stencil, round metal table, bentwood or bistro chairs, two tall planters for flanking, and a striped umbrella. It photographs beautifully because the graphic pattern adds structure and contrast underfoot while glossy leaves and glassware catch light above.
Variations:
– Budget-friendly: freehand a border with tape and keep the center solid; no stencil needed.
– Small-space: a 4-foot diameter circle pattern under a 30-inch table is enough.
– Renter-friendly: use interlocking deck tiles as your “canvas,” then take them when you move.
Key Design Elements:
- Main materials: concrete-safe floor paint, stencil/tape, metal bistro set, planters
- Color palette: soft black and warm white or clay and cream, with green from plants
- Lighting strategy: wall-mounted candle sconce or plug-in lantern; soft string lights perimeter
- Furniture silhouettes: round pedestal table, slim café chairs, tall cylindrical planters
- Texture layers: smooth paint, woven seat pads, glossy leaves, linen napkins
- Accent details: stripe umbrella, vintage-style glassware, small herb pot centerpiece
How To Recreate This Look:
- Start with power-washing the slab; roll on a base coat of porch paint.
- Add a border using painter’s tape; stencil or tape a simple repeating pattern inside.
- Layer tall planters to frame the “rug” corners; choose consistent planter styles.
- Install a wall sconce or hang cafe lights on a tension cable above the zone.
- Style with a round table, two to four chairs, striped umbrella, and linen accents.
Why This Looks Expensive: graphic order elevates humble surfaces. The “tile” illusion tricks the eye and gives your dining zone boutique charm.
Common Mistakes To Avoid: using too many colors, skipping a sealer coat, and choosing a complicated stencil that telegraphs messiness. Keep the pattern bold and simple.
Pro Styling Tip: For photos, shoot from slightly overhead to show the rug geometry; add a carafe of citrus water for a soft pop of color without clutter.
Still here? Same. Because the right backyard tweaks change everything—your morning coffee, your dinner plans, your stress levels. These seven backyard garden ideas on a budget that look expensive aren’t about buying more stuff; they’re about choosing fewer, better moves that create calm and polish. Which one pulled at you? The Mediterranean gravel lounge for languid summer nights? The moody fence moment that makes your plants pop? The painted “tile” rug that turns Tuesday dinner into a café date?
Pick one idea and do it fully. Luxury always hides in texture, lighting, and restraint. Edit your palette, repeat your materials, and scale up a few elements instead of scattering many small ones. Aim for soft shadows at dusk, matte finishes next to a little gloss, and one sculptural piece that anchors the scene. Then stop. Let negative space do its quiet magic.
When you step outside and your shoulders drop—when the crunch of gravel, the glow of lanterns, or the whisper of a fountain greets you—that’s success. Not just “decorated,” but supported. The good life doesn’t need a contractor. It needs intention, a weekend, and a few smart, soulful choices. I’ll be over here cheering you on—and yes, absolutely judging your string-light slack. Kidding. Mostly. Now go make your backyard the place everyone wants to linger, including you.