6 Flower Bed Ideas for the Front of Your House (Gorgeous & Easy)
You step onto the porch and something feels… meh. The facade has bones, your door color is cute, but the front landscaping isn’t pulling its weight. You want glossy-magazine energy: layered blooms, fresh edges, a welcoming glow after sunset. These 6 flower bed ideas for the front of your house solve the real pain point—flat, fussy, or forgotten front yards—by delivering designs that are gorgeous, easy to maintain, and wildly photogenic.
We’re talking texture-forward planting, crave-worthy color stories, and smart lighting that makes everything look expensive. Think: sculptural evergreens against velvety black mulch, breezy cottage drifts that dance in the wind, and minimal schemes that look like a boutique hotel entrance. Each idea elevates your home’s architecture and fixes the “it never looks finished” frustration—while staying realistic for busy lives. If you love a front entry that feels like a deep breath (and looks killer on Pinterest), this lineup was made for you.
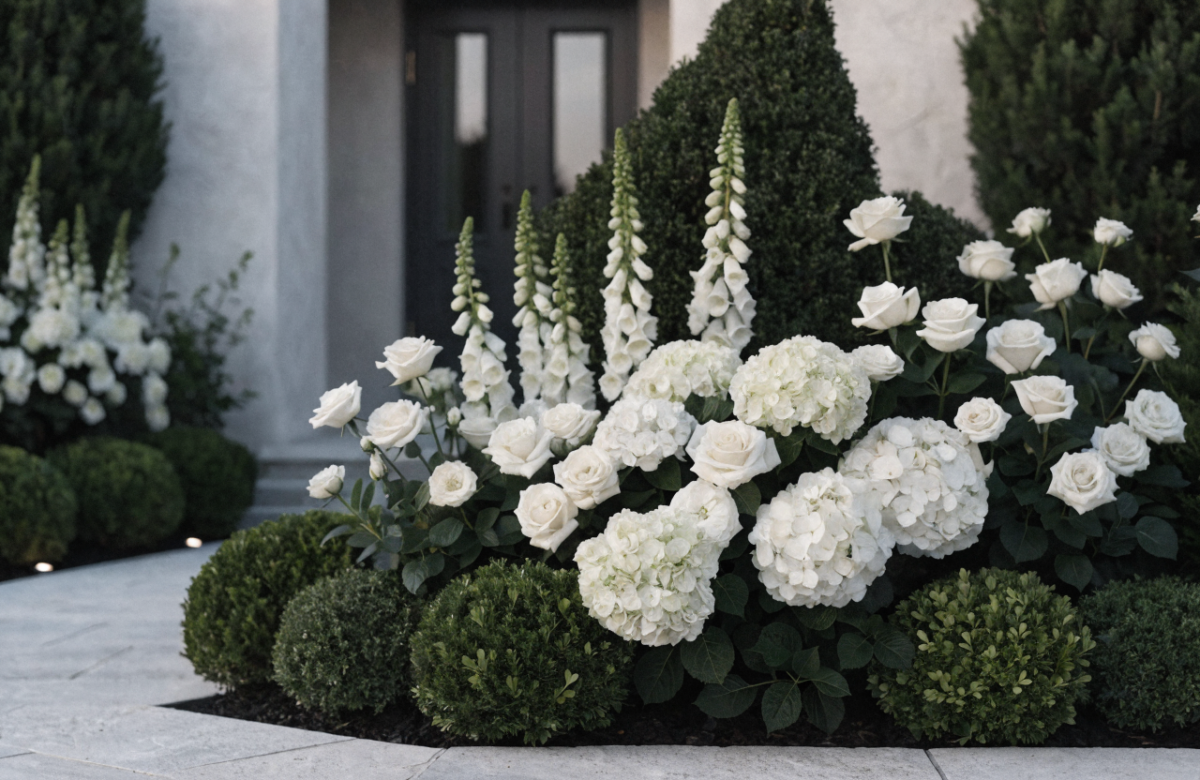
1. Monochrome Moonlight: White-Bloom Bed With Glossy Green Structure
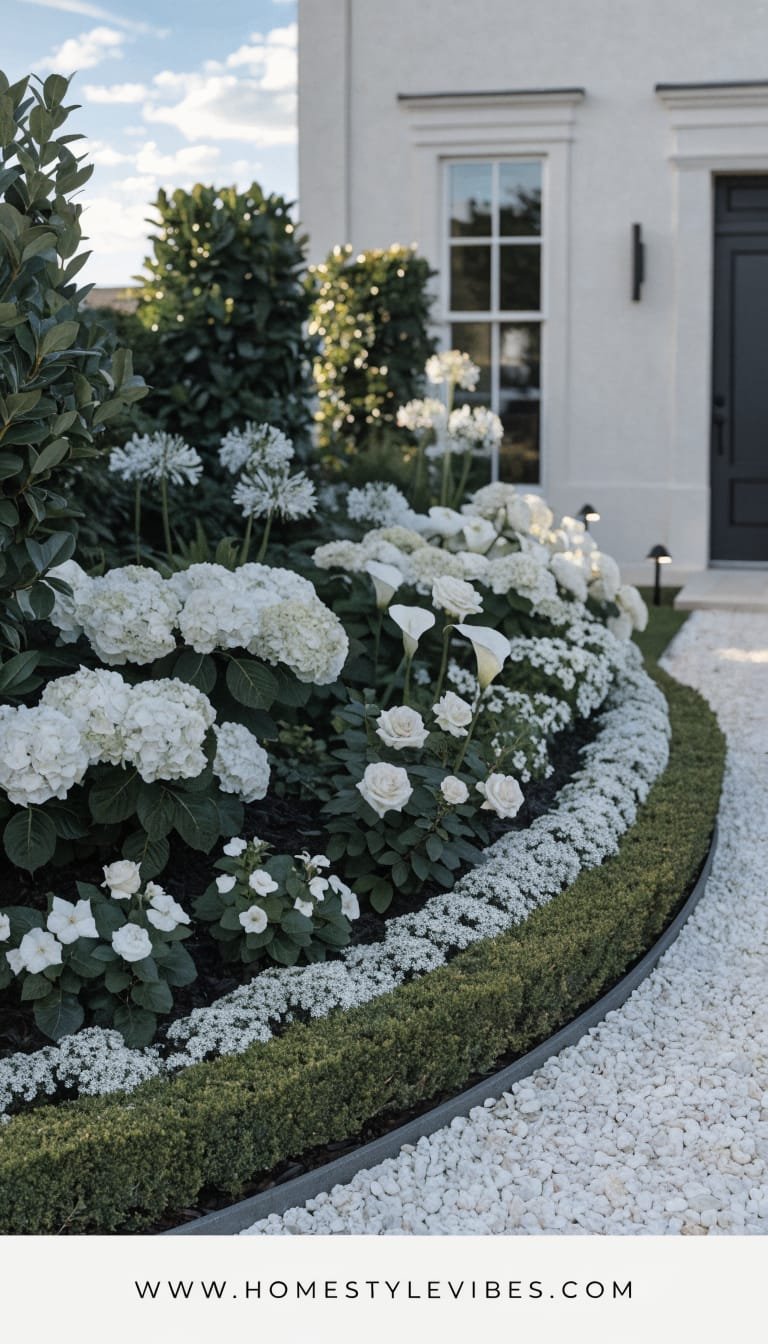
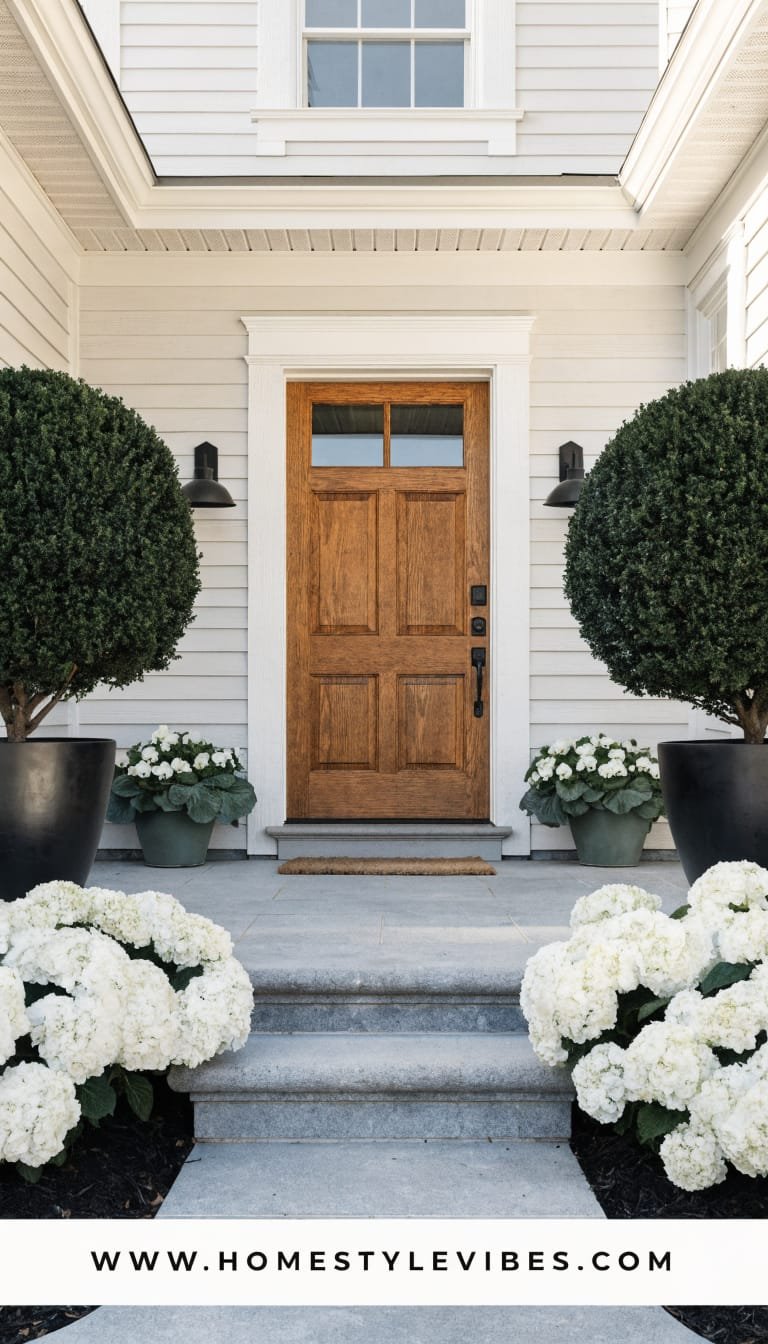
We’ve all been there—your front bed looks chaotic by day and totally disappears at night. You tried color-on-color, but it still reads busy and tired. Enter the monochrome white-flower bed: a lush, calming palette anchored by deep green foliage and crisp edges that looks radiant in daylight and glows under evening lights. The vibe feels hotel-luxe meets modern Mediterranean, and it plays beautifully with almost any facade from brick to board-and-batten.
Why it works in real homes: a single-color bloom strategy simplifies maintenance and weeding decisions, keeps visuals cohesive, and makes smaller beds read larger. It’s family-friendly (no complex deadheading schedules), and if resale’s on your radar, white always signals “clean” and “classic.” Lighting seals the deal—uplights on glossy leaves create moonlit drama and shadow depth that looks straight out of a magazine.
Why It Looks Expensive: Designers love restraint. Sticking to white blooms—hydrangeas, white coneflower, garden phlox—against structured evergreens like boxwood or dwarf holly creates a high-contrast, high-gloss effect. Add a razor-sharp lawn edge and black or dark brown mulch for graphic punch, and the whole bed suddenly screams custom, not DIY.
Materials you’ll lean on: smooth river stone for a slim border, rich mulch for depth, glossy-leaved shrubs, and a mix of white perennials and annuals for season-long interest. The camera loves this scheme—white petals pop, the greenery gives dimension, and shadows sculpt everything into layers.
Variations: Budget-friendly? Use white vinca and annual alyssum to fill quickly. Small-space version? Try a single repeating trio: one dwarf shrub, one white perennial, and one white annual. Renter-friendly swap? Layer large weatherproof planters along the walkway with the same monochrome palette for a moveable moment.
Key Design Elements:
- Main materials: Dark mulch, smooth river stone border, evergreen shrubs
- Color palette: White blooms, deep green foliage, touches of silver-green (lamb’s ear)
- Lighting strategy: Low-voltage spotlights angled up through shrubs, warm 2700K path lights
- Furniture silhouettes: Classic urns or tall taper planters flanking the steps
- Texture layers: Glossy leaves, airy flower heads, soft groundcover
- li>Accent details (hardware, decor pieces, plants): Oil-rubbed bronze door hardware, white hydrangeas, white coneflower, white verbena
How To Recreate This Look:
- Start with structure: Plant a row of low, evergreen shrubs to anchor the back of the bed.
- Add white perennials: Hydrangea ‘Incrediball,’ white echinacea, phlox ‘David’ for staggered heights.
- Layer groundcover: Lamb’s ear or white alyssum along the front for softness.
- Install lighting: Uplight two to three feature shrubs; add warm path lights for glow.
- Style with planters: Place matching tall planters at the entry with white annuals for continuity.
Why This Looks Expensive: Repetition and restraint. One bloom color, tight edging, and quality lighting. It reads “landscape architect,” not “Saturday experiment.”
Common Mistakes To Avoid: Mixing too many whites with different undertones (cool versus creamy) that clash. Also, cramming tall hydrangeas too close to the walkway—give them breathing room.
Pro Styling Tip: For photos, shoot at golden hour with uplights on; step to the side for a slight angle so the white petals catch backlight and the greenery throws soft shadows.
Craving movement and color? Keep scrolling—the next idea leans breezy and romantic with zero fuss.
2. Breezy Cottage Drift: Soft Pastels, Billowy Layers, Zero-Stress Care
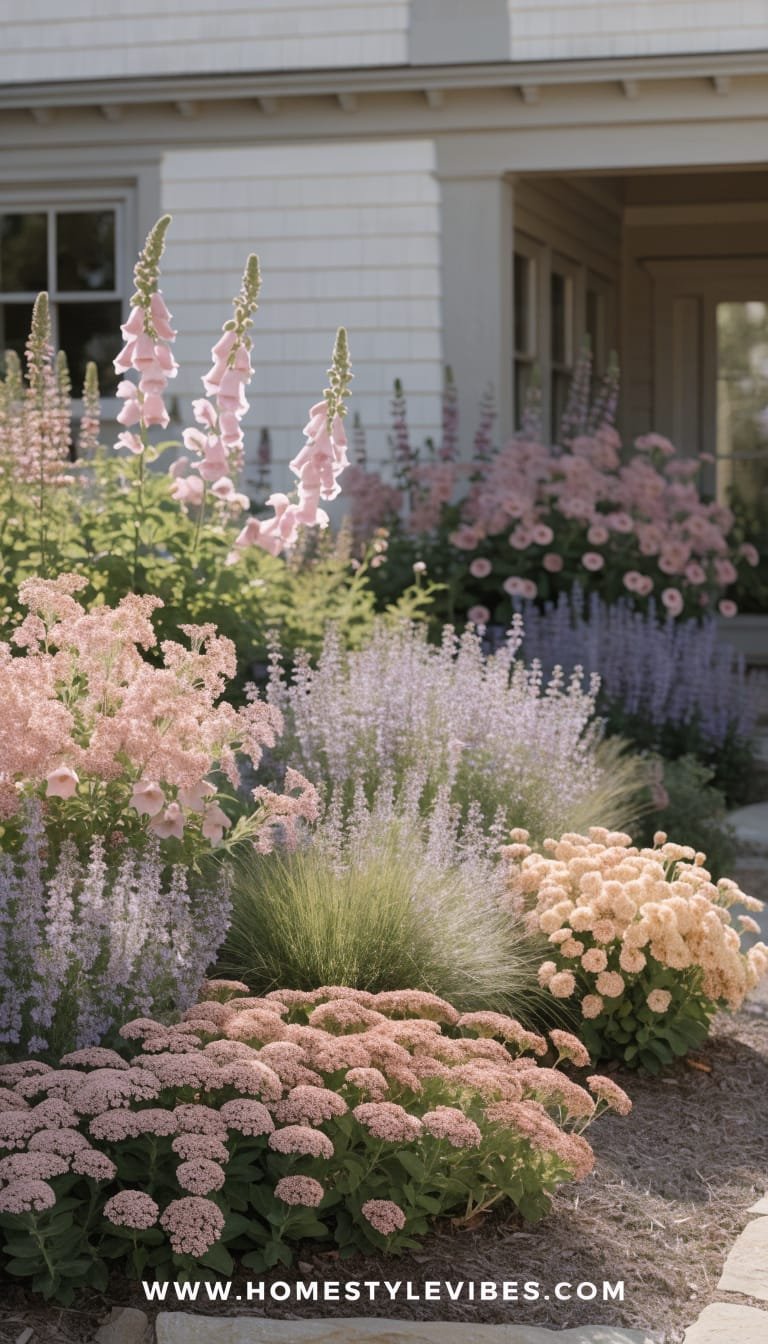
It’s that one corner that always feels off—too stiff, too sparse, too “I bought three random plants and prayed.” You’ve tried neat rows, but it still looks flat. The cottage-drifts approach solves it with loose, painterly swaths of perennials that look effortless and relaxed. Think soft pinks, lavender, creamy apricots, and meadow-like textures that flutter in the breeze. The mood reads garden-party chic (without the high-maintenance schedule).
Why it works in real homes: Layered drifts hide small maintenance lapses and extend bloom time. You’ll always have something happening—peonies in spring, salvia in early summer, echinacea mid-season, and asters into fall. This strategy forgives imperfect spacing and loves full sun. At night, string lights around the porch or warm downlights highlight the feathery textures and seed heads, creating a romantic glow.
Why It Looks Expensive: It borrows from professional meadow-planting techniques. By repeating plants in generous groups, you get rhythm, not randomness. Light catches on plumes (hello, ornamental grasses) and fine foliage, giving dimensionality that feels editorial. Gravel paths or a crushed-stone edge add that European-country vibe.
Materials include pea gravel, reclaimed brick edging, and feathery perennials: catmint, salvia, Russian sage, yarrow, and echinacea. Photographically, this design wins with depth—tall airy plants in back, medium color blocks mid-bed, and delicate spillers at the front. Sun highlights bloom edges for dreamy bokeh.
Variations: Budget-friendly? Divide and swap perennials with neighbors. Small-space version? Use a single sweeping drift of catmint with a couple of tall alliums for punctuation. Shade-lovers? Swap salvia for astilbe and hellebores in dappled light.
Key Design Elements:
- Main materials: Pea gravel, reclaimed brick or metal edging, compost-rich soil
- Color palette: Lavender, blush pink, soft apricot, warm whites, silvery foliage
- Lighting strategy: Downlights from porch soffits; warm string lights for ambiance
- Furniture silhouettes: Weathered bench or a narrow bistro set if space allows
- Texture layers: Feathered grasses, broadleaf perennials, lacy fillers
- Accent details: Terracotta pots with trailing thyme, vintage-style house numbers
How To Recreate This Look:
- Start with curves: Outline a soft, meandering bed shape—cottage style hates laser-straight lines.
- Add backbone plants: Ornamental grasses like Pennisetum ‘Hameln’ or Karl Foerster for height.
- Layer drifts: Repeat 3–5 perennials in clusters of 5–7 plants for rhythm.
- Install edging: Reclaimed brick on edge or weathered steel to define the softness.
- Style with loose containers: Terracotta pots filled with thyme and trailing lobelia at entry points.
Why This Looks Expensive: Editing. By choosing a tight color family and repeating it, you create visual harmony—like a curated wardrobe instead of a clearance rack.
Common Mistakes To Avoid: Mixing too many plant types (over 8 in a small bed reads chaotic). Also, planting in singletons makes everything look accidental—cluster, always.
Pro Styling Tip: Photograph on a breezy afternoon; crouch low so the grasses frame the shot and the house facade becomes a soft backdrop.
Ready for something cleaner and ultra-modern? The next one is pure gallery energy, minimal fuss.
3. Sculpted Minimal: Evergreen Architecture With Black Mulch and Brass Glow
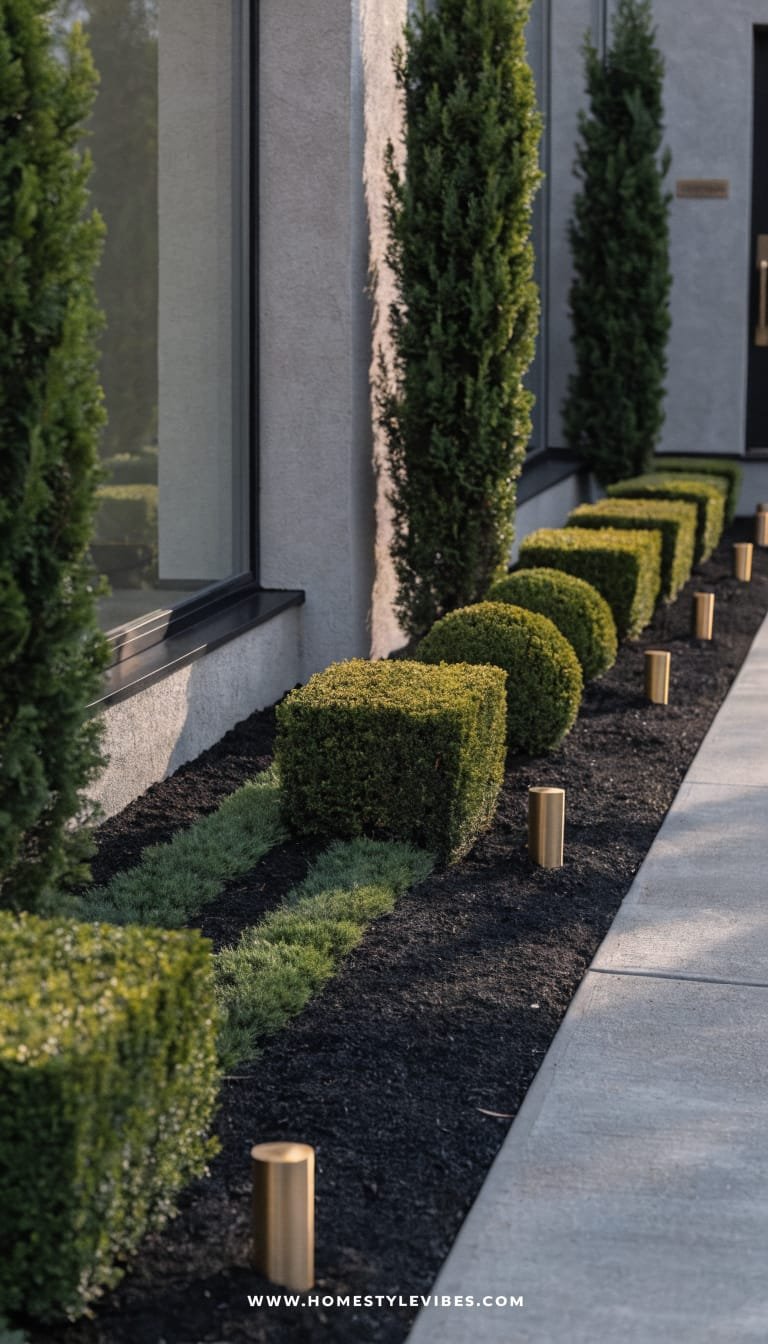
You’ve tried color bombs, but it still looks busy next to your clean-lined home. You want sleek, not stark. Sculpted Minimal delivers calm, structured luxury: clipped evergreens, linear plantings, and black mulch that makes the green pop like a designer’s render. The mood is Japandi-meets-urban-hotel—quiet, intentional, and insanely tidy.
Why it works in real homes: Low maintenance, year-round appeal, and instant curb value. Narrow lots love it, and families appreciate how easy it is to keep clean. Lighting transforms it: discrete brass path lights wash soft gold across the mulch, while mini spotlights highlight sculptural shrubs to create strong silhouettes after dark.
Why It Looks Expensive: It leans on form, not fuss. Instead of 20 plants, you use 5 in repeated modules. Perfectly edged beds, consistent spacing, and restrained plant heights deliver a designer’s “negative space” trick—your eyes rest, your home feels elevated. Black mulch or fine black gravel reads ultra-modern and photographs like a dream.
Materials dominate: smooth steel or concrete edging, black mulch or basalt gravel, boxwood balls, inkberry holly, or dwarf yews, and a single grassy accent like Japanese forest grass for movement. The camera eats contrast here—deep black ground, glossy green domes, and warm metallic glints from hardware and lighting.
Variations: Budget-friendly? Mulch over gravel, and use small starter shrubs. Renter-friendly? Create the look with matching trough planters lined along the path. Darker version? Use smoky bronze planters and deep burgundy heuchera as a moody accent.
Key Design Elements:
- Main materials: Black mulch or basalt gravel, steel edging, evergreen shrubs
- Color palette: Deep green, black, warm brass, occasional burgundy
- Lighting strategy: Low-glare brass path lights and targeted uplights on feature shrubs
- Furniture silhouettes: Slim, linear benches or cube planters
- Texture layers: Smooth mulch, clipped foliage, one wispy movement plant
- Accent details: Brushed brass house numbers, matte black mailbox, tidy welcome mat
How To Recreate This Look:
- Start with shape: Install steel or concrete edging in straight lines to echo your architecture.
- Add structure: Plant evergreens in consistent spacing—think evenly sized spheres or low hedges.
- Layer subtle movement: Add one mass of low, soft grass to break the rigidity.
- Install contrast: Spread black mulch or dark gravel for that gallery-floor effect.
- Style with metal: Choose brass or bronze lights and hardware to warm up the palette.
Why This Looks Expensive: Perfect spacing and consistent forms. Even a simple plant looks high-end when repeated and precisely aligned.
Common Mistakes To Avoid: Mixing too many shapes—one or two forms only. Also, avoid cheap, shiny plastic edging; it kills the vibe instantly.
Pro Styling Tip: For photos, wipe mulch crumbs off hard edges, shoot from a low angle, and let the brass lights create bokeh in the background.
If you’re craving a front bed that smells like summer and buzzes with life, the next design is overflowing—in the best way.
4. Pollinator Parade: Native Blooms, Four-Season Interest, Happy Habitat
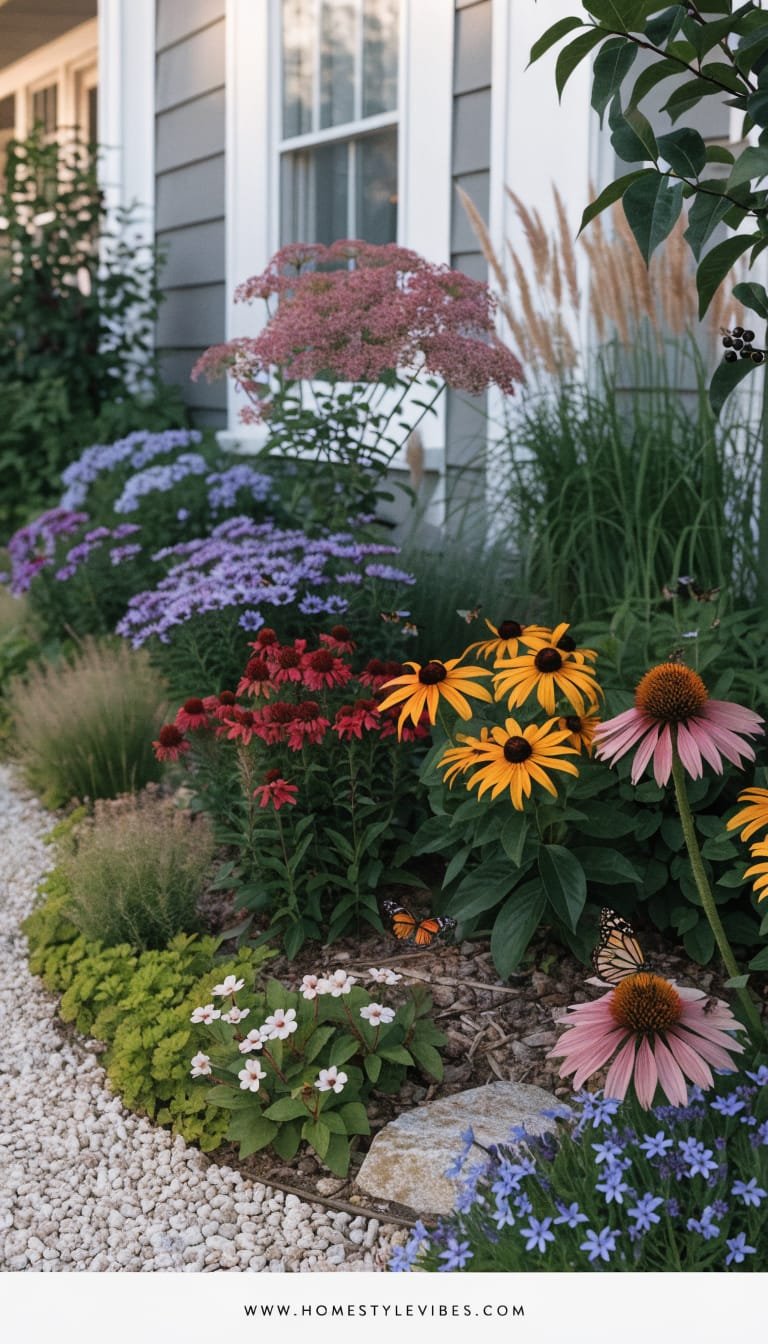
You’ve been sprinkling random “bee-friendly” seed packs, but it still looks patchy. Or the flowers come and go in a blink. This Pollinator Parade bed design uses region-appropriate natives and near-natives in purposeful layers for nectar from spring to frost. The mood feels lush, joyful, and a little wild—in a curated way. Kids can explore, butterflies will linger, and you’ll feel amazing every time you step outside.
Why it works in real homes: Natives generally need less water and bounce back faster from weather swings. They’re tough, beautiful, and they teach your landscape to take care of itself. At dusk, a few solar spots on flower clusters and gentle path lights turn the bed into a small stage—fireflies included if you’re lucky.
Why It Looks Expensive: Thoughtful succession planting mirrors the way high-end gardens always have something peaking. Instead of dead zones, you’ll see continual color pops and seed heads that hold structure into winter. Natural stone edging and a sinuous bed line hint at professional design, not DIY dabbling.
Materials include natural rock, compost, and drought-tolerant natives like black-eyed Susan, bee balm, coreopsis, blazing star, asters, and milkweed. Mix in evergreen structure like small junipers or inkberry to anchor the showy blooms. Photography wins with layered heights, a smorgasbord of petal shapes, and visiting pollinators that bring movement and charm.
Variations: Budget-friendly? Start with plugs from a native plant sale. Small-space? Use three hero natives and repeat in triangles. Shade-adapted? Try columbine, golden ragwort, and woodland phlox with ferny texture.
Key Design Elements:
- Main materials: Natural stone edging, compost-rich soil, native perennials
- Color palette: Sun-kissed yellows, hot pinks, purples, soft whites, deep greens
- Lighting strategy: Low solar spots on primary bloom clumps; minimal to avoid night wildlife disruption
- Furniture silhouettes: Rustic stool or small stump seat for kid-friendly moments
- Texture layers: Daisy shapes, spikes, umbels, seed heads, winter grasses
- Accent details: Bee baths (shallow saucers with pebbles), small birdhouse, discreet plant markers
How To Recreate This Look:
- Start with a curve: Outline a flowing bed and set boulder accents to anchor corners.
- Add structure: Plant 3–5 evergreen shrubs as year-round anchors.
- Layer early-to-late bloomers: Include spring (columbine), summer (bee balm, black-eyed Susan), fall (asters, goldenrod).
- Install a light touch: Solar spots only on key clusters; keep some areas naturally dark.
- Style with habitat: Add a shallow bee bath and leave a small leaf-litter pocket for overwintering.
Why This Looks Expensive: Four-season planning feels curated. The stone accents and controlled drift groupings turn “wild” into “high-end natural.”
Common Mistakes To Avoid: Overcrowding fast spreaders like bee balm; give aggressive plants boundaries or root barriers. Avoid neon mulch—it clashes with the natural palette.
Pro Styling Tip: Photograph after a light watering; droplets on petals catch light and make colors glow without harsh glare.
Want symmetrical, low-effort charm that never goes out of style? The next idea is your forever-classic.
5. Porch-Symphony Classics: Boxwoods, Hydrangeas, and Seasonal Swaps
It’s that “something’s missing” feeling every time you pull into the driveway. You’ve tried a few random plants against the porch, but it never feels pulled together. Porch-Symphony Classics nails it with symmetrical anchors, hydrangea clouds, and stylish planters that change with the seasons. The mood is timeless East Coast curb appeal—warm, welcoming, and totally buyer-friendly.
Why it works in real homes: Symmetry feels intentional and calming. Boxwoods offer evergreen structure through winter, while hydrangeas bring big summer drama. A pair of tall planters by the door lets you refresh spring bulbs or winter greens, so the entry always looks finished. Lighting matters, too: flanked coach lights and path lights choreograph a soft, even glow across the bed.
Why It Looks Expensive: Repetition + proportion. The shrubs echo the door height, the hydrangea mound fills the midline perfectly, and planters frame the steps like a red-carpet moment. You’ll see this look in luxury listings because it flatters most facades and requires simple upkeep.
Expect materials like limestone or brick edging, rich brown mulch, and hardy shrubs: boxwood (or holly for boxwood blight areas), hydrangea ‘Annabelle’ or ‘Limelight,’ and a tidy front layer of hosta or heuchera depending on sun. This photographs beautifully thanks to big-leaf textures against crisp architectural lines.
Variations: Budget-friendly? Use fewer shrubs but larger spacing; fill with mulch until they grow in. Small-space version? Two boxwood balls and one hydrangea bed, mirrored on each side. Shade-dominant? Swap hydrangea for oakleaf hydrangea and front layer with ferns.
Key Design Elements:
- Main materials: Brick or limestone edging, brown mulch, evergreen anchors
- Color palette: Lush greens, creamy whites, seasonal planter color pops
- Lighting strategy: Matching coach lights at the door; soft path lights at 10–12 ft intervals
- Furniture silhouettes: Two tall urn planters; optional classic bench if porch allows
- Texture layers: Glossy boxwood, broadleaf hydrangea, smooth mulch base
- Accent details: Polished door hardware, monogrammed doormat, graceful house numbers
How To Recreate This Look:
- Start with anchors: Plant boxwoods flanking the steps or porch corners, matched in size.
- Add hydrangea mass: Place 2–3 shrubs in a low arc to fill the middle of each bed.
- Layer the front: Add low hosta or heuchera for a tidy edge and color contrast.
- Install lighting: Consistent coach lights and path lights to define entry rhythm.
- Style the planters: Seasonal inserts—spring bulbs, summer annuals, fall mums, winter greens.
Why This Looks Expensive: Scale. The shrubs relate to the house height, the hydrangea mounds proportionally fill space, and the planters echo vertical lines. It looks deliberate because it is.
Common Mistakes To Avoid: Planting hydrangeas too close to the porch—allow 3–4 feet for air and growth. Overmixing colors in planters can fight the calm base; keep them tonal.
Pro Styling Tip: For photos, center your shot on the doorway; let symmetrical beds frame the image like parentheses, and crop so the planters feel tall and powerful.
Love drama, movement, and the feeling of a coastal breeze—even if you’re landlocked? The final idea swings sculptural and cinematic.
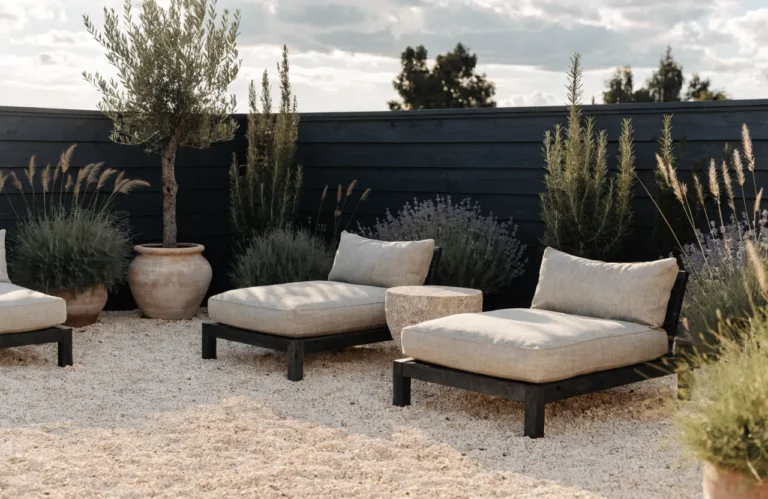
6. Coastal Gravel Garden: Silver Foliage, Drought-Smart Blooms, Year-Round Drama
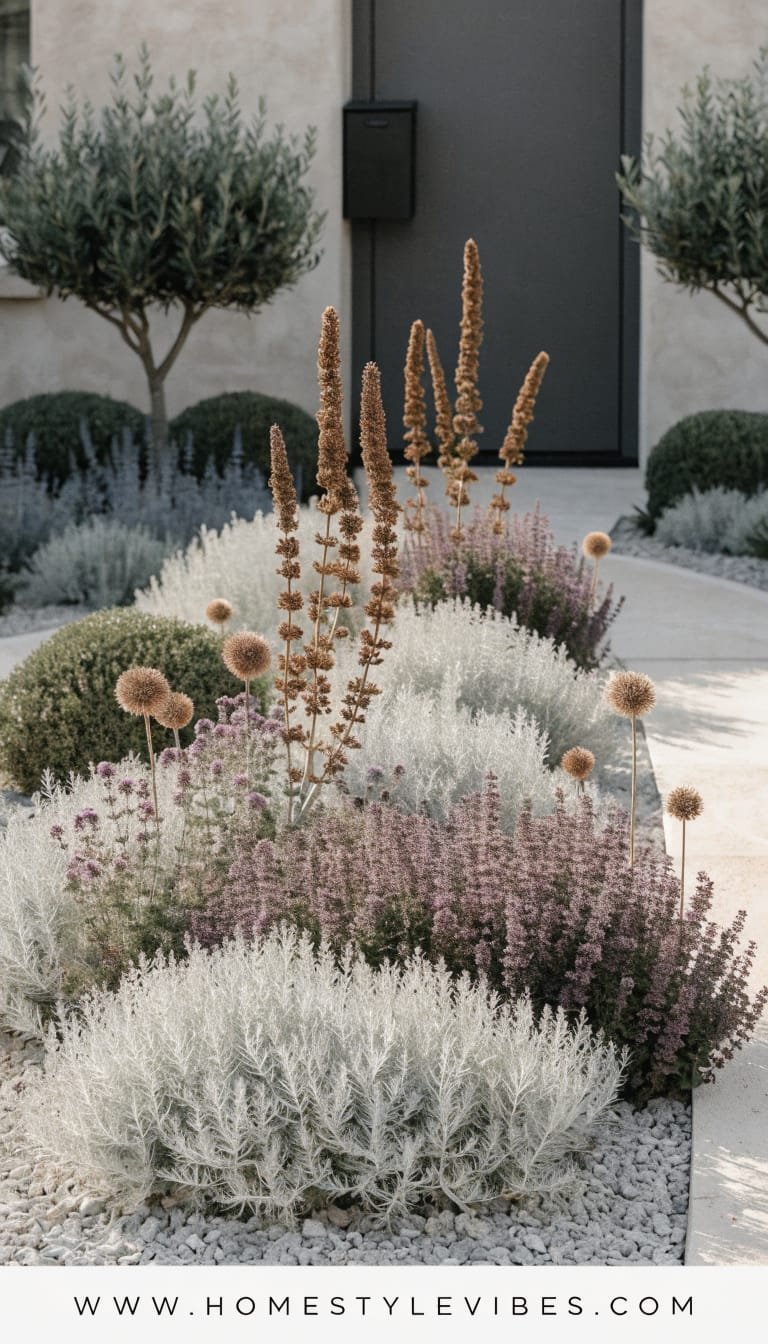
You’ve battled crispy annuals and hose fatigue every July. You tried “tough plants,” but it still reads sparse. The Coastal Gravel Garden flips the script: drought-smart, evergreen structure with silver foliage, dusky purples, and architectural seed heads that look like modern art. The mood whispers modern Mediterranean—sunlit, airy, and built to thrive without constant babysitting.
Why it works in real homes: Gravel mulch suppresses weeds, reduces evaporation, and keeps your entry clean. Perennials like lavender, rosemary, sedum, and yarrow deliver fragrance and long bloom windows, while sculptural agaves or yuccas (in suitable zones or planters) add instant drama. At night, low, warm spots grazing across gravel throw hypnotic shadows—seriously, it’s gorgeous.
Why It Looks Expensive: It showcases intentional negative space and restrained colors: silvery greens, soft purples, chalky blues. Clean steel edging, large stone accents, and textural contrasts make the bed feel curated. Plus, gravel gardens photograph like a design book—matte textures, crisp lines, and strong forms.
Materials you’ll count on: compactable base, permeable landscape fabric (optional, if you prefer), decorative gravel in a pale gray, steel edging, and drought-tolerant plants. The look loves full sun and pairs beautifully with stucco, white brick, or warm wood siding.
Variations: Budget-friendly? Use fewer statement plants and expand over time. Small-space? One hero boulder, a trio of lavender, a clump of blue fescue, and a low rosemary hedge. Renter-friendly? Create a faux “gravel bed” with a row of tall trough planters filled with Mediterranean herbs.
Key Design Elements:
- Main materials: Pale gray gravel, steel edging, boulders or chunky stone
- Color palette: Silver-green, muted purple, chalky blue, natural stone
- Lighting strategy: Low grazers to skim gravel; targeted spots on sculptural forms
- Furniture silhouettes: Backless wood bench or slim teak chair for a coastal nod
- Texture layers: Fine gravel, spiky architectural plants, soft mounding herbs
- Accent details: Matte black mailbox, coastal-style lantern, minimal house numbers
How To Recreate This Look:
- Start with prep: Grade slightly for drainage and install steel edging for crisp lines.
- Add boulders: Place one or two statement stones off-center for a natural composition.
- Layer plants: Combine lavender, rosemary, sedum, blue fescue, and a sculptural accent like yucca.
- Install gravel: Spread 2–3 inches of decorative gravel; brush to reveal clean plant crowns.
- Style with scent: Add a simple lantern and a teak bench; the lavender does the rest.
Why This Looks Expensive: Monochrome hardscaping and bold plant silhouettes feel editorial. Fewer, better elements equals instant polish.
Common Mistakes To Avoid: Using busy, multicolor gravel that competes with plants. Overwatering Mediterranean herbs—they prefer lean, well-drained soil.
Pro Styling Tip: Shoot at midday when silver foliage sparkles; stand slightly above for a flat-lay feel that shows off graphic shapes.
Before you close your laptop and run to the nursery, take a breath and picture your front door at golden hour. What do you want to feel? Calm, sculpted minimalism that looks like a boutique hotel? A breeze-blown cottage moment that feels like a hug? A moonlit, white-bloom glow that turns neighbors’ heads? Pick one idea—just one—and commit to the full concept. That’s where the magic happens.
These 6 flower bed ideas for the front of your house prove that luxury isn’t about spending more; it’s about editing with intention. Texture builds the story, lighting sets the mood, and restraint keeps everything looking elevated. Trust me, once you see layered shadows on glossy leaves or a drift of lavender catching the light, you’ll never go back to the “random plant haul” era.
Your front yard is your home’s handshake: confident, warm, perfectly put-together. Choose a design language—monochrome elegance, breezy cottage, sculpted minimal, pollinator-forward, porch-classic symmetry, or coastal gravel calm—and let it guide every decision from edging to light temperature. The result? A house that looks better every season, photographs like a dream, and welcomes you home with that “ahh, we did this” feeling every single day. Now go make the block a little more beautiful.